ECO mode MERCEDES-BENZ S-Class COUPE 2015 C217 Owner's Manual
[x] Cancel search | Manufacturer: MERCEDES-BENZ, Model Year: 2015, Model line: S-Class COUPE, Model: MERCEDES-BENZ S-Class COUPE 2015 C217Pages: 402, PDF Size: 7.3 MB
Page 7 of 402
Ashtray
.............................................. .300
Assistance display (on-board com-
puter) ................................................. .239
Assistance menu (on-board com-
puter) ................................................. .240
ASSYST PLUS
Displaying a service message ....... .324
Hiding a service message .............. 324
Notes ............................................. 324
Resetting the service interval dis-
play ................................................ 324
Service message ............................ 324
Special service requirements ......... 325
ATA (Anti-Theft Alarm system)
Activating/deactivating ................... 76
Function .......................................... .76
Switching off the alarm .................... 76
ATTENTION ASSIST
Activating/deactivating ................. 241
Display message ............................ 266
Function/note s............................. 211
Authorized Mercedes-Benz Center
see Qualified specialist workshop
Authorized workshop
see Qualified specialist workshop
AUTO lights
Display message ............................ 262
see Lights
Automatic car wash (care) ............... 325
Automatic engine start (ECO start/
stop function) .................................... 152
Automatic engine switch-off (ECO
start/stop function) .......................... 151
Automatic headlamp mode .............. 120
Automatic transmission
Accelerator pedal position ............. 158
Automatic drive program ............... 159
Changing gear ............................... 158
DIRECT SELECT lever ..................... 155
Display message ............................ 275
Driving tips .................................... 158
Emergency running mode .............. 163
Engaging drive position .................. 156
Engaging neutral ............................ 156
Engaging park position automati-
cally ............................................... 155
Engaging reverse gear ................... 155 Engaging the park position ............ 155
Kickdown ....................................... 158
Manual drive progra m.................... 160
Manual drive program (AMG vehi-
cles) ............................................... 161
Overview ........................................ 155
Problem (malfunction) ................... 163
Program selector button ................ 158
Pulling away ................................... 150
Starting the engine ........................ 150
Steering wheel paddle shifters ...... 159
Transmission position display ........ 157
Transmission positions .................. 157
Automatic transmission emer-
gency mode ....................................... 163 B
BAS (Brake Assist System) ................. 66
BAS PLUS Q (Brake Assist System
PLUS) with Cross-Traffic Assist
Function/note s................................ 67
Important safety notes .................... 67
Battery (SmartKey)
Checking .......................................... 82
Important safety notes .................... 81
Replacing ......................................... 82
Battery (vehicle)
Charging ........................................ 343
Display message ............................ 264
Important safety notes .................. 341
Jump starting ................................. 345
Belt
see Seat belts
Blind Spot Assist
see Active Blind Spot Assist
Brake Assist
see BAS (Brake Assist System)
Brake fluid
Display message ............................ 254
Note s............................................. 394
Brake force distribution, elec-
tronic
see EBD (electronic brake force
distribution)
Brake lamps
Display message ............................ 261 Index
5
Page 19 of 402
Sockets
Center console .............................. 301
General notes ................................ 301
Rear compartment .........................3 01
Trunk ............................................. 302
Special seat belt retractor .................. 61
Specialist workshop ............................ 25
Speed, controlling
see Cruise control
Speedometer
Activating/deactivating the addi-
tional speedometer ........................ 244
Digital ............................................ 232
In the Instrument cluster ................. 31
Selecting the unit of measure-
ment .............................................. 243
see Instrument cluster
Standing lamps
Display message ............................ 262
Switching on/off ........................... 121
Start/Stop button
Removing ....................................... 149
Starting the engine ........................ 150
Start/stop function
see ECO start/stop function
Starting (engine) ................................ 149
STEER CONTROL .................................. 75
Steering
Warning lamps ............................... 291
Steering (display message) .............. 276
Steering Assist and Stop&Go Pilot
(DISTRONIC PLUS)
Display message ............................ 272
Steering assistant STEER CON-
TROL
see STEER CONTROL
Steering wheel
Adjusting (electrically) ................... 110
Button overview ............................... 33
Buttons (on-board computer) ......... 227
Cleaning ......................................... 332
EASY ENTRY/EXIT feature ............. 112
Important safety notes .................. 110
Paddle shifters ............................... 159
Steering wheel heating .................. 111
Storing settings (memory func-
tion) ............................................... 117 Steering wheel heating
Problem (malfunction) ................... 112
Switching on/off ........................... 111
Steering wheel paddle shifters ........159
Stowage areas ................................... 294
Stowage compartments
Armrest (under) ............................ .296
Center console .............................. 295
Center console in rear compart-
ment .............................................. 297
Cup holders ................................... 298
Door ............................................... 296
Eyeglasses compartment .............. .295
Glove box ....................................... 295
Important safety information ......... 294
Rear ............................................... 296
Rear seat backrest ......................... 297
Stowage net ................................... 297
Under driver's seat/front-
passenger sea t.............................. 296
Stowage net ....................................... 297
Stowage space
Parcel net retainers ....................... 297
Securing a load .............................. 297
Stowage well beneath the trunk
floor .................................................... 297
Summer tires
In winter ........................................ 358
Sun visor ............................................ 299
Suspension tuning
Active Body Control ABC ............... 191
AIRMATIC ...................................... 193
SETUP (on-board computer) .......... 245
Switching air-recirculation mode
on/off ................................................. 139 T
Tachometer ........................................ 226
Tail lamps
Display message ............................ 261
see Lights
Tank content
Fuel gauge ....................................... 31
Technical data
Capacities ...................................... 391
Information .................................... 390
Tires/wheels ................................. 382 Index
17
Page 26 of 402
the Service and Guarantee booklet or simply
call the Mercedes-Benz Customer Assistance
Center (USA) at the hotline number
1-800-FOR-MERCede s(1-800-367-6372 )or
Customer Service (Canada) at
1-800-387-0100. Vehicle operation outside the USA
and Canada
If you plan to operate your vehicle in foreign
countries, please be aware that:
R service facilities or replacement parts may
not be readily available.
R unleaded fuel for vehicles with a catalytic
converter may not be available. Leaded fuel may cause damage to the catalytic con-
verter.
R the fuel may have a considerably lower
octane rating. Unsuitable fuel can cause
engine damage.
Some Mercedes-Benz models are available
for delivery in Europe through our European
Delivery Program. For details, consult an
authorized Mercedes-Benz Center or write to
one of the following addresses.
In the USA
Mercedes-Benz USA, LLC
European Delivery Department
One Mercedes Drive
Montvale, NJ 07645-0350
In Canada
Mercedes-Benz Canada, Inc.
European Delivery Department
98 Vanderhoof Avenue
Toronto, Ontario M4G 4C9 Operating safety
Important safety notes
G
WARNING
If you do not have the prescribed service/
maintenance work or any required repairs carried out, this can result in malfunctions or
system failures. There is a risk of an accident.
Always have the prescribed service/mainte-
nance work as well as any required repairs
carried out at a qualified specialist workshop. G
WARNING
Flammable material such as leaves, grass or
twigs may ignite if they come into contact with hot parts of the exhaust system. There is a risk of fire.
When driving off road or on unpaved roads,
check the vehicle's underside regularly. In
particular, remove parts of plants or other
flammable materials which have become
trapped. In the case of damage, contact a
qualified specialist workshop. G
WARNING
Modifications to electronic components, their software as well as wiring can impair their
function and/or the function of other net-
worked components. In particular, systems
relevant to safety could also be affected. As a
result, these may no longer function as inten-
ded and/or jeopardize the operating safety of
the vehicle. There is an increased risk of an
accident and injury.
Never tamper with the wiring as well as elec-
tronic components or their software. You
should have all work to electrical and elec-
tronic equipment carried out at a qualified
specialist workshop.
If you make any changes to the vehicle elec-
tronics, the general operating permit is ren-
dered invalid.
! There is a risk of damage to the vehicle if:
R the vehicle becomes stuck, e.g. on a high
curb or an unpaved road
R you drive too fast over an obstacle, e.g. a
curb or a hole in the road
R a heavy object strikes the undercarriage
or parts of the chassis 24
Introduction
Page 44 of 402
Useful information
i This Operator's Manual describes all
models and all standard and optional equip- ment of your vehicle available at the time of
publication of the Operator's Manual.
Country-specific differences are possible.
Please note that your vehicle may not be
equipped with all features described. This
also applies to safety-related systems and
functions.
i Read the information on qualified special-
ist workshops (Y page 25). Panic alarm
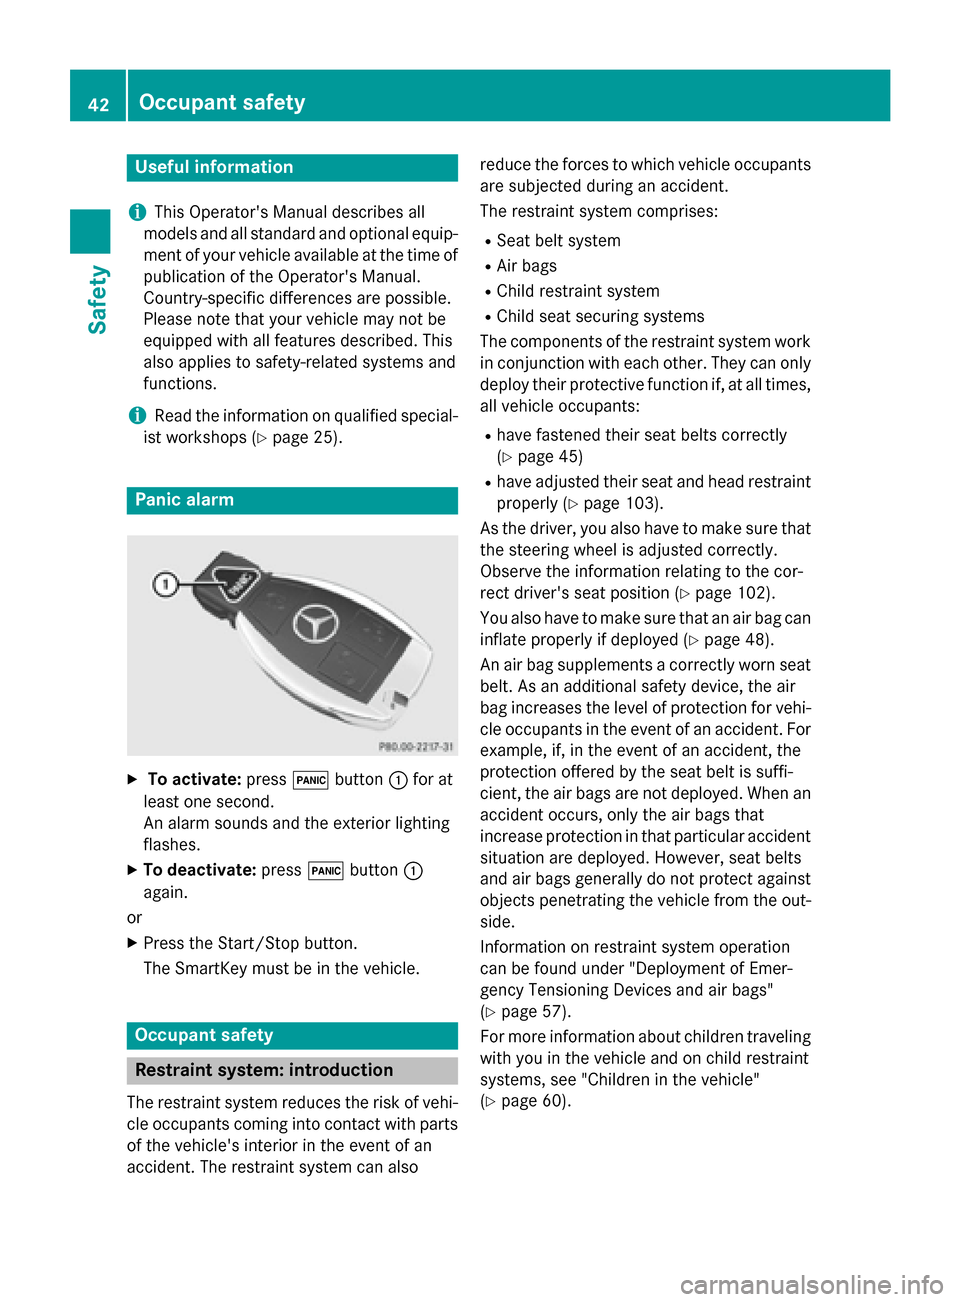
X
To activate: press0033button 0043for at
least one second.
An alarm sounds and the exterior lighting
flashes.
X To deactivate: press0033button 0043
again.
or
X Press the Start/Stop button.
The SmartKey must be in the vehicle. Occupant safety
Restraint system: introduction
The restraint system reduces the risk of vehi-
cle occupants coming into contact with parts of the vehicle's interior in the event of an
accident. The restraint system can also reduce the forces to which vehicle occupants
are subjected during an accident.
The restraint system comprises:
R Seat belt system
R Air bags
R Child restraint system
R Child seat securing systems
The components of the restraint system work
in conjunction with each other. They can only deploy their protective function if, at all times,
all vehicle occupants:
R have fastened their seat belts correctly
(Y page 45)
R have adjusted their seat and head restraint
properly (Y page 103).
As the driver, you also have to make sure that
the steering wheel is adjusted correctly.
Observe the information relating to the cor-
rect driver's seat position (Y page 102).
You also have to make sure that an air bag can inflate properly if deployed (Y page 48).
An air bag supplements a correctly worn seat
belt. As an additional safety device, the air
bag increases the level of protection for vehi-
cle occupants in the event of an accident. For example, if, in the event of an accident, the
protection offered by the seat belt is suffi-
cient, the air bags are not deployed. When an
accident occurs, only the air bags that
increase protection in that particular accident
situation are deployed. However, seat belts
and air bags generally do not protect against objects penetrating the vehicle from the out-
side.
Information on restraint system operation
can be found under "Deployment of Emer-
gency Tensioning Devices and air bags"
(Y page 57).
For more information about children traveling
with you in the vehicle and on child restraint
systems, see "Children in the vehicle"
(Y page 60). 42
Occupant safetySafety
Page 122 of 402
Useful information
i This Operator's Manual describes all
models and all standard and optional equip- ment of your vehicle available at the time of
publication of the Operator's Manual.
Country-specific differences are possible.
Please note that your vehicle may not be
equipped with all features described. This
also applies to safety-related systems and
functions.
i Read the information on qualified special-
ist workshops (Y page 25). Exterior lighting
General notes
For reasons of safety, Mercedes-Benz recom- mends that you drive with the lights switchedon even during the daytime. In some coun-
tries, operation of the headlamps varies due
to legal requirements and self-imposed obli-
gations. Driving abroad
Symmetrical low-beam headlamps Switch the headlamps to symmetrical low
beam in countries in which traffic drives on
the opposite side of the road from the country where the vehicle is registered. This prevents
glare to oncoming traffic. When using sym-
metrical lights, the edge of the road is not lit
as widely and as far ahead as normal.
Have the headlamps converted at a qualified
specialist workshop as close to the border as
possible before driving in these countries.
Asymmetrical low beam Have the headlamps converted back to asym-
metrical low-beam headlamps at a qualified
specialist workshop as soon as possible after
crossing the border again. Setting the exterior lighting
Setting options Exterior lighting can be set using:
R the light switch
R the combination switch (Y page 122)
R the on-board computer (Y page 243)
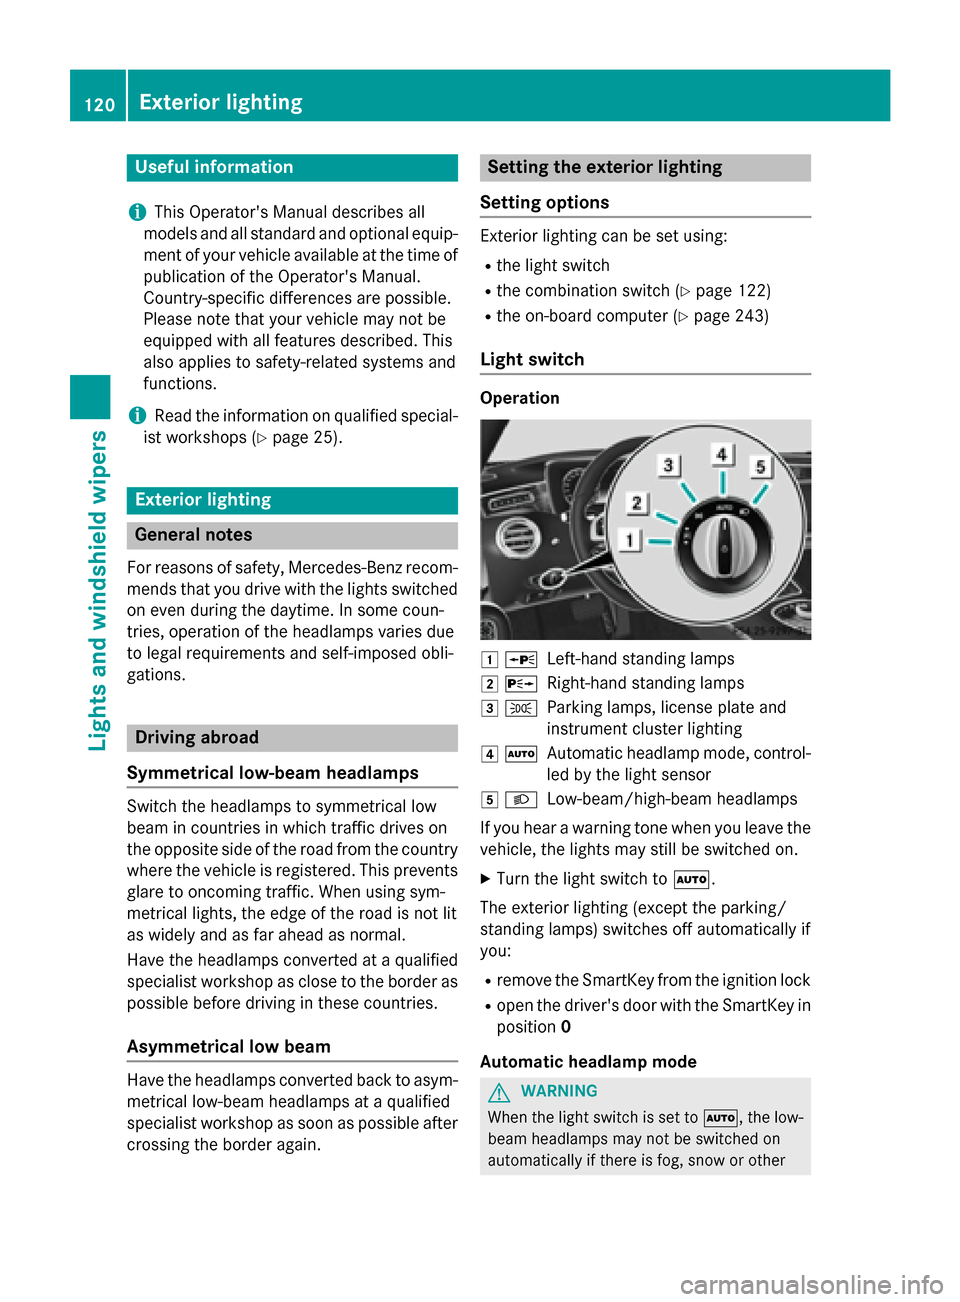
Light switch Operation
0047
0063
Left-hand standing lamps
0048 0064
Right-hand standing lamps
0049 0060
Parking lamps, license plate and
instrument cluster lighting
004A 0058
Automatic headlamp mode, control-
led by the light sensor
004B 0058
Low-beam/high-beam headlamps
If you hear a warning tone when you leave the
vehicle, the lights may still be switched on.
X Turn the light switch to 0058.
The exterior lighting (except the parking/
standing lamps) switches off automatically if
you: R remove the SmartKey from the ignition lock
R open the driver's door with the SmartKey in
position 0
Automatic headlamp mode G
WARNING
When the light switch is set to 0058, the low-
beam headlamps may not be switched on
automatically if there is fog, snow or other 120
Exterior lightingLights and windshield wipers
Page 134 of 402
Useful information
i This Operator's Manual describes all
models and all standard and optional equip- ment of your vehicle available at the time of
publication of the Operator's Manual.
Country-specific differences are possible.
Please note that your vehicle may not be
equipped with all features described. This
also applies to safety-related systems and
functions.
i Read the information on qualified special-
ist workshops (Y page 25). Overview of climate control systems
General notes
Observe the settings recommended on the
following pages. The windows could other-
wise fog up.
To prevent the windows from fogging up:
R switch off climate control only briefly
R switch on air-recirculation mode only
briefly
R switch on the cooling with air dehumidifi-
cation function
R switch on the defrost windshield function
briefly, if required
Climate control regulates the temperature
and air humidity in the vehicle interior. The air filter cleans the air, thus improving the inte-
rior climate.
The "Cooling with air dehumidification" func-
tion is only available when the engine is run-
ning. Optimum climate control is only ach-
ieved with the side windows and roof closed.
The residual heat function can only be acti-
vated or deactivated with the ignition
switched off (Y page 139).
i Ventilate the vehicle for a brief period
during warm weather, e.g. using the con-
venience opening feature (Y page 95). This
will speed up the cooling process and the desired interior temperature will be
reached more quickly.
i The integrated filter filters out most par-
ticles of dust and soot and completely fil-
ters out pollen. It also reduces gaseous pol-
lutants and odors. A clogged filter reduces the amount of air supplied to the vehicle
interior. For this reason, you should alwaysobserve the interval for replacing the filter,which is specified in the Maintenance
Booklet. As it depends on environmental
conditions, e.g. heavy air pollution, the
interval may be shorter than stated in the
Maintenance Booklet.
i It is possible that the blower may be acti-
vated automatically 60 minutes after the
SmartKey has been removed depending on various factors, e.g. the outside tempera-
ture. The vehicle is then ventilated for
30 minutes to dry the climate control sys-
tem. 132
Overview of climate control systemsClimate control
Page 135 of 402
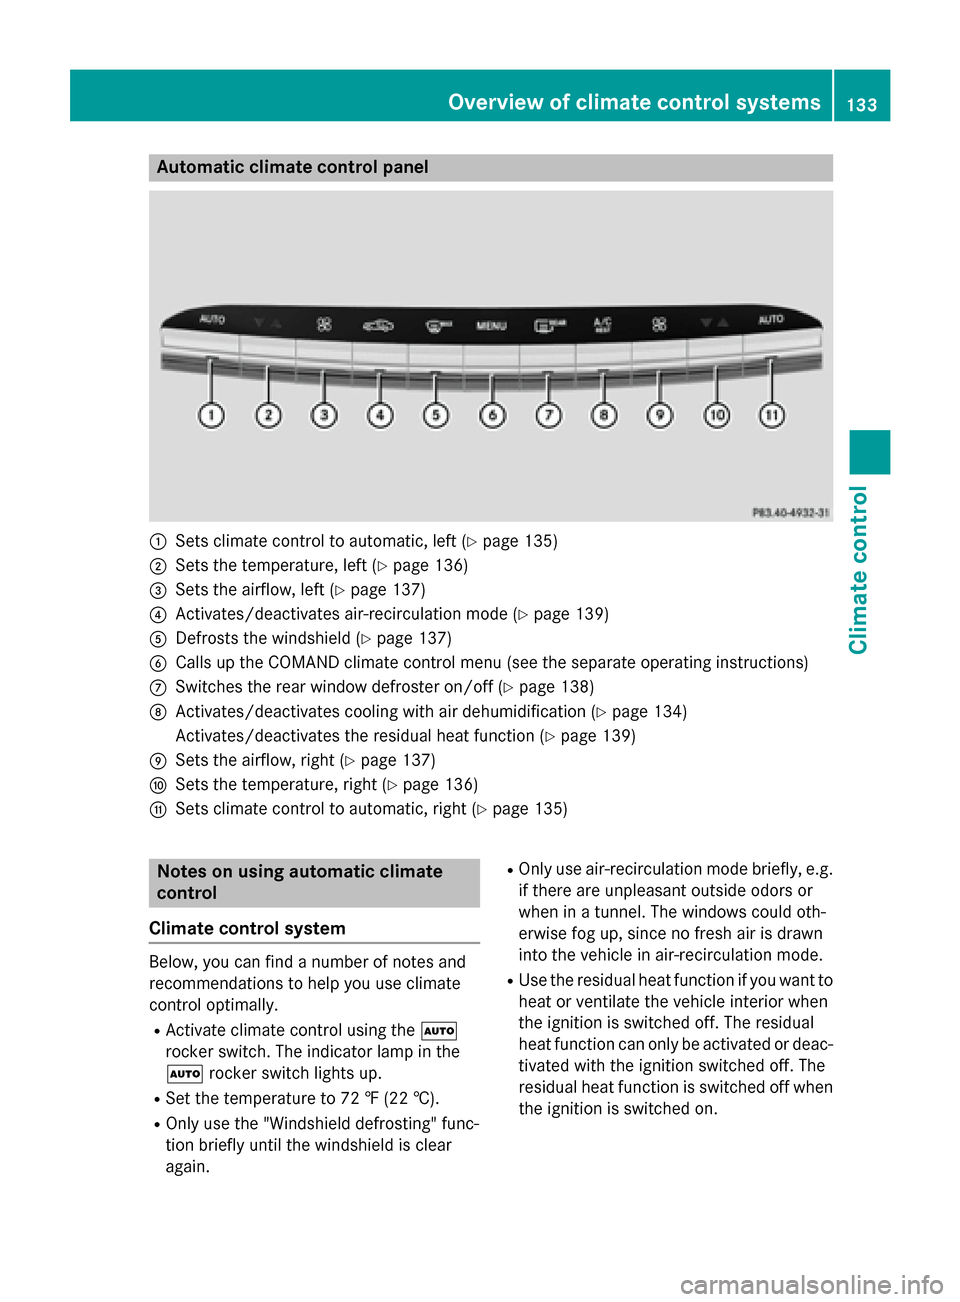
Automatic climate control panel
0043
Sets climate control to automatic, left (Y page 135)
0044 Sets the temperature, left (Y page 136)
0087 Sets the airflow, left (Y page 137)
0085 Activates/deactivates air-recirculation mode (Y page 139)
0083 Defrosts the windshield (Y page 137)
0084 Calls up the COMAND climate control menu (see the separate operating instructions)
006B Switches the rear window defroster on/off (Y page 138)
006C Activates/deactivates cooling with air dehumidification (Y page 134)
Activates/deactivates the residual heat function (Y page 139)
006D Sets the airflow, right (Y page 137)
006E Sets the temperature, right (Y page 136)
006F Sets climate control to automatic, right (Y page 135)Notes on using automatic climate
control
Climate control system Below, you can find a number of notes and
recommendations to help you use climate
control optimally.
R Activate climate control using the 0058
rocker switch. The indicator lamp in the
0058 rocker switch lights up.
R Set the temperature to 72 ‡ (22 †).
R Only use the "Windshield defrosting" func-
tion briefly until the windshield is clear
again. R
Only use air-recirculation mode briefly, e.g.
if there are unpleasant outside odors or
when in a tunnel. The windows could oth-
erwise fog up, since no fresh air is drawn
into the vehicle in air-recirculation mode.
R Use the residual heat function if you want to
heat or ventilate the vehicle interior when
the ignition is switched off. The residual
heat function can only be activated or deac- tivated with the ignition switched off. The
residual heat function is switched off whenthe ignition is switched on. Overview of climate control systems
133Climate control
Page 136 of 402
ECO start/stop function
During automatic engine switch-off, the cli-
mate control system only operates at a
reduced capacity. If you require the full cli-
mate control output, you can switch off the
ECO start/stop function by pressing the ECO
button (Y page 152). Operating the climate control sys-
tems Switching climate control on/off
General notes When the climate control is switched off, the
air supply and air circulation are also
switched off. The windows could fog up.
Therefore, switch off climate control only
briefly
Switch on climate control primarily using the 0058 rocker switch (Y page 135).
Activating/deactivating X
Turn the SmartKey to position 2in the igni-
tion lock (Y page 147).
X To activate: press the008Arocker switch
up or down.
The COMAND climate control menu opens.
X Activate climate control via the air-condi-
tioning setting bar in COMAND (see the
separate operating instructions).
X To deactivate: press the008Arocker
switch up or down.
The COMAND climate control menu opens.
X Deactivate climate control via the air-con-
ditioning setting bar in COMAND (see the
separate operating instructions). Activating/deactivating cooling with
air dehumidification
General notes If you deactivate the "Cooling with air-dehu-
midification" function, the air inside the vehi-
cle will not be cooled. The air inside the vehi-
cle will also not be dehumidified. The win-
dows can fog up more quickly. Therefore,
deactivate the cooling with air-dehumidifica-
tion function only briefly.
The "Cooling with air dehumidification" func-
tion is only available when the engine is run-
ning. The air inside the vehicle is cooled and
dehumidified according to the temperature
selected.
Condensation may drip from the underside of the vehicle when it is in cooling mode. This isnormal and not a sign that there is a malfunc-
tion.
Activating/deactivating cooling with
air dehumidification X
To activate: press the0056rocker switch
up or down.
The indicator lamp above the rocker switch lights up.
or
X Activate the "Cooling with air dehumidifi-
cation" function via COMAND (see the sep-
arate operating instructions).
X To deactivate: press the0056rocker
switch up or down.
The indicator lamp above the rocker switch
goes out.
or X Deactivate the "Cooling with air dehumidi-
fication" function via COMAND (see the
separate operating instructions). 134
Operating the climate control systemsClimate control
Page 152 of 402
Automatic transmission
X
Shift the transmission to position P
(Y page 155).
The transmission position display in the
multifunction display shows
P (Y page 157).
You can start the engine in transmission posi-
tion Pand N.
Starting procedure with the SmartKey To start the engine using the SmartKey
instead of the Start/Stop button, pull the
Start/Stop button out of the ignition lock.
X Turn the SmartKey to position 3in the igni-
tion (Y page 147) lock and release it as
soon as the engine is running.
Starting procedure with the Start/Stop
button The Start/Stop button can be used to start
the vehicle manually without inserting the
SmartKey into the ignition lock. The Start/
Stop button must be inserted in the ignition
lock and the SmartKey must be in the vehicle.
This mode for starting the engine operates
independently of the ECO start/stop auto-
matic engine start function.
You can start the engine if a valid SmartKey is in the vehicle. Always take the SmartKey with you when leaving the vehicle, even if you only
leave it for a short time. Pay attention to the
important safety notes.
X Depress the brake pedal and keep it
depressed.
X Press the Start/Stop button once
(Y page 147).
The engine starts. Pulling away
General notes G
WARNING
If the engine speed is above the idling speed
and you engage transmission position Dor R,
the vehicle could pull away suddenly. There is a risk of an accident.
When engaging transmission position Dor R,
always firmly depress the brake pedal and do not simultaneously accelerate.
Depress the accelerator carefully when pull-
ing away.
The vehicle locks centrally once you have
pulled away. The locking knobs in the doors
drop down.
You can open the doors from the inside at any
time.
You can also deactivate the automatic locking feature (Y page 86).
It is only possible to shift the transmission
from position Pto the desired position if you
depress the brake pedal. Only then is the
parking lock released. If the brake pedal is not
depressed, the DIRECT SELECT lever can still be moved but the parking lock remains
engaged.
i Upshifts take place at higher engine
speeds after a cold start. This helps the
catalytic converter to reach its operating
temperature more quickly.
Information on the automatic release of the
electric parking brake (Y page 168).
Hill start assist Hill start assist helps you when pulling away
forwards or in reverse on an uphill gradient. It
holds the vehicle for a short time after you
have removed your foot from the brake pedal.
This gives you enough time to move your foot from the brake pedal to the accelerator pedal and to depress it before the vehicle begins to
roll. 150
DrivingDriving and pa
rking
Page 165 of 402
Problems with the transmission
Problem
Possible causes/consequences and
0050
0050Solutions The transmission has
problems shifting gear. The transmission is losing oil.
X Have the transmission checked at a qualified specialist work-
shop immediately. The acceleration ability
is deteriorating.
The transmission no
longer changes gear. The transmission is in emergency mode.
It is only possible to shift into
secondgear and reverse gear.
X Stop the vehicle.
X Shift the transmission to position P.
X Switch off the engine.
X Wait at least ten seconds before restarting the engine.
X Shift the transmission to position Dor R.
If D is selected, the transmission shifts into secondgear; ifRis
selected, the transmission shifts into reverse gear.
X Have the transmission checked at a qualified specialist work-
shop immediately. Transfer case
! Performance tests may only be carried
out on a 2-axle dynamometer. The brake
system or transfer case could otherwise be
damaged. Contact a qualified specialist
workshop for a performance test.
! To prevent ESP ®
from intervening, the
ignition must be switched off (SmartKey or
the Start/Stop button in position 0or 1) if:
R the electric parking brake is being tested
on a brake dynamometer.
R the vehicle is being towed with only one
axle raised (not permitted for vehicles
with 4MATIC).
The brake system could otherwise be dam-
aged.
! Vehicles with 4MATIC must not be towed
with either the front or the rear axle raised,
as doing so will damage the transmission.
This section is only valid for vehicles with 4-
wheel drive (4MATIC). Power is always trans- mitted to both axles. Refueling
Important safety notes
G
WARNING
Fuel is highly flammable. If you handle fuel
incorrectly, there is a risk of fire and explo-
sion.
You must avoid fire, open flames, creating
sparks and smoking. Switch off the engine
and, if applicable, the auxiliary heating before refueling. G
WARNING
Fuel is poisonous and hazardous to health.
There is a risk of injury.
You must make sure that fuel does not come into contact with your skin, eyes or clothing
and that it is not swallowed. Do not inhale fuel
vapors. Keep fuel away from children. Refueling
163Driving and parking
Z