winter tyres MERCEDES-BENZ S-CLASS COUPE 2015 Owners Manual
[x] Cancel search | Manufacturer: MERCEDES-BENZ, Model Year: 2015, Model line: S-CLASS COUPE, Model: MERCEDES-BENZ S-CLASS COUPE 2015Pages: 417, PDF Size: 13.42 MB
Page 22 of 417
Start/stop function
see ECO start/stop function
Starting (engine) ................................ 163
STEER CONTROL ..................................80
Steering
Display message ............................3 00
Warning lamps ............................... 314
Steering Assist
see DISTRONIC PLUS
Steering Assist and Stop&Go Pilot
(DISTRONIC PLUS)
Display message ............................ 293
Steering assistant STEER CON-
TROL
see STEER CONTROL
Steering wheel
Adjusting (electrically) ................... 116
Button overview ............................... 34
Buttons (on-board computer) ......... 245
Cleaning ......................................... 352
EASY ENTRY/EXIT feature ............. 118
Gearshift paddle s........................... 174
Important safety notes .................. 116
Steering wheel heating .................. 117
Storing settings (memory func-
tion) ............................................... 123
Steering wheel gearshift paddles .... 174
Steering wheel heating
Problem (malfunction) ................... 118
Switching on/of f........................... 117
Stop&Go Pilot
see DISTRONIC PLUS
Stowage areas ................................... 316
Stowage compartments
Armrest (under) ............................. 318
Centre console .............................. 317
Centre console in rear compart-
ment .............................................. 319
Cup holde r..................................... 322
Door ............................................... 318
Glove compartment ....................... 317
Important safety information ......... 316
Rear ............................................... 318
Spectacles compartment ............... 317
see Stowage areas
Stowage net ....................................... 319 Stowage space
Luggage net retainers .................... 321
Rear seat backrest ......................... 319
Securing a load .............................. 321
Stowage net ................................... 319
Stowage well beneath the boot
floor .................................................... 321
Summer tyres
In winter ........................................ 378
Sun visor ............................................ 323
Suspension tuning
Active Body Control ABC ............... 208
AIRMATIC ...................................... 211
SETUP (on-board computer) .......... 265
Switching the auxiliary heating/
ventilation
On/off ........................................... 150 T
Tail lamps Display message ............................ 281
see Lights
Technical data
Capacities ...................................... 404
Information .................................... 402
Tyres/wheels ................................. 391
Vehicle data ................................... 410
Telephone
Accepting a call (multifunction
steering wheel) .............................. 256
Display message ............................ 300
Introduction ................................... 256
Menu (on-board computer) ............ 256
Number from the phone book ........ 257
Redialling ....................................... 257
Rejecting/ending a call ................. 257
Telephone compartment ................ 318
Temperature
Coolant .......................................... 245
Engine oil (on-board computer,
Mercedes-AMG vehicles) ............... 265
Outside temperature ...................... 245
Setting (climate control )................ 143
Transmission oil (on-board com-
puter, Mercedes-AMG vehicles) ..... 265
TEMPOMAT
Function/note s............................. 189 Index
19
Page 23 of 417
TIREFIT kit
.......................................... 359
Tyre pressure not reached ............. 361
Tyre pressure reache d................... 361
Top Tether ............................................ 62
Total distance recorder .................... 249
Tow-away protection
Activating ......................................... 81
Deactivating ..................................... 81
Function ........................................... 81
Tow-starting
Emergency engine starting ............ 372
Important safety notes .................. 369
Towing
Important safety notes .................. 369
Notes for 4MATIC vehicles ............ 372
Transporting the vehicle ................ 371
With the rear axle raised ................ 371
Towing away
Fitting the towing eye .................... 370
Removing the towing eye ............... 371
With both axles on the ground ....... 371
Towing eye ......................................... 357
Traffic Sign Assist
Activating ....................................... 231
Display message ............................ 291
Function/note s............................. 230
Important safety notes .................. 230
Instrument cluster display ............. 231
Switching on/of f........................... 259
Transmission
see Automatic transmission
Transporting the vehicle .................. 371
Trim pieces (cleaning instruc-
tions) .................................................. 352
Trip computer (on-board com-
puter) .................................................. 250
Trip meter
Calling up ....................................... 249
Resetting (on-board computer) ...... 251
Turn signals
Switching on/of f........................... 128
TV
Operating (on-board computer) ..... 255
Two-way radio
Frequencies ................................... 402
Installation ..................................... 402
Transmission output (maximum) .... 402 Windscreen (infrared reflective) ..... 336
Type identification plate
see Vehicle identification plate
Tyre pressure
Calling up (on-board computer) ..... 381
Display message ............................ 295
Not reached (TIREFIT) .................... 361
Reached (TIREFIT) .......................... 361
Recommended ............................... 380
Tyre pressure loss warning
General notes ................................ 384
Important safety notes .................. 384
Restarting ...................................... 385
Tyre pressure monitor
Checking the tyre pressure elec-
tronically ........................................ 382
Function/note s............................. 381
General notes ................................ 381
Important safety notes .................. 381
Radio type approval for the tyre
pressure monitor ........................... 384
Restarting ...................................... 383
Warning lamp ................................. 313
Warning message .......................... 383
Tyres
Changing a whee l.......................... 385
Checking ........................................ 377
Direction of rotation ...................... 386
Display message ............................ 295
General notes ................................ 391
Important safety notes .................. 376
Information on driving .................... 376
MOExtended tyre s......................... 378
Replacing ....................................... 386
Service life ..................................... 377
Snow chains .................................. 379
Storing ........................................... 386
Summer tyres in winter ................. 378
Tyre size (data ).............................. 391
Tyre tread ...................................... 377
Wheel and tyre combinations ........ 393
see Flat tyre U
Unlocking Emergency unlocking ....................... 93 20
Index
Page 25 of 417
Windscreen
Demisting ...................................... 144
Infrared reflective .......................... 336
Windscreen washer fluid
see Windscreen washer system
Windscreen washer system
Notes ............................................. 409
Topping up .................................... .343
Windscreen wipers
Problem (malfunction) ................... 136
Replacing the wiper blades ............ 134
Switching on/off ........................... 133
Winter operation
Important safety notes .................. 378
Radiator cover ............................... 340
Slippery road surfaces ................... 188
Snow chains .................................. 379
Summer tyres ................................ 378
Winter tyres
Limiting the speed (on-board com-
puter) ............................................. 264
M+S tyres ...................................... 378
Wiper blades
Cleaning ......................................... 349
Important safety notes .................. 134
Replacing ....................................... 134
Wooden trim (cleaning instruc-
tions) ................................................. .352
Workshop
see Qualified specialist workshop 22
Index
Page 73 of 417
override the laws of physics. Driving safety
systems are merely aids designed to assist
driving. You are responsible for maintaining
the distance to the vehicle in front, for vehicle
speed, for braking in good time, and for stay- ing in lane. Always adapt your driving style to
suit the prevailing road and weather condi-
tions and maintain a safe distance from the
vehicle in front. Drive carefully.
The driving safety systems described only
work as effectively as possible when there is
adequate contact between the tyres and the
road surface. Please pay special attention to
the notes on tyres, recommended minimum
tyre tread depths etc. (Y page 376).
In wintry driving conditions, always use winter
tyres (M+S tyres) and, if necessary, snow
chains. Only in this way will the driving safety
systems described in this section work as
effectively as possible. ABS (Anti-lock Braking System)
General notes ABS regulates brake pressure in such a way
that the wheels do not lock when you brake.
This allows you to continue steering the vehi- cle when braking.
The ! ABS warning lamp in the instrument
cluster lights up when the ignition is switched on. It goes out when the engine is running.
ABS works from a speed of about 8 km/h,
regardless of road-surface conditions. ABS
works on slippery surfaces, even when you
only brake gently.
Important safety notes i
Observe the "Important safety notes" sec-
tion (Y page 69). G
WARNING
If ABS is faulty, the wheels could lock when
braking. The steerability and braking charac-
teristics may be severely impaired. Addition-
ally, further driving safety systems are deac- tivated. There is an increased danger of skid-
ding and accidents.
Drive on carefully. Have ABS checked imme-
diately at a qualified specialist workshop.
If ABS is malfunctioning, other systems,
including driving safety systems, will also
become inoperative. Observe the information on the ABS warning lamp (Y page 305) and
display messages which may be shown in the
instrument cluster (Y page 267).
Brakes X
If ABS intervenes: continue to depress the
brake pedal with force until the braking sit- uation is over.
X To make a full brake application:
depress the brake pedal with full force.
If ABS intervenes when braking, you will feel a
pulsing in the brake pedal.
The pulsating brake pedal can be an indica-
tion of hazardous road conditions; this serves as a reminder to take extra care while driving. BAS (Brake Assist)
General notes BAS operates in emergency braking situa-
tions. If you depress the brake pedal quickly,
BAS automatically boosts the braking force,
thus shortening the stopping distance.
Important safety notes i
Observe the "Important safety notes" sec-
tion (Y page 69). G
WARNING
If BAS is malfunctioning, the braking distance
in an emergency braking situation is
increased. There is a risk of accident.
In an emergency braking situation, depress
the brake pedal with full force. ABS prevents
the wheels from locking. 70
Driving safety systemsSafety
Page 191 of 417
age the engine, the electronics or the trans-
mission.
If you must drive on stretches of road on
which water has collected, please bear in
mind that:
R in the case of standing water, the water
level must be no higher than the lower edge
of the vehicle body
R you should drive no faster than walking
pace Winter driving
G
WARNING
If you shift down on a slippery road surface in an attempt to increase the engine's braking
effect, the drive wheels could lose their grip.
This increases the risk of skidding and having
an accident.
Do not shift down for additional engine brak-
ing on a slippery road surface. G
DANGER
If the exhaust pipe is blocked or adequate
ventilation is not possible, poisonous gases
such as carbon monoxide (CO) may enter the vehicle. This is the case, e.g. if the vehicle
becomes trapped in snow. There is a risk of
fatal injury.
If you leave the engine or the auxiliary heating
running, make sure the exhaust pipe and area
around the vehicle are clear of snow. To
ensure an adequate supply of fresh air, open a window on the side of the vehicle that is not
facing into the wind.
Have your vehicle winterproofed at a qualified specialist workshop at the onset of winter.
You should drive particularly carefully on slip-
pery road surfaces. Avoid sudden accelera-
tion, steering and braking manoeuvres. Do
not use cruise control or DISTRONIC PLUS. If the vehicle threatens to skid or cannot be
stopped when moving at low speed:
X Shift the transmission to position N.
X Try to bring the vehicle under control by
using corrective steering.
The outside temperature indicator is not
designed to serve as an ice-warning device
and is therefore unsuitable for that purpose.
Changes in the outside temperature are dis-
played after a short delay.
Indicated temperatures just above the freez-
ing point do not guarantee that the road sur-
face is free of ice. The road may still be icy,
especially in wooded areas or on bridges.
You should pay special attention to road con-
ditions when temperatures are around freez-
ing point.
Further information on driving with snow
chains (Y page 379).
Further information on driving with summer
tyres (Y page 378).
Observe the notes in the "Winter operation"
section (Y page 378). Driving systems
Mercedes-Benz Intelligent Drive
Mercedes-Benz Intelligent Drive stands for
innovative driver assistance and safety sys-
tems which enhance comfort and support the
driver in critical situations. With these intelli-
gent co-ordinated systems Mercedes-Benz
has set a milestone on the path towards
autonomous driving.
Mercedes-Benz Intelligent Drive embraces all elements of active and passive safety in one
well thought-out system – for the safety of thevehicle occupants and that of other road
users.
Further information on driving safety systems (Y page 69). 188
Driving systemsDriving and parking
Page 197 of 417
R
drive slower than the stored speed without
kickdown
R set a new speed or
R call up the last speed stored again
The SPEEDTRONIC suspended
SPEEDTRONIC suspended message in
the multifunction display disappears.
Deactivating variable SPEEDTRONIC
It is not possible to deactivate variable
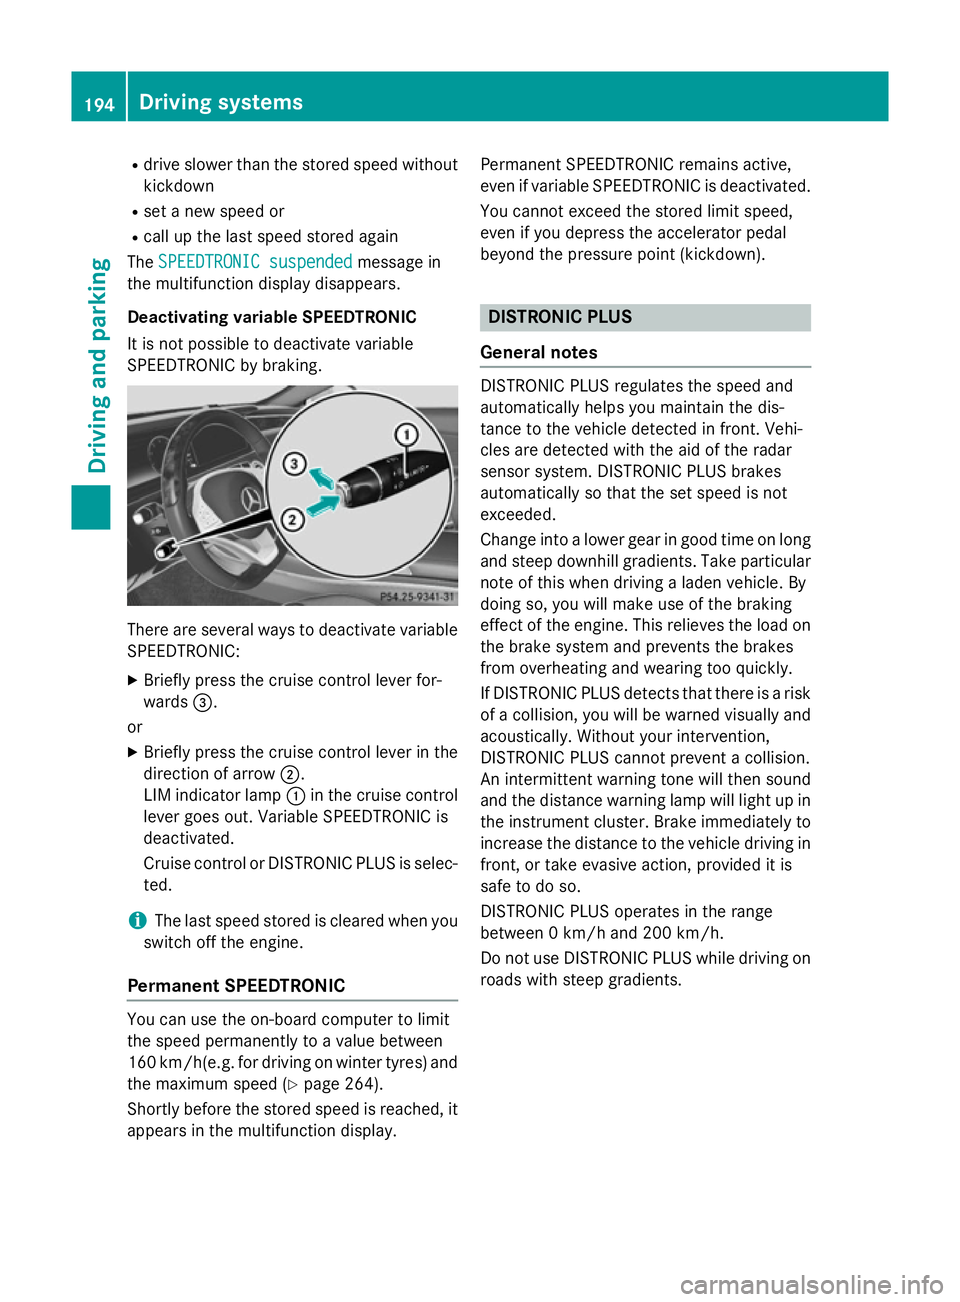
SPEEDTRONIC by braking. There are several ways to deactivate variable
SPEEDTRONIC:
X Briefly press the cruise control lever for-
wards =.
or X Briefly press the cruise control lever in the
direction of arrow ;.
LIM indicator lamp :in the cruise control
lever goes out. Variable SPEEDTRONIC is
deactivated.
Cruise control or DISTRONIC PLUS is selec-
ted.
i The last speed stored is cleared when you
switch off the engine.
Permanent SPEEDTRONIC You can use the on-board computer to limit
the speed permanently to a value between
160 km/ h(e.g. for driving on winter tyres) and
the maximum speed (Y page 264).
Shortly before the stored speed is reached, it
appears in the multifunction display. Permanent SPEEDTRONIC remains active,
even if variable SPEEDTRONIC is deactivated.
You cannot exceed the stored limit speed,
even if you depress the accelerator pedal
beyond the pressure point (kickdown). DISTRONIC PLUS
General notes DISTRONIC PLUS regulates the speed and
automatically helps you maintain the dis-
tance to the vehicle detected in front. Vehi-
cles are detected with the aid of the radar
sensor system. DISTRONIC PLUS brakes
automatically so that the set speed is not
exceeded.
Change into a lower gear in good time on long
and steep downhill gradients. Take particular
note of this when driving a laden vehicle. By
doing so, you will make use of the braking
effect of the engine. This relieves the load on
the brake system and prevents the brakes
from overheating and wearing too quickly.
If DISTRONIC PLUS detects that there is a risk of a collision, you will be warned visually and acoustically. Without your intervention,
DISTRONIC PLUS cannot prevent a collision.
An intermittent warning tone will then sound
and the distance warning lamp will light up in
the instrument cluster. Brake immediately to
increase the distance to the vehicle driving in
front, or take evasive action, provided it is
safe to do so.
DISTRONIC PLUS operates in the range
between 0 km/h and 200 km/h.
Do not use DISTRONIC PLUS while driving on roads with steep gradients. 194
Driving systemsDriving and parking
Page 215 of 417
X
If indicator lamp ;
;is not lit: press but-
ton :.
Indicator lamp ;lights up. You have selec-
ted "Comfort mode".
All vehicles except AMG vehicles: the
AIRMATIC COMFORT AIRMATIC COMFORT message appears in
the multifunction display.
AMG vehicles: theAMG Ride Control AMG Ride Control
COMFORT
COMFORT message appears in the multi-
function display.
All vehicles except AMG vehicles: if the
driving speed is higher than 160 km/h, the
vehicle is automatically lowered by 10 mm.
Load compensation The vehicle can compensate differences in
the vehicle level by raising or lowering the
axles. 4MATIC (permanent all-wheel drive)
4MATIC ensures that all four wheels are per-
manently driven. Together with ESP ®
, it
improves the traction of your vehicle when-
ever a drive wheel spins due to insufficient
grip.
If you fail to adapt your driving style, 4MATIC
can neither reduce the risk of accident nor
override the laws of physics. 4MATIC cannot
take account of road, weather and traffic con- ditions. 4MATIC is only an aid. You are
responsible for the distance to the vehicle in
front, for vehicle speed, for braking in good
time, and for staying in the lane.
If a drive wheel spins due to insufficient grip:
R when pulling away, only depress the accel-
erator pedal as far as is necessary.
R accelerate less when driving
! Never tow the vehicle with one axle
raised. This may damage the transfer case.
Damage of this sort is not covered by the
Mercedes-Benz implied warranty. All
wheels must remain either on the ground or be fully raised. Observe the instructions for towing the vehicle with all wheels in full
contact with the ground.
i In wintry driving conditions, the maximum
effect of 4MATIC can only be achieved if
you use winter tyres (M+S tyres),with snow
chains if necessary. PARKTRONIC
Important safety notes PARKTRONIC is an electronic parking aid with
ultrasonic sensors. It monitors the area
around your vehicle using six sensors in the
front bumper and six sensors in the rear
bumper. PARKTRONIC indicates visually and
audibly the distance between your vehicle
and an object.
PARKTRONIC is only an aid. It is not a substi-
tute for your attention to the immediate sur-
roundings. The responsibility for safe
manoeuvring and parking remains with you.
Make sure that there are no persons, animals
or objects in range while manoeuvring and
parking.
! When parking, pay particular attention to
objects above or below the sensors, such
as flower pots or trailer drawbars.
PARKTRONIC does not detect such objects
when they are in the immediate vicinity of
the vehicle. You could damage the vehicle
or the objects.
The sensors may not detect snow and
objects which absorb ultrasonic sources.
Ultrasonic sources, such as an automatic
car wash, a lorry's compressed-air brakes
or a pneumatic drill, could cause
PARKTRONIC to malfunction.
PARKTRONIC may not function correctly on uneven terrain.
PARKTRONIC is activated automatically when you:
R switch on the ignition
R shift the transmission to position D,Ror N 212
Driving systemsDriving and parking
Page 267 of 417
R
additional speedometer in the status area
of the multifunction display.
The unit in the additional speedometer is
displayed inversely to the selected dis-
tance unit.
R total distance recorder and trip meter
R trip computer
R current consumption and the range
R navigation instructions in the Navi
Navi menu
R cruise control
R SPEEDTRONIC
R DISTRONIC PLUS
R DISTRONIC PLUS with Steering Assist and
Stop&Go Pilot
R ASSYST PLUS service interval display
Switching the additional speedometer
on/off
The Digital speedo [km/h] Digital speedo [km/h] function
allows you to choose whether the status area
in the multifunction display shows the speed
digitally. The unit in the additional speedom-
eter is always inverse to the speedometer
unit.
X Press òon the steering wheel to open
the menu list.
X Press :or9 on the steering wheel
to select the Settings
Settings menu.
X Confirm by pressing aon the steering
wheel.
X Press :or9 to select the Instru‐
Instru‐
ment cluster ment cluster submenu.
X Press ato confirm your selection.
X Press the :or9 button to select the
Digital speedo [km/h]
Digital speedo [km/h] function.
The current selection appears.
X To activate/deactivate: pressa
again. Vehicle submenu Setting permanent SPEEDTRONIC
X Press òon the steering wheel to open
the menu list.
X Press the :or9 button on the steer-
ing wheel to select the Settings
Settings menu.
X Confirm by pressing aon the steering
wheel.
X Press :or9 to select the Vehicle Vehicle
submenu.
X Press ato confirm.
X Press the :or9 button to select the
Limit speed (winter tyres) Limit speed (winter tyres) function.
The current setting appears.
X Press ato confirm.
X Press :or9 to adjust permanent
SPEEDTRONIC in increments of ten
(240 km/h 240 km/h to160 km/h 160 km/h). The Off
Offsetting
switches permanent SPEEDTRONIC off.
X Press the abutton to store the entry.
For further information on permanent SPEED- TRONIC (Y page 194).
Restoring the factory settings X
Press òon the steering wheel to open
the menu list.
X Press :or9 on the steering wheel
to select the Settings
Settingsmenu.
X Confirm by pressing aon the steering
wheel.
X Press :or9 to select the Factory
Factory
settings
settings submenu.
X Press ato confirm.
The Reset all settings?
Reset all settings? function
appears.
X Press the :or9 button to select No
No
or Yes
Yes .
X Press the abutton to confirm the selec-
tion.
If you have selected Yes Yes, the multifunction
display shows a confirmation message.
For safety reasons, not all functions will be
reset: the Limit speed (winter tyres) Limit speed (winter tyres) 264
Menus and submenusOn-board computer and displays
Page 350 of 417
Wash off excess dirt before cleaning the vehi-
cle in an automatic car wash.
After using an automatic car wash, wipe off
wax from the windscreen and the wiper
blades. This will prevent smears and reduce
wiping noises caused by residue on the wind- screen.
Washing by hand In some countries, washing by hand is only
allowed at specially equipped washing bays.
Observe the legal requirements for each indi- vidual country.
X Do not use hot water and do not wash the
vehicle in direct sunlight.
X Use a soft sponge to clean.
X Use a mild cleaning agent, such as a car
shampoo approved by Mercedes-Benz.
X Thoroughly hose down the vehicle with a
gentle jet of water.
X Do not point the water jet directly towards
the air inlet.
X Use plenty of water and rinse out the
sponge frequently.
X Rinse the vehicle with clean water and dry
thoroughly with a chamois.
X Do not let the cleaning agent dry on the
paintwork.
When using the vehicle in winter, remove all
traces of road salt deposits carefully and as
soon as possible.
High-pressure cleaning equipment G
WARNING
The water jet of circular-jet nozzles (dirt grind- ers) can cause damage not visible from the
outside to tyres or chassis components. Com-
ponents damaged in this way can unexpect-
edly fail. There is a risk of an accident.
Do not use high-pressure cleaners with circu-
lar-jet nozzles to clean the vehicle. Have dam- aged tyres or chassis components replaced
immediately. !
Always maintain a distance of at least
30 cm between the vehicle and the high-
pressure cleaner nozzle. Information about
the correct distance is available from the
equipment manufacturer.
Move the high-pressure cleaner nozzle
around when cleaning your vehicle.
Do not aim directly at any of the following:
R tyres
R door gaps, roof gaps, joints etc.
R electrical components
R battery
R connectors
R lights
R seals
R trim elements
R ventilation slots
Damaged seals or electrical components
can lead to leaks or failures.
! If the key is within the rear detection
range of KEYLESS-GO, the following situa-
tions, for example, could lead to the boot lid opening unintentionally:
R using a car wash
R using a high-pressure cleaner
Make sure that the key is at least 3 m away
from the vehicle.
Cleaning the paintwork !
Do not affix:
R stickers
R films
R magnetic plates or similar items
to painted surfaces. You could otherwise
damage the paintwork.
Scratches, corrosive deposits, areas affected by corrosion and damage caused by inade-
quate care cannot always be completely
repaired. In such cases, visit a qualified spe-
cialist workshop. Care
347Maintenance and care Z
Page 361 of 417
X
Open the boot lid.
X Lift the boot floor upwards (Y page 321) or
detach the tool bag Velcro fasteners. Flat tyre
Preparing the vehicle
Your vehicle may be equipped with: R tyres with run-flat characteristics
(MOExtended tyres) (Y page 358)
Vehicle preparation is not necessary on
vehicles with MOExtended tyres.
R a TIREFIT kit (Y page 357)
Vehicles with MOExtended tyres are not
equipped with a TIREFIT kit at the factory. It is
therefore recommended that you additionally equip your vehicle with a TIREFIT kit if you fit tyres that do not feature run-flat characteris- tics, e.g. winter tyres. A TIREFIT kit can be
obtained from a qualified specialist work-
shop.
Information on changing/fitting a wheel
(Y page 385).
X Stop the vehicle as far away as possible
from traffic on solid, non-slippery and level
ground.
X Switch on the hazard warning lamps.
X Safeguard the vehicle against rolling away
(Y page 181).
X If possible, bring the front wheels into the
straight-ahead position.
X Switch off the engine.
X Open the driver's door.
The on-board electronics now have status
0. This is the same as the key having been
removed.
X Remove the Start/Stop button from the
ignition lock (Y page 161).
or, if the key is inserted in the ignition lock: X Remove the key from the ignition lock.
X Make sure that the passengers are not
endangered as they do so. Make sure that
no one is near the danger area while a wheel is being changed. Anyone who is not
directly assisting in the wheel change
should, for example, stand behind the bar-
rier.
X Get out of the vehicle. Pay attention to traf-
fic conditions when doing so.
X Close the driver's door.
X Place the warning triangle at a suitable dis-
tance (Y page 356). Observe legal require-
ments. MOExtended tyres (tyres with run-flat
characteristics)
General notes With MOExtended tyres (tyres with run-flat
characteristics), you can continue to drive
your vehicle even if there is a total loss of
pressure in one or more tyres. The affected
tyre must not show any clearly visible dam-
age.
You can recognise MOExtended tyres by the
MOExtended marking which appears on the
tyre wall. You will find this marking next to the
tyre size designation, the load-bearing capa-
city and the speed index.
MOExtended tyres may only be used in con-
junction with an activated tyre pressure loss
warning system or tyre pressure monitor.
If a pressure loss warning message
appears in the multifunction display:
R observe the instructions in the display mes-
sages (Y page 295)
R check the tyre for damage
R if driving on, observe the following notes
The driving distance possible in run-flat mode is approximately 80 km when the vehicle is
partially laden and approximately 30 km
when the vehicle is fully laden. 358
Flat tyreBreakdown assistance