battery MERCEDES-BENZ S-Class COUPE 2017 C217 User Guide
[x] Cancel search | Manufacturer: MERCEDES-BENZ, Model Year: 2017, Model line: S-Class COUPE, Model: MERCEDES-BENZ S-Class COUPE 2017 C217Pages: 338, PDF Size: 8.16 MB
Page 79 of 338
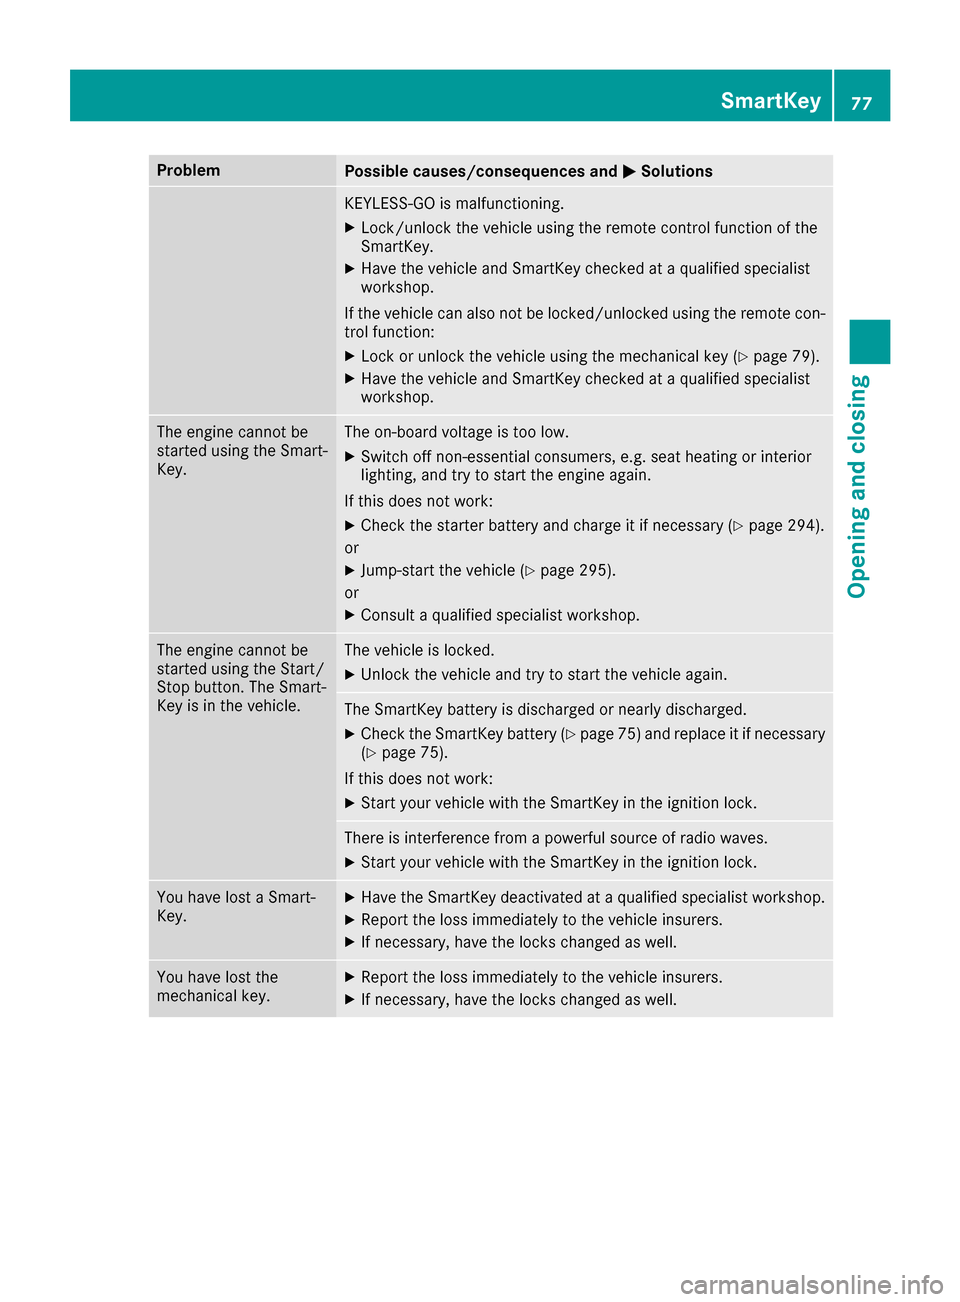
ProblemPossible causes/consequences and0050Solutions
KEYLESS-GO is malfunctioning.
XLock/unlock the vehicle using the remote control function of the
SmartKey.
XHave the vehicle and SmartKey checked at a qualified specialist
workshop.
If the vehicle can also not be locked/unlocked using the remote con-
trol function:
XLock or unlock the vehicle using the mechanical key (Ypage 79).
XHave the vehicle and SmartKey checked at a qualified specialist
workshop.
The engine cannot be
started using the Smart-
Key.The on-board voltage is too low.
XSwitch off non-essential consumers, e.g. seat heating or interior
lighting, and try to start the engine again.
If this does not work:
XCheck the starter battery and charge it if necessary (Ypage 294).
or
XJump-start the vehicle (Ypage 295).
or
XConsult a qualified specialist workshop.
The engine cannot be
started using the Start/
Stop button. The Smart-
Key is in the vehicle.The vehicle is locked.
XUnlock the vehicle and try to start the vehicle again.
The SmartKey battery is discharged or nearly discharged.
XCheck the SmartKey battery (Ypage 75) and replace it if necessary
(Ypage 75).
If this does not work:
XStart your vehicle with the SmartKey in the ignition lock.
There is interference from a powerful source of radio waves.
XStart your vehicle with the SmartKey in the ignition lock.
You have lost a Smart-
Key.XHave the SmartKey deactivated at a qualified specialist workshop.
XReport the loss immediately to the vehicle insurers.
XIf necessary, have the locks changed as well.
You have lost the
mechanical key.XReport the loss immediately to the vehicle insurers.
XIf necessary, have the locks changed as well.
SmartKey77
Opening and closing
Z
Page 80 of 338
Doors
Important safet ynotes
GWARNING
If children are lef tunsupervised in th evehicle,
they could:
Rope nth edoors ,thus endangerin gother
people or road users.
Rget out and disrup ttraffic .
Roperat eth evehicle' sequipment.
Additionally, children could set th evehicle in
motion if, fo rexample, they:
Rrelease th eparking brake .
Rshiftingth eautomatic transmissio nout of
par kposition P
RStart theengine.
There is aris kof an acciden tand injury.
Whe nleavin gth evehicle, always take th e
SmartKey wit hyou and loc kth evehicle. Never
leav echildren or animals unattended in th e
vehicle. Always keep th eSmartKey out of
reach of children .
Unlockingan dopening doors from
th einside
Whe n adoo ris opened, th esid ewindow on that
sid eopens slightly. Whe nth edoo ris closed, th e
sid ewindow close sagain .
!The sid ewindows will no topen/close if th e
battery is discharged or if th esid ewindows
hav eiced up. It will then no tbe possible to
close th edoor. Do no tattempt to forc eth e
doo rclosed. You could otherwise damage th e
doo ror th esid ewindow.
You can ope n adoo rfrom insid eth evehicle
eve nif it has bee nlocked. If th evehicle has bee n
locke dwit hth eSmartKey or wit hKEYLESS-GO ,
opening adoo rfrom th einsid ewill trigger th e
anti-thef talar msystem. Switc hof fth ealar m
(
Ypage 71) .
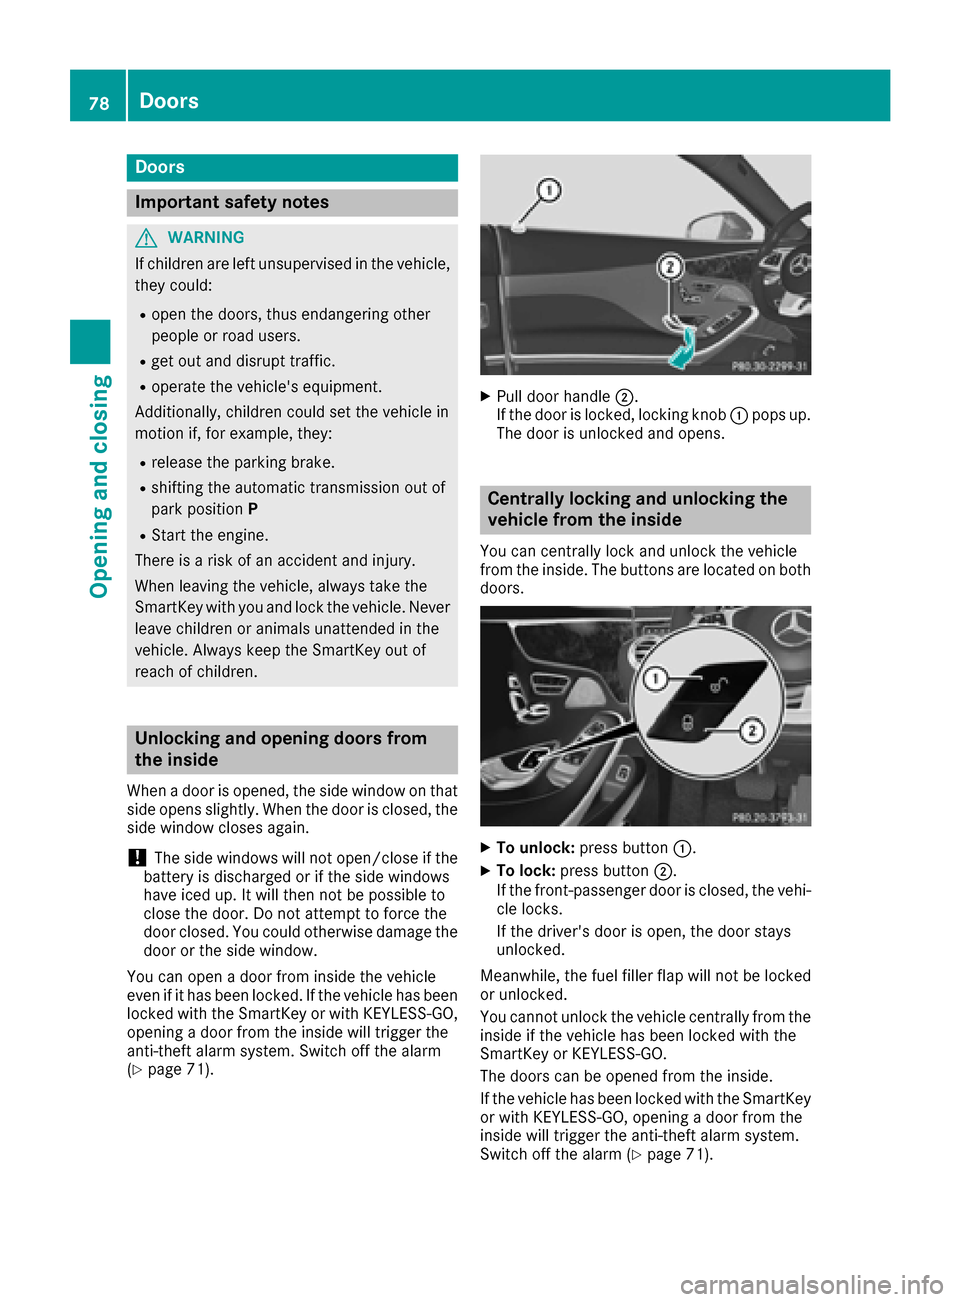
XPull doorhandle 0044.
If th edoo ris locked, locking knob 0043pop sup.
The doo ris unlocke dand opens .
Centrally locking an dunlocking th e
vehicle from th einside
You can centrall yloc kand unloc kth evehicle
from th einside. The buttons are located on bot h
doors .
XTo unlock :press butto n0043.
XTo lock :press butto n0044.
If th efront-passenger doo ris closed, th evehi-
cl e locks .
If th edriver's doo ris open, th edoo rstays
unlocked.
Meanwhile, th efue lfiller flap will no tbe locke d
or unlocked.
You canno tunloc kth evehicle centrall yfrom th e
insid eif th evehicle has bee nlocke dwit hth e
SmartKey or KEYLESS-GO .
The doors can be opene dfrom th einside.
If th evehicle has bee nlocke dwit hth eSmartKey
or wit hKEYLESS-GO ,opening adoo rfrom th e
insid ewill trigger th eanti-thef talar msystem.
Switc hof fth ealar m (
Ypage 71).
78Doors
Opening and closing
Page 87 of 338
Unlocking
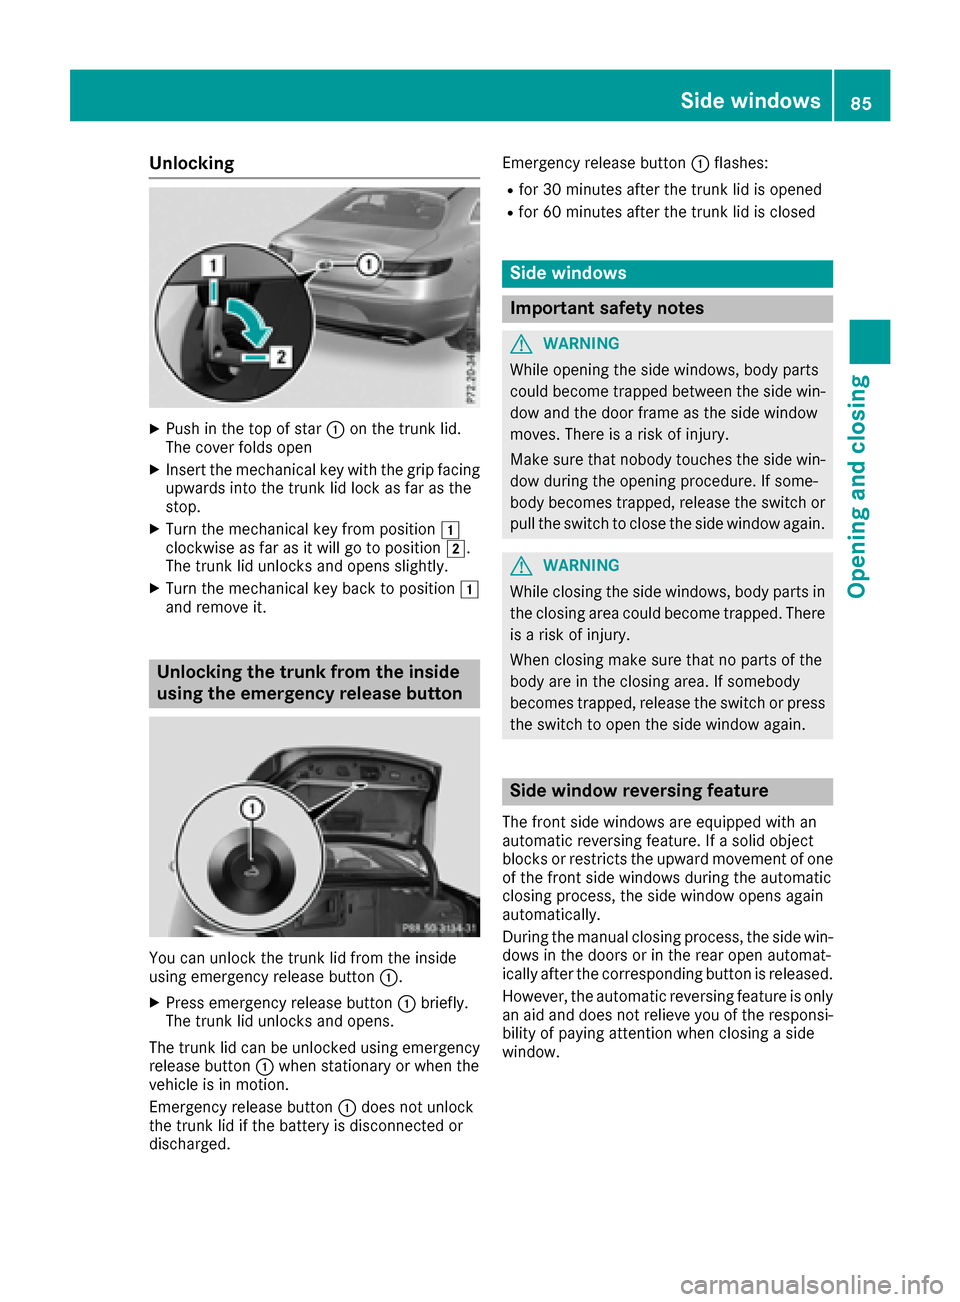
XPush in the top of star0043on the trunk lid.
The cover folds open
XInsert the mechanical key with the grip facing
upwards into the trunk lid lock as far as the
stop.
XTurn the mechanical key from position 0047
clockwise as far as it will go to position 0048.
The trunk lid unlocks and opens slightly.
XTurn the mechanical key back to position 0047
and remove it.
Unlocking the trunk from the inside
using the emergency release button
You can unlock the trunk lid from the inside
using emergency release button 0043.
XPress emergency release button 0043briefly.
The trunk lid unlocks and opens.
The trunk lid can be unlocked using emergency
release button 0043when stationary or when the
vehicle is in motion.
Emergency release button 0043does not unlock
the trunk lid if the battery is disconnected or
discharged. Emergency release button
0043flashes:
Rfor 30 minutes after the trunk lid is opened
Rfor 60 minutes after the trunk lid is closed
Side windows
Important safety notes
GWARNING
While opening the side windows, body parts
could become trapped between the side win-
dow and the door frame as the side window
moves. There is a risk of injury.
Make sure that nobody touches the side win-
dow during the opening procedure. If some-
body becomes trapped, release the switch or
pull the switch to close the side window again.
GWARNING
While closing the side windows, body parts in
the closing area could become trapped. There is a risk of injury.
When closing make sure that no parts of the
body are in the closing area. If somebody
becomes trapped, release the switch or press
the switch to open the side window again.
Side window reversing feature
The front side windows are equipped with an
automatic reversing feature. If a solid object
blocks or restricts the upward movement of one
of the front side windows during the automatic
closing process, the side window opens again
automatically.
During the manual closing process, the side win- dows in the doors or in the rear open automat-
ically after the corresponding button is released.
However, the automatic reversing feature is only
an aid and does not relieve you of the responsi-
bility of paying attention when closing a side
window.
Side windows85
Opening and closing
Z
Page 98 of 338
Switching the seat heating on/off
Switching on/off
GWARNING
Repeatedly switching on the seat heating can
cause the seat cushion and backrest pads to
become very hot. The health of persons with
limited temperature sensitivity or a limited
ability to react to excessively high tempera-
tures may be affected or they may even suffer
burn-like injuries. There is a risk of injury.
Therefore, do not switch the seat heating on
repeatedly.
For vehicles equipped with the Warmth Comfort
package: the armrest in the door and the center
console can also be heated when you switch on
the seat heating of one of the front seats. You
can set this via the multimedia system; see the
Digital Operator's Manual.
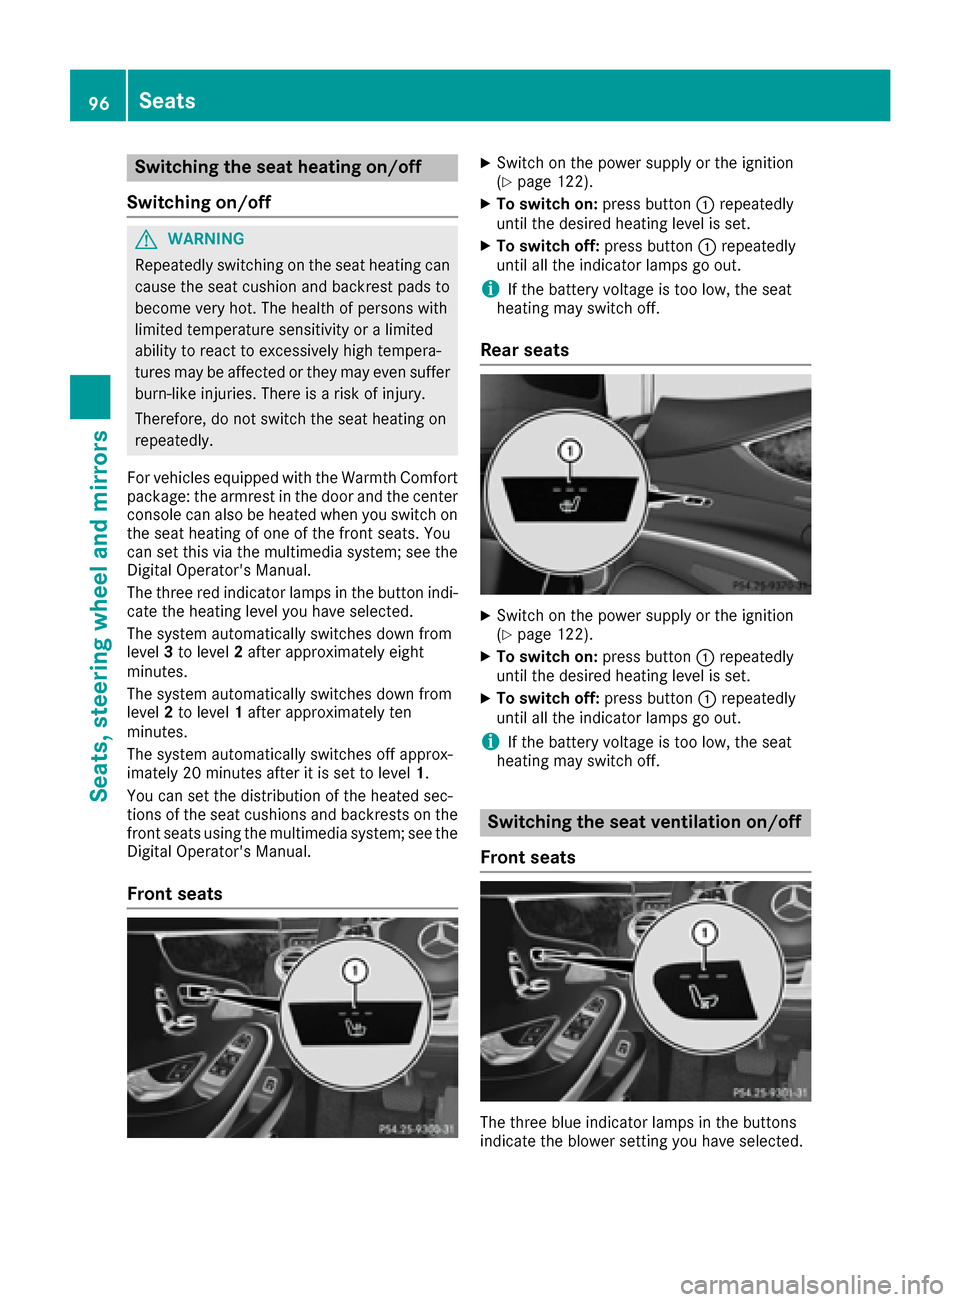
The three red indicator lamps in the button indi-
cate the heating level you have selected.
The system automatically switches down from
level 3to level 2after approximately eight
minutes.
The system automatically switches down from
level 2to level 1after approximately ten
minutes.
The system automatically switches off approx-
imately 20 minutes after it is set to level 1.
You can set the distribution of the heated sec-
tions of the seat cushions and backrests on the
front seats using the multimedia system; see the
Digital Operator's Manual.
Front seats
XSwitch on the power supply or the ignition
(Ypage 122).
XTo switch on: press button0043repeatedly
until the desired heating level is set.
XTo switch off: press button0043repeatedly
until all the indicator lamps go out.
iIf the battery voltage is too low, the seat
heating may switch off.
Rear seats
XSwitch on the power supply or the ignition
(Ypage 122).
XTo switch on: press button0043repeatedly
until the desired heating level is set.
XTo switch off: press button0043repeatedly
until all the indicator lamps go out.
iIf the battery voltage is too low, the seat
heating may switch off.
Switching the seat ventilation on/off
Front seats
The three blue indicator lamps in the buttons
indicate the blower setting you have selected.
96Seats
Seats, steering wheel and mirrors
Page 99 of 338
XSwitch on the power supply or the ignition
(Ypage 122).
XTo switch on:press button0043repeatedly
until the desired blower setting is set.
XTo switch off: press button0043repeatedly
until all the indicator lamps go out.
iIf the battery voltage is too low, the seat
ventilation may switch off.
iYou can open the side windows using the
"Convenience opening" feature (Ypage 86).
The seat ventilation of the driver's seat auto-
matically switches to the highest level.
iWhen the vehicle is stationary, the fan
speed can be reduced automatically. This
reduces the noises of the seat ventilation.
Problems with the seat heating/ventilation
ProblemPossible causes/consequences and 0050Solutions
The seat heating or seat
ventilation has switched
off prematurely or can-
not be switched on.The on-board voltage is too low because too many electrical consum-
ers are switched on.
XSwitch off electrical consumers that you do not need, such as the
rear window defroster or interior lighting.
Once the battery is sufficiently charged, the seat heating or seat
ventilation can be switched back on manually.
AIRSCARF
GWARNING
When AIRSCARF is switched on, very hot air
can flow from the vents in the head restraints. This could result in burns in the immediate
vicinity of the air vents. There is a risk of injury.
Reduce the heater output before it becomes
too hot.
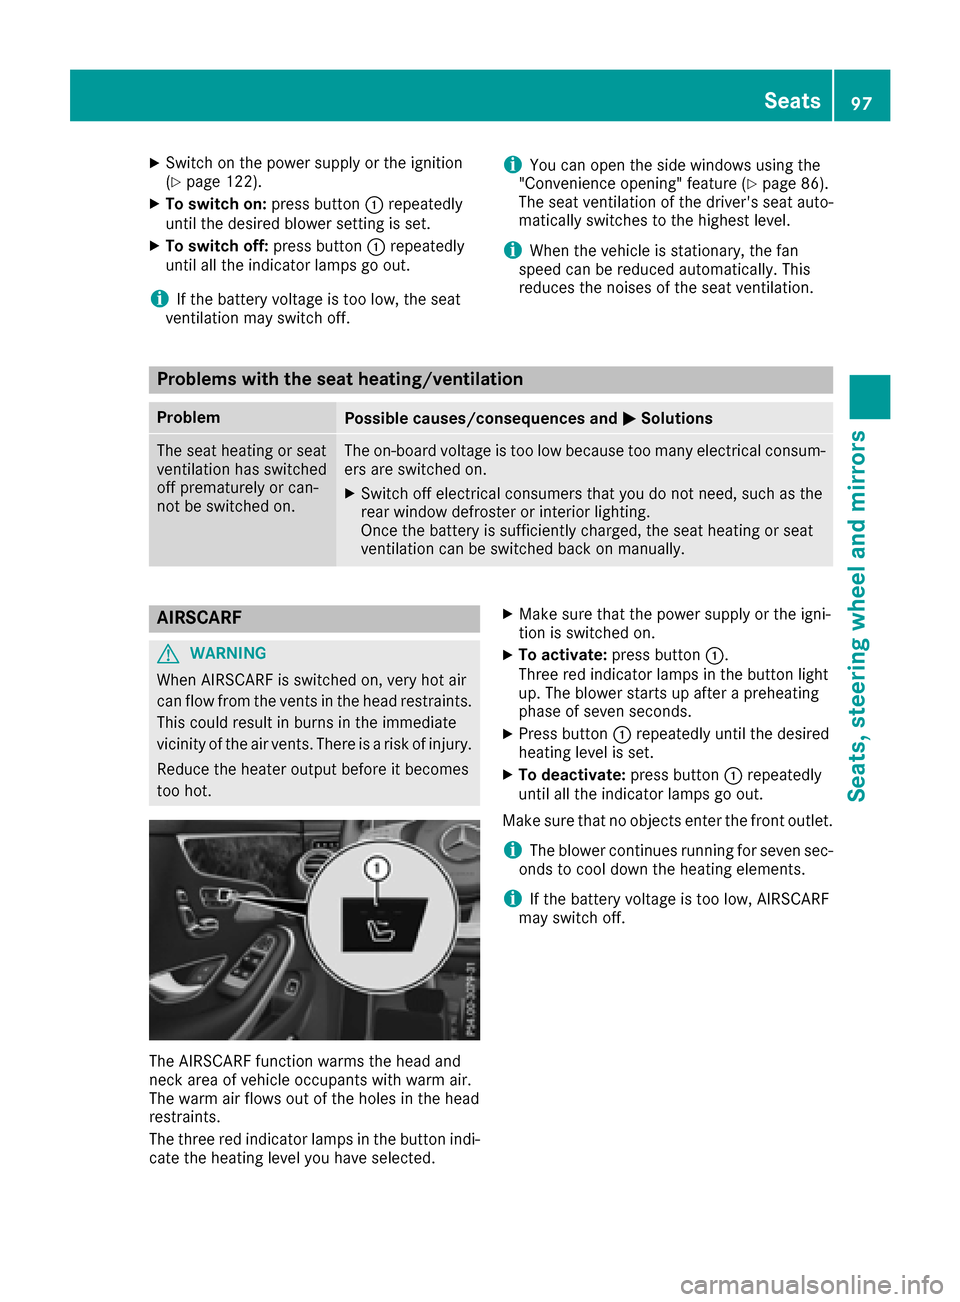
The AIRSCARF function warms the head and
neck area of vehicle occupants with warm air.
The warm air flows out of the holes in the head
restraints.
The three red indicator lamps in the button indi-
cate the heating level you have selected.
XMake sure that the power supply or the igni-
tion is switched on.
XTo activate: press button 0043.
Three red indicator lamps in the button light
up. The blower starts up after a preheating
phase of seven seconds.
XPress button 0043repeatedly until the desired
heating level is set.
XTo deactivate: press button0043repeatedly
until all the indicator lamps go out.
Make sure that no objects enter the front outlet.
iThe blower continues running for seven sec-
onds to cool down the heating elements.
iIf the battery voltage is too low, AIRSCARF
may switch off.
Seats97
Seats, steering wheel and mirrors
Z
Page 103 of 338
dow defroster is switched on and the outside
temperature is low.
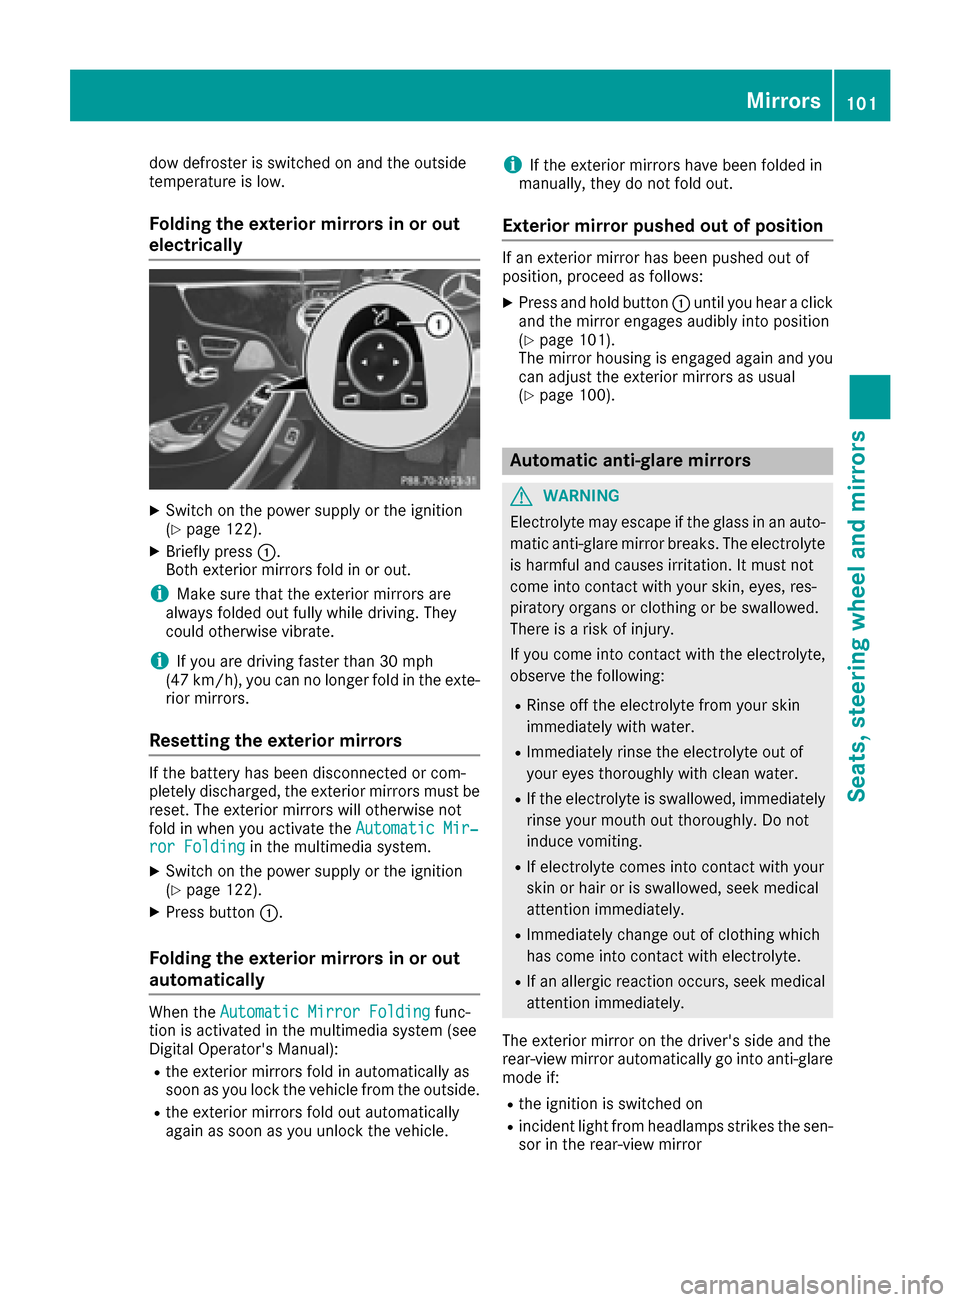
Folding the exterior mirrors in or outelectrically
XSwitch on the power supply or the ignition
(Ypage 122).
XBriefly press 0043.
Both exterior mirrors fold in or out.
iMake sure that the exterior mirrors are
always folded out fully while driving. They
could otherwise vibrate.
iIf you are driving faster than 30 mph
(47 km/h), you can no longer fold in the exte-
rior mirrors.
Resetting the exterior mirrors
If the battery has been disconnected or com-
pletely discharged, the exterior mirrors must be
reset. The exterior mirrors will otherwise not
fold in when you activate the Automatic Mir‐
ror Foldingin the multimedia system.
XSwitch on the power supply or the ignition
(Ypage 122).
XPress button0043.
Folding the exterior mirrors in or out
automatically
When theAutomatic Mirror Foldingfunc-
tion is activated in the multimedia system (see
Digital Operator's Manual):
Rthe exterior mirrors fold in automatically as
soon as you lock the vehicle from the outside.
Rthe exterior mirrors fold out automatically
again as soon as you unlock the vehicle.
iIf the exterior mirrors have been folded in
manually, they do not fold out.
Exterior mirror pushed out of position
If an exterior mirror has been pushed out of
position, proceed as follows:
XPress and hold button 0043until you hear a click
and the mirror engages audibly into position
(
Ypage 101).
The mirror housing is engaged again and you
can adjust the exterior mirrors as usual
(
Ypage 100).
Automatic anti-glare mirrors
GWARNING
Electrolyte may escape if the glass in an auto-
matic anti-glare mirror breaks. The electrolyte
is harmful and causes irritation. It must not
come into contact with your skin, eyes, res-
piratory organs or clothing or be swallowed.
There is a risk of injury.
If you come into contact with the electrolyte,
observe the following:
RRinse off the electrolyte from your skin
immediately with water.
RImmediately rinse the electrolyte out of
your eyes thoroughly with clean water.
RIf the electrolyte is swallowed, immediately
rinse your mouth out thoroughly. Do not
induce vomiting.
RIf electrolyte comes into contact with your
skin or hair or is swallowed, seek medical
attention immediately.
RImmediately change out of clothing which
has come into contact with electrolyte.
RIf an allergic reaction occurs, seek medical
attention immediately.
The exterior mirror on the driver's side and the
rear-view mirror automatically go into anti-glare
mode if:
Rthe ignition is switched on
Rincident light from headlamps strikes the sen-
sor in the rear-view mirror
Mirrors101
Seats, steering wheel and mirrors
Z
Page 107 of 338
When the engine is running and the vehicle is
stationary: if you move the selector lever from a
driving position toP, the daytime running lamps
and low-beam headlamps go out after three
minutes.
When the engine is running, the vehicle is sta-
tionary and in bright ambient light: if you turn the
light switch to the 0060position, the daytime
running lamps and parking lamps switch on.
If the engine is running and you turn the light
switch to the 0058position, the manual settings
take precedence over the daytime running
lamps.
Low-beam headlamps
GWARNING
When the light switch is set to 0058, the low-
beam headlamps may not be switched on
automatically if there is fog, snow or other
causes of poor visibility due to the weather
conditions such as spray. There is a risk of an
accident.
In such situations, turn the light switch to
0058.
Even if the light sensor does not detect that it is
dark, the parking lamps and low-beam head-
lamps switch on when the ignition is switched on and the light switch is set to the 0058position.
This is a particularly useful function in the event
of rain and fog.
XTo switch on the low-beam headlamps:
turn the SmartKey in the ignition lock to posi- tion 2or start the engine.
XTurn the light switch to the 0058position.
The green 0058indicator lamp in the instru-
ment cluster lights up.
Rear fog lamp
The rear fog lamp improves visibility of your
vehicle for the traffic behind in the event of thick
fog. You must observe the legal requirements
for the country in which you are currently driving
when operating the rear fog lamp.
XTo switch on the rear fog lamp: turn the
SmartKey in the ignition lock to position 2or
start the engine.
XTurn the light switch to the 0058or0058
position.
XPress the 005Ebutton.
The yellow 005Eindicator lamp in the instru-
ment cluster lights up.
Parking lamps
!If the battery charge is very low, the parking
lamps or standing lamps are automatically
switched off to enable the next engine start.
Always park your vehicle safely and in a well lit
area, in accordance with the relevant legal
stipulations. Avoid using the 0060parking
lamps over a period of several hours. If pos-
sible, switch on the right-hand 0064or left-
hand 0063 standing lamps.
XTo switch on the parking lamps: turn the
light switch to the 0060position.
The green 0060indicator lamp on the instru-
ment cluster lights up.
Standing lamps
Switching on the standing lamps ensures the
corresponding side of the vehicle is illuminated.
XTo switch on the standing lamps: turn the
Smart Key to position 0in the ignition lock or
remove the SmartKey.
XTurn the light switch to the 0063(left-hand
side of the vehicle) or 0064(right-hand side of
the vehicle) position.
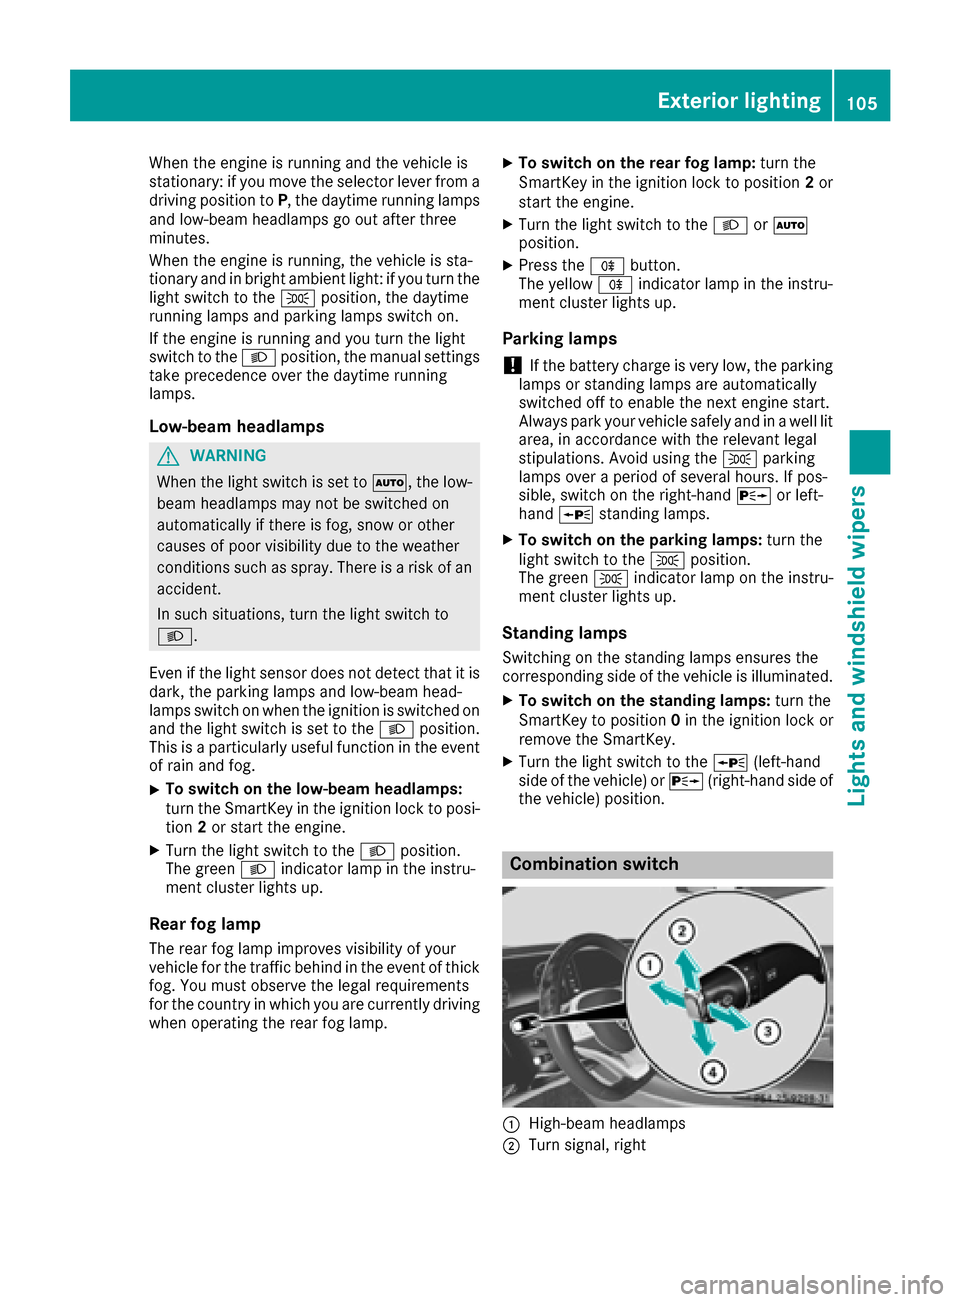
Combination switch
0043High-beam headlamps
0044Turn signal, right
Exterior lighting105
Lights and windshield wipers
Z
Page 110 of 338
Interior lighting
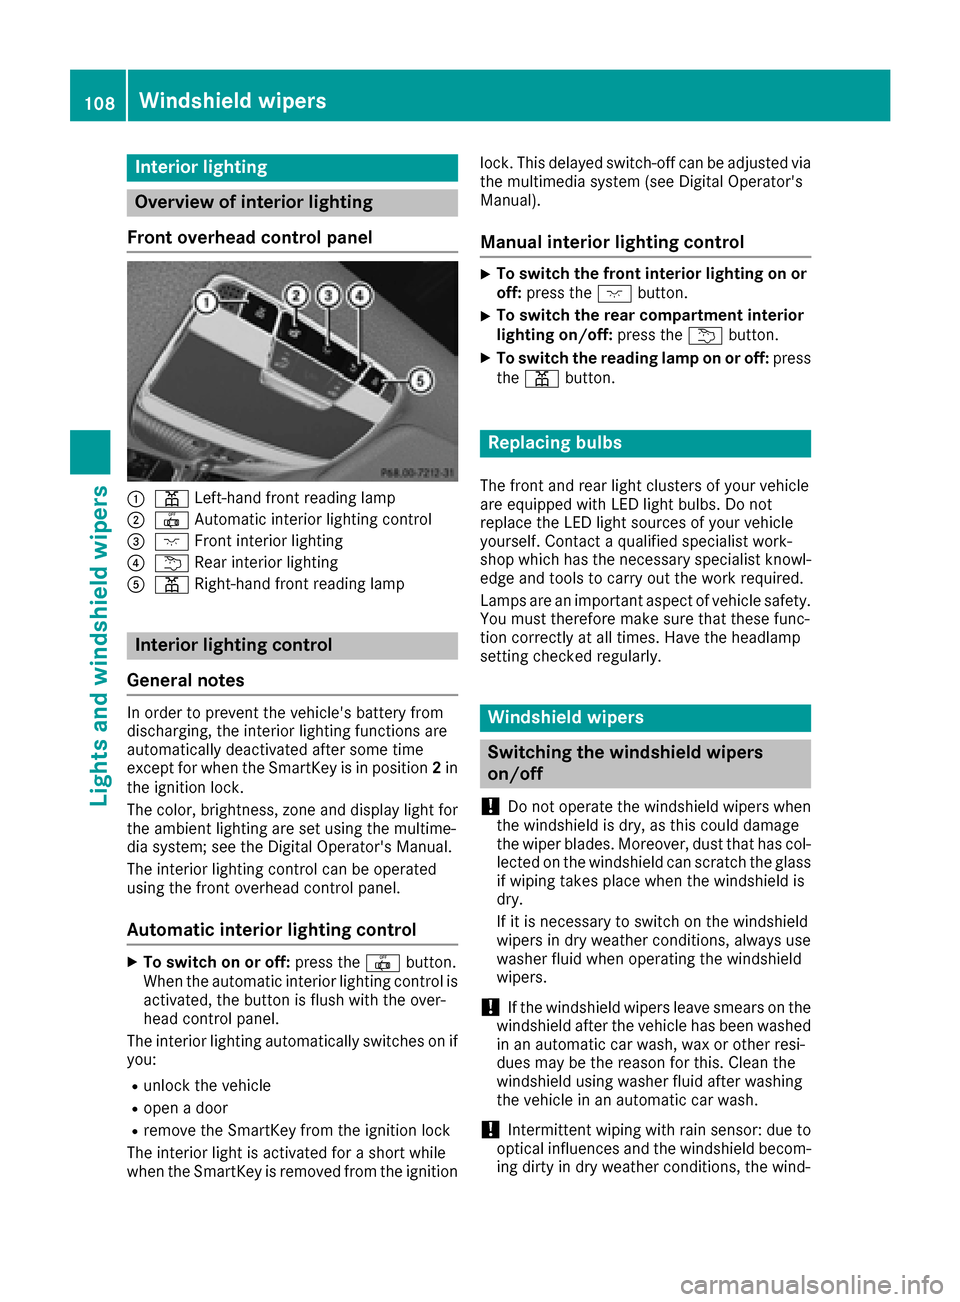
Overview of interior lighting
Front overhead control panel
0043003D Left-han dfron treading lamp
00440033 Automatic interio rlighting control
0087004A Frontinterior lighting
00850042 Rear interio rlighting
0083003D Right-hand fron treading lamp
Interior lighting control
General notes
In order to preven tth evehicle's battery from
discharging ,th einterio rlighting function sare
automatically deactivated after som etime
except for when th eSmartKey is in position 2in
th eignition lock.
The color ,brightness, zone and display ligh tfor
th eambien tlighting are set usin gth emultime-
dia system; see th eDigital Operator's Manual.
The interio rlighting control can be operate d
usin gth efron toverhead control panel.
Automatic interior lighting control
XTo switch on or off :press th e0033 button.
When th eautomatic interio rlighting control is
activated, th ebutto nis flus hwit hth eover-
head control panel.
The interio rlighting automatically switches on if
you:
Runlock th evehicl e
Ropenadoor
Rremove th eSmartKey from th eignition loc k
The interio rligh tis activated for ashort while
when th eSmartKey is remove dfrom th eignition lock. This delaye
dswitch-off can be adjusted via
th emultimedia system (see Digital Operator's
Manual).
Manual interior lighting control
XTo switch th efront interior lighting on or
off :press th e004A button.
XTo switch th erea rcompartmen tinterior
lighting on/off: press the0042 button.
XTo switch th ereadin glam pon or off :press
th e003D button.
Replacing bulbs
The fron tand rear ligh tclusters of your vehicl e
are equipped wit hLE Dligh tbulbs .Do no t
replace th eLE Dligh tsource sof your vehicl e
yourself .Contac t aqualified specialist work-
sho pwhic hhas th enecessar yspecialist knowl-
edge and tools to carry out th ewor krequired.
Lamps are an important aspect of vehicl esafety.
You must therefor emak esur ethat these func-
tion correctl yat all times .Hav eth eheadlamp
setting checke dregularly.
Windshield wipers
Switching the windshield wipers
on/off
!
Do no toperate th ewindshield wiper swhen
th ewindshield is dry, as this could damag e
th ewiper blades. Moreover, dust that has col-
lecte don th ewindshield can scratch th eglass
if wipin gtakes plac ewhen th ewindshield is
dry.
If it is necessar yto switch on th ewindshield
wiper sin dry weather conditions, always use
washe rfluid when operating th ewindshield
wipers.
!If th ewindshield wiper sleav esmears on th e
windshield after th evehicl ehas been washe d
in an automatic car wash, wax or other resi-
dues may be th ereason for this. Clean th e
windshield usin gwashe rfluid after washing
th evehicl ein an automatic car wash.
!Intermittent wipin gwit hrain sensor :due to
optical influence sand th ewindshield becom-
ing dirt yin dry weather conditions, th ewind-
108Windshield wipers
Lights and windshield wipers
Page 118 of 338
Rear window defroster
General notes
The rear window defroster has a high current
draw. You should therefore switch it off as soon
as the rear window is clear. Otherwise, the rear window defroster switches off automatically
after several minutes.
If the battery voltage is too low, the rear window
defroster may switch off.
Activating or deactivating
XTurn the SmartKey to position 2in the ignition
lock (Ypage 121).
XPress the 006Crocker switch up or down.
The indicator lamp in the 006Crocker switch
lights up or goes out.
Problems with the rear window defroster
ProblemPossible causes/consequences and 0050Solutions
The rear window
defroster has deactiva-
ted prematurely or can-
not be activated.The battery has not been sufficiently charged.
XSwitch off any consumers that are not required, e.g. reading lamps,
interior lighting or the seat heating.
When the battery is sufficiently charged, the rear window defroster
can be activated again.
Switching air-recirculation mode
on/off
General notes
You can also temporarily deactivate the flow of
fresh air manually if unpleasant odors are enter-
ing the vehicle from outside. The air already
inside the vehicle will then be recirculated.
If you switch on air-recirculation mode, the win-
dows can fog up more quickly, in particular at
low temperatures. Only use air-recirculation
mode briefly to prevent the windows from fog-
ging up.
Activating/deactivating
XTurn the SmartKey to position 2in the ignition
lock (Ypage 121).
XTo activate: press the0072rocker switch up
or down.
The indicator lamp in the 0072rocker switch
lights up.
Air-recirculation mode switches on automati-
cally:
Rat high outside temperatures
Rat high levels of pollution
Rin a tunnel The indicator lamp in the
0072rocker switch is
not lit when automatic air-recirculation mode is
activated. Outside air is added after about
30 minutes.
XTo deactivate: press the0072rocker switch
up or down.
The indicator lamp in the 0072rocker switch
goes out.
Air-recirculation mode deactivates automati-
cally:
Rafter approximately five minutes at outside
temperatures below approximately 41 ‡
(5 †)
Rafter approximately five minutes if cooling
with air dehumidification is deactivated
Rafter approximately 30 minutes at outside
temperatures above approximately 41 ‡
(5 †) if the "Cooling with air dehumidifica-
tion" function is activated
Switching the residual heat on or off
General notes
Once the engine is switched off, it is possible to
make use of the residual heat of the engine to
continue heating or ventilating the front com-
partment of the vehicle for approximately
30 minutes.
116Operating the climate control systems
Climate control
Page 126 of 338
Also make sure that:
Rthe fuel tank is sufficiently filled
Rthe starter battery is sufficiently charged
GWARNING
Limbs could be crushed or trapped if the
engine is started unintentionally during ser-
vice or maintenance work. There is a risk of
injury.
Always secure the engine against uninten-
tional starting before carrying out mainte-
nance or repair work.
Make sure that the engine cannot be started via
your smartphone before carrying out mainte-
nance or repairs. You can prevent an engine
start via your smartphone, for example, if you:
Rswitch on the hazard warning lamps
Rdo not lock the doors
Ropen the hood
Pulling away
General notes
GWARNING
If the engine speed is above the idling speed
and you engage transmission position Dor R,
the vehicle could pull away suddenly. There is
a risk of an accident.
When engaging transmission position Dor R,
always firmly depress the brake pedal and do not simultaneously accelerate.
Depress the accelerator carefully when pulling
away.
The vehicle locks centrally once you have pulled
away. The locking knobs in the doors drop down.
You can open the doors from the inside at any
time.
You can also deactivate the automatic locking
feature (
Ypage 79).
It is only possible to shift the transmission from
position Pto the desired position if you depress
the brake pedal. Only then is the parking lock
released.
If you do not depress the brake pedal, the
DIRECT SELECT lever can still be moved but the
parking lock remains engaged.
iUpshifts take place at higher engine speeds
after a cold start. This helps the catalytic con-
verter to reach its operating temperature
more quickly.
Information on the automatic release of the
electric parking brake (
Ypage 140).
Hill start assist
Hill start assist helps you when pulling away for-
wards or in reverse on an uphill gradient. It holds
the vehicle for a short time after you have
removed your foot from the brake pedal. This
gives you enough time to move your foot from
the brake pedal to the accelerator pedal and to
depress it before the vehicle begins to roll.
GWARNING
After a short time, hill start assist will no lon-
ger brake your vehicle and it could roll away.
There is a risk of an accident and injury.
Therefore, quickly move your foot from the
brake pedal to the accelerator pedal. Never
leave the vehicle when it is held by hill start
assist.
Hill start assist is not active if:
Ryou are pulling away on a level road or on a
downhill gradient.
Rthe transmission is in position 005C.
Rthe electric parking brake is applied.
RESP®is malfunctioning.
ECO start/stop function
Introduction
The ECO start/stop function switches the
engine off automatically if the vehicle is stopped
under certain conditions.
The engine starts automatically when the driver
wants to pull away again. The ECO start/stop
function thereby helps you to reduce the fuel
consumption and emissions of your vehicle.
Important safety notes
GWARNING
If the engine is switched off automatically and
you exit the vehicle, the engine is restarted
124Driving
Driving an d parking