MERCEDES-BENZ S-Class MAYBACH 2017 W222 Owner's Manual
Manufacturer: MERCEDES-BENZ, Model Year: 2017, Model line: S-Class MAYBACH, Model: MERCEDES-BENZ S-Class MAYBACH 2017 W222Pages: 382, PDF Size: 9.92 MB
Page 111 of 382
iFurther settings are available via the mem-
ory function buttons, if:
Ra position in the normal setting has already been saved
Rthe front-passenger seat has been selected
with button :
Adjusting from the driver's seat
The head restraint must be installed, in order for
the front-passenger seat to be moved into the
normal position (
Ypage 108).
The power supply or the ignition must be
switched on so that the front-passenger seat
can be selected (
Ypage 146).
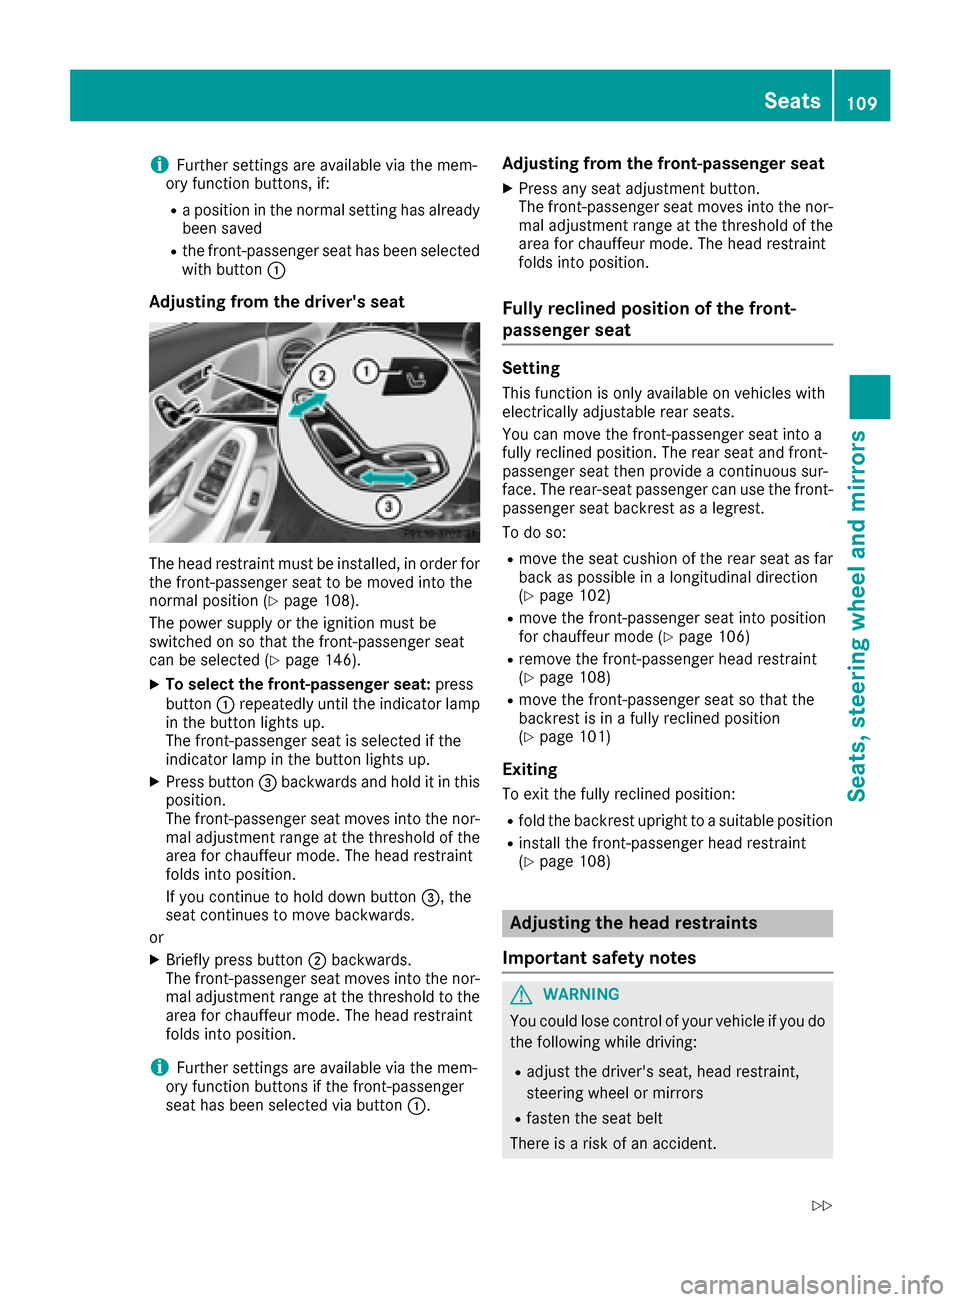
XTo select the front-passenger seat: press
button :repeatedly until the indicator lamp
in the button lights up.
The front-passenger seat is selected if the
indicator lamp in the button lights up.
XPress button =backwards and hold it in this
position.
The front-passenger seat moves into the nor-
mal adjustment range at the threshold of the
area for chauffeur mode. The head restraint
folds into position.
If you continue to hold down button =, the
seat continues to move backwards.
or
XBriefly press button ;backwards.
The front-passenger seat moves into the nor-
mal adjustment range at the threshold to the
area for chauffeur mode. The head restraint
folds into position.
iFurther settings are available via the mem-
ory function buttons if the front-passenger
seat has been selected via button :.
Adjusting from the front-passenger seat
XPress any seat adjustment button.
The front-passenger seat moves into the nor-
mal adjustment range at the threshold of the
area for chauffeur mode. The head restraint
folds into position.
Fully reclined position of the front-
passenger seat
Setting
This function is only available on vehicles with
electrically adjustable rear seats.
You can move the front-passenger seat into a
fully reclined position. The rear seat and front-
passenger seat then provide a continuous sur-
face. The rear-seat passenger can use the front-
passenger seat backrest as a legrest.
To do so:
Rmove the seat cushion of the rear seat as far
back as possible in a longitudinal direction
(
Ypage 102)
Rmove the front-passenger seat into position
for chauffeur mode (Ypage 106)
Rremove the front-passenger head restraint
(Ypage 108)
Rmove the front-passenger seat so that the
backrest is in a fully reclined position
(
Ypage 101)
Exiting
To exit the fully reclined position:
Rfold the backrest upright to a suitable position
Rinstall the front-passenger head restraint
(Ypage 108)
Adjusting the head restraints
Important safety notes
GWARNING
You could lose control of your vehicle if you do the following while driving:
Radjust the driver's seat, head restraint,
steering wheel or mirrors
Rfasten the seat belt
There is a risk of an accident.
Seats109
Seats, steering wheel and mirrors
Z
Page 112 of 382
Adjust the driver's seat, head restraint, steer-ing wheel and mirror and fasten your seat belt
before starting the engine.
GWARNING
If the head restraints are not installed or not
adjusted correctly, they cannot provide pro-
tection as intended. There is an increased risk
of injury in the head and neck area, e.g. in the event of an accident or when braking.
Always drive with the head restraints instal-
led. Before driving off, make sure for every
vehicle occupant that the center of the head
restraint supports the back of the head at
about eye level.
Do not rotate the head restraints of the front and rear seats. Otherwise, you cannot adjust the
height and angle of the head restraints to the
correct position.
Using the fore-and-aft adjustment, adjust the
head restraint so that it is as close as possible to
your head.
Pay attention to the important safety notes
(
Ypage 100).
Adjusting the front head restraints
Adjusting the head restraints manually
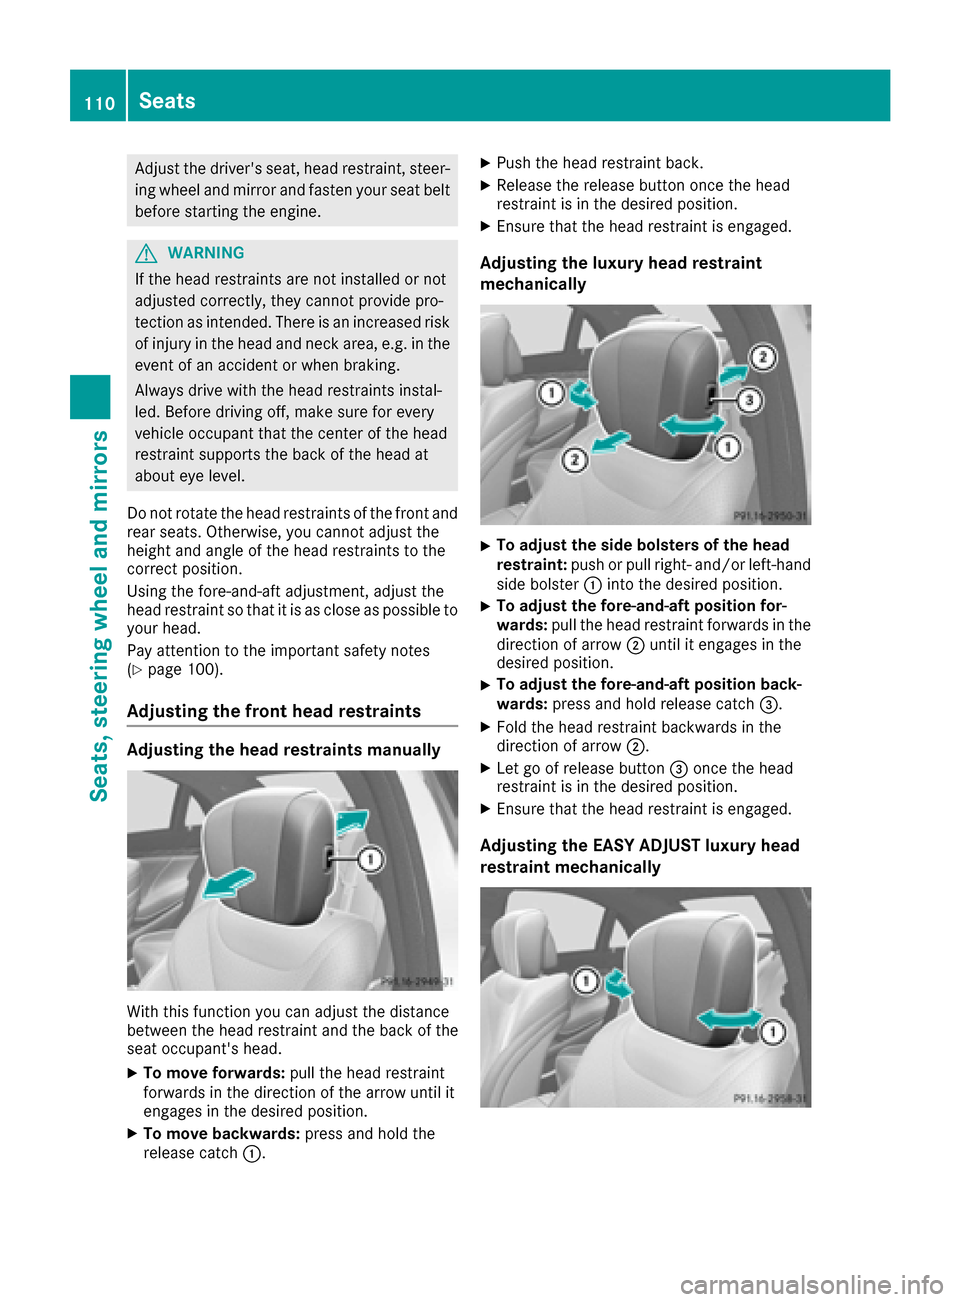
With this function you can adjust the distance
between the head restraint and the back of the
seat occupant's head.
XTo move forwards: pull the head restraint
forwards in the direction of the arrow until it
engages in the desired position.
XTo move backwards: press and hold the
release catch :.
XPush the head restraint back.
XRelease the release button once the head
restraint is in the desired position.
XEnsure that the head restraint is engaged.
Adjusting the luxury head restraint
mechanically
XTo adjust the side bolsters of the head
restraint:push or pull right- and/or left-hand
side bolster :into the desired position.
XTo adjust the fore-and-aft position for-
wards: pull the head restraint forwards in the
direction of arrow ;until it engages in the
desired position.
XTo adjust the fore-and-aft position back-
wards: press and hold release catch =.
XFold the head restraint backwards in the
direction of arrow;.
XLet go of release button =once the head
restraint is in the desired position.
XEnsure that the head restraint is engaged.
Adjusting the EASY ADJUST luxury head
restraint mechanically
110Seats
Seats, steering wheel and mirrors
Page 113 of 382
XTo adjust the side bolsters of the head
restraint:push or pull right and/or left-hand
side bolster :into the desired position.
iThe fore-and-aft position of the head
restraint is adjusted automatically when you
adjust the seat backrest angle using the seat
switch.
Adjusting the front head restraints elec-
trically
The height and fore-and-aft position of the front
head restraints can be adjusted with the seat
adjustment switch (
Ypage 101).
Adjusting the rear seat head restraints
Lowering the rear seat head restraints
electrically from the front
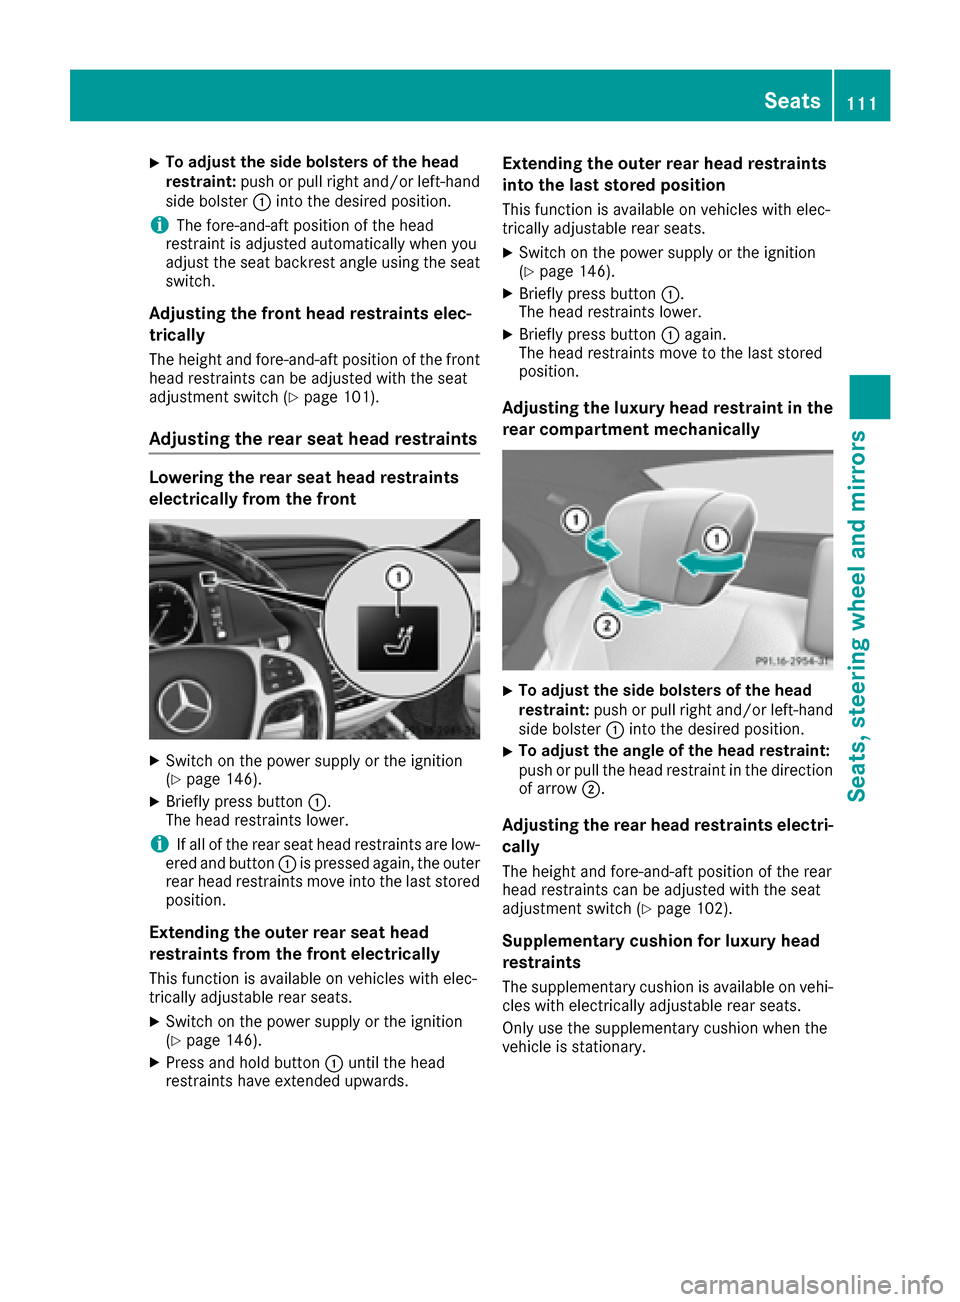
XSwitch on the power supply or the ignition
(Ypage 146).
XBriefly press button :.
The head restraints lower.
iIf all of the rear seat head restraints are low-
ered and button :is pressed again, the outer
rear head restraints move into the last stored
position.
Extending the outer rear seat head
restraints from the front electrically
This function is available on vehicles with elec-
trically adjustable rear seats.
XSwitch on the power supply or the ignition
(Ypage 146).
XPress and hold button :until the head
restraints have extended upwards.
Extending the outer rear head restraints
into the last stored position
This function is available on vehicles with elec-
trically adjustable rear seats.
XSwitch on the power supply or the ignition
(Ypage 146).
XBriefly press button :.
The head restraints lower.
XBriefly press button :again.
The head restraints move to the last stored
position.
Adjusting the luxury head restraint in the
rear compartment mechanically
XTo adjust the side bolsters of the head
restraint: push or pull right and/or left-hand
side bolster :into the desired position.
XTo adjust the angle of the head restraint:
push or pull the head restraint in the direction
of arrow ;.
Adjusting the rear head restraints electri-
cally
The height and fore-and-aft position of the rear
head restraints can be adjusted with the seat
adjustment switch (
Ypage 102).
Supplementary cushion for luxury head
restraints
The supplementary cushion is available on vehi-
cles with electrically adjustable rear seats.
Only use the supplementary cushion when the
vehicle is stationary.
Seats111
Seats, steering wheel and mirrors
Z
Page 114 of 382
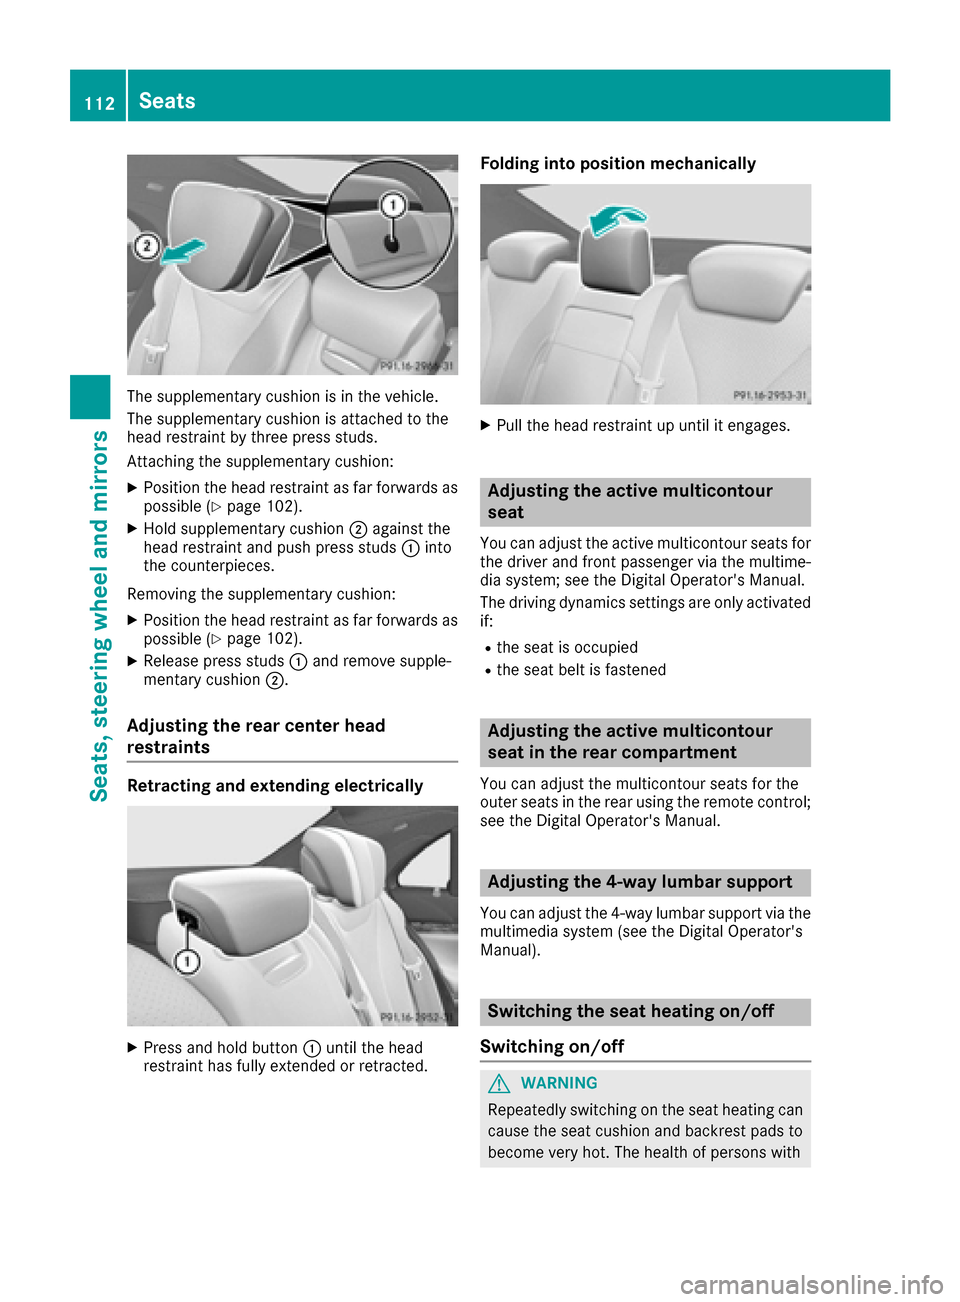
The supplementary cushion is in the vehicle.
The supplementary cushion is attached to the
head restraint by three press studs.
Attaching the supplementary cushion:
XPosition the head restraint as far forwards as
possible (Ypage 102).
XHold supplementary cushion;against the
head restraint and push press studs :into
the counterpieces.
Removing the supplementary cushion:
XPosition the head restraint as far forwards as
possible (Ypage 102).
XRelease press studs :and remove supple-
mentary cushion ;.
Adjusting the rear center head
restraints
Retracting and extending electrically
XPress and hold button :until the head
restraint has fully extended or retracted.
Folding into position mechanically
XPull the head restraint up until it engages.
Adjusting the active multicontour
seat
You can adjust the active multicontour seats for
the driver and front passenger via the multime-
dia system; see the Digital Operator's Manual.
The driving dynamics settings are only activated if:
Rthe seat is occupied
Rthe seat belt is fastened
Adjusting the active multicontour
seat in the rear compartment
You can adjust the multicontour seats for the
outer seats in the rear using the remote control;
see the Digital Operator's Manual.
Adjusting the 4-way lumbar support
You can adjust the 4-way lumbar support via the
multimedia system (see the Digital Operator's
Manual).
Switching the seat heating on/off
Switching on/off
GWARNING
Repeatedly switching on the seat heating can
cause the seat cushion and backrest pads to
become very hot. The health of persons with
112Seats
Seats, steering wheel and mirrors
Page 115 of 382
limited temperature sensitivity or a limited
ability to react to excessively high tempera-
tures may be affected or they may even suffer
burn-like injuries. There is a risk of injury.
Therefore, do not switch the seat heating on
repeatedly.
For vehicles equipped with the Warmth Comfort
package: the armrest in the door and the center
console can also be heated when you switch on
the seat heating of one of the front seats. You
can set this via the multimedia system; see the
Digital Operator's Manual.
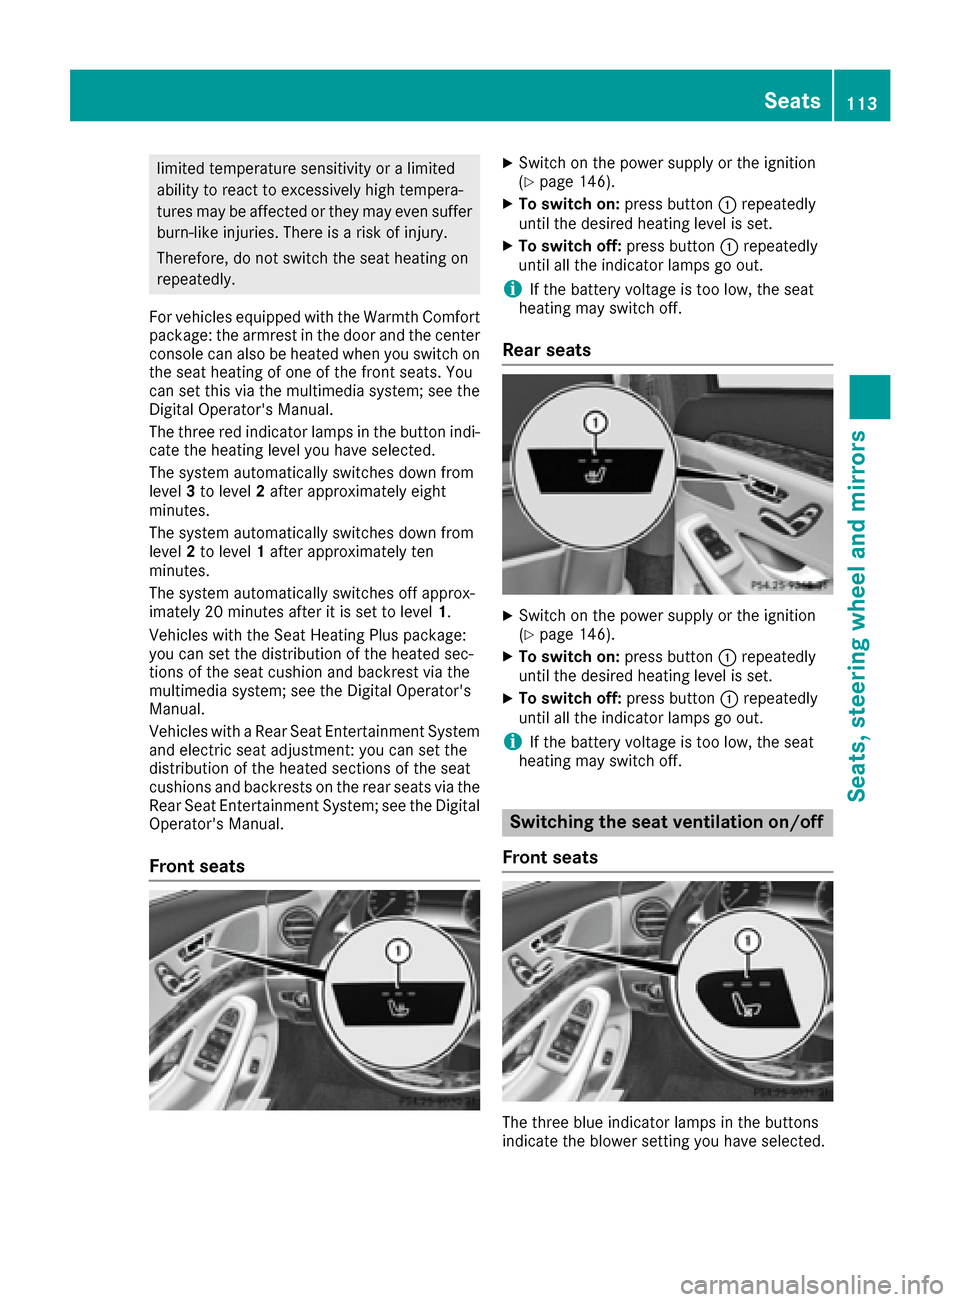
The three red indicator lamps in the button indi-
cate the heating level you have selected.
The system automatically switches down from
level 3to level 2after approximately eight
minutes.
The system automatically switches down from
level 2to level 1after approximately ten
minutes.
The system automatically switches off approx-
imately 20 minutes after it is set to level 1.
Vehicles with the Seat Heating Plus package:
you can set the distribution of the heated sec-
tions of the seat cushion and backrest via the
multimedia system; see the Digital Operator's
Manual.
Vehicles with a Rear Seat Entertainment System
and electric seat adjustment: you can set the
distribution of the heated sections of the seat
cushions and backrests on the rear seats via the
Rear Seat Entertainment System; see the Digital
Operator's Manual.
Front seats
XSwitch on the power supply or the ignition
(Ypage 146).
XTo switch on: press button:repeatedly
until the desired heating level is set.
XTo switch off: press button:repeatedly
until all the indicator lamps go out.
iIf the battery voltage is too low, the seat
heating may switch off.
Rear seats
XSwitch on the power supply or the ignition
(Ypage 146).
XTo switch on: press button:repeatedly
until the desired heating level is set.
XTo switch off: press button:repeatedly
until all the indicator lamps go out.
iIf the battery voltage is too low, the seat
heating may switch off.
Switching the seat ventilation on/off
Front seats
The three blue indicator lamps in the buttons
indicate the blower setting you have selected.
Seats113
Seats, steering wheel and mirrors
Z
Page 116 of 382
XSwitch on the power supply or the ignition
(Ypage 146).
XTo switch on:press button:repeatedly
until the desired blower setting is set.
XTo switch off: press button:repeatedly
until all the indicator lamps go out.
iIf the battery voltage is too low, the seat
ventilation may switch off.
iYou can open the side windows and the slid-
ing sunroof using the "Convenience opening"
feature (
Ypage 92). The seat ventilation of
the driver's seat automatically switches to the
highest level.
iWhen the vehicle is stationary, the fan
speed can be reduced automatically. This
reduces the noises of the seat ventilation.
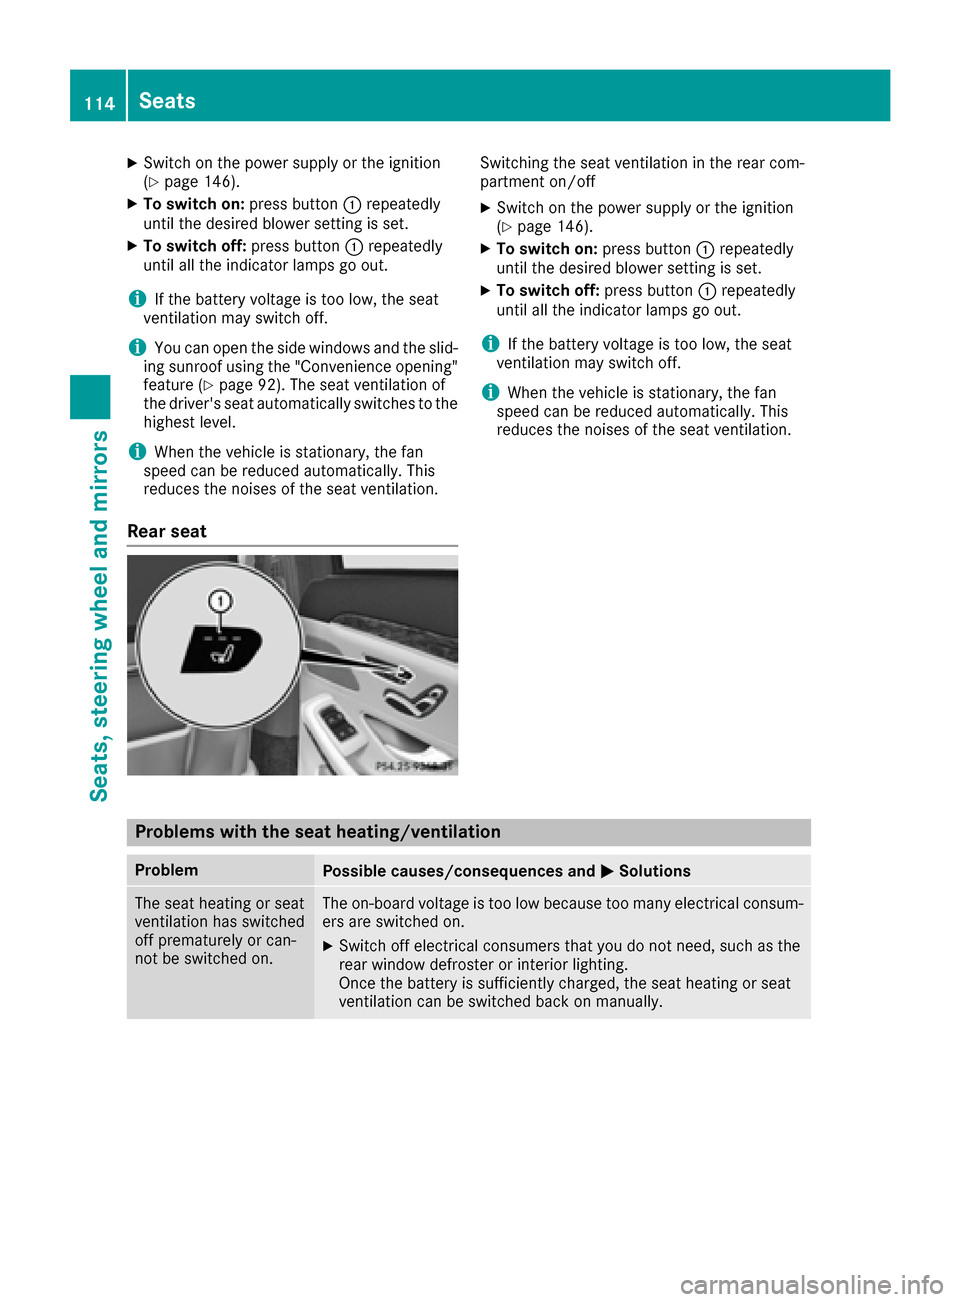
Rear seat
Switching the seat ventilation in the rear com-
partment on/off
XSwitch on the power supply or the ignition
(Ypage 146).
XTo switch on: press button:repeatedly
until the desired blower setting is set.
XTo switch off: press button:repeatedly
until all the indicator lamps go out.
iIf the battery voltage is too low, the seat
ventilation may switch off.
iWhen the vehicle is stationary, the fan
speed can be reduced automatically. This
reduces the noises of the seat ventilation.
Problems with the seat heating/ventilation
ProblemPossible causes/consequences and MSolutions
The seat heating or seat
ventilation has switched
off prematurely or can-
not be switched on.The on-board voltage is too low because too many electrical consum-
ers are switched on.
XSwitch off electrical consumers that you do not need, such as the
rear window defroster or interior lighting.
Once the battery is sufficiently charged, the seat heating or seat
ventilation can be switched back on manually.
114Seats
Seats, steering wheel and mirrors
Page 117 of 382
Steering wheel
Important safety notes
GWARNING
You could lose control of your vehicle if you do the following while driving:
Radjust the driver's seat, head restraint,
steering wheel or mirrors
Rfasten the seat belt
There is a risk of an accident.
Adjust the driver's seat, head restraint, steer-
ing wheel and mirror and fasten your seat belt before starting the engine.
GWARNING
Children could injure themselves if they
adjust the steering wheel. There is a risk of
injury.
When leaving the vehicle, always take the
SmartKey with you and lock the vehicle. Never
leave children unsupervised in the vehicle.
The electrically adjustable steering wheel can
still be adjusted when there is no SmartKey in
the ignition lock.
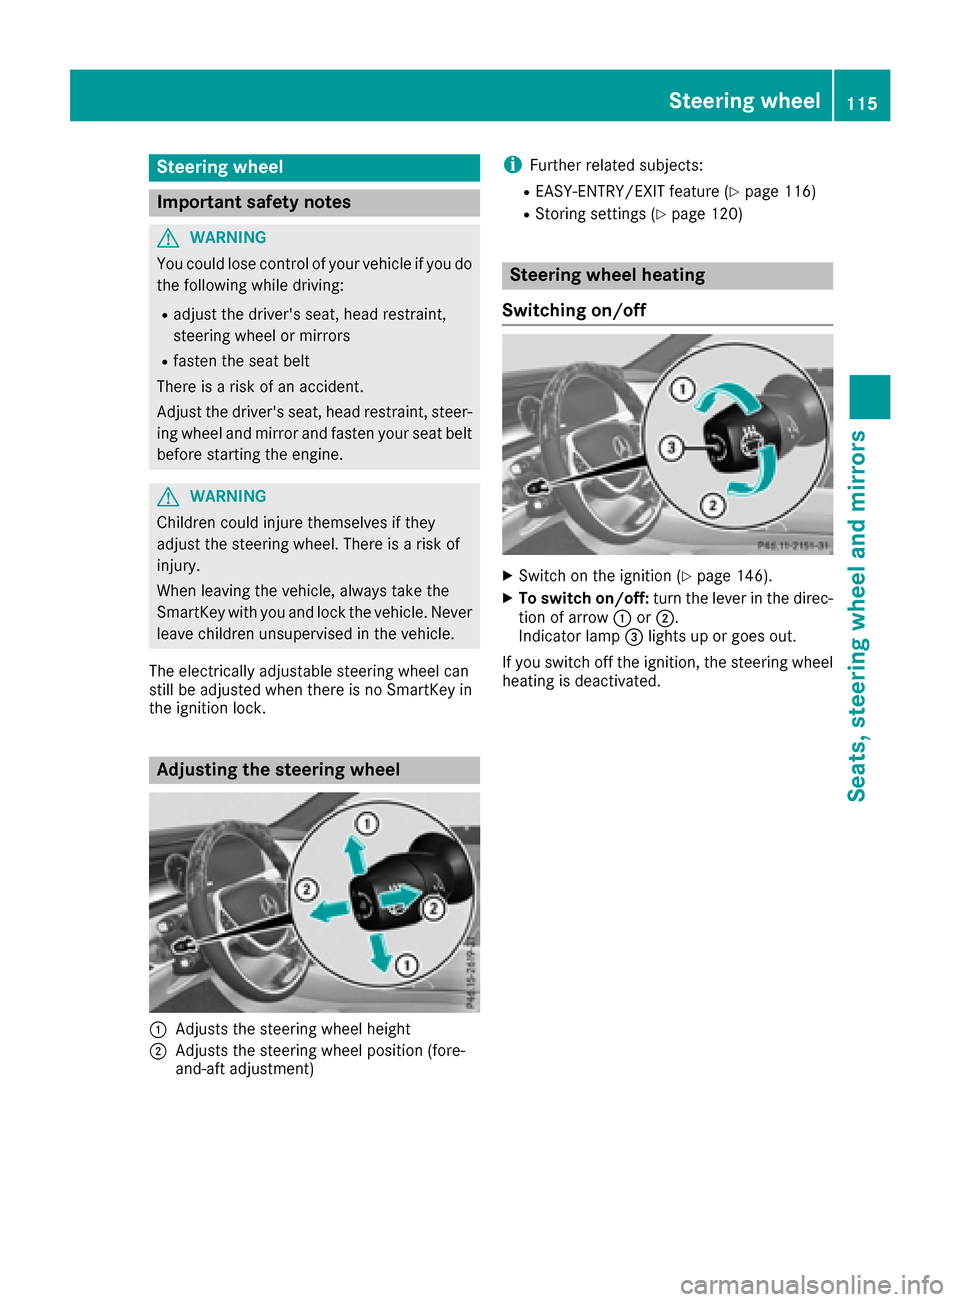
Adjusting the steering wheel
:Adjusts the steering wheel height
;Adjusts the steering wheel position (fore-
and-aft adjustment)
iFurther related subjects:
REASY-ENTRY/EXIT feature (Ypage 116)
RStoring settings (Ypage 120)
Steering wheel heating
Switching on/off
XSwitch on the ignition (Ypage 146).
XTo switch on/off: turn the lever in the direc-
tion of arrow :or;.
Indicator lamp =lights up or goes out.
If you switch off the ignition, the steering wheel
heating is deactivated.
Steering wheel115
Seats, steering wheel and mirrors
Z
Page 118 of 382
Problems with the steering wheel heating
ProblemPossible causes/consequences andMSolutions
The steering wheel heat-
ing has switched off pre-
maturely or cannot be
switched on.The on-board voltage is too low because too many electrical consum-
ers are switched on.
XSwitch off electrical consumers that you do not need, such as the
rear window defroster or interior lighting.
EASY-ENTRY/EXIT feature
Important safety notes
GWARNING
When the EASY-ENTRY/EXIT feature adjusts
the steering wheel and the driver's seat, you
and other vehicle occupants – particularly
children – could become trapped. There is a
risk of injury.
While the EASY-ENTRY/EXIT feature is mak-
ing adjustments, make sure that no one has
any body parts in the sweep of the seat and
the steering wheel.
If there is a risk of becoming trapped by
Rthe steering wheel: move the steering
wheel adjustment lever.
Rthe seat: press the switch for seat adjust-
ment.
The adjustment process is stopped.
You can stop the adjustment process by press-
ing one of the memory function's position but-
tons. This function is only available on vehicles
with memory function.
GWARNING
If children activate the EASY-ENTRY/EXIT fea-
ture, they can become trapped, particularly
when unattended. There is a risk of injury.
When leaving the vehicle, always take the
SmartKey with you and lock the vehicle. Never
leave children unsupervised in the vehicle.
GWARNING
If you drive off while the EASY-ENTRY/EXIT
feature is making adjustments, you could lose
control of the vehicle. There is a risk of an
accident.
Always wait until the adjustment process is
complete before driving off.
The EASY-ENTRY/EXIT feature makes getting in
and out of your vehicle easier.
You can activate and deactivate the EASY-
ENTRY/EXIT feature using the multimedia sys-
tem (see the Digital Operator's Manual).
Position of the steering wheel and the
driver's seat when the EASY-ENTRY/
EXIT feature is active
The steering wheel tilts upwards and the driver's seat moves backwards if you:
Rremove the SmartKey from the ignition lock
Rwith the start/stop button: open the driv-
er's door; the ignition must be switched off
Rwith the SmartKey: open the driver's door;
the SmartKey must be in position 0or 1in the
ignition lock (
Ypage 145)
iThe steering wheel only tilts upwards and
the driver's seat only moves backwards if the
driving position is stored after the seat or
steering column has been adjusted.
The last position of the steering wheel or seat is
stored if:
Rthe ignition is switched off
Rthe setting is stored with the memory function
(Ypage 120).
iThe steering wheel only moves upwards if it
has not already reached the upper stop. The
driver's seat only moves backwards if it is not
already in the rearmost position.
116Steering wheel
Seats, steering wheel and mirrors
Page 119 of 382
Position of the steering wheel and the
driver's seat for driving
The steering wheel and the driver's seat are
moved to the previously set position if:
Rthe driver's door is closed and you insert the
SmartKey into the ignition lock
Ryou close the driver's door when the ignition
is switched on
Ryou press the Start/Stop button once
iThe steering wheel and the driver's seat only
return to the last set position if the driving
position is stored after the seat or steering
column has been adjusted.
The last position of the steering wheel or seat is
stored if:
Rthe ignition is switched off
Rthe setting is stored with the memory function
(Ypage 120).
Crash-responsive EASY-EXIT feature
If the crash-responsive EASY-EXIT feature is trig-
gered in an accident, the steering column will
move upwards when the driver's door is opened
or the SmartKey is removed from the ignition
lock. This makes it easier to exit the vehicle and rescue the occupants.
The crash-responsive EASY-EXIT feature is only
operational if the EASY-EXIT/ENTRY feature is
activated in the multimedia system (see the sep-
arate Operator's Manual).
Mirrors
Rear-view mirror
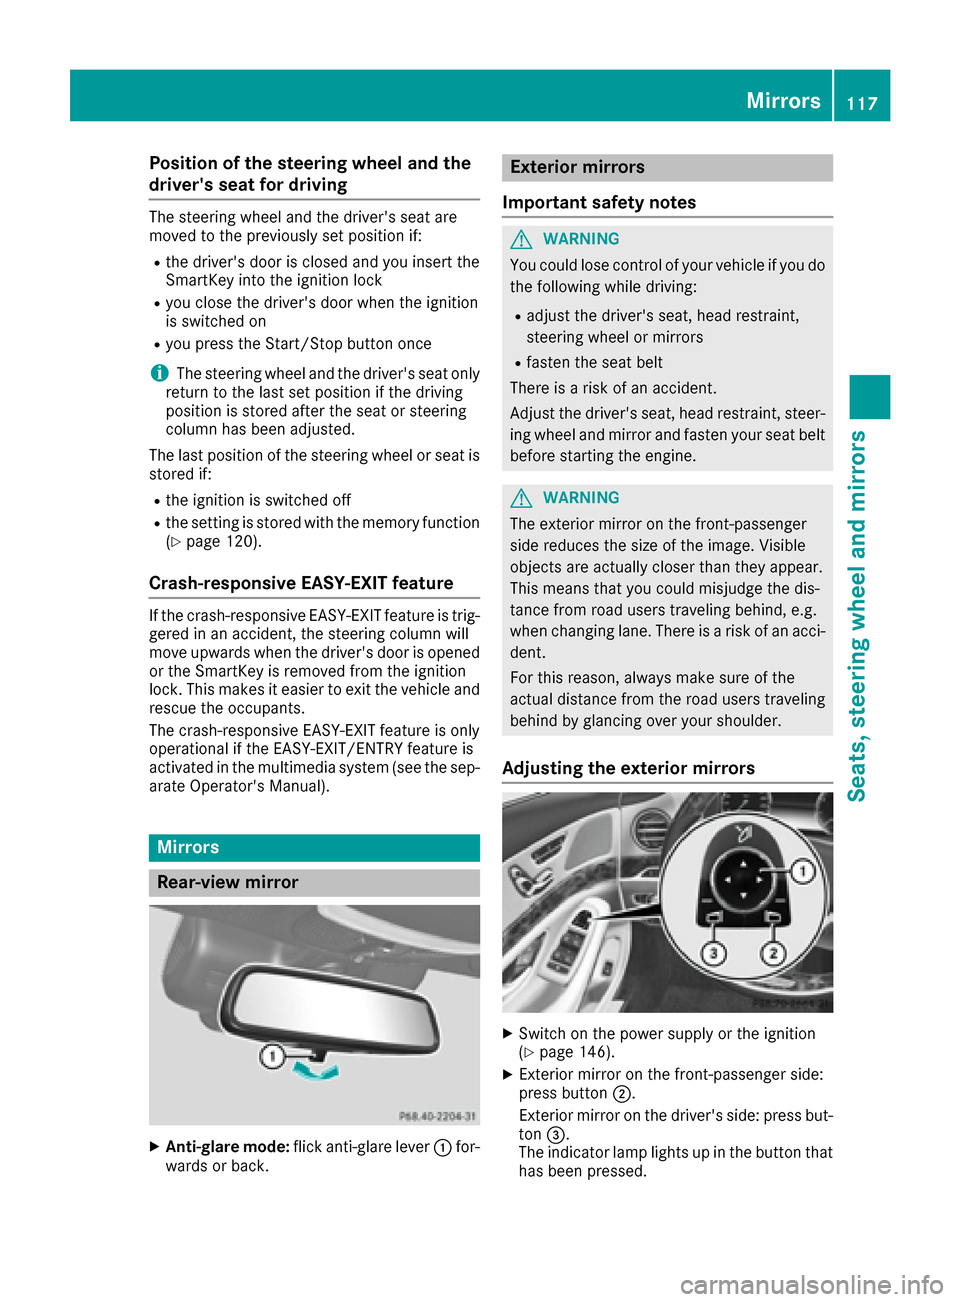
XAnti-glare mode: flick anti-glare lever :for-
wards or back.
Exterior mirrors
Important safety notes
GWARNING
You could lose control of your vehicle if you do the following while driving:
Radjust the driver's seat, head restraint,
steering wheel or mirrors
Rfasten the seat belt
There is a risk of an accident.
Adjust the driver's seat, head restraint, steer-
ing wheel and mirror and fasten your seat belt before starting the engine.
GWARNING
The exterior mirror on the front-passenger
side reduces the size of the image. Visible
objects are actually closer than they appear.
This means that you could misjudge the dis-
tance from road users traveling behind, e.g.
when changing lane. There is a risk of an acci-
dent.
For this reason, always make sure of the
actual distance from the road users traveling
behind by glancing over your shoulder.
Adjusting the exterior mirrors
XSwitch on the power supply or the ignition
(Ypage 146).
XExterior mirror on the front-passenger side:
press button ;.
Exterior mirror on the driver's side: press but-
ton =.
The indicator lamp lights up in the button that
has been pressed.
Mirrors117
Seats, steering wheel and mirrors
Z
Page 120 of 382
The indicator lamp goes out again after some
time. You can adjust the selected exterior
mirror using button:as long as the indicator
lamp is lit.
XPress button :up, down, or to the left or
right until you have adjusted the exterior mir- ror to the correct position. You should have a
good overview of traffic conditions.
The convex exterior mirrors provide a larger field of vision.
After the engine has been started, the exterior
mirrors are automatically heated if the rear win-
dow defroster is switched on and the outside
temperature is low.
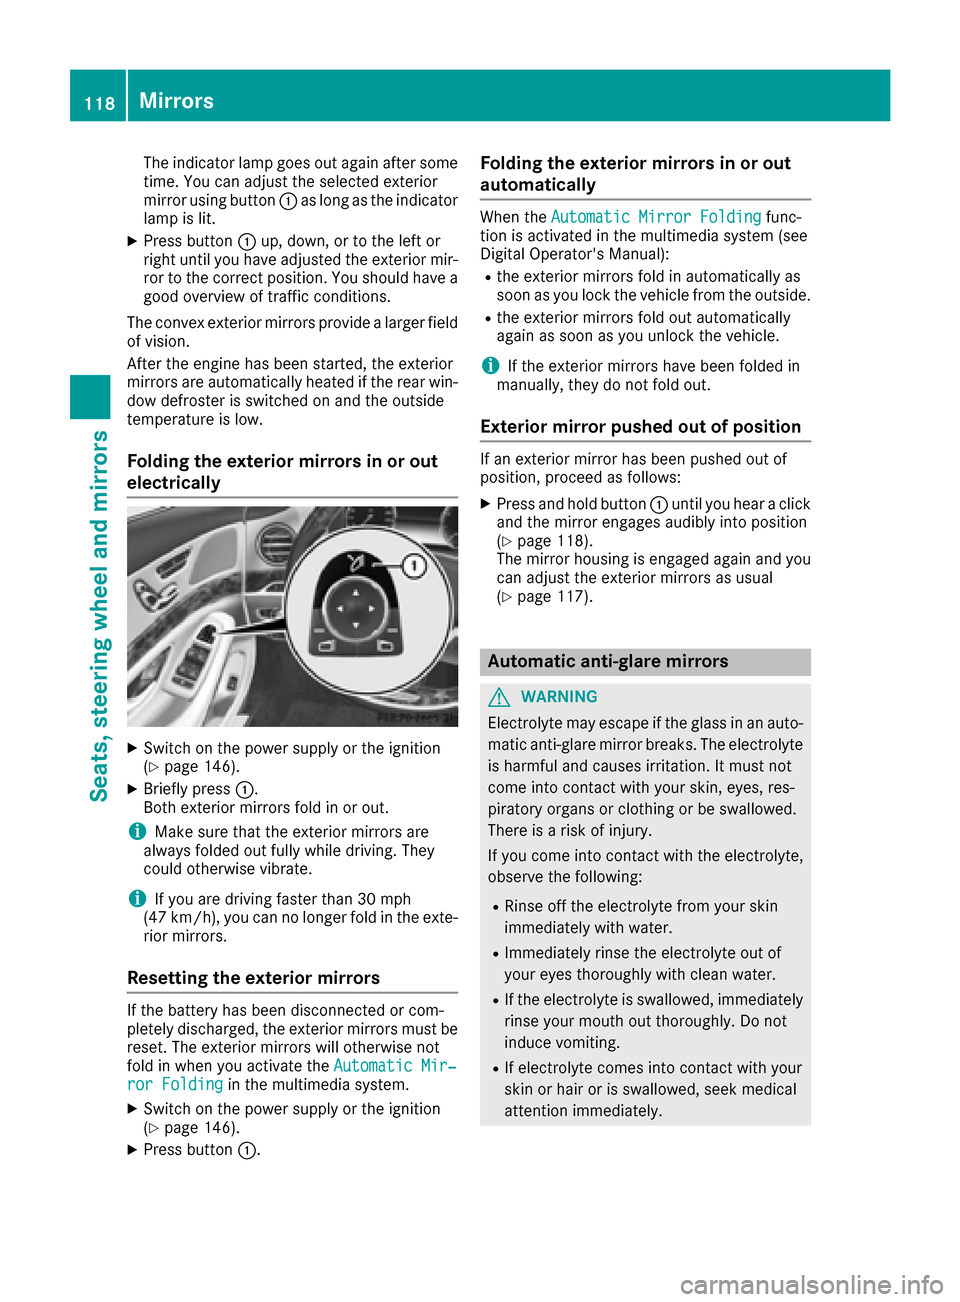
Folding the exterior mirrors in or out
electrically
XSwitch on the power supply or the ignition
(Ypage 146).
XBriefly press :.
Both exterior mirrors fold in or out.
iMake sure that the exterior mirrors are
always folded out fully while driving. They
could otherwise vibrate.
iIf you are driving faster than 30 mph
(47 km/h), you can no longer fold in the exte-
rior mirrors.
Resetting the exterior mirrors
If the battery has been disconnected or com-
pletely discharged, the exterior mirrors must be
reset. The exterior mirrors will otherwise not
fold in when you activate the Automatic Mir‐
ror Foldingin the multimedia system.
XSwitch on the power supply or the ignition
(Ypage 146).
XPress button:.
Folding the exterior mirrors in or out
automatically
When theAutomatic Mirror Foldingfunc-
tion is activated in the multimedia system (see
Digital Operator's Manual):
Rthe exterior mirrors fold in automatically as
soon as you lock the vehicle from the outside.
Rthe exterior mirrors fold out automatically
again as soon as you unlock the vehicle.
iIf the exterior mirrors have been folded in
manually, they do not fold out.
Exterior mirror pushed out of position
If an exterior mirror has been pushed out of
position, proceed as follows:
XPress and hold button :until you hear a click
and the mirror engages audibly into position
(
Ypage 118).
The mirror housing is engaged again and you
can adjust the exterior mirrors as usual
(
Ypage 117).
Automatic anti-glare mirrors
GWARNING
Electrolyte may escape if the glass in an auto-
matic anti-glare mirror breaks. The electrolyte
is harmful and causes irritation. It must not
come into contact with your skin, eyes, res-
piratory organs or clothing or be swallowed.
There is a risk of injury.
If you come into contact with the electrolyte,
observe the following:
RRinse off the electrolyte from your skin
immediately with water.
RImmediately rinse the electrolyte out of
your eyes thoroughly with clean water.
RIf the electrolyte is swallowed, immediately
rinse your mouth out thoroughly. Do not
induce vomiting.
RIf electrolyte comes into contact with your
skin or hair or is swallowed, seek medical
attention immediately.
118Mirrors
Seats, steering wheel and mirrors