isofix MERCEDES-BENZ S-Class MAYBACH 2017 W222 Owner's Manual
[x] Cancel search | Manufacturer: MERCEDES-BENZ, Model Year: 2017, Model line: S-Class MAYBACH, Model: MERCEDES-BENZ S-Class MAYBACH 2017 W222Pages: 382, PDF Size: 9.92 MB
Page 9 of 382
Wooden trim ..................................325
CD
see also Digital Operator's Man-
ual ..................................................2 69
CD player (on-board computer) ........218
Center console
Overview .......................................... 38
Stowage space .............................. 282
Center console in the rear com-
partment
Stowage compartment .................. 283
Central locking
Locking/unlocking (SmartKey) ........7 7
Changing the media source .............218
Chauffeur mode
Display message ............................ 256
Fully reclined position .................... 109
General notes ................................ 106
Installing the head restraint ........... 108
Moving front-passenger seat into
the chauffeur position .................... 106
Moving the front-passenger seat
into the normal position ................. 108
Removing the head restraint .......... 108
Child
Restraint system .............................. 60
Child seat
Forward-facing restraint system ...... 63
LATCH-type (ISOFIX) child seat
anchors ............................................ 61
On the front-passenger seat ............ 63
Rearward-facing restraint system .... 63
Top Tether ....................................... 62
Child-proof locks
Important safety notes .................... 64
Rear doors ....................................... 65
Children
Special seat belt retractor ............... 59
Cigarette lighter ................................ 294
Cleaning
Mirror turn signal ........................... 323
Climate control
Adjusting the footwell tempera-
ture (multimedia system) ............... 275
Automatic climate control ............. 133
Controlling automatically ............... 136
Cooling with air dehumidification .. 135 Cooling with air dehumidification
(multimedia system) ...................... 275
Defrosting the window
s ................. 139
De
frosting the windshield .............. 139
ECO start/stop function ................ 134
General notes ................................ 132
Indicator lamp ................................ 136
Ionization ....................................... 142
Ionization (multimedia system) ...... 274
Notes on using the automatic cli-
mate control .................................. 134
Overview ........................................ 273
Overview of systems ...................... 132
Perfume atomizer .......................... 141
Perfume atomizer (multimedia
system) .......................................... 274
Pre-entry climate control (via key)
(multimedia system) ...................... 274
Pre-entry climate control at
departure time (multimedia sys-
tem) ............................................... 275
Problem with the rear window
defroster ........................................ 140
Problems with cooling with air
dehumidification ............................ 136
Rear control panel ......................... 133
Refrigerant ..................................... 375
Refrigerant filling capacity ............. 376
Setting the air distribution ............. 138
Setting the air vents ...................... 143
Setting the airflow ......................... 138
Setting the climate mode ............... 137
Setting the climate mode (multi-
media system) ............................... 274
Setting the temperature ................ 137
Switching air-recirculation mode
on/off ............................................ 140
Switching on/off ........................... 135
Switching residual heat on/off ...... 140
Switching the rear window
defroster on/off ............................ 139
Switching the synchronization
function on and off ........................ 138
Synchronization function (multi-
media system) ............................... 275
Climate control settings
Multimedia system ........................ 273
Index7
Page 15 of 382
K
Key positionsSmartKey ...................................... .145
Start/Stop button .......................... 145
KEYLESS-GO
Activating ......................................... 78
Convenience closing feature ............ 92
Deactivation ..................................... 78
Locking ............................................ 78
Start function ................................... 79
Unlocking ......................................... 78
Kickdown
Driving tips ....................................1 55
Knee bag .............................................. 49
L
Lamps
see Warning and indicator lamps
Lane Keeping Assist
see Active Lane Keeping Assist
LATCH-type (ISOFIX) child seat
anchors ................................................ 61
License plate lamp (display mes-
sage) ................................................... 241
Light sensor (display message) ....... 241
Lights
Adaptive Highbeam Assist PLUS .... 126
Automatic headlamp mode ............ 124
Cornering light function ................. 126
Fogged up headlamps .................... 127
General notes ................................ 124
Hazard warning lamps ................... 126
High beam flasher .......................... 125
High-beam headlamps ................... 125
Light switch ................................... 124
Low-beam headlamps .................... 125
Parking lamps ................................ 125
Setting exterior lighting ................. 124
Standing lamps .............................. 125
Switching the daytime running
lamps on/off (on-board com-
puter) ............................................. 225
Switching the spotlight on/off ....... 225
Turn signals ................................... 125
see Interior lighting
Loading guidelines ............................ 281 Locking
see Central locking
Locking (doors)
Automatic ........................................ 84
Emergency locking ........................... 84
From inside (central locking but-
ton) ..................................................8 3
Locking centrally
see Central locking
Low-beam headlamps
Display message ............................ 241
Switching on/off .......................... .125
Lumbar support
Adjusting the 4-way lumbar sup-
port ................................................ 112
Luxury head restraints ..................... 110M
M+S tires............................................ 345
Magic Body Control ........................... 180
MAGIC SKY CONTROL ......................... 97
Malfunction message
see Display messages
Matte finish (cleaning instruc-
tions) ..................................................3 21
MBC
see Magic Body Control
mbrace
Call priority ....................................3 04
Display message ............................ 233
Downloading destinations
(COMAND) ..................................... 304
Downloading routes ....................... 307
Emergency call .............................. 301
General notes ................................ 300
Geo fencing ................................... 307
Info call button .............................. 303
Locating a stolen vehicle ...............3 06
Remote fault diagnosis .................. 306
Remote vehicle locking .................. 305
Roadside Assistance button .......... 302
Search & Send ............................... 304
Self-test ......................................... 301
Speed alert .................................... 307
System .......................................... 301
Triggering the vehicle alarm ........... 307
Vehicle remote unlocking .............. 305
Index13
Page 48 of 382
of an accident, they could be crushed
between the vehicle occupant and seat belt.
Robjects are never secured with a seat belt if
the seat belt is also being used by one of the
vehicle's occupants.
Also ensure that there are never objects
between a person and the seat, e.g. cushions.
Seat belts are only intended to secure and
restrain vehicle occupants. Always observe the
"Loading guidelines" for securing objects, lug-
gage or loads (
Ypage 281).
Rear beltbags
iObserve the "Important safety notes" sec-
tion (Ypage 48).
Depending on the vehicle's equipment, the
outer rear seat belts are equipped with a belt
bag. This can be seen from the BELTBAG iden-
tification on the rear seat belt.
GWARNING
In an accident, the beltbag may damage a
child restraint system that is not permitted or
that has not been approved for a beltbag. As a result, the child restraint system may not be
able to provide the intended level of protec-
tion. This poses an increased risk of injury or
even fatal injury.
For this reason, always secure a child
restraint system with an integrated seat belt
with LATCH-type (ISOFIX). On vehicles with
optional beltbags for the rear seats, only use a
booster seat with an integrated backrest,
which has been tested and approved by
Mercedes-Benz in combination with a belt-
bag. Never use a seat belt equipped with a
beltbag to secure a forward or rearward-
facing child restraint system or a non-
approved booster seat. Contact an authorized
Mercedes-Benz Center for information on
approved child restraint systems.
Further information on child restraint systems
(
Ypage 59).
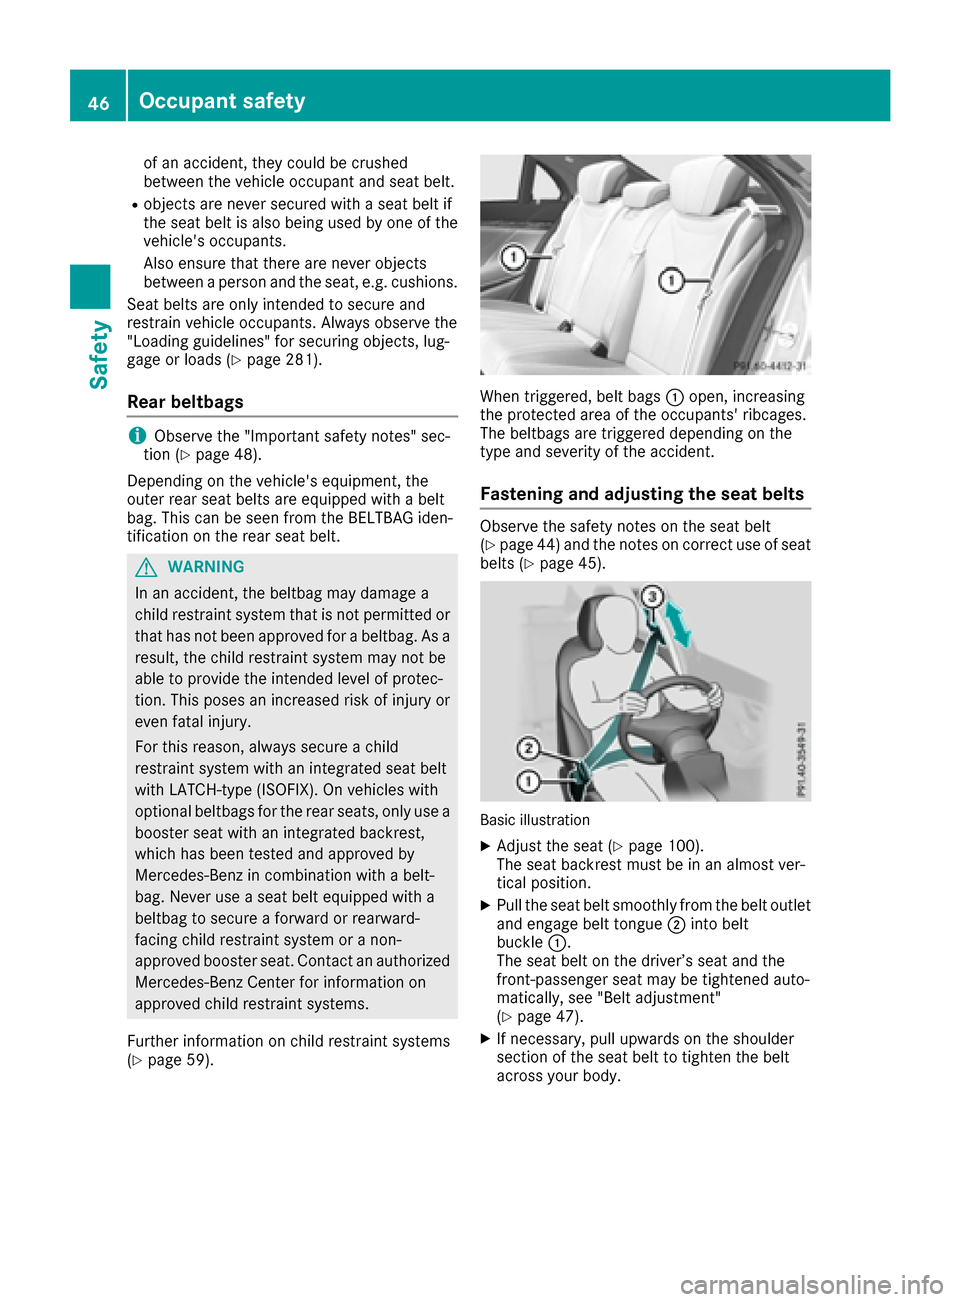
When triggered, belt bags :open, increasing
the protected area of the occupants' ribcages.
The beltbags are triggered depending on the
type and severity of the accident.
Fastening and adjusting the seat belts
Observe the safety notes on the seat belt
(Ypage 44) and the notes on correct use of seat
belts (Ypage 45).
Basic illustration
XAdjust the seat (Ypage 100).
The seat backrest must be in an almost ver-
tical position.
XPull the seat belt smoothly from the belt outlet
and engage belt tongue ;into belt
buckle :.
The seat belt on the driver’s seat and the
front-passenger seat may be tightened auto-
matically, see "Belt adjustment"
(
Ypage 47).
XIf necessary, pull upwards on the shoulder
section of the seat belt to tighten the belt
across your body.
46Occupant safety
Safety
Page 63 of 382
The securing systems of child restraint systems
are:
Rthe seat belt system
Rthe LATCH-type (ISOFIX) securing rings
Rthe Top Tether anchorages
If it is absolutely necessary to carry a child on
the front-passenger seat, be sure to observe the
information on the "Occupant Classification
System (OCS)" (
Ypage 51). There you will also
find information on deactivating the front-
passenger front air bag.
All child restraint systems must meet the fol-
lowing standards:
RU.S. Federal Motor Vehicle Safety Standards
213 and 225
RCanadian Motor Vehicle Safety Standards
213 and 210.2
Confirmation that the child restraint system cor-
responds to the standards can be found on an
instruction label on the child restraint system.
This confirmation can also be found in the instal-
lation instructions that are included with the
child restraint system.
Observe the warning labels in the vehicle inte-
rior and on the child restraint system.
Vehicles with seat belt extenders: when
securing a child in a child restraint system on a
rear seat, observe the following instructions:
Rmake sure that the seat belt on the child
restraint system is fastened according to the
manufacturer's installation instructions for
the child restraint system.
Rfor child restraint systems with a belt clamp:
engage the belt tongue in the buckle before
you tighten the seat belt using the belt clamp.
Vehicles with a rear reclining seat: when
installing a child restraint system, move the rear
reclining seat backrest to an almost vertical
position. The rear reclining seat backrest must
rest against the child restraint system. Observe
the notes on the cushion air bag (
Ypage 50).
Vehicles with belt bags: only use a child
restraint system which has been approved by
Mercedes-Benz. Always observe the instruc-
tions and safety notes on belt bags for the outer
seat belts in the rear (
Ypage 46).
LATCH-type (ISOFIX) child seat secur-
ing system
GWARNING
LATCH-type (ISOFIX) child restraint systems
do not offer sufficient protective effect for
children whose weight is greater than 48 lbs
(22 kg) who are secured using the safety belt integrated in the child restraint system. In the
event of an accident, a child might not be
restrained correctly. This poses an increased
risk of injury or even fatal injury.
If the child weighs more than 48 lbs (22 kg),
only use LATCH-type (ISOFIX) child restraint
systems with which the child is also secured
with the vehicle seat belt. Also secure the
child restraint system with the Top Tether
belt, if available.
Always comply with the manufacturer's instal-
lation and operating instructions for the child
restraint system used.
Before every trip, make sure that the LATCH-
type (ISOFIX) child restraint system is engaged
correctly in both LATCH-type (ISOFIX) securing
rings
!When installing the child restraint system,
make sure that the seat belt for the middle
seat does not get trapped. The seat belt could
otherwise be damaged.
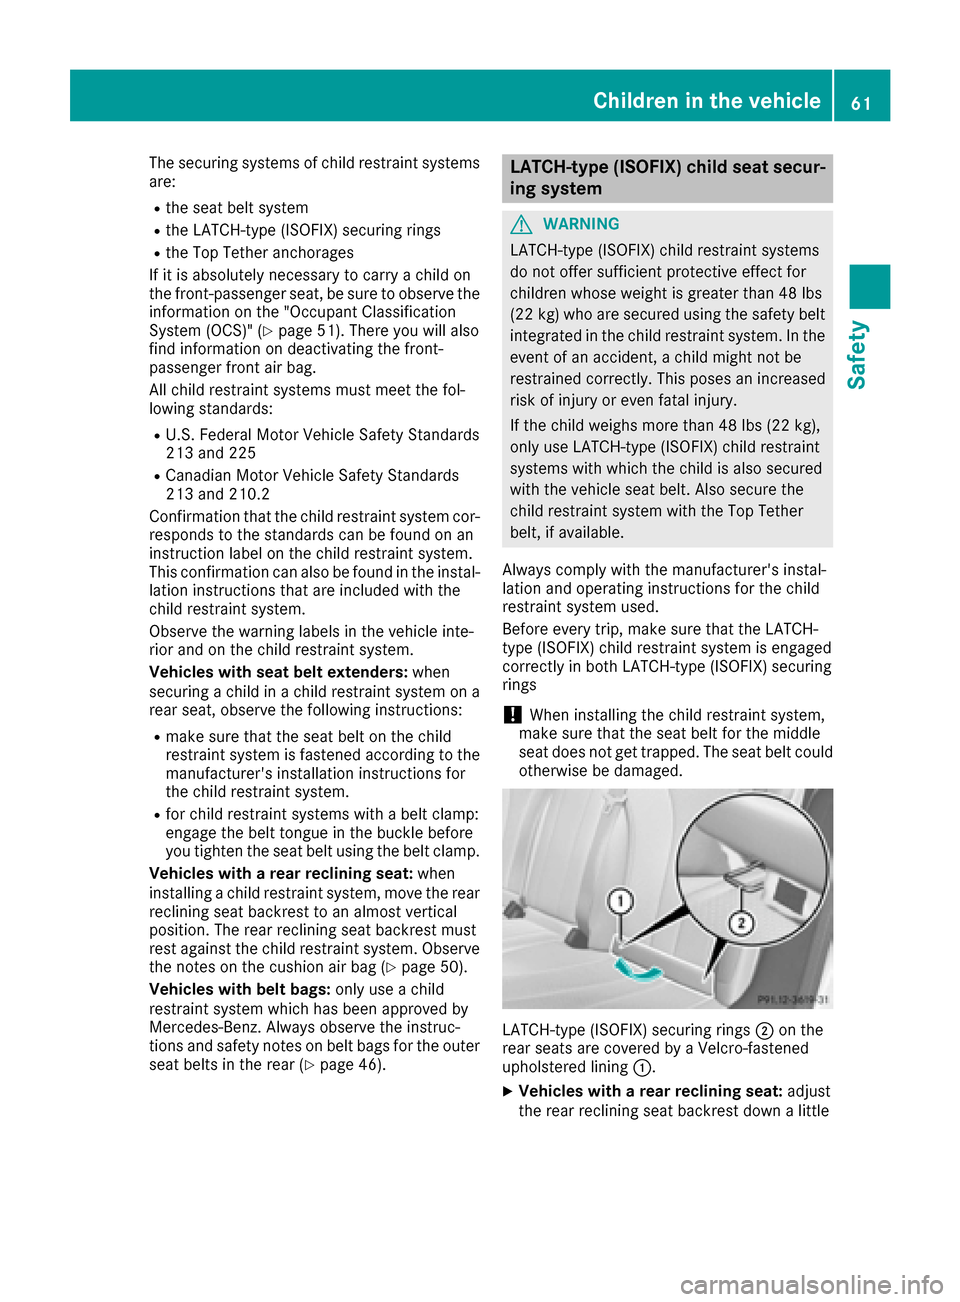
LATCH-type (ISOFIX) securing rings ;on the
rear seats are covered by a Velcro-fastened
upholstered lining :.
XVehicles with a rear reclining seat: adjust
the rear reclining seat backrest down a little
Children in the vehicle61
Safety
Z
Page 64 of 382
before installing the LATCH-type (ISOFIX)
child restraint system.
XVehicles without rear reclining seat:fold
upholstered lining :upwards.
XVehicles with a rear reclining seat: remove
upholstered lining :.
XVehicles without a rear reclining seat: turn
the support on the rear side of upholstered
lining :by 90°.
Upholstered lining :remains folded
upwards.
XInstall the LATCH-type (ISOFIX) child restraint
system on both LATCH-type (ISOFIX) securing
rings ;.
XVehicles with a rear reclining seat: move
the rear reclining seat backrest to an upright
position. The rear reclining seat backrest
must rest against the child restraint system.
GWARNING
Vehicles with electrically adjustable rear
bench seats:
If you adjust the seat after installing a child
restraint system:
Rthe seat belt could slacken or become too
tight
Rthe child restraint system could become
loose, incorrectly positioned or damaged
As a result, the child restraint system may not
be able to provide the intended level of pro-
tection. This poses an increased risk of injury
or even fatal injury.
Never adjust the seat after installing the child
restraint system.
Vehicles without rear reclining seat: after
you have removed the LATCH-type (ISOFIX)
child restraint system, you must turn the sup-
port on the rear side of upholstered lining :by
90° again. Then fold upholstery lining :down.
ISOFIX is a standardized securing system for
specially designed child restraint systems on
the rear seats. LATCH-type (ISOFIX) securing
rings ;for two LATCH-type (ISOFIX) child
restraint systems are installed on the left and
right rear seats.
Vehicles with rear seat armrest: adjust the
rear seat armrest so that LATCH-type (ISOFIX)
securing rings ;for the LATCH-type (ISOFIX)
child restraint system are accessible. Non-LATCH-type (ISOFIX) child seats may also
be used and can be installed using the vehicle's
seat belt system. Install the child seat according to the manufacturer's instructions.
Top Tether
Introduction
Top Tether provides an additional connection
between the child restraint system secured with
a LATCH-type (ISOFIX) system and the vehicle.
This helps reduce the risk of injury even further.
If the child restraint system is equipped with a
Top Tether belt, this should always be used.
Important safety notes
GWARNING
If the rear seat backrests are not locked, they
could fold forwards in the event of an acci-
dent, heavy braking or sudden changes of
direction. As a result, child restraint systems
cannot perform their intended protective
function. Rear seat backrests that are not
locked can also cause additional injuries, e.g.
in the event of an accident. This poses an
increased risk of injury or even fatal injury.
Always lock rear seat backrests after instal-
ling a Top Tether belt. Observe the lock veri-
fication indicator. Adjust the rear seat backr-
ests so that they are in an upright position.
GWARNING
Vehicles with electrically adjustable rear
bench seats:
If you adjust the seat after installing a child
restraint system:
Rthe seat belt could slacken or become too
tight
Rthe child restraint system could become
loose, incorrectly positioned or damaged
As a result, the child restraint system may not
be able to provide the intended level of pro-
tection. This poses an increased risk of injury
or even fatal injury.
62Children in the vehicle
Safety
Page 65 of 382
Never adjust the seat after installing the child
restraint system.
If the rear seat backrest is not engaged and
locked, this will be shown in the multifunction
display in the instrument cluster. A warning tone
also sounds.
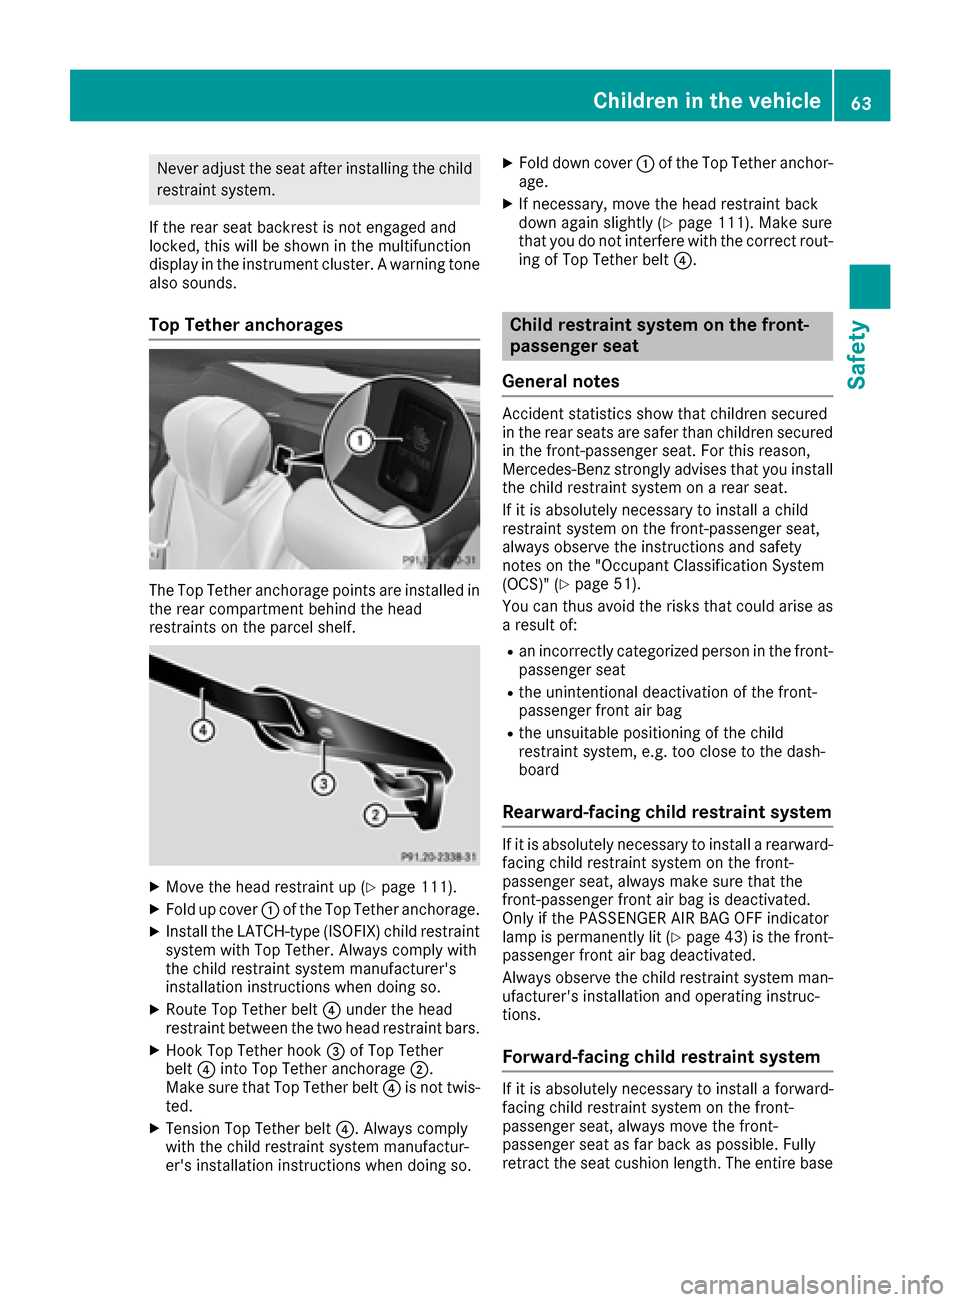
Top Tether anchorages
The Top Tether anchorage points are installed in
the rear compartment behind the head
restraints on the parcel shelf.
XMove the head restraint up (Ypage 111).
XFold up cover :of the Top Tether anchorage.
XInstall the LATCH-type (ISOFIX) child restraint
system with Top Tether. Always comply with
the child restraint system manufacturer's
installation instructions when doing so.
XRoute Top Tether belt ?under the head
restraint between the two head restraint bars.
XHook Top Tether hook =of Top Tether
belt ?into Top Tether anchorage ;.
Make sure that Top Tether belt ?is not twis-
ted.
XTension Top Tether belt ?. Always comply
with the child restraint system manufactur-
er's installation instructions when doing so.
XFold down cover :of the Top Tether anchor-
age.
XIf necessary, move the head restraint back
down again slightly (Ypage 111). Make sure
that you do not interfere with the correct rout-
ing of Top Tether belt ?.
Child restraint system on the front-
passenger seat
General notes
Accident statistics show that children secured
in the rear seats are safer than children secured
in the front-passenger seat. For this reason,
Mercedes-Benz strongly advises that you install
the child restraint system on a rear seat.
If it is absolutely necessary to install a child
restraint system on the front-passenger seat,
always observe the instructions and safety
notes on the "Occupant Classification System
(OCS)" (
Ypage 51).
You can thus avoid the risks that could arise as a result of:
Ran incorrectly categorized person in the front-
passenger seat
Rthe unintentional deactivation of the front-
passenger front air bag
Rthe unsuitable positioning of the child
restraint system, e.g. too close to the dash-
board
Rearward-facing child restraint system
If it is absolutely necessary to install a rearward-
facing child restraint system on the front-
passenger seat, always make sure that the
front-passenger front air bag is deactivated.
Only if the PASSENGER AIR BAG OFF indicator
lamp is permanently lit (
Ypage 43) is the front-
passenger front air bag deactivated.
Always observe the child restraint system man-
ufacturer's installation and operating instruc-
tions.
Forward-facing child restraint system
If it is absolutely necessary to install a forward-
facing child restraint system on the front-
passenger seat, always move the front-
passenger seat as far back as possible. Fully
retract the seat cushion length. The entire base
Children in the vehicle63
Safety
Z