wheel size MERCEDES-BENZ S-Class MAYBACH 2017 W222 Owner's Manual
[x] Cancel search | Manufacturer: MERCEDES-BENZ, Model Year: 2017, Model line: S-Class MAYBACH, Model: MERCEDES-BENZ S-Class MAYBACH 2017 W222Pages: 382, PDF Size: 9.92 MB
Page 23 of 382
Maximum ....................................... 348
Not reached (TIREFIT) .................... 330
Notes ............................................. 347
Reached (TIREFIT) .......................... 331
Recommended ...............................346
Using the TIREFIT kit ......................3 29
Tire pressure loss warning system
General notes ................................ 352
Important safety notes .................. 352
Restarting ...................................... 352
Tire pressure monitor
Checking the tire pressure elec-
tronically ........................................ 350
Function/notes .............................3 49
General notes ................................ 349
Important safety notes .................. 349
Radio type approval for the tire
pressure monitor ........................... 352
Restarting ...................................... 351
Warning lamp ................................. 267
Warning message .......................... 351
TIREFIT kit
Important safety notes .................. 329
Storage location ............................ 327
Tire pressure not reached .............. 330
Tire pressure reached .................... 331
Using ............................................. 329
Tires
Aspect ratio (definition) ................. 361
Average weight of the vehicle
occupants (definition) .................... 360
Bar (definition) ............................... 360
Changing a wheel .......................... 362
Characteristics .............................. 360
Checking ........................................ 343
Curb weight (definition) ................. 361
Definition of terms ......................... 360
Direction of rotation ...................... 363
Display message ............................ 252
Distribution of the vehicle occu-
pants (definition) ............................ 362
DOT (Department of Transporta-
tion) (definition) ............................. 360
DOT, Tire Identification Number
(TIN) ............................................... 360
GAWR (G ross Axl
e Weight Rating)
(definition) ..................................... 361 GVW (Gross Vehicle Weight) (def-
inition) ........................................... 361
GVWR (Gross Vehicle Weight Rat-
ing) (definition) .............................. 361
Important safety notes .................. 343
Increased vehicle weight due to
optional equipment (definition) ...... 361
Information on driving .................... 343
Kilopascal (kPa) (definition) ........... 361
Labeling (overview) ........................ 357
Load bearing index (definition) ...... 362
Load index ..................................... 359
Load index (definition) ................... 361
Maximum load on a tire (defini-
tion) ............................................... 361
Maximum loaded vehicle weight
(definition) ..................................... 361
Maximum permissible tire pres-
sure (definition) ............................. 361
Maximum tire load ......................... 359
Maximum tire load (definition) ....... 361
MOExtended tires .......................... 344
Optional equipment weight (defi-
nition) ............................................ 362
PSI (pounds per square inch) (def-
inition) ........................................... 361
Replacing ....................................... 362
Service life ..................................... 344
Sidewall (definition) ....................... 362
Snow chains .................................. 345
Speed rating (definition) ................ 361
Storing ........................................... 363
Structure and characteristics
(definition) ..................................... 360
Summer tires in winter .................. 345
Temperature .................................. 357
TIN (Tire Identification Number)
(definition) ..................................... 362
Tire bead (definition) ...................... 362
Tire pressure (definition) ................ 362
Tire pressures (recommended) ...... 361
Tire size (data) ............................... 367
Tire size designation, load-bearing
capacity, speed rating .................... 357
Tire trea d ....................................... 344
T
ire tread (definition) ..................... 362
Total load limit (definition) ............. 362
Traction ......................................... 356
Index21
Page 26 of 382
Snow chains .................................. 345
Storing ........................................... 363
Tightening torque ........................... 367
Wheel size/tire size ....................... 367
Window curtain air bag
Display message ............................ 238
Operation ......................................... 50
Windows
see Side windows
Windshield
Defrosting ...................................... 139
Infrared reflective .......................... 311
Windshield washer fluid
see Windshield washer system
Windshield washer system
Adding washer fluid ....................... 317
Important safety notes .................. 375
Notes ............................................. 375
Windshield wipers
Problem (malfunction) ................... 131
Replacing the wiper blades ............ 129
Switching on/off ........................... 128
Winter driving
Important safety notes .................. 345
Slippery road surfaces ................... 168
Snow chains .................................. 345
Winter operation
Radiator cover ............................... 313
Summer tires ................................. 345
Winter tires
M+S tires ....................................... 345
Wiper blades
Cleaning ......................................... 322
Important safety notes .................. 129
Replacing ....................................... 129
Wooden trim (cleaning instruc-
tions) .................................................. 325
Workshop
see Qualified specialist workshop
24Index
Page 61 of 382
Rthe front side windows are lowered
Rthe electrically adjustable steering wheel is
raised
Rthe engine is switched off and the fuel supply
is cut off
Rvehicles with seat belt extenders: the seat-
belt buckles for the outer rear seats are illu-
minated and extend forwards
Rvehicles with mbrace: automatic emergency
call
Children in the vehicle
Important safety notes
Accident statistics show that children secured
in the rear seats are safer than children secured
in the front-passenger seat. For this reason,
Mercedes-Benz strongly advises that you install
a child restraint system on a rear seat. Children
are generally better protected there.
If a child younger than twelve years old and
under 5 ft (1.50m) in height istraveling in the
vehicle:
Ralways secure the child in a child restraint
system suitable for Mercedes-Benz vehicles.
The child restraint system must be appropri-
ate to the age, weight and size of the child
Rbe sure to observe the instructions and safety
notes in this section in addition to the child
restraint system manufacturer's installation
instructions
Rbe sure to observe the instructions and safety notes on the "Occupant classification system
(OCS)" (
Ypage 51)
GWARNING
If you leave children unsupervised in the vehi-
cle, they could set it in motion by, for example:
Rrelease the parking brake.
Rshift the automatic transmission out of the
parking position P.
Rstart the engine.
In addition, they may operate vehicle equip-
ment and become trapped. There is a risk of
an accident and injury.
When leaving the vehicle, always take the
SmartKey with you and lock the vehicle. Never
leave children unsupervised in the vehicle.
GWARNING
If persons, particularly children are subjected to prolonged exposure to extreme heat or
cold, there is a risk of injury, possibly even
fatal. Never leave children unattended in the
vehicle.
GWARNING
If the child restraint system is subjected to
direct sunlight, parts may get very hot. Chil-
dren may burn themselves on these parts,
particularly on the metal parts of the child
restraint system. There is a risk of injury.
If you leave the vehicle, taking the child with
you, always ensure that the child restraint
system is not exposed to direct sunlight. Pro- tect it with a blanket, for example. If the child
restraint system has been exposed to direct
sunlight, let it cool down before securing the
child in it. Never leave children unattended in
the vehicle.
Always ensure that all vehicle occupants have
their seat belts fastened correctly and are sitting
properly. Particular attention must be paid to
children.
Observe the safety notes on the seat belt
(
Ypage 44) and the notes on correct use of seat
belts (Ypage 45).
A booster seat may be necessary to achieve
proper seat belt positioning for children over
41 lb s(18 kg) until they reach a height where a
three-point seat belt can be properly fastened
without a booster seat.
Special seat belt retractor
GWARNING
If the seat belt is released while driving, the
child restraint system will no longer be
secured properly. The special seat belt retrac- tor is disabled and the inertia real draws in a
portion of the seat belt. The seat belt cannot
be immediately refastened. There is an
increased risk of injury, possibly even fatal.
Stop the vehicle immediately, paying atten-
tion to road and traffic conditions. Reactivate
Children in the vehicle59
Safety
Z
Page 73 of 382
ESP®(Electronic Stability Program)
General notes
iObserve the "Important safety notes" sec-
tion (Ypage 66).
ESP
®monitors driving stability and traction, i.e.
power transmission between the tires and the
road surface.
If ESP
®detects that the vehicle is deviating from
the direction desired by the driver, one or more
wheels are braked to stabilize the vehicle. The
engine output is also modified to keep the vehi-
cle on the desired course within physical limits.
ESP
®assists the driver when pulling away on
wet or slippery roads. ESP®can also stabilize
the vehicle during braking.
ETS/4ETS (Electronic Traction System)
iObserve the "Important safety notes" sec-
tion (Ypage 66).
ETS traction control is part of ESP
®. On vehicles
with 4MATIC, 4ETS is part of ESP®.
Traction control brakes the drive wheels indi-
vidually if they spin. This enables you to pull
away and accelerate on slippery surfaces, for
example if the road surface is slippery on one
side. In addition, more drive torque is transfer-
red to the wheel or wheels with traction.
Traction control remains active, even if you
deactivate ESP
®.
Important safety notes
GWARNING
If ESP
®is malfunctioning, ESP®is unable to
stabilize the vehicle. Additionally, further driv-
ing safety systems are deactivated. This
increases the risk of skidding and an accident.
Drive on carefully. Have ESP
®checked at a
qualified specialist workshop.
If the å ESP
®OFF warning lamp lights up
continuously, then ESP®is deactivated.
If the ÷ ESP®warning lamp lights up contin-
uously, ESP®is not available due to a malfunc-
tion.
Observe the information on warning lamps
(
Ypage 261) and display messages which may be shown in the instrument cluster
(
Ypage 228).
Only use wheels with the recommended tire
sizes. Only then will ESP
®function properly.
Characteristics of ESP®
General information
If the ÷ ESP warning lamp goes out before
beginning the journey, ESP®is automatically
active.
If ESP
®intervenes, the ÷ESP®warning lamp
flashes in the instrument cluster.
If ESP
®intervenes:
XDo not deactivate ESP®under any circum-
stances.
XOnly depress the accelerator pedal as far as
necessary when pulling away.
XAdapt your driving style to suit the prevailing
road and weather conditions.
ECO start/stop function
The ECO start/stop function switches the
engine off automatically when the vehicle stops
moving. The engine starts automatically when
the driver wants to pull away again. ESP
®
remains in its previously selected status, e.g. if
ESP®was deactivated before the engine was
automatically switched off.
Deactivating/activating ESP®
Important safety notes
iObserve the "Important safety notes" sec-
tion (Ypage 66).
You can select between the following states of
ESP
®:
RESP®is activated.
RESP®is deactivated.
GWARNING
If you deactivate ESP
®, ESP®no longer sta-
bilizes the vehicle. There is an increased risk
of skidding and an accident.
Only deactivate ESP
®in the situations descri-
bed in the following.
Driving safety systems71
Safety
Z
Page 119 of 382
Position of the steering wheel and the
driver's seat for driving
The steering wheel and the driver's seat are
moved to the previously set position if:
Rthe driver's door is closed and you insert the
SmartKey into the ignition lock
Ryou close the driver's door when the ignition
is switched on
Ryou press the Start/Stop button once
iThe steering wheel and the driver's seat only
return to the last set position if the driving
position is stored after the seat or steering
column has been adjusted.
The last position of the steering wheel or seat is
stored if:
Rthe ignition is switched off
Rthe setting is stored with the memory function
(Ypage 120).
Crash-responsive EASY-EXIT feature
If the crash-responsive EASY-EXIT feature is trig-
gered in an accident, the steering column will
move upwards when the driver's door is opened
or the SmartKey is removed from the ignition
lock. This makes it easier to exit the vehicle and rescue the occupants.
The crash-responsive EASY-EXIT feature is only
operational if the EASY-EXIT/ENTRY feature is
activated in the multimedia system (see the sep-
arate Operator's Manual).
Mirrors
Rear-view mirror
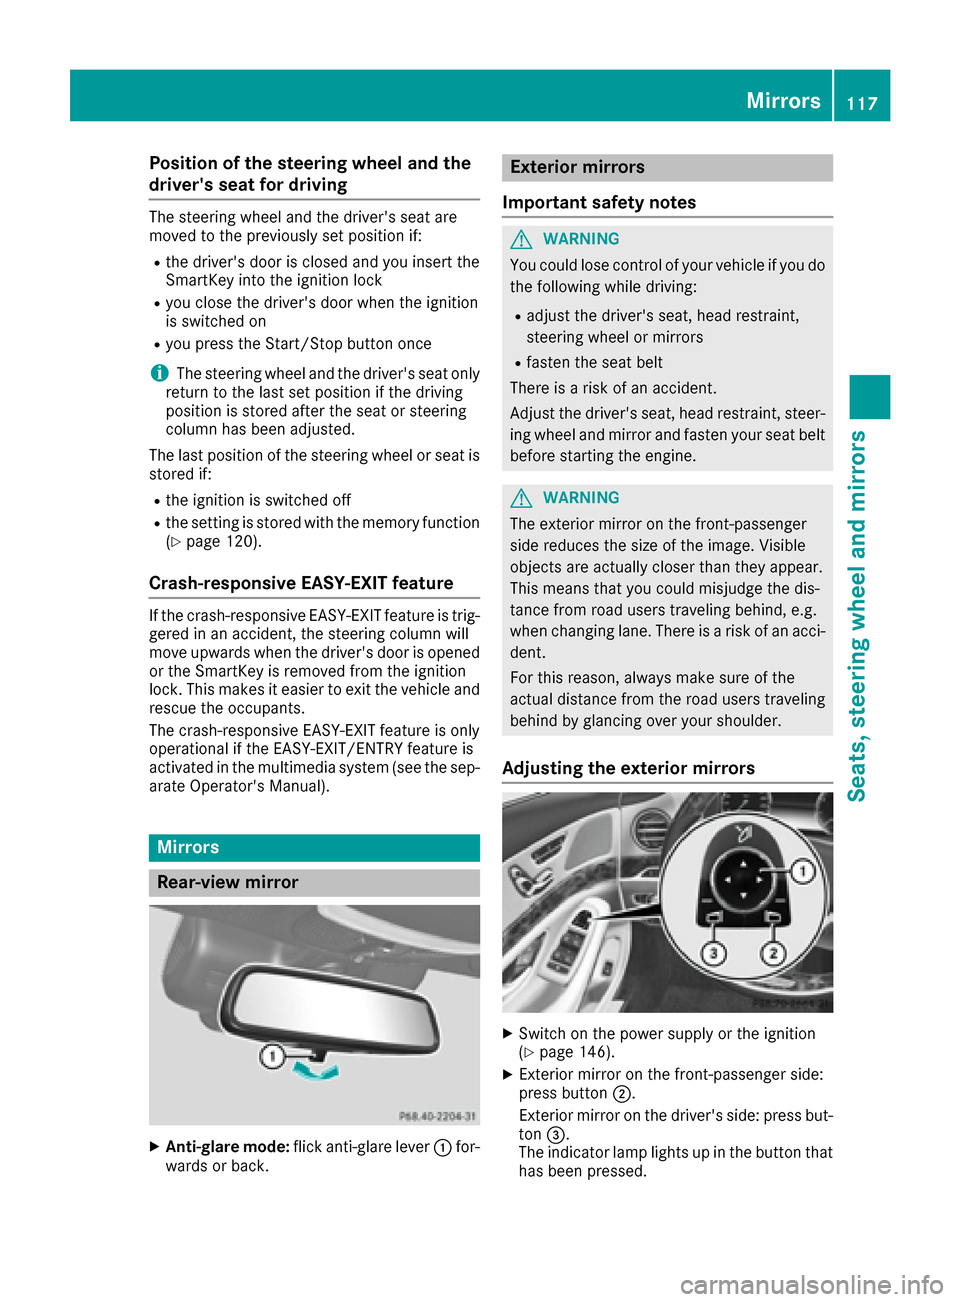
XAnti-glare mode: flick anti-glare lever :for-
wards or back.
Exterior mirrors
Important safety notes
GWARNING
You could lose control of your vehicle if you do the following while driving:
Radjust the driver's seat, head restraint,
steering wheel or mirrors
Rfasten the seat belt
There is a risk of an accident.
Adjust the driver's seat, head restraint, steer-
ing wheel and mirror and fasten your seat belt before starting the engine.
GWARNING
The exterior mirror on the front-passenger
side reduces the size of the image. Visible
objects are actually closer than they appear.
This means that you could misjudge the dis-
tance from road users traveling behind, e.g.
when changing lane. There is a risk of an acci-
dent.
For this reason, always make sure of the
actual distance from the road users traveling
behind by glancing over your shoulder.
Adjusting the exterior mirrors
XSwitch on the power supply or the ignition
(Ypage 146).
XExterior mirror on the front-passenger side:
press button ;.
Exterior mirror on the driver's side: press but-
ton =.
The indicator lamp lights up in the button that
has been pressed.
Mirrors117
Seats, steering wheel and mirrors
Z
Page 190 of 382
Active Parking Assist will only detect parking
spaces:
Rparallel or at right angles to the direction of
travel
Rthat are parallel to the direction of travel and
at least 59 in (1.5m) wide
Rthat are parallel to the direction of travel and
at least 39.5 in (1.0 m)longer than your vehi-
cle
Rthat are at right angles to the direction of
travel and at least 39.5 in (1.0 m) wider than
your vehicle
iNote that Active Parking Assist cannot
measure the size of a parking space if it is at
right angles to the direction of travel. You will
need to judge whether your vehicle will fit into
the parking space.
When driving at speeds below 19 mph
(30 km/h), you will see the parking symbol as a
status indicator in the instrument cluster. When
a parking space has been detected, an arrow
towards the right or the left also appears. By
default, Active Parking Assist only displays park-
ing spaces on the front-passenger side. Parking
spaces on the driver's side are displayed as
soon as the turn signal on the driver's side is
activated. When parking on the driver's side,
this must remain switched on until you acknowl-
edge the use of Active Parking Assist by press-
ing the abutton on the multifunction steer-
ing wheel. The system automatically determines
whether the parking space is parallel or at right
angles to the direction of travel.
A parking space is displayed while you are driv-
ing past it, and until you are approximately 50 ft
(15 m) away from it.
Parking
GWARNING
If you leave the vehicle when it is only being
braked by Active Parking Assist it could roll
away if:
Rthere is a malfunction in the system or in
the voltage supply.
Rthe electrical system in the engine com-
partment, the battery or the fuses have
been tampered with.
Rthe battery is disconnected.
Rthe accelerator pedal has been depressed,
e.g. by a vehicle occupant.
There is a risk of an accident.
Before leaving the vehicle, always secure it
against rolling away.
iWhen PARKTRONIC detects obstacles,
Active Parking Assist brakes automatically
during the parking process. You are respon-
sible for braking in good time.
XStop the vehicle when the parking space sym-
bol shows the desired parking space in the
instrument cluster.
XShift the transmission to position R.
The Start
ParkAssist?Yes:OKNo:%
message appears in the multifunction display.
XTo cancel the procedure: press the%
button on the multifunction steering wheel or
pull away.
or
XTo park using Active Parking Assist: press
the a button on the multifunction steering
wheel.
The Park Assist Active Accelerate
and BrakeObserve Surroundingsmes-
sage appears in the multifunction display.
XLet go of the multifunction steering wheel.
XBack up the vehicle, being ready to brake at all
times. When backing up, drive at a speed
below approximately 6 mph (10 km/h). Oth-
erwise Active Parking Assist will be canceled.
Active Parking Assist brakes the vehicle to a
standstill when the vehicle approaches the
rear border of the parking space.
Maneuvering may be required in tight parking
spaces.
The Park
AssistActiveSelect DObserveSurroundingsmessage appears in the multi-
function display.
XShift the transmission to position Dwhile the
vehicle is stationary.
Active Parking Assist immediately steers in
the other direction.
188Driving systems
Driving and parking
Page 330 of 382
XStop the vehicle on solid, non-slippery and
level ground, as far away as possible from
traffic.
XSwitch on the hazard warning lamps.
XSecure the vehicle against rolling away
(Ypage 162).
XIf possible, bring the front wheels into the
straight-ahead position.
XSwitch off the engine.
XOpen the driver's door.
The on-board electronics now have status0.
This is the same as the SmartKey having been
removed.
XRemove the Start/Stop button from the igni-
tion lock (Ypage 145).
or, if the SmartKey is inserted in the ignition
lock:
XRemove the SmartKey from the ignition lock.
XMake sure that the engine cannot be started
via your smartphone (Ypage 147).
XMake sure that the passengers are not endan-
gered as they do so. Make sure that no one is
near the danger area while a wheel is being
changed. Anyone who is not directly assisting
in the wheel change should, for example,
stand behind the barrier.
XGet out of the vehicle. Pay attention to traffic
conditions when doing so.
XClose the driver's door.
MOExtended tires (tires with run-flat
properties)
General notes
With MOExtended tires (tires with run flat char-
acteristics), you can continue to drive your vehi-
cle even if there is a total loss of pressure in one
or more tires. The affected tire must not show
any clearly visible damage.
You can recognize MOExtended tires by the
MOExtended marking which appears on the
sidewall of the tire. You will find this marking
next to the tire size designation, the load-bear-
ing capacity and the speed index (
Ypage 357).
MOExtended tires may only be used in conjunc-
tion with an active tire pressure loss warning
system or with an active tire pressure monitor. If a pressure loss warning message appears
in the multifunction display:
Robserve the instructions in the display mes-
sages (Ypage 252).
Rcheck the tire for damage.
Rif driving on, observe the following notes.
The driving distance possible in run-flat mode is
approximately 50 miles (80 km) when the vehi-
cle is partially laden. When the vehicle is fully
laden it is approximately 19 miles (30 km).
In addition to the vehicle load, the driving dis-
tance possible depends upon:
RVehicle speed
RRoad condition
ROutside temperature
The driving distance possible in run-flat mode
may be reduced by extreme driving conditions
or maneuvers, or it can be increased through a
moderate style of driving.
The driving distance possible in run-fla
t mode is
counted from the moment the tire pressure loss
warning appears in the multifunction display.
You must not exceed a maximum permissible
speed of 50 mph (80 km/h).
When replacing one or all tires, please observe
the following specifications for your vehicle's
tires:
Rsize
Rthe type and
Rthe "MOExtended" mark
If a tire has gone flat and cannot be replaced
with a MOExtended tire, a standard tire may be
used as a temporary measure. Make sure that
you use the proper size and type (summer or
winter tires).
Vehicles equipped with MOExtended tires are
not equipped with a TIREFIT kit at the factory. It
is therefore recommended that you additionally
equip your vehicle with a TIREFIT kit if you mount tires that do not feature run-flat properties, e.g.
winter tires. A TIREFIT kit may be obtained from
a qualified specialist workshop.
Important safety notes
GWARNING
When driving in emergency mode, the driving
characteristics deteriorate, e.g. when corner-
ing, accelerating quickly and when braking.
There is a risk of an accident.
328Flat tire
Breakdown assistance
Page 345 of 382
Important safety notes
GWARNING
If wheels and tires of th ewrong siz eare used,
th ewhee lbrakes or suspension component s
may be damaged. Ther eis aris kof an acci-
dent.
Always replace wheels and tires wit hthose
that fulfill th especification sof th eoriginal
part .
When replacing wheels, mak esur eto use th e
correct:
Rdesignation
Rmodel
When replacing tires ,mak esur eto use th e
correct:
Rdesignation
Rmanufacturer
Rmodel
GWARNIN G
A flat tire severely impairs th edriving ,steer -
ing and braking characteristics of th evehicle.
Ther eis aris kof accident.
Tires without run-flat characteristics :
Rdo notdriv ewit h a flat tire.
Rimmediately replace th eflat tire wit hyour
emergenc yspar ewhee lor spar ewheel, or
consult aqualified specialist workshop.
Tires wit hrun-flat characteristics :
Rpay attention to theinformation and warn -
ing notice son MOExtended tires (tire swit h
run-flat characteristics).
Accessories that are no tapprove dfor your vehi-
cle by Mercedes-Ben zor are no tbein gused cor-
rectl ycan impair th eoperating safety.
Before purchasing and usin gnon-approve d
accessories, visit aqualified specialist work-
sho pand inquire about :
Rsuitability
Rlegal stipulation s
Rfactory recommendation sInformation on th
esizes and types of wheels and
tires for your vehicl ecan be foun dunder
"Wheel/tire combinations" (
Ypage 367).
Information on tire pressur ecan be found:
Ron th evehicle's Tir eand Loading Information
placard on th eB-pillar (Ypage 353)
Rin thetire pressur etable in th efuel filler flap
(Ypage 162)
Runder "Tir epressure" (Ypage 346)
Operation
Information on driving
Checkth etire pressur ewhen th evehicl eis
heavily laden and adjust prio rto atrip.
While driving ,pay attention to vibrations, noises
and unusual handlin gcharacteristics ,e.g. pull-
ing to on eside .This may indicat ethat th e
wheels or tires are damaged. If you suspec tthat
a tire is defective, reduce your spee dimmedi-
ately. Stop th evehicl eas soo nas possible to
chec kth ewheels and tires for damage. Hidden
tire damag ecould also be causing th eunusual
handlin gcharacteristics .If you fin dno sign sof
damage, hav eth etires and wheels checke dat a
qualified specialist workshop.
When parking your vehicle, mak esur ethat th e
tires do no tget deformed by th ecur bor other
obstacles. If they canno tbe avoided, driv eove r
obstacles suc has curbs slowly and at an obtuse
angle. Otherwise, you may damag eth ewheels
or tires .
Regular checking of wheels and tires
GWARNIN G
Damaged tires can caus etire inflation pres-
sur eloss .As aresult ,you could lose control of
your vehicle. Ther eis aris kof accident.
Chec kth etires regularly for sign sof damag e
and replace any damaged tires immediately.
Chec kwheels and tires for damag eat least once
a month .Chec kwheels and tires after driving
off-road or on roug hroads. Damaged wheels
can caus e aloss of tire pressure.
Pay particular attention to damag esuc has:
Rcut sin th etires
Rpunctures in th etires
Operation343
Wheels and tires
Z
Page 346 of 382
Rtears in the tires
Rbulges on tires
Rdeformation or severe corrosion on wheels
Regularly check the tire tread depth and the
condition of the tread across the whole width of
the tire (
Ypage 344). If necessary, turn the
front wheels to full lock in order to inspect the
inner side of the tire surface.
All wheels must have a valve cap to protect the
valve against dirt and moisture. Do not mount
anything onto the valve other than the standard
valve cap or other valve caps approved by
Mercedes-Benz for your vehicle. Do not use any
other valve caps or systems, e.g. tire pressure
monitoring systems.
Regularly check the pressure of all the tires par-
ticularly prior to long trips. Adjust the tire pres-
sure as necessary (
Ypage 346).
The service life of tires depends, among other
things, on the following factors:
RDriving style
RTire pressure
RDistance covered
Notes on tire tread
GWARNING
Insufficient tire tread will reduce tire traction.
The tire is no longer able to dissipate water.
This means that on wet road surfaces, the risk
of hydroplaning increases, in particular where speed is not adapted to suit the driving con-
ditions. There is a risk of accident.
If the tire pressure is too high or too low, tires
may exhibit different levels of wear at differ-
ent locations on the tire tread. Thus, you
should regularly check the tread depth and
the condition of the tread across the entire
width of all tires.
Minimum tire tread depth for:
RSummer tires: âin (3 mm)
RM+S tires: ãin (4 mm)
For safety reasons, replace the tires before
the legally prescribed limit for the minimum
tire tread depth is reached.
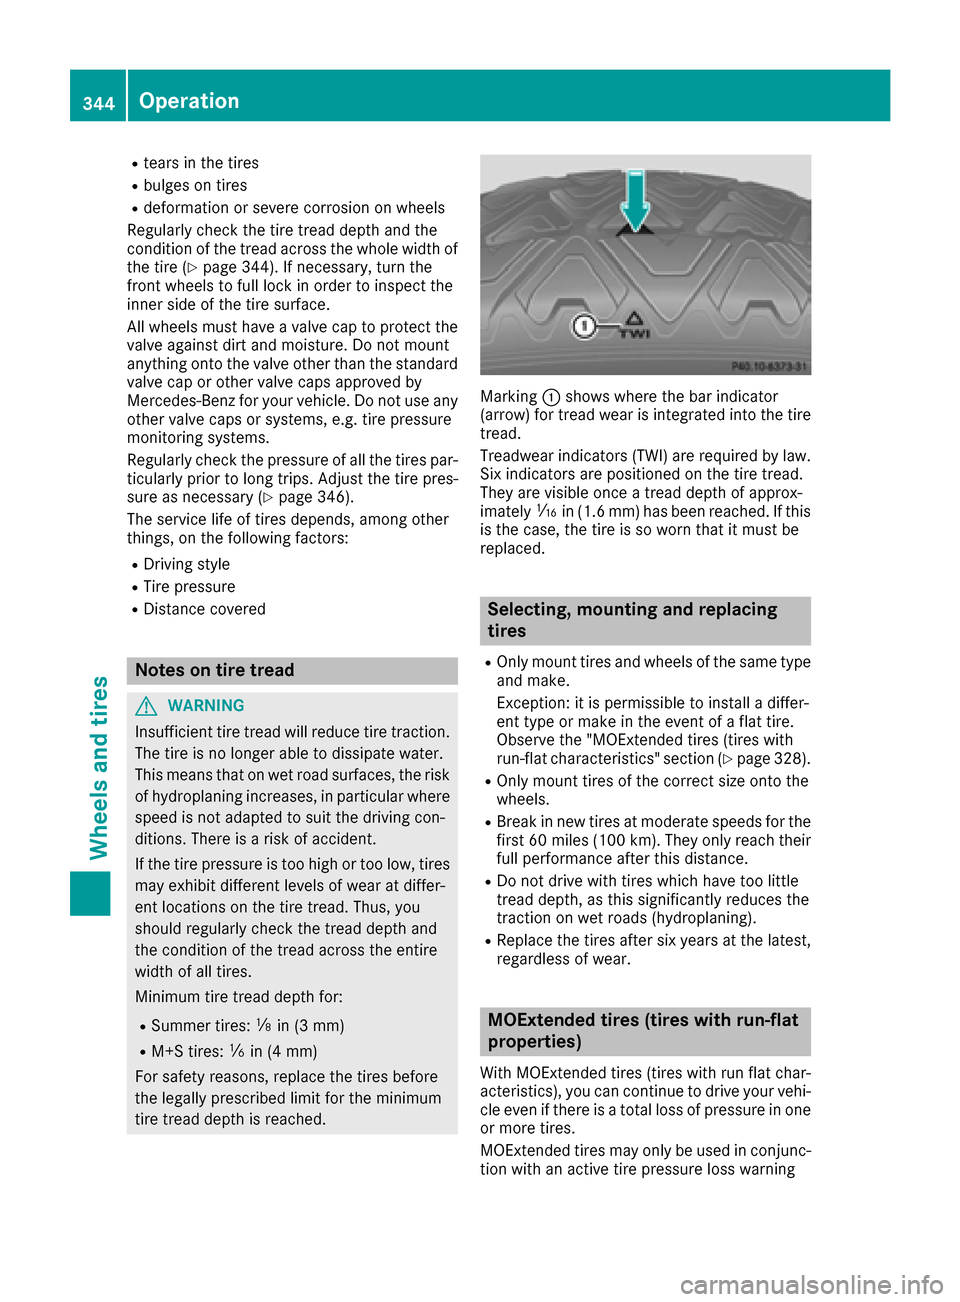
Marking :shows where the bar indicator
(arrow) for tread wear is integrated into the tire
tread.
Treadwear indicators (TWI) are required by law. Six indicators are positioned on the tire tread.
They are visible once a tread depth of approx-
imately áin (1.6 mm) has been reached. If this
is the case, the tire is so worn that it must be
replaced.
Selecting, mounting and replacing
tires
ROnly mount tires and wheels of the same type
and make.
Exception: it is permissible to install a differ-
ent type or make in the event of a flat tire.
Observe the "MOExtended tires (tires with
run-flat characteristics" section (
Ypage 328).
ROnly mount tires of the correct size onto the
wheels.
RBreak in new tires at moderate speeds for the
first 60 mile s(100 km). They only reach their
full performance after this distance.
RDo not drive with tires which have too little
tread depth, as this significantly reduces the
traction on wet roads (hydroplaning).
RReplace the tires after six years at the latest,
regardless of wear.
MOExtended tires (tires with run-flat
properties)
With MOExtended tires (tires with run flat char-
acteristics), you can continue to drive your vehi-
cle even if there is a total loss of pressure in one
or more tires.
MOExtended tires may only be used in conjunc-
tion with an active tire pressure loss warning
344Operation
Wheels and tires
Page 349 of 382
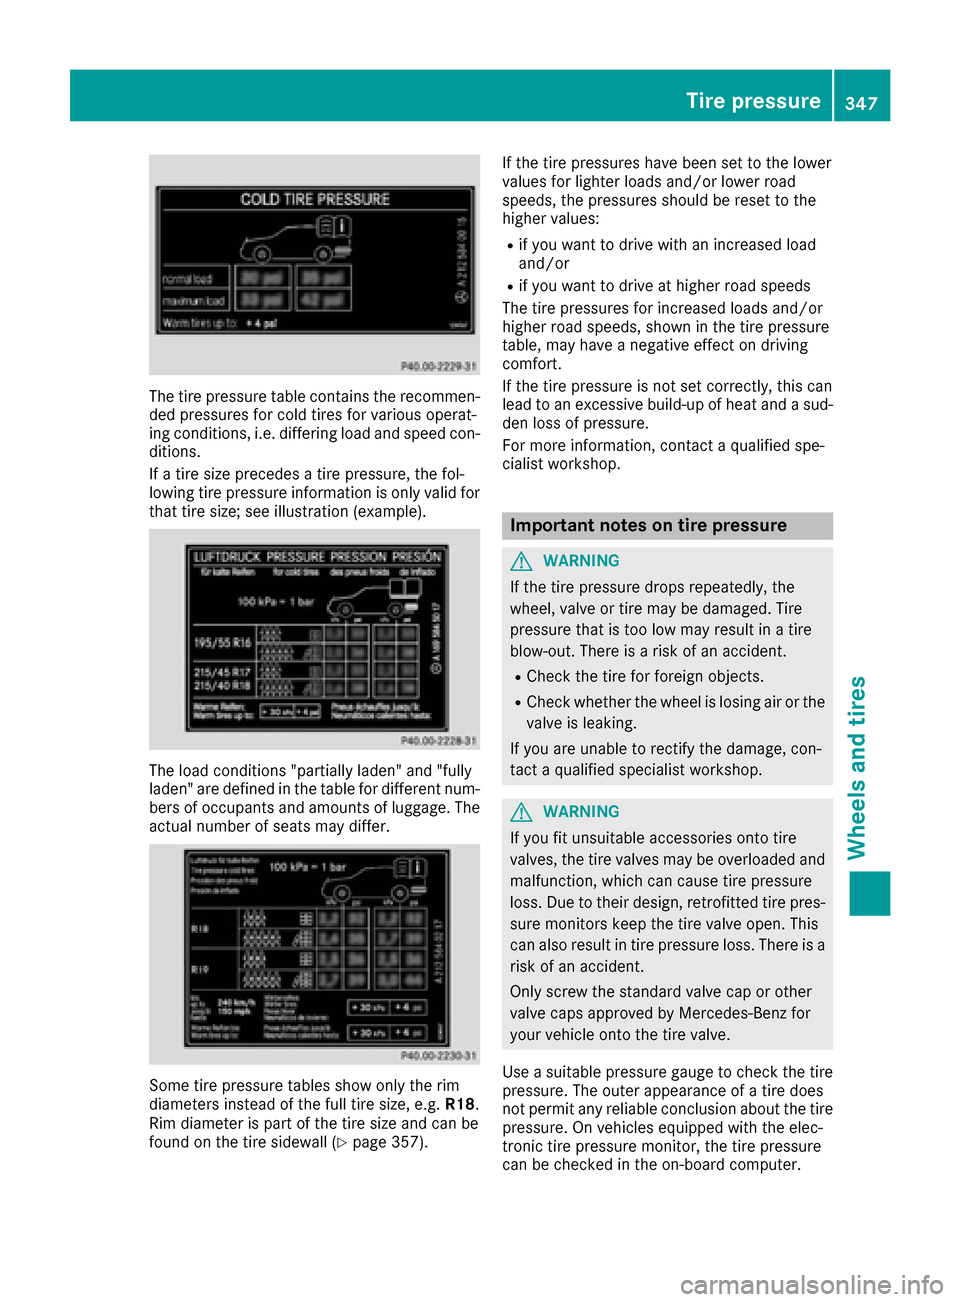
The tire pressure table contains the recommen-
ded pressures for cold tires for various operat-
ing conditions, i.e. differing load and speed con-
ditions.
If a tire size precedes a tire pressure, the fol-
lowing tire pressure information is only valid forthat tire size; see illustration (example).
The load conditions "partially laden" and "fully
laden" are defined in the table for different num-
bers of occupants and amounts of luggage. The
actual number of seats may differ.
Some tire pressure tables show only the rim
diameters instead of the full tire size, e.g. R18.
Rim diameter is part of the tire size and can be
found on the tire sidewall (
Ypage 357). If the tire pressures have been set to the lower
values for lighter loads and/or lower road
speeds, the pressures should be reset to the
higher values:
Rif you want to drive with an increased load
and/or
Rif you want to drive at higher road speeds
The tire pressures for increased loads and/or
higher road speeds, shown in the tire pressure
table, may have a negative effect on driving
comfort.
If the tire pressure is not set correctly, this can
lead to an excessive build-up of heat and a sud-
den loss of pressure.
For more information, contact a qualified spe-
cialist workshop.
Important notes on tire pressure
GWARNING
If the tire pressure drops repeatedly, the
wheel, valve or tire may be damaged. Tire
pressure that is too low may result in a tire
blow-out. There is a risk of an accident.
RCheck the tire for foreign objects.
RCheck whether the wheel is losing air or the valve is leaking.
If you are unable to rectify the damage, con-
tact a qualified specialist workshop.
GWARNING
If you fit unsuitable accessories onto tire
valves, the tire valves may be overloaded and
malfunction, which can cause tire pressure
loss. Due to their design, retrofitted tire pres- sure monitors keep the tire valve open. This
can also result in tire pressure loss. There is a
risk of an accident.
Only screw the standard valve cap or other
valve caps approved by Mercedes-Benz for
your vehicle onto the tire valve.
Use a suitable pressure gauge to check the tire
pressure. The outer appearance of a tire does
not permit any reliable conclusion about the tire pressure. On vehicles equipped with the elec-
tronic tire pressure monitor, the tire pressure
can be checked in the on-board computer.
Tire pressure347
Wheels and tires
Z