wiper blades MERCEDES-BENZ S-Class MAYBACH 2017 W222 Owner's Manual
[x] Cancel search | Manufacturer: MERCEDES-BENZ, Model Year: 2017, Model line: S-Class MAYBACH, Model: MERCEDES-BENZ S-Class MAYBACH 2017 W222Pages: 382, PDF Size: 9.92 MB
Page 8 of 382
Replacing........................................ .80
Battery (vehicle)
Charging ........................................ 334
Display message ............................ 243
Important safety notes .................. 332
Jump starting ................................. 335
Belt
see Seat belts
Belt bag ................................................ 46
Blind Spot Assist
see Active Blind Spot Assist
Blootooth
®
Connecting a different mobile
phone ............................................ 278
Bluetooth
®
Searching for a mobile phone ........ 277
see also Digital Operator's Man-
ual .................................................. 269
Telephony ...................................... 277
Box (trunk) ......................................... 287
Brake Assist
see BAS (Brake Assist System)
Brake fluid
Display message ............................ 233
Notes ............................................. 374
Brake force distribution
see EBD (electronic brake force
distribution)
Brakes
ABS .................................................. 66
Adaptive Brake Assist ...................... 70
BAS .................................................. 66
BAS PLUS with Cross-Traffic
Assist ............................................... 67
Brake fluid (notes) ......................... 374
Display message ............................ 228
EBD .................................................. 73
High-performance brake system .... 168
Hill start assist ............................... 148
HOLD function ............................... 178
Important safety notes .................. 166
Maintenance .................................. 167
Parking brake ................................ 163
Riding tips ...................................... 166
Warning lamp ................................. 260
Breakdown
Where will I find...? ........................ 327 see Flat tire
see Towing away
Brightness control (instrument
cluster lighting) ................................... 36
Buttons on the steering wheel ......... 211
C
California
Important notice for retail cus-
tomers and lessees .......................... 27
Calling up a malfunction
see Display messages
Calling up the climate control bar
Multimedia system ........................ 274
Calling up the climate control
menu
Multimedia system ........................ 274
Camera
see Rear view camera
Car
see Vehicle
Care
360° camera ................................. 323
Car wash ........................................ 319
Carpets .......................................... 326
Display ........................................... 324
Exhaust pipe .................................. 323
Exterior lights ................................ 322
General notes ................................ 319
Interior ........................................... 324
Matte finish ................................... 321
Night View Assist Plus ................... 324
Paint .............................................. 321
Plastic trim .................................... 324
Power washer ................................ 320
Rear view camera .......................... 323
Roof lining ...................................... 326
Seat belt ........................................ 325
Seat cover ..................................... 325
Selector lever ................................ 325
Sensors ......................................... 323
Steering wheel ............................... 325
Trim pieces .................................... 325
Washing by hand ........................... 320
Wheels ........................................... 322
Windows ........................................ 322
Wiper blades .................................. 322
6Index
Page 26 of 382
Snow chains .................................. 345
Storing ........................................... 363
Tightening torque ........................... 367
Wheel size/tire size ....................... 367
Window curtain air bag
Display message ............................ 238
Operation ......................................... 50
Windows
see Side windows
Windshield
Defrosting ...................................... 139
Infrared reflective .......................... 311
Windshield washer fluid
see Windshield washer system
Windshield washer system
Adding washer fluid ....................... 317
Important safety notes .................. 375
Notes ............................................. 375
Windshield wipers
Problem (malfunction) ................... 131
Replacing the wiper blades ............ 129
Switching on/off ........................... 128
Winter driving
Important safety notes .................. 345
Slippery road surfaces ................... 168
Snow chains .................................. 345
Winter operation
Radiator cover ............................... 313
Summer tires ................................. 345
Winter tires
M+S tires ....................................... 345
Wiper blades
Cleaning ......................................... 322
Important safety notes .................. 129
Replacing ....................................... 129
Wooden trim (cleaning instruc-
tions) .................................................. 325
Workshop
see Qualified specialist workshop
24Index
Page 130 of 382
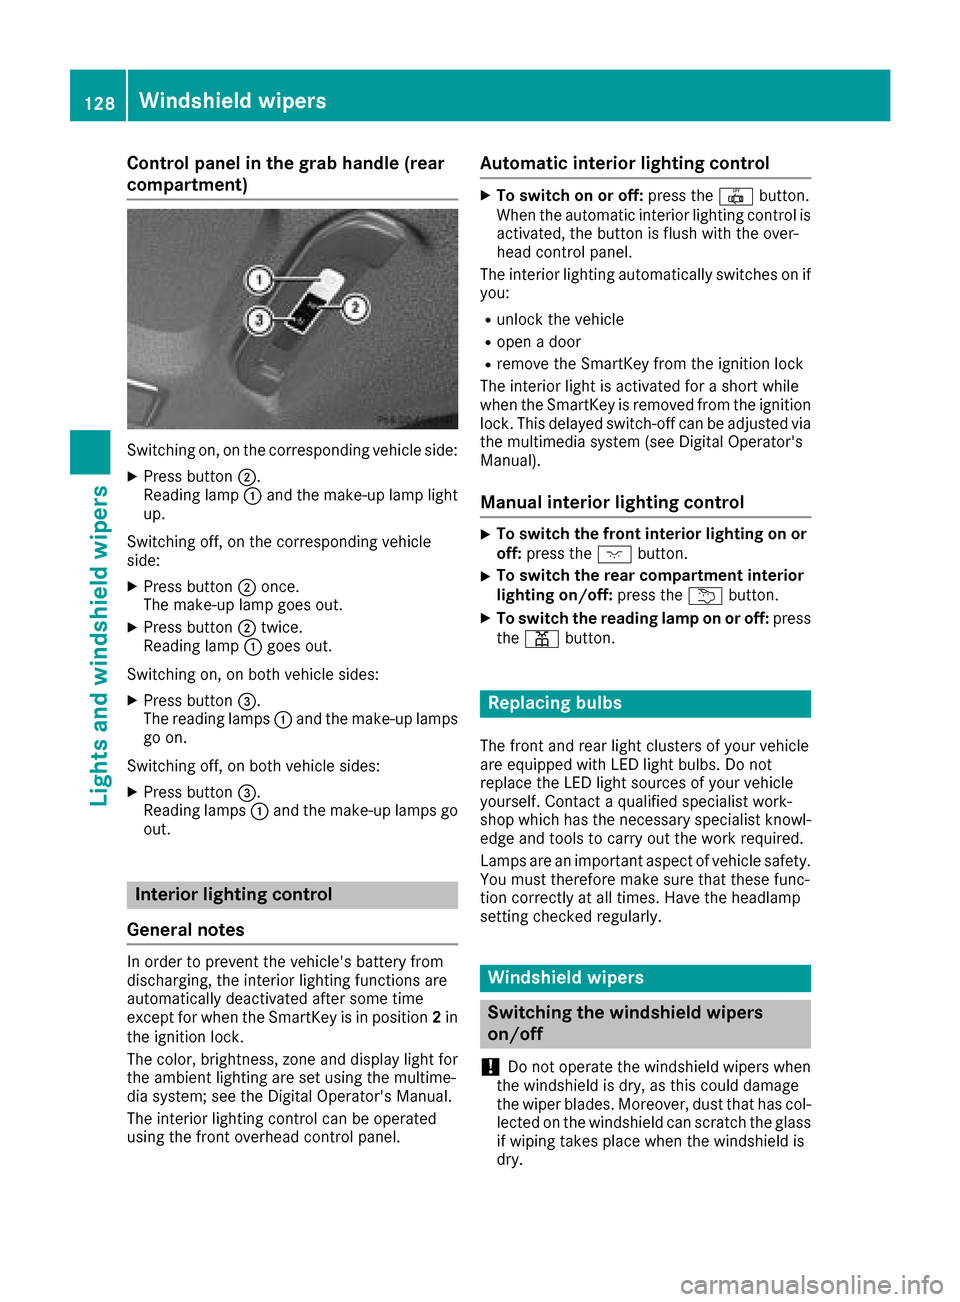
Control panel in the grab handle (rear
compartment)
Switching on, on the corresponding vehicle side:
XPress button;.
Reading lamp :and the make-up lamp light
up.
Switching off, on the corresponding vehicle
side:
XPress button ;once.
The make-up lamp goes out.
XPress button ;twice.
Reading lamp :goes out.
Switching on, on both vehicle sides:
XPress button =.
The reading lamps :and the make-up lamps
go on.
Switching off, on both vehicle sides:
XPress button =.
Reading lamps :and the make-up lamps go
out.
Interior lighting control
General notes
In order to prevent the vehicle's battery from
discharging, the interior lighting functions are
automatically deactivated after some time
except for when the SmartKey is in position 2in
the ignition lock.
The color, brightness, zone and display light for
the ambient lighting are set using the multime-
dia system; see the Digital Operator's Manual.
The interior lighting control can be operated
using the front overhead control panel.
Automatic interior lighting control
XTo switch on or off: press the|button.
When the automatic interior lighting control is
activated, the button is flush with the over-
head control panel.
The interior lighting automatically switches on if
you:
Runlock the vehicle
Ropen a door
Rremove the SmartKey from the ignition lock
The interior light is activated for a short while
when the SmartKey is removed from the ignition
lock. This delayed switch-off can be adjusted via
the multimedia system (see Digital Operator's
Manual).
Manual interior lighting control
XTo switch the front interior lighting on or off: press the cbutton.
XTo switch the rear compartment interior
lighting on/off: press theubutton.
XTo switch the reading lamp on or off: press
the p button.
Replacing bulbs
The front and rear light clusters of your vehicle
are equipped with LED light bulbs. Do not
replace the LED light sources of your vehicle
yourself. Contact a qualified specialist work-
shop which has the necessary specialist knowl-
edge and tools to carry out the work required.
Lamps are an important aspect of vehicle safety.
You must therefore make sure that these func-
tion correctly at all times. Have the headlamp
setting checked regularly.
Windshield wipers
Switching the windshield wipers
on/off
!
Do not operate the windshield wipers when
the windshield is dry, as this could damage
the wiper blades. Moreover, dust that has col-
lected on the windshield can scratch the glass
if wiping takes place when the windshield is
dry.
128Windshield wipers
Lights and windshield wipers
Page 131 of 382
If it is necessary to switch on the windshield
wipers in dry weather conditions, always use
washer fluid when operating the windshield
wipers.
!If the windshield wipers leave smears on the
windshield after the vehicle has been washed
in an automatic car wash, wax or other resi-
dues may be the reason for this. Clean the
windshield using washer fluid after washing
the vehicle in an automatic car wash.
!Intermittent wiping with rain sensor: due to
optical influences and the windshield becom-
ing dirty in dry weather conditions, the wind-
shield wipers may be activated inadvertently.
This could then damage the windshield wiper
blades or scratch the windshield.
For this reason, you should always switch off
the windshield wipers in dry weather.
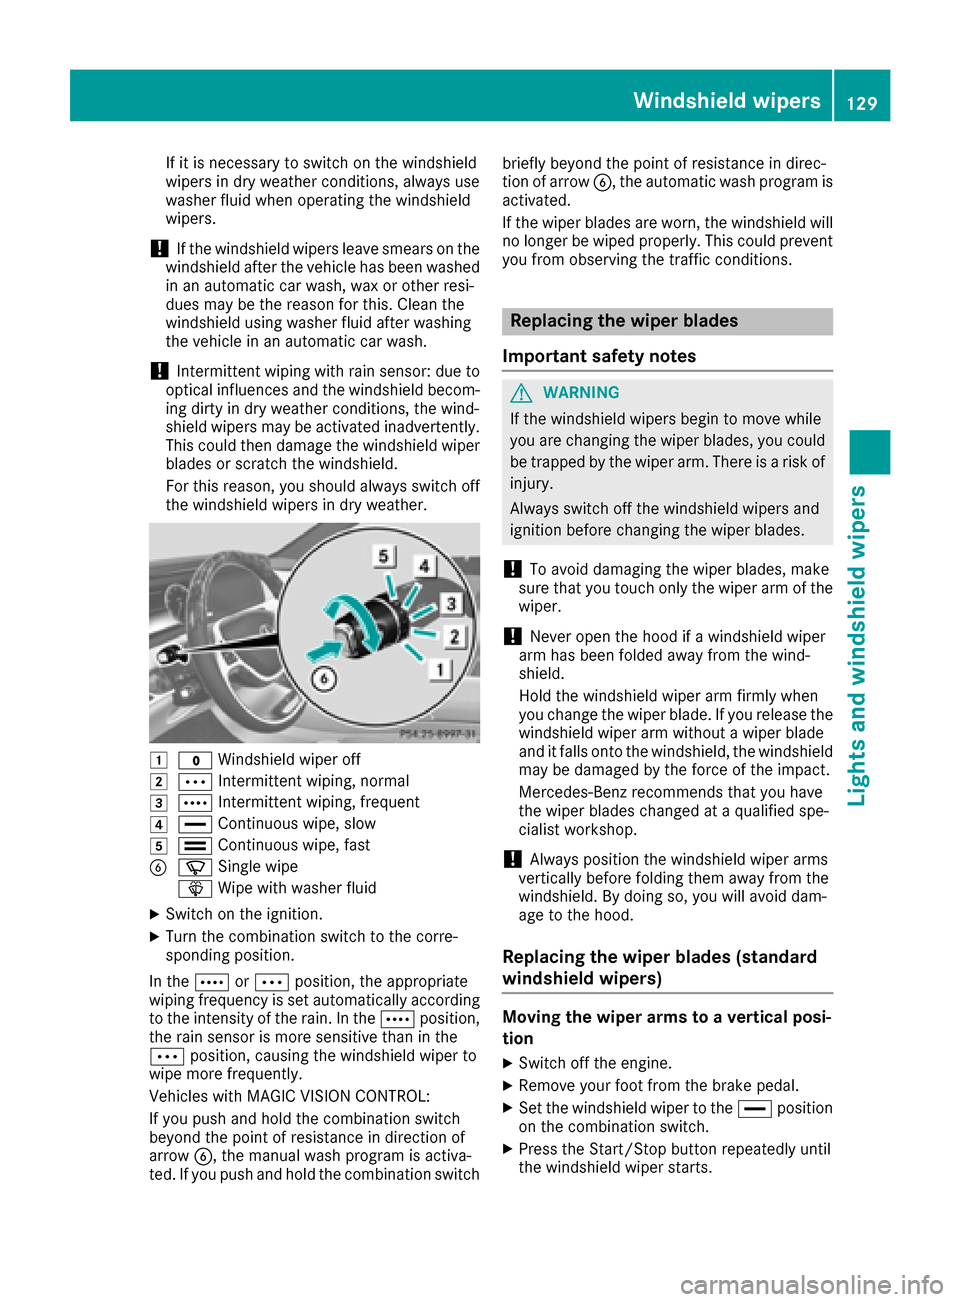
1$ Windshield wiper off
2ÄIntermittent wiping, normal
3ÅIntermittent wiping, frequent
4°Continuous wipe, slow
5¯Continuous wipe, fast
BíSingle wipe
î Wipe with washer fluid
XSwitch on the ignition.
XTurn the combination switch to the corre-
sponding position.
In the ÅorÄ position, the appropriate
wiping frequency is set automatically according
to the intensity of the rain. In the Åposition,
the rain sensor is more sensitive than in the
Ä position, causing the windshield wiper to
wipe more frequently.
Vehicles with MAGIC VISION CONTROL:
If you push and hold the combination switch
beyond the point of resistance in direction of
arrow B, the manual wash program is activa-
ted. If you push and hold the combination switch briefly beyond the point of resistance in direc-
tion of arrow
B, the automatic wash program is
activated.
If the wiper blades are worn, the windshield will
no longer be wiped properly. This could prevent
you from observing the traffic conditions.
Replacing the wiper blades
Important safety notes
GWARNING
If the windshield wipers begin to move while
you are changing the wiper blades, you could be trapped by the wiper arm. There is a risk of
injury.
Always switch off the windshield wipers and
ignition before changing the wiper blades.
!To avoid damaging the wiper blades, make
sure that you touch only the wiper arm of the
wiper.
!Never open the hood if a windshield wiper
arm has been folded away from the wind-
shield.
Hold the windshield wiper arm firmly when
you change the wiper blade. If you release the
windshield wiper arm without a wiper blade
and it falls onto the windshield, the windshield
may be damaged by the force of the impact.
Mercedes-Benz recommends that you have
the wiper blades changed at a qualified spe-
cialist workshop.
!Always position the windshield wiper arms
vertically before folding them away from the
windshield. By doing so, you will avoid dam-
age to the hood.
Replacing the wiper blades (standard
windshield wipers)
Moving the wiper arms to a vertical posi-
tion
XSwitch off the engine.
XRemove your foot from the brake pedal.
XSet the windshield wiper to the °position
on the combination switch.
XPress the Start/Stop button repeatedly until
the windshield wiper starts.
Windshield wipers129
Lights and windshield wipers
Z
Page 132 of 382
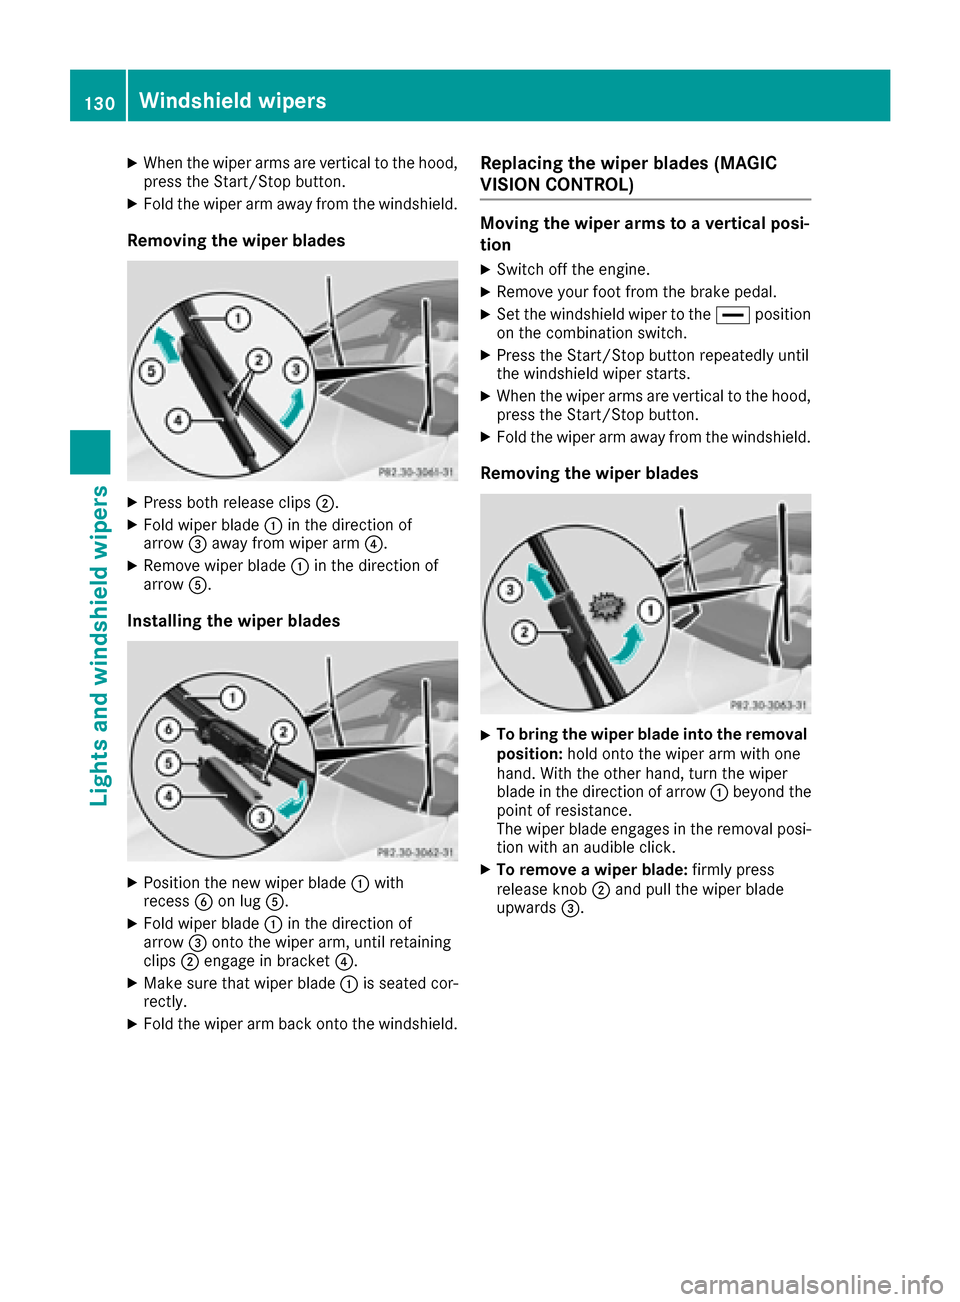
XWhen the wiper arms are vertical to the hood,
press the Start/Stop button.
XFold the wiper arm away from the windshield.
Removing the wiper blades
XPress both release clips;.
XFold wiper blade:in the direction of
arrow =away from wiper arm ?.
XRemove wiper blade:in the direction of
arrow A.
Installing the wiper blades
XPosition the new wiper blade :with
recess Bon lug A.
XFold wiper blade :in the direction of
arrow =onto the wiper arm, until retaining
clips ;engage in bracket ?.
XMake sure that wiper blade :is seated cor-
rectly.
XFold the wiper arm back onto the windshield.
Replacing the wiper blades (MAGIC
VISION CONTROL)
Moving the wiper arms to a vertical posi-
tion
XSwitch off the engine.
XRemove your foot from the brake pedal.
XSet the windshield wiper to the °position
on the combination switch.
XPress the Start/Stop button repeatedly until
the windshield wiper starts.
XWhen the wiper arms are vertical to the hood,
press the Start/Stop button.
XFold the wiper arm away from the windshield.
Removing the wiper blades
XTo bring the wiper blade into the removal
position: hold onto the wiper arm with one
hand. With the other hand, turn the wiper
blade in the direction of arrow :beyond the
point of resistance.
The wiper blade engages in the removal posi-
tion with an audible click.
XTo remove a wiper blade: firmly press
release knob ;and pull the wiper blade
upwards =.
130Windshield wipers
Lights and windshield wipers
Page 133 of 382
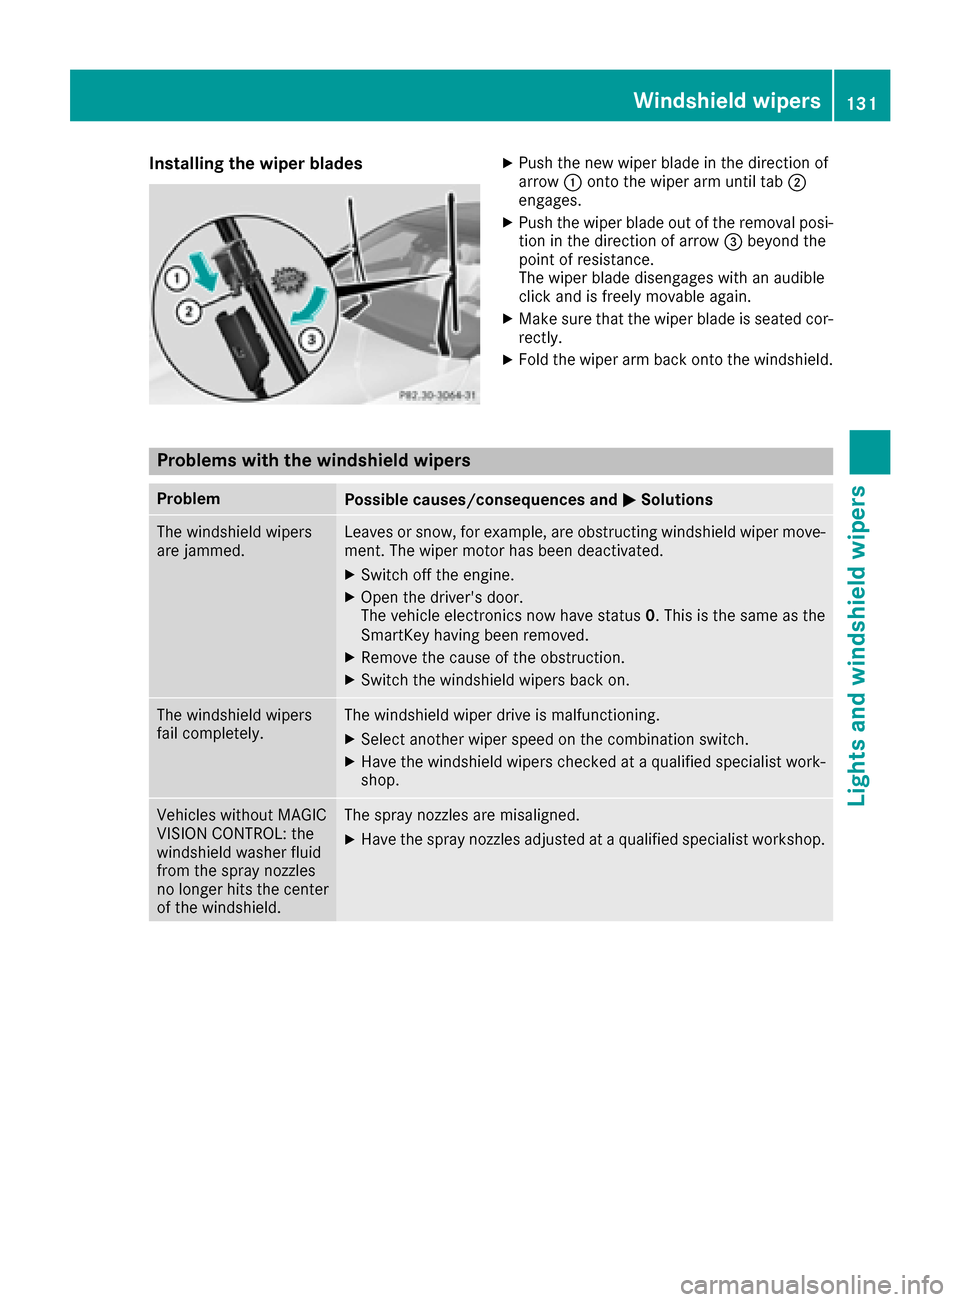
Installing the wiper bladesXPush the new wiper blade in the direction of
arrow:onto the wiper arm until tab ;
engages.
XPush the wiper blade out of the removal posi- tion in the direction of arrow =beyond the
point of resistance.
The wiper blade disengages with an audible
clic k and isfreely movable again.
XMake sure that the wiperblade is seated cor-
rectly.
XFold the wiper arm back onto the windshield.
Problems with the windshield wipers
ProblemPossible causes/consequences and MSolutions
Thewindshield wipers
are jammed.Leaves or snow, for example, are obstructing windshield wipermove-
ment. The wipermotor has been deactivate d.
XSwitch off the engine.
XOpen the driver's door.
The veh icleelectronics now have status 0. This is the same as the
Sm artKey having been remove d.
XRemove the cause of the obstruction.
XSwitch the windshield wipers back on.
The windshield wipers
fail co mpletely.Thewindshield wiperdrive is malfunctioning.
XSelect another wiperspeed on the co mbination switch.
XHave the windshield wipers checked at a qualified specialist work-
shop.
Vehicle swit hout MAGIC
VISION CONTROL: the
win dshield washer fluid
from the spray nozzles
no longer hits the center
of the windshield.The spray nozzles are misaligned.
XHave the spray nozzles adjusted at a qualified specialist workshop.
Windshield wipers131
Lights and windshield wipers
Z
Page 205 of 382
lamps to flash four short pulses at a pedestrian
detected on or near to the road.
XIn the light menu, select the spotlight function
of Night View Assist Plus (Ypage 225).
The spotlight function does not flash at animals.
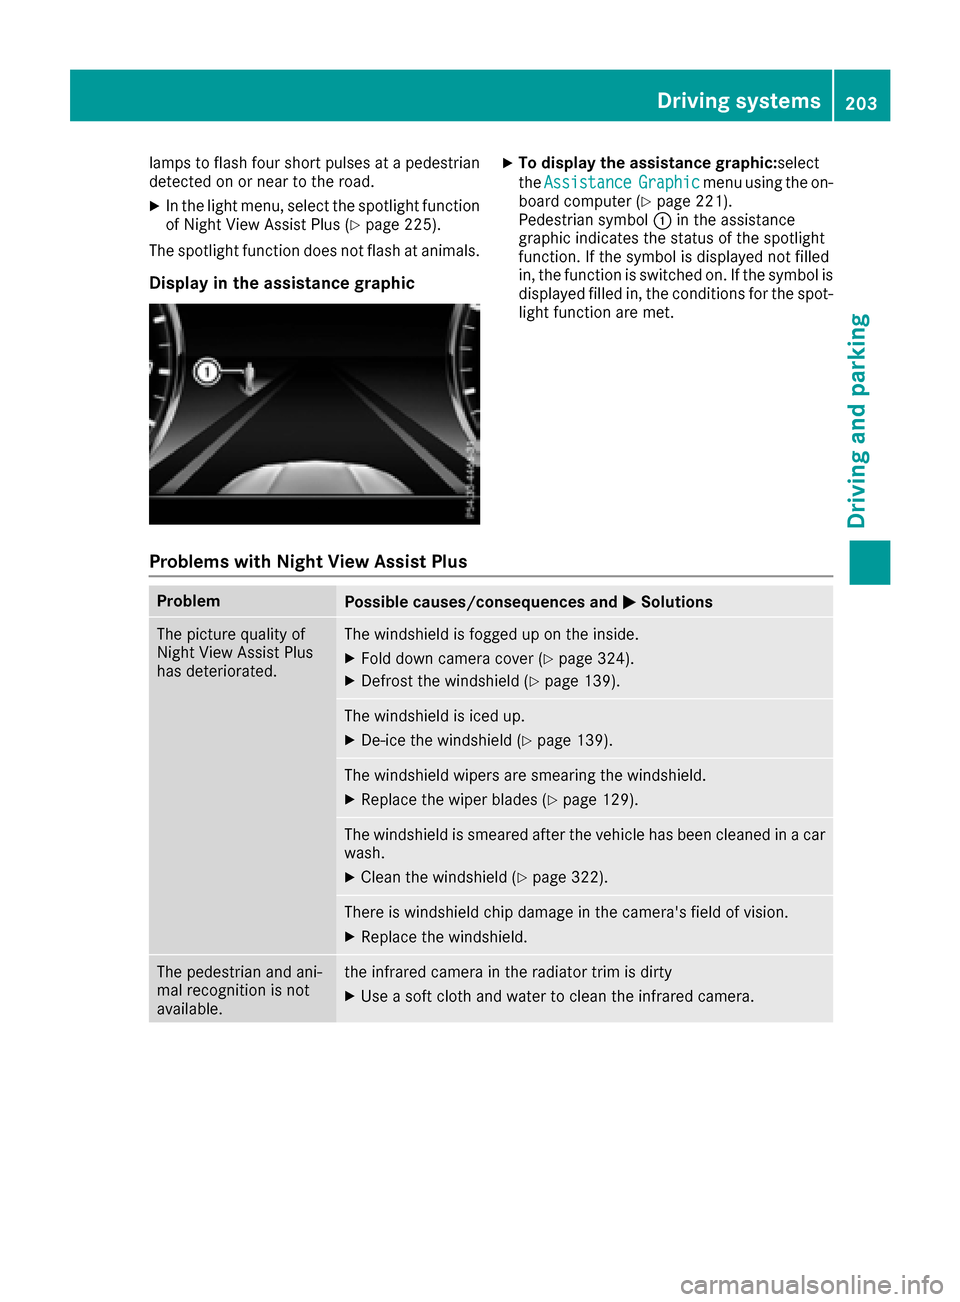
Display in the assistance graphic
XTo display the assistance graphic: select
the Assistance
Graphicmenu using the on-
board computer (Ypage 221).
Pedestrian symbol :in the assistance
graphic indicates the status of the spotlight
function. If the symbol is displayed not filled
in, the function is switched on. If the symbol is
displayed filled in, the conditions for the spot-
light function are met.
Problems with Night View Assist Plus
ProblemPossible causes/consequences and MSolutions
The picture quality of
Night View Assist Plus
has deteriorated.The windshield is fogged up on the inside.
XFold down camera cover (Ypage 324).
XDefrost the windshield (Ypage 139).
The windshield is iced up.
XDe-ice the windshield (Ypage 139).
The windshield wipers are smearing the windshield.
XReplace the wiper blades (Ypage 129).
The windshield is smeared after the vehicle has been cleaned in a car
wash.
XClean the windshield (Ypage 322).
There is windshield chip damage in the camera's field of vision.
XReplace the windshield.
The pedestrian and ani-
mal recognition is not
available.the infrared camera in the radiator trim is dirty
XUse a soft cloth and water to clean the infrared camera.
Driving systems203
Driving and parking
Z
Page 322 of 382
low speeds. Otherwise, when in transmis-
sion positionDor Rthe automatic trans-
mission will automatically switch to park
position Pand block the wheels.
ROperating with the Start/Stop button:
Do not open the driver's door when the
engine is switched off or at very low
speeds. Otherwise, when in transmission
position Dor Rthe automatic transmission
will automatically switch to park position P
and block the wheels.
Observe the following to make sure that the
automatic transmission stays in position Nneu-
tral:
Operating with the SmartKey:
XMake sure that the ignition is switched on.
XMake sure that the vehicle is stationary.
XDepress and hold the brake pedal.
XShift to neutral N.
XRelease the brake pedal.
XRelease the electric parking brake, if neces-
sary.
XSwitch off the ignition and leave the SmartKey
in the ignition lock.
Operating with the Start/Stop button:
XMake sure that the ignition is switched on.
XMake sure that the vehicle is stationary.
XDepress and hold the brake pedal.
XEngage park position P.
XRelease the brake pedal.
XRemove Start/Stop button from ignition lock
(Ypage 145).
XInsert the SmartKey into the ignition lock.
XSwitch on the ignition.
XDepress and hold the brake pedal.
XShift to neutral N.
XRelease the brake pedal.
XRelease the electric parking brake, if neces-
sary.
XSwitch off the ignition and leave the SmartKey
in the ignition lock.
You can wash the vehicle in an automatic car
wash from the very start.
If the vehicle is very dirty, pre-wash it before
cleaning it in an automatic car wash.
After using an automat
ic car wash, wipe off wax
from the windshield and the wiper blades. This will prevent smears and reduce wiping noises
caused by residue on the windshield.
Washing by hand
In some countries, washing by hand is only
allowed at specially equipped washing bays.
Observe the legal requirements in each country.
XDo not use hot water and do not wash the
vehicle in direct sunlight.
XUse a soft sponge to clean.
XUse a mild cleaning agent, such as a car
shampoo approved by Mercedes-Benz.
XThoroughly hose down the vehicle with a gen-
tle jet of water.
XDo not point the water jet directly towards the
air inlet.
XUse plenty of water and rinse out the sponge
frequently.
XRinse the vehicle with clean water and dry
thoroughly with a chamois.
XDo not let the cleaning agent dry on the paint-
work.
Carefully remove all deposits of road salt as
soon as possible when driving in winter.
Power washers
GWARNING
The water jet from a circular jet nozzle (dirt
blasters) can cause invisible exterior damage
to the tires or chassis components. Compo-
nents damaged in this way may fail unexpect-
edly. There is a risk of an accident.
Do not use power washers with circular jet
nozzles to clean the vehicle. Have damaged
tires or chassis components replaced imme-
diately.
!Always maintain a distance of at least
11.8 in (30 cm) between the vehicle and the
power washer nozzle. Information about the
correct distance is available from the equip-
ment manufacturer.
Move the power washer nozzle around when
cleaning your vehicle.
Do not aim directly at any of the following:
RTires
RDoor gaps, roof gaps, joints, etc.
RElectrical components
320Care
Maintenance and care
Page 324 of 382
Cleaning the vehicle parts
Cleaning the wheels
GWARNING
The water jet from a circular jet nozzle (dirt
blasters) can cause invisible exterior damage
to the tires or chassis components. Compo-
nents damaged in this way may fail unexpect-
edly. There is a risk of an accident.
Do not use power washers with circular jet
nozzles to clean the vehicle. Have damaged
tires or chassis components replaced imme-
diately.
!Do not use acidic wheel cleaning products
to remove brake dust. This could damage
wheel bolts and brake components.
!Do not park your vehicle for a long period of
time directly after cleaning, particularly after
cleaning the wheel rim with wheel cleaner.
Wheel cleaner can lead to the increased cor-
rosion of the brake discs and pads. Therefore,
drive for a few minutes after cleaning. By
heating up the brakes, the brake discs and
pads dry. The vehicle can then be parked for a
long period of time.
Cleaning the windows
GWARNING
You could become trapped by the windshield wipers if they start moving while cleaning the
windshield or wiper blades. There is a risk of
injury.
Always switch off the windshield wipers and
the ignition before cleaning the windshield or
wiper blades.
!Do not use dry cloths, abrasive products,
solvents or cleaning agents containing sol-
vents to clean the inside of the windows. Do
not touch the insides of the windows with
hard objects, e.g. an ice scraper or ring. There
is otherwise a risk of damaging the windows.
!Clean the water drainage channels of the
windshield and the rear window at regular
intervals. Deposits such as leaves, petals and pollen may under certain circumstances pre-
vent water from draining away. This can lead to corrosion damage and damage to elec-
tronic components.
XClean the inside and outside of the windows
with a damp cloth and a cleaning product that
is recommended and approved by Mercedes-
Benz.
Cleaning wiper blades
GWARNING
You could become trapped by the windshield wipers if they start moving while cleaning the
windshield or wiper blades. There is a risk of
injury.
Always switch off the windshield wipers and
the ignition before cleaning the windshield or
wiper blades.
!Do not pull the wiper blade. Otherwise, the
wiper blade could be damaged.
!Do not clean wiper blades too often and do
not rub them too hard. Otherwise, the graph-
ite coating could be damaged. This could
cause wiper noise.
!Hold the wiper arm securely when folding
back. The windshield could be damaged if the
wiper arm smacks against it suddenly.
XFold the windshield wiper arms away from the
windshield (Ypage 129).
XCarefully clean the wiper blades with a damp
cloth.
XFold the windshield wiper arms back again
before switching on the ignition.
Cleaning the exterior lighting
!Only use cleaning agents or cleaning cloths
which are suitable for plastic light lenses.
Unsuitable cleaning agents or cleaning cloths
could scratch or damage the plastic light len- ses.
XClean the plastic lenses of the exterior lights
with a wet sponge and a mild cleaning agent,
e.g. Mercedes-Benz car shampoo or cleaning
cloths.
322Care
Maintenance and care