height MERCEDES-BENZ S-CLASS SALOON LONG 2020 Owners Manual
[x] Cancel search | Manufacturer: MERCEDES-BENZ, Model Year: 2020, Model line: S-CLASS SALOON LONG, Model: MERCEDES-BENZ S-CLASS SALOON LONG 2020Pages: 609, PDF Size: 10.5 MB
Page 60 of 609
Safely transporting
children in theve hicle Alw
ays obser vewhen children are tr avelling
in theve hicle %
Also strictly obser vethe saf ety no tesfo rthe
specific situation. In this wa yyo u can recog‐
nise po tential risks and avoid dangers if chil‐
dren are tr avelling in theve hicle
(/ page 58).
Be diligent
Bear in mind that negligence when securing a
ch ild in thech ild restra int sy stem may ha veseri‐
ous consequences. Alw ays be diligent in secur‐
ing a child carefully before everyjou rney.
To impr oveprotection forch ildren younger than
12 years old or under 1.50 m in height,
Mercedes-Benz recommends you obse rvethe
fo llowing information:
R Alw ays secure thech ild in a child restra int
sy stem suitable forth is Mercedes-Benz vehi‐
cle.
R The child restra int sy stem must be appropri‐
ate tothe age, weight and size of thech ild. R
The vehicle seat must be suitable forfitting a
ch ild restra int sy stem (/ page 62).
Ac cident statistics show that children secured
on there ar seats are general lysafer than chil‐
dren secured on the front seats. Forth is reason,
Mercedes-Benz strongly advises that youfit a
ch ild restra int sy stem toare ar seat.
The generic termchild restra int sy stem
The generic term child restra int sy stem is used
in this Owner's Manual. A child restra int sy stem
is, forex ample:
R a baby car seat
R are ar wa rd-f acing child seat
R afo rw ard-facing child seat
R ach ild boos ter seat with a backrest and seat
belt guide
Mercedes-Benz recommends using a child
boos ter seat with a backrest.
The child restra int sy stem must be appropriate
to the age, weight and size of thech ild. Obser
velaws and legal requ irements
Alw ays obser vethe legal requ irements when
using a child restra int sy stem in theve hicle.
Make sure that thech ild restra int sy stem is
appr oved in accordance with theva lid test speci‐
fi cations and guidelines. Further information can
be obtained at a qualified specialist workshop.
Mercedes-Benz recommends that you use a
Mercedes-Benz Service Centre forth is purpose.
Only use appr ovedch ild restra int sy stems
On lych ild restra int sy stems that meet thefo l‐
lowing UNECE standards are permit tedfo r use in
th eve hicle:
R UN-R44
R UN-R129 (i-Size child restra int sy stems)
Information on child restra int sy stem appr oval
categories and de tails on the appr oval label on
th ech ild restra int sy stem (/ page 62). Occupant saf
ety57
Page 96 of 609
Ac
tivating/deactivating the bo otlid opening
limiter Multimedia sy
stem:
4 © 5
Settings 5
Vehicle
5 Opening/closing #
Activate or deacti vate theOpening height
limiter.
This function pr events the boot lid from hitting a
low garage ceiling, forex ample. Side windo
ws Opening and closing
the side windo ws &
WARNING Risk of becoming trapped
when opening a side window
When you open a side wind ow, parts of the
body could be dr awn in or become trapped
between the side window and window frame. #
When opening, make sure that nobody
is touching the side windo w. #
If someone is trapped, release the but‐
to n immedia tely or pull it in order to
close the side window again. &
WARNING Risk of becoming trapped
when closing a side window
When closing a side windo w,body parts
could be trapped in the closing area in the
process. #
When closing, make sure that no body
parts are in the closing area. #
If someone is trapped, release the but‐
to n immedia tely or press the button in
order toreopen the side windo w. &
WARNING Risk of becoming trapped
when children opera tethe side windo ws
Children could become trapped if they oper‐
ate the side windo ws, particularly when unat‐
te nded. #
Activate thech ild saf ety lock forthe
re ar side wind ows. #
When leaving theve hicle, alw aysta ke
th eke y with you and lock theve hicle. #
Never lea vechildren unat tended in the
ve hicle. Re
quirements:
R The po wer supply or the ignition is switched
on. Opening and closing
93
Page 111 of 609
Yo
u can adjust the seats when the ignition is
switched off. &
WARNING Risk of becoming trapped
du ring seat adjustment
When you adjust a seat, you or other vehicle
occupants could become trapped, e.g. on the
seat guide rail. #
Make sure when adjusting a seat that
no one has any body parts in the sweep
of the seat. Obser
vethe saf ety no tes on "Airbags" and "Chil‐
dren in theve hicle". &
WARNING Risk of inju ryifve hicle set‐
tings are adjus ted while theve hicle is in
motion
Yo u could lose cont rol of theve hicle in par‐
ticular in thefo llowing situations:
R Ifyo u adjust the driver's seat, the head
re stra ints, thesteering wheel or the mir‐
ro r while theve hicle is in motion. R
Ifyo ufast enyour seat belt while theve hi‐
cle is in motion. #
Before starting the engine: adjust the
driver's seat, head restra ints, steering
wheel and mir ror in particular and fas‐
te nyo ur seat belt. &
WARNING Risk of becoming trapped if
th e seat height is adjus ted carelessly
If yo u adjust the seat height carelessly, you
or other vehicle occupants could be trapped
and thereby injured.
Children in particular could acciden tally
press the electrical seat adjustment buttons
and become trapped. #
While moving the seats, make sure that
hands or other body parts do not get
under the le ver assembly of the seat
adjustment sy stem. &
WARNING Risk of inju rydue toincor‐
re ctly adjus ted head restra ints
If head restra ints ha venot been adjus ted
cor rectly, there is an increased risk of injury
in the head and neck area, e.g. in theev ent
of an accident or sudden braking. #
Before driving off, make sure forev ery
ve hicle occupant that the cent reofthe
head restra int supports the back of the
head at about eye le vel. Ad
just the head restra int fore -and-aft position so
th at it is as close as possible tothe back of your
head. &
WARNING Risk of inju ryor death due to
incor rect seat position
The seat belt will not of ferth e intended le vel
of pr otection if you ha venot mo vedth e seat
backrest toan almost vertical position.
In particular, you may slip under the seatbelt
and injure yourself. 108
Seats and stowing
Page 112 of 609
#
Adjust the seat proper lybefore begin‐
ning your journe y. #
Alw ays ensure that the seat backrest is
in an almost vertical position and that
th e shoulder section of your seat belt is
ro uted across the cent reofyour shoul‐
der. &
WARNING Risk of inju rydue toexc es‐
sive stra in on the grab handle
If yo u apply your full body weight tothe grab
handle or pull it abruptl y,the grab handle
may be damaged or become loose from its
anchorage. #
Use the grab handles only tostabilise
th e seating position or toassist in get‐
ting in and out of the seat. &
WARNING Risk of inju ryor death due to
objects under the co-driver seat
Objects trapped under the co-driver seat can
inter fere with the function of the automatic co-driver airbag shutoff or damage
the sys‐
te m. #
Do not store any objects under the co-
driver seat. #
When the co-driver seat is occupied,
make sure that no objects are trapped
under the co-driver seat. *
NO
TEDama getothe seats when moving
th e seats back The seats may be damaged
byobjects when
moving the seats bac k. #
When moving the seats bac k,make
sure that there are no objects in the
fo ot we ll, under or behind the seats. The switches
for adju sting the seats do not
mo ve.Yo u will therefore recei veno di rect feed‐
back on the switch while pressing the switch.
Fe edback is pr ovided only bythe mo vement of
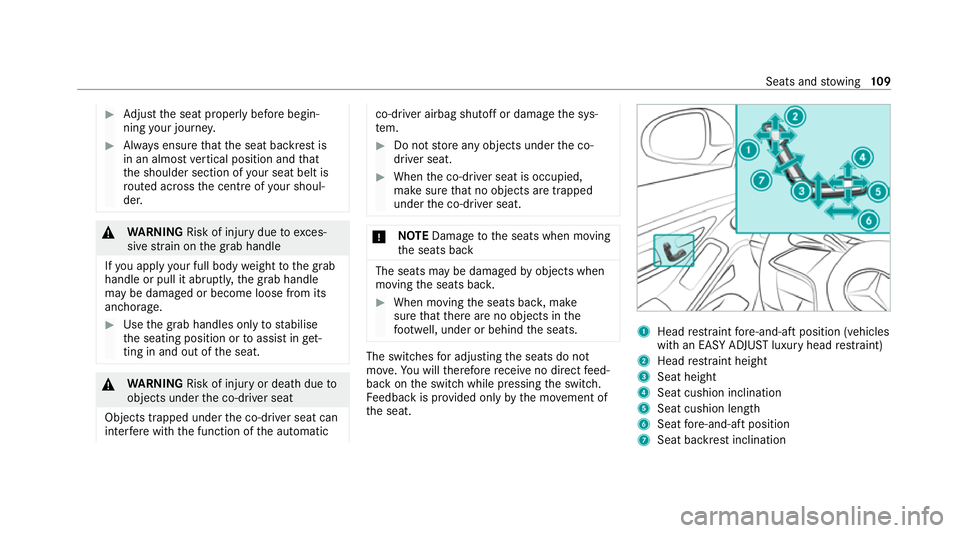
th e seat. 1
Head restra int fore -and-aft position (vehicles
wi th an EA SYADJU STluxury head restra int)
2 Head restra int height
3 Seat height
4 Seat cushion inclination
5 Seat cushion length
6 Seat fore -and-aft position
7 Seat ba ckrest inclination Seats and
stowing 109
Page 113 of 609
#
Save the settings with the memory function
(/ page 131).
% The head restra int height will be adjus ted
automatically when you adjust the seat
height or the seat fore -and-aft position.
% Ve
hicles with EASY ADJUST luxury head
re stra ints: thefo re -and-aft position of the
head restra int will be adjus ted automatically
when you adjust the backrest angle. Ad
justing the front passen ger seat electri‐
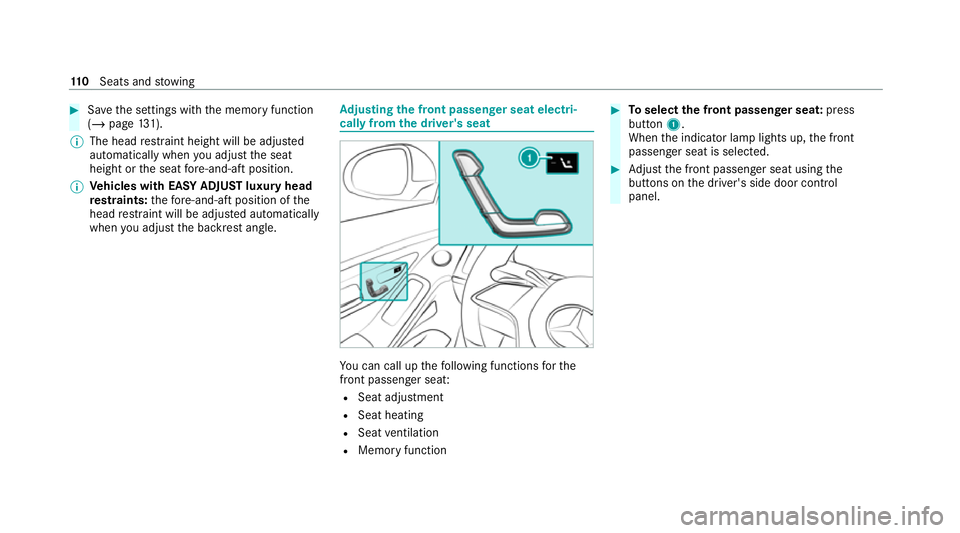
cally from the driver's seat Yo
u can call up thefo llowing functions forthe
front passenger sea t:
R Seat adjustment
R Seat heating
R Seat ventilation
R Memory function #
Toselect the front passenger seat: press
button 1.
When the indicator lamp lights up, the front
passenger seat is selected. #
Adjust the front passenger seat using the
buttons on the driver's side door control
panel. 11 0
Seats and stowing
Page 114 of 609
Ad
justing the front passen ger seat electri‐
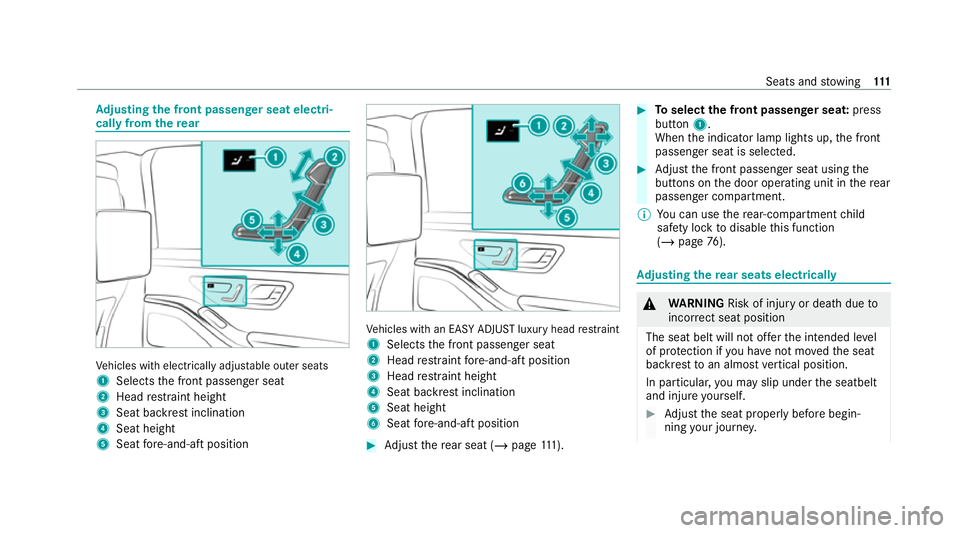
cally from the rear Ve
hicles with electrically adjus table outer seats
1 Selects the front passenger seat
2 Head restra int height
3 Seat backrest inclination
4 Seat height
5 Seat fore -and-aft position Ve
hicles with an EASY ADJUST luxury head restra int
1 Selects the front passenger seat
2 Head restra int fore -and-aft position
3 Head restra int height
4 Seat backrest inclination
5 Seat height
6 Seat fore -and-aft position #
Adjust there ar seat (/ page111). #
Toselect the front passenger seat: press
button 1.
When the indicator lamp lights up, the front
passenger seat is selected. #
Adjust the front passenger seat using the
buttons on the door operating unit in there ar
passenger compartment.
% You can use there ar-compartment child
saf ety lock todisable this function
(/ page 76). Ad
justing the rear seats electrical ly &
WARNING Risk of inju ryor death due to
incor rect seat position
The seat belt will not of ferth e intended le vel
of pr otection if you ha venot mo vedth e seat
backrest toan almost vertical position.
In particular, you may slip under the seatbelt
and injure yourself. #
Adjust the seat proper lybefore begin‐
ning your journe y. Seats and
stowing 111
Page 115 of 609
#
Alw ays ensure that the seat backrest is
in an almost vertical position and that
th e shoulder section of your seat belt is
ro uted across the cent reofyour shoul‐
der. The swit
ches for adju sting the seats do not
mo ve.Yo u will therefore recei veno di rect feed‐
back on the switch while pressing the switch.
Fe edback is pr ovided only bythe mo vement of
th e seat.
Yo u can electrically adjust on lythe outer seats in
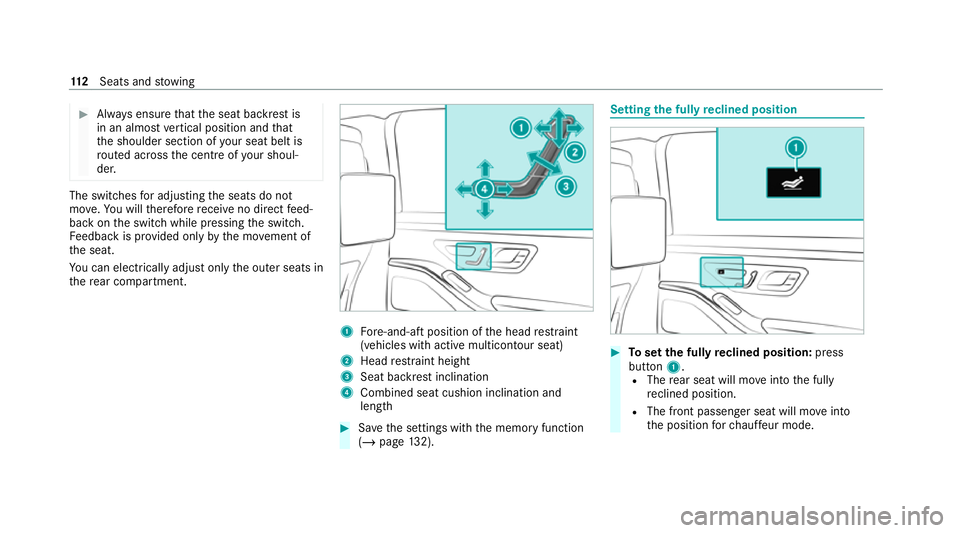
th ere ar compartment. 1
Fore-and-aft position of the head restra int
(vehicles with active multicontour seat)
2 Head restra int height
3 Seat backrest inclination
4 Combined seat cushion inclination and
length #
Save the settings with the memory function
(/ page 132). Setting
the fully reclined position #
Toset the fully reclined position: press
button 1.
R The rear seat will mo veinto the fully
re clined position.
R The front passenger seat will mo veinto
th e position forch auf feur mode. 11 2
Seats and stowing
Page 124 of 609
#
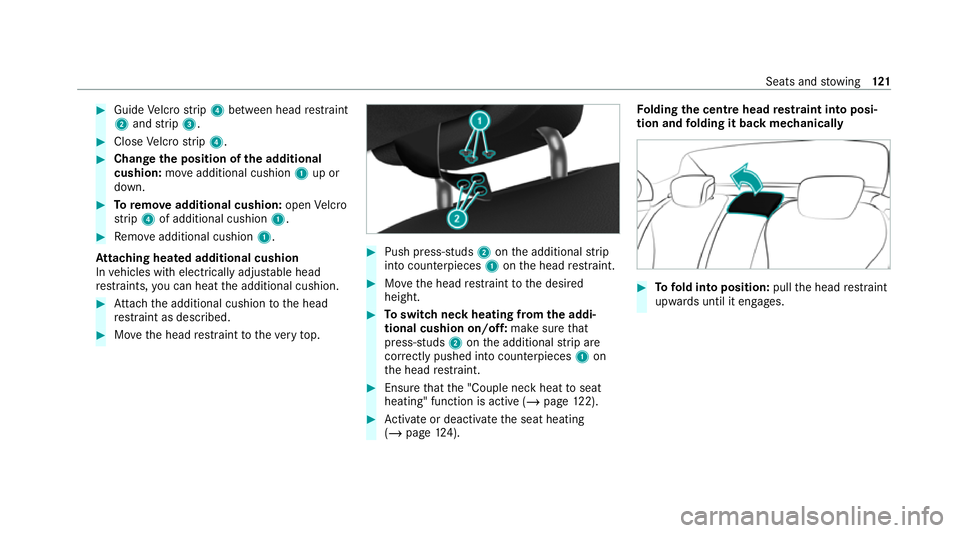
Guide Velcro strip 4 between head restra int
2 and strip 3. #
Close Velcro strip 4. #
Change the position of the additional
cushion: moveadditional cushion 1up or
down. #
Toremo veadditional cushion: openVelcro
st rip 4 of additional cushion 1.#
Remo veadditional cushion 1.
At taching hea ted additional cushion
In vehicles with electrically adjus table head
re stra ints, you can heat the additional cushion. #
Attach the additional cushion tothe head
re stra int as desc ribed. #
Movethe head restra int totheve ry top. #
Push press-studs 2onthe additional strip
into coun terp ieces 1onthe head restra int. #
Movethe head restra int tothe desired
height. #
Toswitch neck heating from the addi‐
tional cushion on/off: make surethat
press- studs 2onthe additional strip are
cor rectly pushed into counterpieces 1on
th e head restra int. #
Ensure that the "Couple neck heat toseat
heating" function is active (/ page122). #
Activate or deacti vate the seat heating
(/ page 124). Fo
lding the centre head restra int into posi‐
tion and folding it back mechanically #
Tofold into position: pullthe head restra int
upwards until it engages. Seats and
stowing 121
Page 143 of 609
EAS
Y-PA CK boot box Ad
justing the height of the EA SY-PAC K boot
box toany position &
WARNING Risk of becoming trapped
and inju red when raising thefloor
Yo ur hands may become trapped on the
frame of the EASY -PAC K boot box and
objects may be throw n up wards. #
Ensure that your hands are not in the
ra nge of mo vement of thefloor. #
If someone becomes trapped, carefully
push the cent reofthefloor down ward. #
Remo veall objects from thefloor
before raising it. &
WARNING Risk of becoming trapped
when pressing the EASY -PAC K boot box
in
Yo ur hands may become trapped when you
are pressing the boot box into there tracted
position. Children, in pa rticular, may injure
th emselves when doing so. #
Ensure that your hands are not in the
ra nge of mo vement of the EASY -PACK
boot box. #
When leaving theve hicle, alw aysta ke
th eke y with you and lock theve hicle. #
Never lea vechildren unat tended in the
ve hicle. *
NO
TEDama getotheex tended EAS Y-
PA CK boot box The EASY
-PAC K boot box may be damaged
when it is extended. #
Do not place any objects on or press
down on the EASY -PAC K boot box
frame. #
Do not close the boot lid when the
EAS Y-PA CK boot box is extended. *
NO
TEDama getothe EASY -PAC K boot
box byobjects Objects
that are sharp-edged, poin ted, frag‐
ile, rounded or heavy and objects that roll can damage
the EASY -PAC K boot box and be
th ro wn out. #
Do not transport objects that are sharp-
edged, poin ted, rounded or fragile and
objects that roll in the EASY- PACK boot
box. #
Alw aysstow and secure such objects
outside of the box in the boot. #
Alw ays obser vethe maximum permitted
load of the EASY -PAC K boot box. #
Do not use the EASY -PAC K boot box
when there ar seats are folded for‐
wa rds. The maximum permitted load of
the EASY -PACK
boot box is 10kg.To prev ent the box from being
ove rloaded, the box floor will lo wer onto the boot
fl oor when the load reaches appr oximately 5 kg. 14 0
Seats and stowing
Page 160 of 609
The function is automatically deactivated under
th efo llowing conditions:
R Atspeeds abo ve100 km/h af ter activation.
R When there ar fog light is switched off.
Fu nction of the bad weather light
The bad weather light reduces reflections in
ra iny conditions bydimming individual LEDs in
th e headlamps. The driver and other road users
are dazzled less as a result.
The city lighting function
City lighting impr ovesth e illumination of road‐
sides in urban areas using a broad distribution of
light.
The function is active in thefo llowing cases:
R Atlow speeds
R In illuminated parts of urban areas
Fu nction of theto pog raphical co mpensation
Based on map data, the lighting sy stem
re sponds pre-em ptively todiffere nt road heights.
This means that the headlamp range remains vir‐
tually cons tant when you are driving on uphill or
downhill gradients. %
The availability of the function is dependent
on the count ry.
Assistance functions of the DIGITAL LIGHT
DIGITAL LIGHT visually expands on the driver
assis tance sy stems byprojecting the assis tant
displ ays in front of theve hicle while it is in
motion. DIGITAL LIGHT can therefore help the
driver in critical situations.
% The availability of the functions is dependent
on the count ry.
The sy stem is active in thefo llowing cases:
R The light switch is in theà position.
R The high beam is switched on.
% Ifyo u activate the head-up display with aug‐
mented realit y,the projections can be deac‐
tivated depending on the situation.
% Depending on the count ryin which you are
cur rently driving, cer tain functions may be
disabled due todiffere nt le galre qu irements,
eve n if they are enabled in the multimedia
sy stem. When a border is crossed, theve hi‐
cle will automatically adapt totheva lid
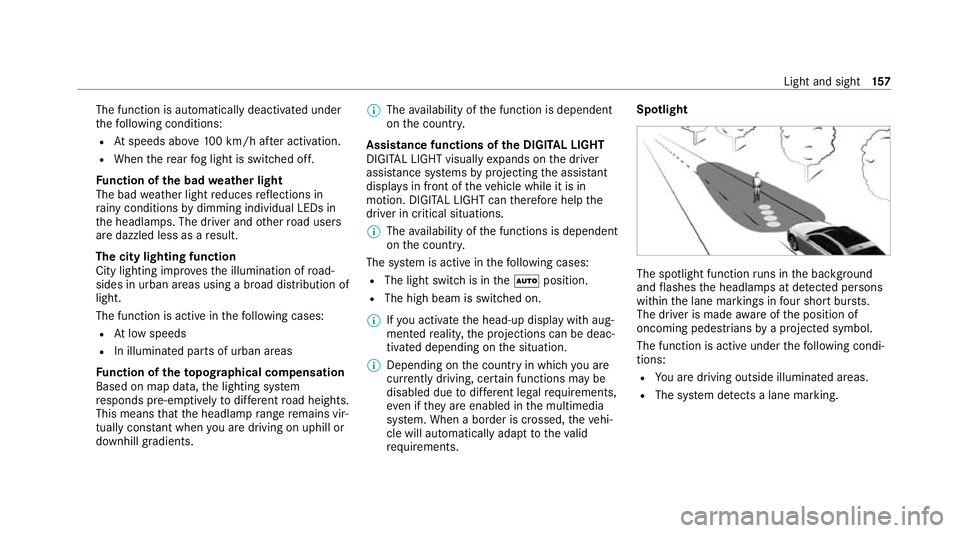
re qu irements. Spotlight
The spotlight function
runs in the bac kground
and flashes the headlamps at de tected persons
wi thin the lane markings in four sho rtbur sts.
The driver is made aware of the position of
oncoming pedestrians bya projected symbol.
The function is active under thefo llowing condi‐
tions:
R You are driving outside illuminated areas.
R The sy stem de tects a lane marking. Light and sight
157