lock MERCEDES-BENZ S-CLASS SEDAN 2013 Manual PDF
[x] Cancel search | Manufacturer: MERCEDES-BENZ, Model Year: 2013, Model line: S-CLASS SEDAN, Model: MERCEDES-BENZ S-CLASS SEDAN 2013Pages: 536, PDF Size: 24.14 MB
Page 256 of 536
X
Select CD, DVD-A or MP3 using
the :=;
buttons on the remote
control and press the 9 button to confirm.
The options list appears. The # dot
indicates the option currently selected.
X Select Normal Track Sequence, Track
List Mix or Random Folder using the
9:
buttons and press the 9 button
to confirm.
The option is switched on. All options
except Normal Track Sequence will be
indicated in the display/selection window.
i If you change the disc, the Normal
Track Sequence option is activated
automatically. If an option is selected, it
remains selected after the Rear Seat
Entertainment System is switched on or
off.
Switching track information on/off
(MP3 mode only) If the function is switched on, folder and track
names are displayed.
If the function is switched off, disc and file
names are displayed.
X
Select MP3 using the :=;
buttons on the remote control and press
the 9 button to confirm.
X Select Show Track Information using
the 9: buttons and press the 9
button to confirm.
The function is switched on O or off ª,
depending on the previous status. Video DVD mode
General notes Here you will find further information on the
following topics:
R
safety notes (Y page 220)
R notes on DVDs
(Y page 240) DVD playback conditions Playback problems may occur when playing
copied
discs. There is a large variety of discs,
DVD authoring software, writing software and
writers available. This variety means that
there is no guarantee that the Rear Seat
Entertainment System will be able to play
video DVDs that you have copied yourself.
You will find further information in the "Video"
chapter (Y page 241). Information regarding
COMAND also applies to the Rear Seat
Entertainment System.
Function restrictions Depending on the DVD, it is possible that
certain functions or actions described in this
section
will be temporarily blocked or may not
function at all. As soon as you try to activate
these functions or actions, you will see the
K symbol in the display.
Inserting and removing a CD/DVD X
Proceed as described in the "Audio CD/
DVD and MP3 mode" section
(Y page 220).
Activating video DVD mode X
Insert a video DVD.
The
Rear Seat Entertainment System loads
the disc.
If disc mode was the last mode selected, it
will now be active.
If it was not, switch on video DVD mode as
described in the following instruction.
X Select Disc in the menu using the
9=; buttons on the remote
control
and press the 9 button to confirm.
If the video DVD fulfills the playback
criteria, the film either starts automatically
or the menu stored on the DVD appears. If
the DVD menu appears, you must start the
film manually.
X Select the corresponding menu item in the
DVD menu.254
Rear Seat Entertainment System
COMAND
Page 262 of 536
and turning cVd the COMAND controller
and press W to confirm.
X Select Active Source for Rear and
press W to confirm.
In
the status bar at the top, you will see the
headphones icon and the _ icon for the
source that has been switched on.
X To switch off the function in COMAND:
switch on the desired audio mode in
COMAND or show the menu in video DVD
mode.
X Select the menu item at the bottom left,
e.g. CD in audio CD mode, by sliding VÆ
and turning cVd the COMAND controller
and press W to confirm.
X Select Rear OFF_ and press W the
COMAND controller to confirm.
Adjusting the brightness, contrast or
color X
Select Source in the rear-compartment
screen and press the 9 button on the
remote control to confirm.
X Select Display Aux or Disk Drive Aux
and press the 9 button to confirm.
X Select Brightness, Contrast or Color
and press the 9 button to confirm.
An adjustment scale appears.
X Select a setting using the 9 or :
button
and press the 9 button to confirm.
Changing the picture format X
Select Source in the AUX menu and press
the 9 button on the remote control to
confirm.
X Select Display Aux or Disk Drive Aux
and press the 9 button to confirm.
X Select Auto16:9 optimized, 4:3 or
Widescreen using the 9: buttons
and press the 9 button to confirm.
The ä icon in front of a menu item
indicates the current setting. Vehicle
Vehicle functions
General notes In this menu, you can set the following vehicle
functions:
R
ECO
R multicontour seat settings
R rear window blind
R EASY-ENTRY/EXIT feature
R exterior lighting delayed switch-off
R interior lighting delayed switch-off
R ambient lighting
R automatic folding mirror
R locator lighting
R automatic locking feature
R trunk lid opening height restriction
You can open the "Vehicle" menu in one of
two ways.
Opening the "Vehicle" menu from the
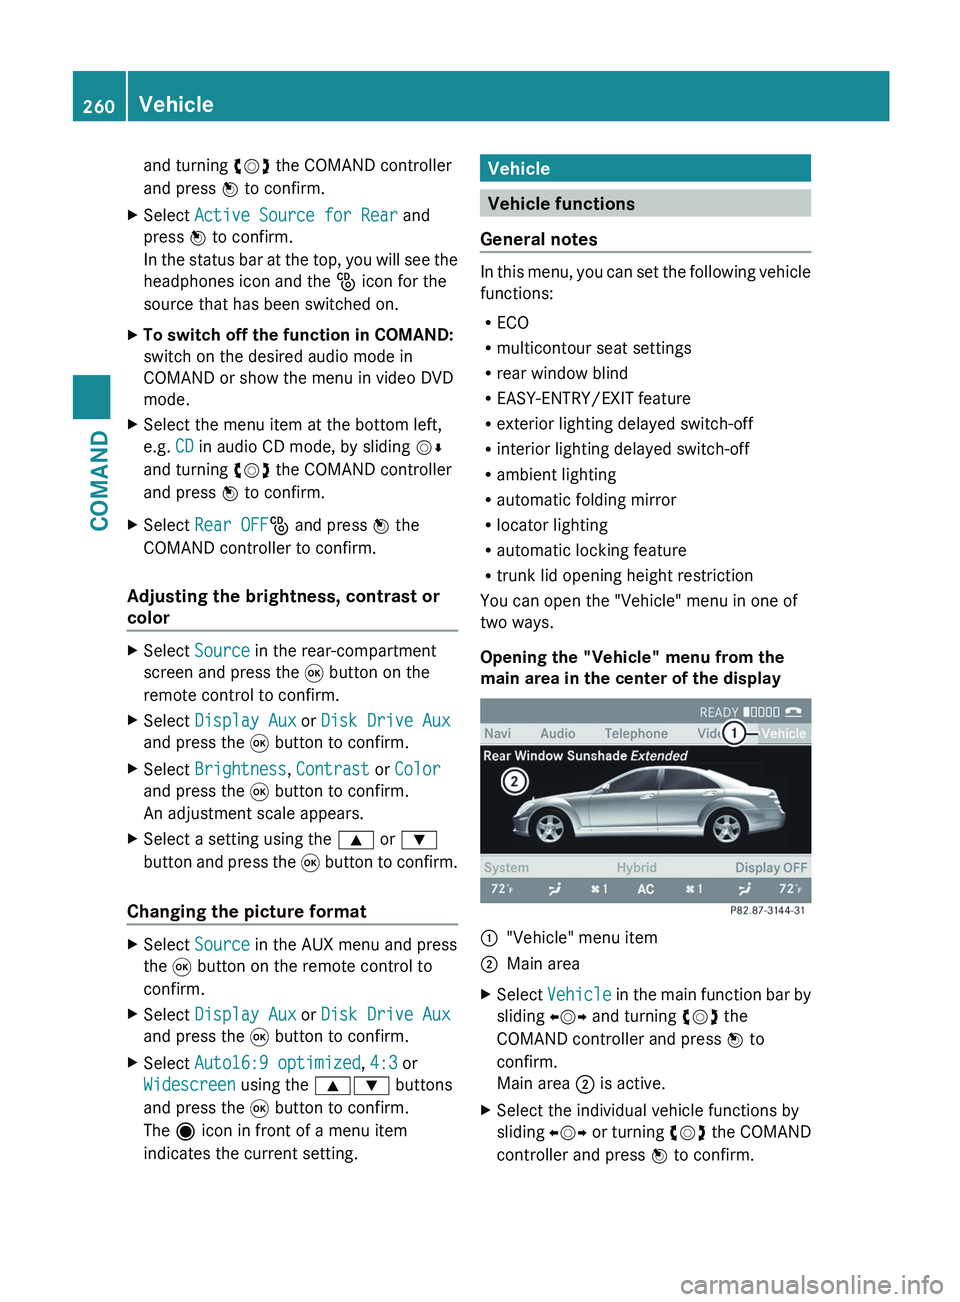
main area in the center of the display :
"Vehicle" menu item
; Main area
X Select Vehicle
in the main function bar by
sliding XVY and turning cVd the
COMAND controller and press W to
confirm.
Main area ; is active.
X Select the individual vehicle functions by
sliding XVY or turning cVd the COMAND
controller and press W to confirm. 260
Vehicle
COMAND
Page 264 of 536
COMAND controller and press
W to
confirm.
The main area is active.
X Select the Rear Window Sunshade
function by sliding XVY or turning cVd
the COMAND controller and press W to
confirm.
Activating/deactivating the automatic
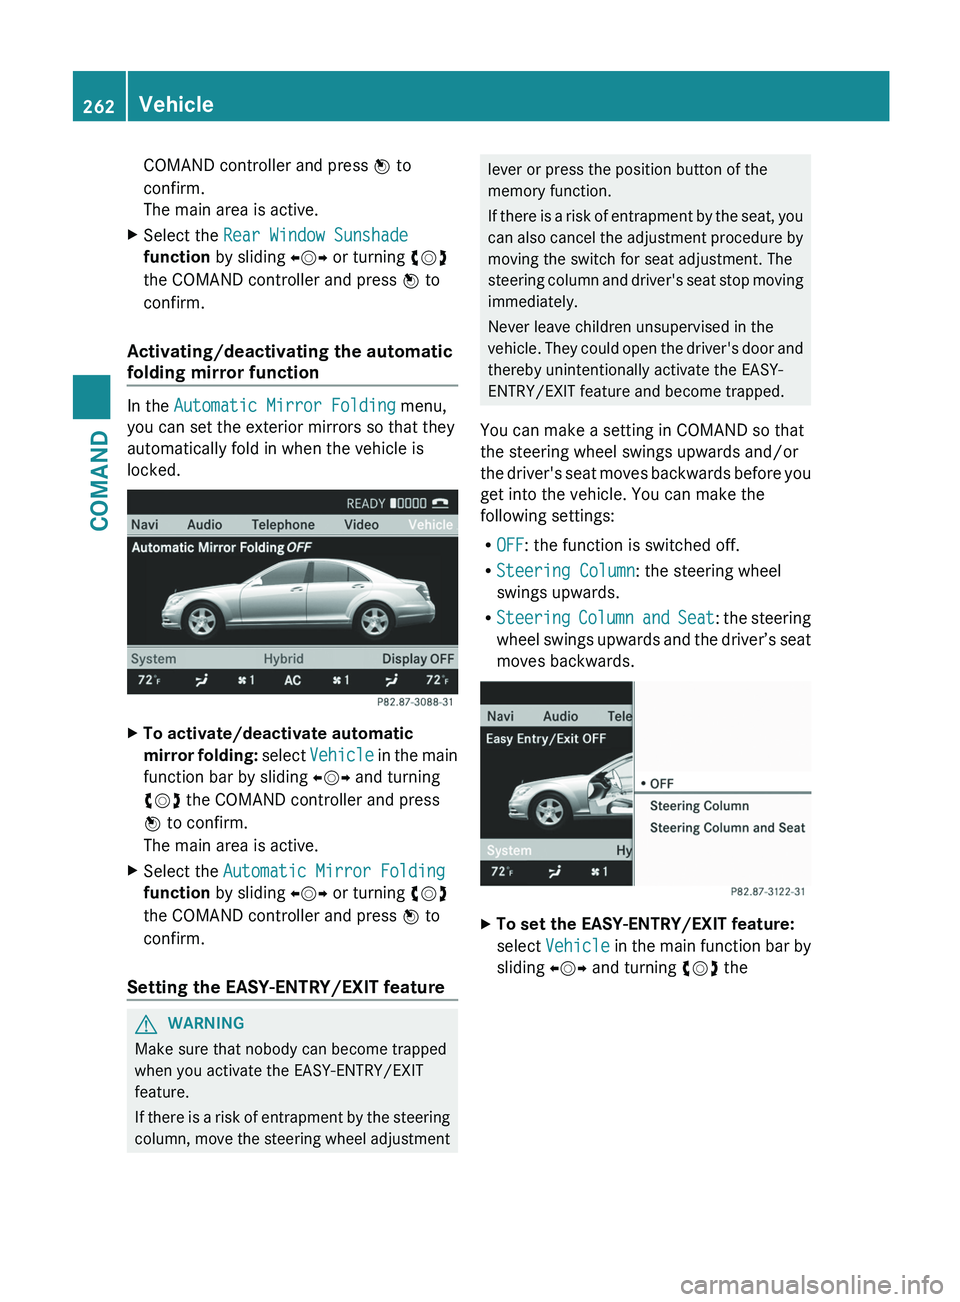
folding mirror function In the
Automatic Mirror Folding menu,
you can set the exterior mirrors so that they
automatically fold in when the vehicle is
locked. X
To activate/deactivate automatic
mirror
folding: select Vehicle in the main
function bar by sliding XVY and turning
cVd the COMAND controller and press
W to confirm.
The main area is active.
X Select the Automatic Mirror Folding
function by sliding XVY or turning cVd
the COMAND controller and press W to
confirm.
Setting the EASY-ENTRY/EXIT feature G
WARNING
Make sure that nobody can become trapped
when you activate the EASY-ENTRY/EXIT
feature.
If
there is a risk of entrapment by the steering
column, move the steering wheel adjustment lever or press the position button of the
memory function.
If
there is a risk of entrapment by the seat, you
can also cancel the adjustment procedure by
moving the switch for seat adjustment. The
steering column and driver's seat stop moving
immediately.
Never leave children unsupervised in the
vehicle. They could open the driver's door and
thereby unintentionally activate the EASY-
ENTRY/EXIT feature and become trapped.
You can make a setting in COMAND so that
the steering wheel swings upwards and/or
the driver's seat moves backwards before you
get into the vehicle. You can make the
following settings:
R OFF: the function is switched off.
R Steering Column: the steering wheel
swings upwards.
R Steering Column and Seat : the steering
wheel swings upwards and the driver’s seat
moves backwards. X
To set the EASY-ENTRY/EXIT feature:
select Vehicle
in the main function bar by
sliding XVY and turning cVd the262
Vehicle
COMAND
Page 265 of 536
COMAND controller and press
W to
confirm.
The main area is active.
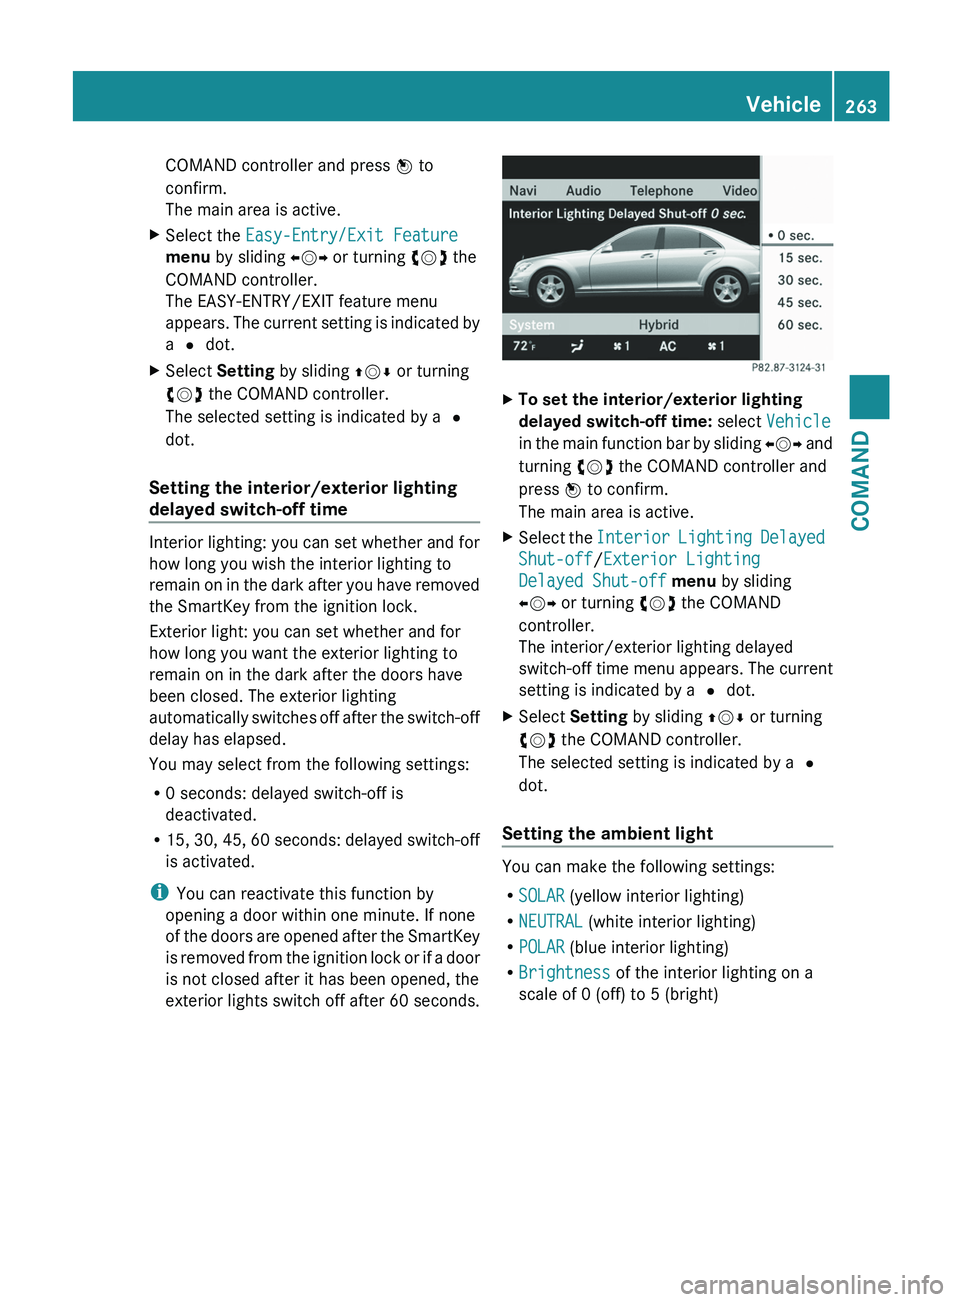
X Select the Easy-Entry/Exit Feature
menu by sliding XVY or turning cVd the
COMAND controller.
The EASY-ENTRY/EXIT feature menu
appears.
The current setting is indicated by
a # dot.
X Select Setting by sliding ZVÆ or turning
cVd the COMAND controller.
The selected setting is indicated by a #
dot.
Setting the interior/exterior lighting
delayed switch-off time Interior lighting: you can set whether and for
how long you wish the interior lighting to
remain
on in the dark after you have removed
the SmartKey from the ignition lock.
Exterior light: you can set whether and for
how long you want the exterior lighting to
remain on in the dark after the doors have
been closed. The exterior lighting
automatically switches off after the switch-off
delay has elapsed.
You may select from the following settings:
R 0 seconds: delayed switch-off is
deactivated.
R 15, 30, 45, 60 seconds: delayed switch-off
is activated.
i You can reactivate this function by
opening a door within one minute. If none
of the doors are opened after the SmartKey
is removed from the ignition lock or if a door
is not closed after it has been opened, the
exterior lights switch off after 60 seconds. X
To set the interior/exterior lighting
delayed switch-off time: select Vehicle
in
the main function bar by sliding XVY and
turning cVd the COMAND controller and
press W to confirm.
The main area is active.
X Select the Interior
Lighting Delayed
Shut-off/Exterior Lighting
Delayed Shut-off menu by sliding
XVY or turning cVd the COMAND
controller.
The interior/exterior lighting delayed
switch-off time menu appears. The current
setting is indicated by a # dot.
X Select Setting by sliding ZVÆ or turning
cVd the COMAND controller.
The selected setting is indicated by a #
dot.
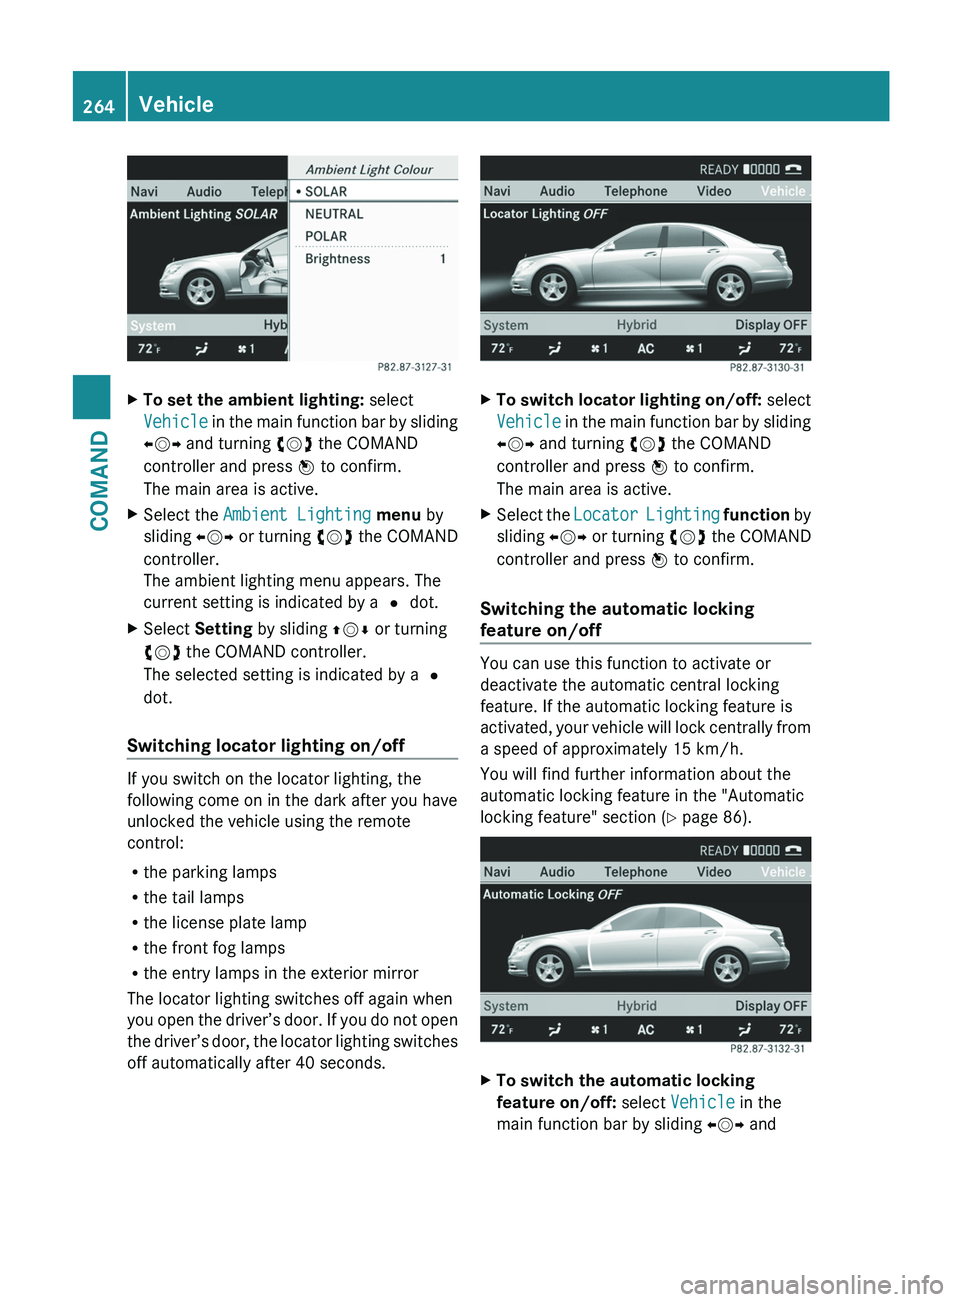
Setting the ambient light You can make the following settings:
R
SOLAR (yellow interior lighting)
R NEUTRAL (white interior lighting)
R POLAR (blue interior lighting)
R Brightness of the interior lighting on a
scale of 0 (off) to 5 (bright) Vehicle
263COMAND Z
Page 266 of 536
X
To set the ambient lighting: select
Vehicle
in the main function bar by sliding
XVY and turning cVd the COMAND
controller and press W to confirm.
The main area is active.
X Select the Ambient Lighting menu by
sliding XVY or turning cVd the COMAND
controller.
The ambient lighting menu appears. The
current setting is indicated by a # dot.
X Select Setting by sliding ZVÆ or turning
cVd the COMAND controller.
The selected setting is indicated by a #
dot.
Switching locator lighting on/off If you switch on the locator lighting, the
following come on in the dark after you have
unlocked the vehicle using the remote
control:
R
the parking lamps
R the tail lamps
R the license plate lamp
R the front fog lamps
R the entry lamps in the exterior mirror
The locator lighting switches off again when
you
open the driver’s door. If you do not open
the driver’s door, the locator lighting switches
off automatically after 40 seconds. X
To switch locator lighting on/off: select
Vehicle
in the main function bar by sliding
XVY and turning cVd the COMAND
controller and press W to confirm.
The main area is active.
X Select the Locator
Lighting function by
sliding XVY or turning cVd the COMAND
controller and press W to confirm.
Switching the automatic locking
feature on/off You can use this function to activate or
deactivate the automatic central locking
feature. If the automatic locking feature is
activated,
your vehicle will lock centrally from
a speed of approximately 15 km/h.
You will find further information about the
automatic locking feature in the "Automatic
locking feature" section (Y page 86). X
To switch the automatic locking
feature on/off: select Vehicle in the
main function bar by sliding XVY and264
Vehicle
COMAND
Page 267 of 536
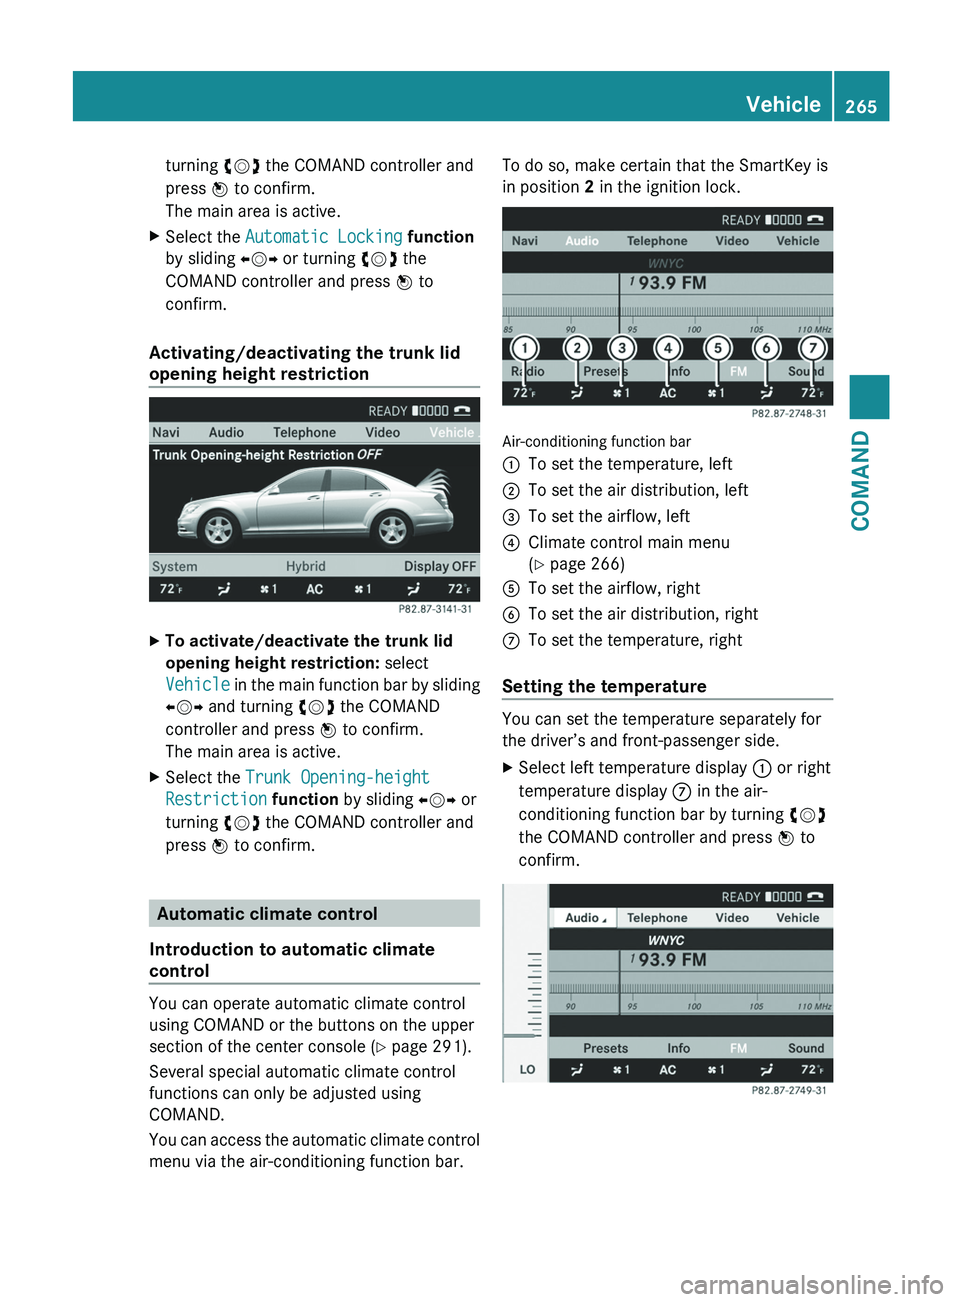
turning
cVd the COMAND controller and
press W to confirm.
The main area is active.
X Select the Automatic Locking function
by sliding XVY or turning cVd the
COMAND controller and press W to
confirm.
Activating/deactivating the trunk lid
opening height restriction X
To activate/deactivate the trunk lid
opening height restriction: select
Vehicle
in the main function bar by sliding
XVY and turning cVd the COMAND
controller and press W to confirm.
The main area is active.
X Select the Trunk Opening-height
Restriction function by sliding XVY or
turning cVd the COMAND controller and
press W to confirm. Automatic climate control
Introduction to automatic climate
control You can operate automatic climate control
using COMAND or the buttons on the upper
section of the center console
(Y page 291).
Several special automatic climate control
functions can only be adjusted using
COMAND.
You can access the automatic climate control
menu via the air-conditioning function bar. To do so, make certain that the SmartKey is
in position 2 in the ignition lock.
Air-conditioning function bar
:
To set the temperature, left
; To set the air distribution, left
= To set the airflow, left
? Climate control main menu
(Y page 266)
A To set the airflow, right
B To set the air distribution, right
C To set the temperature, right
Setting the temperature You can set the temperature separately for
the driver’s and front-passenger side.
X
Select left temperature display : or right
temperature display C in the air-
conditioning function bar by turning cVd
the COMAND controller and press W to
confirm. Vehicle
265
COMAND Z
Page 272 of 536
X
To move to the lower menu bar: select
by sliding ZVÆ the COMAND controller
and press W to confirm.
i When you press the T function button,
the previously adjusted seat is active.
X To adjust the lumbar support: select by
sliding XVY or turning cVd the COMAND
controller and press W to confirm.
Multicontour seat i
Information about the components and
operating principles of COMAND can be
found on (Y page 118).
The contour of the driver's seat and front-
passenger
seat backrests can be individually
adjusted to provide optimum support for your
back. This is achieved by controlling the
pressure in the air chambers in the
multicontour seat.
The adjustments are made using the
COMAND display.
i When you adjust the multicontour seat,
you may hear the air being pumped in or
released.
You can adjust the following air cushions:
R seat side bolsters
R seat backrest side bolsters
R backrest curvature in the lumbar region
R backrest curvature in the upper back
region
X Make sure that the SmartKey is in position
2 in the ignition lock.
X Press the T function button.
Selecting the seat
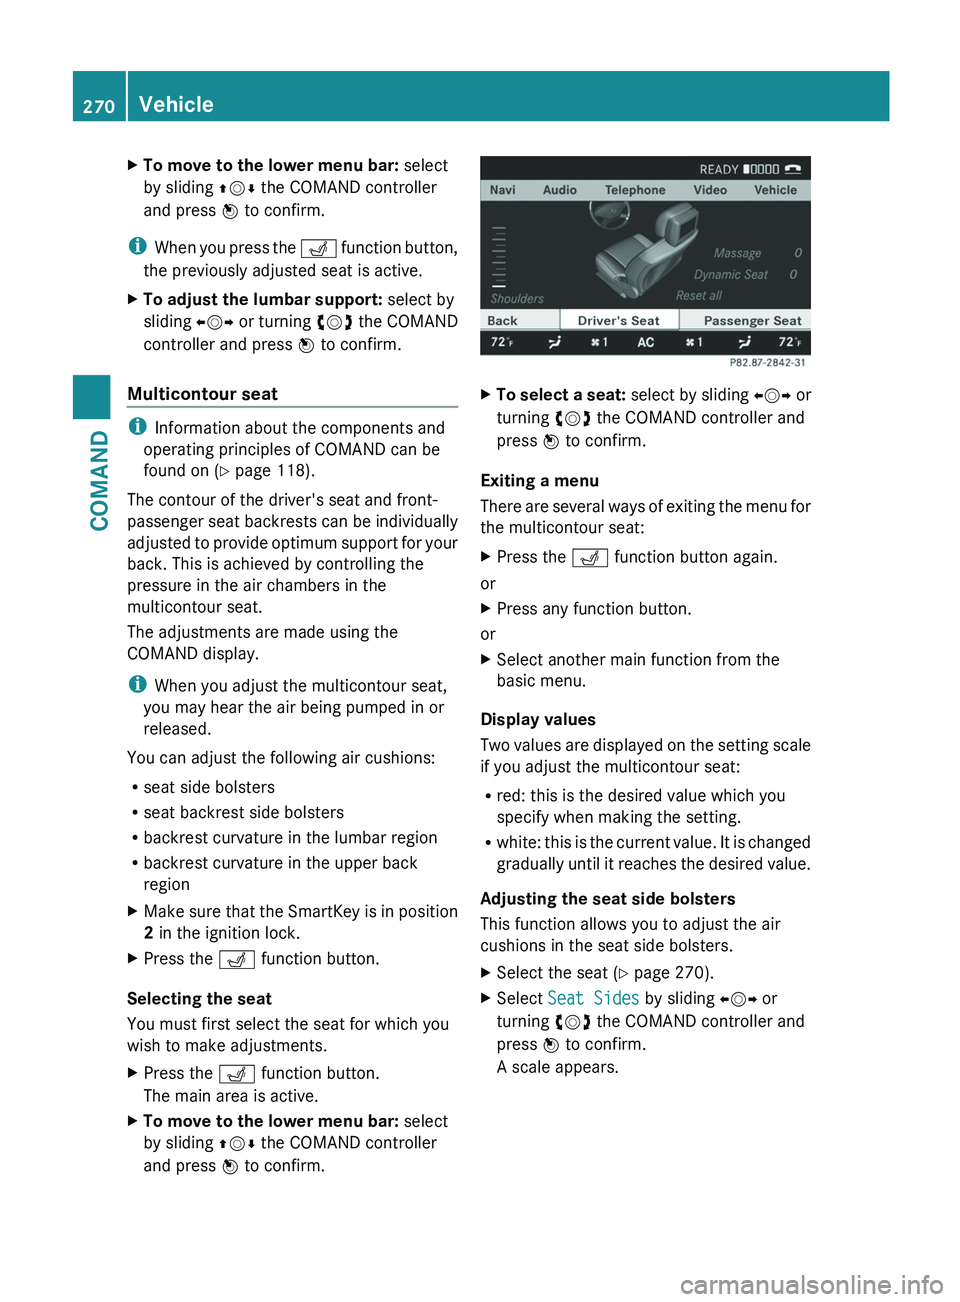
You must first select the seat for which you
wish to make adjustments.
X Press the T function button.
The main area is active.
X To move to the lower menu bar: select
by sliding ZVÆ the COMAND controller
and press W to confirm. X
To select a seat:
select by sliding XVY or
turning cVd the COMAND controller and
press W to confirm.
Exiting a menu
There
are several ways of exiting the menu for
the multicontour seat:
X Press the T function button again.
or
X Press any function button.
or
X Select another main function from the
basic menu.
Display values
Two
values are displayed on the setting scale
if you adjust the multicontour seat:
R red: this is the desired value which you
specify when making the setting.
R white: this is the current value. It is changed
gradually until it reaches the desired value.
Adjusting the seat side bolsters
This function allows you to adjust the air
cushions in the seat side bolsters.
X Select the seat ( Y page 270).
X Select Seat Sides by sliding XVY or
turning cVd the COMAND controller and
press W to confirm.
A scale appears. 270
Vehicle
COMAND
Page 278 of 536
Useful information
i This Operator's Manual describes all
models and all standard and optional
equipment of your vehicle available at the
time of publication of the Operator's
Manual. Country-specific differences are
possible.
Please note that your vehicle may
not be equipped with all features
described. This also applies to safety-
related systems and functions.
i Please read the information on qualified
specialist workshops (Y page 31). Exterior lighting
Important safety notes
For reasons of safety, Mercedes-Benz
recommends that you drive with the lights
switched
on even during the daytime. In some
countries, operation of the headlamps varies
due to legal requirements and self-imposed
obligations. Information about driving abroad
Converting to symmetrical low beam
when
driving abroad: switch the headlamps
to symmetrical low beam in countries in
which traffic drives on the opposite side of the
road to the country where the vehicle is
registered. This prevents glare to oncoming
traffic. Symmetrical lights do not illuminate
as large an area of the edge of the road.
Have the headlamps converted at a qualified
specialist workshop, e.g. an authorized
Mercedes-Benz Center, as close to the border
as possible before driving in these countries.
Converting to asymmetrical low beam
after returning: have the headlamps
converted back to asymmetrical low beam at
a qualified specialist workshop, e.g. an
authorized Mercedes-Benz Center, as soon as
possible after crossing the border again. Light switch
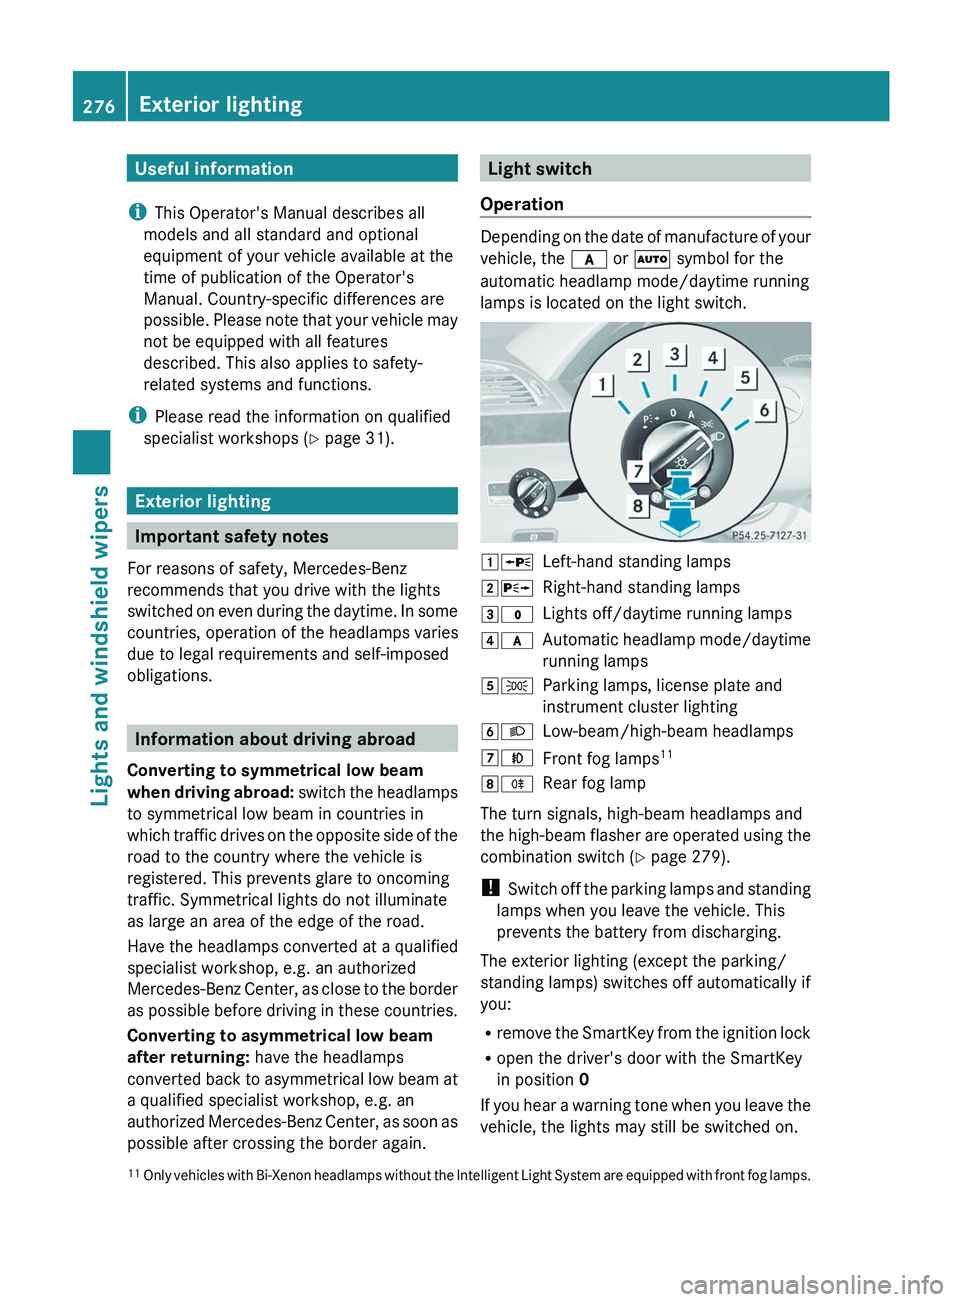
Operation Depending on the date of manufacture of your
vehicle, the c or à symbol for the
automatic headlamp mode/daytime running
lamps is located on the light switch. 1W
Left-hand standing lamps
2X Right-hand standing lamps
3$ Lights off/daytime running lamps
4c Automatic headlamp mode/daytime
running lamps
5T Parking lamps, license plate and
instrument cluster lighting
6L Low-beam/high-beam headlamps
7N Front fog lamps 11
8R Rear fog lamp
The turn signals, high-beam headlamps and
the
high-beam flasher are operated using the
combination switch (Y page 279).
! Switch off the parking lamps and standing
lamps when you leave the vehicle. This
prevents the battery from discharging.
The exterior lighting (except the parking/
standing lamps) switches off automatically if
you:
R remove the SmartKey from the ignition lock
R open the driver's door with the SmartKey
in position 0
If you hear a warning tone when you leave the
vehicle, the lights may still be switched on.
11 Only
vehicles with Bi-Xenon headlamps without the Intelligent Light System are equipped with front fog lamps.276
Exterior lighting
Lights and windshield wipers
Page 279 of 536
X
Turn the light switch to $ or c.
or
X If the rear fog lamp is switched on: press
the light switch in to the stop.
Low-beam headlamps X
To switch on the low-beam headlamps:
turn the SmartKey in the ignition lock to
position 2 or start the engine.
X Turn the light switch to L.
The T
indicator lamp on the light switch
lights up.
X To switch off the low-beam
headlamps: turn the light switch to $.
Daytime running lamps Daytime running lamps in Canada
The daytime running lamps function is
required
by law in Canada. It cannot therefore
be deactivated.
X Turn the light switch to $ or c.
With
the engine running: depending on the
ambient light, the daytime running lamps or
the low-beam headlamps are switched on.
When the low-beam headlamps are
activated, the T indicator lamp on the
light switch lights up.
When the engine is running and the vehicle is
stationary
or if the electronic parking brake is
applied: if you move the selector lever from a
drive position to P, the daytime running
lamps/low-beam headlamps go out after
three minutes.
When the engine is running, the vehicle is
stationary and in high ambient light
brightness: if you turn the light switch
to T, the daytime running lamps and the
parking lamps are switched on.
If the engine is running and you turn the light
switch to L, the manual settings take
precedence over the daytime running lamps. Daytime running lamps in the USA
In the USA, the daytime running lamps are
deactivated upon delivery from the factory.
X
To activate the daytime running
lamps:
activate the daytime running lamps
function in the on-board computer
(Y page 385).
X Turn the light switch to $ or c.
With
the engine running: depending on the
ambient light, the daytime running lamps or
the low-beam headlamps are switched on.
When the low-beam headlamps are
activated, the T indicator lamp on the
light switch lights up.
If the engine is running and you turn the light
switch to T or L, the manual settings
take precedence over the daytime running
lamps.
Automatic headlamp mode X
To switch on automatic headlamp
mode: turn the light switch to c.
SmartKey
in position 1 in the ignition lock:
the parking lamps are switched on or off
automatically depending on the brightness
of the ambient light.
With the engine running: depending on the
brightness of the ambient light, the daytime
running lamps 12
or the parking lamps and
low-beam headlamps are switched on or off
automatically.
When the low-beam headlamps are
switched on, the T indicator lamp on
the light switch lights up. G
WARNING
If the light switch is set to c,
the low-beam
headlamps will not come on automatically if
it is foggy. This could endanger you and
others. Therefore, turn the light switch to
L in fog.
12 Only if daytime running lamps have been activated via the on-board computer. Exterior lighting
277
Lights and windshield wipers
Z
Page 280 of 536
The automatic headlamp feature is only an
aid.
The driver is responsible for the vehicle's
lighting at all times. G
WARNING
When it is dark or foggy, turn the light switch
quickly from c to L. Otherwise, the
headlamps could switch off temporarily and
you could cause an accident.
Front fog lamps G
WARNING
If you suspect that driving conditions will be
foggy,
turn the light switch to L before you
start your journey. Otherwise, your vehicle
may not be visible and you could endanger
yourself and others. G
WARNING
In low ambient lighting or foggy conditions,
only switch from position c to L with
the vehicle at a standstill in a safe location.
Switching from c to L will briefly
switch off the headlamps. Doing so while
driving
in low ambient lighting conditions may
result in an accident.
X To switch on the front fog lamps: turn
the
SmartKey in the ignition lock to position
2 or start the engine.
X Turn the light switch to L
or T. If the
light switch is set to c, you cannot
switch on the fog lamps.
X Pull the light switch out to the first detent.
The
green N indicator lamp on the light
switch lights up.
X To switch off the front fog lamps: press
the light switch in as far as it will go.
The
green N indicator lamp on the light
switch goes out. Rear fog lamp X
To switch on the rear fog lamp: turn the
SmartKey in the ignition lock to position 2
or start the engine.
X Turn the light switch to L or T
(vehicles with front fog lamps), or turn the
light
switch to L (vehicles without front
fog lamps). If the light switch is set to
c, you cannot switch on the rear fog
lamp.
X Turn the light switch to L. If the light
switch
is set to T, you cannot switch on
the rear fog lamp.
X Pull the light switch out to the second stop
(vehicles
with front fog lamps) or pull it out
to the stop (vehicles without front fog
lamps).
The yellow R indicator lamp on the light
switch lights up.
X To switch off the rear fog lamp: press
the
light switch in as far as it will go.
The yellow R indicator lamp on the light
switch goes out.
Headlamp cleaning system The headlamps are cleaned automatically if
the "Wipe with washer fluid" function is
operated
ten times while the lights are on and
the engine is running (Y page 285). When you
switch off the ignition, the automatic
headlamp cleaning system is reset and
counting is resumed from 0. 278
Exterior lighting
Lights and windshield wipers