center console MERCEDES-BENZ S-CLASS SEDAN 2013 Owners Manual
[x] Cancel search | Manufacturer: MERCEDES-BENZ, Model Year: 2013, Model line: S-CLASS SEDAN, Model: MERCEDES-BENZ S-CLASS SEDAN 2013Pages: 536, PDF Size: 24.14 MB
Page 9 of 536
Car
see Vehicle
Care
Carpets .......................................... 469
Car wash ........................................ 463
Display ........................................... 467
Exterior lights ................................ 466
Gear or selector lever ....................468
Matte finish ................................... 465
Night View Assist Plus ...................467
Notes ............................................. 463
Paint .............................................. 465
Plastic trim .................................... 468
Power washer ................................ 464
Rear view camera .......................... 467
Roof lining ...................................... 469
Seat belt ........................................ 469
Seat cover ..................................... 469
Sensors ......................................... 467
Steering wheel ............................... 468
Tail pipes ....................................... 467
Trim pieces .................................... 468
Washing by hand ........................... 464
Wheels ........................................... 465
Windows ........................................ 466
Wiper blades .................................. 466
Wooden trim .................................. 468
Cargo tie down rings .........................435
Car pool lanes .................................... 169
Car wash (care) ................................. 463
Category Satellite radio ................................ 218
CD
Copy protection ............................. 229
Fast forward/fast rewind ............... 225
General information ....................... 229
Inserting ........................................ 220
Inserting/loading (Rear Seat
Entertainment System) .................. 251
Mode, switching to ........................ 221
Multisession .................................. 228
Notes on discs ............................... 229
Operating the player/changer
(on-board computer) ...................... 379
Pause function ............................... 223
Playback options ........................... 228
Player/changer operation
(COMAND) ..................................... 220Removing/ejecting (Rear Seat
Entertainment System)
..................251
Safety notes .................................. 220
Selecting a media type .................. 224
Selecting a track ............................ 224
Sound settings (balance, bass,
fader, treble) .................................. 135
Cell phone
see Mobile phone
Center console ..................................... 38
Central locking Automatic locking feature
(COMAND) ..................................... 264
Locking/unlocking (SmartKey) ........ 78
Changing batteries (remote
control, headphones) ........................247
Changing bulbs High-beam headlamps (vehicles
with halogen daytime running
lamps) ............................................ 284
High-beam headlamps (vehicles
with LED daylight lamps) ...............284
Important safety notes .................. 282
Overview of bulb types ..................283
Changing direction
Announcement phase .................... 166
Change of direction phase ............. 167
Preparation phase ......................... 166
Character bar ..................................... 129
Characters Entering ......................................... 130
Entering (address book, phone
book) ............................................. 132
Entering (navigation) ......................129
Child-proof locks
Important safety notes .................... 66
Rear doors ....................................... 67
Children
In the vehicle ................................... 62
Restraint systems ............................ 62
Child seat
LATCH-type (ISOFIX) child seat
anchors ............................................ 65
Special seat belt retractor ............... 64
Top Tether ....................................... 65
Cigarette lighter ................................ 440 Index
7
Page 11 of 536
Cup holder
Center console .............................. 437
Important safety notes
..................437
Rear compartment ......................... 437
Customer Assistance Center (CAC) ...31
Customer Relations Department .......31 D
Dashboard see Cockpit
Data
see Technical data
Data carrier
MUSIC REGISTER ........................... 230
Data medium
Audio DVD ..................................... 228
CD/DVD ........................................ 229
MP3 ............................................... 228
Date format, setting ..........................144
Day design, setting ...........................143
Daytime running lamp mode see Daytime running lamps
Daytime running lamps
Display message ............................ 403
Switching on/off (on-board
computer) ...................................... 385
Switching on/off (switch) .............. 277
DEF
Adding ........................................... 321
Display message ............................ 408
Delayed switch-off
Exterior lighting (COMAND) ...........263
Interior lighting (COMAND) ............263
Destination (navigation)
Displaying information ...................172
Entering a destination by address .. 153
Entering a destination using the
map ............................................... 160
Entering an intermediate stop .......161
Entering a point of interest ............ 162
Saving ............................................ 179
Selecting from the destination
memory ......................................... 159
Selecting from the list of last
destinations ................................... 159Destination memory (navigation)
Deleting an entry ........................... 181
Entering/saving your home
address .......................................... 156
Previous destinations ....................181
Dialing a number (telephone) ...........
200
Digital speedometer .........................376
Digital TV see TV
DIRECT SELECT lever
see Automatic transmission
Display
Selecting the design ......................143
Settings ......................................... 143
Display (cleaning instructions) ........467
Displaying the arrival time ............... 172
Displaying the distance to the
destination ......................................... 172
Display messages Calling up (on-board computer) ..... 388
Driving systems ............................. 408
Engine ............................................ 404
General notes ................................ 388
Hiding (on-board computer) ........... 388
Lights ............................................. 401
Safety systems .............................. 389
Service interval display .................. 462
SmartKey ....................................... 419
Tires ............................................... 415
Vehicle ........................................... 417
Distance
see Navigation, route overview
Distance display (on-board
computer) .......................................... 383
Distance recorder ............................. 376
see Odometer
see Trip odometer
Distance warning (warning lamp) ....428
DISTRONIC PLUS Deactivating ................................... 340
Display message ............................ 413
Displays in the multifunction
display ........................................... 339
Driving tips .................................... 340
Function/notes ............................. 332
Important safety notes .................. 332 Index
9
Page 35 of 536
Cockpit
................................................. 34
Instrument cluster ..............................35
On-board computer and COMAND .....37
Center console .................................... 38
Overhead control panel ......................39
Door control panel .............................. 40
Rear seats ............................................ 42 33At a glance
Page 40 of 536
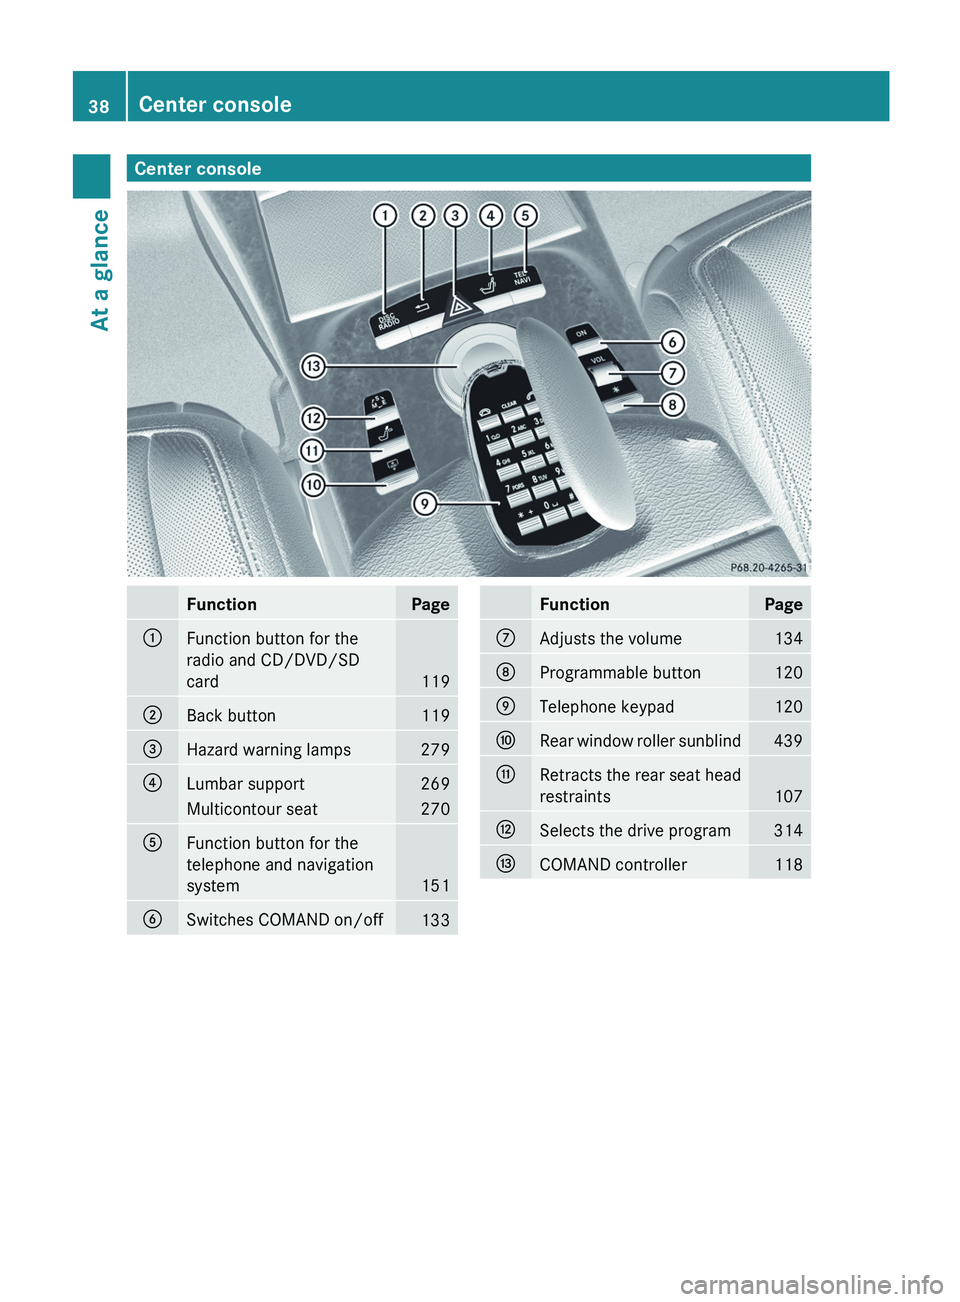
Center console
Function Page
:
Function button for the
radio and CD/DVD/SD
card
119
;
Back button 119
=
Hazard warning lamps 279
?
Lumbar support 269
Multicontour seat 270
A
Function button for the
telephone and navigation
system
151
B
Switches COMAND on/off
133 Function Page
C
Adjusts the volume 134
D
Programmable button 120
E
Telephone keypad 120
F
Rear window roller sunblind 439
G
Retracts the rear seat head
restraints
107
H
Selects the drive program 314
I
COMAND controller 11838
Center consoleAt a glance
Page 50 of 536
belts regardless of whether your vehicle is
equipped with air bags or not.
It
is important for your safety and that of your
passenger to have deployed air bags replaced
and to have any malfunctioning air bags
repaired. This will help to make sure the air
bags continue to perform their protective
function for the vehicle occupants in the
event of a crash.
Front air bags The front air bags increase protection for the
driver's and front-passenger's head and
chest.
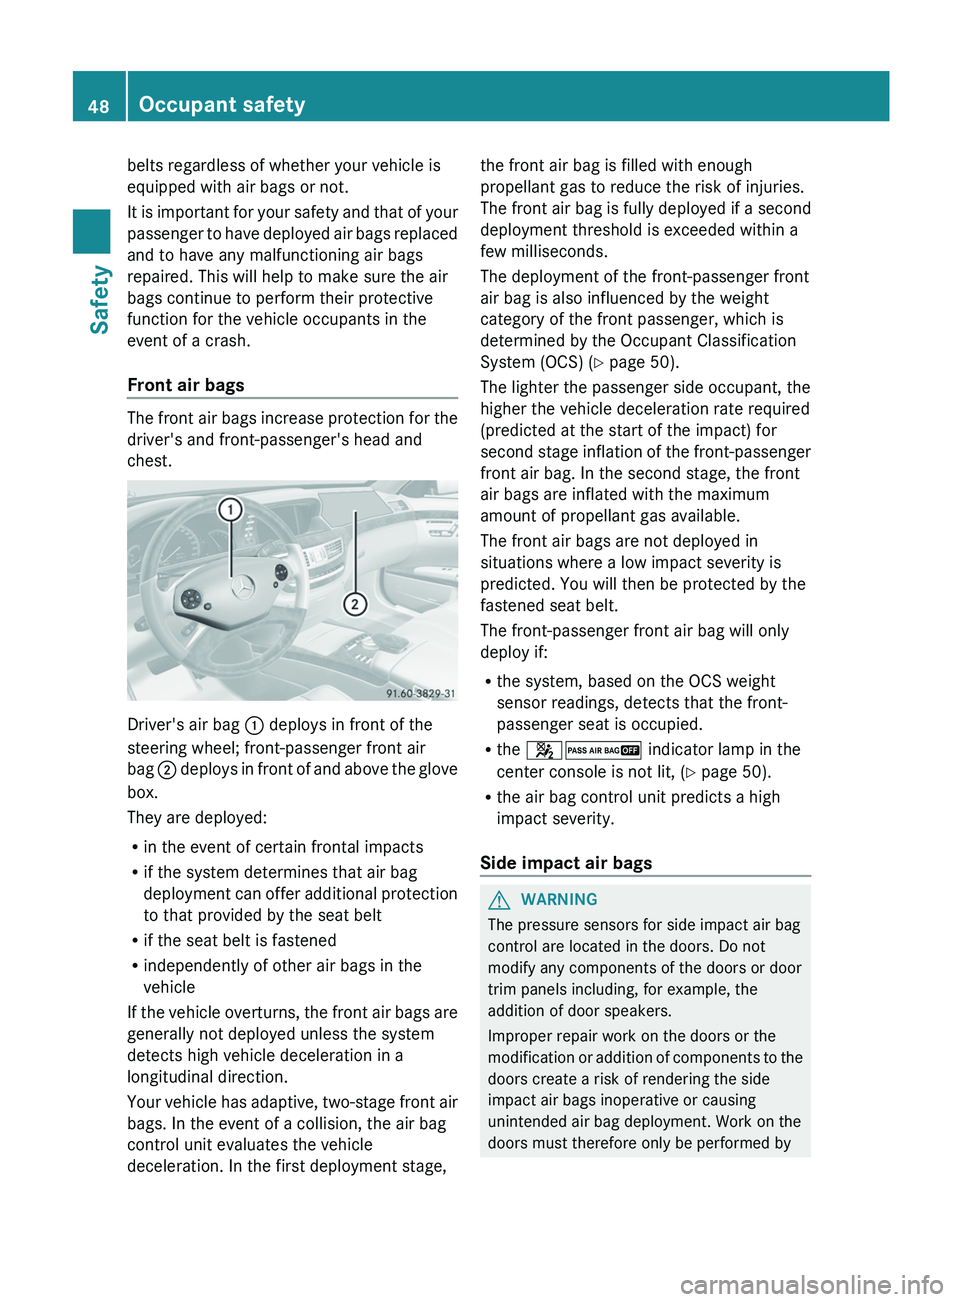
Driver's air bag
: deploys in front of the
steering wheel; front-passenger front air
bag ;
deploys in front of and above the glove
box.
They are deployed:
R in the event of certain frontal impacts
R if the system determines that air bag
deployment can offer additional protection
to that provided by the seat belt
R if the seat belt is fastened
R independently of other air bags in the
vehicle
If the vehicle overturns, the front air bags are
generally not deployed unless the system
detects high vehicle deceleration in a
longitudinal direction.
Your vehicle has adaptive, two-stage front air
bags. In the event of a collision, the air bag
control unit evaluates the vehicle
deceleration. In the first deployment stage, the front air bag is filled with enough
propellant gas to reduce the risk of injuries.
The
front air bag is fully deployed if a second
deployment threshold is exceeded within a
few milliseconds.
The deployment of the front-passenger front
air bag is also influenced by the weight
category of the front passenger, which is
determined by the Occupant Classification
System (OCS) ( Y page 50).
The lighter the passenger side occupant, the
higher the vehicle deceleration rate required
(predicted at the start of the impact) for
second stage inflation of the front-passenger
front air bag. In the second stage, the front
air bags are inflated with the maximum
amount of propellant gas available.
The front air bags are not deployed in
situations where a low impact severity is
predicted. You will then be protected by the
fastened seat belt.
The front-passenger front air bag will only
deploy if:
R the system, based on the OCS weight
sensor readings, detects that the front-
passenger seat is occupied.
R the 42 indicator lamp in the
center console is not lit, (Y page 50).
R the air bag control unit predicts a high
impact severity.
Side impact air bags G
WARNING
The pressure sensors for side impact air bag
control are located in the doors. Do not
modify any components of the doors or door
trim panels including, for example, the
addition of door speakers.
Improper repair work on the doors or the
modification
or addition of components to the
doors create a risk of rendering the side
impact air bags inoperative or causing
unintended air bag deployment. Work on the
doors must therefore only be performed by 48
Occupant safety
Safety
Page 110 of 536
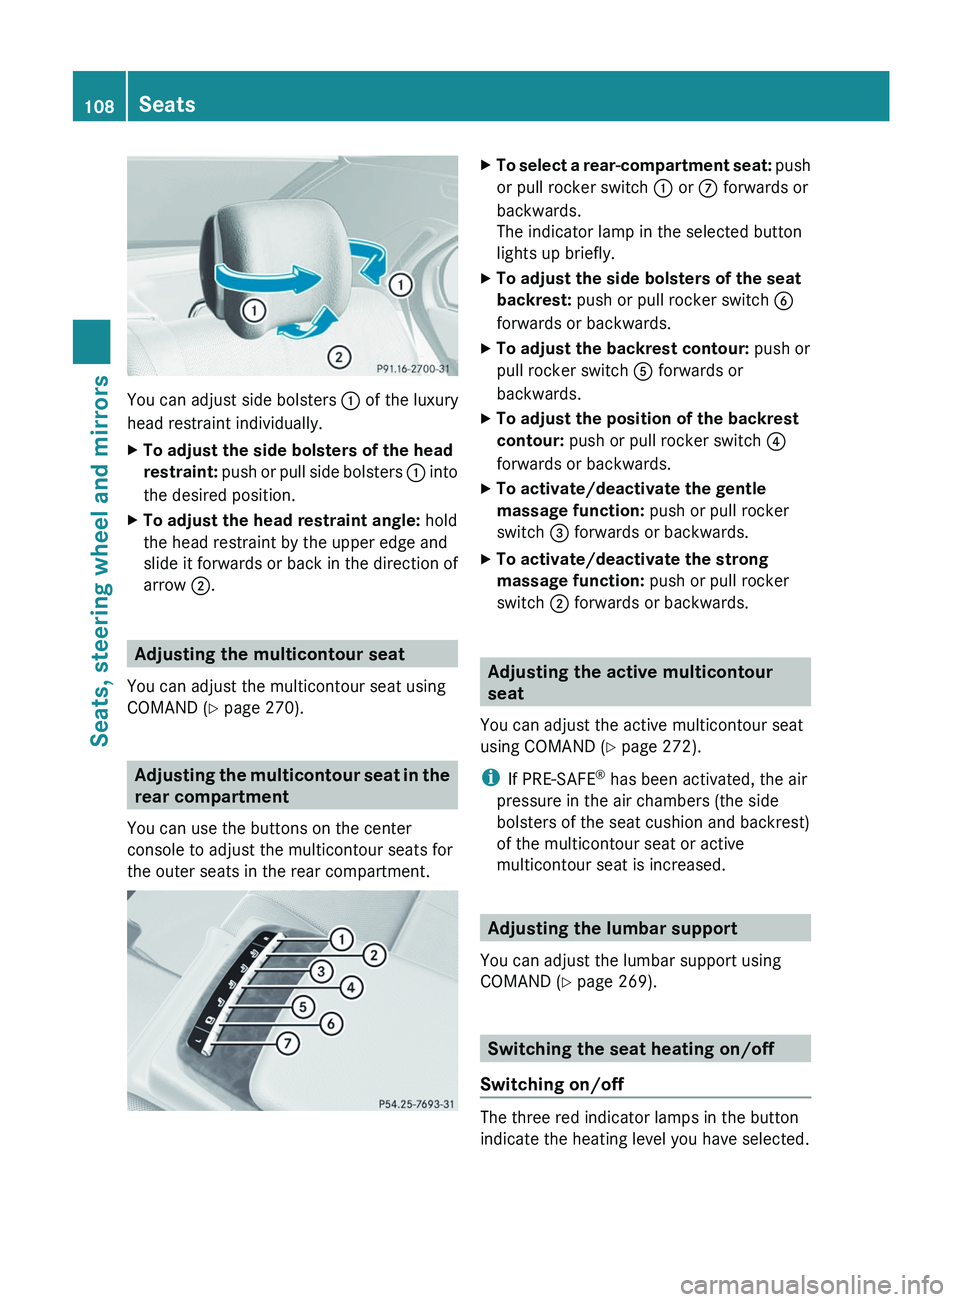
You can adjust side bolsters
: of the luxury
head restraint individually.
X To adjust the side bolsters of the head
restraint:
push or pull side bolsters : into
the desired position.
X To adjust the head restraint angle: hold
the head restraint by the upper edge and
slide
it forwards or back in the direction of
arrow ;. Adjusting the multicontour seat
You can adjust the multicontour seat using
COMAND (Y page 270). Adjusting the multicontour seat in the
rear compartment
You can use the buttons on the center
console to adjust the multicontour seats for
the outer seats in the rear compartment. X
To select a rear-compartment seat:
push
or pull rocker switch : or C forwards or
backwards.
The indicator lamp in the selected button
lights up briefly.
X To adjust the side bolsters of the seat
backrest: push or pull rocker switch B
forwards or backwards.
X To adjust the backrest contour: push or
pull rocker switch A forwards or
backwards.
X To adjust the position of the backrest
contour: push or pull rocker switch ?
forwards or backwards.
X To activate/deactivate the gentle
massage function: push or pull rocker
switch = forwards or backwards.
X To activate/deactivate the strong
massage function: push or pull rocker
switch ; forwards or backwards. Adjusting the active multicontour
seat
You can adjust the active multicontour seat
using COMAND (Y page 272).
i If PRE-SAFE ®
has been activated, the air
pressure in the air chambers (the side
bolsters of the seat cushion and backrest)
of the multicontour seat or active
multicontour seat is increased. Adjusting the lumbar support
You can adjust the lumbar support using
COMAND (Y page 269). Switching the seat heating on/off
Switching on/off The three red indicator lamps in the button
indicate the heating level you have selected.108
Seats
Seats, steering wheel and mirrors
Page 135 of 536
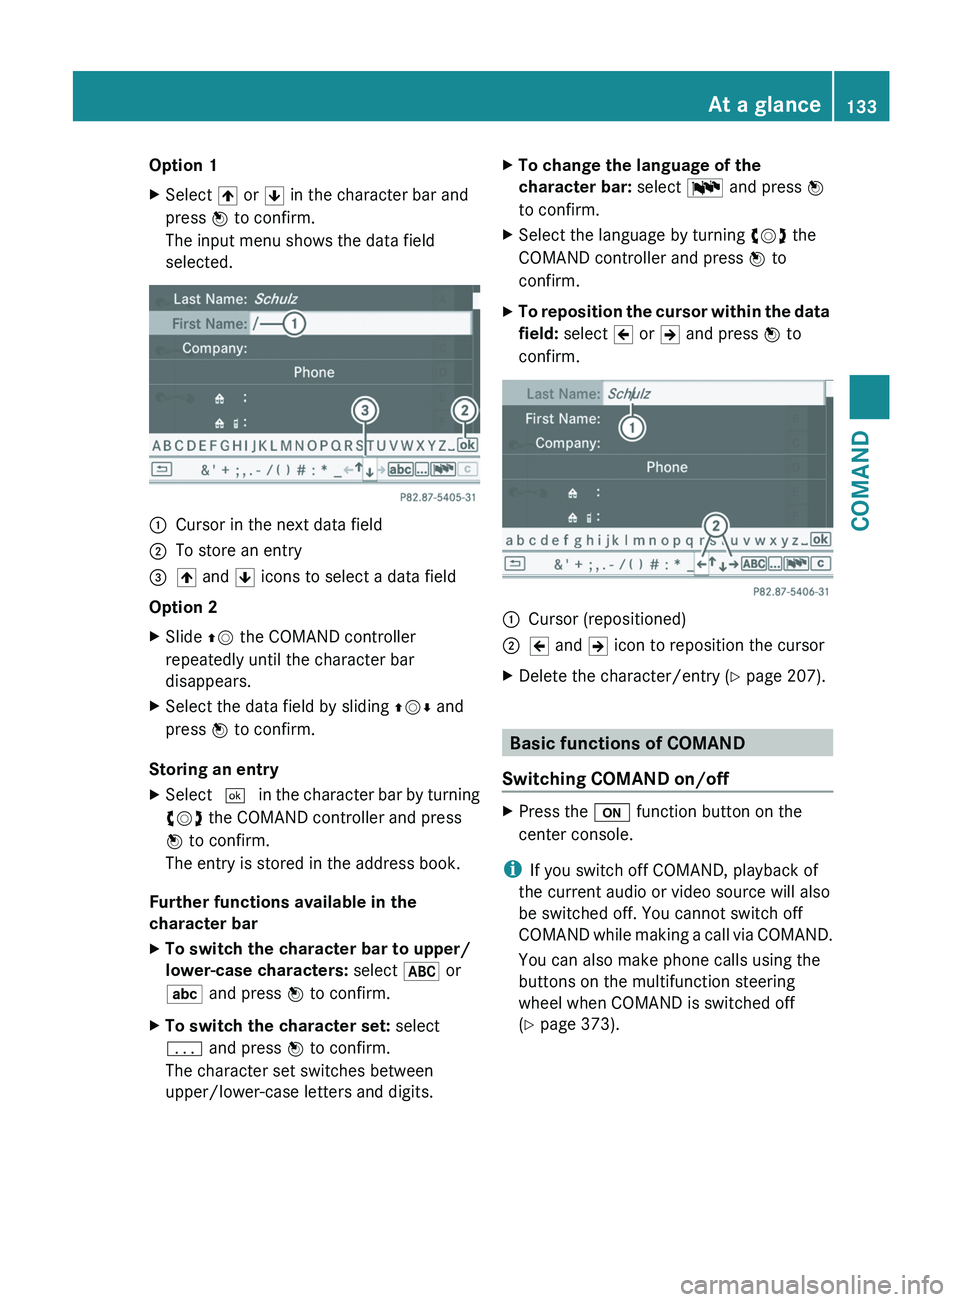
Option 1
X
Select 4 or 5 in the character bar and
press W to confirm.
The input menu shows the data field
selected. :
Cursor in the next data field
; To store an entry
= 4 and 5 icons to select a data field
Option 2
X Slide ZV the COMAND controller
repeatedly until the character bar
disappears.
X Select the data field by sliding ZVÆ and
press W to confirm.
Storing an entry
X Select ¬ in the character bar by turning
cVd the COMAND controller and press
W to confirm.
The entry is stored in the address book.
Further functions available in the
character bar
X To switch the character bar to upper/
lower-case characters: select * or
E and press W to confirm.
X To switch the character set: select
p and press W to confirm.
The character set switches between
upper/lower-case letters and digits. X
To change the language of the
character bar: select B and press W
to confirm.
X Select the language by turning cVd the
COMAND controller and press W to
confirm.
X To reposition the cursor within the data
field: select 2 or 3 and press W to
confirm. :
Cursor (repositioned)
; 2 and 3 icon to reposition the cursor
X Delete the character/entry (Y page 207). Basic functions of COMAND
Switching COMAND on/off X
Press the u function button on the
center console.
i If you switch off COMAND, playback of
the current audio or video source will also
be switched off. You cannot switch off
COMAND
while making a call via COMAND.
You can also make phone calls using the
buttons on the multifunction steering
wheel when COMAND is switched off
(Y page 373). At a glance
133
COMAND Z
Page 196 of 536
Call disconnection while the vehicle is
in motion
A call may be disconnected if:
R
there is insufficient network coverage in
certain areas.
R you move from one transmitter/receiver
area
(cell) into another and no channels are
free.
R you use a SIM card which is not compatible
with the network available.
R you are using a mobile phone with
"Twincard" and the mobile phone with the
second SIM card is already logged into the
network.
Operating options You can operate the telephone by:
R
using the COMAND controller:
turn cVd.
slide XVY or ZVÆ.
press W.
R the 6 or ~ button on the telephone
keypad on the center console
R the 6 or ~ button on the
multifunction steering wheel
R using the Voice Control System (see the
separate Voice Control System operating
instructions)
Unless otherwise indicated, the descriptions
and illustrations in this section refer to
COMAND and the telephone keypad. This
also means that to carry out the functions
described here, you must always be in the
Telephone menu. The fastest way to access
the Telephone menu is to press the S
function button. Function restrictions You will not be able to use the telephone, will
no
longer be able to use the telephone, or you
may have to wait before using it, in the
following situations:
R when the mobile phone is switched off
R when the "Bluetooth ®
" function is switched
off in COMAND
R when the "Bluetooth ®
" function is switched
off on the mobile phone
R if the mobile phone is not logged into a
mobile phone network
i The telephone automatically tries to log
on to a network. If no network is available,
you will not be able to make a " 911"
emergency call. If you attempt to make an
outgoing call, the NO SERVICE message will
appear for a short while.
R if you remove the SmartKey from the
ignition lock during an active conversation
in hands-free mode, the conversation may
be continued for up to 30 minutes. After
that time, it will be interrupted.
You can prevent this interruption by switching
to "private call" ("private mode") on the
mobile phone before deactivating COMAND
(see mobile phone operating instructions).
If you wish to switch off COMAND during an
active conversation in hands-free mode, the
following message will appear: You cannot
shut off COMAND until you have
finished your telephone call
911 emergency call G
WARNING
The 911 emergency call system is a public
service. Using it without due cause is a
criminal offense.
The following requirements must be fulfilled
for a 911 emergency call:
R the mobile phone must be switched on.
R a network must be available.194
Telephone
COMAND
Page 207 of 536
i
If you switch to another main function,
e.g.
navigation, while receiving vCards, the
reception of vCards will be terminated.
X Select Data/Connections in the
telephone basic menu by sliding VÆ and
turning cVd the COMAND controller and
press W to confirm.
X Select Download Contacts and press W
to confirm.
X Select Via Bluetooth and press W to
confirm.
This interrupts the Bluetooth ®
connection
between COMAND and your active mobile
phone.
In turn, COMAND is ready to receive
vCards from another Bluetooth ®
device.
X Start data transfer on the external
Bluetooth
device (N operating instructions
of the device).
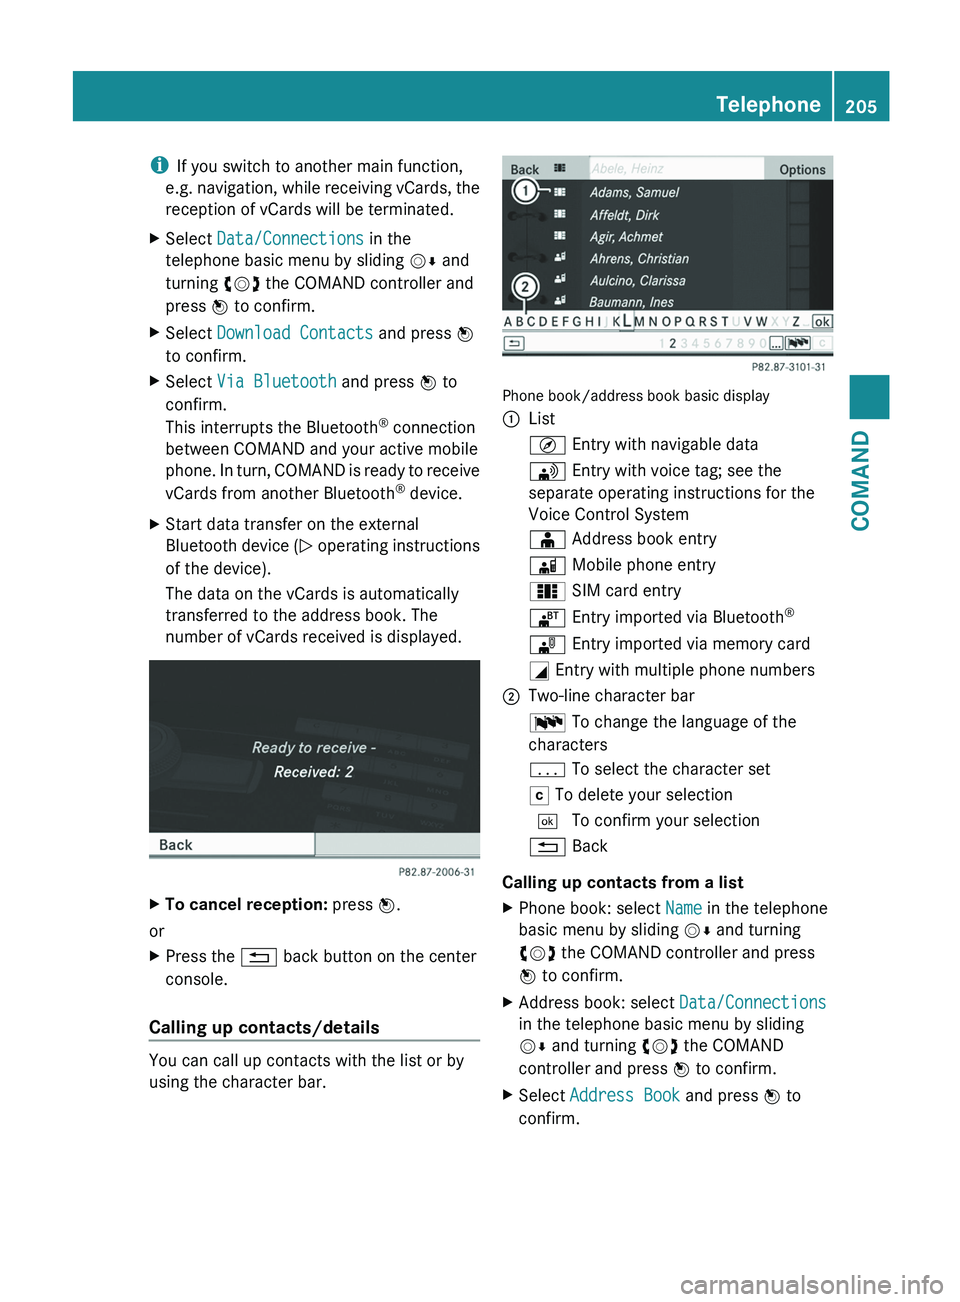
The data on the vCards is automatically
transferred to the address book. The
number of vCards received is displayed. X
To cancel reception: press W.
or
X Press the % back button on the center
console.
Calling up contacts/details You can call up contacts with the list or by
using the character bar. Phone book/address book basic display
:
List
Ç Entry with navigable data
\ Entry with voice tag; see the
separate operating instructions for the
Voice Control System
Æ Address book entry
à Mobile phone entry
0 SIM card entry
® Entry imported via Bluetooth ®
¯ Entry imported via memory card
G Entry with multiple phone numbers
; Two-line character bar
B To change the language of the
characters
p To select the character set
F To delete your selection
¬ To confirm your selection
% Back
Calling up contacts from a list
X Phone book: select Name in the telephone
basic menu by sliding VÆ and turning
cVd the COMAND controller and press
W to confirm.
X Address book: select Data/Connections
in the telephone basic menu by sliding
VÆ and turning cVd the COMAND
controller and press W to confirm.
X Select Address Book and press W to
confirm. Telephone
205COMAND Z
Page 250 of 536
headphones as shown to prevent the
batteries from falling out.
X Remove the discharged batteries from the
tray.
X Insert the new batteries. Observe the
polarity markings on the batteries and
battery tray when doing so.
Left-hand battery: The positive pole (+)
must face upwards.
Right-hand battery The positive pole (+)
must face downwards.
X To close the battery compartment:
press battery compartment cover
downwards until it engages into place.
If the batteries have been inserted
correctly, the indicator lamp will light up
green when the headphones are switched
on. Basic functions
Using headphones i
Vehicles intended for sale in the USA are
equipped with cordless headphones.
Corded headphones are available for the
Canadian and other markets.
You can use the cordless headphones
supplied and/or up to two sets of corded
headphones connected to the corresponding
jack of the rear-compartment screens
(Y page 139).
You will find information on the following
topics in the "Cordless headphones" section
(Y page 142).
R Switching the cordless headphones on/off
R Adjusting the volume of the headphones
R Selecting a screen for the headphones
Using the main loudspeakers This function is available in conjunction with
COMAND.
You can use the vehicle loudspeakers to
listen to a disc inserted in the rear-
compartment drive. To do so, at least one of the rear-compartment screens must be set to
disc mode.
X
To set operation via the main
loudspeakers: press the R function
button
on the center console once or twice.
X Select Audio by sliding ZV the COMAND
controller and press W to confirm.
The Audio menu appears.
X Select Rear by turning cVd the COMAND
controller and press W to confirm.
i The
headphones' volume setting does not
affect the main loudspeakers.
Adjusting the sound settings You can select the sound settings in the audio
CD/DVD/MP3, video DVD and AUX modes.
X
Switch on an audio operating mode (e.g.
audio CD mode).
X Select Treble or Bass using
the :=;
buttons on the remote
control and press the 9 button to confirm.
An adjustment scale appears.
X Select a setting using the 9:
buttons
and press the 9 button to confirm.
Multiple users Simultaneous use of the rear-
compartment disc drive
The two rear-compartment screens can be
operated almost entirely independently from
one
another. However, there can be a conflict
in some menus if the two screens are used
simultaneously.
If the rear-compartment disc drive is being
used for both screens simultaneously,
selecting certain menus or settings on one of
the screens also affects the other screen.
The following functions affect both screens:
R changing playback options
R selecting a track (from a track list or folder)
R using the play, pause and stop functions
R fast forwarding/rewinding or scrolling248
Rear Seat Entertainment System
COMAND