instrument cluster MERCEDES-BENZ S-Class SEDAN 2016 W222 Owner's Guide
[x] Cancel search | Manufacturer: MERCEDES-BENZ, Model Year: 2016, Model line: S-Class SEDAN, Model: MERCEDES-BENZ S-Class SEDAN 2016 W222Pages: 438, PDF Size: 10.93 MB
Page 79 of 438
Rdarkness
Rif:
-pedestrians move quickly, e.g. into the path
of the vehicle
-the camera system no longer recognizes a
pedestrian as a person due to special cloth- ing or other objects
-a pedestrian is concealed by other objects
-the typical outline of a person is not distin-
guishable from the background
Following damage to the front end of the vehicle,
have the configuration and operation of the
radar sensors checked at a qualified specialist
workshop. This also applies to collisions at slow
speeds where there is no visible damage to the
front of the vehicle.
Following damage to the windshield, have the
configuration and operation of the camera sys-
tem checked at a qualified specialist workshop.
Function
XTo activate/deactivate: activate or deacti-
vate PRE-SAFE®Brake in the on-board com-
puter (Ypage 271).
If the PRE-SAFE®Brake is not activated, the
æ symbol appears in the multifunction dis-
play.
Starting at a speed of around 4 mph (7 km/h),
this function warns you if you rapidly approach a
vehicle in front. An intermittent warning tone
will then sound and the ·distance warning
lamp will light up in the instrument cluster.
XBrake immediately to defuse the situation.
or
XTake evasive action provided it is safe to do
so.
PRE-SAFE
®Brake can also brake the vehicle
automatically under the following conditions:
Rthe driver and front-passenger have their seat
belts fastened
and
Rthe vehicle speed is between approximately
4 mph (7 km/h) and 124 mph (200 km/h)
At speeds of up to approximately 44 mph
(70 km/h) PRE-SAFE
®Brake can also detect:
Rstationary objects in the path of your vehicle,
e.g. stopped or parked vehicles
Rpedestrians in the path of your vehicle
iIf there is an increased risk of a collision,
preventive passenger protection measures
(PRE-SAFE
®) are triggered (Ypage 59).
If the risk of collision with the vehicle in front
remains and you do not brake, take evasive
action or accelerate significantly, the vehicle
may perform automatic emergency braking, up
to the point of full brake application. Automatic emergency braking is not performed until imme-
diately prior to an imminent accident.
You can prevent the intervention of the PRE-
SAFE
®Brake at any time by:
Rdepressing the accelerator pedal further.
Ractivating kickdown.
Rreleasing the brake pedal.
The braking action of PRE-SAFE®Brake is ended
automatically if:
Ryou maneuver to avoid the obstacle.
Rthere is no longer a risk of collision.
Rthere is no longer an obstacle detected in
front of your vehicle.
STEER CONTROL
General information
STEER CONTROL helps you by transmitting a
noticeable steering force to the steering wheel
in the direction required for vehicle stabilization.
This steering assistance is provided in particular if:
Rboth right wheels or both left wheels are on a
wet or slippery road surface when you brake.
Rthe vehicle starts to skid.
Important safety notes
iObserve the "Important safety notes" sec-
tion (Ypage 68).
No steering support is provided from STEER
CONTROL, if:
RESP®is deactivated
RESP®is malfunctioning.
Rthe lighting is faulty.
Power steering will, however, continue to func-
tion.
Driving safety systems77
Safety
Z
Page 106 of 438
Useful information
i
This Operator's Manual describes all models
and all standard and optional equipment of
your vehicle available at the time of publica-
tion of the Operator's Manual. Country-spe-
cific differences are possible. Please note
that your vehicle may not be equipped with all
features described. This also applies to
safety-related systems and functions.
iRead the information on qualified specialist
workshops (Ypage 28).
Correct driver's seat position
GWARNING
You could lose control of your vehicle if you do the following while driving:
Radjust the driver's seat, head restraint,
steering wheel or mirrors
Rfasten the seat belt
There is a risk of an accident.
Adjust the driver's seat, head restraint, steer-
ing wheel and mirror and fasten your seat belt before starting the engine.
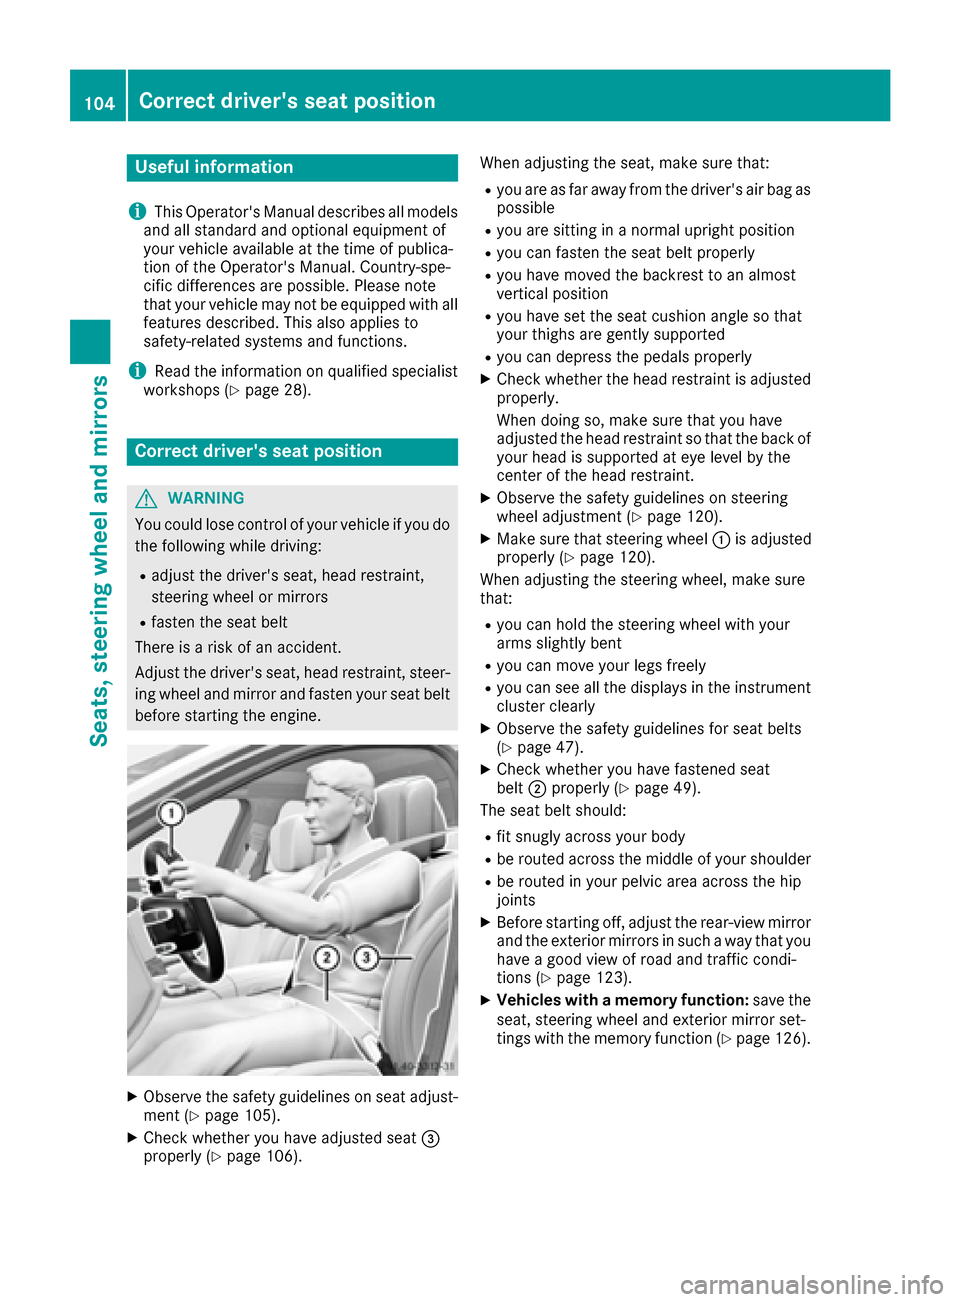
XObserve the safety guidelines on seat adjust-
ment (Ypage 105).
XCheck whether you have adjusted seat =
properly (Ypage 106). When adjusting the seat, make sure that:
Ryou are as far away from the driver's air bag as
possible
Ryou are sitting in a normal upright position
Ryou can fasten the seat belt properly
Ryou have moved the backrest to an almost
vertical position
Ryou have set the seat cushion angle so that
your thighs are gently supported
Ryou can depress the pedals properly
XCheck whether the head restraint is adjusted
properly.
When doing so, make sure that you have
adjusted the head restraint so that the back of
your head is supported at eye level by the
center of the head restraint.
XObserve the safety guidelines on steering
wheel adjustment (Ypage 120).
XMake sure that steering wheel
:is adjusted
properly (Ypage 120).
When adjusting the steering wheel, make sure
that:
Ryou can hold the steering wheel with your
arms slightly bent
Ryou can move your legs freely
Ryou can see all the displays in the instrument cluster clearly
XObserve the safety guidelines for seat belts
(Ypage 47).
XCheck whether you have fastened seat
belt ;properly (Ypage 49).
The seat belt should:
Rfit snugly across your body
Rbe routed across the middle of your shoulder
Rbe routed in your pelvic area across the hip
joints
XBefore starting off, adjust the rear-view mirror
and the exterior mirrors in such a way that you
have a good view of road and traffic condi-
tions (
Ypage 123).
XVehicles with a memory function: save the
seat, steering wheel and exterior mirror set-
tings with the memory function (
Ypage 126).
104Correct driver's seat position
Seats, steering wheel and mirrors
Page 132 of 438
Useful information
i
This Operator's Manual describes all models
and all standard and optional equipment of
your vehicle available at the time of publica-
tion of the Operator's Manual. Country-spe-
cific differences are possible. Please note
that your vehicle may not be equipped with all
features described. This also applies to
safety-related systems and functions.
iRead the information on qualified specialist
workshops (Ypage 28).
Exterior lighting
General notes
For reasons of safety, Mercedes-Benz recom-
mends that you drive with the lights switched on
even during the daytime. In some countries,
operation of the headlamps varies due to legal
requirements and self-imposed obligations.
Setting the exterior lighting
Setting options
Exterior lighting can be set using:
Rthe light switch
Rthe combination switch (Ypage 131)
Rthe on-board computer (Ypage 274)
Light switch
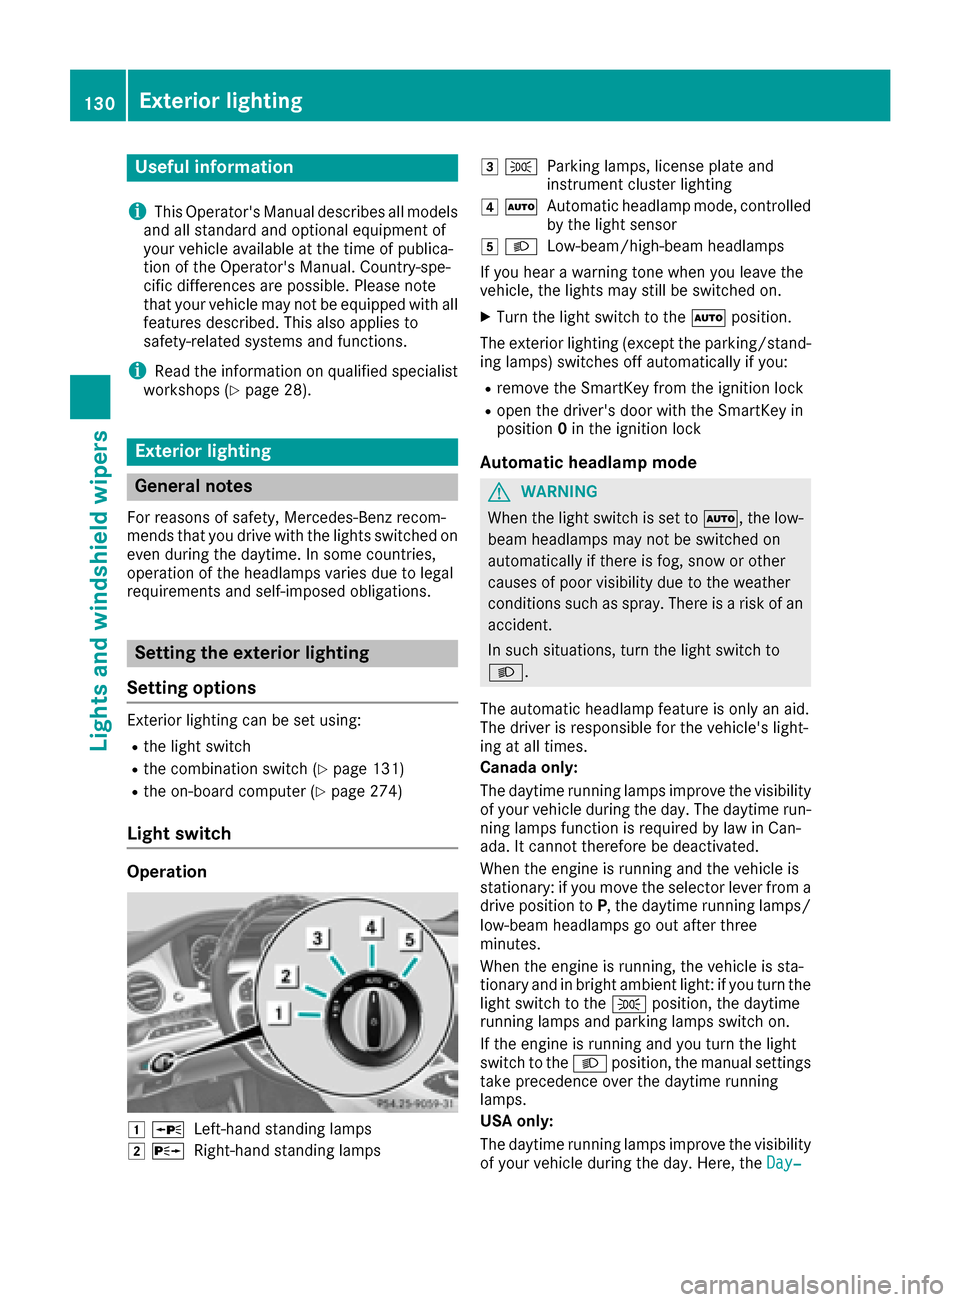
Operation
1 WLeft-hand standing lamps
2XRight-hand standing lamps
3TParking lamps, license plate and
instrument cluster lighting
4ÃAutomatic headlamp mode, controlled
by the light sensor
5 LLow-beam/high-beam headlamps
If you hear a warning tone when you leave the
vehicle, the lights may still be switched on.
XTurn the light switch to the Ãposition.
The exterior lighting (except the parking/stand-
ing lamps) switches off automatically if you:
Rremove the SmartKey from the ignition lock
Ropen the driver's door with the SmartKey in
position 0in the ignition lock
Automatic headlamp mode
GWARNING
When the light switch is set to Ã, the low-
beam headlamps may not be switched on
automatically if there is fog, snow or other
causes of poor visibility due to the weather
conditions such as spray. There is a risk of an
accident.
In such situations, turn the light switch to
L.
The automatic headlamp feature is only an aid.
The driver is responsible for the vehicle's light-
ing at all times.
Canada only:
The daytime running lamps improve the visibility
of your vehicle during the day. The daytime run-
ning lamps function is required by law in Can-
ada. It cannot therefore be deactivated.
When the engine is running and the vehicle is
stationary: if you move the selector lever from a
drive position to P, the daytime running lamps/
low-beam headlamps go out after three
minutes.
When the engine is running, the vehicle is sta-
tionary and in bright ambient light: if you turn the
light switch to the Tposition, the daytime
running lamps and parking lamps switch on.
If the engine is running and you turn the light
switch to the Lposition, the manual settings
take precedence over the daytime running
lamps.
USA only:
The daytime running lamps improve the visibility
of your vehicle during the day. Here, the Day‐
130Exterior lighting
Lights and windshield wipers
Page 136 of 438
=High-beam flasher
?Turn signal, left
XTo switch on:turn the light switch to Ã.
XPress the combination switch beyond the
pressure point in the direction of arrow :.
The _ indicator lamp in the multifunction
display lights up if it is dark and the light sen-
sor activates the low-beam headlamps.
At speeds above approx. 16 mph
(25 km/h): the headlamp range is set auto-
matically depending on the distance between
the vehicle and other road users.
At speeds above approx. 19 mph
(30 km/h):
RIf no other road users are detected, the
high-beam headlamps are automatically
switched on.
RIf other road users are detected, the partial
high-beam headlamps are automatically
switched on.
The K indicator lamp in the instrument
cluster also lights up.
At speeds below approx. 16 mph
(25 km/h) or when there is sufficient
street lighting:
RThe partial high-beam headlamps are
switched off automatically.
RThe high-beam headlamps are switched off
automatically.
The K indicator lamp in the instrument
cluster goes out. The _indicator lamp in
the multifunction display remains lit.
XTo switch off: move the combination switch
back to its normal position or move the light
switch to another position.
The _ indicator lamp in the multifunction
display goes out.
Headlamps fogged up on the inside
Certain climatic and physical conditions may
cause moisture to form in the headlamp. This
moisture does not affect the functionality of the
headlamp.
Interior lighting
Overview of interior lighting
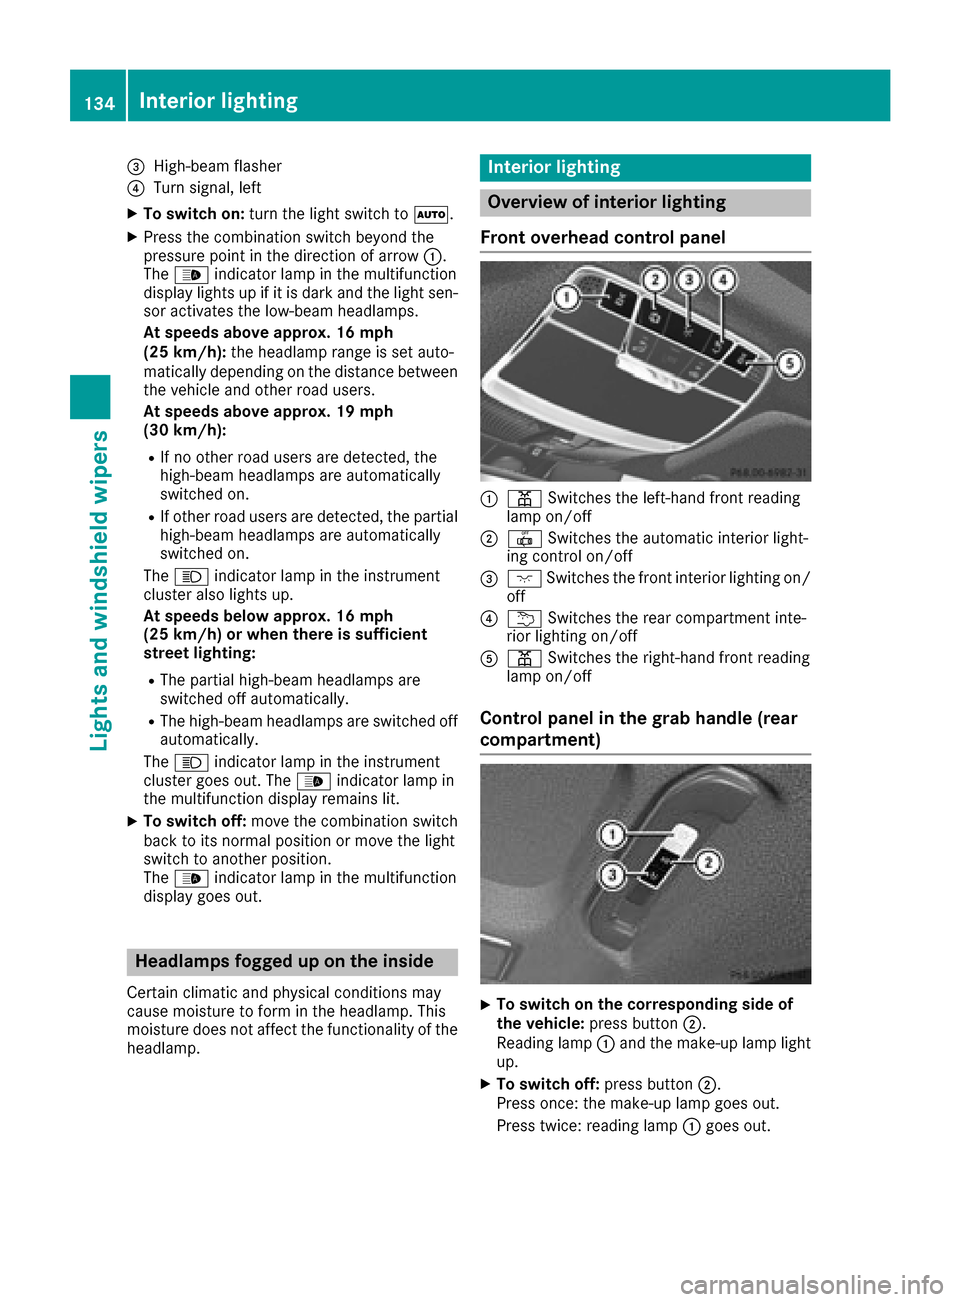
Front overhead control panel
:p Switches the left-hand front reading
lamp on/off
;| Switches the automatic interior light-
ing control on/off
=c Switches the front interior lighting on/
off
?u Switches the rear compartment inte-
rior lighting on/off
Ap Switches the right-hand front reading
lamp on/off
Control panel in the grab handle (rear
compartment)
XTo switch on the corresponding side of
the vehicle: press button ;.
Reading lamp :and the make-up lamp light
up.
XTo switch off: press button;.
Press once: the make-up lamp goes out.
Press twice: reading lamp :goes out.
134Interior lighting
Lights and windshield wipers
Page 165 of 438
To start the vehicle without actively using the
Smartkey:
Rthe Start/Stop button must be inserted in the
ignition lock.
Rthe Smartkey must be in the vehicle.
Rthe vehicle must not be locked with the
SmartKey or KEYLESS-GO (Ypage 80).
Do not keep the SmartKey:
Rwith electronic devices, e.g. a mobile phone
or another SmartKey.
Rwith metallic objects, e.g. coins or metal foil.
Rinside metallic objects, e.g. a metal case.
This can affect the functionality of the Smart-
Key.
Do not keep the SmartKey in the temperature-
controlled cup holder (
Ypage 332). Otherwise,
the key will not be detected, e.g. when starting
the engine with the Start/Stop button.
If you lock the vehicle with the SmartKey's
remote control or with KEYLESS-GO, after a
short time:
Ryou will not be able to switch on the ignition
with the Start/Stop button.
Ryou will not be able to start the engine with the
Start/Stop button until the vehicle is
unlocked again.
If you lock the vehicle centrally using the button
on the front door (
Ypage 86), you can continue
to start the engine with the Start/Stop button.
The engine can be switched off while the vehicle
is in motion by pressing and holding the Start/
Stop button for three seconds. This function
operates independently of the ECO start/stop
automatic engine switch-off function.
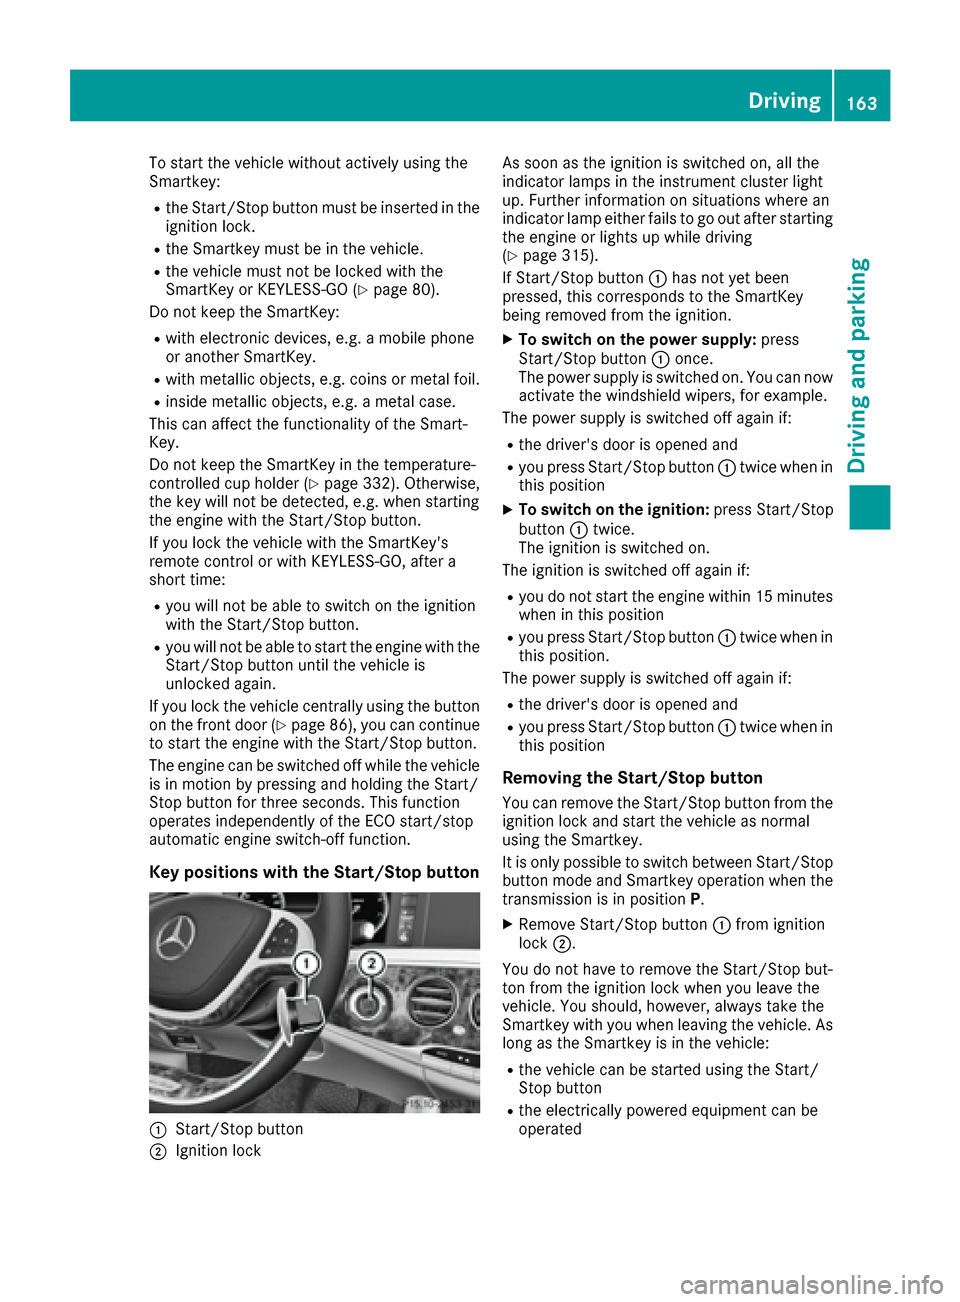
Key positions with the Start/Stop button
:Start/Stop button
;Ignition lock As soon as the ignition is switched on, all the
indicator lamps in the instrument cluster light
up. Further information on situations where an
indicator lamp either fails to go out after starting
the engine or lights up while driving
(
Ypage 315).
If Start/Stop button :has not yet been
pressed, this corresponds to the SmartKey
being removed from the ignition.
XTo switch on the power supply: press
Start/Stop button :once.
The power supply is switched on. You can now activate the windshield wipers, for example.
The power supply is switched off again if:
Rthe driver's door is opened and
Ryou press Start/Stop button :twice when in
this position
XTo switch on the ignition: press Start/Stop
button :twice.
The ignition is switched on.
The ignition is switched off again if:
Ryou do not start the engine within 15 minutes
when in this position
Ryou press Start/Stop button :twice when in
this position.
The power supply is switched off again if:
Rthe driver's door is opened and
Ryou press Start/Stop button :twice when in
this position
Removing the Start/Stop button
You can remove the Start/Stop button from the
ignition lock and start the vehicle as normal
using the Smartkey.
It is only possible to switch between Start/Stop button mode and Smartkey operation when the
transmission is in position P.
XRemove Start/Stop button :from ignition
lock ;.
You do not have to remove the Start/Stop but-
ton from the ignition lock when you leave the
vehicle. You should, however, always take the
Smartkey with you when leaving the vehicle. As long as the Smartkey is in the vehicle:
Rthe vehicle can be started using the Start/
Stop button
Rthe electrically powered equipment can be
operated
Driving163
Driving and parking
Z
Page 171 of 438
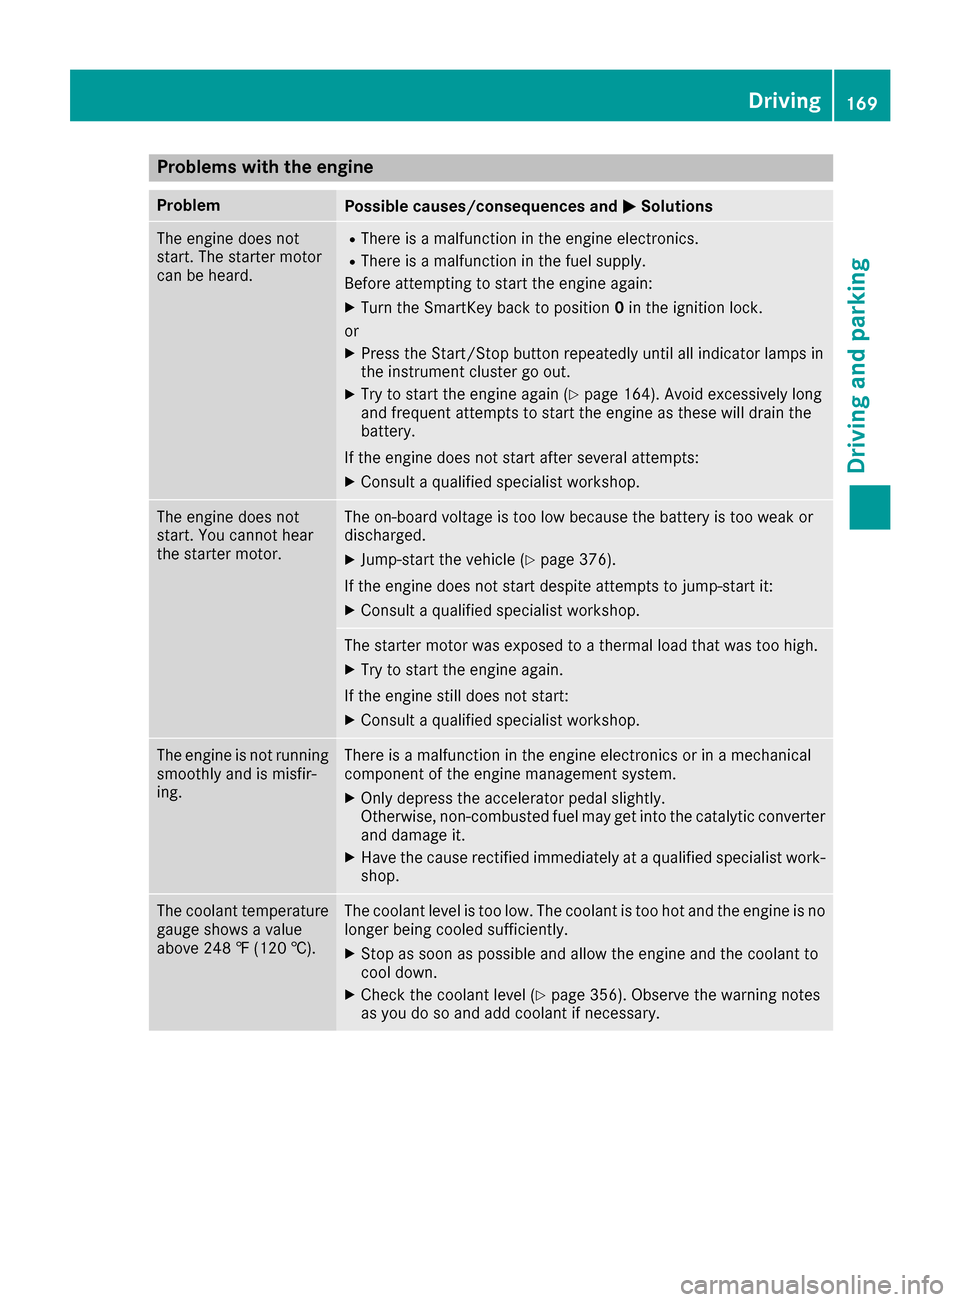
Problems with the engine
ProblemPossible causes/consequences andMSolutions
The engine does not
start. The starter motor
can be heard.RThere is a malfunction in the engine electronics.
RThere is a malfunction in the fuel supply.
Before attempting to start the engine again:
XTurn the SmartKey back to position 0in the ignition lock.
or
XPress the Start/Stop button repeatedly until all indicator lamps in
the instrument cluster go out.
XTry to start the engine again (Ypage 164). Avoid excessively long
and frequent attempts to start the engine as these will drain the
battery.
If the engine does not start after several attempts:
XConsult a qualified specialist workshop.
The engine does not
start. You cannot hear
the starter motor.The on-board voltage is too low because the battery is too weak or
discharged.
XJump-start the vehicle (Ypage 376).
If the engine does not start despite attempts to jump-start it:
XConsult a qualified specialist workshop.
The starter motor was exposed to a thermal load that was too high.
XTry to start the engine again.
If the engine still does not start:
XConsult a qualified specialist workshop.
The engine is not running
smoothly and is misfir-
ing.There is a malfunction in the engine electronics or in a mechanical
component of the engine management system.
XOnly depress the accelerator pedal slightly.
Otherwise, non-combusted fuel may get into the catalytic converter
and damage it.
XHave the cause rectified immediately at a qualified specialist work-
shop.
The coolant temperature
gauge shows a value
above 248 ‡ (120 †).The coolant level is too low. The coolant is too hot and the engine is no
longer being cooled sufficiently.
XStop as soon as possible and allow the engine and the coolant to
cool down.
XCheck the coolant level (Ypage 356). Observe the warning notes
as you do so and add coolant if necessary.
Driving169
Driving and parking
Z
Page 177 of 438
All vehicles (except Mercedes-AMG vehi-
cles:)Mand the selected gear appear in the
multifunction display.
Further information on activating manual drive
program Mon PLUG-IN HYBRID vehicles
(
Ypage 250).
Shifting gears
If you pull on the left or right steering wheel
paddle shifter, the automatic transmission
switches to manual drive program Mfor a limi-
ted amount of time. Depending on which paddle
shifter is pulled, the automatic transmission
immediately shifts into the next gear down or
up, if permitted.
XTo shift up: pull the right-hand steering wheel
paddle shifter (Ypage 174).
The automatic transmission shifts up to the
next gear.
If the maximum engine speed on the currently
engaged gear is reached and you continue to
accelerate, the automatic transmission auto-
matically shifts up in order to prevent engine
damage.
Mercedes-AMG vehicles: the automatic
transmission will not shift up to the next gear
when the engine speed is very low.
XTo shift down: pull on the left-hand steering
wheel paddle shifter (Ypage 174).
The automatic transmission shifts down to
the next gear.
If the engine exceeds the maximum engine
speed when shifting down, the automatic
transmission protects against engine damage
by not shifting down.
Automatic down shifting occurs when coast-
ing.
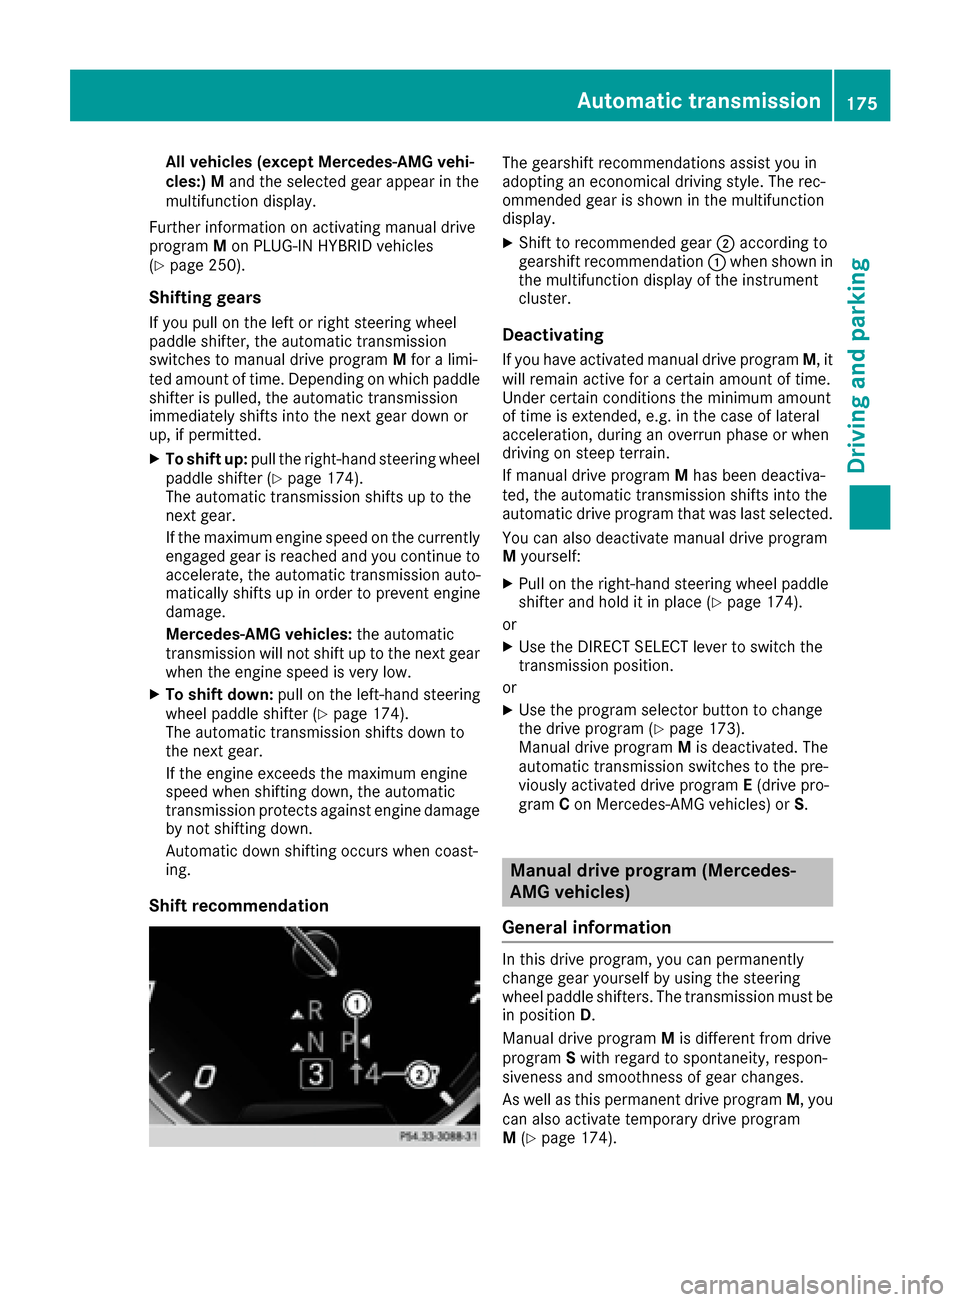
Shift recommendation
The gearshift recommendations assist you in
adopting an economical driving style. The rec-
ommended gear is shown in the multifunction
display.
XShift to recommended gear ;according to
gearshift recommendation :when shown in
the multifunction display of the instrument
cluster.
Deactivating
If you have activated manual drive program M, it
will remain active for a certain amount of time.
Under certain conditions the minimum amount
of time is extended, e.g. in the case of lateral
acceleration, during an overrun phase or when
driving on steep terrain.
If manual drive program Mhas been deactiva-
ted, the automatic transmission shifts into the
automatic drive program that was last selected.
You can also deactivate manual drive program
M yourself:
XPull on the right-hand steering wheel paddle
shifter and hold it in place (Ypage 174).
or
XUse the DIRECT SELECT lever to switch the
transmission position.
or
XUse the program selector button to change
the drive program (Ypage 173).
Manual drive program Mis deactivated. The
automatic transmission switches to the pre-
viously activated drive program E(drive pro-
gram Con Mercedes-AMG vehicles) or S.
Manual drive program (Mercedes-
AMG vehicles)
General information
In this drive program, you can permanently
change gear yourself by using the steering
wheel paddle shifters. The transmission must be
in position D.
Manual drive program Mis different from drive
program Swith regard to spontaneity, respon-
siveness and smoothness of gear changes.
As well as this permanent drive program M, you
can also activate temporary drive program
M (
Ypage 174).
Automatic transmission175
Driving and parking
Z
Page 180 of 438
and that it is not swallowed. Do not inhale fuelvapors. Keep fuel away from children.
If you or others come into contact with fuel,
observe the following:
RWash away fuel from skin immediately
using soap and water.
RIf fuel comes into contact with your eyes,
immediately rinse them thoroughly with
clean water. Seek medical assistance with-
out delay.
RIf fuel is swallowed, seek medical assis-
tance without delay. Do not induce vomit-
ing.
RImmediately change out of clothing which
has come into contact with fuel.
GWARNING
Electrostatic buildup can create sparks and
ignite fuel vapors. There is a risk of fire and
explosion.
Always touch the vehicle body before opening
the fuel filler flap or touching the fuel pump
nozzle. Any existing electrostatic buildup is
thereby discharged.
Do not get into the vehicle again during the refu-
eling process. Otherwise, electrostatic charge
could build up again.
!Do not use diesel to refuel vehicles with a
gasoline engine. Do not switch on the ignition
if you accidentally refuel with the wrong fuel.
Otherwise, the fuel will enter the fuel system. Even small amounts of the wrong fuel could
result in damage to the fuel system and the
engine. Notify a qualified specialist workshop
and have the fuel tank and fuel lines drained
completely.
!Overfilling the fuel tank could damage the
fuel system.
!Take care not to spill any fuel on painted
surfaces. You could otherwise damage the
paintwork.
!Use a filter when refueling from a fuel can.
Otherwise, the fuel lines and/or injection sys-
tem could be blocked by particles from the
fuel can. If you overfill the fuel tank, fuel could spray out
when the fuel pump nozzle is removed.
For further information on fuel and fuel quality
(
Ypage 428).
Refueling
General information
Pay attention to the important safety notes
(Ypage 177).
PLUG-IN HYBRID vehicles: pressure in the fuel
tank must be released before refueling.
Except PLUG-IN HYBRID vehicles: if you
unlock/lock the vehicle from the outside, the
fuel filler flap also unlocks/locks.
The position of the fuel filler cap is displayed in
the instrument cluster 8. The arrow next to
the filling pump indicates the side of the vehicle.
Preparing to refuel
XSwitch off the engine.
XOpen the driver's door.
The on-board electronics now have status 0.
This is the same as the SmartKey having been
removed.
or, if the SmartKey is inserted in the ignition
lock:
XRemove the SmartKey from the ignition lock.
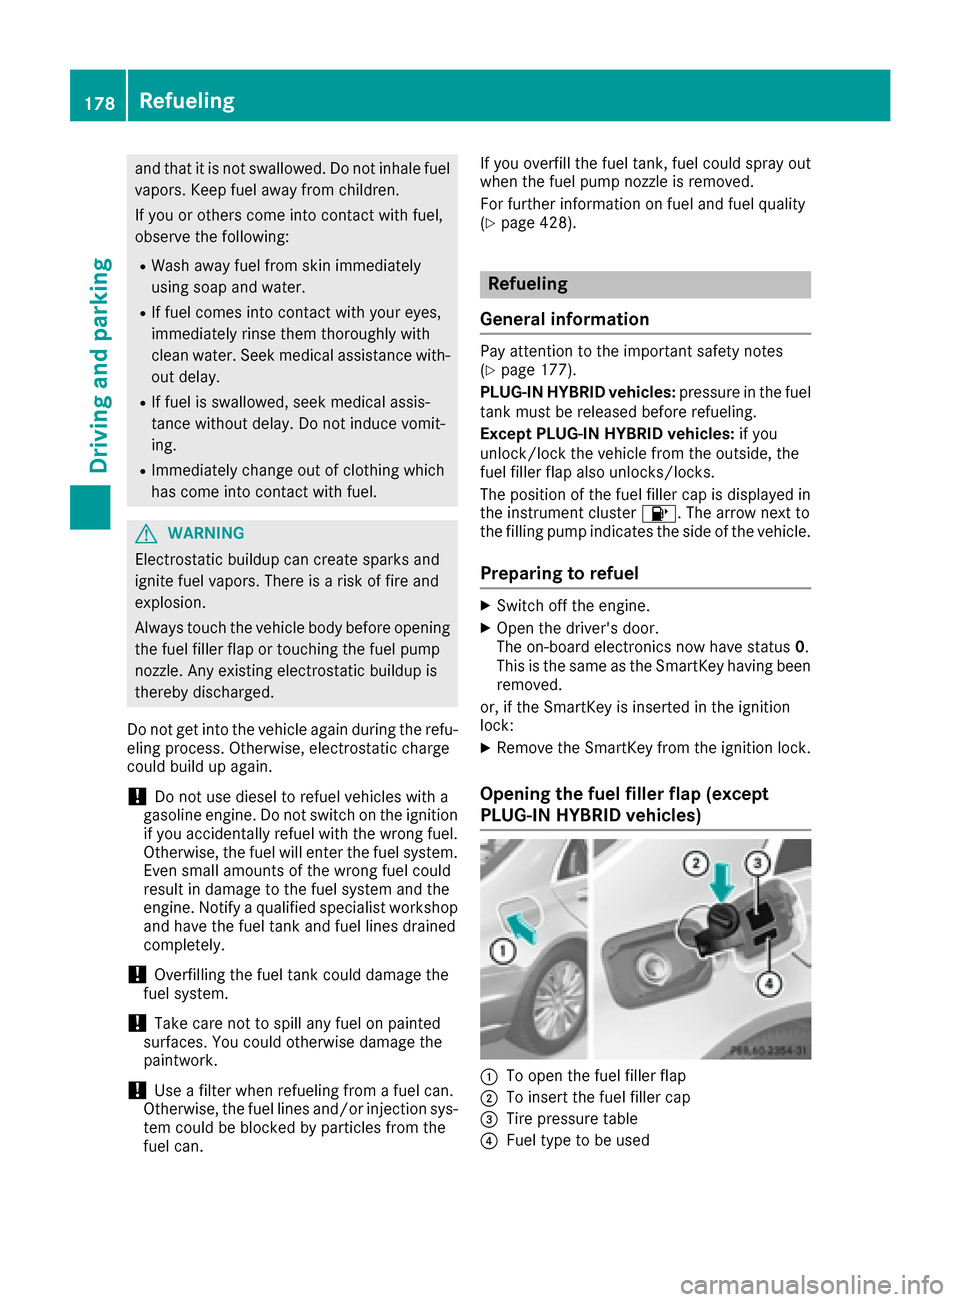
Opening the fuel filler flap (except
PLUG-IN HYBRID vehicles)
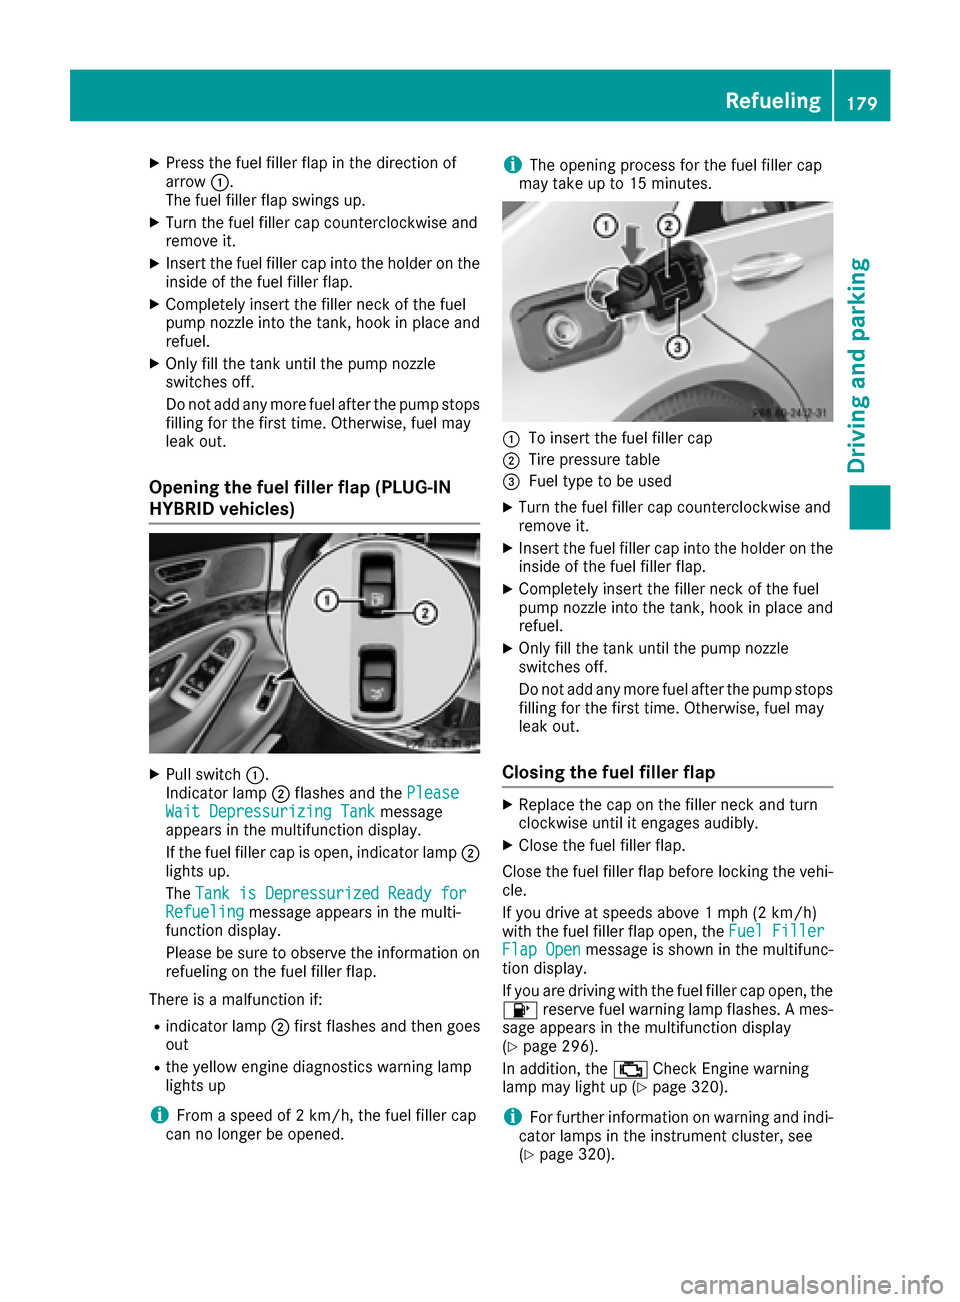
:To open the fuel filler flap
;To insert the fuel filler cap
=Tire pressure table
?Fuel type to be used
178Refueling
Driving and parking
Page 181 of 438
XPress the fuel filler flap in the direction of
arrow:.
The fuel filler flap swings up.
XTurn the fuel filler cap counterclockwise and
remove it.
XInsert the fuel filler cap into the holder on the
inside of the fuel filler flap.
XCompletely insert the filler neck of the fuel
pump nozzle into the tank, hook in place and
refuel.
XOnly fill the tank until the pump nozzle
switches off.
Do not add any more fuel after the pump stops
filling for the first time. Otherwise, fuel may
leak out.
Opening the fuel filler flap (PLUG-IN
HYBRID vehicles)
XPull switch :.
Indicator lamp ;flashes and the Please
Wait Depressurizing Tankmessage
appears in the multifunction display.
If the fuel filler cap is open, indicator lamp ;
lights up.
The Tank is Depressurized Ready for
Refuelingmessage appears in the multi-
function display.
Please be sure to observe the information on
refueling on the fuel filler flap.
There is a malfunction if:
Rindicator lamp ;first flashes and then goes
out
Rthe yellow engine diagnostics warning lamp
lights up
iFrom a speed of 2 km/h, the fuel filler cap
can no longer be opened.
iThe opening process for the fuel filler cap
may take up to 15 minutes.
:To insert the fuel filler cap
;Tire pressure table
=Fuel type to be used
XTurn the fuel filler cap counterclockwise and
remove it.
XInsert the fuel filler cap into the holder on the inside of the fuel filler flap.
XCompletely insert the filler neck of the fuel
pump nozzle into the tank, hook in place andrefuel.
XOnly fill the tank until the pump nozzle
switches off.
Do not add any more fuel after the pump stopsfilling for the first time. Otherwise, fuel may
leak out.
Closing the fuel filler flap
XReplace the cap on the filler neck and turn
clockwise until it engages audibly.
XClose the fuel filler flap.
Close the fuel filler flap before locking the vehi-
cle.
If you drive at speeds above 1 mph (2 km/h)
with the fuel filler flap open, the Fuel Filler
Flap Openmessage is shown in the multifunc-
tion display.
If you are driving with the fuel filler cap open, the
8 reserve fuel warning lamp flashes. A mes-
sage appears in the multifunction display
(
Ypage 296).
In addition, the ;Check Engine warning
lamp may light up (
Ypage 320).
iFor further information on warning and indi-
cator lamps in the instrument cluster, see
(
Ypage 320).
Refueling179
Driving and parking
Z
Page 192 of 438
Switching off the engine
Important safety notes
GWARNING
The automatic transmission switches to neu-
tral position Nwhen you switch off the engine.
The vehicle may roll away. There is a risk of an
accident.
After switching off the engine, always switch
to parking position P. Prevent the parked vehi-
cle from rolling away by applying the parking
brake.
Using the SmartKey
XApply the electric parking brake.
XShift the transmission to position P.
XTurn the SmartKey to position0in the ignition
lock and remove it.
The immobilizer is activated.
If you switch the engine off with the trans-
mission in position Ror D, the automatic
transmission shifts to Nautomatically.
If you then open the driver's door or the front-
passenger door or remove the SmartKey from the ignition, the automatic transmission shifts
to Pautomatically.
If you want the automatic transmission to
remain in neutral N, e.g. when having the vehicle
cleaned in an automatic car wash with a towing system:
XSwitch on the ignition.
XDepress the brake pedal and keep it
depressed.
XShift to neutral N.
XRelease the brake pedal.
XRelease the electric parking brake.
XSwitch off the ignition and leave the SmartKey
in the ignition lock.
Using the Start/Stop button
XApply the electric parking brake.
XShift the transmission to position P.
XPress the Start/Stop button (Ypage 162)
The engine stops and all the indicator lamps in
the instrument cluster go out. When the driver's door is closed, this corre-
sponds to SmartKey position
1. When the
driver's door is open, this corresponds to
SmartKey position 0: "SmartKey removed".
If you switch the engine off with the transmis-
sion in position Ror D, the automatic transmis-
sion shifts to Nautomatically.
If you then open the driver's or front-passenger door, the automatic transmission shifts to P
automatically.
If you want the automatic transmission to
remain in neutral N, e.g. when having the vehicle
cleaned in an automatic car wash with a towing
system:
XSwitch on the ignition.
XDepress the brake pedal and keep it
depressed.
XRemove the Start/Stop button from the igni-
tion lock.
XInsert the SmartKey into the ignition lock.
XShift to neutral N.
XRelease the brake pedal.
XRelease the electric parking brake.
XSwitch off the ignition and leave the SmartKey
in the ignition lock.
The engine can be switched off in an emergency
while the vehicle is in motion by pressing and
holding the Start/Stop button for three sec-
onds. This function operates independently of
the ECO start/stop automatic engine switch-off
function.
Electric parking brake
General notes
GWARNING
If you leave children unsupervised in the vehi-
cle, they could set it in motion by, for example:
Rrelease the parking brake.
Rshift the automatic transmission out of the
parking position P.
Rstart the engine.
In addition, they may operate vehicle equip-
ment and become trapped. There is a risk of
an accident and injury.
190Parking
Driving and parking