Lift MERCEDES-BENZ S-Class SEDAN 2016 W222 Owner's Manual
[x] Cancel search | Manufacturer: MERCEDES-BENZ, Model Year: 2016, Model line: S-Class SEDAN, Model: MERCEDES-BENZ S-Class SEDAN 2016 W222Pages: 438, PDF Size: 10.93 MB
Page 45 of 438
Deactivate the hybrid system manually if:
Rthe6 restraint system warning lamp in the
instrument cluster lights up after an accident
Rthe vehicle is badly damaged, e.g. after an
accident, and the restraint system compo-
nents were not activated
Rthe vehicle is badly damaged and has to be
towed or transported
XIf possible, move the vehicle out of the
danger zone: shift the automatic transmis-
sion into position N.
XRelease the electric parking brake.
XRoll the vehicle to a safe place and park it
safely.
Get assistance from others if necessary.
iThe vehicle is locked automatically when
the ignition is switched on and the wheels are
turning. There is therefore a risk of being
locked out if the vehicle is being pushed or
tested on a dynamometer.
XSwitch the ignition off.
XShift the automatic transmission to park posi-
tion P(Ypage 170).
Depress the electric parking brake
(
Ypage 190).
Secure the vehicle against rolling away
(
Ypage 406).
XTo use the high-voltage switch-off device:
open the trunk lid.
XLift the trunk floor upwards (Ypage 329).
XRemove the right-hand paneling in the trunk.
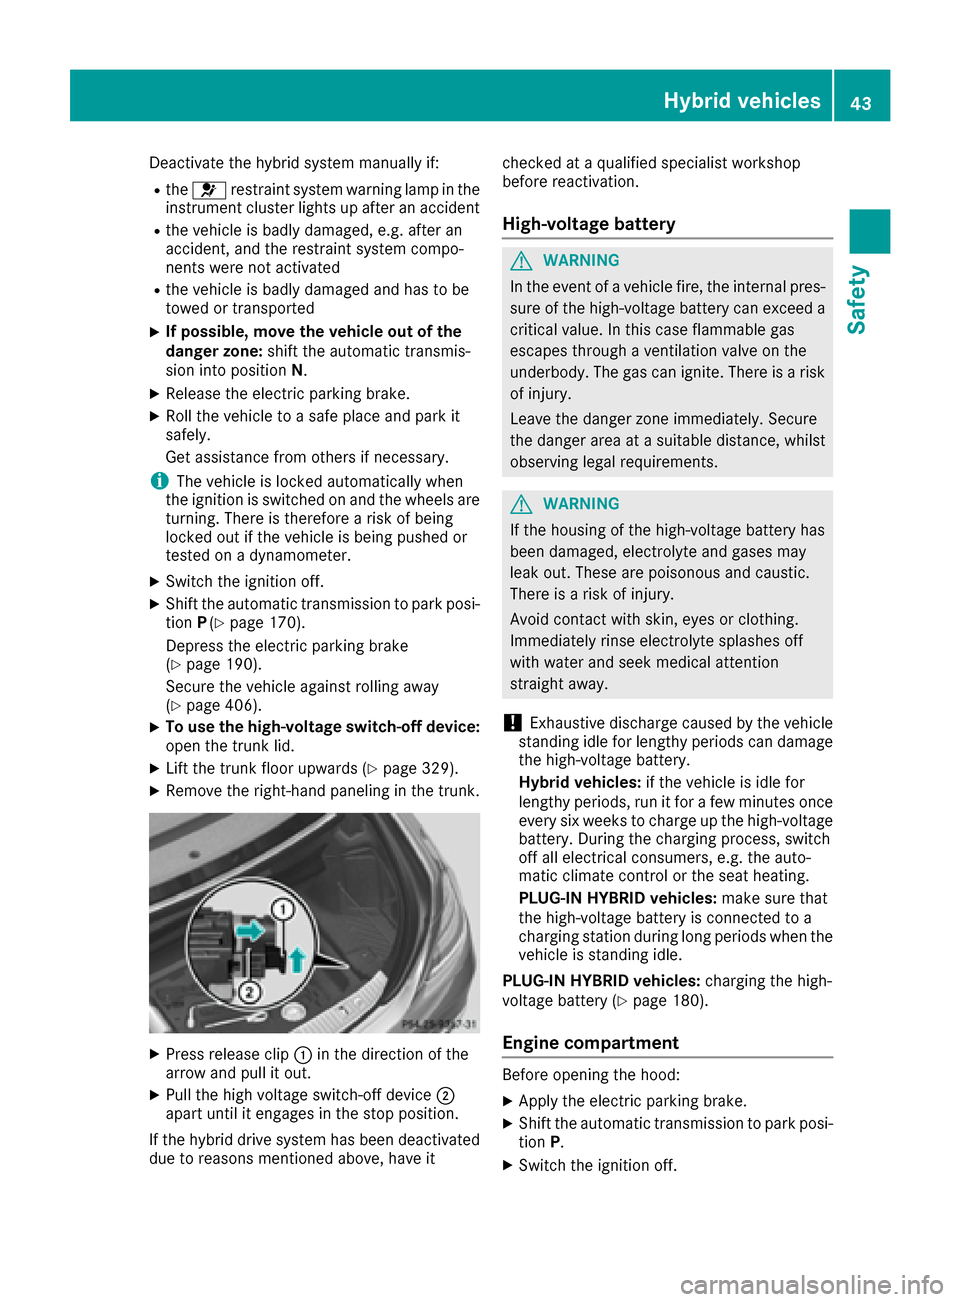
XPress release clip :in the direction of the
arrow and pull it out.
XPull the high voltage switch-off device ;
apart until it engages in the stop position.
If the hybrid drive system has been deactivated
due to reasons mentioned above, have it checked at a qualified specialist workshop
before reactivation.
High-voltage battery
GWARNING
In the event of a vehicle fire, the internal pres- sure of the high-voltage battery can exceed a
critical value. In this case flammable gas
escapes through a ventilation valve on the
underbody. The gas can ignite. There is a risk
of injury.
Leave the danger zone immediately. Secure
the danger area at a suitable distance, whilst
observing legal requirements.
GWARNING
If the housing of the high-voltage battery has
been damaged, electrolyte and gases may
leak out. These are poisonous and caustic.
There is a risk of injury.
Avoid contact with skin, eyes or clothing.
Immediately rinse electrolyte splashes off
with water and seek medical attention
straight away.
!Exhaustive discharge caused by the vehicle
standing idle for lengthy periods can damage
the high-voltage battery.
Hybrid vehicles: if the vehicle is idle for
lengthy periods, run it for a few minutes once every six weeks to charge up the high-voltage
battery. During the charging process, switch
off all electrical consumers, e.g. the auto-
matic climate control or the seat heating.
PLUG-IN HYBRID vehicles: make sure that
the high-voltage battery is connected to a
charging station during long periods when the
vehicle is standing idle.
PLUG-IN HYBRID vehicles: charging the high-
voltage battery (
Ypage 180).
Engine compartment
Before opening the hood:
XApply the electric parking brake.
XShift the automatic transmission to park posi-
tion P.
XSwitch the ignition off.
Hybrid vehicles43
Safety
Z
Page 93 of 438

RPress the remote operating switch on the
driver's door, or
RIn vehicles with HANDS-FREE ACCESS:
kick into the sensor detection range under
the bumper with your foot.
iIf theF button on the SmartKey is
pressed or HANDS-FREE ACCESS is initiated
after the closing process is stopped, the trunk
lid opens.
Vehicles with trunk lid remote closing fea-
ture and KEYLESS-GO: when all the doors are
closed, you can simultaneously close the trunk
lid and lock the vehicle. The SmartKey must be
located to the rear of the vehicle.
XPress and release locking button ;on the
trunk lid.
If a KEYLESS-GO key is detected outside the
vehicle, the trunk lid closes and the vehicle
locks.
If KEYLESS-GO detects a second SmartKey out- side the vehicle, the trunk lid remains closed.
If KEYLESS-GO detects a SmartKey in the trunk,
the trunk lid opens again after it is closed.
HANDS-FREE ACCESS
Important safety notes
GWARNING
The vehicle's exhaust system may be very hot. You could burn yourself by touching the
exhaust system if you use HANDS-FREE
ACCESS. There is a risk of injury. Always
ensure that you only make the kicking move-
ment within the detection range of sensors.
!If the SmartKey is within the rear detection
range of KEYLESS-GO, the following situa-
tions, for example, could lead to the uninten-
tional opening of the trunk:
Rusing a car wash
Rusing a power washer
Make sure that the SmartKey is at least 10 ft
(3 m) away from the vehicle.
General notes
With KEYLESS-GO and HANDS-FREE ACCESS,
you can open or close the trunk lid or stop the
procedure without using your hands. This is use- ful if you have your hands full. To do this, make
a kicking movement under the bumper with your
foot.
Observe the following points:
RCarry your KEYLESS-GO key about your per-
son. The KEYLESS-GO key must be in the rear
detection range of the vehicle.
RWhen making the kicking movement, make
sure that you are standing firmly on the
ground and that there is sufficient clearance
to the rear of the vehicle. You could otherwise
lose your balance e.g. on ice.
RAlways ensure that you only make the kicking
movement within the detection range of sen-
sors
:.
RStand at least 12 in (30 cm) away from the
rear area while doing so.
RDo not come into contact with the bumper
while making the kicking movement. Other-
wise, the sensors may not function correctly.
RHANDS-FREE ACCESS does not function
when the engine is started.
RDirt caused by road salt around sensors :
may restrict functionality.
RUsing the HANDS-FREE ACCESS with a pros-
thetic leg may restrict functionality.
RIf a KEYLESS-GO key is within the rear detec-
tion range of KEYLESS-GO, HAND-FREE
ACCESS could be triggered. The trunk lid
could thus be opened or closed unintention-
ally, for example, if you:
-sit on the edge of the trunk.
-set something down or lift something up
behind the vehicle.
-move the charging cable through the detec-
tion range of the sensors.
-polish the rear of the vehicle.
Do not carry the KEYLESS-GO key about your
person in these situations or in situations sim-
Trunk91
Opening and closing
Z
Page 184 of 438

High and low outside temperatures
Low outside temperatures
At very low outside temperatures the maximum
power output of the high-voltage battery may be
reduced. The high-voltage battery is then no
longer able to provide the normal electrical
power output.
High outside temperatures
To prevent damage to the high-voltage battery
due to very high outside temperatures, the max-
imum power output of the high-voltage battery
is reduced by the vehicle.
Energy consumption and electrical
range
The maximum electrical range is generally
reduced by:
Rhigh and low outside temperatures
Roperating the climate control system
Rswitching on consumers
The battery's physical characteristics are such
that leaving the vehicle parked for long periods
at low outdoor temperatures without charging it
can lead to:
Ra reduction in battery performance
Rlonger charge times
Notes on battery care
Avoid storing or transporting the vehicle at
excessively high or low temperatures over a long
period.
If you park the vehicle and leave it stationary for
long periods:
Rcheck the condition of charge of the high-
voltage battery more often
Rconnect the vehicle to a power supply
This prevents self-discharge and damage to the
high-voltage battery.
Terms of use
Please note the information on exceptions and
limitations in warranty documentation and in
the Maintenance Booklet.
Handling the charging cable and charg- ing cable controls
Do not leave the charging cable controls
(Ypage 183) hanging loose from an electrical
outlet. Otherwise, this could result in a poor
contact with the electrical outlet and malfunc-
tions when charging the vehicle.
To ensure that the brackets within the charging
cable controls are not subjected to incorrect
loads, observe the following:
RNever lift or carry the controls by the charging
cable connector or the mains plug.
RTo transport the charging cable, the charging cable can be:
-wrapped around the controls or
-secured to the housing of the controls
Heat generated by the charging cable
and charging cable connector
Pay attention to the "Important safety notes"
(Ypage 180).
During the charging process, the charging cable
and charging cable connector may heat up.
The charging cable and the charging cable con-
nector will only heat up within the permissible
limiting values, provided that:
Rthe power supply and the charging cable are
not damaged
Rthe instructions for handling the charging
cable and controls on the charging cable are
observed
If the charging cable or charging cable connec-
tor become too hot, have the mains power sup-
ply checked.
Protection device against overvoltage
!Overvoltage in the mains supply may dam-
age the vehicle. For this reason, the vehicle is
equipped with a protection device against
overvoltage in the mains supply. This device
may be triggered during severe thunder-
storms, for example, and may lead to the buil-
ding's fuse being tripped and an interruption
in the power supply. These functions protect
the vehicle. After the building fuse is switched on again, the charging process resumes auto-
matically. Following an interruption in the
power supply or tripping of the building's fuse,
it may take up to 10 minutes for charging to
resume automatically.
182Charging the high-voltage battery (PLUG-IN HYBRID vehicles)
Driving and parking
Page 338 of 438

Vehicles without a Rear Seat Entertainment Sys-
tem
XTurn the SmartKey to position2in the ignition
lock (Ypage 162).
XTo open: briefly press cover ;at the top.
The compartment opens.
XPress in cigarette lighter :.
Cigarette lighter :will pop out automatically
when the heating element is red-hot.
XTo close: press cover ;closed until it locks.
Vehicles with a Rear Seat Entertainment Sys-
tem:
XTurn the SmartKey to position 2in the ignition
lock (Ypage 162).
XTo open: briefly press cover ;at the top.
The compartment opens.
XPress in cigarette lighter :.
Cigarette lighter :will pop out automatically
when the heating element is red-hot.
XTo close: press cover ;closed until it locks.
Vehicles with individual seats in the rear
Example: Sedan
XPress lid :of the socket compartment
briefly.
The socket compartment opens.
XPress in cigarette lighter ;.
Cigarette lighter ;will pop out automatically
when the heating element is red-hot.
12 V sockets
General notes
XTurn the SmartKey to position 1in the ignition
lock (Ypage 162).
The sockets can be used for accessories with a maximum draw of 180 W (15 A). Accessories
include such items as chargers for mobile
phones.
If you use the sockets for long periods when the
engine is switched off, the battery may dis-
charge.
An emergency cut-out ensures that the on-
board voltage does not drop too low. If the on-
board voltage is too low, the power to the sock-
ets is automatically cut. This ensures that there is sufficient power to start the engine.
Socket in the front-compartment center
console
XTo open: briefly press marking =.
Stowage compartment :opens.
XLift up the cover of socket ;.
XTo close:press stowage compartment :
closed until it locks.
336Features
Stowage and features
Page 339 of 438

Socket in the rear compartment
Vehicles with a rear bench seat or electri-
cally adjustable rear seats
Vehicles without a Rear Seat Entertainment Sys-
tem
XTo open:briefly press cover ;at the top.
The compartment opens.
XLift up the cover of socket :.
XTo close:press cover ;closed until it locks.
Vehicles with a Rear Seat Entertainment Sys-
tem:
XTo open: briefly press cover ;at the top.
The compartment opens.
XLift up the cover of socket :.
XTo close:press cover ;closed until it locks.
On vehicles with a 115 V socket, there is no 12 V
socket in the center console in the rear com-
partment.
Vehicles with individual seats in the rear
Example: Sedan
XPress lid :of the socket compartment
briefly.
The socket compartment opens.
XLift up the cover of socket ;.
Socket in the trunk
XLift up the cover of socket:.
115 V socket
Important safety notes
GDANGER
When a suitable device is connected, the
115 V power socket will be carrying a high
voltage. You could receive an electric shock if the connector cable or the 115 V power
socket is pulled out of the trim or is damaged
or wet. There is a risk of fatal injury.
Features337
Stowage and features
Z
Page 355 of 438
!Make sure that the windshield wipers are
not folded away from the windshield. You
could otherwise damage the windshield wip-
ers or the hood.
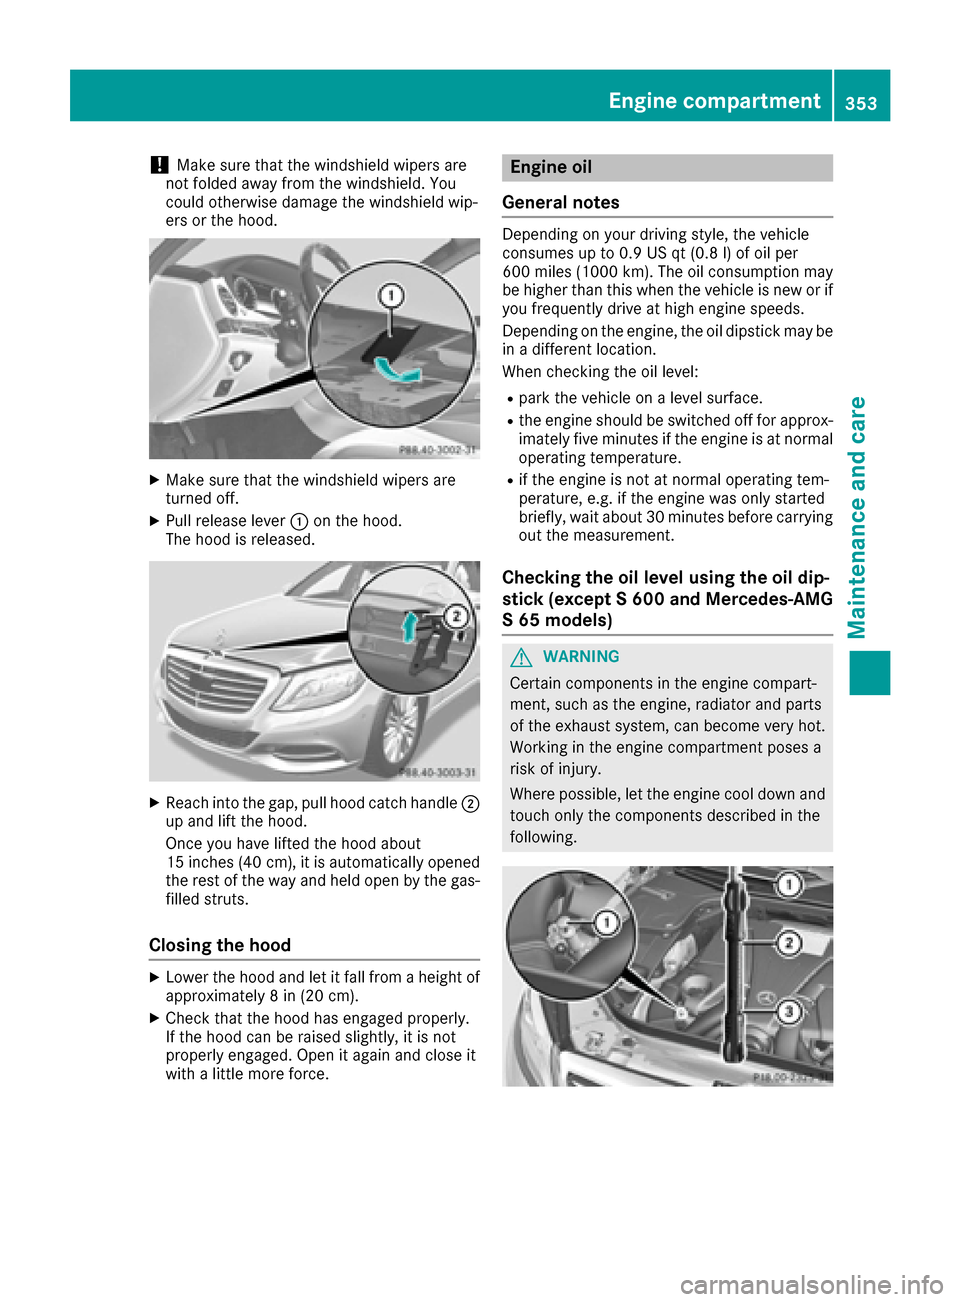
XMake sure that the windshield wipers are
turned off.
XPull release lever :on the hood.
The hood is released.
XReach into the gap, pull hood catch handle ;
up and lift the hood.
Once you have lifted the hood about
15 inches (40 cm), it is automatically opened
the rest of the way and held open by the gas-
filled struts.
Closing the hood
XLower the hood and let it fall from a height of
approximately 8 in (20 cm).
XCheck that the hood has engaged properly.
If the hood can be raised slightly, it is not
properly engaged. Open it again and close it
with a little more force.
Engine oil
General notes
Depending on your driving style, the vehicle
consumes up to 0.9 US qt (0.8 l) of oil per
600 miles (1000 km). The oil consumption may
be higher than this when the vehicle is new or if
you frequently drive at high engine speeds.
Depending on the engine, the oil dipstick may be
in a different location.
When checking the oil level:
Rpark the vehicle on a level surface.
Rthe engine should be switched off for approx-
imately five minutes if the engine is at normal
operating temperature.
Rif the engine is not at normal operating tem-
perature, e.g. if the engine was only started
briefly, wait about 30 minutes before carrying
out the measurement.
Checking the oil level using the oil dip-
stick (except S 600 and Mercedes-AMG
S 65 models)
GWARNING
Certain components in the engine compart-
ment, such as the engine, radiator and parts
of the exhaust system, can become very hot.
Working in the engine compartment poses a
risk of injury.
Where possible, let the engine cool down and touch only the components described in the
following.
Engine compartment353
Maintenance and care
Z
Page 369 of 438

Useful information
i
This Operator's Manual describes all models
and all standard and optional equipment of
your vehicle available at the time of publica-
tion of the Operator's Manual. Country-spe-
cific differences are possible. Please note
that your vehicle may not be equipped with all
features described. This also applies to
safety-related systems and functions.
iRead the information on qualified specialist
workshops (Ypage 28).
Where will I find...?
Vehicle tool kit
General notes
The towing eye is located in the stowage well
under the trunk floor.
Some tools for changing a wheel are specific to
the vehicle. For more information on which tire
changing tools are required and approved to
perform a wheel change on your vehicle, consult a qualified specialist workshop.
Tools required for changing a wheel may
include, for example:
RJack
RWheel chock
RLug wrench
RRatchet wrench
RAlignment bolt
Vehicles with a TIREFIT kit
:Tire sealant filler bottle
;Tire inflation compressor
=Towing eye
XOpen the trunk lid.
XLift the trunk floor upwards (Ypage 329).
XUse the TIREFIT kit (Ypage 369).
Mercedes-AMG vehicles
:Tire sealant filler bottle
;Jack
=Ratchet
?Alignment bolt
AJacking support
BSocket
CLug wrench
DTowing eye
EFolding wheel chock
FTire inflation compressor
The tire-change tool kit is in a tray in the stowage
well under the trunk floor.
XOpen the trunk lid.
XLift the trunk floor upwards (Ypage 329).
iExample: equipment and country-specific
variations possible.
Flat tire
Preparing the vehicle
Your vehicle may be equipped with:
Rtires with run-flat characteristics
(MOExtended tires) (Ypage 368)
Vehicle preparation is not necessary on vehi-
cles with MOExtended tires
Ra TIREFIT kit (Ypage 367)
Vehicles equipped with MOExtended tires are
not equipped with a TIREFIT kit at the factory. It
is therefore recommended that you additionally
equip your vehicle with a TIREFIT kit if you mount
tires that do not feature run-flat properties, e.g.
Flat tire367
Breakdown assistance