ECO mode MERCEDES-BENZ S430 2002 W220 Owner's Manual
[x] Cancel search | Manufacturer: MERCEDES-BENZ, Model Year: 2002, Model line: S430, Model: MERCEDES-BENZ S430 2002 W220Pages: 430, PDF Size: 20.81 MB
Page 5 of 430

2 Contents
Safety guidelines for the
seat belt, emergency
tensioning retractor
and airbag .................................... 97
Infant and child
restraint systems ......................... 99
Steering wheel adjustment .......... 102
Rear view mirrors .......................... 103
Memory function ........................... 108
Key dependent
memory settings ........................ 111
Instrument cluster ......................... 112
Multifunction steering wheel,
multifunction display ................118
Trip and main odometer
and sub menu ............................ 122
Audio systems ............................. 124
Radio ............................................ 124
CD player ..................................... 125
Cassette player ........................... 126
Telephone ........................................ 127
Telephone book .......................... 127
Redialing ..................................... 129
Incoming call .............................. 131Navigation system ..........................132
Distronic (DTR) ...............................133
Trip computer .................................134
Malfunction / warning
message memory ......................136
Individual settings .........................138
Setting the audio volume ............. 148
Flexible service system
(FSS) ........................................... 149
Tire inflation pressure
monitor ........................................152
Engine oil level indicator ..............156
Engine oil consumption ................157
Exterior lamp switch ......................158
Night security illumination ..........160
Headlamp cleaning system ........... 161
Combination switch .......................162
Hazard warning flasher
switch ..........................................165
Automatic climate control .............166
Display and controls ..................168
Automatic maximum
cooling ......................................... 170
Basic setting ................................ 171Special Settings .......................... 172
Activated charcoal filter ............ 175
Economy mode ........................... 176
Residual engine
heat utilization ........................... 176
Switching the automatic
climate control on and off ......... 177
Front center console storage
compartment ventilation .......... 178
Front center console storage
compartment ventilation .......... 178
Rear passenger compartment
climate control .......................... 180
Automatic maximum
cooling ......................................... 181
Power windows ............................... 184
Sliding/pop-up roof ....................... 187
Interior lighting ............................. 190
Rear window sunshade ................. 193
Rear door window sunshade ........ 194
Sun visors ....................................... 194
Vanity mirrors ................................ 195
Interior ............................................ 196
Page 10 of 430

7 IntroductionProduct information
Kindly observe the following in your own best interest:
We recommend using Mercedes-Benz original parts as well as conversion parts and accessories
explicitly approved by us for your vehicle model.
We have tested these parts to determine their reliability, safety and their special
suitability for Mercedes-Benz vehicles.
We are unable to make an assessment for other products and therefore cannot be held responsible
for them, even if in individual cases an official approval or authorization by governmental or other
agencies should exist. Use of such parts and accessories could adversely affect the safety, performance
or reliability of your vehicle. Please do not use them.
Mercedes-Benz original parts as well as conversion parts and accessories approved by us are available
at your authorized Mercedes-Benz Center where you will receive comprehensive information, also on
permissible technical modifications, and where proper installation will be performed.
Page 30 of 430
27 Contents – Operation
Te ch n i c a l
data Instruments
and controlsOperationDrivingInstrument
cluster displayPractical hints Car care Index Trip and main odometer
and sub menu ............................ 122
Audio systems ............................. 124
Radio ............................................ 124
CD player ..................................... 125
Cassette player ........................... 126
Telephone ........................................ 127
Telephone book .......................... 127
Redialing ..................................... 129
Incoming call .............................. 131
Navigation system .......................... 132
Distronic (DTR) ............................... 133
Trip computer ................................. 134
Malfunction / warning
message memory ...................... 136
Individual settings ......................... 138
Setting the audio volume .............. 148
Flexible service system
(FSS) ............................................ 149
Tire inflation pressure
monitor ....................................... 152
Engine oil level indicator .............. 156
Engine oil consumption ................ 157Exterior lamp switch ......................158
Night security illumination ..........160
Headlamp cleaning system ........... 161
Combination switch .......................162
Hazard warning flasher
switch ..........................................165
Automatic climate control .............166
Display and controls ..................168
Automatic maximum
cooling ......................................... 170
Basic setting ................................ 171
Special Settings ......................... 172
Activated charcoal filter ........... 175
Economy mode ............................ 176
Residual engine
heat utilization ............................ 176
Switching the automatic
climate control on and off ........ 177
Front center console storage
compartment ventilation .......... 178
Front center console storage
compartment ventilation .......... 178
Rear passenger compartment
climate control ...........................180Automatic maximum
cooling ......................................... 181
Power windows ............................... 184
Sliding/pop-up roof ....................... 187
Interior lighting ............................. 190
Rear window sunshade ................. 193
Rear door window sunshade ........ 194
Sun visors ....................................... 194
Vanity mirrors ................................ 195
Interior ............................................ 196
Storage compartments
and armrests .............................. 196
Glove box ..................................... 197
Cup holder ......................................202
Ashtrays ..........................................204
Lighter .............................................206
Parcel net in front
passenger footwell ....................208
Parcel net in trunk ........................208
Telephone, general ........................209
Garage door opener ....................... 210
Infrared reflecting
windshield ................................. 214
Page 33 of 430
30 Central locking system
Te ch n i c a l
data Instruments
and controlsOperationDrivingInstrument
cluster displayPractical hints Car care Index
KEYLESS-GO-card
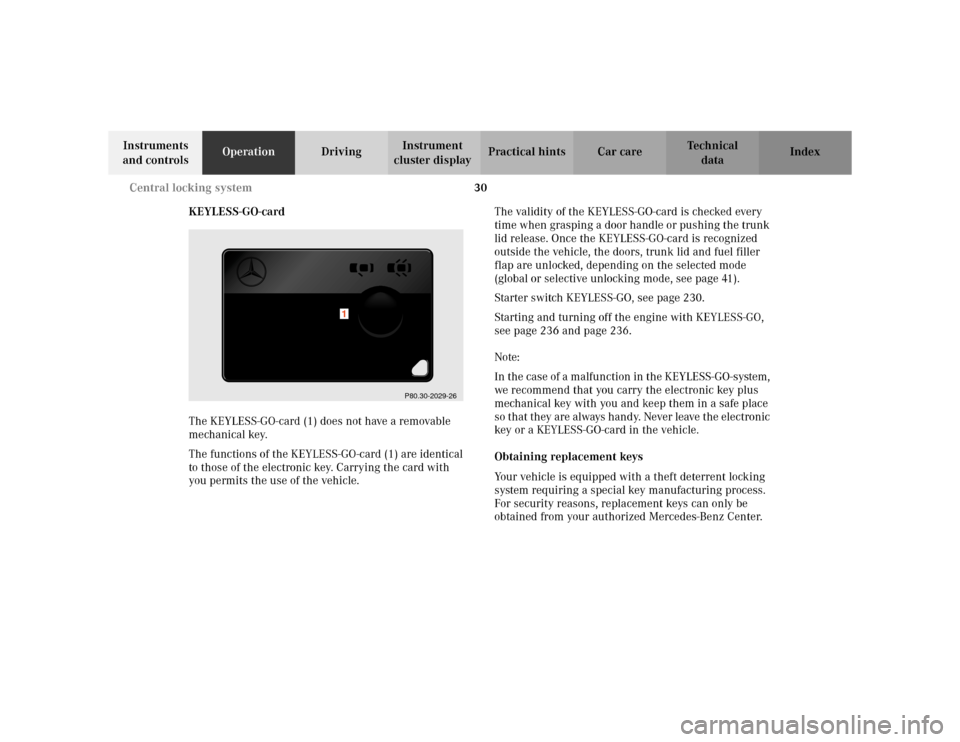
The KEYLESS-GO-card (1) does not have a removable
mechanical key.
The functions of the KEYLESS-GO-card (1) are identical
to those of the electronic key. Carrying the card with
you permits the use of the vehicle.The validity of the KEYLESS-GO-card is checked every
time when grasping a door handle or pushing the trunk
lid release. Once the KEYLESS-GO-card is recognized
outside the vehicle, the doors, trunk lid and fuel filler
flap are unlocked, depending on the selected mode
(global or selective unlocking mode, see page 41).
Starter switch KEYLESS-GO, see page 230.
Starting and turning off the engine with KEYLESS-GO,
see page 236 and page 236.
Note:
In the case of a malfunction in the KEYLESS-GO-system,
we recommend that you carry the electronic key plus
mechanical key with you and keep them in a safe place
so that they are always handy. Never leave the electronic
key or a KEYLESS-GO-card in the vehicle.
Obtaining replacement keys
Your vehicle is equipped with a theft deterrent locking
system requiring a special key manufacturing process.
For security reasons, replacement keys can only be
obtained from your authorized Mercedes-Benz Center.
P80.30-2029-26
1
Page 38 of 430
35 Central locking system
Te ch n i c a l
data Instruments
and controlsOperationDrivingInstrument
cluster displayPractical hints Car care Index Locking and unlocking with remote control
Unlocking:
Press transmit button Œ. All turn signal lamps blink
once to indicate that the vehicle is unlocked.
The remote control can be programmed for two kinds of
unlocking modes (see below):
Selective unlocking mode –
Press transmit button Œ o nce to un lock dr iver’s d oor
and fuel filler flap.
Press transmit button Πtwice to unlock all doors,
fuel filler flap, and trunk.
Global unlocking mode –
Press transmit button Πonce to unlock all doors,
fuel filler flap, and trunk.
Notes:
If the trunk was previously locked separately, it will
remain locked, see page 51.
The presently active unlocking mode (selective or
global) can only be determined by unlocking the vehicle
with the remote control (see below for changing mode).If within 40 seconds of unlocking with the remote
control, neither door nor trunk is opened, the electronic
key is not inserted in the starter switch, or the central
locking switch is not activated, the vehicle will
automatically lock.
Locking:
Press transmit button ‹ once. All turn signal lamps
blink three times to indicate that the vehicle is locked. If
they do not blink three times, a door or trunk is not
properly closed.
Note:
If the vehicle cannot be locked or unlocked by pressing
the transmit button, then it may be necessary to change
the batteries in the electronic key (if ok, battery check
lamp in electronic key will light briefly when pressing
transmit button) or to synchronize the remote control,
see pages 371 and 373.
Choosing global or selective mode on remote control
Press and hold transmit buttons‹ andŒ
simultaneously for five seconds to reprogram the
remote control. Battery check lamp will blink two times
indicating the completed mode change.
Page 41 of 430
38 Central locking system
Te ch n i c a l
data Instruments
and controlsOperationDrivingInstrument
cluster displayPractical hints Car care Index
Locking and unlocking with KEYLESS-GO-card
Unlocking:
Grasp any door handle. All turn signal lamps blink once
to indicate that the vehicle is unlocked.
The KEYLESS-GO-card can be programmed for two
kinds of unlocking modes (see below):
Selective unlocking mode –
Grasp driver’s door handle to unlock driver’s door and
fuel filler flap.
Grasping the passenger door or a rear door, centrally
unlocks the vehicle.
Global unlocking mode –
Grasp any door handle to unlock both doors, fuel filler
flap, and trunk.
For choosing global or selective mode on KEYLESS-GO-
card, see page 41.Notes:
The door which was unlocked, can be opened
immediately after the audible click. The other door can
be opened after its lock button rises up.
If the trunk was previously locked separately, it will
remain locked, see page 51.
The presently active unlocking mode (selective or
global) can be determined by pressing the button on the
KEYLESS-GO-card (see page 41 for changing mode).
If within 40 seconds of unlocking with the
KEYLESS-GO-card, neither door nor trunk is opened,
the electronic key is not inserted in the starter switch,
or the central locking switch is not activated, the vehicle
will automatically lock.
Page 73 of 430
70 Seats
Te ch n i c a l
data Instruments
and controlsOperationDrivingInstrument
cluster displayPractical hints Car care Index
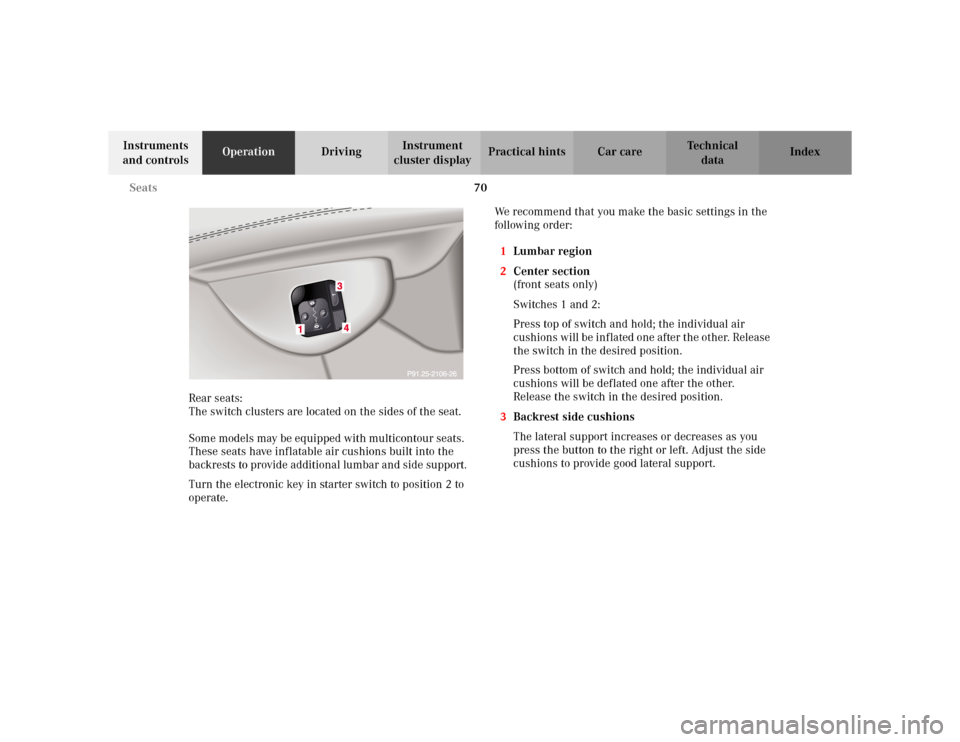
Rear seats:
The switch clusters are located on the sides of the seat.
Some models may be equipped with multicontour seats.
These seats have inflatable air cushions built into the
backrests to provide additional lumbar and side support.
Turn the electronic key in starter switch to position 2 to
operate.We recommend that you make the basic settings in the
following order:
1Lumbar region
2Center section
(front seats only)
Switches 1 and 2:
Press top of switch and hold; the individual air
cushions will be inflated one after the other. Release
the switch in the desired position.
Press bottom of switch and hold; the individual air
cushions will be deflated one after the other.
Release the switch in the desired position.
3Backrest side cushions
The lateral support increases or decreases as you
press the button to the right or left. Adjust the side
cushions to provide good lateral support.
Page 95 of 430
92 Restraint systems
Te ch n i c a l
data Instruments
and controlsOperationDrivingInstrument
cluster displayPractical hints Car care Index
come on at all or if it fails to extinguish after
approximately 4 seconds or if it comes on thereafter, a
malfunction in the system has been detected.
The following system components are monitored or
undergo a self-check: crash-sensor(s), airbag ignition
circuits, front seat belt buckles, emergency tensioning
retractors, seat sensor.
Initially, when the electronic key is turned from starter
switch position 0 to position 1 or 2, malfunctions in the
crash sensor are detected and indicated (the “SRS”
indicator lamp stays on longer than 4 seconds or does
not come on).
Have the system checked at your authorized
Mercedes-Benz Center immediately.
In the operational mode, after the indicator lamp has
gone out following the initial check, interruptions or
short circuits in the airbag ignition circuit and in the
driver and front passenger seat belt buckle harnesses,
and low voltage in the entire system are detected and
indicated.Note:
See page 305 for information on the Supplemental
Restraint System (SRS) indicator lamp.
The driver and passenger front airbags are designed to
activate only in certain frontal impacts exceeding a
preset threshold. The front passenger airbag deploys
only if the front passenger seat is occupied and the
7 indicator lamp on the center console is not
illuminated.
Note:
Heavy objects on the front passenger seat can appear to
the “SRS” to indicate the presence of an occupant in
that seat which causes the passenger front airbag to
deploy in a crash exceeding the appropriate threshold.
Wa r n i n g !
In the event a malfunction of the “SRS” is indicated
as outlined above, the “SRS” may not be
operational. For your safety, we strongly
recommend that you visit an authorized
Mercedes-Benz Center immediately to have the
system checked; otherwise the “SRS” may not be
activated when needed in an accident, which could
result in serious or fatal injury, or it might deploy
unexpectedly and unnecessarily which could also
result in injury.
Page 161 of 430
158 Exterior lamp switch
Te ch n i c a l
data Instruments
and controlsOperationDrivingInstrument
cluster displayPractical hints Car care Index
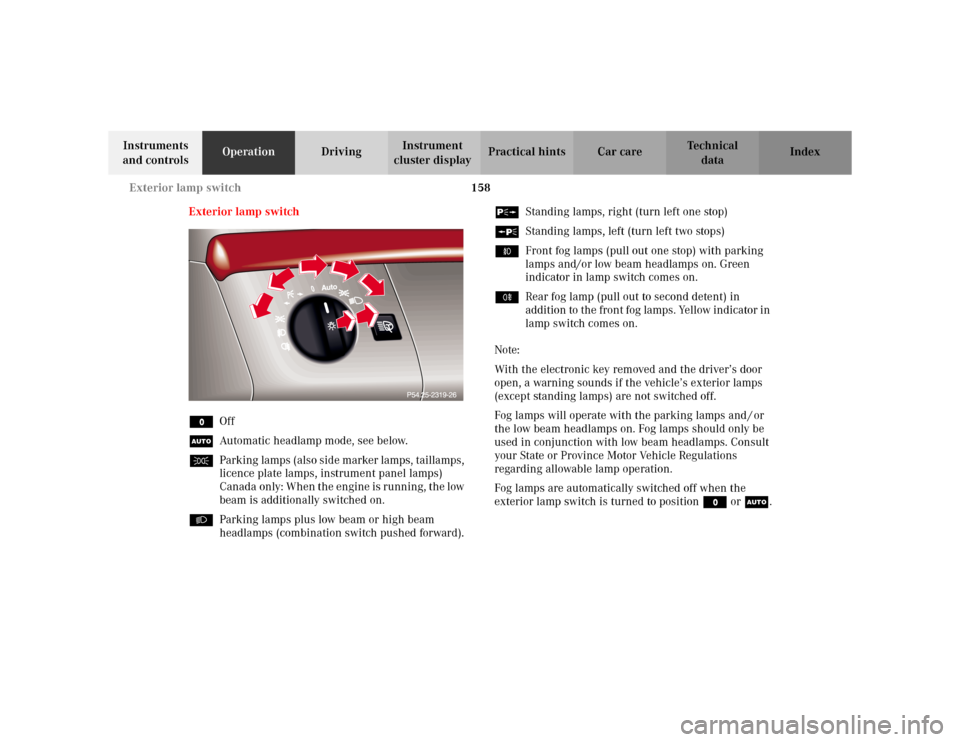
Exterior lamp switch
MOff
UAutomatic headlamp mode, see below.
CParking lamps (also side marker lamps, taillamps,
licence plate lamps, instrument panel lamps)
Canada only: When the engine is running, the low
beam is additionally switched on.
BParking lamps plus low beam or high beam
headlamps (combination switch pushed forward).ˆStanding lamps, right (turn left one stop)
‚Standing lamps, left (turn left two stops)
‡Front fog lamps (pull out one stop) with parking
lamps and/or low beam headlamps on. Green
indicator in lamp switch comes on.
†Rear fog lamp (pull out to second detent) in
addition to the front fog lamps. Yellow indicator in
lamp switch comes on.
Note:
With the electronic key removed and the driver’s door
open, a warning sounds if the vehicle’s exterior lamps
(except standing lamps) are not switched off.
Fog lamps will operate with the parking lamps and / or
the low beam headlamps on. Fog lamps should only be
used in conjunction with low beam headlamps. Consult
your State or Province Motor Vehicle Regulations
regarding allowable lamp operation.
Fog lamps are automatically switched off when the
exterior lamp switch is turned to position M or U.
Page 163 of 430
160 Exterior lamp switch
Te ch n i c a l
data Instruments
and controlsOperationDrivingInstrument
cluster displayPractical hints Car care Index
Daytime running lamp mode
Turn exterior lamp switch to positionM orU.
When the engine is running, the low beam headlamps
are automatically switched on. In low ambient light
conditions the parking lamps will also switch on.
•Canada only:
When shifting from a driving position to
position “N” or “P”, the low beam switches off
(3 minutes delay).
For nighttime driving the exterior lamp switch
should be turned to position B to permit
activation of the high beam headlamps.
•USA only:
The high beam headlamps can also be activated
when driving with the daytime running lamp mode
activated and exterior lamp switch in positionM.
To activate the daytime running lamp mode, see the
individual setting menu “LIGHTING” – “LAMP
CIRCUIT HEADLAMP” on page 142.
Note:
See page 158 for notes on the exterior lamp switch.Night security illumination
Turn exterior lamp switch to positionU.
At low ambient light conditions and with the engine
having been turned off, the exterior lamps (fog lamps
and parking lamps) switch on for added illumination.
After the last door has been closed the lamp-on time
period commences.
To activate the function see the individual setting menu
“LIGHTING” –“HEADLAMPS DELAYED SHUT-OFF” on
page 142.
The lamp-on time period for night security illumination
can be set at several different timed levels from 0 (off) to
60 seconds.
Note:
Within 10 minutes after closing the last door the night
security illumination can be reactivated by opening a
door.
If after switching the engine off, no doors are opened or
if after opening the doors they are not closed, the night
security illumination will switch off automatically after
approximately 60 seconds.