level MERCEDES-BENZ S500 2002 W220 User Guide
[x] Cancel search | Manufacturer: MERCEDES-BENZ, Model Year: 2002, Model line: S500, Model: MERCEDES-BENZ S500 2002 W220Pages: 430, PDF Size: 20.81 MB
Page 85 of 430
82 Restraint systems
Te ch n i c a l
data Instruments
and controlsOperationDrivingInstrument
cluster displayPractical hints Car care Index
Seat belt nonusage warning system
With the electronic key in starter switch position 2, a
warning sounds for a short time if the driver’s seat belt
is not fastened.
Automatic comfort-fit seat belt:
An automatic comfort-fit feature for all seat belt is
activated when the electronic key in the starter switch is
turned to position 1 or 2.
The retraction force of the inertia reel is reduced,
increasing the level of seat belt comfort.
Note:
For cleaning and care of the seat belts see page 389.
Wa r n i n g !
Never ride in a moving vehicle with the backrest
reclined. Sitting in an excessively reclined position
can be dangerous. You could slide under the seat
belt in a collision. If you slide under it, the belt
would apply force at the abdomen or neck. That
could cause serious or even fatal injuries. The
backrest and seat belt provide the best restraint
when the wearer is in an upright position and the
belt is properly positioned on the body.
Page 92 of 430
89 Restraint systems
Te ch n i c a l
data Instruments
and controlsOperationDrivingInstrument
cluster displayPractical hints Car care Index Supplemental Restraint System (SRS)
Airbags are intended as a supplement to seat belts.
Airbags alone cannot protect as well as airbags plus
seat belts in impacts for which the airbags were
designed to operate, and do not afford any protection
whatsoever in crashes for which the airbags are not
designed to deploy.
The SRS uses two crash severity levels (thresholds) to
activate either the emergency tensioning retractor (ETR)
or front airbag or both. Activation depends on the
direction and severity of the impact exceeding the
preset thresholds and whether the seat belt is fastened.Seat belt fastened
•first threshold exceeded: ETR activates
•second threshold exceeded: airbag also activates
Seat belt not fastened
Front seats:
•first threshold exceeded: airbag activates, not ETR
Rear outer seats:
•first threshold exceeded: ETR activates
Driver and front passenger and rear outer seat systems
operate independently of each other.
Page 93 of 430
90 Restraint systems
Te ch n i c a l
data Instruments
and controlsOperationDrivingInstrument
cluster displayPractical hints Car care Index
Emergency tensioning retractor (ETR)
The seat belts for the front and rear outer seats are
equipped with emergency tensioning retractors. These
tensioning retractors are located in each belt’s inertia
reel and become operationally ready with the electronic
key in starter switch position 1 or 2.
The emergency tensioning retractors are designed to
activate only when the seat belts are fastened during
frontal impacts exceeding the first threshold of the SRS
and in rear impacts exceeding a preset severity level.
They remove slack from the belts in such a way that the
seat belts fit more snugly against the body restricting its
forward movement as much as possible.In cases of other frontal impacts, angled impacts, roll-
overs, certain side impacts, or other accidents without
sufficient frontal or rear impact forces, the emergency
tensioning retractors will not be activated. The driver
and passengers will then be protected by the fastened
seat belts and inertia reel in the usual manner.
Note:
The front passenger ETR activates only if the front
passenger seat is occupied.
Heavy objects on the front passenger seat can appear to
the “SRS” to indicate the presence of an occupant in
that seat which causes the passenger front airbag to
deploy and the ETR to activate in a crash exceeding the
appropriate threshold.
Page 122 of 430
119 Multifunction steering wheel, multifunction display
Te ch n i c a l
data Instruments
and controlsOperationDrivingInstrument
cluster displayPractical hints Car care Index Depending on your vehicle’s equipment, you may use
the buttons on the multifunction steering wheel to call
up, control and set the following systems in the
multifunction display:
1Trip and main odometer, see page 122
Flexible service system (FSS), see page 149
Tire inflation pressure monitor, see page 152
Engine oil level indicator, see page 156
2Audio systems, see page 124
Radio, seepage124
CD player, see page 125
Cassette player, see page 126
3Telephone, see page 1274Navigation system, see page 132
5Distronic (DTR), see page 133
6Trip computer, see page 134
After start
After reset
Range
7Malfunction message memory, see page 136
8Individual settings, see page 138
9Malfunction messages are stored in memory (7), see
page 136.
Press the è or ÿ button repeatedly until the
required system is displayed.
The display advances by one system each time the
button is pressed.
You may call up additional displays within some of these
categories by pressing the j or k button.
Page 126 of 430
123 Multifunction steering wheel, multifunction display
Te ch n i c a l
data Instruments
and controlsOperationDrivingInstrument
cluster displayPractical hints Car care Index 1Trip and main odometer
See page 117 for instructions on resetting the trip
odometer.
2FSS (Flexible service system), see page 149
3Tire inflation pressure monitor, see page 152
4Engine oil level indicator, see page 156
5Ve h i c l e s p e e dPress è or ÿ button repeatedly until the trip and
main odometer display (1) appears.
Press the j or k button repeatedly until the
required display (2, 3, 4, 5, 1) appears.
Pressing the è or ÿ button displays the next or
previous system.
Page 140 of 430
137 Multifunction steering wheel, multifunction display
Te ch n i c a l
data Instruments
and controlsOperationDrivingInstrument
cluster displayPractical hints Car care Index Important!
Malfunction and warning messages are only indicated
for certain systems and displayed to a low level of detail.
The malfunction and warning messages are simply a
reminder with respect to the operation of certain
systems and do not replace the driver’s responsibility to
maintain the vehicle’s operating safety by having all
required maintenance and safety checks performed on
the vehicle and by bringing the vehicle to an authorized
Mercedes-Benz Center to address the malfunction and
warning messages. See page 309.
Page 153 of 430
150 Flexible service system
Te ch n i c a l
data Instruments
and controlsOperationDrivingInstrument
cluster displayPractical hints Car care Index
The service indicator disappears automatically after
30 seconds or if button Jon the instrument cluster is
pressed.
Calling up service indicator manually:
Turn the electronic key in starter switch to position 1
or 2.
Call up the trip odometer and main odometer by
pressing button è or ÿ on the multifunction
steering wheel until the display appears. See page 122.
Press button j or k until the FSS indicator
appears.
The next or previous system is displayed by pressing
button è or ÿ.
Important!
The FSS indicator does not include an engine oil level
indicator. See page 156 for engine oil level indicator.Note:
When disconnecting vehicle battery for one or more
days at a time, such days will not be counted. Any such
days not counted by the FSS can be added by your
Mercedes-Benz Center.
The interval between services is determined by the type
of driving for which the vehicle is used. For example,
driving at extreme speeds, and cold starts combined
with short distance driving in which the engine does not
reach operating normal temperature, reduce the interval
between services.
Page 159 of 430
156 Engine oil level indicator
Te ch n i c a l
data Instruments
and controlsOperationDrivingInstrument
cluster displayPractical hints Car care Index
Engine oil level indicator
To check the engine oil level, park vehicle on level
ground, with engine at normal operational temperature.
Check oil level approximately 5 minutes after turning
off the engine, allowing for the oil to return to the oil
pan.
The message “OBSERVE WAITING PERIOD” will be
displayed if the required waiting period has not been
observed after turning off the engine:
•with engine at operational temperature
approximately 5 minutes.•with engine not at operational temperature up to
approximately 30 minutes.
The engine oil level check can be repeated after a short
time.
Turn the electronic key in starter switch to position 2.
To call up the trip odometer and main odometer, press
button è or ÿ on the multifunction steering
wheel until the display appears. See page 122.
Press button j or k on the multifunction
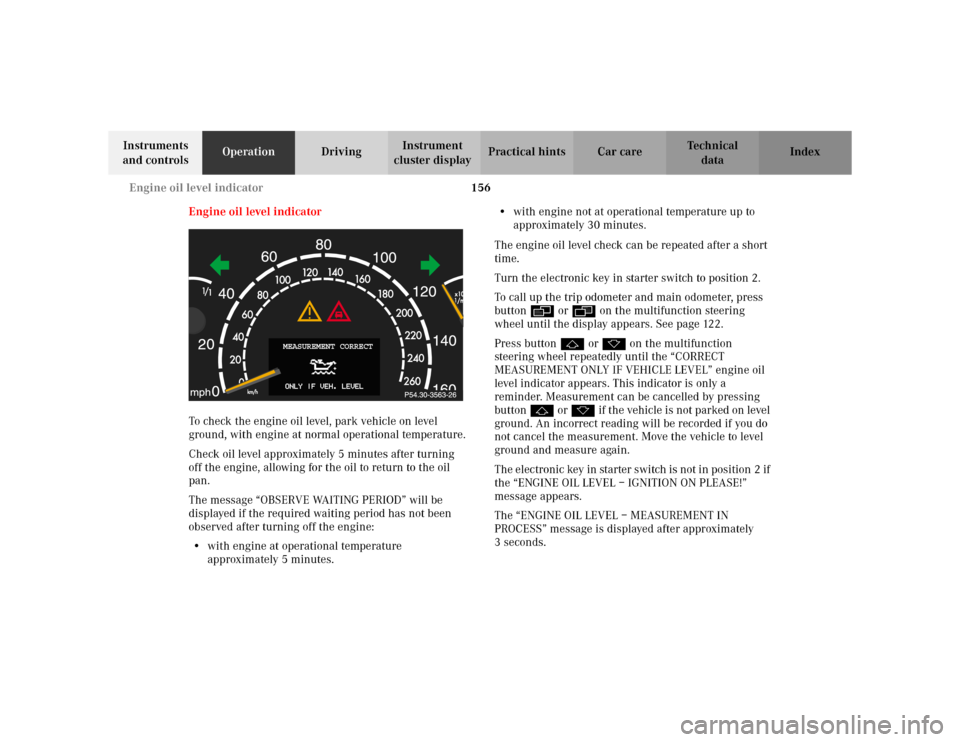
steering wheel repeatedly until the “CORRECT
MEASUREMENT ONLY IF VEHICLE LEVEL” engine oil
level indicator appears. This indicator is only a
reminder. Measurement can be cancelled by pressing
button j or k if the vehicle is not parked on level
ground. An incorrect reading will be recorded if you do
not cancel the measurement. Move the vehicle to level
ground and measure again.
The electronic key in starter switch is not in position 2 if
the “ENGINE OIL LEVEL – IGNITION ON PLEASE!”
message appears.
The “ENGINE OIL LEVEL – MEASUREMENT IN
PROCESS” message is displayed after approximately
3seconds.
MEASUREMENT CORRECT
Page 160 of 430
157 Engine oil level indicator
Te ch n i c a l
data Instruments
and controlsOperationDrivingInstrument
cluster displayPractical hints Car care Index One of the following messages will subsequently appear
on the indicator:
“ENGINE OIL LEVEL – O.K.”
No oil needs to be added.
“ENGINE OIL LEVEL – ADD 1.0 QUART”
(Canada: 1.0 L)
“ENGINE OIL LEVEL – ADD 1.5 QUART”
(Canada: 1.5 L)
“ENGINE OIL LEVEL – ADD 2.0 QUART”
(Canada: 2.0 L)
See “Checking engine oil level”, on page 342 for
instructions on adding engine oil.
“ENGINE OIL LEVEL – REDUCE OIL LEVEL”
Do not overfill the engine.
Excessive oil must be siphoned or drained off. It could
cause damage to the engine and catalytic converter not
covered by the Mercedes-Benz Limited Warranty.
The “MEASURING NOT POSSIBLE!” message will be
displayed if a proper oil level check cannot be
performed. The engine oil level check can be repeated
after a short while.S 430, S 500 and S 55 AMG only:
Perform the engine oil level check with the dipstick, if it
cannot be completed via the multifunction display.
See “Checking engine oil level”, page 342.
In this case we recommend that you have the system
checked at a Mercedes-Benz Center.
Notes:
See malfunction and warning messages on page 309
and page 324 if an engine oil level indicator appears in
the multifunction display when the engine is running.
The engine oil level cannot be checked while the engine
is running. The “ENGINE OIL LEVEL – NOT WHEN
ENGINE ON” message will appear.
Engine oil consumption
Engine oil consumption checks should only be made
after the break-in period. During the break-in period,
higher oil consumption may be noticed and is normal.
Frequent driving at high engine speeds results in
increased consumption.
Page 163 of 430
160 Exterior lamp switch
Te ch n i c a l
data Instruments
and controlsOperationDrivingInstrument
cluster displayPractical hints Car care Index
Daytime running lamp mode
Turn exterior lamp switch to positionM orU.
When the engine is running, the low beam headlamps
are automatically switched on. In low ambient light
conditions the parking lamps will also switch on.
•Canada only:
When shifting from a driving position to
position “N” or “P”, the low beam switches off
(3 minutes delay).
For nighttime driving the exterior lamp switch
should be turned to position B to permit
activation of the high beam headlamps.
•USA only:
The high beam headlamps can also be activated
when driving with the daytime running lamp mode
activated and exterior lamp switch in positionM.
To activate the daytime running lamp mode, see the
individual setting menu “LIGHTING” – “LAMP
CIRCUIT HEADLAMP” on page 142.
Note:
See page 158 for notes on the exterior lamp switch.Night security illumination
Turn exterior lamp switch to positionU.
At low ambient light conditions and with the engine
having been turned off, the exterior lamps (fog lamps
and parking lamps) switch on for added illumination.
After the last door has been closed the lamp-on time
period commences.
To activate the function see the individual setting menu
“LIGHTING” –“HEADLAMPS DELAYED SHUT-OFF” on
page 142.
The lamp-on time period for night security illumination
can be set at several different timed levels from 0 (off) to
60 seconds.
Note:
Within 10 minutes after closing the last door the night
security illumination can be reactivated by opening a
door.
If after switching the engine off, no doors are opened or
if after opening the doors they are not closed, the night
security illumination will switch off automatically after
approximately 60 seconds.