Seat control MERCEDES-BENZ S500 2002 W220 Workshop Manual
[x] Cancel search | Manufacturer: MERCEDES-BENZ, Model Year: 2002, Model line: S500, Model: MERCEDES-BENZ S500 2002 W220Pages: 430, PDF Size: 20.81 MB
Page 111 of 430
108 Memory function
Te ch n i c a l
data Instruments
and controlsOperationDrivingInstrument
cluster displayPractical hints Car care Index
Memory function
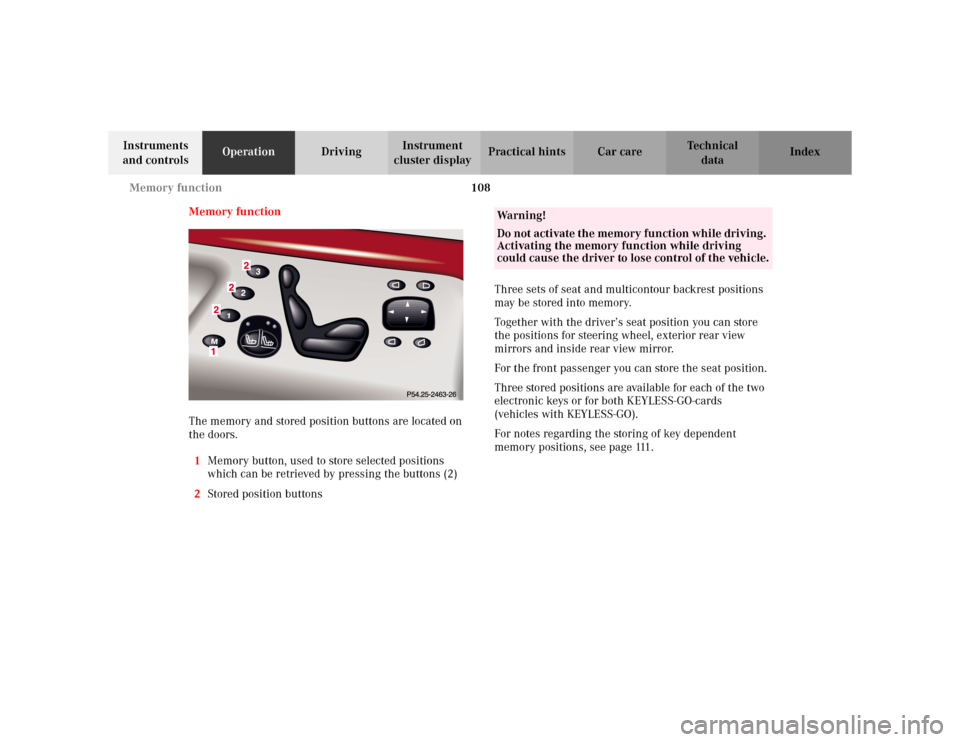
The memory and stored position buttons are located on
the doors.
1Memory button, used to store selected positions
which can be retrieved by pressing the buttons (2)
2Stored position buttonsThree sets of seat and multicontour backrest positions
may be stored into memory.
Together with the driver’s seat position you can store
the positions for steering wheel, exterior rear view
mirrors and inside rear view mirror.
For the front passenger you can store the seat position.
Three stored positions are available for each of the two
electronic keys or for both KEYLESS-GO-cards
(vehicles with KEYLESS-GO).
For notes regarding the storing of key dependent
memory positions, see page 111.
Wa r n i n g !
Do not activate the memory function while driving.
Activating the memory function while driving
could cause the driver to lose control of the vehicle.
Page 112 of 430
109 Memory function
Te ch n i c a l
data Instruments
and controlsOperationDrivingInstrument
cluster displayPractical hints Car care Index Storing positions into memory
Driver’s seat: with the electronic key in starter switch
position 1 or 2 or with the driver’s door open.
Front passenger seat and rear seats: with electronic key
in starter switch position 1 or 2 or the relevant doors
open.
Adjust the seat and multicontour backrest to the desired
position. You can also adjust the steering wheel, the
exterior rear view mirrors electrically and the inside
rear view mirror by hand for the driver’s seat. See
page 104 for exterior rear view mirror adjustment and
page 102 for steering wheel adjustment.
Push memory button “M”, release and push a stored
position button “1”, “2” or “3” within 3 seconds.Recalling positions from memory
To recall a seat / steering wheel and rear view mirror
position, push and hold button “1”, “2” or “3” until seat /
steering wheel and rear view mirror movement has
stopped.
The seat / steering wheel and rear view mirror
movement stops when the button is released.
Caution!
Do not operate the power seats using the memory
button if the seat backrest is in an excessively reclined
position. Doing so could cause damage to front or rear
seats.
First move backrest to an upright position.
Page 113 of 430
110 Memory function
Te ch n i c a l
data Instruments
and controlsOperationDrivingInstrument
cluster displayPractical hints Car care Index
Important!
Prior to operating the vehicle, the driver should check
and adjust if necessary the seat height, seat position
fore and aft, and backrest angle to insure adequate
control, reach and comfort. The head restraint should
also be adjusted for proper height. See also airbag
section for proper seat positioning.
In addition, also adjust the steering wheel to ensure
adequate control, reach, operation and comfort. Both the
inside and outside rear view mirrors should be adjusted
for adequate rearward vision.
Fasten seat belts. Infants and small children should be
seated in a properly secured restraint system that
complies with U.S. Federal Motor Vehicle Safety
Standard 213 and Canadian Motor Vehicle Safety
Standard 213.
All seat, head restraint, steering wheel, and rear view
mirror adjustments as well as fastening of seat belts
should be done before the vehicle is put into motion.
Wa r n i n g !
Children 12 years old and under must never ride in
the front seat, except in a Mercedes-Benz
authorized BabySmart
TM compatible child seat,
which operates with the BabySmart
TM system
installed in the vehicle to deactivate the passenger-
side front airbag when it is properly installed.
Otherwise they will be struck by the airbag when it
inflates in a crash. If this happens, serious or fatal
injury can result.
According to accident statistics, children are safer
when properly restrained in the rear seating
positions than in the front seating positions.
Infants and small children must ride in back seats
and be seated in an appropriate infant or child
restraint system, which is properly secured with
the vehicle’s seat belt, fully in accordance with the
child seat manufacturer’s instructions.A child’s risk of serious or fatal injuries is
significantly increased if the child restraints are
not properly secured in the vehicle and the child is
not properly secured in the child restraint.
Page 116 of 430
113 Instrument cluster
Te ch n i c a l
data Instruments
and controlsOperationDrivingInstrument
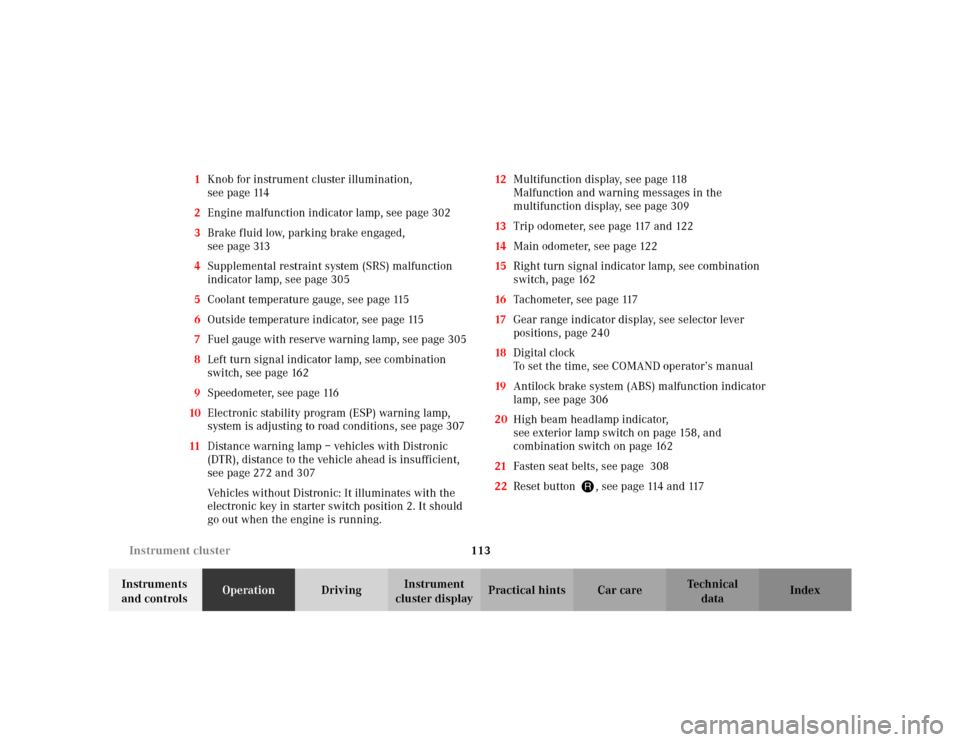
cluster displayPractical hints Car care Index 1Knob for instrument cluster illumination,
seepage114
2Engine malfunction indicator lamp, see page 302
3Brake fluid low, parking brake engaged,
seepage313
4Supplemental restraint system (SRS) malfunction
indicator lamp, see page 305
5Coolant temperature gauge, see page 115
6Outside temperature indicator, see page 115
7Fuel gauge with reserve warning lamp, see page 305
8Left turn signal indicator lamp, see combination
switch, see page 162
9Speedometer, see page 116
10Electronic stability program (ESP) warning lamp,
system is adjusting to road conditions, see page 307
11Distance warning lamp – vehicles with Distronic
(DTR), distance to the vehicle ahead is insufficient,
see page 272 and 307
Vehicles without Distronic: It illuminates with the
electronic key in starter switch position 2. It should
go out when the engine is running.12Multifunction display, see page 118
Malfunction and warning messages in the
multifunction display, see page 309
13Trip odometer, see page 117 and 122
14Main odometer, see page 122
15Right turn signal indicator lamp, see combination
switch, page 162
16Tachometer, see page 117
17Gear range indicator display, see selector lever
positions, page 240
18Digital clock
To set the time, see COMAND operator’s manual
19Antilock brake system (ABS) malfunction indicator
lamp, see page 306
20High beam headlamp indicator,
see exterior lamp switch on page 158, and
combination switch on page 162
21Fasten seat belts, see page 308
22Reset button J, see page 114 and 117
Page 172 of 430
169 Automatic climate control
Te ch n i c a l
data Instruments
and controlsOperationDrivingInstrument
cluster displayPractical hints Car care Index Automatic climate control
The system is always at operational readiness, except
when manually switched off.
The automatic climate control only operates with the
engine running.
The temperature selector should be left at the desired
temperature setting. The temperature selected is
reached as quickly as possible.
The system will not heat or cool any quicker by setting a
higher or lower temperature.
The desired interior temperature and air distribution
can be selected separately for the left and right side of
the passenger compartment. Adjust the temperature
settings in small increments.
The automatic climate control removes considerable
moisture from the air during operation in the cooling
mode. It is normal for water to drip on the ground
through ducts in the underbody.
The air conditioning will not engage (no cooling) if the
economy mode AC
OFF
is selected, see page 176. Notes:
The current settings (Temperature, Air volume, AC
OFF,
Activated charcoal filter, ON / OFF) are stored for each
electronic key before the electronic key is removed from
the starter switch or when the vehicle is locked using
the KEYLESS-GO-card (vehicles with keyless-go), see
key dependent memory settings on page 111.
Do not obstruct the air flow by placing objects on the air
flow-through exhaust slots below the rear window.
Also keep the air intake grill in front of the windshield
free of snow and debris.
The storage compartment between the front seats can be
ventilated. See page 178 for notes on ventilating the
storage space under the armrest in the center console.
The air conditioner switches itself off for its own
protection if refrigerant is lost. No cooling will then take
place. Economy mode AC
OFF
cannot be switched off.
Have the air conditioner checked by a Mercedes-Benz
Center should this happen.
If the vehicle interior has been heated by direct sunlight
and is very hot, ventilate the interior (open door or
windows for a short period) before driving off.
Page 183 of 430

180 Automatic climate control
Te ch n i c a l
data Instruments
and controlsOperationDrivingInstrument
cluster displayPractical hints Car care Index
Rear passenger compartment climate control
(optional, standard on model S 600)
1On / off
Residual engine heat utilization, see page 176.
2Display
Depending on the ambient light conditions, the
figures on the display will be shown as dark figures
on a bright background (in daylight) or as, bright
figures on a dark background (at night).3Air distribution up / down
4Temperature control, right
5Air volume (automatic, manual)
6Temperature control, left
7Adjustable rear center air outlet, left
8Adjustable rear center air outlet, right
Note:
The rear air conditioner will not cool the air if the
AC
OFF
button on the automatic air conditioner is
pressed.
The temperature on both sides is automatically set to
the settings of the automatic air conditioner if the rear
seats are not occupied (rear seat belts unbuckled).
7
8
1
3
2
4
6
5
P83.00-0371-26
Page 189 of 430
186 Interior equipment
Te ch n i c a l
data Instruments
and controlsOperationDrivingInstrument
cluster displayPractical hints Car care Index
Blocking of rear door window operation
If no operation of the rear door windows by switch (for
instance by children) is desired, slide override
switch (3) to the right; the N symbol becomes
visible.
Operation of the rear door windows with the switches
located in the driver’s door is still possible.
Note:
The operation of the rear door lighters and the setting of
the front passenger power seat from the rear is blocked.
See page 206 for lighter and page 80 for power seat
setting passenger position from rear.Synchronizing power windows
If the power supply was interrupted, (battery
disconnected or low), the windows cannot be opened or
closed by the express feature.
To resynchronize the express feature, press j side of
power window switch until the window is completely
closed and hold down for approximately 1 second.
Repeat procedure for each window.
The automatic full opening and closing procedure of the
windows should now be restored.
Page 198 of 430
195 Interior equipment
Te ch n i c a l
data Instruments
and controlsOperationDrivingInstrument
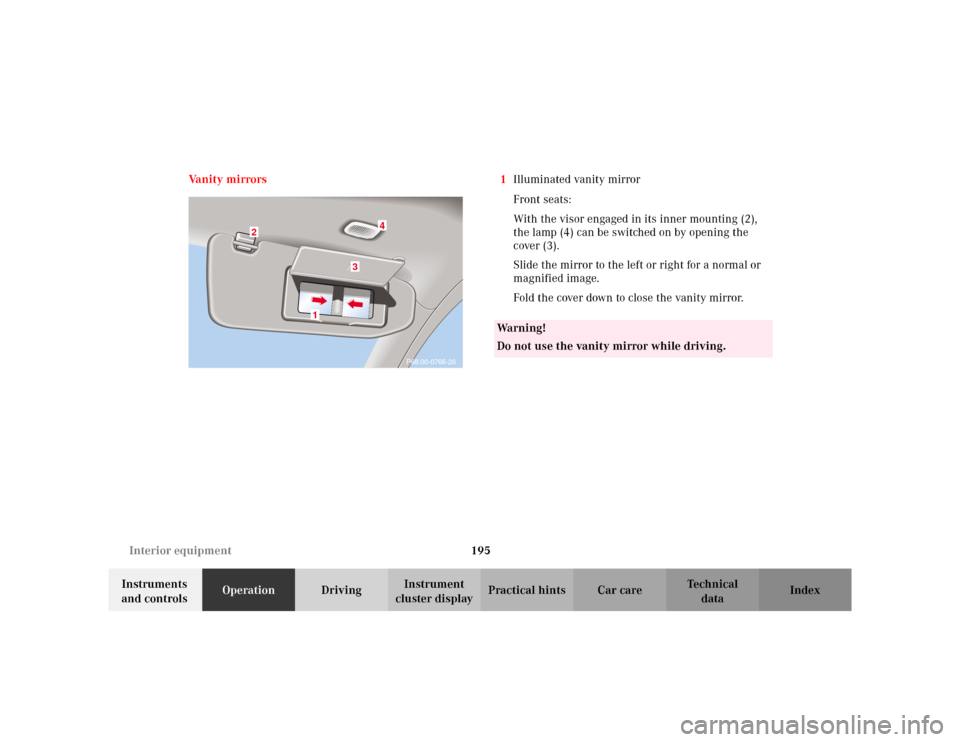
cluster displayPractical hints Car care Index Va n i t y m i r r o r s 1Illuminated vanity mirror
Front seats:
With the visor engaged in its inner mounting (2),
the lamp (4) can be switched on by opening the
cover (3).
Slide the mirror to the left or right for a normal or
magnified image.
Fold the cover down to close the vanity mirror.
P68.00-0766-26
4
3
1
2
Wa r n i n g !
Do not use the vanity mirror while driving.
Page 199 of 430
196 Interior equipment
Te ch n i c a l
data Instruments
and controlsOperationDrivingInstrument
cluster displayPractical hints Car care Index
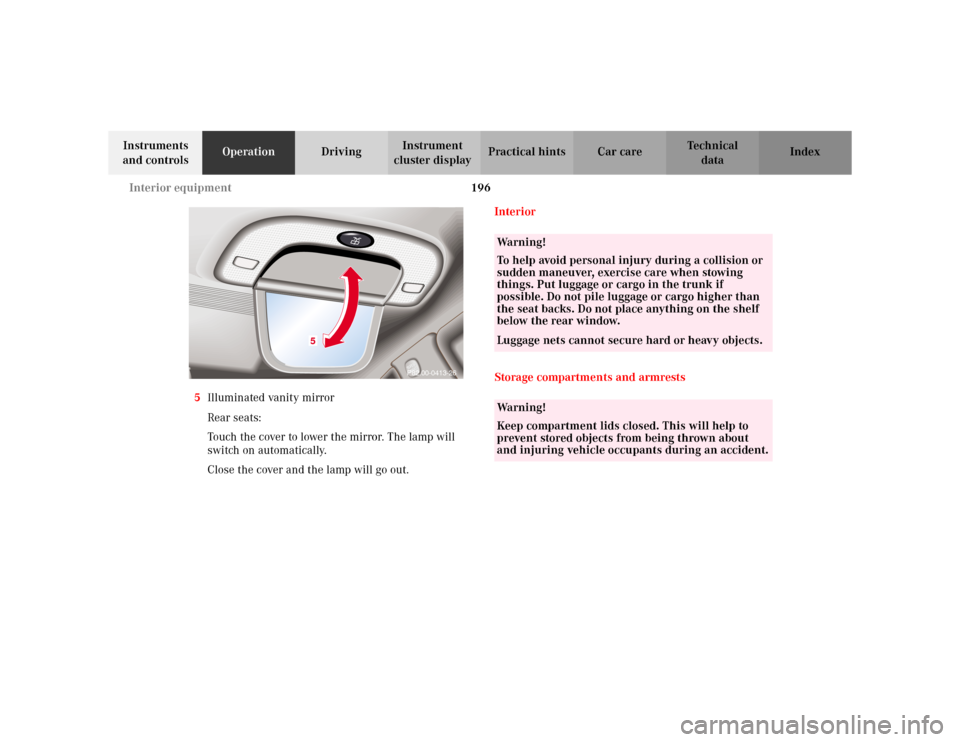
5Illuminated vanity mirror
Rear seats:
Touch the cover to lower the mirror. The lamp will
switch on automatically.
Close the cover and the lamp will go out.Interior
Storage compartments and armrests
P82.00-0413-26
5
Wa r n i n g !
To help avoid personal injury during a collision or
sudden maneuver, exercise care when stowing
things. Put luggage or cargo in the trunk if
possible. Do not pile luggage or cargo higher than
the seat backs. Do not place anything on the shelf
below the rear window.Luggage nets cannot secure hard or heavy objects. Wa r n i n g !
Keep compartment lids closed. This will help to
prevent stored objects from being thrown about
and injuring vehicle occupants during an accident.
Page 202 of 430
199 Interior equipment
Te ch n i c a l
data Instruments
and controlsOperationDrivingInstrument
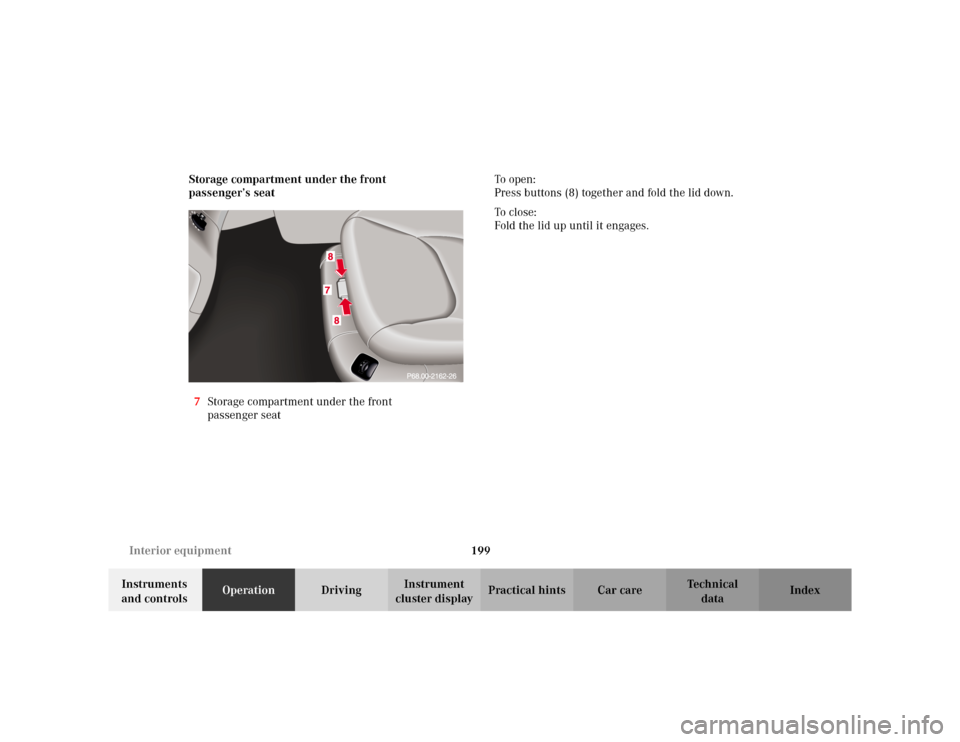
cluster displayPractical hints Car care Index Storage compartment under the front
passenger’s seat
7Storage compartment under the front
passenger seatTo o p e n :
Press buttons (8) together and fold the lid down.
To c l o s e :
Fold the lid up until it engages.