phone MERCEDES-BENZ S550 4MATIC 2010 W221 Owner's Guide
[x] Cancel search | Manufacturer: MERCEDES-BENZ, Model Year: 2010, Model line: S550 4MATIC, Model: MERCEDES-BENZ S550 4MATIC 2010 W221Pages: 548, PDF Size: 12.48 MB
Page 83 of 548
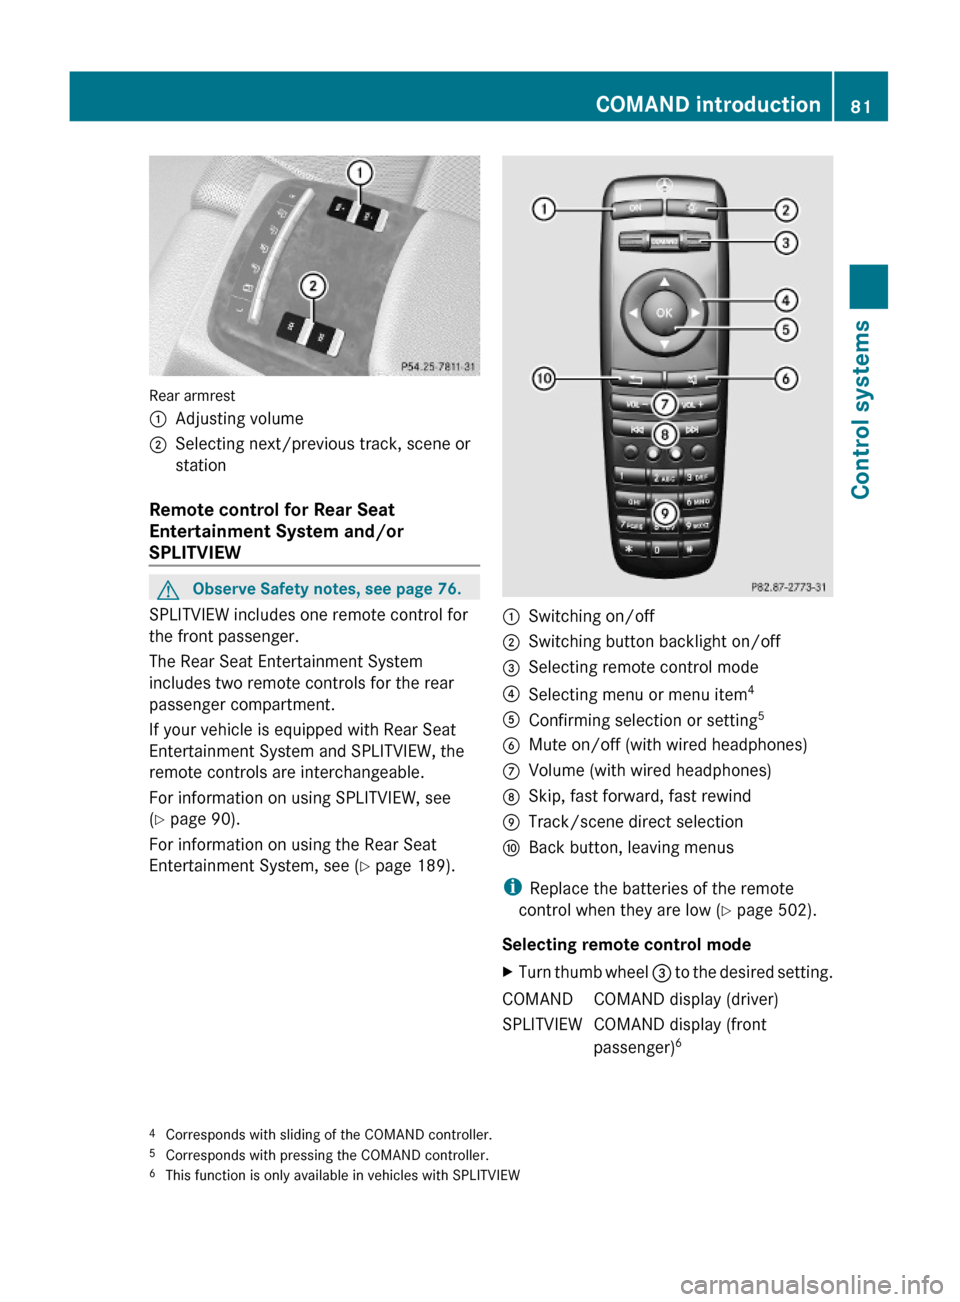
Rear armrest
:Adjusting volume;Selecting next/previous track, scene or
station
Remote control for Rear Seat
Entertainment System and/or
SPLITVIEW
GObserve Safety notes, see page 76.
SPLITVIEW includes one remote control for
the front passenger.
The Rear Seat Entertainment System
includes two remote controls for the rear
passenger compartment.
If your vehicle is equipped with Rear Seat
Entertainment System and SPLITVIEW, the
remote controls are interchangeable.
For information on using SPLITVIEW, see
(Y page 90).
For information on using the Rear Seat
Entertainment System, see (Y page 189).
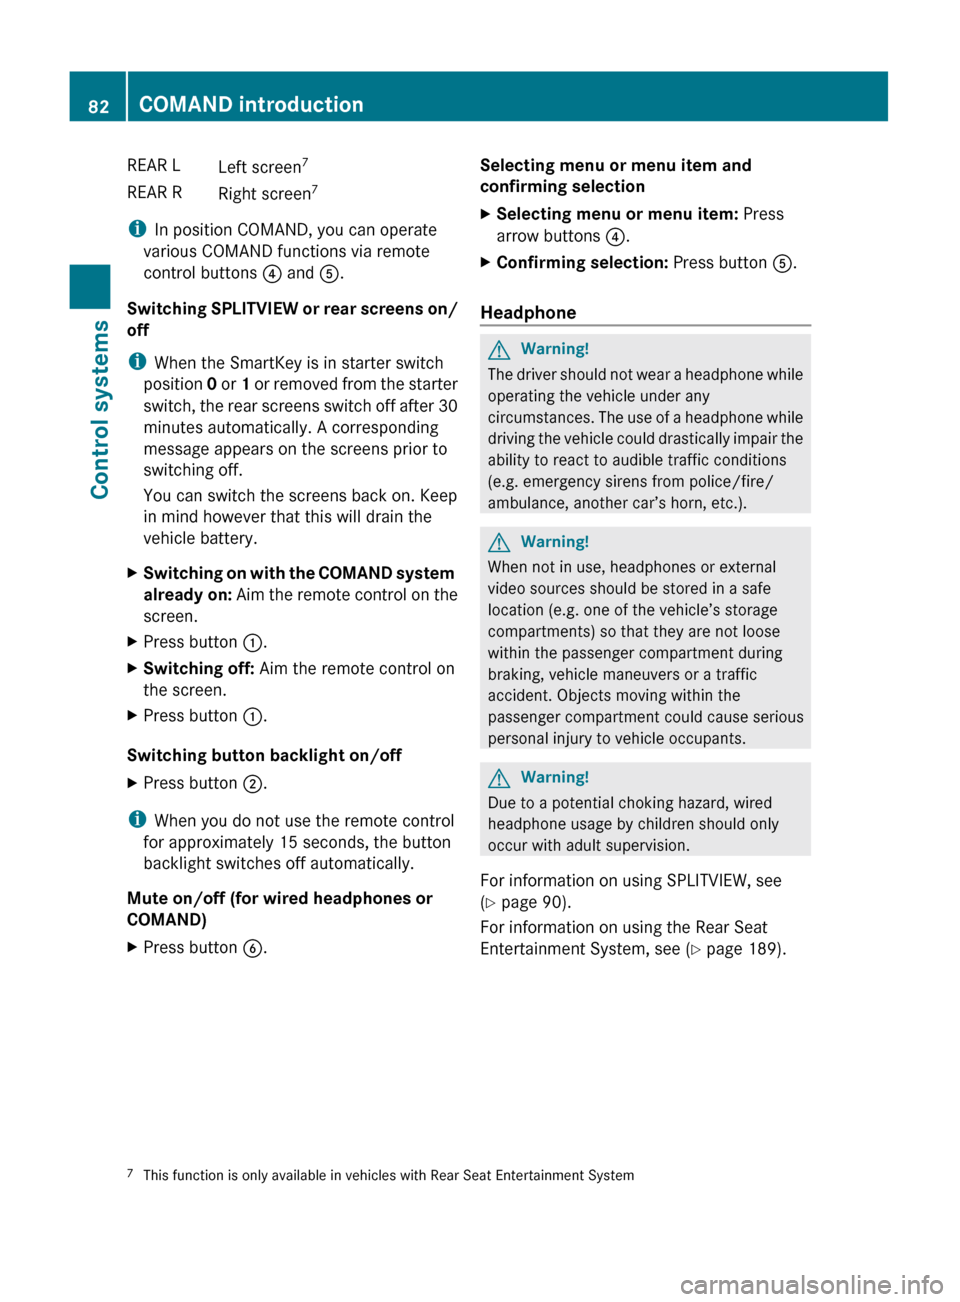
:Switching on/off;Switching button backlight on/off=Selecting remote control mode?Selecting menu or menu item4AConfirming selection or setting5BMute on/off (with wired headphones)CVolume (with wired headphones)DSkip, fast forward, fast rewindETrack/scene direct selectionFBack button, leaving menus
iReplace the batteries of the remote
control when they are low (Y page 502).
Selecting remote control mode
XTurn thumb wheel = to the desired setting.COMANDCOMAND display (driver)SPLITVIEWCOMAND display (front
passenger)64Corresponds with sliding of the COMAND controller.5Corresponds with pressing the COMAND controller.6This function is only available in vehicles with SPLITVIEW
COMAND introduction81Control systems221_AKB; 6; 20, en-USd2ugruen,Version: 2.11.8.12009-09-24T13:28:17+02:00 - Seite 81Z
Page 84 of 548
REAR LLeft screen7REAR RRight screen 7
i
In position COMAND, you can operate
various COMAND functions via remote
control buttons ? and A.
Switching SPLITVIEW or rear screens on/
off
i When the SmartKey is in starter switch
position 0 or 1 or removed from the starter
switch, the rear screens switch off after 30
minutes automatically. A corresponding
message appears on the screens prior to
switching off.
You can switch the screens back on. Keep
in mind however that this will drain the
vehicle battery.
XSwitching on with the COMAND system
already on: Aim the remote control on the
screen.XPress button :.XSwitching off: Aim the remote control on
the screen.XPress button :.
Switching button backlight on/off
XPress button ;.
i
When you do not use the remote control
for approximately 15 seconds, the button
backlight switches off automatically.
Mute on/off (for wired headphones or
COMAND)
XPress button B.Selecting menu or menu item and
confirming selectionXSelecting menu or menu item: Press
arrow buttons ?.XConfirming selection: Press button A.
Headphone
GWarning!
The driver should not wear a headphone while
operating the vehicle under any
circumstances. The use of a headphone while
driving the vehicle could drastically impair the
ability to react to audible traffic conditions
(e.g. emergency sirens from police/fire/
ambulance, another car’s horn, etc.).
GWarning!
When not in use, headphones or external
video sources should be stored in a safe
location (e.g. one of the vehicle’s storage
compartments) so that they are not loose
within the passenger compartment during
braking, vehicle maneuvers or a traffic
accident. Objects moving within the
passenger compartment could cause serious
personal injury to vehicle occupants.
GWarning!
Due to a potential choking hazard, wired
headphone usage by children should only
occur with adult supervision.
For information on using SPLITVIEW, see
( Y page 90).
For information on using the Rear Seat
Entertainment System, see ( Y page 189).
7
This function is only available in vehicles with Rear Seat Entertainment System82COMAND introductionControl systems
221_AKB; 6; 20, en-USd2ugruen,Version: 2.11.8.12009-09-24T13:28:17+02:00 - Seite 82
Page 85 of 548
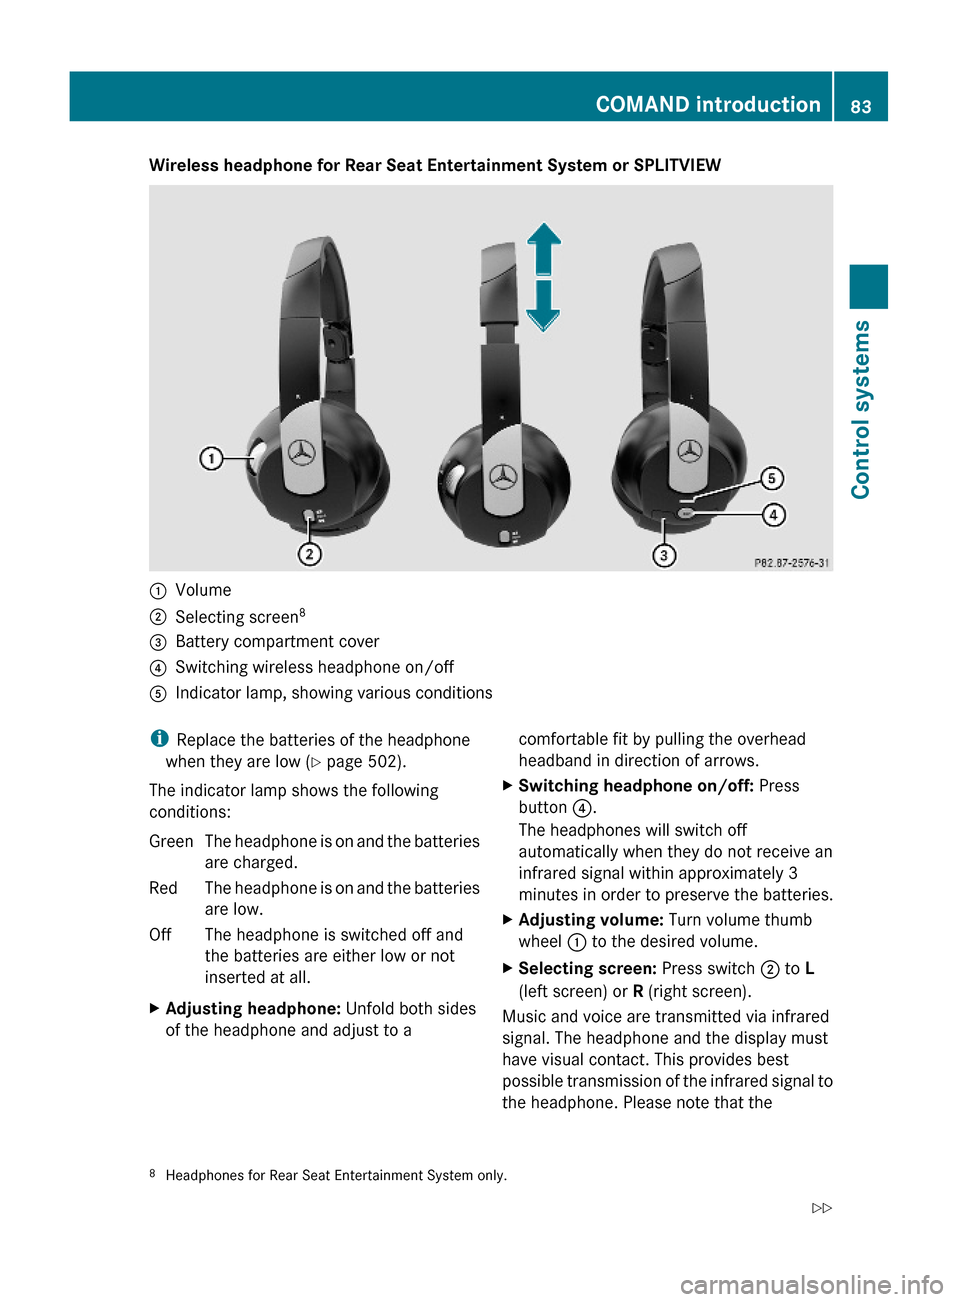
Wireless headphone for Rear Seat Entertainment System or SPLITVIEW:Volume;Selecting screen8=Battery compartment cover?Switching wireless headphone on/offAIndicator lamp, showing various conditionsiReplace the batteries of the headphone
when they are low (Y page 502).
The indicator lamp shows the following
conditions:
GreenThe headphone is on and the batteries
are charged.
RedThe headphone is on and the batteries
are low.
OffThe headphone is switched off and
the batteries are either low or not
inserted at all.
XAdjusting headphone: Unfold both sides
of the headphone and adjust to a
comfortable fit by pulling the overhead
headband in direction of arrows.
XSwitching headphone on/off: Press
button ?.
The headphones will switch off
automatically when they do not receive an
infrared signal within approximately 3
minutes in order to preserve the batteries.
XAdjusting volume: Turn volume thumb
wheel : to the desired volume.
XSelecting screen: Press switch ; to L
(left screen) or R (right screen).
Music and voice are transmitted via infrared
signal. The headphone and the display must
have visual contact. This provides best
possible transmission of the infrared signal to
the headphone. Please note that the
8Headphones for Rear Seat Entertainment System only.COMAND introduction83Control systems221_AKB; 6; 20, en-USd2ugruen,Version: 2.11.8.12009-09-24T13:28:17+02:00 - Seite 83Z
Page 86 of 548
headphone has a left and right side and must
be used accordingly.
The Rear Seat Entertainment System and
SPLITVIEW headphones are not
interchangeable.
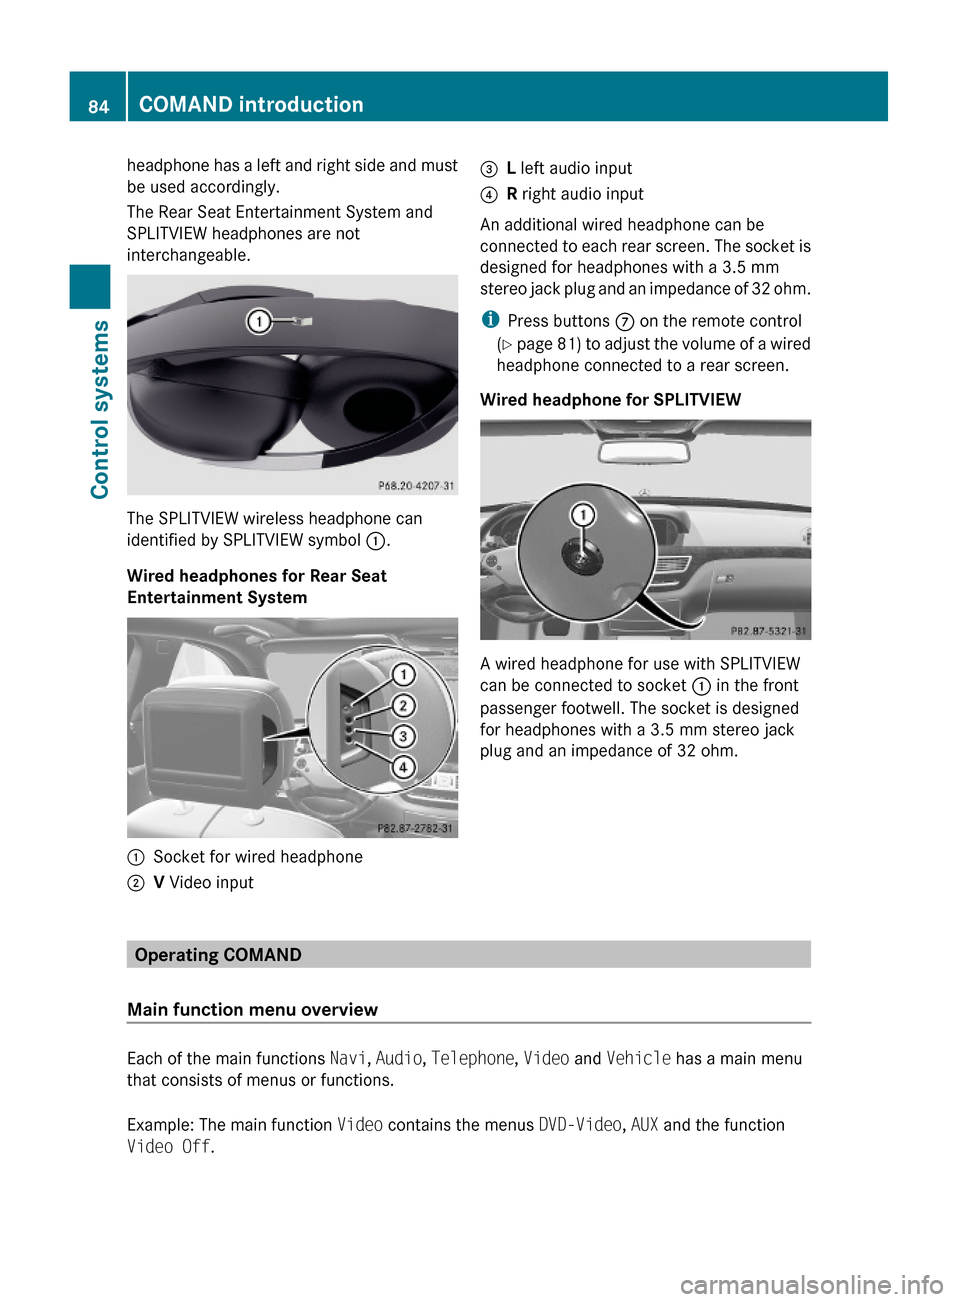
The SPLITVIEW wireless headphone can
identified by SPLITVIEW symbol :.
Wired headphones for Rear Seat
Entertainment System
:Socket for wired headphone;V Video input=L left audio input?R right audio input
An additional wired headphone can be
connected to each rear screen. The socket is
designed for headphones with a 3.5 mm
stereo jack plug and an impedance of 32 ohm.
iPress buttons C on the remote control
(Y page 81) to adjust the volume of a wired
headphone connected to a rear screen.
Wired headphone for SPLITVIEW
A wired headphone for use with SPLITVIEW
can be connected to socket : in the front
passenger footwell. The socket is designed
for headphones with a 3.5 mm stereo jack
plug and an impedance of 32 ohm.
Operating COMAND
Main function menu overview
Each of the main functions Navi, Audio, Telephone, Video and Vehicle has a main menu
that consists of menus or functions.
Example: The main function Video contains the menus DVD-Video, AUX and the function
Video Off.
84COMAND introductionControl systems
221_AKB; 6; 20, en-USd2ugruen,Version: 2.11.8.12009-09-24T13:28:17+02:00 - Seite 84
Page 87 of 548
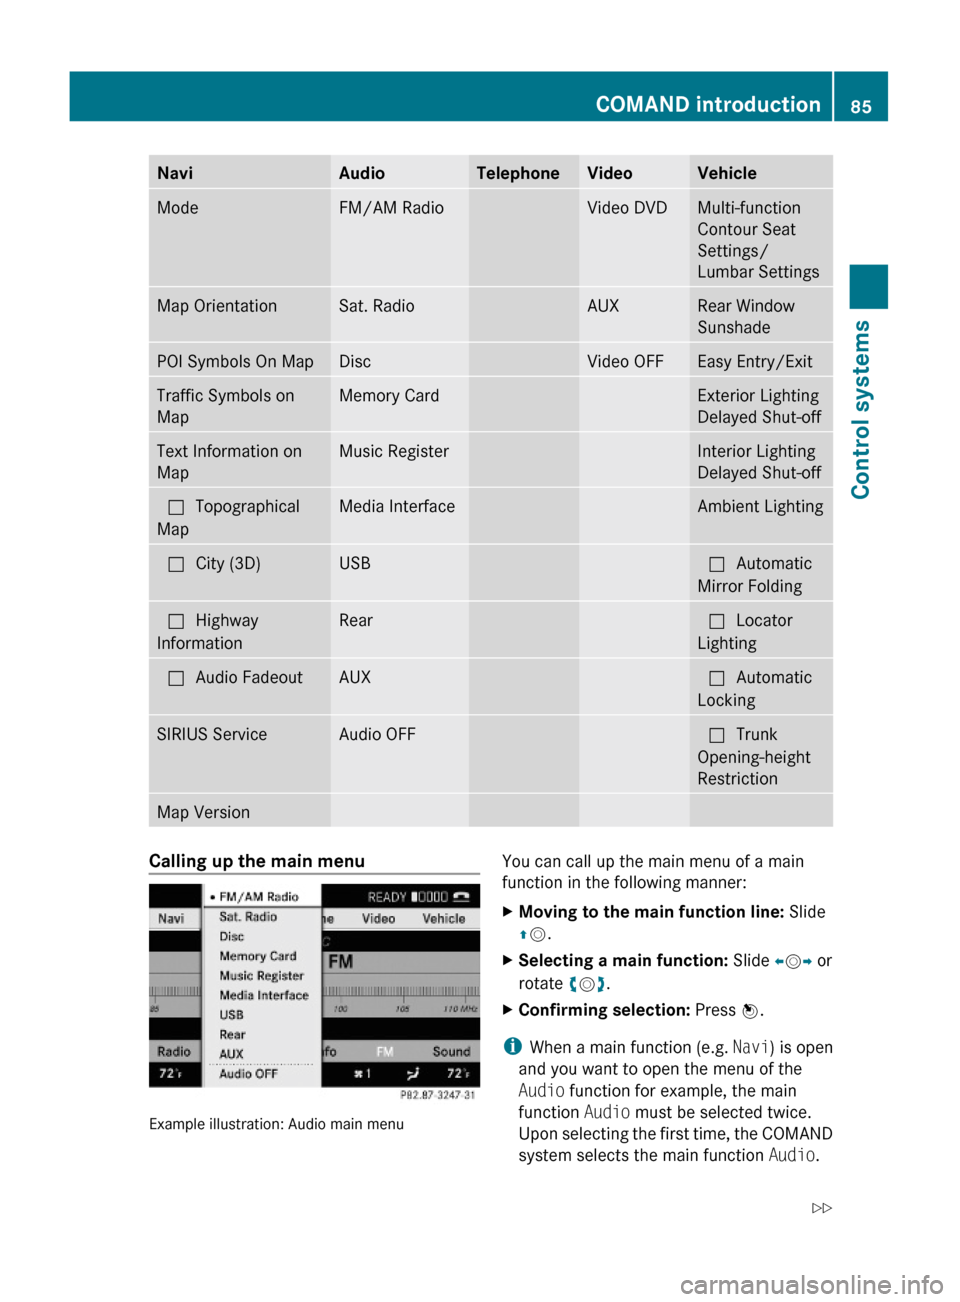
NaviAudioTelephoneVideoVehicleModeFM/AM RadioVideo DVDMulti-function
Contour Seat
Settings/
Lumbar Settings
Map OrientationSat. RadioAUXRear Window
Sunshade
POI Symbols On MapDiscVideo OFFEasy Entry/ExitTraffic Symbols on
Map
Memory CardExterior Lighting
Delayed Shut-off
Text Information on
Map
Music RegisterInterior Lighting
Delayed Shut-off
ªTopographical
Map
Media InterfaceAmbient LightingªCity (3D)USBªAutomatic
Mirror Folding
ªHighway
Information
RearªLocator
Lighting
ªAudio FadeoutAUXªAutomatic
Locking
SIRIUS ServiceAudio OFFªTrunk
Opening-height
Restriction
Map VersionCalling up the main menu
Example illustration: Audio main menu
You can call up the main menu of a main
function in the following manner:
XMoving to the main function line: Slide
ZV.
XSelecting a main function: Slide XVY or
rotate cVd.
XConfirming selection: Press W.
iWhen a main function (e.g. Navi) is open
and you want to open the menu of the
Audio function for example, the main
function Audio must be selected twice.
Upon selecting the first time, the COMAND
system selects the main function Audio.
COMAND introduction85Control systems221_AKB; 6; 20, en-USd2ugruen,Version: 2.11.8.12009-09-24T13:28:17+02:00 - Seite 85Z
Page 90 of 548
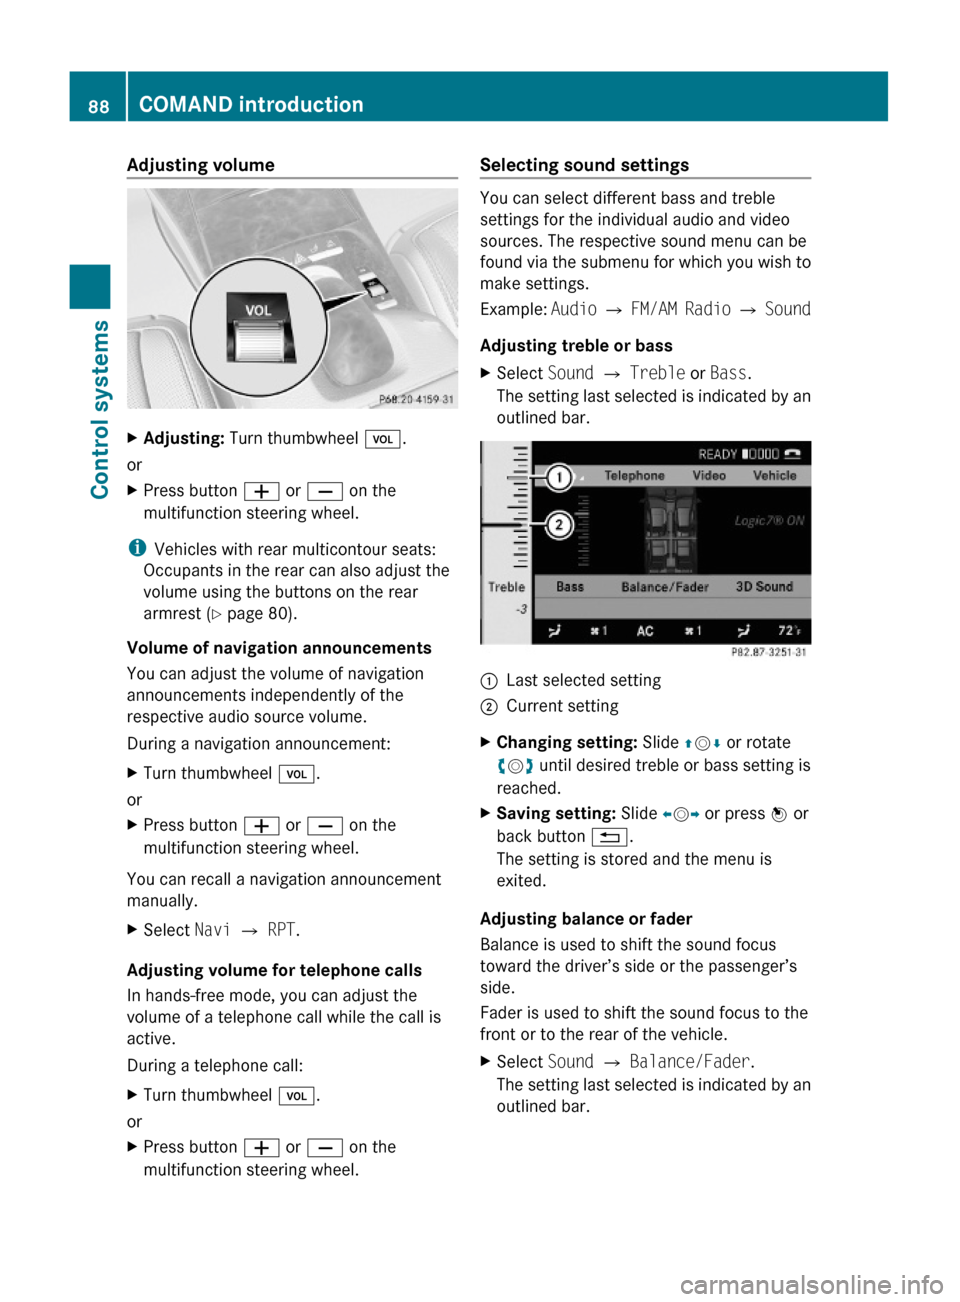
Adjusting volumeXAdjusting: Turn thumbwheel H.
or
XPress button W or X on the
multifunction steering wheel.
iVehicles with rear multicontour seats:
Occupants in the rear can also adjust the
volume using the buttons on the rear
armrest (Y page 80).
Volume of navigation announcements
You can adjust the volume of navigation
announcements independently of the
respective audio source volume.
During a navigation announcement:
XTurn thumbwheel H.
or
XPress button W or X on the
multifunction steering wheel.
You can recall a navigation announcement
manually.
XSelect Navi Q RPT.
Adjusting volume for telephone calls
In hands-free mode, you can adjust the
volume of a telephone call while the call is
active.
During a telephone call:
XTurn thumbwheel H.
or
XPress button W or X on the
multifunction steering wheel.
Selecting sound settings
You can select different bass and treble
settings for the individual audio and video
sources. The respective sound menu can be
found via the submenu for which you wish to
make settings.
Example: Audio Q FM/AM Radio Q Sound
Adjusting treble or bass
XSelect Sound Q Treble or Bass.
The setting last selected is indicated by an
outlined bar.
:Last selected setting;Current settingXChanging setting: Slide ZVÆ or rotate
cVd until desired treble or bass setting is
reached.
XSaving setting: Slide XVY or press W or
back button %.
The setting is stored and the menu is
exited.
Adjusting balance or fader
Balance is used to shift the sound focus
toward the driver’s side or the passenger’s
side.
Fader is used to shift the sound focus to the
front or to the rear of the vehicle.
XSelect Sound Q Balance/Fader.
The setting last selected is indicated by an
outlined bar.
88COMAND introductionControl systems
221_AKB; 6; 20, en-USd2ugruen,Version: 2.11.8.12009-09-24T13:28:17+02:00 - Seite 88
Page 92 of 548
R3-D sound does not work for mono-signal
sources, such as on analog AM radio or
in Weather Band.
R In the event of poor radio reception
quality, e.g. inside a tunnel, you should
switch off Logic 7 ®
, as a dynamic switch
from Stereo to Mono could occur,
resulting in temporary sound distortion.
R With some stereo recordings, the
resulting sound may deviate from
conventional stereo playback.
Switching the audio/video source off/
on
i When you load a CD or DVD, the audio or
video source is activated automatically.
Active audio source
XSwitching off: Select Audio Q Audio
OFF .
Playback is paused and the audio source is
switched off; Audio OFF appears in the
COMAND display.XSwitching on: Select Audio, then the
desired audio source.
or
XLoad a CD/DVD ( Y page 179) or an SD
card ( Y page 180).
or
XConnect a USB storage device
( Y page 80) or media interface device
( Y page 200) to COMAND.
Active video source
XSwitching off: Select Video Q Video
OFF .
The audio source is switched off; Video
OFF appears in the COMAND display.XSwitching on: Select Video, then the
desired video source.
or
XLoad a DVD ( Y page 179).SPLITVIEW
SPLITVIEW enables the driver and front
passenger to use separate COMAND
functions at the same time. Two different
displays appear in the COMAND screen. For
example, a Navigation display is only viewable
form the driver’s seat while a DVD Video
display is only viewable from the front
passenger’s seat.
COMAND is operated via SPLITVIEW from the
front passenger seat using the SPLITVIEW
remote control and the special wireless,
infrared headphone. You may also use a wired
headphone via the 3.5 mm socket in the front
passenger footwell.
For information about using the remote
control, see ( Y page 81).
For information about using the headphone,
see ( Y page 82).
Depending on the production date of your
vehicle, it may be equipped with SPLITVIEW.
At the time of this printing, the use of
SPLITVIEW is NOT allowed in the following US
states (AL, AZ, CO, IL, LA, MA, MD, NH, PA,
VA, VT, WA, WI, and WV) or Canadian
provinces (Manitoba, Newfoundland, New
Brunswick, and Prince Edward Island).
SPLITVIEW must NOT be operated in these
states or provinces. The driver is responsible
for observing ALL local statutory provisions.
If your vehicle is registered in a non-approved
state or province, then the feature will need
to be deactivated. Contact your authorized
Mercedes-Benz dealer to verify if SPLITVIEW
is allowed in your state or province.
Notes
R The audio volume of the wireless
headphone for the front passenger side
must be adjusted on the headphone
directly. The audio volume of a wired
headphone can be adjusted via the remote
90COMAND introductionControl systems
221_AKB; 6; 20, en-USd2ugruen,Version: 2.11.8.12009-09-24T13:28:17+02:00 - Seite 90
Page 93 of 548
control. Make sure the volume is not set
too high before putting on a headphone.
RThe DVD changer can playback only one
media source at a time. Example: if the
driver is playing an audio CD, the front
passenger can not play a different medium
(e.g. DVD video) from the DVD changer.
However, it is possible for the front
passenger to play media from radio,
memory card, MUSIC REGISTER, media
interface, USB, AUX or Rear Seat
Entertainment System.
RWhen driver and front passenger are using
the same medium, each can select
individual settings for that medium.
RCOMAND transmits music and voice to the
wireless headphone for the front passenger
side via infrared signal. The headphone and
the display must have visual contact. This
provides best possible transmission of the
infrared signal to the headphone. Please
note that the headphone has a left and right
side and must be used accordingly.
RWhen SPLITVIEW is on, the front passenger
can operate audio or video functions only.
RThe multifunction steering wheel lets you
operate functions for the driver’s side only.
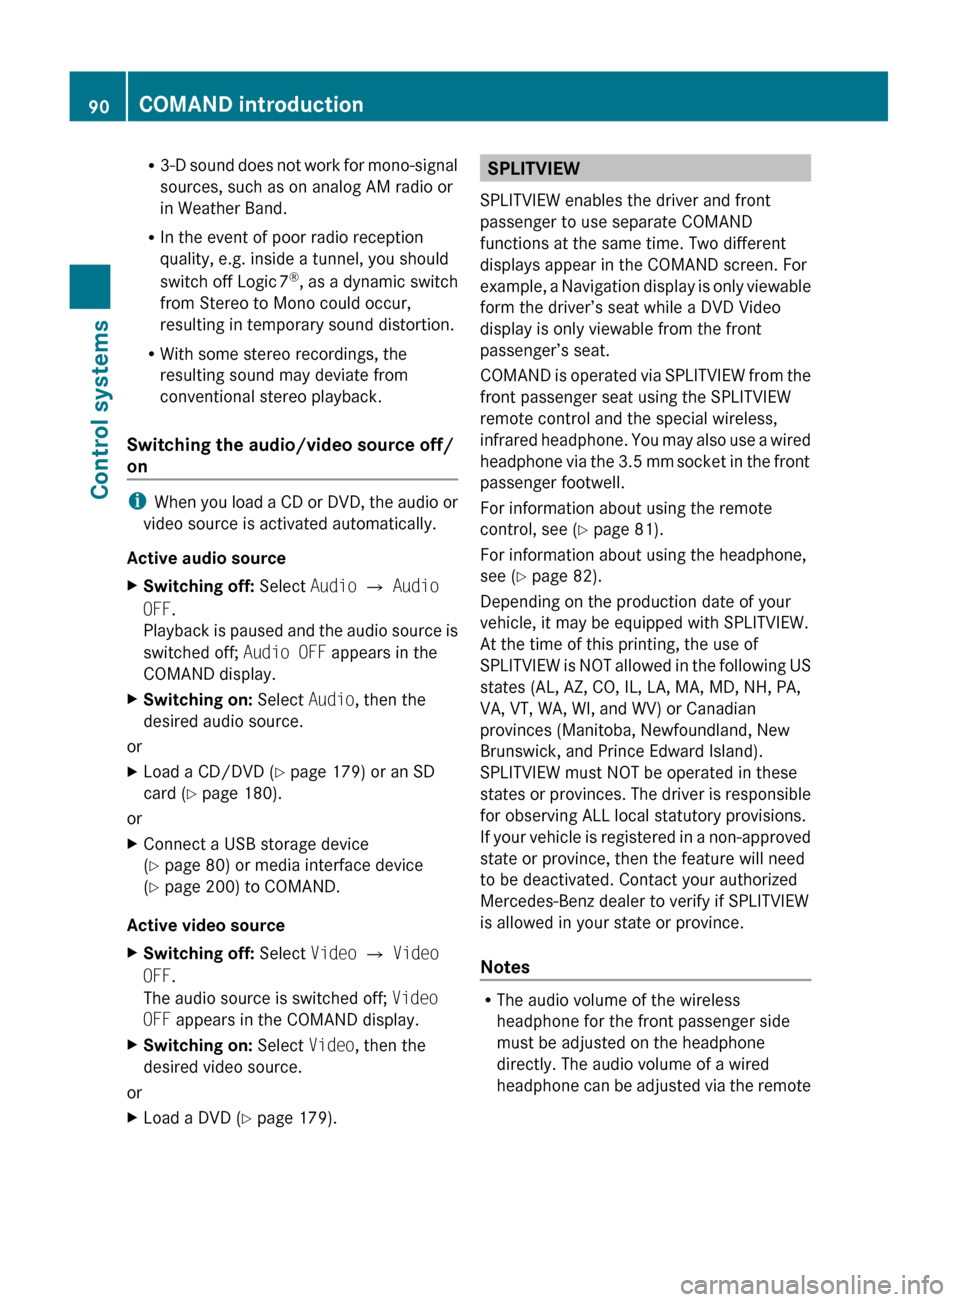
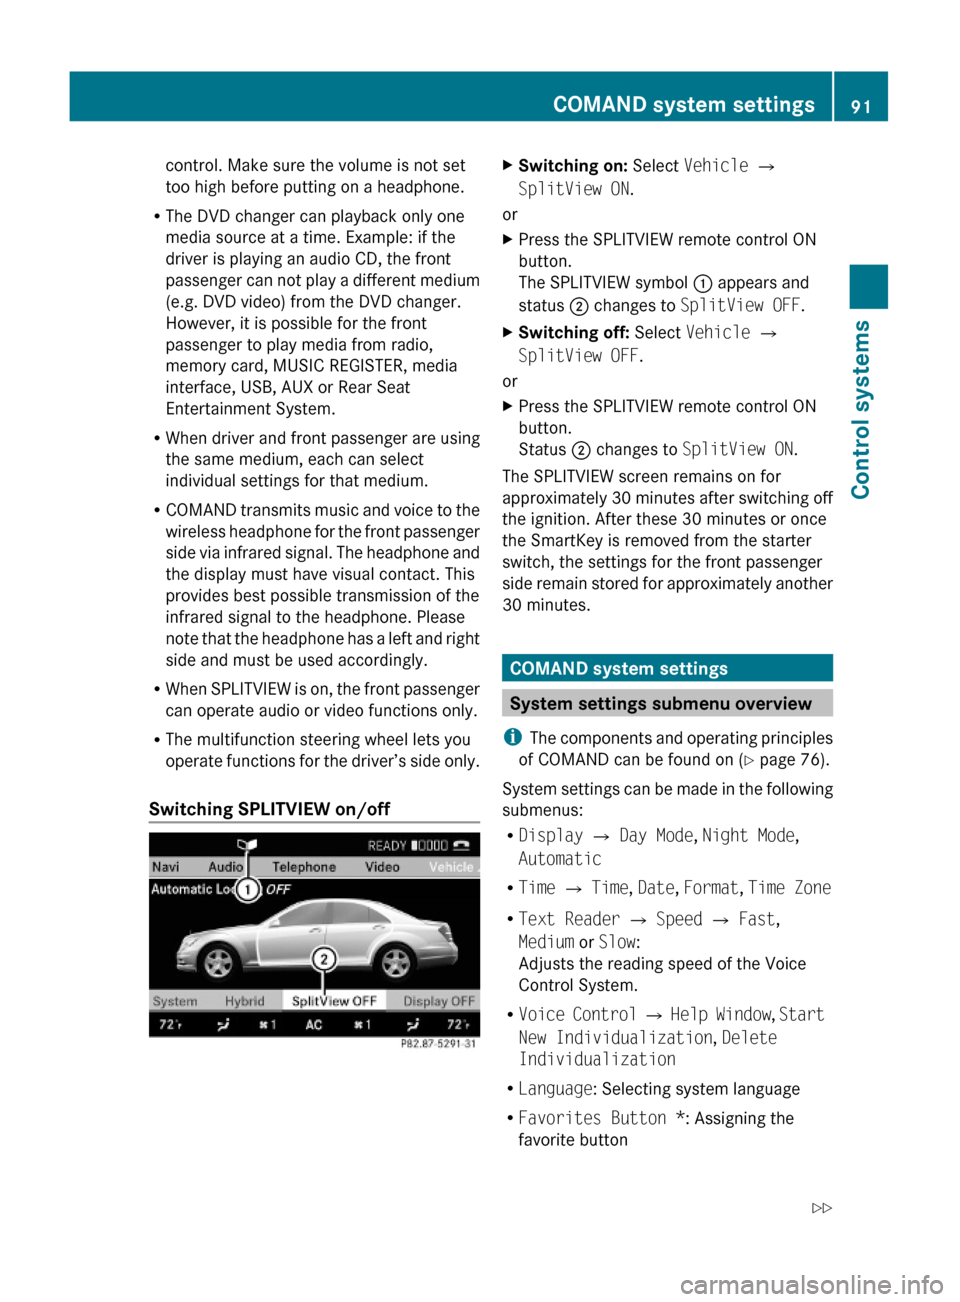
Switching SPLITVIEW on/off
XSwitching on: Select Vehicle Q
SplitView ON.
or
XPress the SPLITVIEW remote control ON
button.
The SPLITVIEW symbol : appears and
status ; changes to SplitView OFF.
XSwitching off: Select Vehicle Q
SplitView OFF.
or
XPress the SPLITVIEW remote control ON
button.
Status ; changes to SplitView ON.
The SPLITVIEW screen remains on for
approximately 30 minutes after switching off
the ignition. After these 30 minutes or once
the SmartKey is removed from the starter
switch, the settings for the front passenger
side remain stored for approximately another
30 minutes.
COMAND system settings
System settings submenu overview
iThe components and operating principles
of COMAND can be found on (Y page 76).
System settings can be made in the following
submenus:
RDisplay Q Day Mode, Night Mode,
Automatic
RTime Q Time, Date, Format, Time Zone
RText Reader Q Speed Q Fast,
Medium or Slow:
Adjusts the reading speed of the Voice
Control System.
RVoice Control Q Help Window, Start
New Individualization, Delete
Individualization
RLanguage: Selecting system language
RFavorites Button *: Assigning the
favorite button
COMAND system settings 91Control systems221_AKB; 6; 20, en-USd2ugruen,Version: 2.11.8.12009-09-24T13:28:17+02:00 - Seite 91Z
Page 112 of 548
You can only enter those zip codes/postal
codes which are saved on the digital map.
The available zip codes/postal codes
depend on the state (USA) or province
(Canada) currently entered.
XIn the address input menu, select Zip
Code. A list of zip codes/postal codes
appears with the predictive speller.
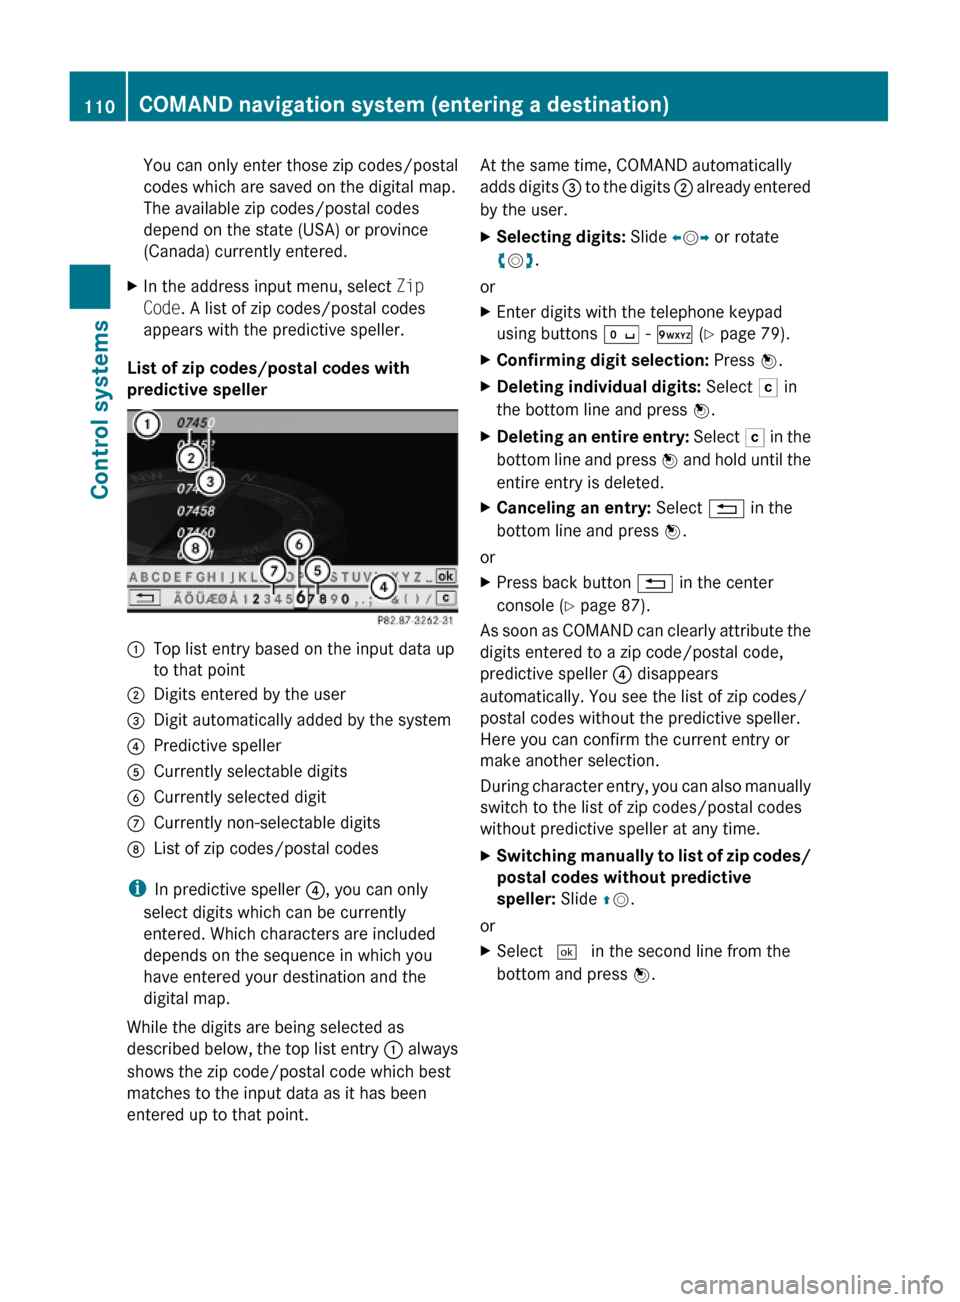
List of zip codes/postal codes with
predictive speller
:Top list entry based on the input data up
to that point
;Digits entered by the user=Digit automatically added by the system?Predictive spellerACurrently selectable digitsBCurrently selected digitCCurrently non-selectable digitsDList of zip codes/postal codes
iIn predictive speller ?, you can only
select digits which can be currently
entered. Which characters are included
depends on the sequence in which you
have entered your destination and the
digital map.
While the digits are being selected as
described below, the top list entry : always
shows the zip code/postal code which best
matches to the input data as it has been
entered up to that point.
At the same time, COMAND automatically
adds digits = to the digits ; already entered
by the user.
XSelecting digits: Slide XVY or rotate
cVd.
or
XEnter digits with the telephone keypad
using buttons Å - Ã (Y page 79).
XConfirming digit selection: Press W.XDeleting individual digits: Select F in
the bottom line and press W.
XDeleting an entire entry: Select F in the
bottom line and press W and hold until the
entire entry is deleted.
XCanceling an entry: Select % in the
bottom line and press W.
or
XPress back button % in the center
console (Y page 87).
As soon as COMAND can clearly attribute the
digits entered to a zip code/postal code,
predictive speller ? disappears
automatically. You see the list of zip codes/
postal codes without the predictive speller.
Here you can confirm the current entry or
make another selection.
During character entry, you can also manually
switch to the list of zip codes/postal codes
without predictive speller at any time.
XSwitching manually to list of zip codes/
postal codes without predictive
speller: Slide ZV.
or
XSelect ¬ in the second line from the
bottom and press W.
110COMAND navigation system (entering a destination)Control systems
221_AKB; 6; 20, en-USd2ugruen,Version: 2.11.8.12009-09-24T13:28:17+02:00 - Seite 110
Page 117 of 548
XSwitching manually to the street list
without predictive speller: Slide ZV.
or
XSelect ¬ in the second line from the
bottom and press W.
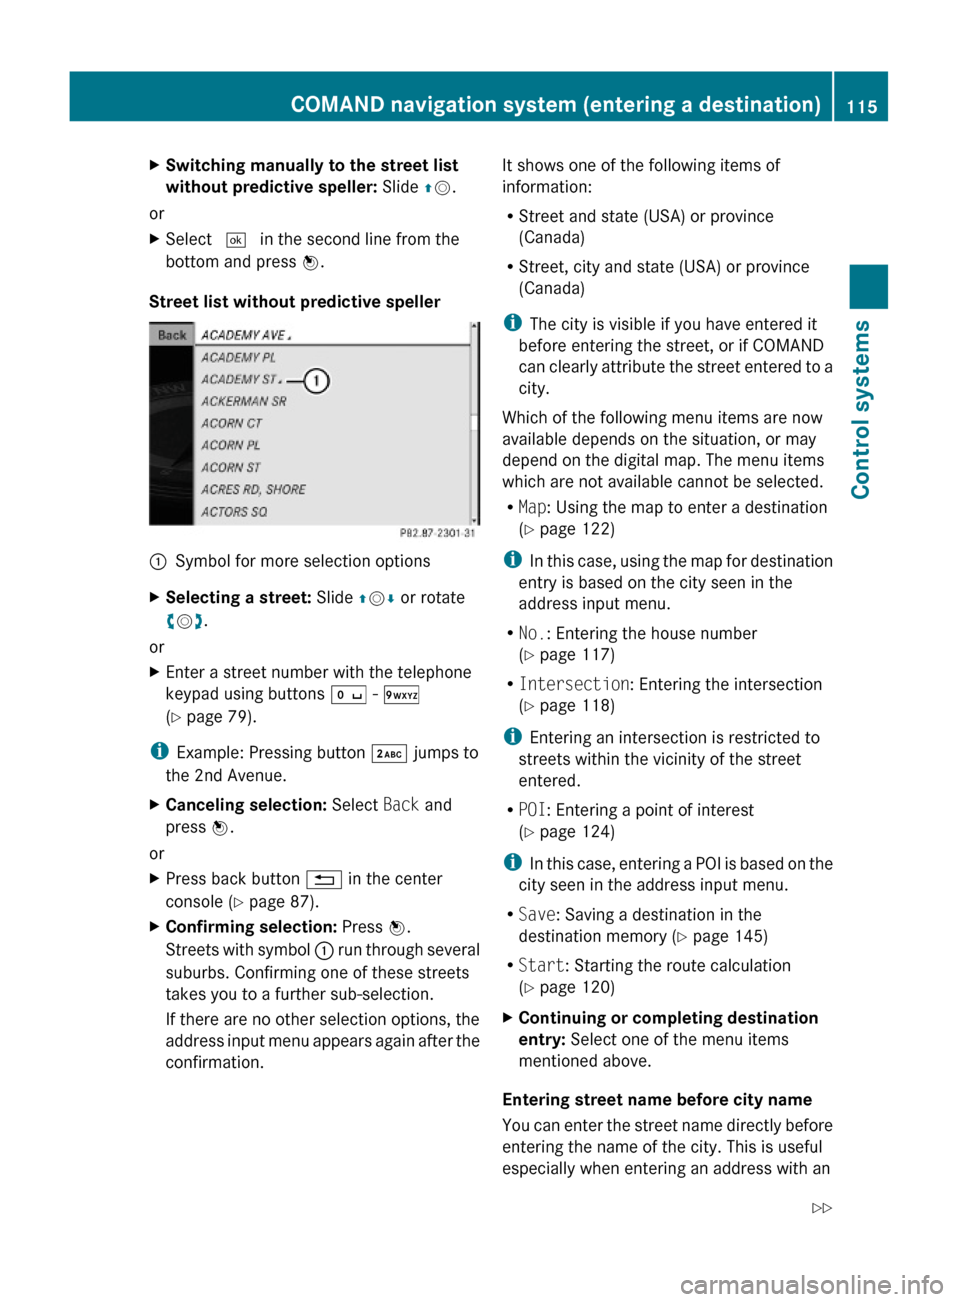
Street list without predictive speller
:Symbol for more selection optionsXSelecting a street: Slide ZVÆ or rotate
cVd.
or
XEnter a street number with the telephone
keypad using buttons Å - Ã
(Y page 79).
iExample: Pressing button · jumps to
the 2nd Avenue.
XCanceling selection: Select Back and
press W.
or
XPress back button % in the center
console (Y page 87).
XConfirming selection: Press W.
Streets with symbol : run through several
suburbs. Confirming one of these streets
takes you to a further sub-selection.
If there are no other selection options, the
address input menu appears again after the
confirmation.
It shows one of the following items of
information:
RStreet and state (USA) or province
(Canada)
RStreet, city and state (USA) or province
(Canada)
iThe city is visible if you have entered it
before entering the street, or if COMAND
can clearly attribute the street entered to a
city.
Which of the following menu items are now
available depends on the situation, or may
depend on the digital map. The menu items
which are not available cannot be selected.
RMap: Using the map to enter a destination
(Y page 122)
iIn this case, using the map for destination
entry is based on the city seen in the
address input menu.
RNo.: Entering the house number
(Y page 117)
RIntersection: Entering the intersection
(Y page 118)
iEntering an intersection is restricted to
streets within the vicinity of the street
entered.
RPOI: Entering a point of interest
(Y page 124)
iIn this case, entering a POI is based on the
city seen in the address input menu.
RSave: Saving a destination in the
destination memory (Y page 145)
RStart: Starting the route calculation
(Y page 120)
XContinuing or completing destination
entry: Select one of the menu items
mentioned above.
Entering street name before city name
You can enter the street name directly before
entering the name of the city. This is useful
especially when entering an address with an
COMAND navigation system (entering a destination)115Control systems221_AKB; 6; 20, en-USd2ugruen,Version: 2.11.8.12009-09-24T13:28:17+02:00 - Seite 115Z