center console MERCEDES-BENZ S600 2010 W221 Owner's Manual
[x] Cancel search | Manufacturer: MERCEDES-BENZ, Model Year: 2010, Model line: S600, Model: MERCEDES-BENZ S600 2010 W221Pages: 548, PDF Size: 12.48 MB
Page 29 of 548
Exterior view .......................................28
Rear passenger compartment ...........29
Cockpit .................................................30
Instrument cluster ..............................32
Control systems ..................................34
Center console ....................................36
Overhead control panel ......................37
Driver’s door control panel ................38
Rear door control panel ......................38
27At a glance221_AKB; 6; 20, en-USd2ugruen,Version: 2.11.8.12009-09-24T13:28:17+02:00 - Seite 27
Page 32 of 548
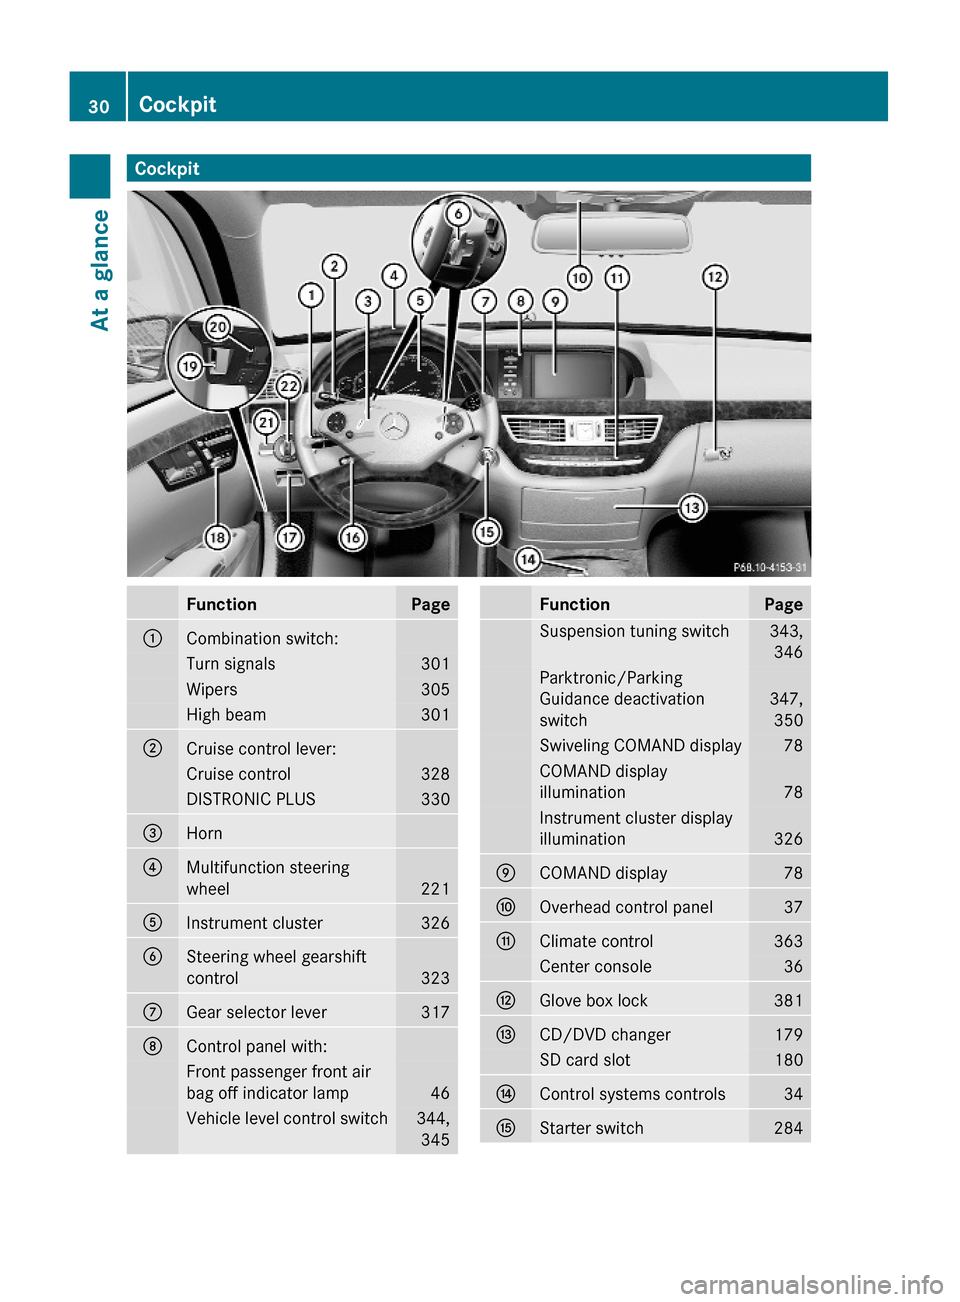
CockpitFunctionPage:Combination switch:Turn signals301Wipers305High beam301;Cruise control lever:Cruise control328DISTRONIC PLUS330=Horn ?Multifunction steering
wheel221
AInstrument cluster326BSteering wheel gearshift
control323
CGear selector lever317DControl panel with:Front passenger front air
bag off indicator lamp46
Vehicle level control switch344,
345
FunctionPageSuspension tuning switch343,
346
Parktronic/Parking
Guidance deactivation
switch
347,
350
Swiveling COMAND display78COMAND display
illumination78
Instrument cluster display
illumination326
ECOMAND display78FOverhead control panel37GClimate control363Center console36HGlove box lock381ICD/DVD changer179SD card slot180JControl systems controls34KStarter switch28430CockpitAt a glance
221_AKB; 6; 20, en-USd2ugruen,Version: 2.11.8.12009-09-24T13:28:17+02:00 - Seite 30
Page 38 of 548
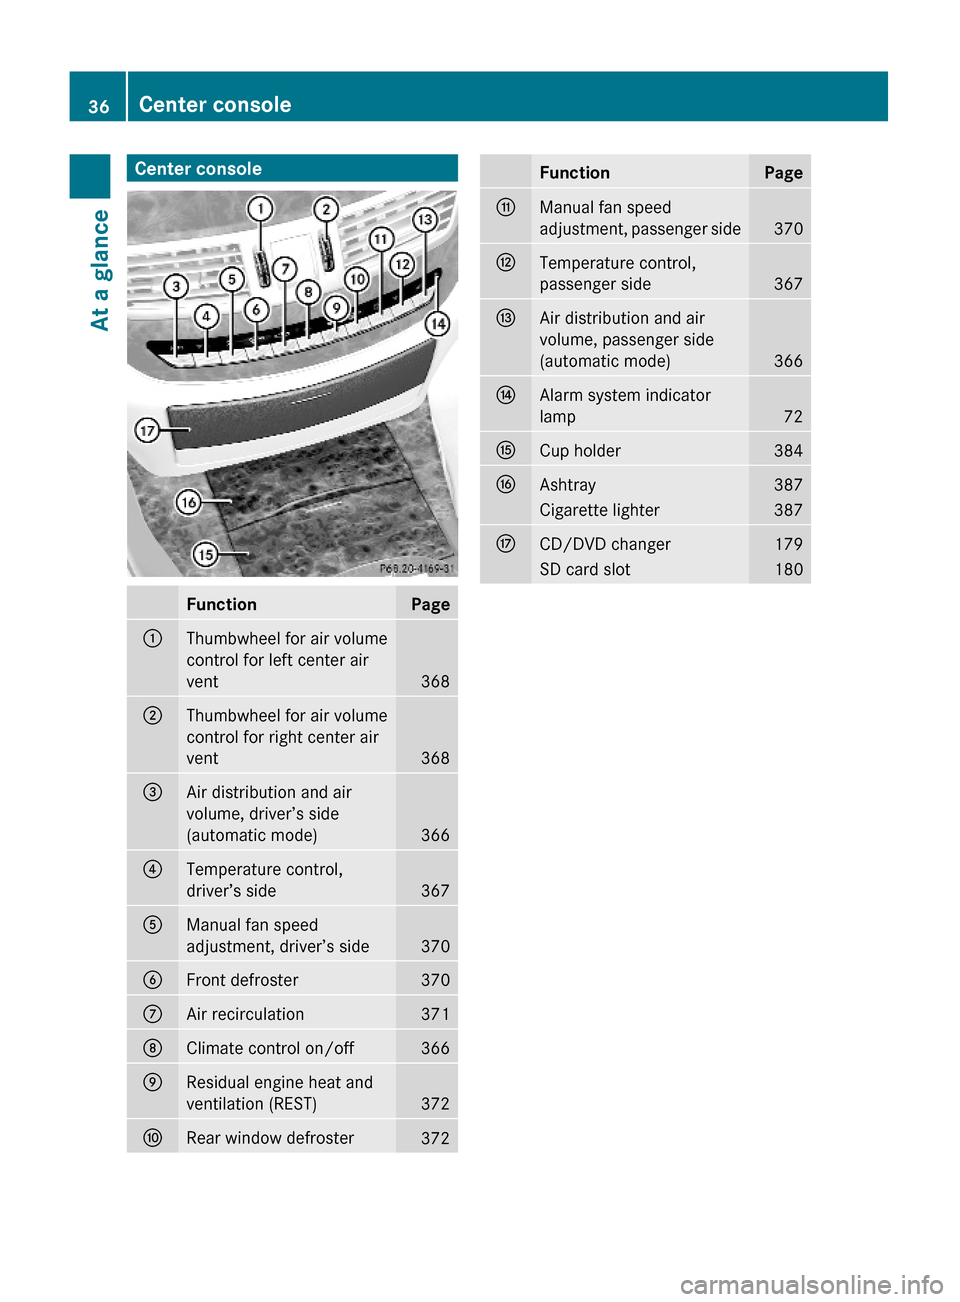
Center consoleFunctionPage:Thumbwheel for air volume
control for left center air
vent368
;Thumbwheel for air volume
control for right center air
vent368
=Air distribution and air
volume, driver’s side
(automatic mode)366
?Temperature control,
driver’s side367
AManual fan speed
adjustment, driver’s side370
BFront defroster370CAir recirculation371DClimate control on/off366EResidual engine heat and
ventilation (REST)372
FRear window defroster372FunctionPageGManual fan speed
adjustment, passenger side370
HTemperature control,
passenger side367
IAir distribution and air
volume, passenger side
(automatic mode)366
JAlarm system indicator
lamp72
KCup holder384LAshtray387Cigarette lighter387MCD/DVD changer179SD card slot18036Center consoleAt a glance
221_AKB; 6; 20, en-USd2ugruen,Version: 2.11.8.12009-09-24T13:28:17+02:00 - Seite 36
Page 46 of 548
followed. These instructions are available
from any authorized Mercedes-Benz
Center.
RGiven the considerable deployment speed,
required inflation volume, and the material
of the air bags, there is the possibility of
abrasions or other, potentially more serious
injuries resulting from air bag deployment.
If you sell your vehicle, we strongly
recommend that you inform the subsequent
owner that the vehicle is equipped with SRS.
Also refer them to the applicable section in
the Operator’s Manual.
Front air bags
GObserve Safety notes, see page 41.
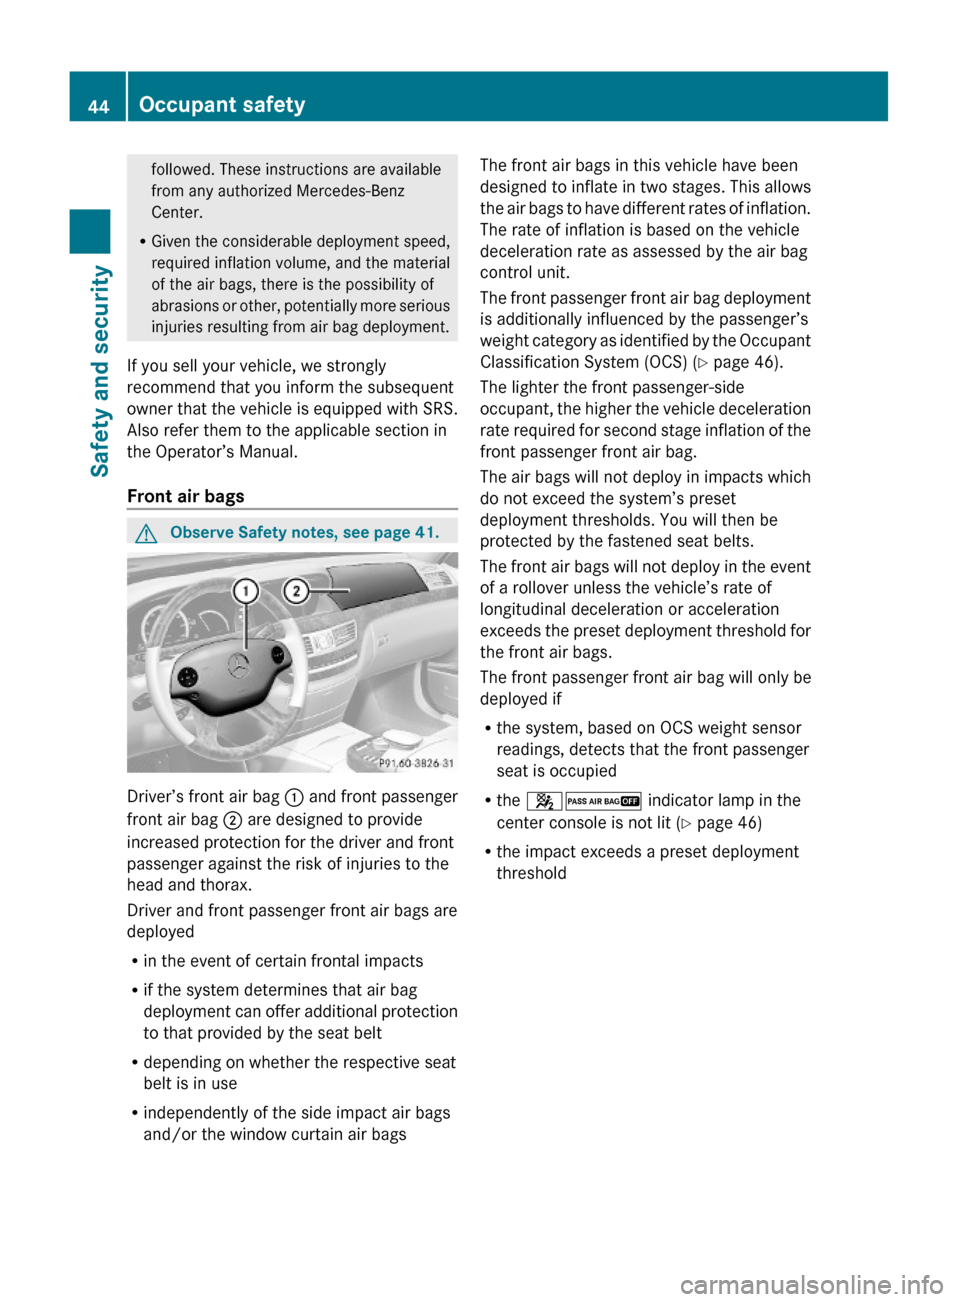
Driver’s front air bag : and front passenger
front air bag ; are designed to provide
increased protection for the driver and front
passenger against the risk of injuries to the
head and thorax.
Driver and front passenger front air bags are
deployed
Rin the event of certain frontal impacts
Rif the system determines that air bag
deployment can offer additional protection
to that provided by the seat belt
Rdepending on whether the respective seat
belt is in use
Rindependently of the side impact air bags
and/or the window curtain air bags
The front air bags in this vehicle have been
designed to inflate in two stages. This allows
the air bags to have different rates of inflation.
The rate of inflation is based on the vehicle
deceleration rate as assessed by the air bag
control unit.
The front passenger front air bag deployment
is additionally influenced by the passenger’s
weight category as identified by the Occupant
Classification System (OCS) (Y page 46).
The lighter the front passenger-side
occupant, the higher the vehicle deceleration
rate required for second stage inflation of the
front passenger front air bag.
The air bags will not deploy in impacts which
do not exceed the system’s preset
deployment thresholds. You will then be
protected by the fastened seat belts.
The front air bags will not deploy in the event
of a rollover unless the vehicle’s rate of
longitudinal deceleration or acceleration
exceeds the preset deployment threshold for
the front air bags.
The front passenger front air bag will only be
deployed if
Rthe system, based on OCS weight sensor
readings, detects that the front passenger
seat is occupied
Rthe 42 indicator lamp in the
center console is not lit (Y page 46)
Rthe impact exceeds a preset deployment
threshold
44Occupant safetySafety and security
221_AKB; 6; 20, en-USd2ugruen,Version: 2.11.8.12009-09-24T13:28:17+02:00 - Seite 44
Page 63 of 548
XVehicles with rear center seat: Make sure
that the seat belt for the rear center seat
can operate freely with a child seat
installed.
GWarning!
Vehicles with rear power seats:
Never change the rear seat position after
installing the child restraint. This could
Rdamage the child restraint
Rintroduce undesirable slack or tension into
the seat belt
Rloosen the child restraint
Rmisposition the child restraint
All of the above will lessen the
effectiveness of the child restraint and thus
increase the chance or severity of injury in
an accident.
Child safety
Child safety locks
GObserve Safety notes, see page 56.GWarning!
Children could open a rear door from the
inside. This may cause serious personal injury
or an accident. Therefore, secure the rear
doors with the child safety locks whenever
children are riding in the back seats of the
vehicle.
The child safety locks on the rear doors
enable you to secure each rear door
individually. You cannot open a secured rear
door from the inside. You can open the rear
door from the outside when the vehicle is
unlocked.
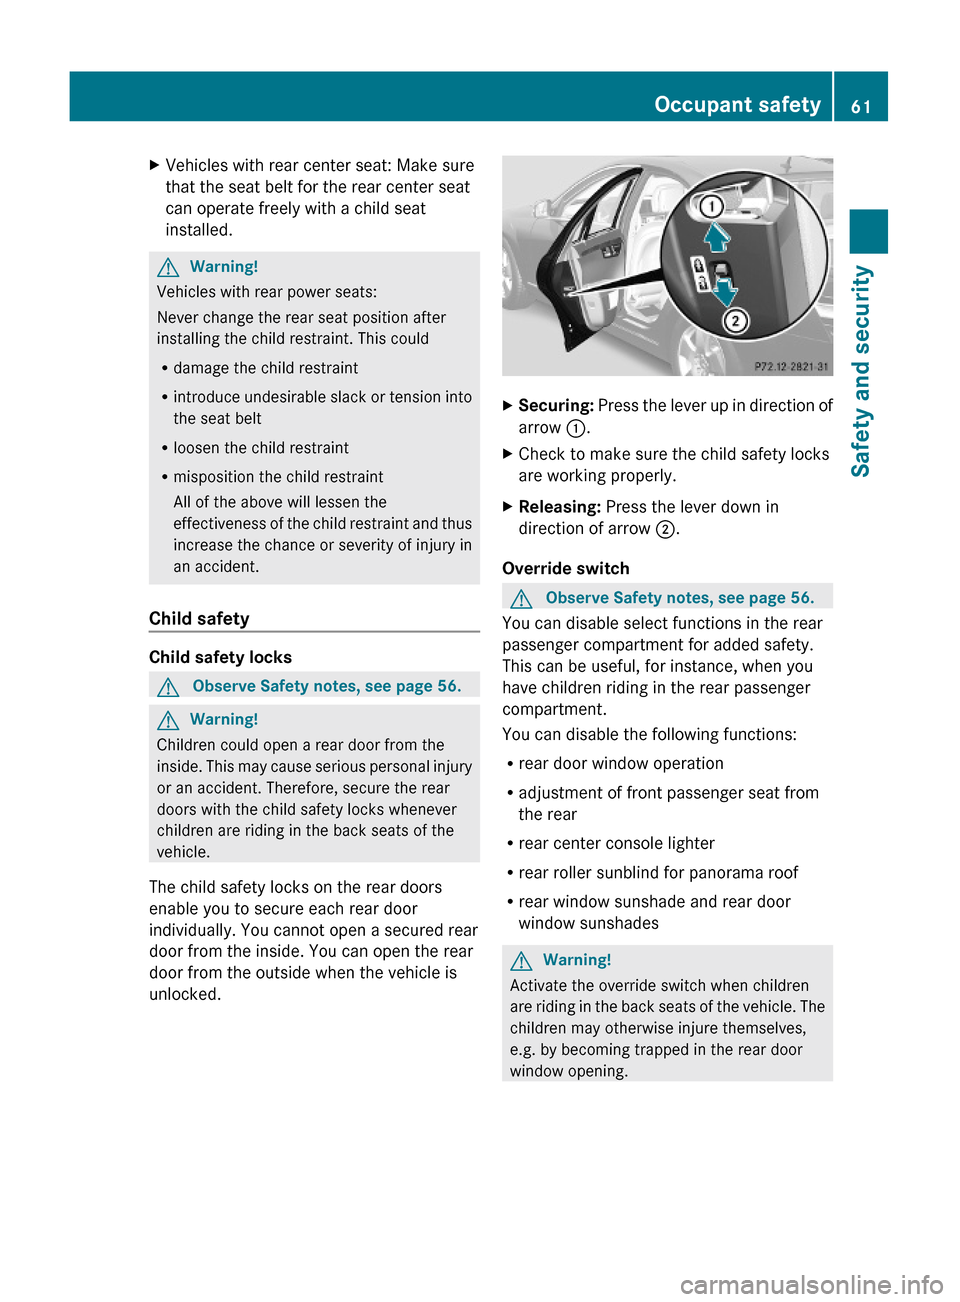
XSecuring: Press the lever up in direction of
arrow :.
XCheck to make sure the child safety locks
are working properly.
XReleasing: Press the lever down in
direction of arrow ;.
Override switch
GObserve Safety notes, see page 56.
You can disable select functions in the rear
passenger compartment for added safety.
This can be useful, for instance, when you
have children riding in the rear passenger
compartment.
You can disable the following functions:
Rrear door window operation
Radjustment of front passenger seat from
the rear
Rrear center console lighter
Rrear roller sunblind for panorama roof
Rrear window sunshade and rear door
window sunshades
GWarning!
Activate the override switch when children
are riding in the back seats of the vehicle. The
children may otherwise injure themselves,
e.g. by becoming trapped in the rear door
window opening.
Occupant safety61Safety and security221_AKB; 6; 20, en-USd2ugruen,Version: 2.11.8.12009-09-24T13:28:17+02:00 - Seite 61Z
Page 79 of 548
Switching COMAND on or offXPress shortcut button u in the center
console (Y page 77).
COMAND calls up the last selected menu.
iWhen you switch off COMAND, you also
switch off the currently playing audio
source. During a telephone call, you cannot
switch off COMAND.
COMAND components
COMAND can be used to operate:
RAudio functions
RNavigation system
RTelephone
RExternal audio and video sources
RVideo DVD
RVarious vehicle settings
COMAND consists of the following:
RCOMAND shortcut buttons
RCOMAND display (with SPLITVIEW, if so
equipped)
RTelephone keypad
RCOMAND controller
RBuilt-in USB socket to connect USB storage
devices
ROptional media interface in the glove box
to connect external devices via iPod®
cable, jack plug, or USB cable
The Rear Seat Entertainment System consists
of the following:
Rtwo remote controls
Rtwo wireless headphones
Rtwo screens in rear passenger
compartment
Rone CD/DVD drive in rear passenger
compartment
RAudio and video sockets on each screen
RAudio and video sockets on CD/DVD drive
The Rear Seat Entertainment System
contains the following functions:
RDisc playback (CD audio, MP3, DVD audio
and DVD video)
RAUX playback
RSystem settings
SPLITVIEW contains the following:
Rone remote control for the front passenger
Rone wireless headphone for the front
passenger
Rone 3.5 mm socket in the front passenger
footwell for SPLITVIEW wired headphones
iFor information about cleaning and care
of displays, see (Y page 446).
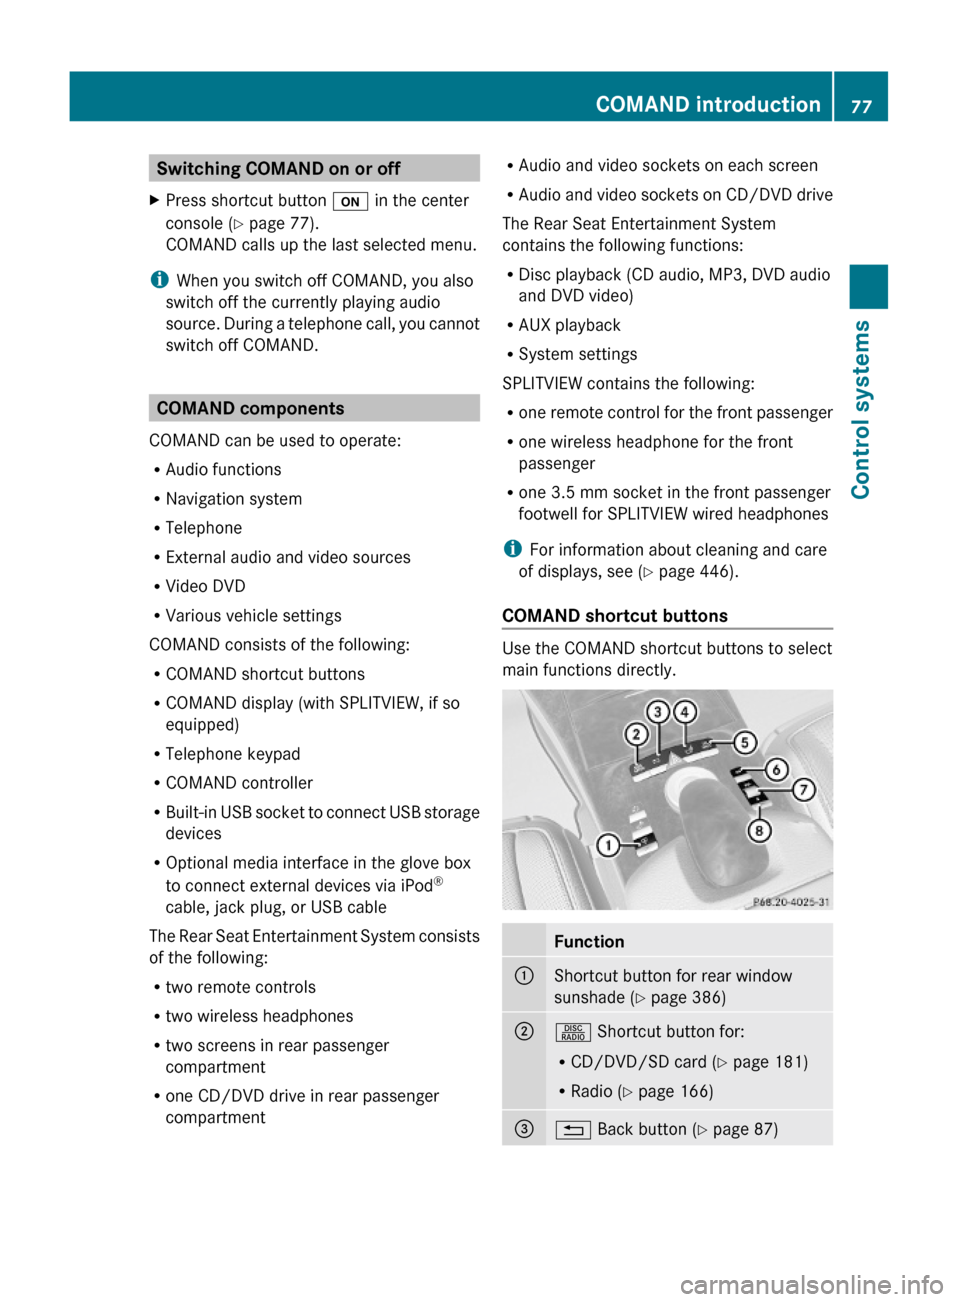
COMAND shortcut buttons
Use the COMAND shortcut buttons to select
main functions directly.
Function:Shortcut button for rear window
sunshade (Y page 386)
;R Shortcut button for:
RCD/DVD/SD card (Y page 181)
RRadio (Y page 166)
=% Back button (Y page 87)COMAND introduction77Control systems221_AKB; 6; 20, en-USd2ugruen,Version: 2.11.8.12009-09-24T13:28:17+02:00 - Seite 77Z
Page 104 of 548
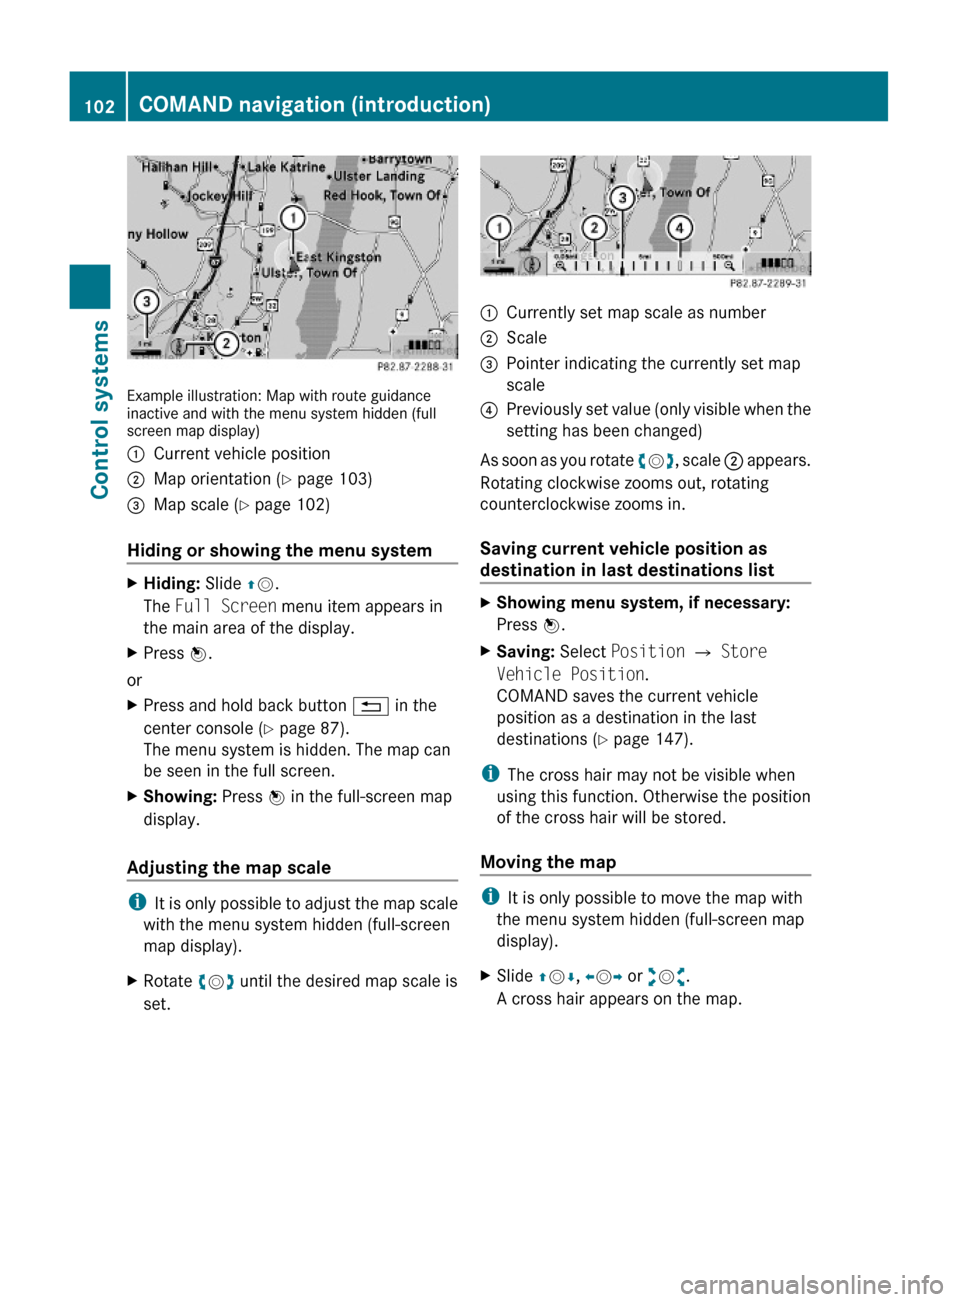
Example illustration: Map with route guidanceinactive and with the menu system hidden (fullscreen map display)
:Current vehicle position;Map orientation (Y page 103)=Map scale (Y page 102)
Hiding or showing the menu system
XHiding: Slide ZV.
The Full Screen menu item appears in
the main area of the display.
XPress W.
or
XPress and hold back button % in the
center console (Y page 87).
The menu system is hidden. The map can
be seen in the full screen.
XShowing: Press W in the full-screen map
display.
Adjusting the map scale
iIt is only possible to adjust the map scale
with the menu system hidden (full-screen
map display).
XRotate cVd until the desired map scale is
set.
:Currently set map scale as number;Scale=Pointer indicating the currently set map
scale
?Previously set value (only visible when the
setting has been changed)
As soon as you rotate cVd, scale ; appears.
Rotating clockwise zooms out, rotating
counterclockwise zooms in.
Saving current vehicle position as
destination in last destinations list
XShowing menu system, if necessary:
Press W.
XSaving: Select Position Q Store
Vehicle Position.
COMAND saves the current vehicle
position as a destination in the last
destinations (Y page 147).
iThe cross hair may not be visible when
using this function. Otherwise the position
of the cross hair will be stored.
Moving the map
iIt is only possible to move the map with
the menu system hidden (full-screen map
display).
XSlide ZVÆ, XVY or aVb.
A cross hair appears on the map.
102COMAND navigation (introduction)Control systems
221_AKB; 6; 20, en-USd2ugruen,Version: 2.11.8.12009-09-24T13:28:17+02:00 - Seite 102
Page 105 of 548
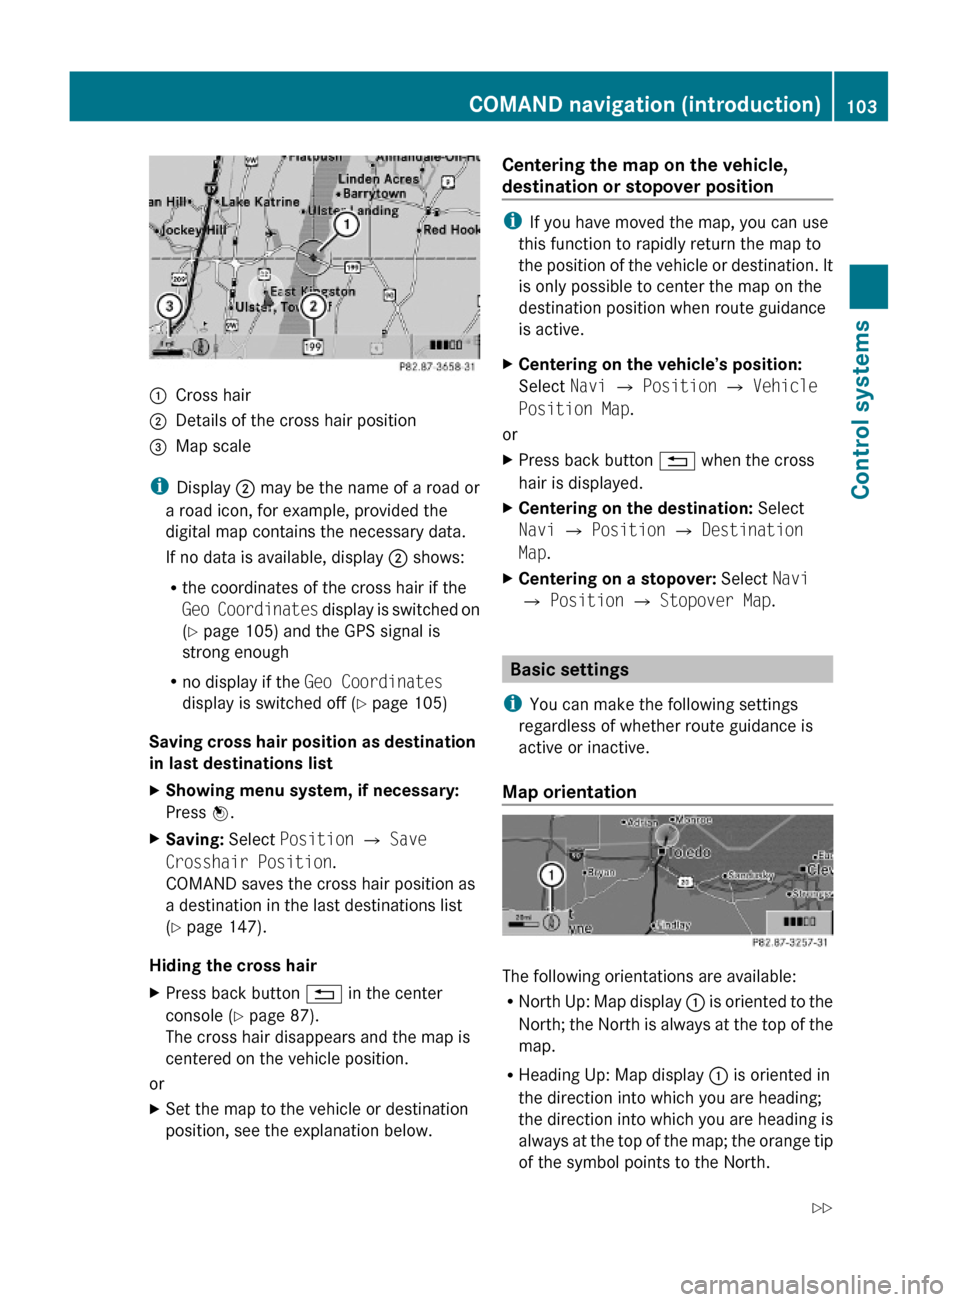
:Cross hair;Details of the cross hair position=Map scale
iDisplay ; may be the name of a road or
a road icon, for example, provided the
digital map contains the necessary data.
If no data is available, display ; shows:
Rthe coordinates of the cross hair if the
Geo Coordinates display is switched on
(Y page 105) and the GPS signal is
strong enough
Rno display if the Geo Coordinates
display is switched off (Y page 105)
Saving cross hair position as destination
in last destinations list
XShowing menu system, if necessary:
Press W.
XSaving: Select Position Q Save
Crosshair Position.
COMAND saves the cross hair position as
a destination in the last destinations list
(Y page 147).
Hiding the cross hair
XPress back button % in the center
console (Y page 87).
The cross hair disappears and the map is
centered on the vehicle position.
or
XSet the map to the vehicle or destination
position, see the explanation below.
Centering the map on the vehicle,
destination or stopover position
iIf you have moved the map, you can use
this function to rapidly return the map to
the position of the vehicle or destination. It
is only possible to center the map on the
destination position when route guidance
is active.
XCentering on the vehicle’s position:
Select Navi Q Position Q Vehicle
Position Map.
or
XPress back button % when the cross
hair is displayed.
XCentering on the destination: Select
Navi Q Position Q Destination
Map.
XCentering on a stopover: Select Navi
Q Position Q Stopover Map.
Basic settings
iYou can make the following settings
regardless of whether route guidance is
active or inactive.
Map orientation
The following orientations are available:
RNorth Up: Map display : is oriented to the
North; the North is always at the top of the
map.
RHeading Up: Map display : is oriented in
the direction into which you are heading;
the direction into which you are heading is
always at the top of the map; the orange tip
of the symbol points to the North.
COMAND navigation (introduction)103Control systems221_AKB; 6; 20, en-USd2ugruen,Version: 2.11.8.12009-09-24T13:28:17+02:00 - Seite 103Z
Page 106 of 548
RBird’s-eye View: Map display : is oriented
in the direction into which you are heading;
the orange tip of the symbol points to the
North.
R 3-D Map: Certain buildings in selected
cities are displayed in detail as a 3-D (three-
dimensional) model. The map displays
mountains and valleys three-
dimensionally. The 3-D map is country-
specific and is connected with the function
City (3D) ( Y page 105).XSelecting map orientation: Select Navi
Q Map Orientation .
The list of available map orientations
appears. The dot # indicates the currently
selected map orientation.XSelect North Up , Heading Up , Bird's-
eye View , or 3-D Map and press W.XExiting menu: Slide XV Y.
Setting POI symbols
You can set which points of interest (POIs)
should be displayed as symbols in the map.
POIs are parking facilities, hotels, restaurants
or movie theaters, for example.
i Depending on the map scale, POI symbols
may not be visible although their display is
activated. In addition, POI symbols may be
covered by other POIs or names displayed
on the map.
The following settings are possible:
R Standard symbols (factory setting)
R Personal symbols (you can select the
desired POIs)
R No symbols
XAdjusting: Select Navi Q POI Symbols
on Map .
The map display list appears. A dot #
indicates the current setting.XSelect Standard symbols , Personal
symbols or No symbols .
If you select Personal symbols , the list of
POIs appears.XSwitching POI symbol display on or
off: Select the desired POI.
The corresponding symbol displays are
switched on or off, depending on the
previous status. A checkmark indicates
which status is active. You can switch on
the symbol displays for more than one POI.
i The list shows all symbols that are
contained in the digital map across all
states (USA) and provinces (Canada). Not
all POIs in all states (USA) or in all provinces
(Canada) are available, however. Certain
POI symbols may not be displayed on the
map, even if the symbol display is switched
on. You can use this list as a map legend.
The map legend also contains, in addition
to the POI symbols, the names of the POI
categories.
XExiting menu: Slide XV Y or press back
button % in the center console
( Y page 87).
Selecting traffic symbols on the map
You can select what kind of traffic information
is displayed on the map ( Y page 139).
Selecting text information on the map
COMAND can display various text
information below the map:
R Time of arrival and distance to destination
R Current street
R Geo coordinates
R None
104COMAND navigation (introduction)Control systems
221_AKB; 6; 20, en-USd2ugruen,Version: 2.11.8.12009-09-24T13:28:17+02:00 - Seite 104
Page 108 of 548
XSelect Navi.XCheck the check box for menu item City
(3D) .
Setting route type
You can set the following route types:
R Fast Route : COMAND calculates a route
with minimized driving time.
R Dynamic Route : COMAND calculates a
route with minimized driving time and takes
into account traffic messages received
along the route. Thus, the navigation
system can dynamically recalculate the
route. Roads that are blocked will be
avoided whenever possible. For
information on traffic messages see
( Y page 138).
R Short Route : COMAND calculates a route
with minimized route length.
XSelect Navi Q Mode .
The list of available rote types appears. The
dot # indicates the currently selected
setting.XSelect route type: Fast Route , Dynamic
Route or Short Route .XExit menu: Slide XV Y.
i
If you change the route type setting during
active route guidance, COMAND calculates
a new route. If you change the setting when
route guidance is inactive, COMAND uses
the new setting for the next route guidance.
Setting route mode
With this function you can select the following
options for route calculation:
R Minimize Highways
R Minimize Toll Roads
R Minimize Tunnels
R Minimize Ferries
R Minimize Motorail Trains
XSelect Navi Q Mode .
The mode list appears.XSwitching mode on or off: Select desired
modes.
Depending on the previous status, the
mode is switched on or off. A checkmark
indicates that the mode is switched on. It
is possible to switch on more than one
mode.XExiting menu: Slide XV Y or press back
button % in the center console
( Y page 87).
COMAND will verify whether it can
incorporate the modes if you select them
with route guidance active.
If possible, COMAND calculates a new
route considering the selected options.
If the route cannot be recalculated with the
selected options, a message appears and
an announcement is made. COMAND
calculates a new route. Only options that
are possible will be considered.
Displaying highway information
When this function is enabled, highway
information ahead will display automatically
( Y page 137).
Audio fadeout
XSelect Navi Q Audio Fadeout .
When the check box is checked U the
volume of the current audio source fades
during a navigation announcement.
COMAND navigation system
(entering a destination)
Introduction
GWarning!
For safety reasons, only enter a new
destination when the vehicle is stationary.
106COMAND navigation system (entering a destination)Control systems
221_AKB; 6; 20, en-USd2ugruen,Version: 2.11.8.12009-09-24T13:28:17+02:00 - Seite 106