mirror MERCEDES-BENZ S63AMG 2010 W221 User Guide
[x] Cancel search | Manufacturer: MERCEDES-BENZ, Model Year: 2010, Model line: S63AMG, Model: MERCEDES-BENZ S63AMG 2010 W221Pages: 548, PDF Size: 12.48 MB
Page 87 of 548
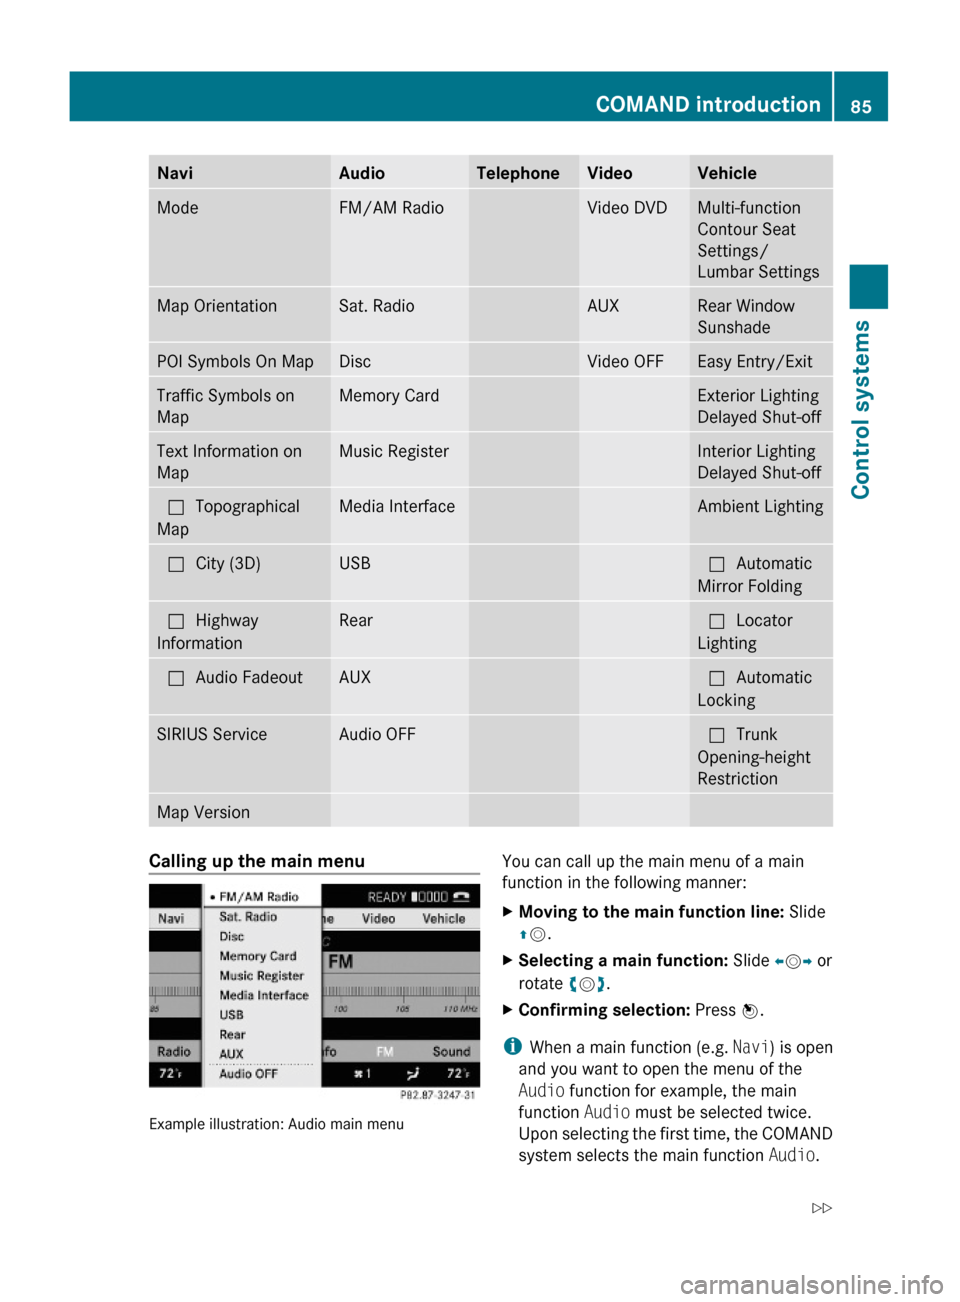
NaviAudioTelephoneVideoVehicleModeFM/AM RadioVideo DVDMulti-function
Contour Seat
Settings/
Lumbar Settings
Map OrientationSat. RadioAUXRear Window
Sunshade
POI Symbols On MapDiscVideo OFFEasy Entry/ExitTraffic Symbols on
Map
Memory CardExterior Lighting
Delayed Shut-off
Text Information on
Map
Music RegisterInterior Lighting
Delayed Shut-off
ªTopographical
Map
Media InterfaceAmbient LightingªCity (3D)USBªAutomatic
Mirror Folding
ªHighway
Information
RearªLocator
Lighting
ªAudio FadeoutAUXªAutomatic
Locking
SIRIUS ServiceAudio OFFªTrunk
Opening-height
Restriction
Map VersionCalling up the main menu
Example illustration: Audio main menu
You can call up the main menu of a main
function in the following manner:
XMoving to the main function line: Slide
ZV.
XSelecting a main function: Slide XVY or
rotate cVd.
XConfirming selection: Press W.
iWhen a main function (e.g. Navi) is open
and you want to open the menu of the
Audio function for example, the main
function Audio must be selected twice.
Upon selecting the first time, the COMAND
system selects the main function Audio.
COMAND introduction85Control systems221_AKB; 6; 20, en-USd2ugruen,Version: 2.11.8.12009-09-24T13:28:17+02:00 - Seite 85Z
Page 208 of 548

USB storage device
iThis function is available for
alphabetically ordered directories. The
function is not available within playlists for
example.
XWithin a folder, press the respective button
on the telephone keypad once or more to
enter the first character of the desired
artist name. For example, press button
l three times for an artist whose name
starts with a “C”.
The available characters are displayed on
the bottom of the display.
When the directory contains folders only,
COMAND will search for folders.
Selecting active partition (USB
storage devices only)
You can select this function with USB storage
devices when the storage space is
partitioned. The system supports up to 4
partitions (primary or logical, FAT formatted).
i The Windows formatting program
supports FAT partitions of up to 32 gigabyte
by default.
XSelect Media Interface Q Select
Active Partition .
Playback options
The following options are available:
R Normal Track Sequence
Tracks are played back in regular order (e.g.
in numerical or in alphabetical order).
R Random Tracks
All available tracks on the current medium
are played back in random order.
R Category Mix or Random Folder (with
USB devices when Folder was selected)
Tracks of the currently active category or
folder and its subfolders are played back in
random order.XSelecting playback options: Select
Media Interface in the basic display.
The list of options appears. The dot #
indicates the currently selected option.XSelect an option.
COMAND vehicle menu
Introduction
GWarning!
HYBRID vehicles: It is imperative that you read
the HYBRID Supplemental Operating
Instructions included in your vehicle literature
portfolio. You may otherwise not receive all
necessary safety information and warning for
the operation of your vehicle.
In this menu, you can program the following
vehicle functions:
FunctionMulti-function Contour Seat
Settings (Y page 216)Rear Window Sunshade (Y page 207)Easy Entry/Exit Feature
( Y page 208)Exterior Lighting Delayed Shut-off
( Y page 208)Interior Lighting Delayed Shut-off
( Y page 208)Ambient Lighting (Y page 209)Automatic Mirror Folding
( Y page 209)Locator Lighting (Y page 210)206COMAND vehicle menuControl systems
221_AKB; 6; 20, en-USd2ugruen,Version: 2.11.8.12009-09-24T13:28:17+02:00 - Seite 206
Page 211 of 548
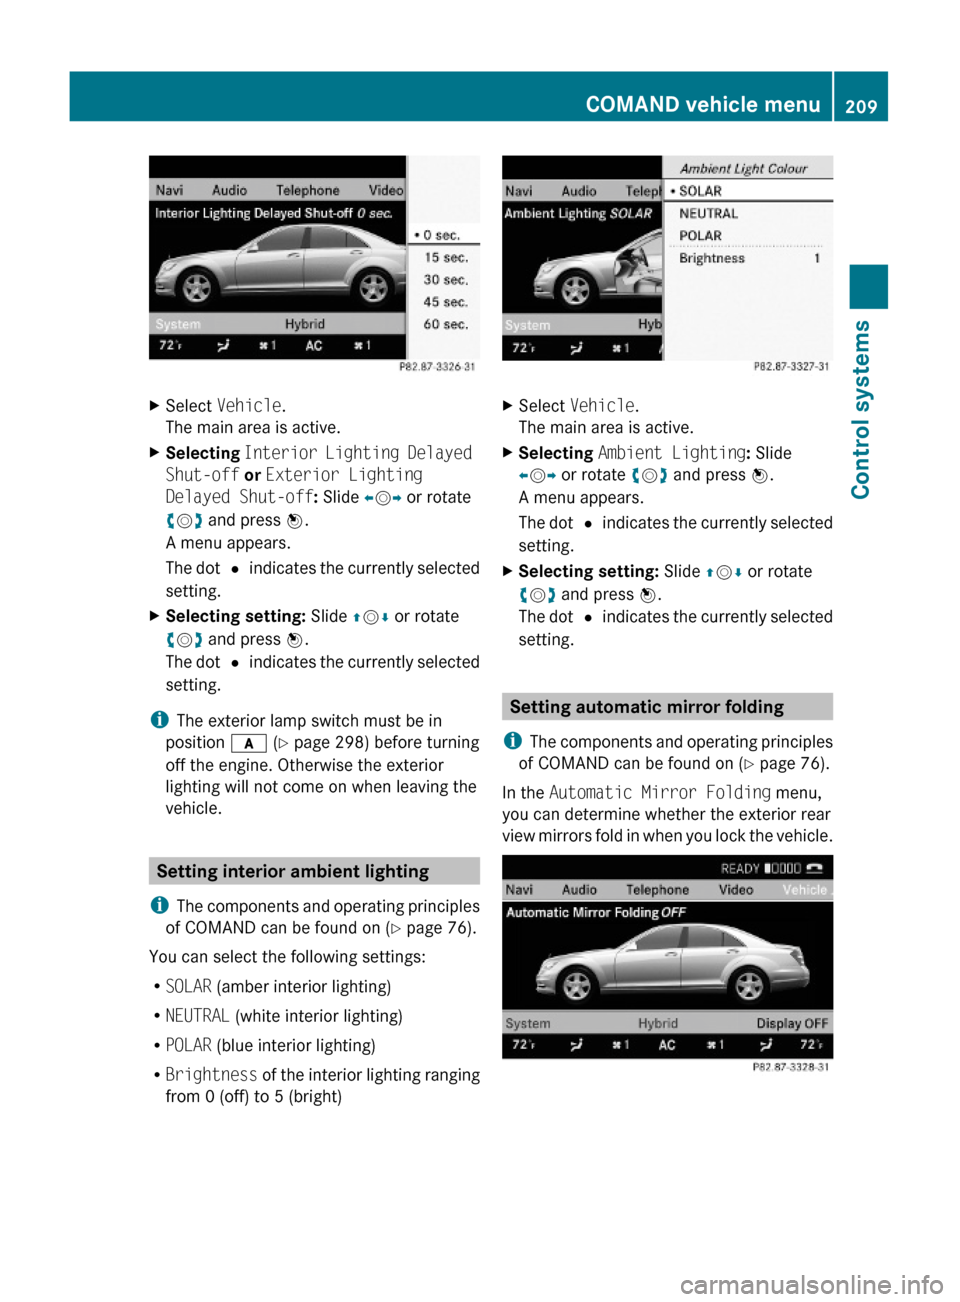
XSelect Vehicle.
The main area is active.
XSelecting Interior Lighting Delayed
Shut-off or Exterior Lighting
Delayed Shut-off: Slide XVY or rotate
cVd and press W.
A menu appears.
The dot # indicates the currently selected
setting.
XSelecting setting: Slide ZVÆ or rotate
cVd and press W.
The dot # indicates the currently selected
setting.
iThe exterior lamp switch must be in
position c (Y page 298) before turning
off the engine. Otherwise the exterior
lighting will not come on when leaving the
vehicle.
Setting interior ambient lighting
iThe components and operating principles
of COMAND can be found on (Y page 76).
You can select the following settings:
RSOLAR (amber interior lighting)
RNEUTRAL (white interior lighting)
RPOLAR (blue interior lighting)
RBrightness of the interior lighting ranging
from 0 (off) to 5 (bright)
XSelect Vehicle.
The main area is active.
XSelecting Ambient Lighting: Slide
XVY or rotate cVd and press W.
A menu appears.
The dot # indicates the currently selected
setting.
XSelecting setting: Slide ZVÆ or rotate
cVd and press W.
The dot # indicates the currently selected
setting.
Setting automatic mirror folding
iThe components and operating principles
of COMAND can be found on (Y page 76).
In the Automatic Mirror Folding menu,
you can determine whether the exterior rear
view mirrors fold in when you lock the vehicle.
COMAND vehicle menu209Control systems221_AKB; 6; 20, en-USd2ugruen,Version: 2.11.8.12009-09-24T13:28:17+02:00 - Seite 209Z
Page 212 of 548
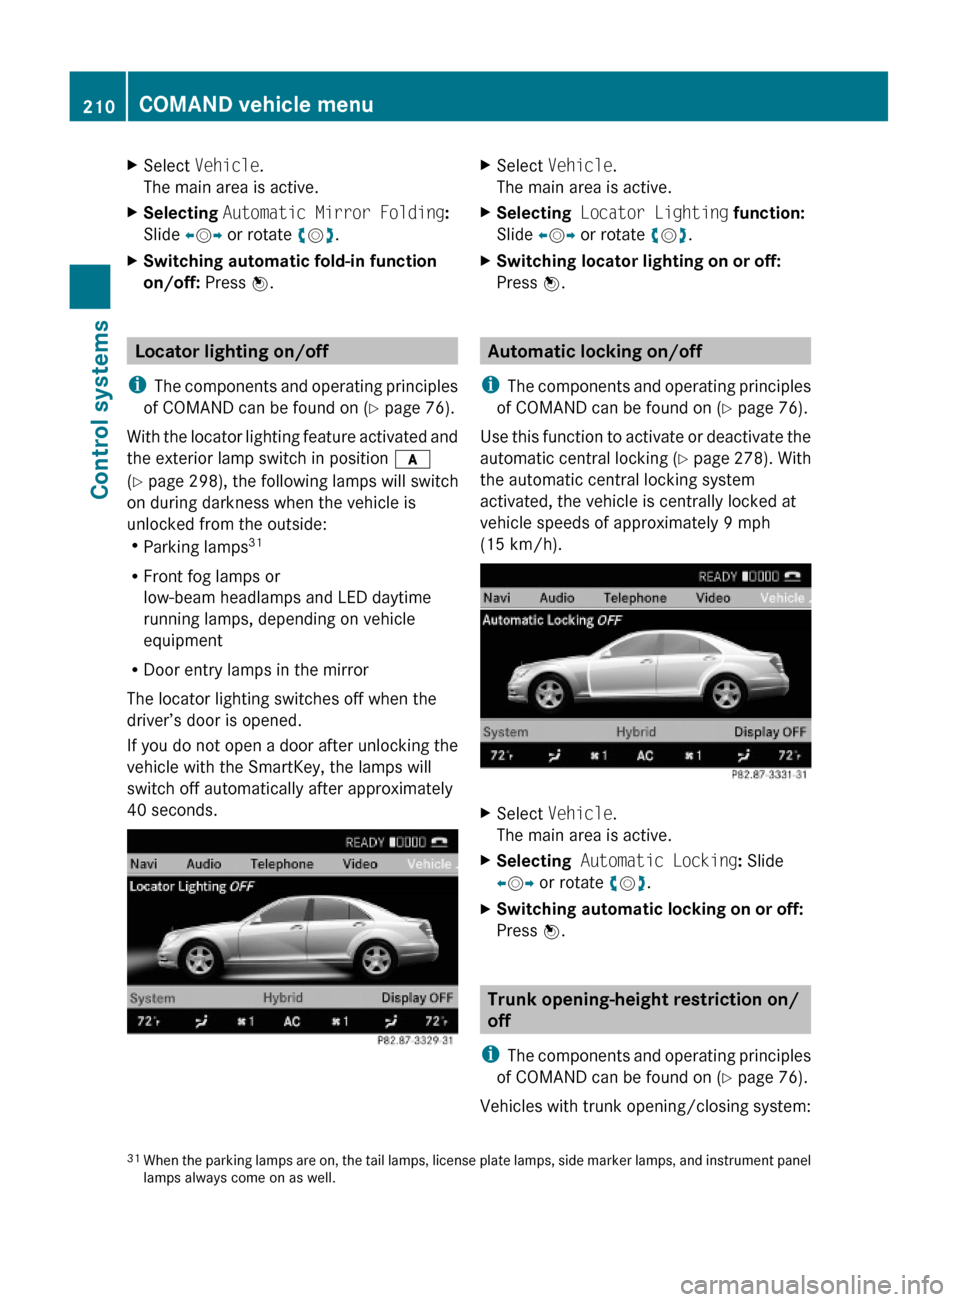
XSelect Vehicle.
The main area is active.
XSelecting Automatic Mirror Folding:
Slide XVY or rotate cVd.
XSwitching automatic fold-in function
on/off: Press W.
Locator lighting on/off
iThe components and operating principles
of COMAND can be found on (Y page 76).
With the locator lighting feature activated and
the exterior lamp switch in position c
(Y page 298), the following lamps will switch
on during darkness when the vehicle is
unlocked from the outside:RParking lamps31
RFront fog lamps or
low-beam headlamps and LED daytime
running lamps, depending on vehicle
equipment
RDoor entry lamps in the mirror
The locator lighting switches off when the
driver’s door is opened.
If you do not open a door after unlocking the
vehicle with the SmartKey, the lamps will
switch off automatically after approximately
40 seconds.
XSelect Vehicle.
The main area is active.
XSelecting Locator Lighting function:
Slide XVY or rotate cVd.
XSwitching locator lighting on or off:
Press W.
Automatic locking on/off
iThe components and operating principles
of COMAND can be found on (Y page 76).
Use this function to activate or deactivate the
automatic central locking (Y page 278). With
the automatic central locking system
activated, the vehicle is centrally locked at
vehicle speeds of approximately 9 mph
(15 km/h).
XSelect Vehicle.
The main area is active.
XSelecting Automatic Locking: Slide
XVY or rotate cVd.
XSwitching automatic locking on or off:
Press W.
Trunk opening-height restriction on/
off
iThe components and operating principles
of COMAND can be found on (Y page 76).
Vehicles with trunk opening/closing system:
31When the parking lamps are on, the tail lamps, license plate lamps, side marker lamps, and instrument panellamps always come on as well.
210COMAND vehicle menuControl systems
221_AKB; 6; 20, en-USd2ugruen,Version: 2.11.8.12009-09-24T13:28:17+02:00 - Seite 210
Page 275 of 548
Vehicle equipment ............................274
Locking and unlocking .....................274
Starter switch positions ...................284
Seats ..................................................286
Multifunction steering wheel ..........293
Mirrors ...............................................294
Memory function ..............................297
Lighting ..............................................298
Wipers ................................................305
Power windows .................................307
Driving and parking ..........................311
Automatic transmission ...................317
Transfer case ....................................325
Instrument cluster ............................326
Driving systems ................................327
Climate control system ....................363
Rear window defroster .....................372
Power tilt/sliding sunroof ...............373
Panorama roof with power tilt/
sliding panel ......................................375
Loading and storing ..........................379
Useful features .................................384
273Controls in detail221_AKB; 6; 20, en-USd2ugruen,Version: 2.11.8.12009-09-24T13:28:17+02:00 - Seite 273
Page 288 of 548
iWhen you now press the KEYLESS-GO
start/stop button once and the driver’s
door is open, the power supply is switched
off.
Seats
Safety notes
GWarning!
In order to avoid possible loss of vehicle
control the following must be done before the
vehicle is put into motion:
R seat adjustment
R head restraint adjustment
R steering wheel adjustment
R rear view mirror adjustment
R fastening of seat belts
GWarning!
Do not adjust the driver’s seat while driving.
Adjusting the seat while driving could cause
the driver to lose control of the vehicle.
Never ride in a moving vehicle with the seat
backrest in an excessively reclined position as
this can be dangerous. You could slide under
the seat belt in a collision. If you slide under
it, the seat belt would apply force at the
abdomen or neck. That could cause serious
or fatal injuries. The seat backrest and seat
belts provide the best restraint when the
wearer is in a position that is as upright as
possible and seat belts are properly
positioned on the body.
GWarning!
Your seat must be adjusted so that you can
correctly fasten your seat belt.
Observe the following points:
R Adjust the seat backrest until your arms are
slightly angled when holding the steering
wheel.
R Adjust the seat to a comfortable seating
position that still allows you to reach the
accelerator/brake pedal safely. The
position should be as far back as possible
with the driver still able to operate the
controls properly.
R Adjust the head restraint so that it is as
close to the head as possible. The center of
the head restraint must support the back of
the head at eye level.
R Never place hands under the seat or near
any moving parts while a seat is being
adjusted.
Failure to do so could result in an accident
and/or serious personal injury.GWarning!
The power seats can be operated at any time.
Therefore, do not leave children unattended
in the vehicle, or with access to an unlocked
vehicle. A child’s unsupervised access to a
vehicle could result in an accident and/or
serious personal injury.
GWarning!
According to accident statistics, children are
safer when properly restrained in the rear
seating positions than in the front seating
position. Thus, we strongly recommend that
children be placed in the rear seats whenever
possible. Regardless of seating position,
children 12 years old and under must be
seated and properly secured in an
appropriately sized infant restraint, toddler
restraint, or booster seat recommended for
the size and weight of the child. For additional
information, see “Children in the vehicle”.
A child’s risk of serious or fatal injuries is
significantly increased if the child restraints
are not properly secured in the vehicle and/
286SeatsControls in detail
221_AKB; 6; 20, en-USd2ugruen,Version: 2.11.8.12009-09-24T13:28:17+02:00 - Seite 286
Page 296 of 548
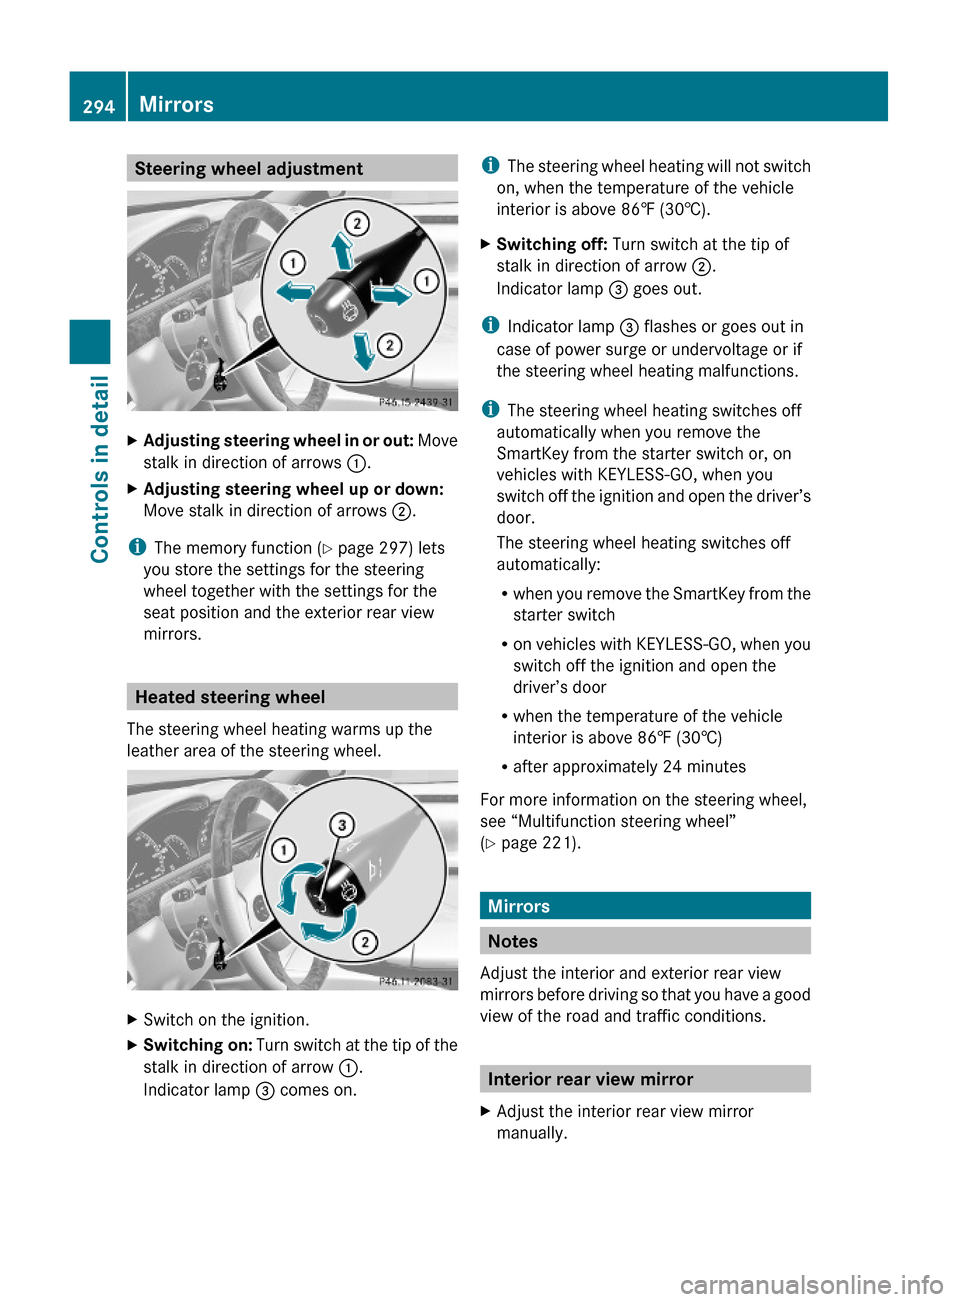
Steering wheel adjustmentXAdjusting steering wheel in or out: Move
stalk in direction of arrows :.
XAdjusting steering wheel up or down:
Move stalk in direction of arrows ;.
iThe memory function (Y page 297) lets
you store the settings for the steering
wheel together with the settings for the
seat position and the exterior rear view
mirrors.
Heated steering wheel
The steering wheel heating warms up the
leather area of the steering wheel.
XSwitch on the ignition.XSwitching on: Turn switch at the tip of the
stalk in direction of arrow :.
Indicator lamp = comes on.
iThe steering wheel heating will not switch
on, when the temperature of the vehicle
interior is above 86‡ (30†).
XSwitching off: Turn switch at the tip of
stalk in direction of arrow ;.
Indicator lamp = goes out.
iIndicator lamp = flashes or goes out in
case of power surge or undervoltage or if
the steering wheel heating malfunctions.
iThe steering wheel heating switches off
automatically when you remove the
SmartKey from the starter switch or, on
vehicles with KEYLESS-GO, when you
switch off the ignition and open the driver’s
door.
The steering wheel heating switches off
automatically:
Rwhen you remove the SmartKey from the
starter switch
Ron vehicles with KEYLESS-GO, when you
switch off the ignition and open the
driver’s door
Rwhen the temperature of the vehicle
interior is above 86‡ (30†)
Rafter approximately 24 minutes
For more information on the steering wheel,
see “Multifunction steering wheel”
(Y page 221).
Mirrors
Notes
Adjust the interior and exterior rear view
mirrors before driving so that you have a good
view of the road and traffic conditions.
Interior rear view mirror
XAdjust the interior rear view mirror
manually.
294MirrorsControls in detail
221_AKB; 6; 20, en-USd2ugruen,Version: 2.11.8.12009-09-24T13:28:17+02:00 - Seite 294
Page 297 of 548
Exterior rear view mirrorsGWarning!
Exercise care when using the passenger-side
exterior rear view mirror. The mirror surface
is convex (outwardly curved surface for a
wider field of view). Objects in mirror are
closer than they appear. Check your interior
rear view mirror and glance over your
shoulder before changing lanes.
iYou can store the settings for the exterior
rear view mirror position with the memory
function (Y page 297).
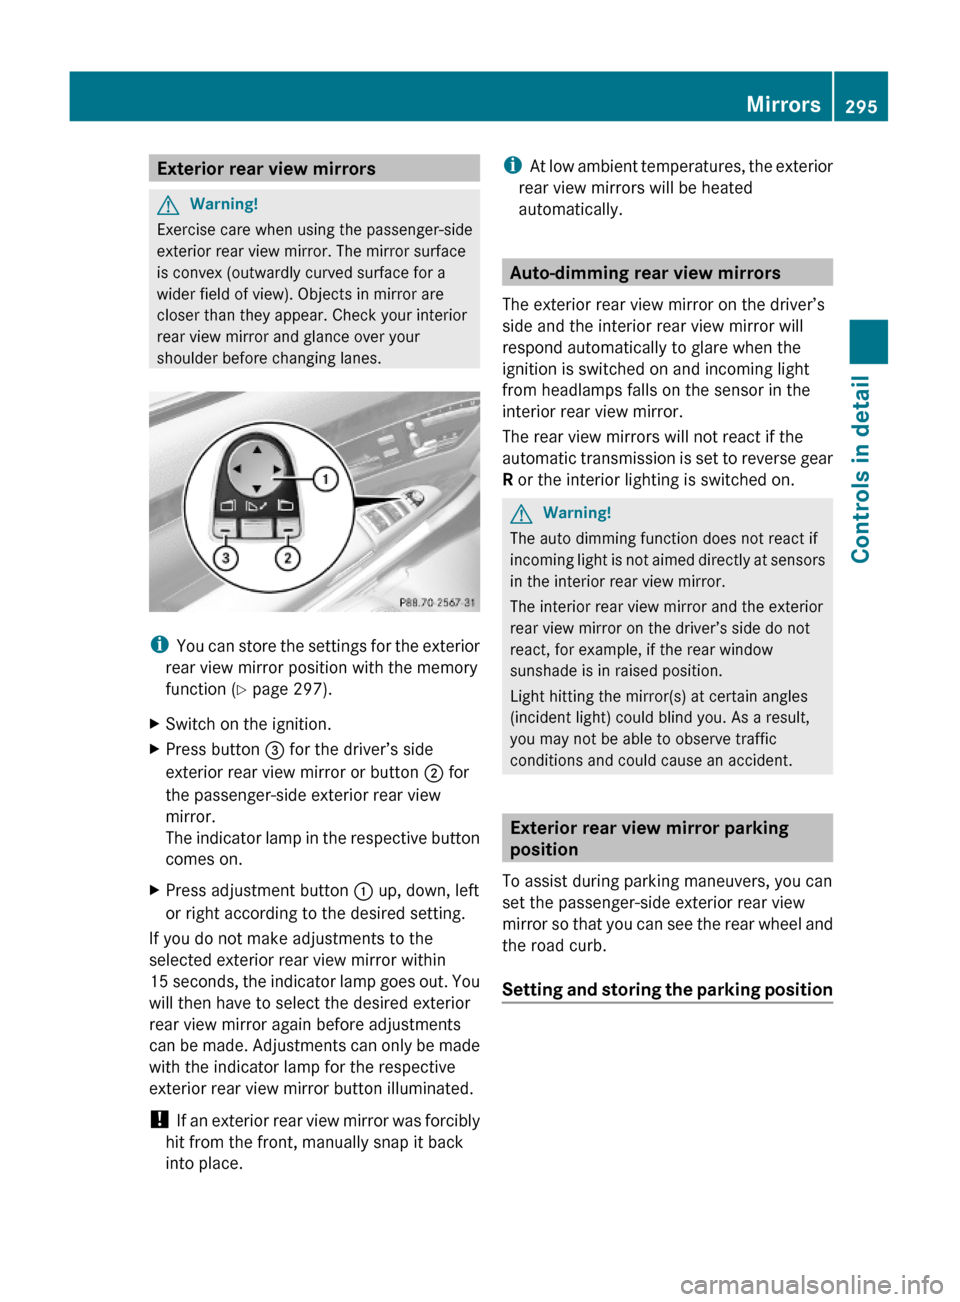
XSwitch on the ignition.XPress button = for the driver’s side
exterior rear view mirror or button ; for
the passenger-side exterior rear view
mirror.
The indicator lamp in the respective button
comes on.
XPress adjustment button : up, down, left
or right according to the desired setting.
If you do not make adjustments to the
selected exterior rear view mirror within
15 seconds, the indicator lamp goes out. You
will then have to select the desired exterior
rear view mirror again before adjustments
can be made. Adjustments can only be made
with the indicator lamp for the respective
exterior rear view mirror button illuminated.
! If an exterior rear view mirror was forcibly
hit from the front, manually snap it back
into place.
iAt low ambient temperatures, the exterior
rear view mirrors will be heated
automatically.
Auto-dimming rear view mirrors
The exterior rear view mirror on the driver’s
side and the interior rear view mirror will
respond automatically to glare when the
ignition is switched on and incoming light
from headlamps falls on the sensor in the
interior rear view mirror.
The rear view mirrors will not react if the
automatic transmission is set to reverse gear
R or the interior lighting is switched on.
GWarning!
The auto dimming function does not react if
incoming light is not aimed directly at sensors
in the interior rear view mirror.
The interior rear view mirror and the exterior
rear view mirror on the driver’s side do not
react, for example, if the rear window
sunshade is in raised position.
Light hitting the mirror(s) at certain angles
(incident light) could blind you. As a result,
you may not be able to observe traffic
conditions and could cause an accident.
Exterior rear view mirror parking
position
To assist during parking maneuvers, you can
set the passenger-side exterior rear view
mirror so that you can see the rear wheel and
the road curb.
Setting and storing the parking position
Mirrors295Controls in detail221_AKB; 6; 20, en-USd2ugruen,Version: 2.11.8.12009-09-24T13:28:17+02:00 - Seite 295Z
Page 298 of 548
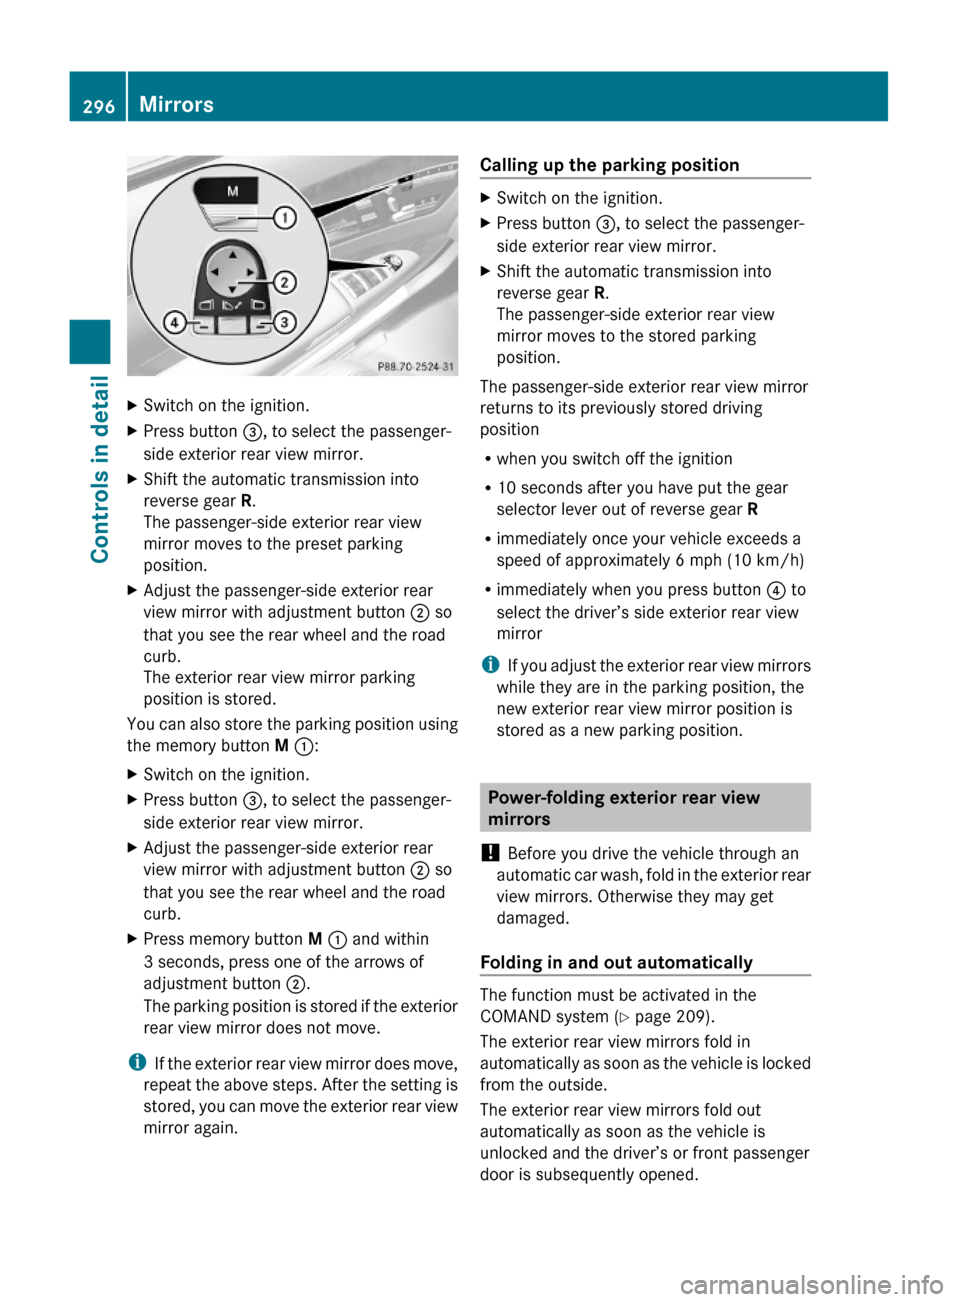
XSwitch on the ignition.XPress button =, to select the passenger-
side exterior rear view mirror.
XShift the automatic transmission into
reverse gear R.
The passenger-side exterior rear view
mirror moves to the preset parking
position.
XAdjust the passenger-side exterior rear
view mirror with adjustment button ; so
that you see the rear wheel and the road
curb.
The exterior rear view mirror parking
position is stored.
You can also store the parking position using
the memory button M ::
XSwitch on the ignition.XPress button =, to select the passenger-
side exterior rear view mirror.
XAdjust the passenger-side exterior rear
view mirror with adjustment button ; so
that you see the rear wheel and the road
curb.
XPress memory button M : and within
3 seconds, press one of the arrows of
adjustment button ;.
The parking position is stored if the exterior
rear view mirror does not move.
iIf the exterior rear view mirror does move,
repeat the above steps. After the setting is
stored, you can move the exterior rear view
mirror again.
Calling up the parking positionXSwitch on the ignition.XPress button =, to select the passenger-
side exterior rear view mirror.
XShift the automatic transmission into
reverse gear R.
The passenger-side exterior rear view
mirror moves to the stored parking
position.
The passenger-side exterior rear view mirror
returns to its previously stored driving
position
Rwhen you switch off the ignition
R10 seconds after you have put the gear
selector lever out of reverse gear R
Rimmediately once your vehicle exceeds a
speed of approximately 6 mph (10 km/h)
Rimmediately when you press button ? to
select the driver’s side exterior rear view
mirror
iIf you adjust the exterior rear view mirrors
while they are in the parking position, the
new exterior rear view mirror position is
stored as a new parking position.
Power-folding exterior rear view
mirrors
! Before you drive the vehicle through an
automatic car wash, fold in the exterior rear
view mirrors. Otherwise they may get
damaged.
Folding in and out automatically
The function must be activated in the
COMAND system (Y page 209).
The exterior rear view mirrors fold in
automatically as soon as the vehicle is locked
from the outside.
The exterior rear view mirrors fold out
automatically as soon as the vehicle is
unlocked and the driver’s or front passenger
door is subsequently opened.
296MirrorsControls in detail
221_AKB; 6; 20, en-USd2ugruen,Version: 2.11.8.12009-09-24T13:28:17+02:00 - Seite 296
Page 299 of 548
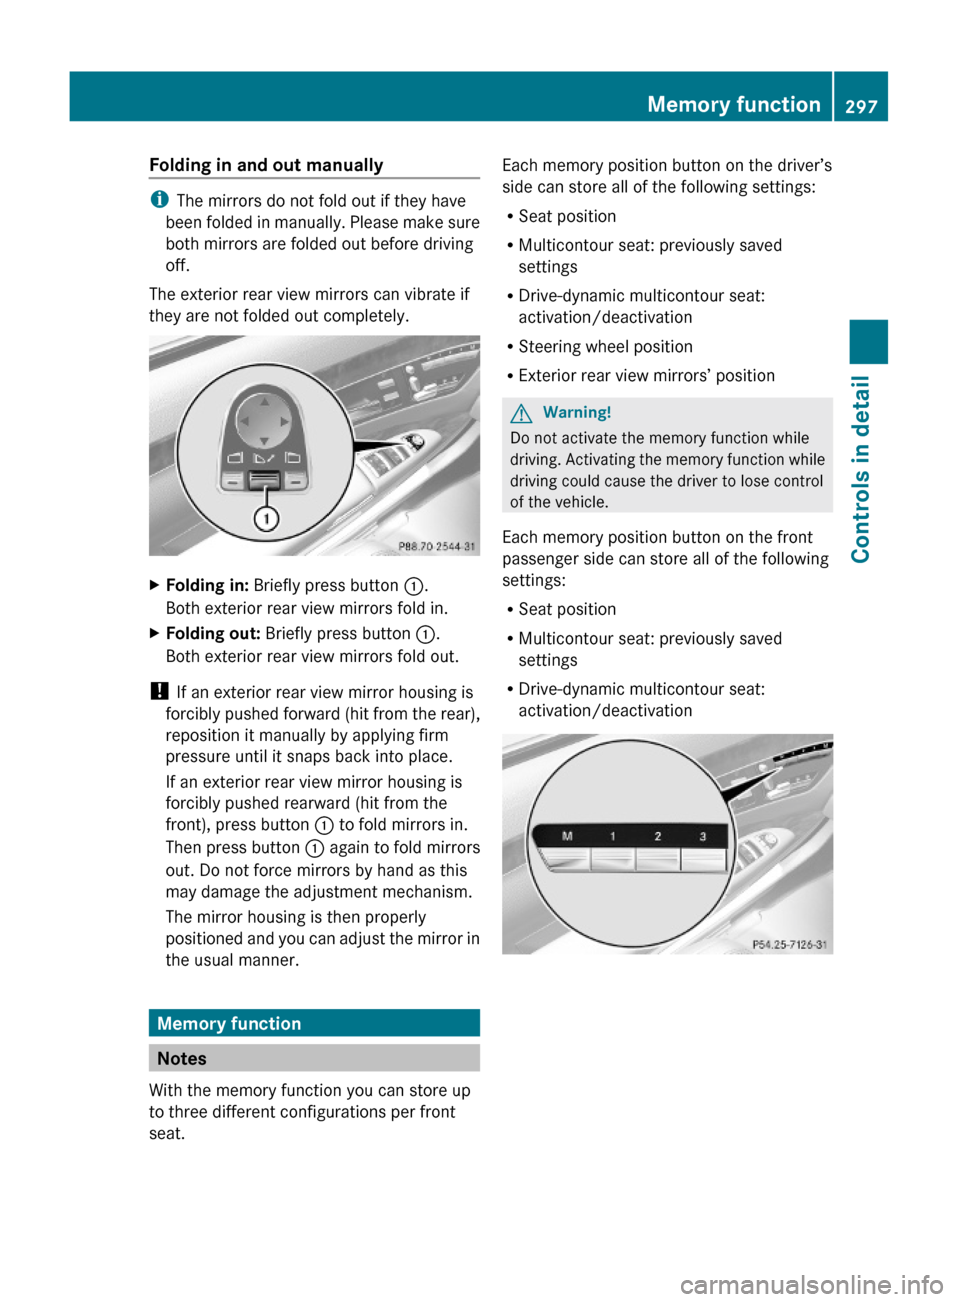
Folding in and out manually
iThe mirrors do not fold out if they have
been folded in manually. Please make sure
both mirrors are folded out before driving
off.
The exterior rear view mirrors can vibrate if
they are not folded out completely.
XFolding in: Briefly press button :.
Both exterior rear view mirrors fold in.
XFolding out: Briefly press button :.
Both exterior rear view mirrors fold out.
! If an exterior rear view mirror housing is
forcibly pushed forward (hit from the rear),
reposition it manually by applying firm
pressure until it snaps back into place.
If an exterior rear view mirror housing is
forcibly pushed rearward (hit from the
front), press button : to fold mirrors in.
Then press button : again to fold mirrors
out. Do not force mirrors by hand as this
may damage the adjustment mechanism.
The mirror housing is then properly
positioned and you can adjust the mirror in
the usual manner.
Memory function
Notes
With the memory function you can store up
to three different configurations per front
seat.
Each memory position button on the driver’s
side can store all of the following settings:
RSeat position
RMulticontour seat: previously saved
settings
RDrive-dynamic multicontour seat:
activation/deactivation
RSteering wheel position
RExterior rear view mirrors’ position
GWarning!
Do not activate the memory function while
driving. Activating the memory function while
driving could cause the driver to lose control
of the vehicle.
Each memory position button on the front
passenger side can store all of the following
settings:
RSeat position
RMulticontour seat: previously saved
settings
RDrive-dynamic multicontour seat:
activation/deactivation
Memory function297Controls in detail221_AKB; 6; 20, en-USd2ugruen,Version: 2.11.8.12009-09-24T13:28:17+02:00 - Seite 297Z