center console MERCEDES-BENZ S63AMG 2010 W221 Owner's Guide
[x] Cancel search | Manufacturer: MERCEDES-BENZ, Model Year: 2010, Model line: S63AMG, Model: MERCEDES-BENZ S63AMG 2010 W221Pages: 548, PDF Size: 12.48 MB
Page 120 of 548
XSelecting numbers: Slide XVY or rotate
cVd.
XConfirming number selection: Press W.
or
XEntering a number with the telephone
keypad using buttons Å - Ã
(Y page 79).
XDeleting individual numbers: Select F
in the bottom line and press W.
XDeleting an entire entry: Select F in the
bottom line and press W and hold until the
entire entry is deleted.
XCanceling an entry: Select % in the
bottom line and press W.
or
XPress back button % in the center
console (Y page 87).
XConfirming entry: Select ¬ in the
second line from the bottom and press W.
If COMAND cannot clearly attribute the
house number to a city, the city input menu
appears.
Entering city: Proceed as described in the
“Entering a city” section (Y page 111).
After the city has been entered, the address
input menu appears again.
If COMAND can clearly attribute the house
number to a city, the address input menu
also appears.
In both cases, the address input menu
shows the house number, street, city and
state (USA) or province (Canada).
Which of the following menu items are now
available may depend on the data version of
the digital map. The menu items which are not
available cannot be selected.
RMap: Using the map to enter a destination
(Y page 122)
iIn this case, using the map for destination
entry is based on the city seen in the
address input menu.
RPOI: Entering a point of interest
(Y page 124)
iIn this case, entering a POI is based on the
city seen in the address input menu.
RSave: Saving a destination in the
destination memory (Y page 145)
RStart: Starting the route calculation
(Y page 120)
XContinuing or completing destination
entry: Select one of the menu items
mentioned above.
Entering an intersection
iThe intersection can only be entered after
the street has been entered.
You can only enter intersections which are
available on the digital map.
XIn the address input menu, select
Intersection.
The list of intersections appears either with
or without the predictive speller
(Y page 119). Whether or not the
predictive speller appears depends on how
many intersections are available for the
selected street.
List of intersections with predictive
speller
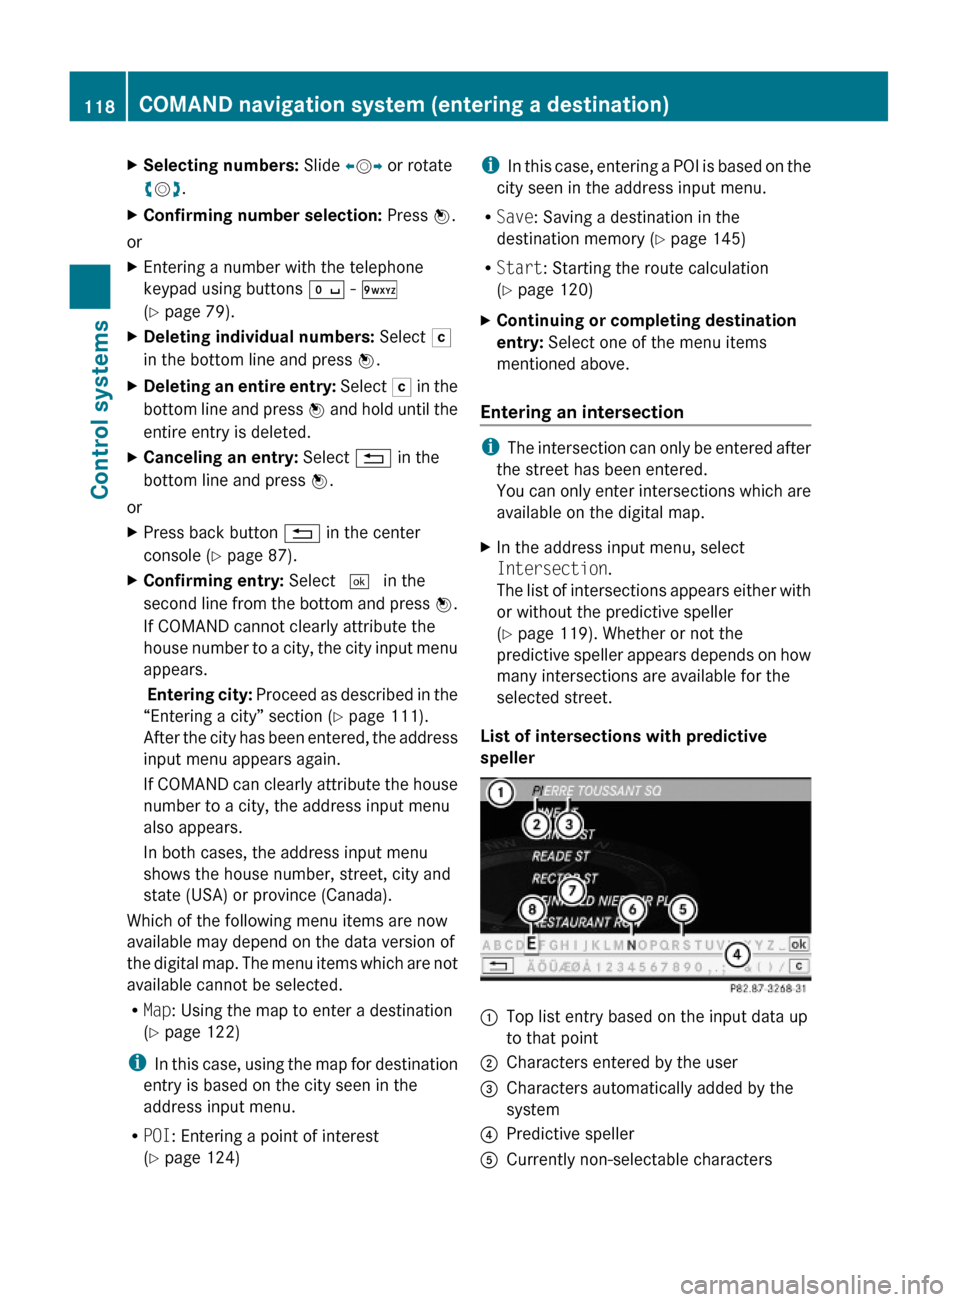
:Top list entry based on the input data up
to that point
;Characters entered by the user=Characters automatically added by the
system
?Predictive spellerACurrently non-selectable characters118COMAND navigation system (entering a destination)Control systems
221_AKB; 6; 20, en-USd2ugruen,Version: 2.11.8.12009-09-24T13:28:17+02:00 - Seite 118
Page 121 of 548
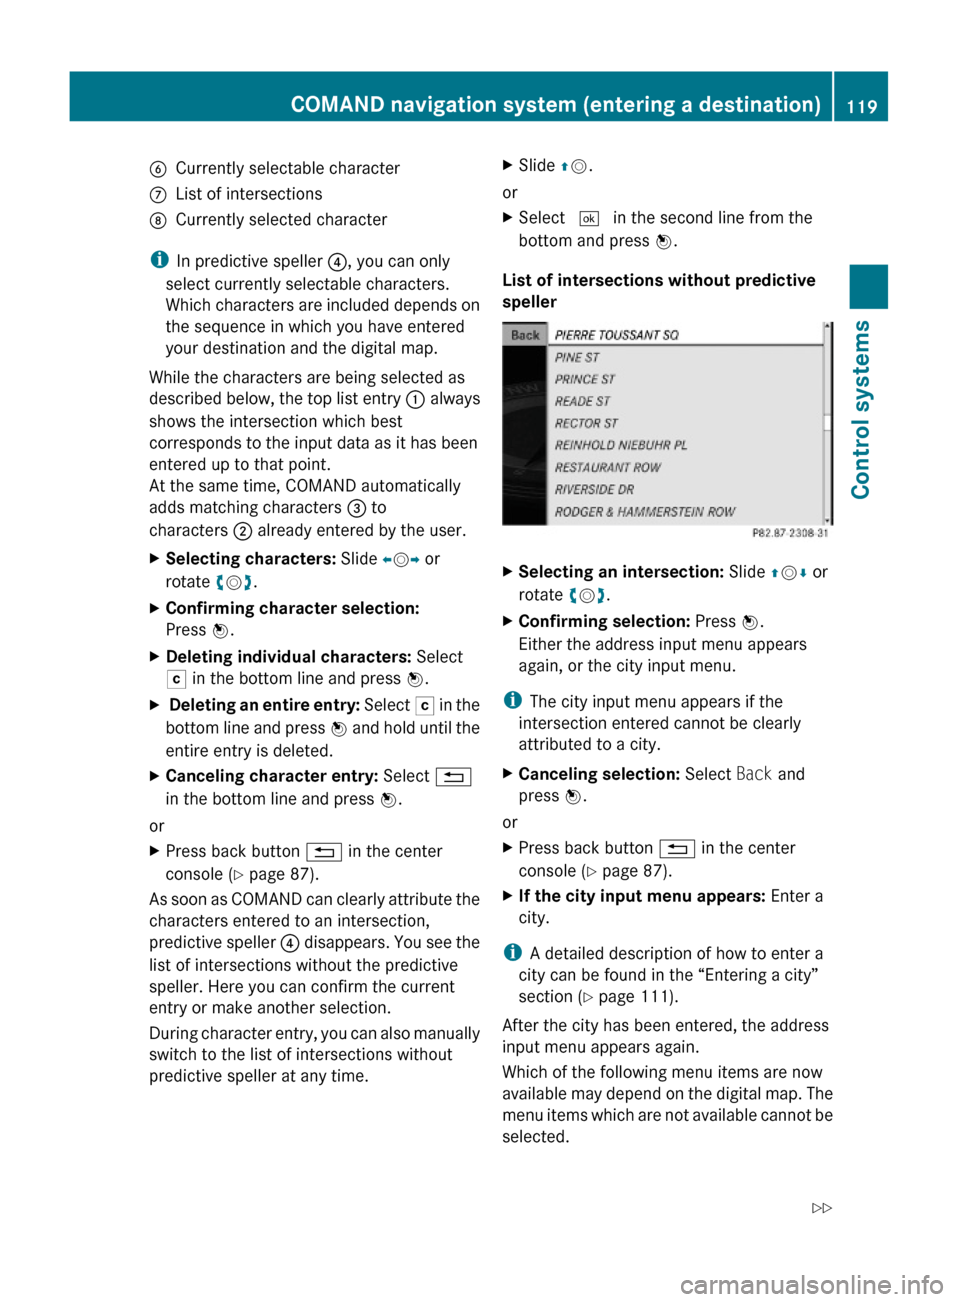
BCurrently selectable characterCList of intersectionsDCurrently selected character
iIn predictive speller ?, you can only
select currently selectable characters.
Which characters are included depends on
the sequence in which you have entered
your destination and the digital map.
While the characters are being selected as
described below, the top list entry : always
shows the intersection which best
corresponds to the input data as it has been
entered up to that point.
At the same time, COMAND automatically
adds matching characters = to
characters ; already entered by the user.
XSelecting characters: Slide XVY or
rotate cVd.
XConfirming character selection:
Press W.
XDeleting individual characters: Select
F in the bottom line and press W.
X Deleting an entire entry: Select F in the
bottom line and press W and hold until the
entire entry is deleted.
XCanceling character entry: Select %
in the bottom line and press W.
or
XPress back button % in the center
console (Y page 87).
As soon as COMAND can clearly attribute the
characters entered to an intersection,
predictive speller ? disappears. You see the
list of intersections without the predictive
speller. Here you can confirm the current
entry or make another selection.
During character entry, you can also manually
switch to the list of intersections without
predictive speller at any time.
XSlide ZV.
or
XSelect ¬ in the second line from the
bottom and press W.
List of intersections without predictive
speller
XSelecting an intersection: Slide ZVÆ or
rotate cVd.
XConfirming selection: Press W.
Either the address input menu appears
again, or the city input menu.
iThe city input menu appears if the
intersection entered cannot be clearly
attributed to a city.
XCanceling selection: Select Back and
press W.
or
XPress back button % in the center
console (Y page 87).
XIf the city input menu appears: Enter a
city.
iA detailed description of how to enter a
city can be found in the “Entering a city”
section (Y page 111).
After the city has been entered, the address
input menu appears again.
Which of the following menu items are now
available may depend on the digital map. The
menu items which are not available cannot be
selected.
COMAND navigation system (entering a destination)119Control systems221_AKB; 6; 20, en-USd2ugruen,Version: 2.11.8.12009-09-24T13:28:17+02:00 - Seite 119Z
Page 123 of 548
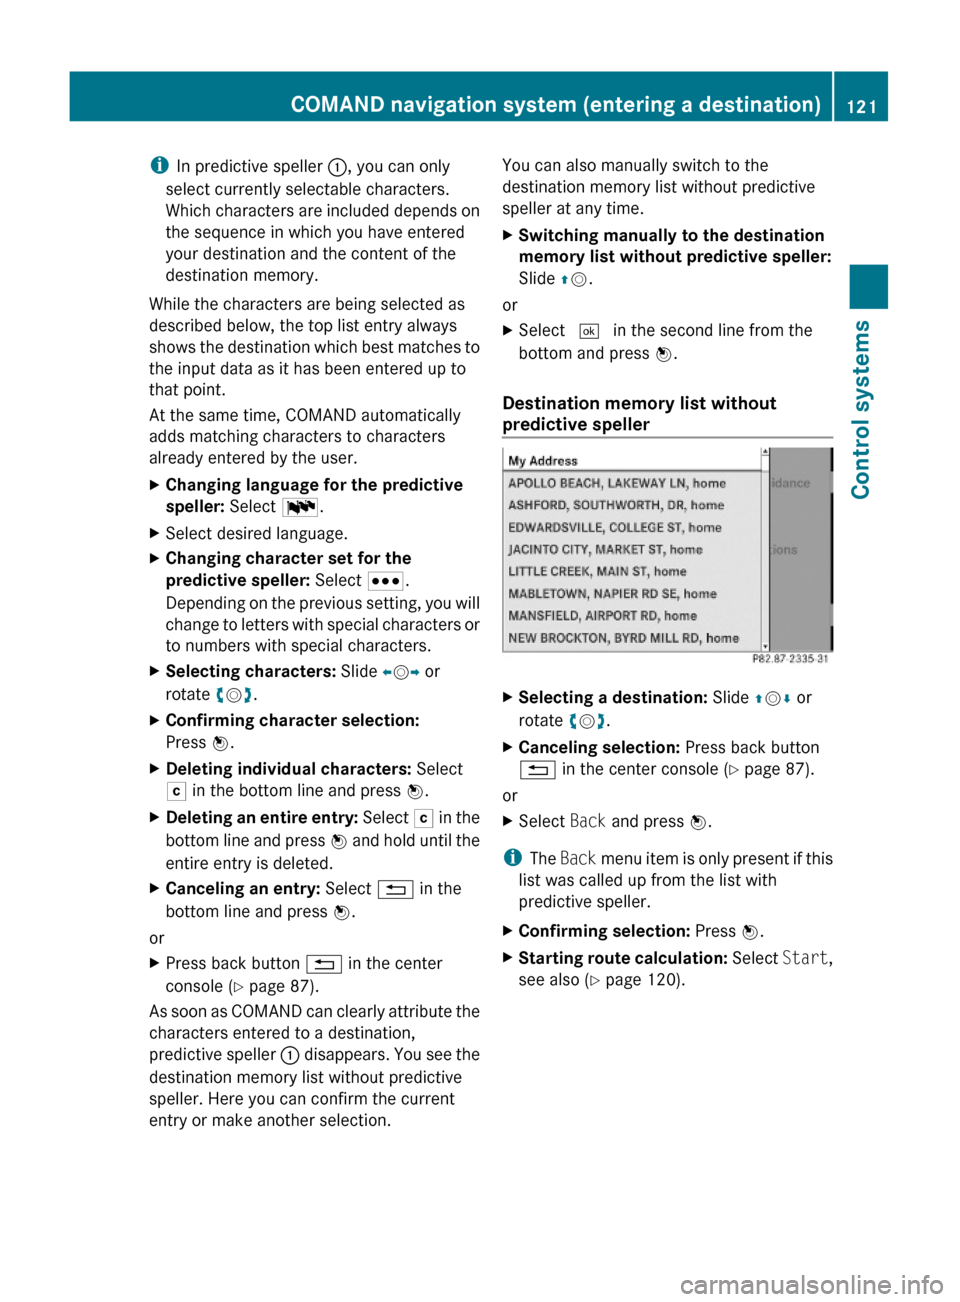
iIn predictive speller :, you can only
select currently selectable characters.
Which characters are included depends on
the sequence in which you have entered
your destination and the content of the
destination memory.
While the characters are being selected as
described below, the top list entry always
shows the destination which best matches to
the input data as it has been entered up to
that point.
At the same time, COMAND automatically
adds matching characters to characters
already entered by the user.
XChanging language for the predictive
speller: Select B.
XSelect desired language.XChanging character set for the
predictive speller: Select C.
Depending on the previous setting, you will
change to letters with special characters or
to numbers with special characters.
XSelecting characters: Slide XVY or
rotate cVd.
XConfirming character selection:
Press W.
XDeleting individual characters: Select
F in the bottom line and press W.
XDeleting an entire entry: Select F in the
bottom line and press W and hold until the
entire entry is deleted.
XCanceling an entry: Select % in the
bottom line and press W.
or
XPress back button % in the center
console (Y page 87).
As soon as COMAND can clearly attribute the
characters entered to a destination,
predictive speller : disappears. You see the
destination memory list without predictive
speller. Here you can confirm the current
entry or make another selection.
You can also manually switch to the
destination memory list without predictive
speller at any time.
XSwitching manually to the destination
memory list without predictive speller:
Slide ZV.
or
XSelect ¬ in the second line from the
bottom and press W.
Destination memory list without
predictive speller
XSelecting a destination: Slide ZVÆ or
rotate cVd.
XCanceling selection: Press back button
% in the center console (Y page 87).
or
XSelect Back and press W.
iThe Back menu item is only present if this
list was called up from the list with
predictive speller.
XConfirming selection: Press W.XStarting route calculation: Select Start,
see also (Y page 120).
COMAND navigation system (entering a destination)121Control systems221_AKB; 6; 20, en-USd2ugruen,Version: 2.11.8.12009-09-24T13:28:17+02:00 - Seite 121Z
Page 128 of 548
Choosing a main category
Example illustration: Main category list for POIs inthe surrounding area
:Main category;Symbol for available POIs or other
available subcategories
XSelecting a main category: Slide ZVÆ or
rotate cVd.
XCanceling selection: Press back button
% in the center console (Y page 87).
XConfirming selection: Press W.
Main categories with symbol ; contain
either POIs or subcategories. Further
operation depends on whether the
selected main category contains
subcategories or only POIs.
Selected main category contains
subcategories:
Selecting such a main category opens a list
of subcategories.
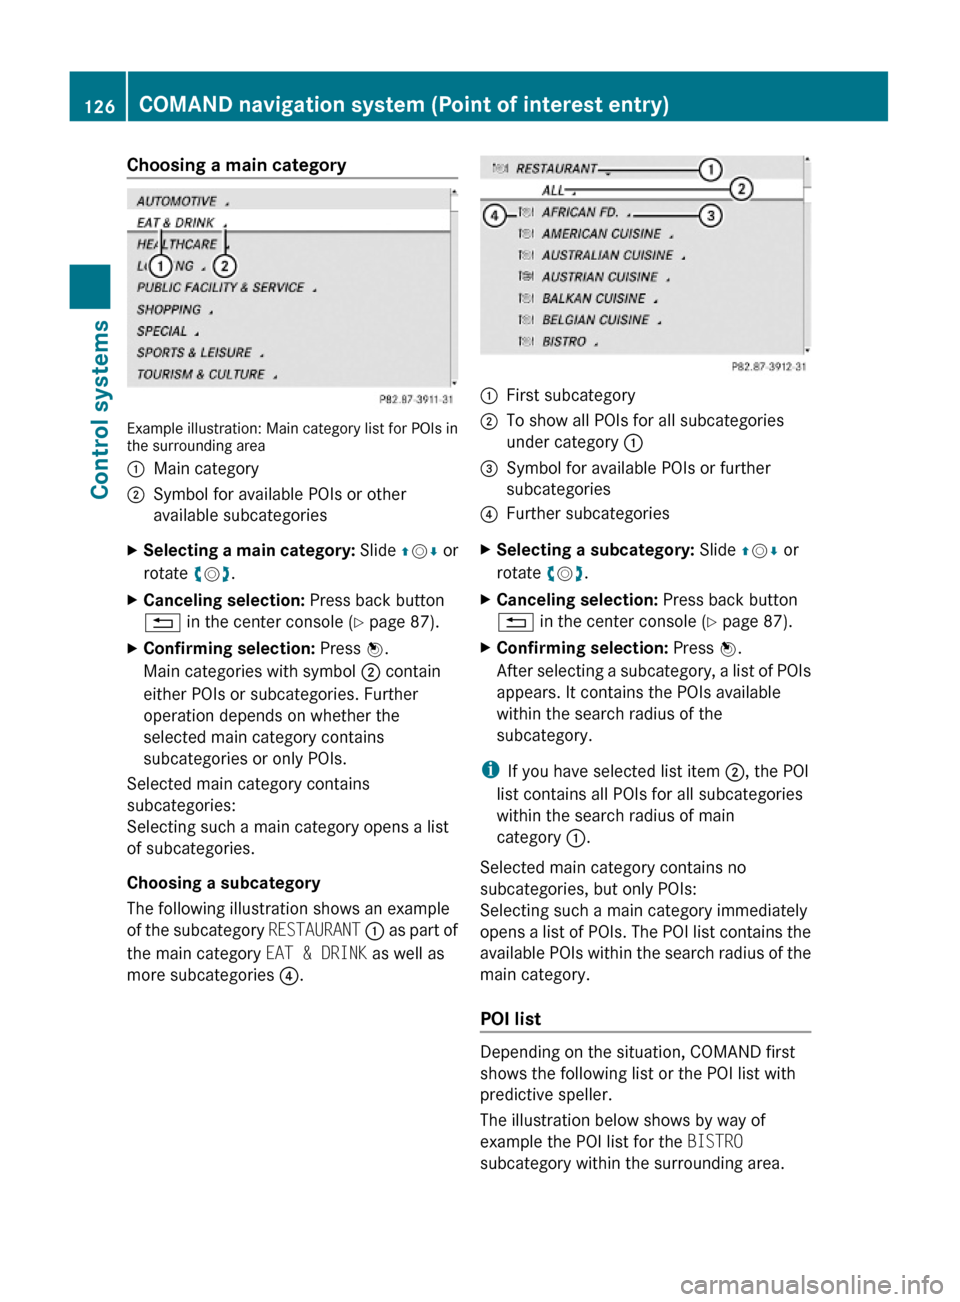
Choosing a subcategory
The following illustration shows an example
of the subcategory RESTAURANT : as part of
the main category EAT & DRINK as well as
more subcategories ?.
:First subcategory;To show all POIs for all subcategories
under category :
=Symbol for available POIs or further
subcategories
?Further subcategoriesXSelecting a subcategory: Slide ZVÆ or
rotate cVd.
XCanceling selection: Press back button
% in the center console (Y page 87).
XConfirming selection: Press W.
After selecting a subcategory, a list of POIs
appears. It contains the POIs available
within the search radius of the
subcategory.
iIf you have selected list item ;, the POI
list contains all POIs for all subcategories
within the search radius of main
category :.
Selected main category contains no
subcategories, but only POIs:
Selecting such a main category immediately
opens a list of POIs. The POI list contains the
available POIs within the search radius of the
main category.
POI list
Depending on the situation, COMAND first
shows the following list or the POI list with
predictive speller.
The illustration below shows by way of
example the POI list for the BISTRO
subcategory within the surrounding area.
126COMAND navigation system (Point of interest entry)Control systems
221_AKB; 6; 20, en-USd2ugruen,Version: 2.11.8.12009-09-24T13:28:17+02:00 - Seite 126
Page 129 of 548
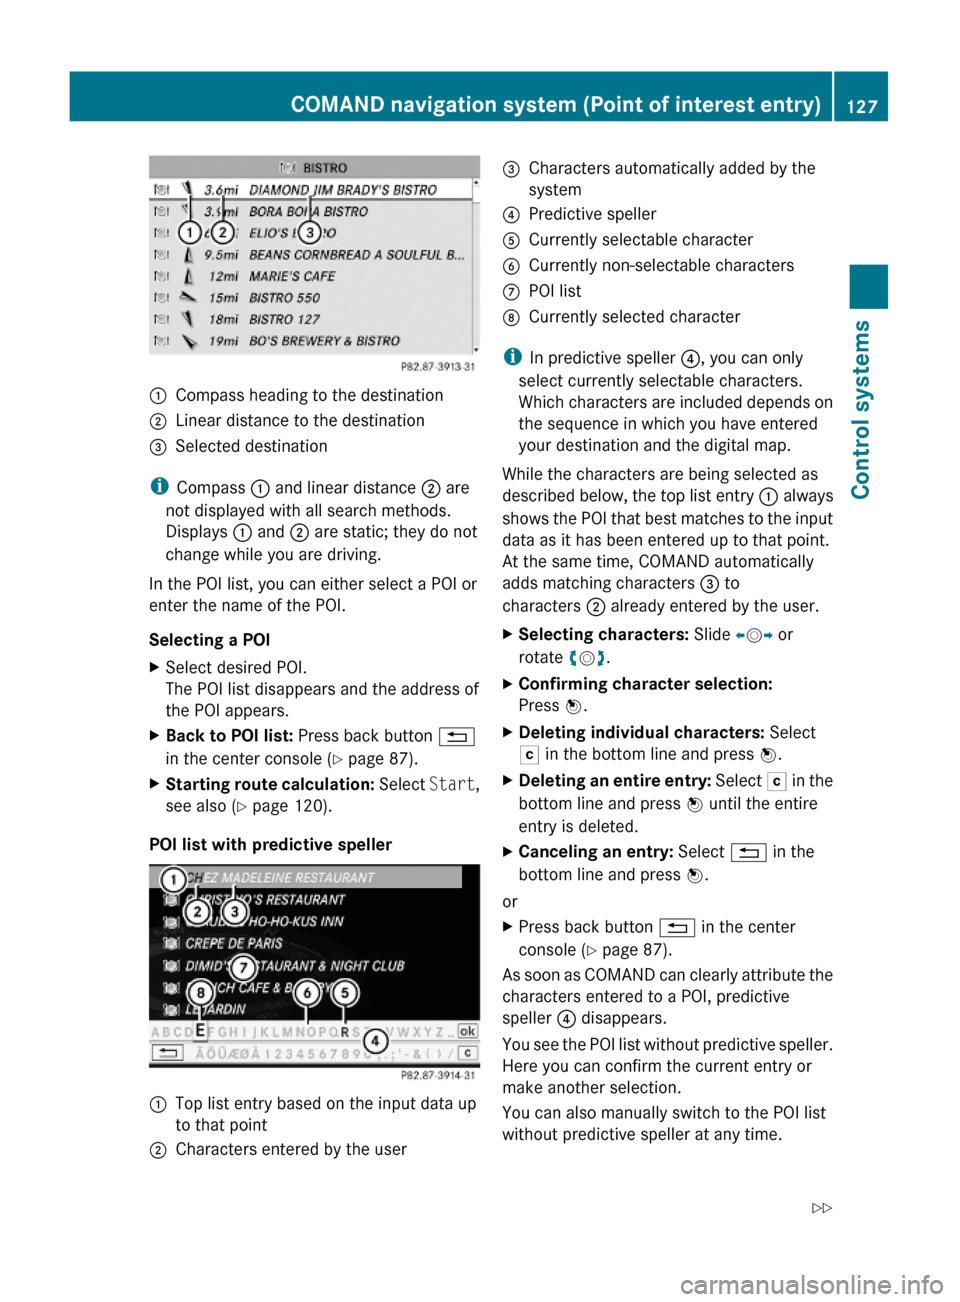
:Compass heading to the destination;Linear distance to the destination=Selected destination
iCompass : and linear distance ; are
not displayed with all search methods.
Displays : and ; are static; they do not
change while you are driving.
In the POI list, you can either select a POI or
enter the name of the POI.
Selecting a POI
XSelect desired POI.
The POI list disappears and the address of
the POI appears.
XBack to POI list: Press back button %
in the center console (Y page 87).
XStarting route calculation: Select Start,
see also (Y page 120).
POI list with predictive speller
:Top list entry based on the input data up
to that point
;Characters entered by the user=Characters automatically added by the
system
?Predictive spellerACurrently selectable characterBCurrently non-selectable charactersCPOI listDCurrently selected character
iIn predictive speller ?, you can only
select currently selectable characters.
Which characters are included depends on
the sequence in which you have entered
your destination and the digital map.
While the characters are being selected as
described below, the top list entry : always
shows the POI that best matches to the input
data as it has been entered up to that point.
At the same time, COMAND automatically
adds matching characters = to
characters ; already entered by the user.
XSelecting characters: Slide XVY or
rotate cVd.
XConfirming character selection:
Press W.
XDeleting individual characters: Select
F in the bottom line and press W.
XDeleting an entire entry: Select F in the
bottom line and press W until the entire
entry is deleted.
XCanceling an entry: Select % in the
bottom line and press W.
or
XPress back button % in the center
console (Y page 87).
As soon as COMAND can clearly attribute the
characters entered to a POI, predictive
speller ? disappears.
You see the POI list without predictive speller.
Here you can confirm the current entry or
make another selection.
You can also manually switch to the POI list
without predictive speller at any time.
COMAND navigation system (Point of interest entry)127Control systems221_AKB; 6; 20, en-USd2ugruen,Version: 2.11.8.12009-09-24T13:28:17+02:00 - Seite 127Z
Page 130 of 548
XSwitching manually to the POI list
without predictive speller: Slide ZV.
or
XSelect ¬ in the second line from the
bottom and press W.
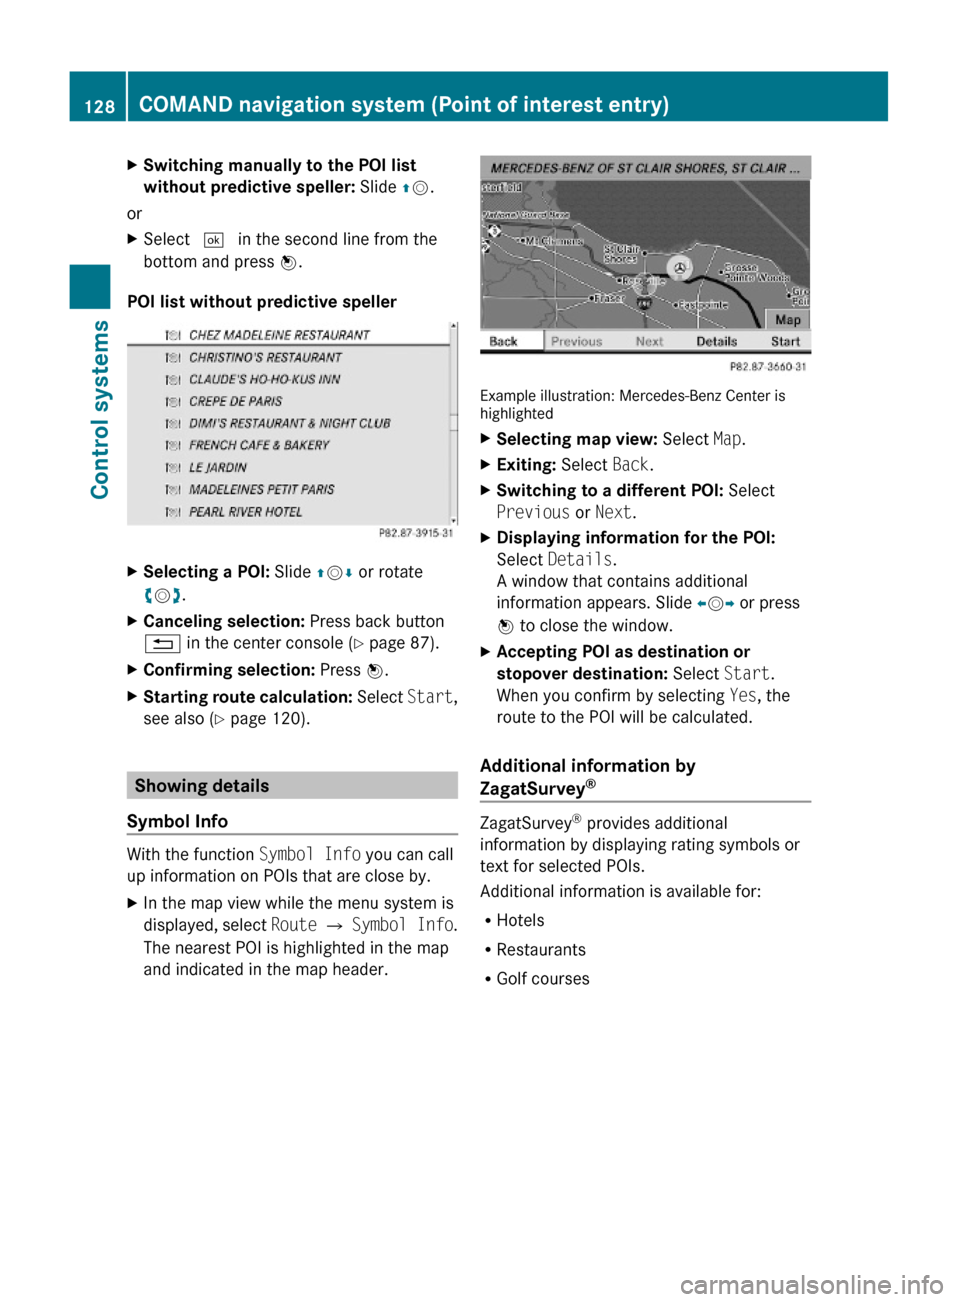
POI list without predictive speller
XSelecting a POI: Slide ZVÆ or rotate
cVd.
XCanceling selection: Press back button
% in the center console (Y page 87).
XConfirming selection: Press W.XStarting route calculation: Select Start,
see also (Y page 120).
Showing details
Symbol Info
With the function Symbol Info you can call
up information on POIs that are close by.
XIn the map view while the menu system is
displayed, select Route Q Symbol Info.
The nearest POI is highlighted in the map
and indicated in the map header.
Example illustration: Mercedes-Benz Center ishighlighted
XSelecting map view: Select Map.XExiting: Select Back.XSwitching to a different POI: Select
Previous or Next.
XDisplaying information for the POI:
Select Details.
A window that contains additional
information appears. Slide omp or press
n to close the window.
XAccepting POI as destination or
stopover destination: Select Start.
When you confirm by selecting Yes, the
route to the POI will be calculated.
Additional information by
ZagatSurvey®
ZagatSurvey® provides additional
information by displaying rating symbols or
text for selected POIs.
Additional information is available for:
RHotels
RRestaurants
RGolf courses
128COMAND navigation system (Point of interest entry)Control systems
221_AKB; 6; 20, en-USd2ugruen,Version: 2.11.8.12009-09-24T13:28:17+02:00 - Seite 128
Page 138 of 548
Displaying infoXSelect Info in map view with the menu
system displayed (Y page 102).
The route information appears.
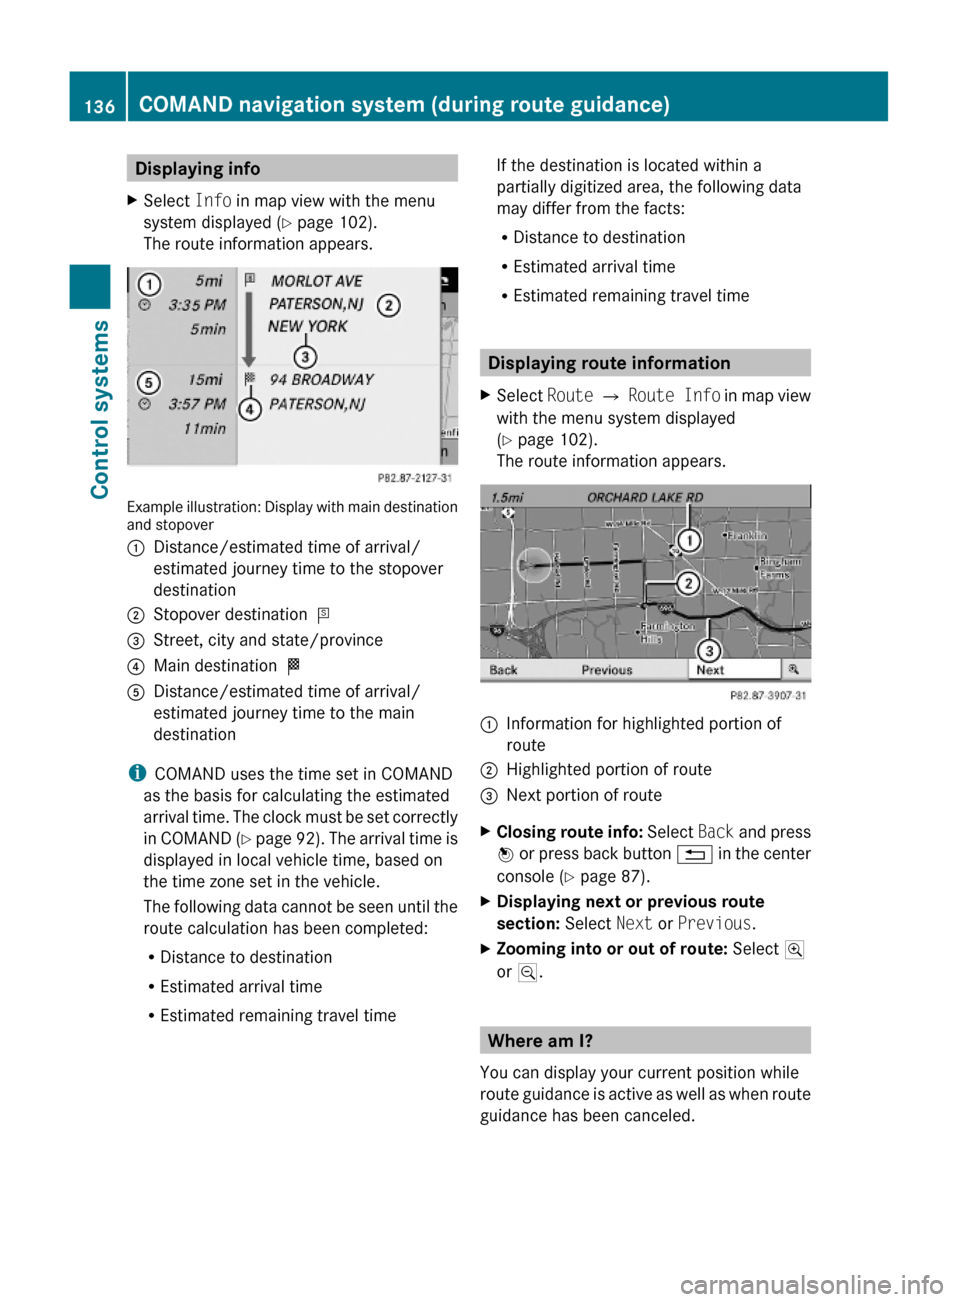
Example illustration: Display with main destinationand stopover
:Distance/estimated time of arrival/
estimated journey time to the stopover
destination
;Stopover destination P=Street, city and state/province?Main destination OADistance/estimated time of arrival/
estimated journey time to the main
destination
iCOMAND uses the time set in COMAND
as the basis for calculating the estimated
arrival time. The clock must be set correctly
in COMAND (Y page 92). The arrival time is
displayed in local vehicle time, based on
the time zone set in the vehicle.
The following data cannot be seen until the
route calculation has been completed:
RDistance to destination
REstimated arrival time
REstimated remaining travel time
If the destination is located within a
partially digitized area, the following data
may differ from the facts:
RDistance to destination
REstimated arrival time
REstimated remaining travel time
Displaying route information
XSelect Route Q Route Info in map view
with the menu system displayed
(Y page 102).
The route information appears.
:Information for highlighted portion of
route
;Highlighted portion of route=Next portion of routeXClosing route info: Select Back and press
W or press back button % in the center
console (Y page 87).
XDisplaying next or previous route
section: Select Next or Previous.
XZooming into or out of route: Select N
or M.
Where am I?
You can display your current position while
route guidance is active as well as when route
guidance has been canceled.
136COMAND navigation system (during route guidance)Control systems
221_AKB; 6; 20, en-USd2ugruen,Version: 2.11.8.12009-09-24T13:28:17+02:00 - Seite 136
Page 151 of 548
Using the Bluetooth®
interface
COMAND provides telephony via the
Bluetooth ®
interface by connecting a
Bluetooth ®
-compatible mobile phone. The
following functions can be used when a
suitable mobile phone is connected to the
Bluetooth ®
interface:
R Hands-free phone operation
R Phone book
R Reception of electronic business cards
(vCards 10
)
i For further information on suitable mobile
phones and connecting Bluetooth ®
-
enabled mobile phones to COMAND
R visit www.mbusa-mobile.com
R call the Mercedes-Benz Customer
Assistance Center at
1-800-FOR-MERCedes
(1-800-367-6372) (in the USA)
R call Customer Service at
1-800-387-0100 (in Canada)
Calls disconnected while the vehicle is
in motion
A call may be disconnected if
R there is insufficient network coverage
R you move from one transmitter/receiver
area (cell) into another and no channels are
free or the cell is full
Operating options
i The components and operating principles
of COMAND can be found on ( Y page 76).
You can operate the mobile phone using the
following:
R the keys on the mobile phone
R the COMAND telephone keypad in the
center console
R the COMAND controller
R the multifunction steering wheel
R the Voice Control System ( Y page 237)
Unless otherwise specified, the descriptions
and illustrations in this section apply to
COMAND or the telephone keypad in the
center console. Thus, in order to use the
described functions you always have to call
up the Telephone menu. The fastest way to
get to the Telephone menu is pressing
shortcut button S.
You can control other functions of the mobile
phone via the COMAND, instrument cluster
control system (Y page 230) or Voice Control
System ( Y page 237).
Caller ID
COMAND can display the telephone number
and the name of the caller, e.g. for an
incoming call and also in other menus or
displays.
For the telephone number to be displayed,
the caller must transmit his telephone
number.
This is also the case for name displays. For
this, the telephone number and the name of
the caller must also be saved in the mobile
phone book.
Functional restrictions
You will not be able to use the telephone, or
you may have to wait a while, in the following
situations:
R If the Bluetooth function in COMAND or
on the mobile phone is switched off.
R If the telephone has not yet logged into the
network.
The telephone tries to log into a network
automatically. If no network is available,
you will also not be able to make a “911”
emergency call. If you attempt to make an
10 vCards are electronic business cards used by e-mail applications, mobile phones, PDAs, etc. to exchange
contact information.COMAND telephone149Control systems221_AKB; 6; 20, en-USd2ugruen,Version: 2.11.8.12009-09-24T13:28:17+02:00 - Seite 149Z
Page 153 of 548
The following conditions must be met for a
“911” emergency call via COMAND:
RMobile phone must be switched on.
RThe corresponding mobile
communications network must be
available.
iEmergency calls may not be possible with
all telephone networks or if certain network
services and/or telephone functions are
active. Check with your local service
providers.
If you cannot make an emergency call, you
will have to initiate rescue measures yourself.
Placing a “911” emergency call using
COMAND with the mobile phone
unlocked
XPress button S to switch to telephone
mode.
XEnter 911 using the telephone keypad in
the center console.
XPress button 6 on the telephone
keypad in the center console.
or
XSelect 6 in the COMAND display and
press W for dialing to begin.
Connecting call… appears in the
COMAND display while the mobile phone
establishes the connection.
XWait until the emergency call center
answers, then describe the emergency.
iDepending on the phone type, if no SIM
card is inserted in a GSM mobile phone or
if there is no service on a CDMA mobile
phone, NO SERVICE may appear in the
COMAND display. In that case, you only can
make an emergency call on the mobile
phone itself, without the use of COMAND.
Placing a “911” emergency call with the
mobile phone locked
iIf the mobile phone is locked, you only can
make an emergency call on the mobile
phone itself, without the use of COMAND.
Bluetooth interface
Bluetooth® is a technology for wireless
exchange of data over short distances of up
to approximately 33 feet (10 m). You can
connect your mobile phone to COMAND or
exchange vCards using Bluetooth®.
Activating and deactivating Bluetooth®
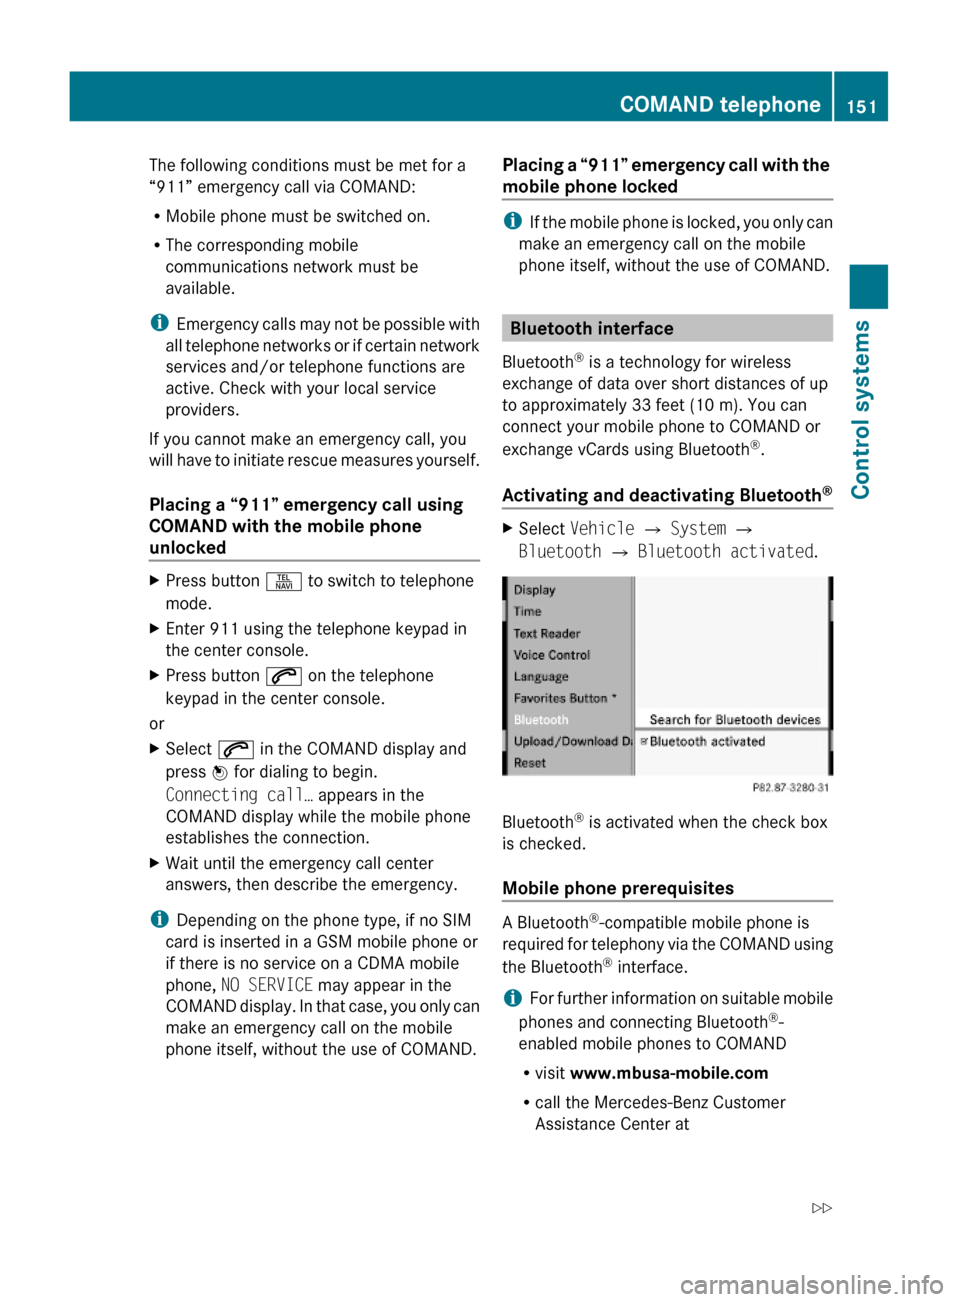
XSelect Vehicle Q System Q
Bluetooth Q Bluetooth activated.
Bluetooth® is activated when the check box
is checked.
Mobile phone prerequisites
A Bluetooth®-compatible mobile phone is
required for telephony via the COMAND using
the Bluetooth® interface.
iFor further information on suitable mobile
phones and connecting Bluetooth®-
enabled mobile phones to COMAND
Rvisit www.mbusa-mobile.com
Rcall the Mercedes-Benz Customer
Assistance Center at
COMAND telephone151Control systems221_AKB; 6; 20, en-USd2ugruen,Version: 2.11.8.12009-09-24T13:28:17+02:00 - Seite 151Z
Page 158 of 548
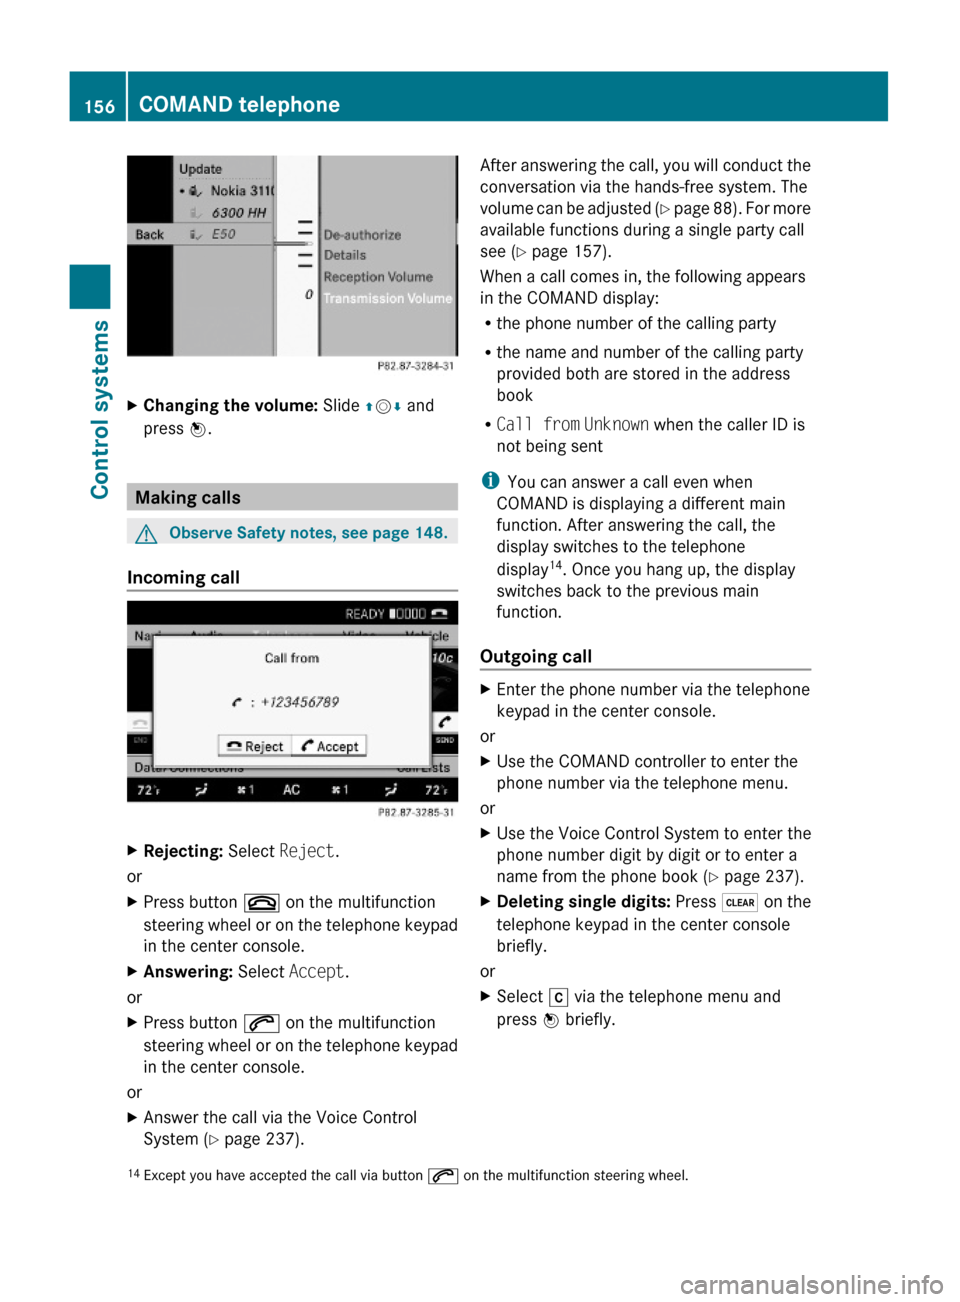
XChanging the volume: Slide ZVÆ and
press W.
Making calls
GObserve Safety notes, see page 148.
Incoming call
XRejecting: Select Reject.
or
XPress button ~ on the multifunction
steering wheel or on the telephone keypad
in the center console.
XAnswering: Select Accept.
or
XPress button 6 on the multifunction
steering wheel or on the telephone keypad
in the center console.
or
XAnswer the call via the Voice Control
System (Y page 237).
After answering the call, you will conduct the
conversation via the hands-free system. The
volume can be adjusted (Y page 88). For more
available functions during a single party call
see (Y page 157).
When a call comes in, the following appears
in the COMAND display:
Rthe phone number of the calling party
Rthe name and number of the calling party
provided both are stored in the address
book
RCall from Unknown when the caller ID is
not being sent
iYou can answer a call even when
COMAND is displaying a different main
function. After answering the call, the
display switches to the telephone
display14. Once you hang up, the display
switches back to the previous main
function.
Outgoing call
XEnter the phone number via the telephone
keypad in the center console.
or
XUse the COMAND controller to enter the
phone number via the telephone menu.
or
XUse the Voice Control System to enter the
phone number digit by digit or to enter a
name from the phone book (Y page 237).
XDeleting single digits: Press $ on the
telephone keypad in the center console
briefly.
or
XSelect r via the telephone menu and
press W briefly.14Except you have accepted the call via button 6 on the multifunction steering wheel.156COMAND telephoneControl systems
221_AKB; 6; 20, en-USd2ugruen,Version: 2.11.8.12009-09-24T13:28:17+02:00 - Seite 156