Comand reset MERCEDES-BENZ S63AMG 2010 W221 Owner's Manual
[x] Cancel search | Manufacturer: MERCEDES-BENZ, Model Year: 2010, Model line: S63AMG, Model: MERCEDES-BENZ S63AMG 2010 W221Pages: 548, PDF Size: 12.48 MB
Page 8 of 548
Break-in period .................................. 402
Bulbs see Replacing bulbs
C
CAC (Customer Assistance Center) ... 24
California retail buyers and
lessees, important notice for ............. 22
Calls (phone) .............................. 148, 230
Can holders see Cup holders
Capacities and recommended
fuel/lubricants .................................. 537
Carpets, cleaning .............................. 446
CD player ............................................ 176
Central locking
Automatic ...................................... 278
KEYLESS-GO .................................. 275
Locking/unlocking from inside ......279
SmartKey ....................................... 274
Central locking/unlocking switch ... 279
Certification label .............................. 524
Children in the vehicle
Air bags ........................................... 41
Child safety locks (rear doors) .........61
Child seat anchors – LATCH-type
(ISOFIX) ........................................... 60
Indicator lamp, front passenger
front air bag off ................................ 46
Infant and child restraint systems .... 57
ISOFIX (Child seat anchors –
LATCH-type) ..................................... 60
OCS (Occupant Classification
System) ........................................... 46
Override switch ................................ 61
Safety notes ..................................... 56
Tether anchorage points ..................59
Top tether ........................................ 59
Child safety
see Children in the vehicle
Child seat anchors – LATCH-type
(ISOFIX) see Children in the vehicle
Chrome-plated exhaust tip,
cleaning .............................................. 447
Cigarette lighters .............................. 387
Climate control system .................... 363
Air conditioning ............................. 366
Air conditioning refrigerant ............540
Air distribution ............................... 370
Air recirculation mode ...................371
Air volume ..................................... 370
Automatic mode ............................ 366
Deactivating system ......................366
Front defroster .............................. 370
Maximum cooling MAX COOL ........371
Residual heat and ventilation .........372
Temperature .................................. 367
Coat hooks ......................................... 380
Cockpit ................................................. 30
Cold tire inflation pressure .............. 430
Collapsible wheel chock ................... 450
COMAND .............................................. 76
Address book ................................. 159
Audio playback .............................. 176
AUX sockets .................................. 186
Components .................................... 77
Controller ......................................... 79
FM/AM Radio ................................ 165
Gracenote ®
Media Database .........185
HD Radio™ .................................... 167
Headphone ...................................... 82
Inserting/ejecting CDs and DVDs . 179
Introduction ..................................... 76
iPod ®
............................................. 200
Media interface .............................. 200
Music Register ............................... 196
Navigation ........................................ 95
Operating ......................................... 84
Phone book .................................... 159
Rear Seat Entertainment System ...189
Remote control (Rear Seat
Entertainment System) ....................81
Remote control (SPLITVIEW) ............81
Reset to factory settings ..................95
Satellite radio ................................ 170
SD card .......................................... 180
Shortcut buttons .............................. 77
SPLITVIEW ....................................... 90
Switching on or off ........................... 77
System settings ............................... 91
Telephone ...................................... 148
Telephone keypad ............................ 796Index221_AKB; 6; 20, en-USd2ugruen,Version: 2.11.8.12009-09-24T13:28:17+02:00 - Seite 6
Page 81 of 548
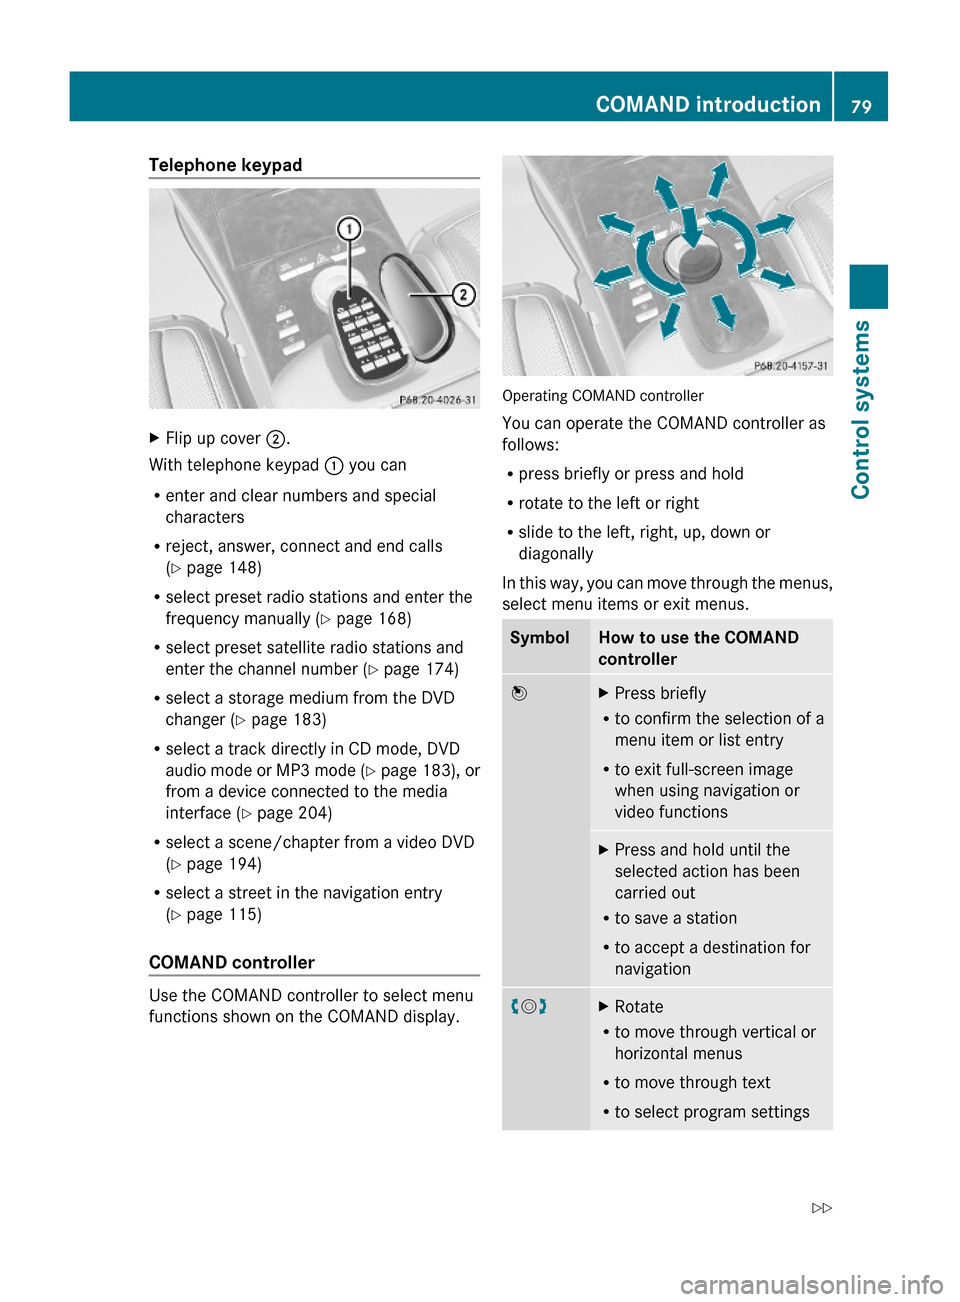
Telephone keypad XFlip up cover ;.
With telephone keypad : you can
Renter and clear numbers and special
characters
Rreject, answer, connect and end calls
(Y page 148)
Rselect preset radio stations and enter the
frequency manually (Y page 168)
Rselect preset satellite radio stations and
enter the channel number (Y page 174)
Rselect a storage medium from the DVD
changer (Y page 183)
Rselect a track directly in CD mode, DVD
audio mode or MP3 mode (Y page 183), or
from a device connected to the media
interface (Y page 204)
Rselect a scene/chapter from a video DVD
(Y page 194)
Rselect a street in the navigation entry
(Y page 115)
COMAND controller
Use the COMAND controller to select menu
functions shown on the COMAND display.
Operating COMAND controller
You can operate the COMAND controller as
follows:
Rpress briefly or press and hold
Rrotate to the left or right
Rslide to the left, right, up, down or
diagonally
In this way, you can move through the menus,
select menu items or exit menus.
SymbolHow to use the COMAND
controller
WXPress briefly
Rto confirm the selection of a
menu item or list entry
Rto exit full-screen image
when using navigation or
video functions
XPress and hold until the
selected action has been
carried out
Rto save a station
Rto accept a destination for
navigation
cVdXRotate
Rto move through vertical or
horizontal menus
Rto move through text
Rto select program settings
COMAND introduction79Control systems221_AKB; 6; 20, en-USd2ugruen,Version: 2.11.8.12009-09-24T13:28:17+02:00 - Seite 79Z
Page 94 of 548
RBluetooth Q Search for Bluetooth
Devices, Bluetooth activated. For
information on the Bluetooth® interface
see (Y page 151).
RUpload/Download Data Q Copy Data
to Storage Medium, Import Data from
Storage Medium (Y page 95)
RReset: Resetting the COMAND system to
factory settings
Display settings
Switching the display on or off
XSwitching off: Select Vehicle Q
Display OFF.
XSwitching back on: Rotate cVd or slide
ZVÆ, XVY or press W.
or
XPress button u.
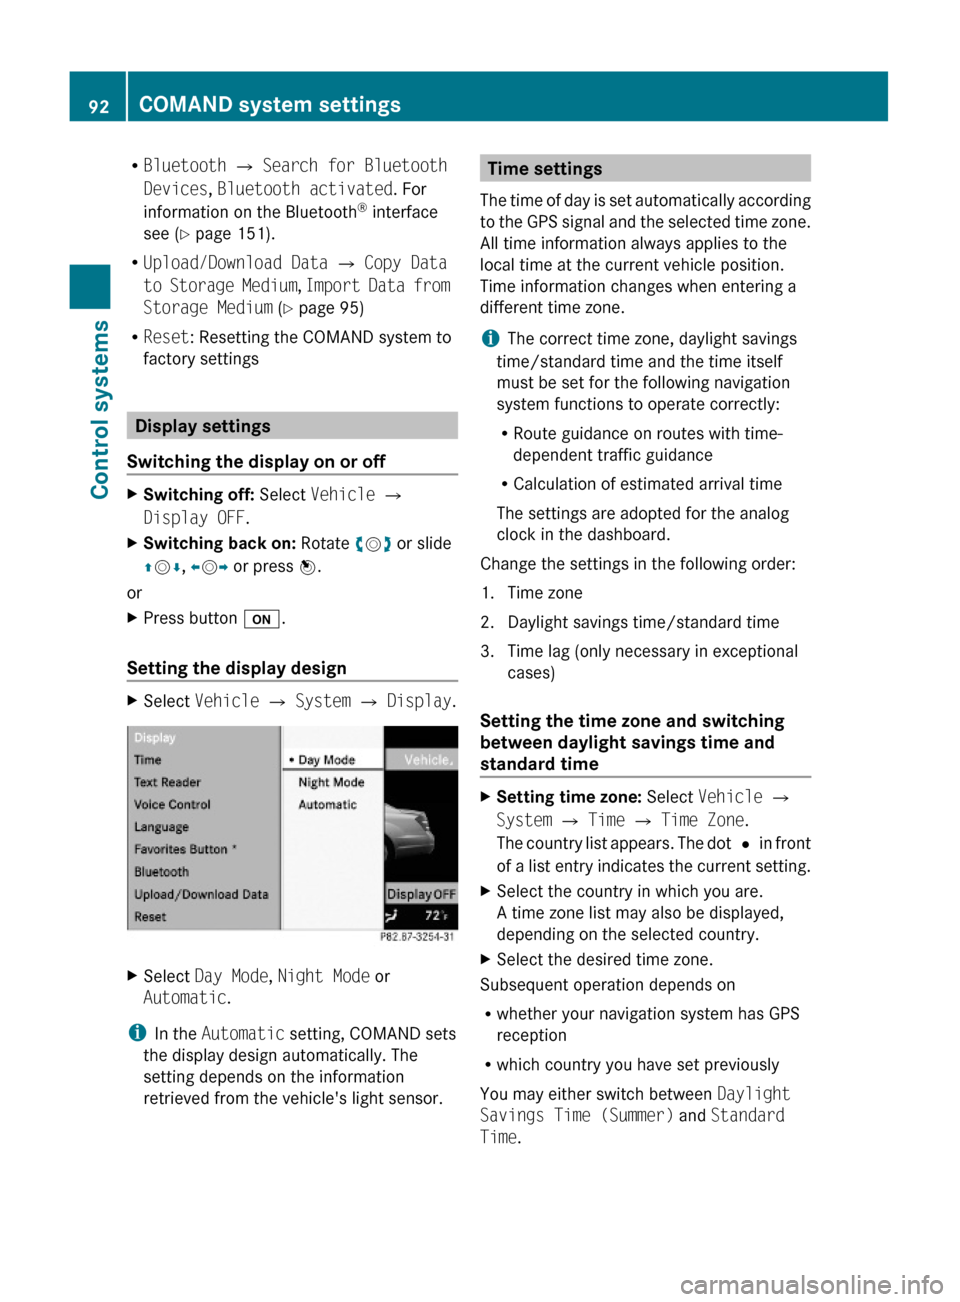
Setting the display design
XSelect Vehicle Q System Q Display.XSelect Day Mode, Night Mode or
Automatic.
iIn the Automatic setting, COMAND sets
the display design automatically. The
setting depends on the information
retrieved from the vehicle's light sensor.
Time settings
The time of day is set automatically according
to the GPS signal and the selected time zone.
All time information always applies to the
local time at the current vehicle position.
Time information changes when entering a
different time zone.
iThe correct time zone, daylight savings
time/standard time and the time itself
must be set for the following navigation
system functions to operate correctly:
RRoute guidance on routes with time-
dependent traffic guidance
RCalculation of estimated arrival time
The settings are adopted for the analog
clock in the dashboard.
Change the settings in the following order:
1. Time zone
2. Daylight savings time/standard time
3. Time lag (only necessary in exceptional
cases)
Setting the time zone and switching
between daylight savings time and
standard time
XSetting time zone: Select Vehicle Q
System Q Time Q Time Zone.
The country list appears. The dot # in front
of a list entry indicates the current setting.
XSelect the country in which you are.
A time zone list may also be displayed,
depending on the selected country.
XSelect the desired time zone.
Subsequent operation depends on
Rwhether your navigation system has GPS
reception
Rwhich country you have set previously
You may either switch between Daylight
Savings Time (Summer) and Standard
Time.
92COMAND system settings Control systems
221_AKB; 6; 20, en-USd2ugruen,Version: 2.11.8.12009-09-24T13:28:17+02:00 - Seite 92
Page 97 of 548
Upload/Download of Data
This function lets you transfer COMAND data
to a memory card or a USB storage device and
vice versa.
The following COMAND data can be
transferred:
R Navigation destination memory and last
destination
R Address book entries
R Audio/Video presets memory
R System settings
i You can use this function, for example, to
save your COMAND data and transfer them
to another vehicle.XInsert an SD card into the SD card slot
( Y page 180) or connect a USB storage
device to the built-in USB socket in the
glove box (Y page 80). The USB jack of the
optional media interface is not intended for
this purpose.XSelect Vehicle Q System Q Upload/
Download Data .XDownload: Select Copy Data to
Storage Medium Q On the Memory
Card or On USB .XSelect Start Copying .XUpload: Select Import Data from
Storage Medium Q From Memory Card
or From USB .XSelect Start Data Import .XExiting menu without data transfer:
Select Back.
Reset
i You can reset COMAND back to its
factory settings.
Among other things, all personal data are
deleted, for example
R the address book entries
R the entries in the destination memory
R the list of last destinations of the
navigation systemXSelect Vehicle Q System Q Reset .
A prompt appears asking whether you
really want to reset.XSelect Yes or No.
If you select Yes another prompt will
appear asking whether you really want to
reset.XSelect Yes or No.
If you select Yes, COMAND will be reset
and restarted.
COMAND navigation (introduction)
Safety notes
GWarning!
For safety reasons, only enter a destination
when the vehicle is stationary. When the
vehicle is in motion, a passenger should enter
the destination. Study manual and select
route before driving.
Bear in mind that at a speed of just 30 mph
(approximately 50 km/h), your vehicle is
covering a distance of 44 feet (approximately
14 m) every second.
COMAND calculates the route to the
destination without taking account of the
following, for example:
R Traffic lights
R Stop and right-of-way signs
R Parking or stopping in prohibited areas
R Lane merging
R Other road and traffic rules and regulations
R Narrow bridges
COMAND navigation (introduction)95Control systems221_AKB; 6; 20, en-USd2ugruen,Version: 2.11.8.12009-09-24T13:28:17+02:00 - Seite 95Z
Page 124 of 548
Entering a destination from the list of
last destinations
XSelect Navi Q Destination Q From
Last Destinations.
The list of last destinations appears. The
most recent destination is at the top of the
list.
XSelect desired destination.XStarting route calculation: Select Start,
see also (Y page 120).
Entering a destination from the map
iDepending on the factory settings of the
vehicle, it may not be possible to enter a
destination while the vehicle exceeds a
preset speed. As soon as the vehicles
speed drops to below the preset speed, the
function is available again.
Calling up the map
XIn the address input menu, select Map
(Y page 107).
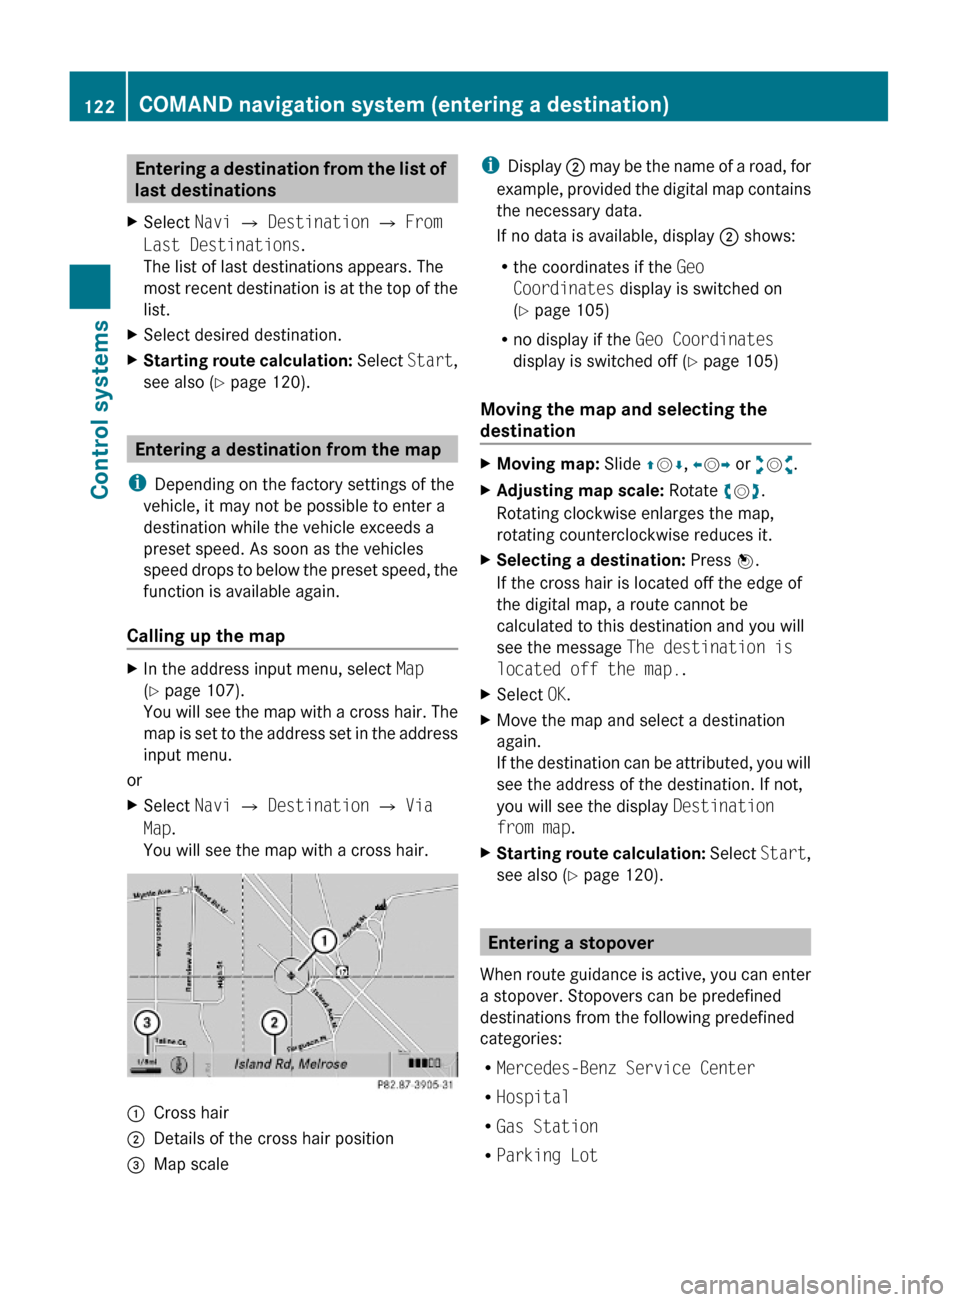
You will see the map with a cross hair. The
map is set to the address set in the address
input menu.
or
XSelect Navi Q Destination Q Via
Map.
You will see the map with a cross hair.
:Cross hair;Details of the cross hair position=Map scaleiDisplay ; may be the name of a road, for
example, provided the digital map contains
the necessary data.
If no data is available, display ; shows:
Rthe coordinates if the Geo
Coordinates display is switched on
(Y page 105)
Rno display if the Geo Coordinates
display is switched off (Y page 105)
Moving the map and selecting the
destination
XMoving map: Slide ZVÆ, XVY or aVb.XAdjusting map scale: Rotate cVd.
Rotating clockwise enlarges the map,
rotating counterclockwise reduces it.
XSelecting a destination: Press W.
If the cross hair is located off the edge of
the digital map, a route cannot be
calculated to this destination and you will
see the message The destination is
located off the map..
XSelect OK.XMove the map and select a destination
again.
If the destination can be attributed, you will
see the address of the destination. If not,
you will see the display Destination
from map.
XStarting route calculation: Select Start,
see also (Y page 120).
Entering a stopover
When route guidance is active, you can enter
a stopover. Stopovers can be predefined
destinations from the following predefined
categories:
RMercedes-Benz Service Center
RHospital
RGas Station
RParking Lot
122COMAND navigation system (entering a destination)Control systems
221_AKB; 6; 20, en-USd2ugruen,Version: 2.11.8.12009-09-24T13:28:17+02:00 - Seite 122
Page 164 of 548
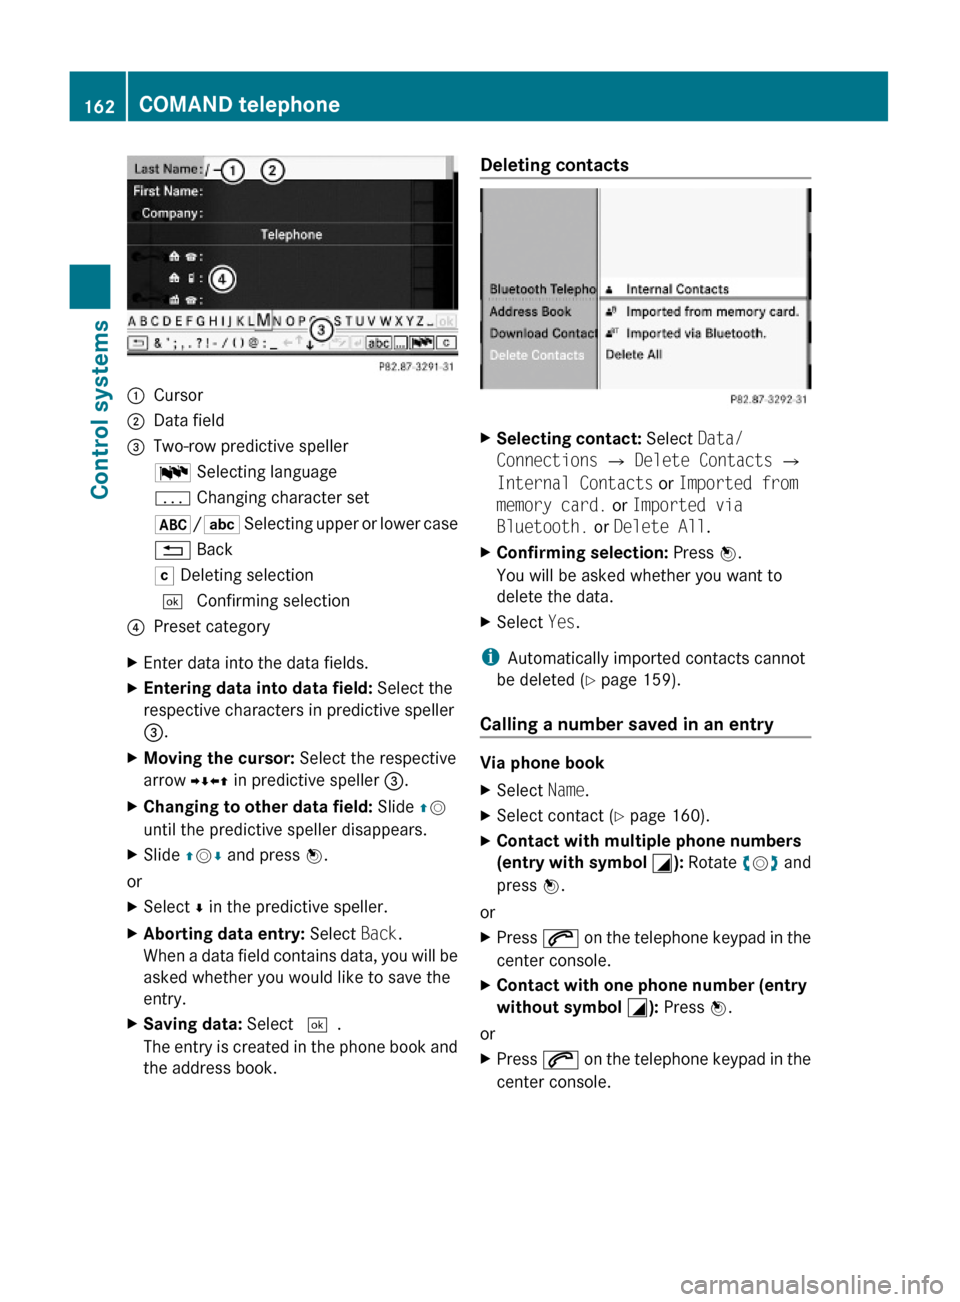
:Cursor;Data field=Two-row predictive spellerB Selecting languagep Changing character set*/E Selecting upper or lower case% BackF Deleting selection¬ Confirming selection?Preset categoryXEnter data into the data fields.XEntering data into data field: Select the
respective characters in predictive speller
=.
XMoving the cursor: Select the respective
arrow YÆXZ in predictive speller =.
XChanging to other data field: Slide ZV
until the predictive speller disappears.
XSlide ZVÆ and press W.
or
XSelect Æ in the predictive speller.XAborting data entry: Select Back.
When a data field contains data, you will be
asked whether you would like to save the
entry.
XSaving data: Select ¬.
The entry is created in the phone book and
the address book.
Deleting contacts XSelecting contact: Select Data/
Connections Q Delete Contacts Q
Internal Contacts or Imported from
memory card. or Imported via
Bluetooth. or Delete All.
XConfirming selection: Press W.
You will be asked whether you want to
delete the data.
XSelect Yes.
iAutomatically imported contacts cannot
be deleted (Y page 159).
Calling a number saved in an entry
Via phone book
XSelect Name.XSelect contact (Y page 160).XContact with multiple phone numbers
(entry with symbol G): Rotate cVd and
press W.
or
XPress 6 on the telephone keypad in the
center console.
XContact with one phone number (entry
without symbol G): Press W.
or
XPress 6 on the telephone keypad in the
center console.
162COMAND telephoneControl systems
221_AKB; 6; 20, en-USd2ugruen,Version: 2.11.8.12009-09-24T13:28:17+02:00 - Seite 162
Page 168 of 548
Radio
(except
Weather Band)
Presets
(except
Weather
Band)
Channel
(only
Weather
Band)
InfoFM or AM
or WB
SoundSave StationAutostoreChannel listProgram
Information
Switch to
FM wave
band
TrebleFrequency EntryPreset
station list
Switch to
AM wave
band
BassShow Station
Info
Switch to
Weather
Band
Balance/
Fader
ª¥Radio3D SoundActive Source
for Rear
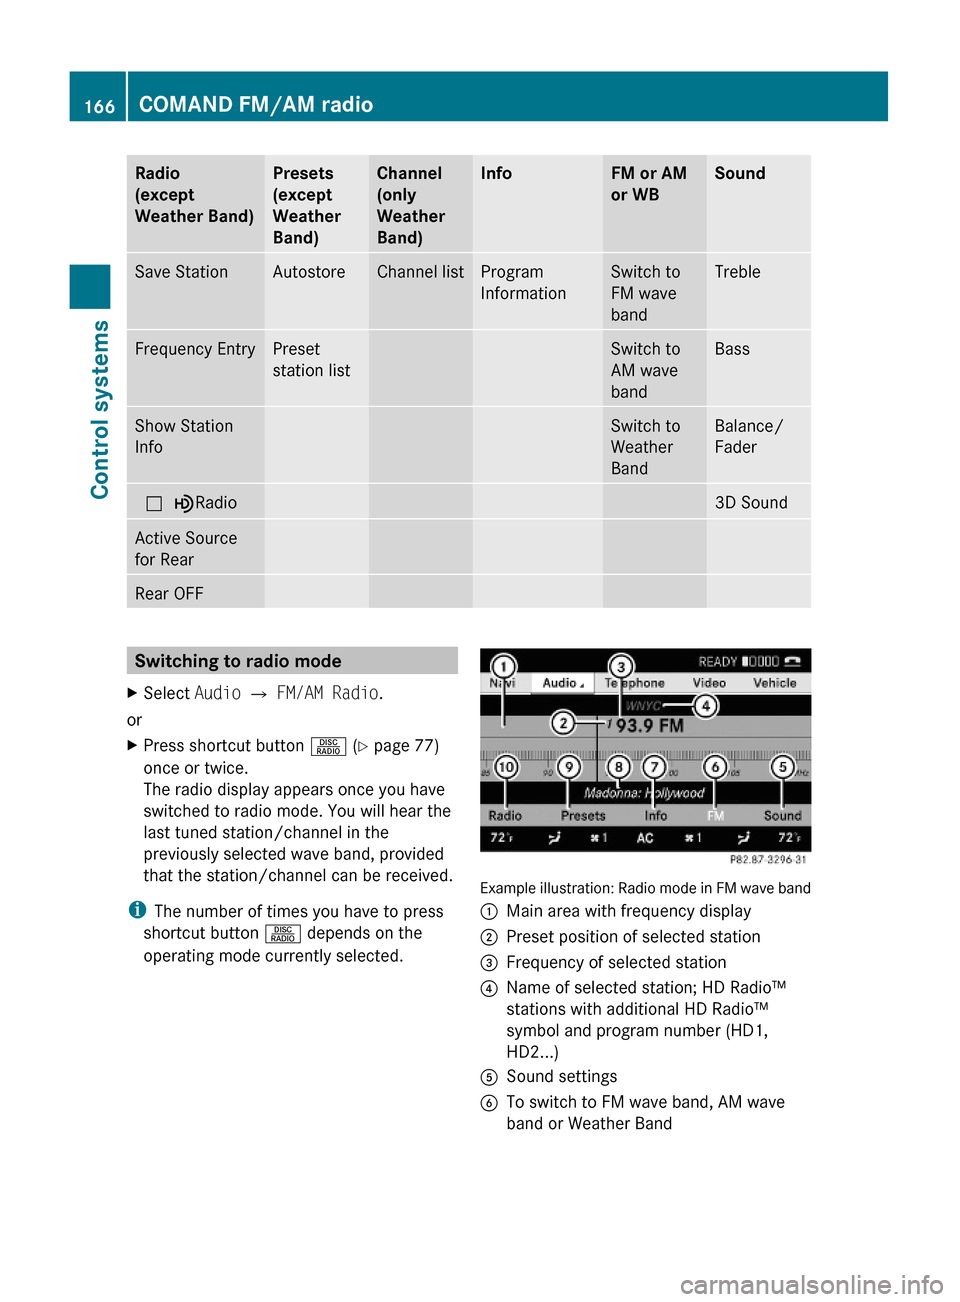
Rear OFFSwitching to radio modeXSelect Audio Q FM/AM Radio.
or
XPress shortcut button R (Y page 77)
once or twice.
The radio display appears once you have
switched to radio mode. You will hear the
last tuned station/channel in the
previously selected wave band, provided
that the station/channel can be received.
iThe number of times you have to press
shortcut button R depends on the
operating mode currently selected.
Example illustration: Radio mode in FM wave band
:Main area with frequency display;Preset position of selected station=Frequency of selected station?Name of selected station; HD Radio™
stations with additional HD Radio™
symbol and program number (HD1,
HD2...)
ASound settingsBTo switch to FM wave band, AM wave
band or Weather Band
166COMAND FM/AM radioControl systems
221_AKB; 6; 20, en-USd2ugruen,Version: 2.11.8.12009-09-24T13:28:17+02:00 - Seite 166
Page 169 of 548
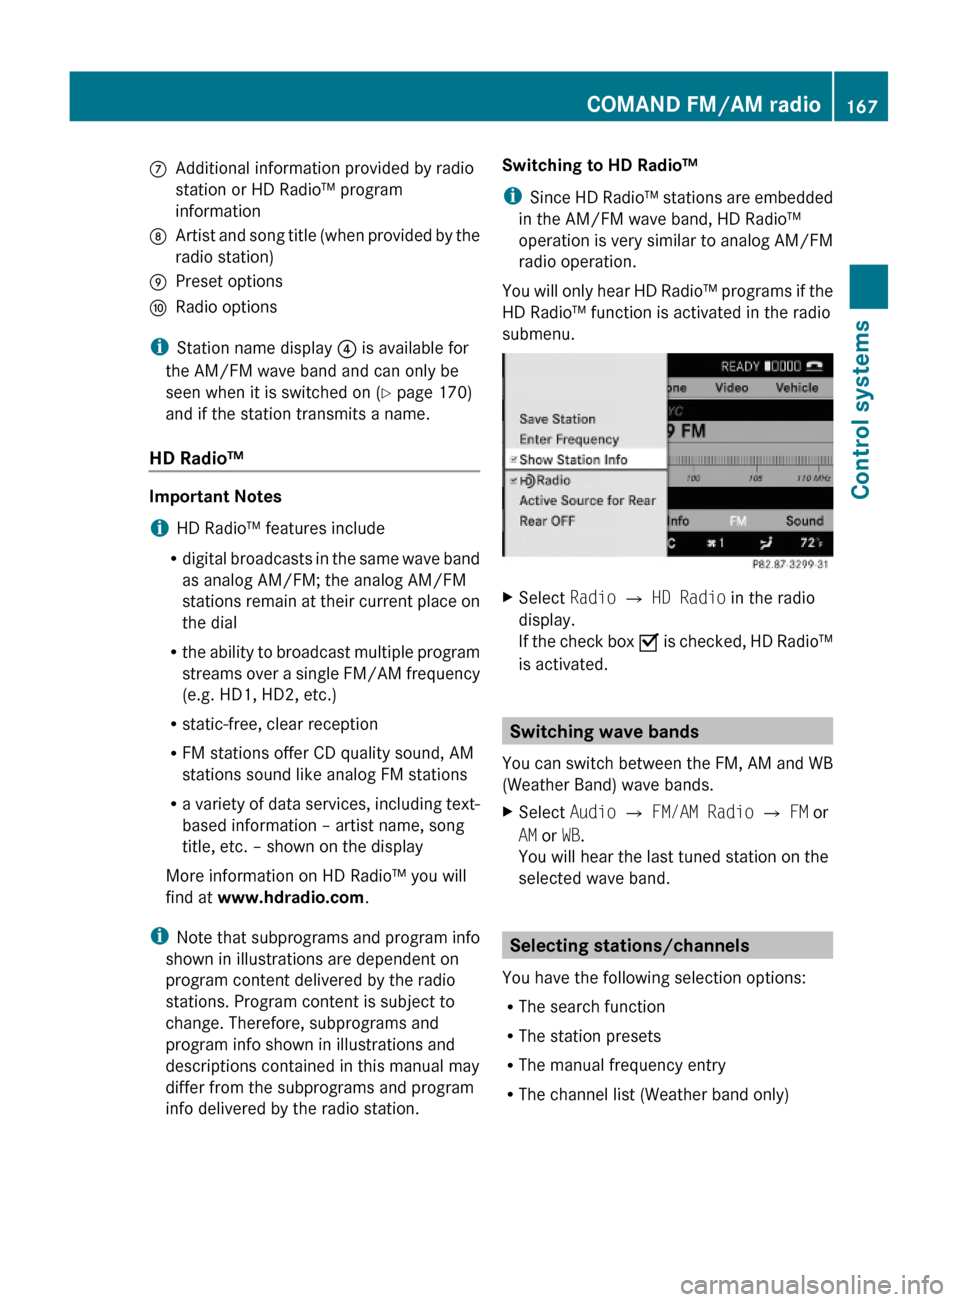
CAdditional information provided by radio
station or HD Radio™ program
information
DArtist and song title (when provided by the
radio station)
EPreset optionsFRadio options
iStation name display ? is available for
the AM/FM wave band and can only be
seen when it is switched on (Y page 170)
and if the station transmits a name.
HD Radio™
Important Notes
iHD Radio™ features include
Rdigital broadcasts in the same wave band
as analog AM/FM; the analog AM/FM
stations remain at their current place on
the dial
Rthe ability to broadcast multiple program
streams over a single FM/AM frequency
(e.g. HD1, HD2, etc.)
Rstatic-free, clear reception
RFM stations offer CD quality sound, AM
stations sound like analog FM stations
Ra variety of data services, including text-
based information – artist name, song
title, etc. – shown on the display
More information on HD Radio™ you will
find at www.hdradio.com.
iNote that subprograms and program info
shown in illustrations are dependent on
program content delivered by the radio
stations. Program content is subject to
change. Therefore, subprograms and
program info shown in illustrations and
descriptions contained in this manual may
differ from the subprograms and program
info delivered by the radio station.
Switching to HD Radio™
iSince HD Radio™ stations are embedded
in the AM/FM wave band, HD Radio™
operation is very similar to analog AM/FM
radio operation.
You will only hear HD Radio™ programs if the
HD Radio™ function is activated in the radio
submenu.
XSelect Radio £ HD Radio in the radio
display.
If the check box Ç is checked, HD Radio™
is activated.
Switching wave bands
You can switch between the FM, AM and WB
(Weather Band) wave bands.
XSelect Audio Q FM/AM Radio Q FM or
AM or WB.
You will hear the last tuned station on the
selected wave band.
Selecting stations/channels
You have the following selection options:
RThe search function
RThe station presets
RThe manual frequency entry
RThe channel list (Weather band only)
COMAND FM/AM radio167Control systems221_AKB; 6; 20, en-USd2ugruen,Version: 2.11.8.12009-09-24T13:28:17+02:00 - Seite 167Z
Page 170 of 548
Selecting stations/channels using the
search functionXSlide XV Y or rotate cV d when the main
area is selected.
Depending on the direction in which the
controller is being slid or rotated, the
system searches upward or downward and
stops at the next receivable station/
channel.
or
XPress and hold button 9 or : on the
multifunction steering wheel 24
.
Selecting stations using station presets
i This function is not available for Weather
Band.
XSelect Audio Q FM/AM Radio Q FM or
AM .XSelect Presets .
or
XPress W when the main area is selected.
The preset menu appears. The dot # in
front of a preset position indicates that the
currently selected station is saved there.XSelect station preset by rotating cV d or
sliding ZV Æ and press W.
or
XEnter a position number with the telephone
keypad using buttons ´ - Ã
( Y page 79).
or
XPress button 9 or : on the
multifunction steering wheel briefly 24
.
i Vehicles with rear multicontour seats:
Rear occupants can also select a station
using the buttons on the rear armrest
( Y page 80).
Selecting stations by entering the
frequency manually
i This function is not available for Weather
Band.
XSelect Audio Q FM/AM Radio Q FM or
AM .
Entering the frequency using the
COMAND controller
XSelect Radio Q Enter Frequency .
The menu for manual frequency entry
appears.XExiting menu without making an entry:
Press back button % in the center
console ( Y page 87).XIncreasing or decreasing number: Slide
Z V Æ or rotate cV d.
i
You can only select available frequencies.
XSelecting the next number: Slide VY.XConfirming frequency entry: Press W.
COMAND tunes in to the frequency
entered.
i If you enter a frequency which is outside
the frequency range, COMAND tunes in to
the next lowest frequency.
Entering the frequency using the
telephone keypad
XPress button à on the telephone
keypad ( Y page 79).XEnter frequency using buttons Å -
à .
COMAND tunes in to the frequency
entered.
Selecting channels using the WB
channel
i This function is only available for Weather
Band.
24 Function is only available if the Audio menu is selected in the instrument cluster.168COMAND FM/AM radioControl systems
221_AKB; 6; 20, en-USd2ugruen,Version: 2.11.8.12009-09-24T13:28:17+02:00 - Seite 168
Page 171 of 548
XSelect Audio Q FM/AM Radio Q WB
Q Channel.
or
XPress W when the main area is selected.
The channel list appears. The dot # in
front of a list entry indicates the currently
selected channel.
XSelect channel by rotating cVd or sliding
ZVÆ and press W.
iVehicles with rear multicontour seats:
Rear occupants can also select a channel
using the buttons on the rear armrest
(Y page 80).
Saving stations
iTwenty stations can be saved in each
wave band except for Weather Band.
You have the following options:
RSaving stations manually
RSaving stations using the autostore
function
Saving stations manually
Option 1
XSelect Audio Q FM/AM Radio Q FM or
AM.
XSelect Radio Q Save Station.
Option 2
XPress W when the main area is selected.
Option 3
XSelect Audio Q FM/AM Radio Q FM or
AM.
XSelect Presets.
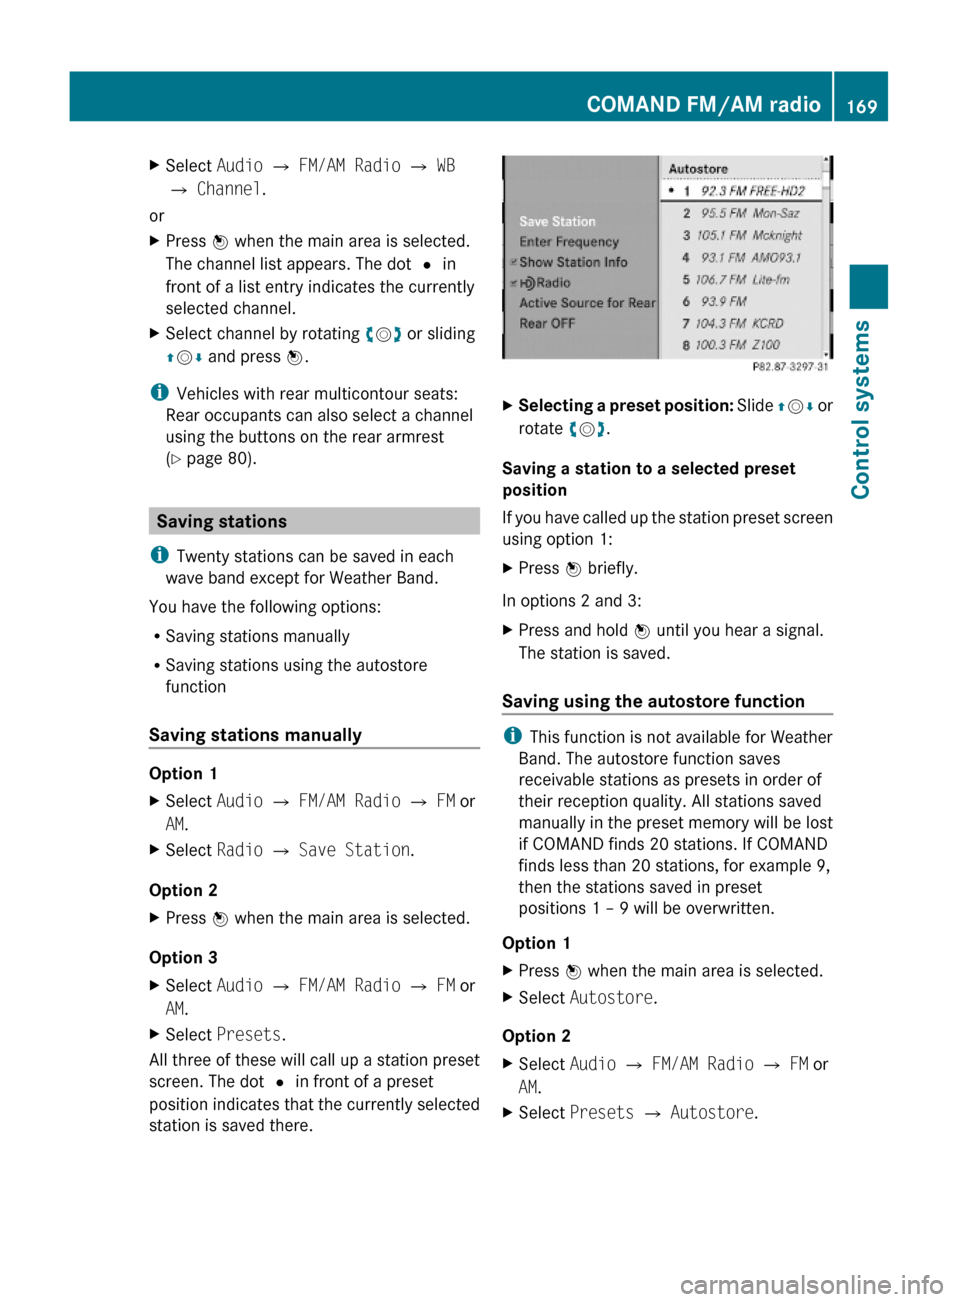
All three of these will call up a station preset
screen. The dot # in front of a preset
position indicates that the currently selected
station is saved there.
XSelecting a preset position: Slide ZVÆ or
rotate cVd.
Saving a station to a selected preset
position
If you have called up the station preset screen
using option 1:
XPress W briefly.
In options 2 and 3:
XPress and hold W until you hear a signal.
The station is saved.
Saving using the autostore function
iThis function is not available for Weather
Band. The autostore function saves
receivable stations as presets in order of
their reception quality. All stations saved
manually in the preset memory will be lost
if COMAND finds 20 stations. If COMAND
finds less than 20 stations, for example 9,
then the stations saved in preset
positions 1 – 9 will be overwritten.
Option 1
XPress W when the main area is selected.XSelect Autostore.
Option 2
XSelect Audio Q FM/AM Radio Q FM or
AM.
XSelect Presets Q Autostore.COMAND FM/AM radio169Control systems221_AKB; 6; 20, en-USd2ugruen,Version: 2.11.8.12009-09-24T13:28:17+02:00 - Seite 169Z