instrument panel MERCEDES-BENZ SL CLASS 2000 Owners Manual
[x] Cancel search | Manufacturer: MERCEDES-BENZ, Model Year: 2000, Model line: SL CLASS, Model: MERCEDES-BENZ SL CLASS 2000Pages: 297, PDF Size: 7.11 MB
Page 4 of 297

1 Contents
IntroductionProduct information .......................... 7
Operator’s manual ............................. 8
Where to find it ................................ 13
Problems with your vehicle ........... 14
Reporting Safety Defects ................ 15Instruments and controlsInstruments and controls ............... 18
Door control panel ....................... 20
Overhead control panel ............... 21
Dashboard ..................................... 22
Center console .............................. 24OperationVehicle keys ...................................... 28
Remote control with folding
master key ..................................... 28
Central locking system ................... 30
Remote control ............................. 30
Locking and unlocking ................ 31Choosing global or selective mode
on remote control ........................ 32
Opening the trunk ....................... 32
Panic button ................................. 33
Start lock-out .................................... 34
General notes on the
central locking system ............... 34
Doors ................................................. 35
Central locking switch .................... 37
Automatic central locking .......... 38
Emergency unlocking in case of
accident ........................................ 39
Trunk ................................................. 39
Trunk lid release switch ................ 40
Power windows .................................41
Antitheft alarm system ................... 42
Tow-away alarm ............................... 43
Power seats ....................................... 44
Storing position in memory ....... 46
Backrest ............................................ 48
Multicontour seats .......................... 49
Seat heater ........................................ 50
Seat belts and integrated
restraint system .......................... 52Seat belts ........................................... 52
Seat belt nonusage
warning system ............................ 53
Fastening of seat belts ................. 54
BabySmart
TM airbag deactivation
system ........................................... 58
Self-test BabySmart
TM without
special child seat installed ........ 59
Supplemental restraint
system (SRS) ................................ 59
Emergency tensioning retractor
(ETR) ............................................. 60
Airbags .............................................. 60
Front airbags ................................ 62
Side impact airbags ..................... 63
Safety guidelines for the seat belt,
emergency tensioning retractor
and airbag ..................................... 66
Infant and child
restraint systems .......................... 67
Adjusting steering column ............. 70
Storing steering column
position in memory ..................... 70
Rear view mirrors ............................ 71
Inside rear view mirror ............... 71
Page 8 of 297

5 ContentsPassenger airbag
indicator lamp ............................. 213
Practical hintsFirst aid kit ..................................... 215
Stowing things in the vehicle ...... 215
Vehicle tools .................................... 216
Vehicle jack ..................................... 217
Fuses ................................................ 218
Hood ................................................. 219
Automatic transmission
fluid level ...................................221
Checking engine oil level .............221
Coolant level ...................................223
Adding coolant ...............................224
Windshield and headlamp
washer fluid mixing ratio ........225
Wheels .............................................226
Tire replacement ............................226
Rotating wheels ..............................227
Spare wheel ....................................228
Changing wheels ...........................230
Tire inflation pressure ..................234
Battery .............................................236Battery Recycling ....................... 237
Jump starting ................................. 238
Towing the vehicle ........................ 240
Exterior lamps ............................... 242
Headlamp assembly
(Halogen) .................................... 243
Taillamp assemblies .................. 249
Changing batteries in
the remote control .................... 251
Synchronizing ............................ 252
Raising soft top manually ............ 253
Replacing wiper blade insert ...... 257
Manual release of
fuel filler flap ............................ 259
Trunk lamp ..................................... 259
Vehicle careCleaning and care
of the vehicle ............................. 261
Power washer ............................. 262
Tar stains .................................... 262
Paintwork, Painted Body
Components ................................ 262
Engine cleaning ......................... 263Vehicle washing .........................263
Ornamental moldings ................263
Headlamps, taillamps,
turn signal lenses ......................263
Window cleaning .......................264
Light alloy wheels ......................264
Instrument cluster .....................264
Steering wheel and
gear selector lever ......................264
Cup holder ...................................264
Seat belts .....................................265
Headliner, shelf behind
roll bars, and other hard
plastic trim items .......................265
Soft top .........................................265
Headliner .....................................266
Wind screen ................................266
Automatic antenna .....................266
Wiper blade .................................266
Headlamp cleaning system .......266
Leather upholstery .....................267
Plastic and rubber parts ............267
Illuminated door sill panels .....267
Page 20 of 297

17 Contents – Instruments and controls
Technical
data Instruments
and controlsOperation DrivingInstrument
cluster displayPractical hints Car care Index
Instruments and controlsInstruments and controls ............... 18
Door control panel ....................... 20
Overhead control panel ............... 21
Dashboard ..................................... 22
Center console .............................. 24
Page 22 of 297

19 Instruments and controls
Technical
data Instruments
and controlsOperation DrivingInstrument
cluster displayPractical hints Car care Index 1Door control panel, see page 20
2Overhead control panel, see page 213Dashboard, see page 22
4Center console, see page 24
Page 23 of 297

20 Instruments and controls
Technical
data Instruments
and controlsOperation DrivingInstrument
cluster displayPractical hints Car care Index
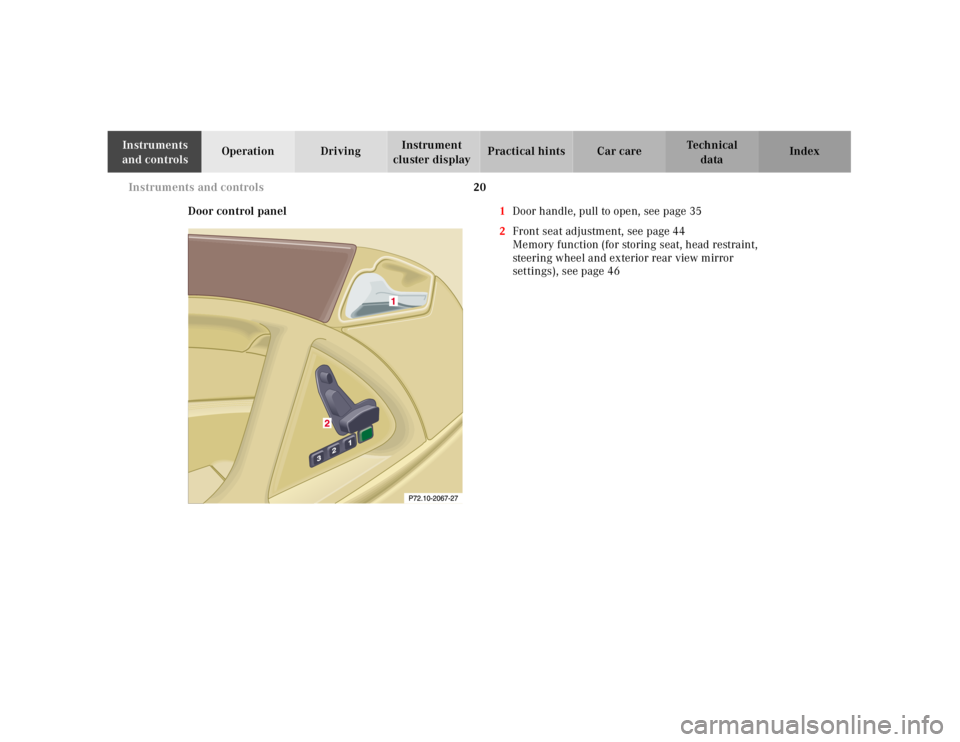
Door control panel1Door handle, pull to open, see page 35
2Front seat adjustment, see page 44
Memory function (for storing seat, head restraint,
steering wheel and exterior rear view mirror
settings), see page 46
Page 24 of 297

21 Instruments and controls
Technical
data Instruments
and controlsOperation DrivingInstrument
cluster displayPractical hints Car care Index Overhead control panel1Hands-free microphone for Tele Aid, and optional
telephone with voice recognition system
2Interior lighting, see page 120
3Tele Aid (emergency call system), see page 155
4Rear view mirror, see page 71
5 Garage door opener, see page 133
Page 61 of 297

57 Restraint systems
Technical
data Instruments
and controlsOperationDrivingInstrument
cluster displayPractical hints Car care Index
BabySmart
TM is a trademark of Siemens Automotive Corp.
• Never wear the shoulder belt under your arm,
against you neck or off your shoulder. In a
crash, your body would move too far forward.
That would increase the chance of head and
neck injuries. The belt would also apply too
much force to the ribs or abdomen, which
could severely injure internal organs such as
your liver or spleen.• Each seat belt must never be used for more
than one person at a time. Do not fasten a seat
belt around a person and another person or
other objects.• Belts should not be worn twisted. In a crash,
you wouldn’t have the full width of the belt to
manage impact forces. The twisted belt against
your body could cause injuries.• Pregnant women should also use a lap-
shoulder belt. The lap belt portion should be
positioned as low as possible on the hips to
avoid pressure on the abdomen.• Never place your feet on the instrument panel
or on the seat. Always keep both feet on the
floor in front of the seat.
Wa r n i n g !
USE CHILD RESTRAINTS PROPERLY.
Children 12 years old and under must never ride in
this vehicle, except in a Mercedes-Benz authorized
BabySmart
TM compatible child seat, which operates
with the BabySmart
TM system installed in the
vehicle to deactivate the passenger side front
airbag wh en it is properly installed. Otherwise they
will be struck by the airbag when it inflates in a
crash. If this happens, serious or fatal injury will
result.
Infants and small children must be seated in an
appropriate infant or child restraint system, which
is properly secured with the vehicle’s seat belt,
fully in accordance with the child seat
manufacturer’s instructions.A child’s risk of serious or fatal injuries is
significantly increased if the child restraints are
not properly secured in the vehicle and the child is
not properly secured in the child restraint.Adjust the passenger seat as far as possible
rearward from the dashboard when the seat is
occupied.
Page 70 of 297

66 Restraint systems
Technical
data Instruments
and controlsOperationDrivingInstrument
cluster displayPractical hints Car care Index
Safety guidelines for the seat belt, emergency
tensioning retractor and airbag
Wa r n i n g !
• Damaged seat belts or belts that were highly
stressed in an accident must be replaced and
their anchoring points must also be checked.
Use only belts installed or supplied by an
authorized Mercedes-Benz Center.• Do not pass belts over sharp edges.• Do not make any modification that could
change the effectiveness of the belts.• Airbags and ETR’s are designed to function on
a one-time-only basis. An airbag or emergency
tensioning retractor (ETR) that was activated
must be replaced.
• No modifications of any kind may be made to
any components or wiring of the “SRS”. This
includes changing or removing any component
or part of the “SRS”, the installation of
additional trim material, badges etc. over the
steering wheel hub, passenger airbag cover, or
door trim panels, and installation of additional
electrical/electronic equipment on or near
“SRS” components and wiring. Keep area
between airbags and occupants free of objects
(e.g. packages, purses, umbrellas, etc.).• An airbag system component within the
steering wheel gets hot after the airbag has
inflated. Do not touch.• Improper work on the system, including
incorrect installation and removal, can lead to
possible injury through an unintended
activation of the “SRS”.• In addition, through improper work there is
the risk of rendering the “SRS” inoperative or
causing unintended airbag deployment. Work
on the “SRS” must therefore only be performed
by an authorized Mercedes-Benz Center.
Page 88 of 297

84 Exterior lamp switch
Technical
data Instruments
and controlsOperationDrivingInstrument
cluster displayPractical hints Car care Index
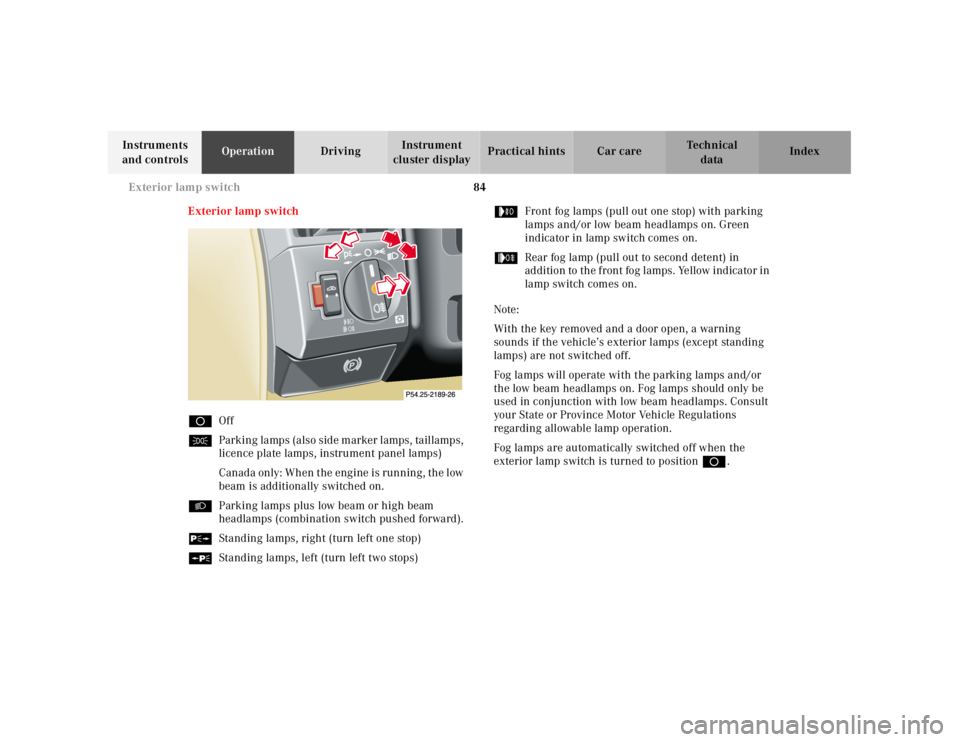
Exterior lamp switch
DOff
CParking lamps (also side marker lamps, taillamps,
licence plate lamps, instrument panel lamps)
Canada only: When the engine is running, the low
beam is additionally switched on.
BParking lamps plus low beam or high beam
headlamps (combination switch pushed forward).
ˆStanding lamps, right (turn left one stop)
‚Standing lamps, left (turn left two stops)…Front fog lamps (pull out one stop) with parking
lamps and/or low beam headlamps on. Green
indicator in lamp switch comes on.
„Rear fog lamp (pull out to second detent) in
addition to the front fog lamps. Yellow indicator in
lamp switch comes on.
Note:
With the key removed and a door open, a warning
sounds if the vehicle’s exterior lamps (except standing
lamps) are not switched off.
Fog lamps will operate with the parking lamps and/or
the low beam headlamps on. Fog lamps should only be
used in conjunction with low beam headlamps. Consult
your State or Province Motor Vehicle Regulations
regarding allowable lamp operation.
Fog lamps are automatically switched off when the
exterior lamp switch is turned to position D.
Page 103 of 297

99 Audio system
Technical
data Instruments
and controlsOperationDrivingInstrument
cluster displayPractical hints Car care Index Operating and display elements
1On/off, volume, see page 102
2Telephone mode selector, see page 113
3Seek, see page 104, 107 and 111
4Radio mode selector, see page 104
5Tune, see page 104 and 105
Fast Forward/Reverse, see page 108 and 111
6CD mode selector, see page 1107Display panel, see page 106
8Alpha-numeric keypad for
station storage and frequency entry, see page 105
optional telephone, see page 113
Tape eject, see page 107
Tape track select, see page 107
Dolby, see page 108
CD Random/repeat, see page 112
9Function button, see page 105 and 112