MERCEDES-BENZ SL CLASS 2011 Owners Manual
Manufacturer: MERCEDES-BENZ, Model Year: 2011, Model line: SL CLASS, Model: MERCEDES-BENZ SL CLASS 2011Pages: 316, PDF Size: 6.55 MB
Page 151 of 316
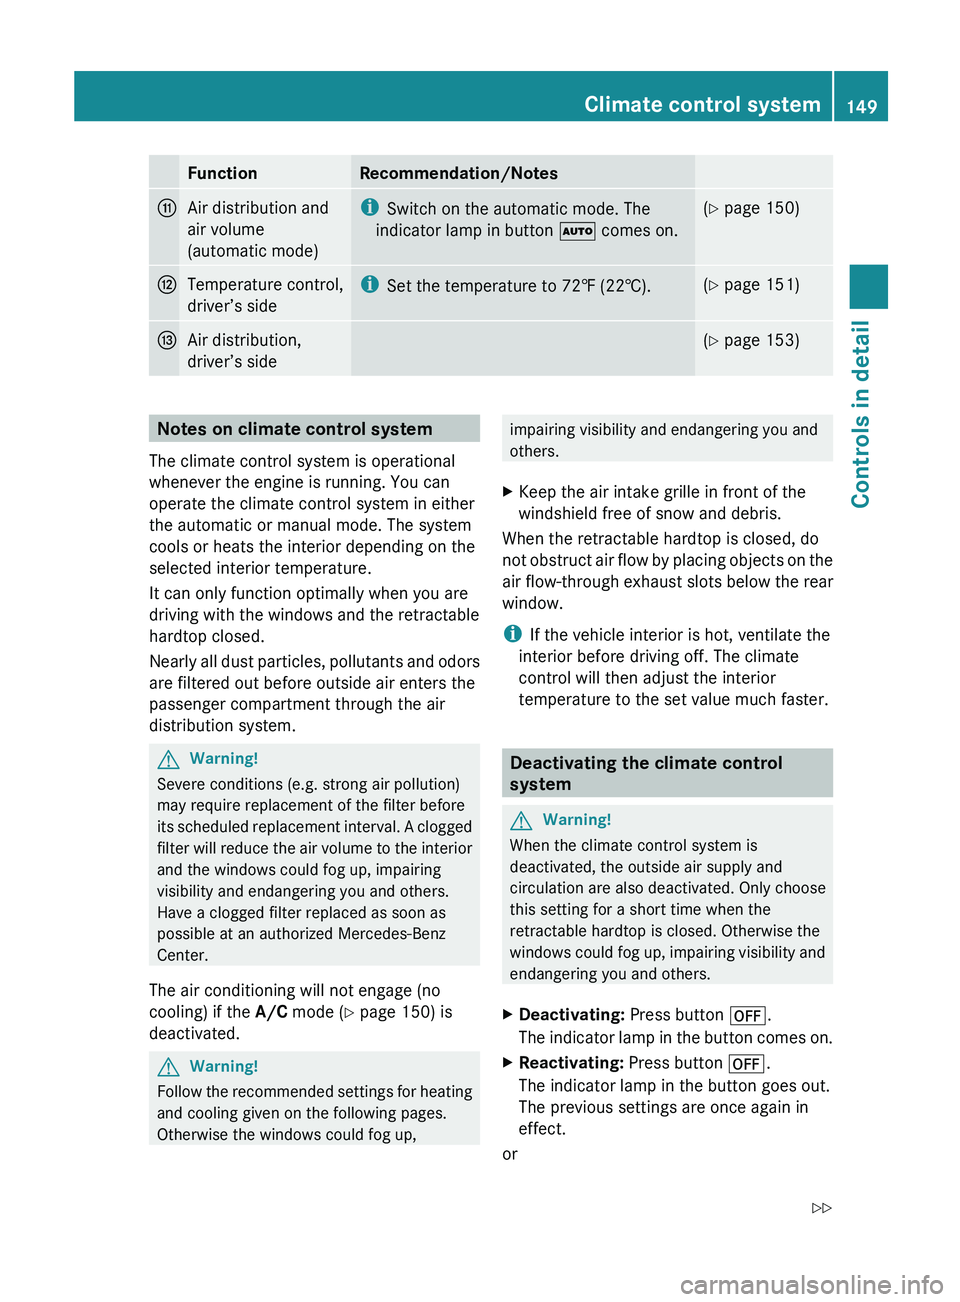
FunctionRecommendation/NotesbAir distribution and
air volume
(automatic mode)i Switch on the automatic mode. The
indicator lamp in button 005A comes on.(Y page 150)cTemperature control,
driver’s sidei Set the temperature to 72‡ (22†).(Y page 151)dAir distribution,
driver’s side( Y page 153)Notes on climate control system
The climate control system is operational
whenever the engine is running. You can
operate the climate control system in either
the automatic or manual mode. The system
cools or heats the interior depending on the
selected interior temperature.
It can only function optimally when you are
driving with the windows and the retractable
hardtop closed.
Nearly all dust particles, pollutants and odors
are filtered out before outside air enters the
passenger compartment through the air
distribution system.GWarning!
Severe conditions (e.g. strong air pollution)
may require replacement of the filter before
its scheduled replacement interval. A clogged
filter will reduce the air volume to the interior
and the windows could fog up, impairing
visibility and endangering you and others.
Have a clogged filter replaced as soon as
possible at an authorized Mercedes-Benz
Center.
The air conditioning will not engage (no
cooling) if the A/C mode ( Y page 150) is
deactivated.
GWarning!
Follow the recommended settings for heating
and cooling given on the following pages.
Otherwise the windows could fog up,
impairing visibility and endangering you and
others.XKeep the air intake grille in front of the
windshield free of snow and debris.
When the retractable hardtop is closed, do
not obstruct air flow by placing objects on the
air flow-through exhaust slots below the rear
window.
i If the vehicle interior is hot, ventilate the
interior before driving off. The climate
control will then adjust the interior
temperature to the set value much faster.
Deactivating the climate control
system
GWarning!
When the climate control system is
deactivated, the outside air supply and
circulation are also deactivated. Only choose
this setting for a short time when the
retractable hardtop is closed. Otherwise the
windows could fog up, impairing visibility and
endangering you and others.
XDeactivating: Press button 0061.
The indicator lamp in the button comes on.XReactivating: Press button 0061.
The indicator lamp in the button goes out.
The previous settings are once again in
effect.
or
Climate control system149Controls in detail230_AKB; 6; 22, en-USd2ureepe,Version: 2.11.8.12009-07-28T18:49:58+02:00 - Seite 149Z
Page 152 of 316
XTurn temperature controls 006E or 0073
( Y page 148) clockwise or
counterclockwise.
The indicator lamp in button 0061 goes out.
or
XPress button 005A.
The indicator lamp in button 005A comes
on. The air volume and air distribution are
adjusted automatically.
or
XPress button 0066.
The indicator lamp in button 0061 goes out.
Air conditioning
The air conditioning is operational while the
engine is running and cools the interior air to
the temperature set by the operator. In
addition, the air conditioning dehumidifies
the interior air and helps prevent window
fogging.
GWarning!
If you deactivate the air conditioning, the
vehicle will not be cooled when weather
conditions are warm. The windows can fog up
more quickly. Window fogging may impair
visibility and endanger you and others.
i Condensated water may drip out from
underneath the vehicle. This is normal and
not an indication of a malfunction.
The air conditioning uses the refrigerant
R134a. This refrigerant is free of CFCs which
are harmful to the ozone layer.
Deactivating
It is possible to deactivate the air
conditioning. The interior air will then no
longer be cooled or dehumidified.
XPress button 0058.
The indicator lamp in the button goes out.
The cooling function switches off after a
short delay.Activating
Moist air can fog up the windows. You can
dehumidify the interior air with the air
conditioning.
XPress button 0058.
The indicator lamp in the button comes on.
Automatic mode
Air distribution and air volume can be
adjusted automatically by the climate control
system. You can also adjust the settings for
air distribution and air volume manually.
When operating the climate control system in
automatic mode, the interior air temperature,
air volume and air distribution are adjusted
automatically.
In automatic mode, cooling with
dehumidification is switched on. This function
can be switched off if necessary.
GWarning!
If you deactivate the air conditioning, the
vehicle will not be cooled when weather
conditions are warm. The windows can fog up
more quickly. Window fogging may impair
visibility and endanger you and others.
XSet the desired temperature
( Y page 151).XActivating: Press button 005A.
The indicator lamp in the button comes on.
The air volume and air distribution are
adjusted automatically.XDeactivating: Press button 005A.
The indicator lamp in the button goes out.
The blower will run at speed setting 3. The
air flows through the center and side air
vents.
or
XPress one button 0056.
The indicator lamp in button 005A goes out.
The climate control settings for the
respective side of the passenger
compartment is adjusted manually.150Climate control systemControls in detail
230_AKB; 6; 22, en-USd2ureepe,Version: 2.11.8.12009-07-28T18:49:58+02:00 - Seite 150
Page 153 of 316
orXTurn air volume control \000
Page 154 of 316
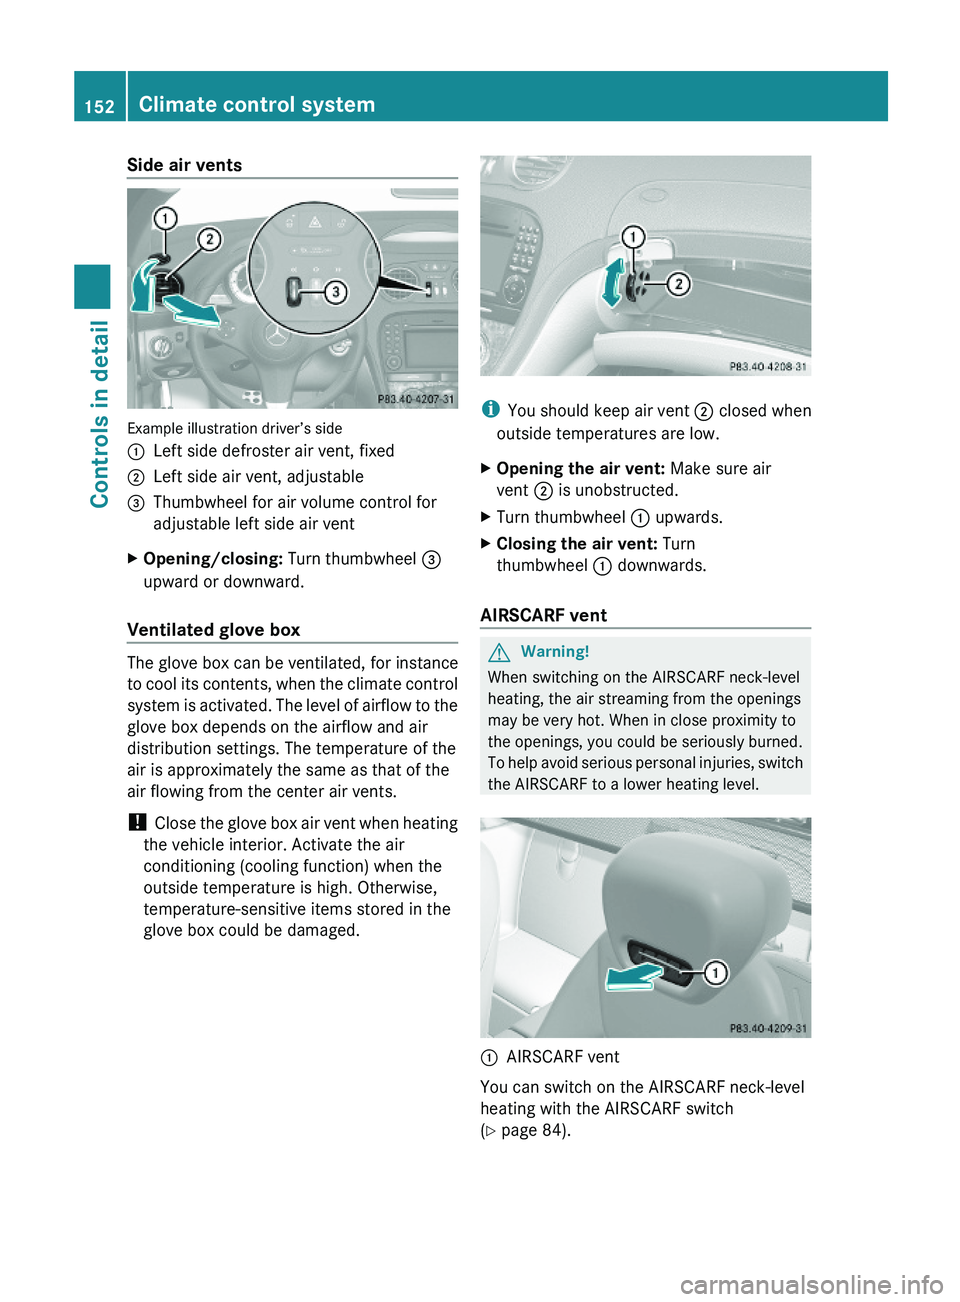
Side air vents
Example illustration driver’s side
\000FLeft side defroster air vent, fixed\000GLeft side air vent, adjustable\000
Page 155 of 316
Adjusting air distribution
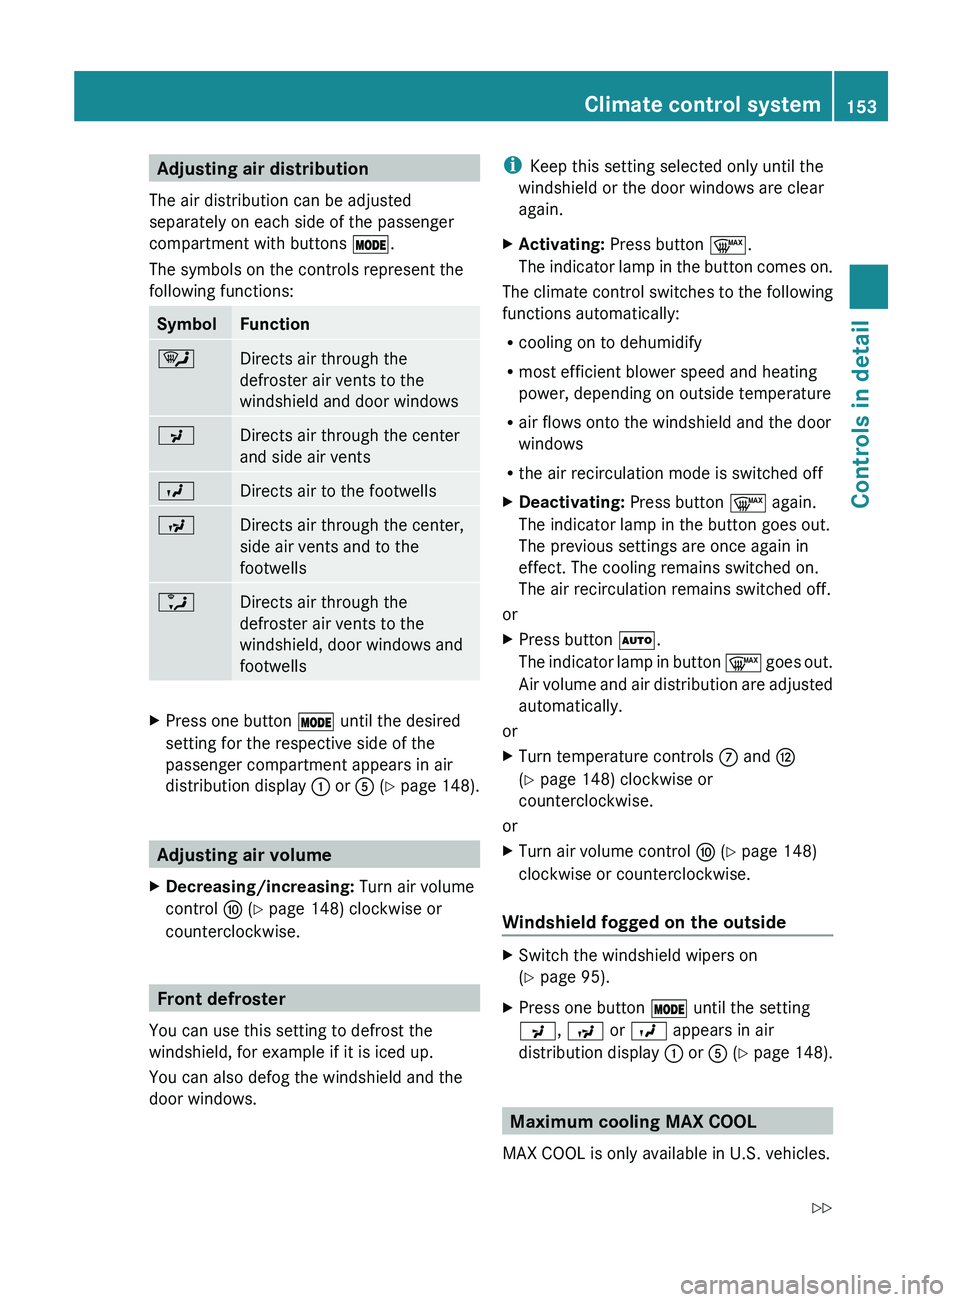
The air distribution can be adjusted
separately on each side of the passenger
compartment with buttons 0056.
The symbols on the controls represent the
following functions:SymbolFunction0063Directs air through the
defroster air vents to the
windshield and door windows009EDirects air through the center
and side air vents009DDirects air to the footwells009CDirects air through the center,
side air vents and to the
footwells0088Directs air through the
defroster air vents to the
windshield, door windows and
footwellsXPress one button 0056 until the desired
setting for the respective side of the
passenger compartment appears in air
distribution display 0046 or 0086 (Y page 148).
Adjusting air volume
XDecreasing/increasing: Turn air volume
control 0071 (Y page 148) clockwise or
counterclockwise.
Front defroster
You can use this setting to defrost the
windshield, for example if it is iced up.
You can also defog the windshield and the
door windows.
i Keep this setting selected only until the
windshield or the door windows are clear
again.XActivating: Press button 0066.
The indicator lamp in the button comes on.
The climate control switches to the following
functions automatically:
R cooling on to dehumidify
R most efficient blower speed and heating
power, depending on outside temperature
R air flows onto the windshield and the door
windows
R the air recirculation mode is switched off
XDeactivating: Press button 0066 again.
The indicator lamp in the button goes out.
The previous settings are once again in
effect. The cooling remains switched on.
The air recirculation remains switched off.
or
XPress button 005A.
The indicator lamp in button 0066 goes out.
Air volume and air distribution are adjusted
automatically.
or
XTurn temperature controls 006E and 0073
( Y page 148) clockwise or
counterclockwise.
or
XTurn air volume control 0071 (Y page 148)
clockwise or counterclockwise.
Windshield fogged on the outside
XSwitch the windshield wipers on
( Y page 95).XPress one button 0056 until the setting
009E , 009C or 009D appears in air
distribution display 0046 or 0086 (Y page 148).
Maximum cooling MAX COOL
MAX COOL is only available in U.S. vehicles.
Climate control system153Controls in detail230_AKB; 6; 22, en-USd2ureepe,Version: 2.11.8.12009-07-28T18:49:58+02:00 - Seite 153Z
Page 156 of 316
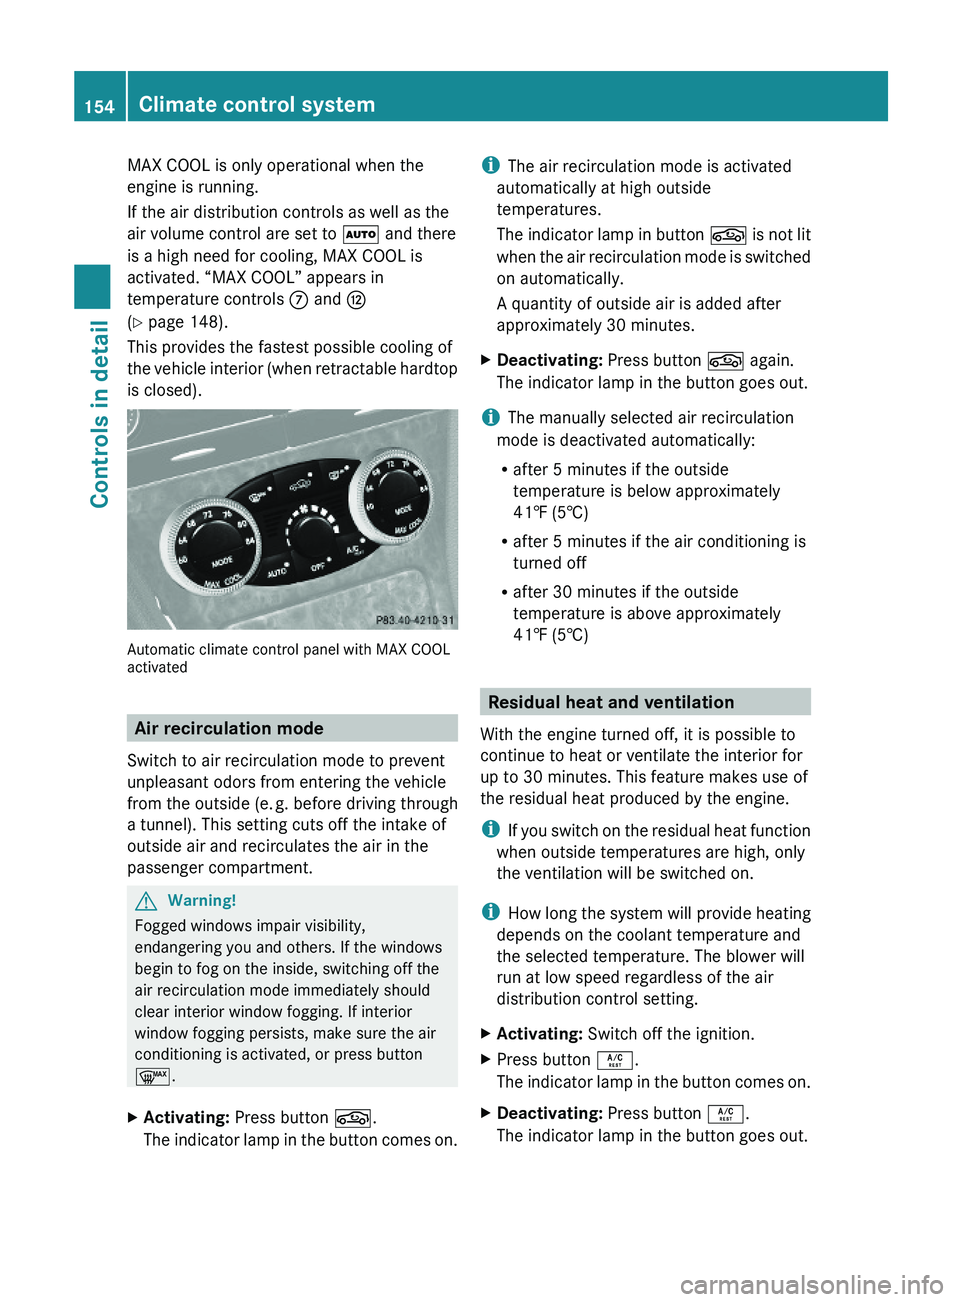
MAX COOL is only operational when the
engine is running.
If the air distribution controls as well as the
air volume control are set to \000Z and there
is a high need for cooling, MAX COOL is
activated. “MAX COOL” appears in
temperature controls \000n and \000s
(Y page 148).
This provides the fastest possible cooling of
the vehicle interior (when retractable hardtop
is closed).
Automatic climate control panel with MAX COOLactivated
Air recirculation mode
Switch to air recirculation mode to prevent
unpleasant odors from entering the vehicle
from the outside (e. g. before driving through
a tunnel). This setting cuts off the intake of
outside air and recirculates the air in the
passenger compartment.
GWarning!
Fogged windows impair visibility,
endangering you and others. If the windows
begin to fog on the inside, switching off the
air recirculation mode immediately should
clear interior window fogging. If interior
window fogging persists, make sure the air
conditioning is activated, or press button
\000f.
XActivating: Press button \000t.
The indicator lamp in the button comes on.
iThe air recirculation mode is activated
automatically at high outside
temperatures.
The indicator lamp in button \000t is not lit
when the air recirculation mode is switched
on automatically.
A quantity of outside air is added after
approximately 30 minutes.
XDeactivating: Press button \000t again.
The indicator lamp in the button goes out.
iThe manually selected air recirculation
mode is deactivated automatically:
Rafter 5 minutes if the outside
temperature is below approximately
41‡ (5†)
Rafter 5 minutes if the air conditioning is
turned off
Rafter 30 minutes if the outside
temperature is above approximately
41‡ (5†)
Residual heat and ventilation
With the engine turned off, it is possible to
continue to heat or ventilate the interior for
up to 30 minutes. This feature makes use of
the residual heat produced by the engine.
iIf you switch on the residual heat function
when outside temperatures are high, only
the ventilation will be switched on.
iHow long the system will provide heating
depends on the coolant temperature and
the selected temperature. The blower will
run at low speed regardless of the air
distribution control setting.
XActivating: Switch off the ignition.XPress button \000X.
The indicator lamp in the button comes on.
XDeactivating: Press button \000X.
The indicator lamp in the button goes out.
154Climate control systemControls in detail
230_AKB; 6; 22, en-USd2ureepe,Version: 2.11.8.12009-07-28T18:49:58+02:00 - Seite 154
Page 157 of 316
The residual heat is deactivated
automatically:
R when the ignition is switched on
R after approximately 30 minutes
R if the battery voltage drops
Rear window defroster
GWarning!
Any accumulation of snow and ice should be
removed from the rear window before driving.
Visibility could otherwise be impaired,
endangering you and others.
The rear window defroster uses a large
amount of power. To keep the battery drain
to a minimum, switch off the defroster as
soon as the rear window is clear. The
defroster is switched off automatically after
some time of operation depending on the
outside temperature.
XSwitch on the ignition.XSwitching on: Press button 006E.
The indicator lamp in the button comes on.
! The rear window defroster cannot be
switched on when the retractable hardtop
is open. The indicator lamp will start
flashing if the hardtop is open.
R Close the retractable hardtop.
The rear window defroster can then be
switched on.
XSwitching off: Press button 006E again.
The rear window defroster switches off when
the battery voltage is too low. The indicator
lamp in button 006E flashes. Too many
electrical consumers may be operating
simultaneously.
XSwitch off consumers that are currently not
needed if required.Retractable hardtop
Safety notes
For safety reasons, the retractable hardtop
can only be opened and closed when the
vehicle is standing still.
GObserve Safety notes, see page 51.GWarning!
To prevent possible accidents, only drive the
vehicle with the retractable hardtop either
completely closed and locked, or fully lowered
into its storage compartment.
If the retractable hardtop does not completely
open or close, the roof hydraulics will lose
pressure and the retractable hardtop is
lowered
R after approximately 7 minutes when the
ignition is switched on
R after approximately 15 seconds when the
ignition is switched off
Shortly before the retractable hardtop is
lowered, a warning will sound. In the
multifunction display you will see 0059 and
the message Retractable Roof Lowering .
Properly lock the retractable hardtop before
continuing to drive. Otherwise, the unlocked
hardtop could open while the vehicle is in
motion and cause you to lose control of the
vehicle. You or others could be injured as a
result.
GWarning!
Before operating the retractable hardtop,
make sure there is no danger of anyone being
injured by the moving parts (retractable
hardtop, roof frame, and trunk lid).
Hands must never be placed near the roof
frame, upper windshield area, hardtop, shelf
behind roll bars, or trunk lid while the
retractable hardtop is being raised or
lowered. Serious personal injury may occur.
If potential danger exists, release the
retractable hardtop switch or button 0036 or
Retractable hardtop155Controls in detail230_AKB; 6; 22, en-USd2ureepe,Version: 2.11.8.12009-07-28T18:49:58+02:00 - Seite 155Z
Page 158 of 316
\0007 on the SmartKey. This immediately
interrupts the raising or lowering procedure.
You then can operate the retractable hardtop
switch or press button \0006 or \0007 on the
SmartKey to raise or lower the retractable
hardtop away from the danger zone
! Never sit or place heavy objects on the
rear shelf. Doing so could cause damage to
the retractable hardtop and the rear shelf.
! Please keep in mind that weather
conditions can sometimes change rapidly.
Make sure to close the retractable hardtop
when leaving the vehicle. If water enters
the vehicle interior, vehicle electronics
could be damaged which is not covered by
the Mercedes-Benz Limited Warranty.
! When opening and closing the retractable
hardtop, make sure
Rthere is sufficient clearance for the
retractable hardtop to move up and for
the trunk lid to move back
Rthe luggage cover is installed, extended
and closed
Rthe trunk is loaded only to the height of
the luggage cover
Rthe luggage/cargo does not push up the
closed luggage cover
Rthe trunk lid is closed
Rthe outside temperature is above +5‡
(-15†)
Otherwise the retractable hardtop and
trunk as well as other parts of the vehicle
could be damaged.
Opening and closing
With the retractable hardtop switch
GObserve Safety notes, see page 155.XEngage the parking brake.XClose the luggage cover (Y page 158).XClose the trunk lid.XSwitch on the ignition.
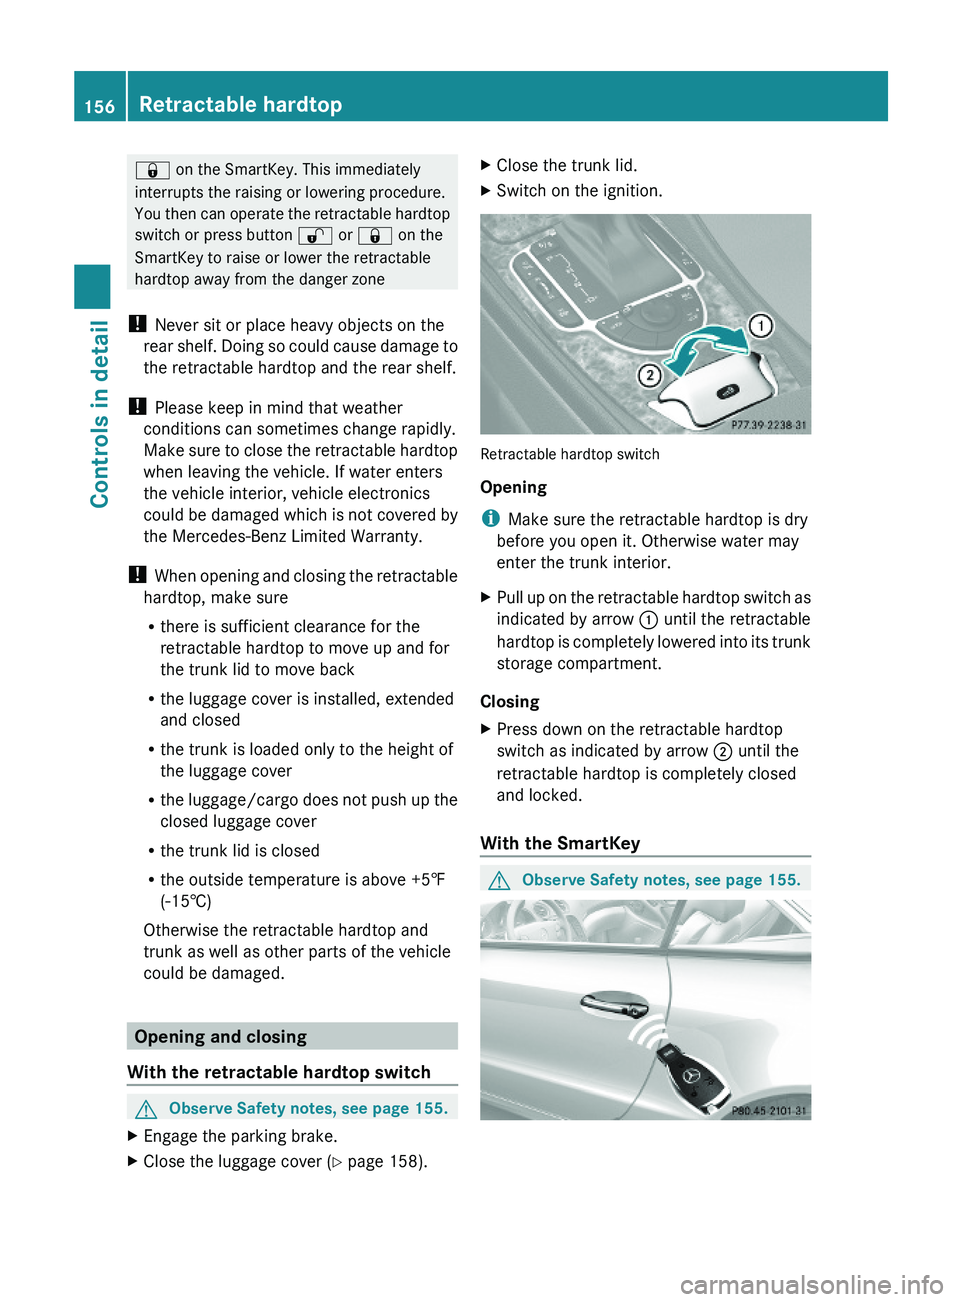
Retractable hardtop switch
Opening
iMake sure the retractable hardtop is dry
before you open it. Otherwise water may
enter the trunk interior.
XPull up on the retractable hardtop switch as
indicated by arrow \000F until the retractable
hardtop is completely lowered into its trunk
storage compartment.
Closing
XPress down on the retractable hardtop
switch as indicated by arrow \000G until the
retractable hardtop is completely closed
and locked.
With the SmartKey
GObserve Safety notes, see page 155.156Retractable hardtopControls in detail
230_AKB; 6; 22, en-USd2ureepe,Version: 2.11.8.12009-07-28T18:49:58+02:00 - Seite 156
Page 159 of 316
XClose the luggage cover (Y page 158).XClose the trunk lid.XAim the transmitter eye at an outside door
handle.
The SmartKey must be in close proximity to
the outside door handle.
Opening (Summer opening feature)
i Make sure the retractable hardtop is dry
before you open it. Otherwise water may
enter the trunk interior.
XPress and hold button 0036 until the
retractable hardtop is completely open.
The seat ventilation for the driver’s seat
switches on and the rear side windows also
open.XRelease button 0036 to interrupt the
opening procedure.XPress and hold button 0036 once more to
open the door windows.
Closing (Convenience closing feature)
XPress and hold button 0037 until the
retractable hardtop is completely closed.
All currently open windows also close.XRelease button 0037 to interrupt the
closing procedure.
Locking
GObserve Safety notes, see page 155.
The retractable hardtop is not fully closed and
locked or not fully opened and locked if
R the message 0059 Retractable Roof
In Operation appears in the
multifunction display
R a warning sounds for 10 seconds when
driving off or while driving
If the retractable hardtop is not properly
locked, lock it as follows.
Unlocked status noticed when stoppedXSwitch on the ignition.XTo lock the retractable hardtop in its fully
closed position, press down on the
retractable hardtop switch ( Y page 156)
until the retractable hardtop is fully closed.
or
XTo lock the retractable hardtop in its fully
opened position, pull up on the retractable
hardtop switch ( Y page 156) until the
retractable hardtop is fully opened.
Unlocked status noticed while driving
GWarning!
Stop the vehicle in a safe location or as soon
as it is safe to do so and lock the retractable
hardtop before continuing to drive. You could
otherwise endanger yourself and others.
XStop the vehicle in a safe location or as
soon as it is safe to do so.XLeave the ignition switched on.XTo lock the retractable hardtop in its fully
closed position, press down on the
retractable hardtop switch ( Y page 156)
until the retractable hardtop is fully closed.
or
XTo lock the retractable hardtop in its fully
opened position, pull up on the retractable
hardtop switch ( Y page 156) until the
retractable hardtop is fully opened.
Wind screen
GWarning!
The wind screen can restrict the driver’s
vision to the rear of the vehicle. To prevent a
possible accident when visibility is limited
(e.g. in darkness), the upper part of the wind
screen should be folded back.
The wind screen deflects drafts away from the
driver and passenger when the retractable
hardtop is lowered.
Retractable hardtop157Controls in detail230_AKB; 6; 22, en-USd2ureepe,Version: 2.11.8.12009-07-28T18:49:58+02:00 - Seite 157Z
Page 160 of 316
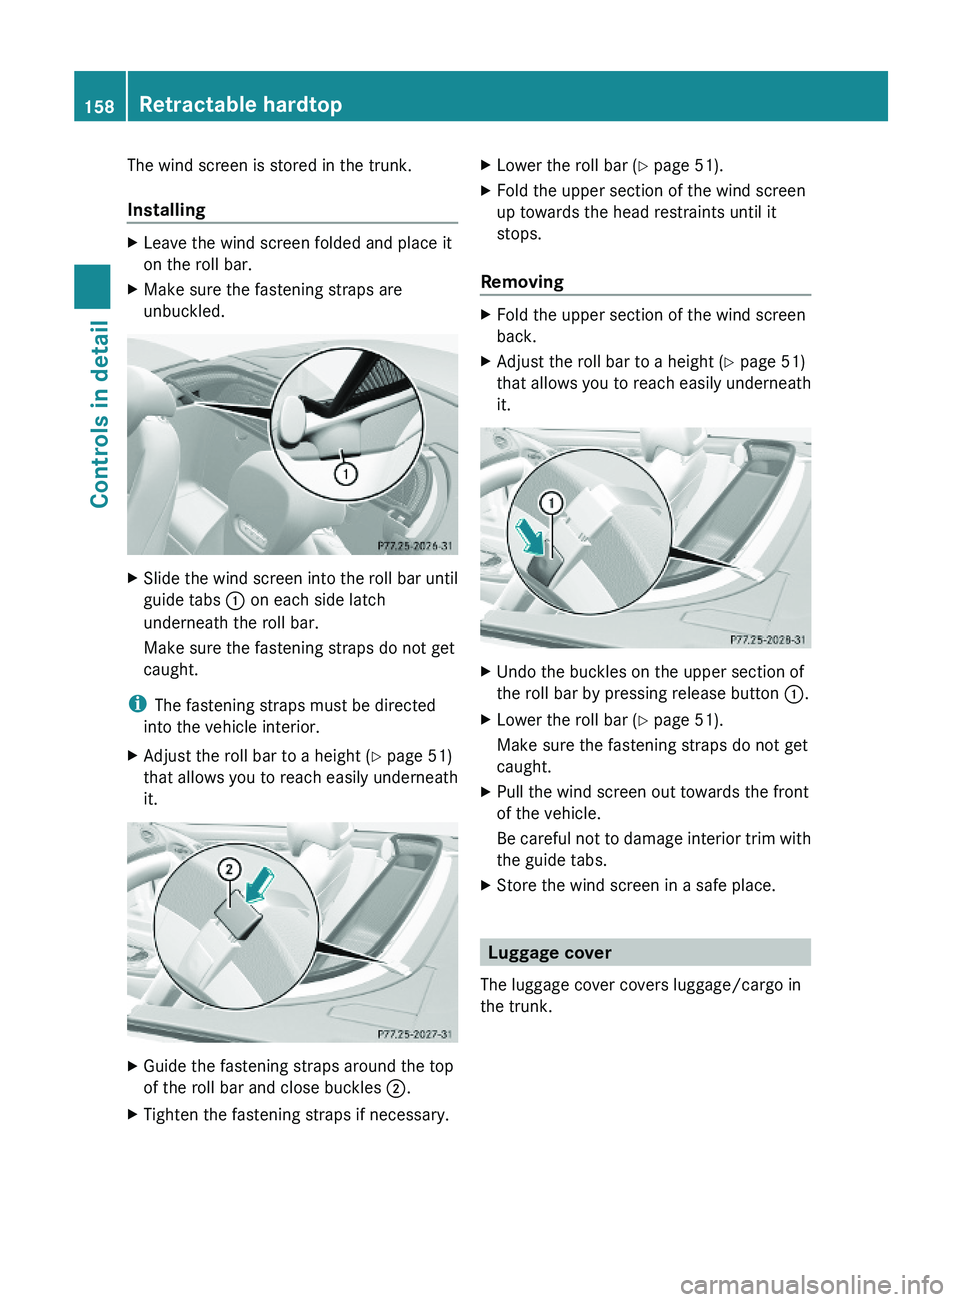
The wind screen is stored in the trunk.
Installing
XLeave the wind screen folded and place it
on the roll bar.
XMake sure the fastening straps are
unbuckled.
XSlide the wind screen into the roll bar until
guide tabs \000F on each side latch
underneath the roll bar.
Make sure the fastening straps do not get
caught.
iThe fastening straps must be directed
into the vehicle interior.
XAdjust the roll bar to a height (Y page 51)
that allows you to reach easily underneath
it.
XGuide the fastening straps around the top
of the roll bar and close buckles \000G.
XTighten the fastening straps if necessary.XLower the roll bar (Y page 51).XFold the upper section of the wind screen
up towards the head restraints until it
stops.
Removing
XFold the upper section of the wind screen
back.
XAdjust the roll bar to a height (Y page 51)
that allows you to reach easily underneath
it.
XUndo the buckles on the upper section of
the roll bar by pressing release button \000F.
XLower the roll bar (Y page 51).
Make sure the fastening straps do not get
caught.
XPull the wind screen out towards the front
of the vehicle.
Be careful not to damage interior trim with
the guide tabs.
XStore the wind screen in a safe place.
Luggage cover
The luggage cover covers luggage/cargo in
the trunk.
158Retractable hardtopControls in detail
230_AKB; 6; 22, en-USd2ureepe,Version: 2.11.8.12009-07-28T18:49:58+02:00 - Seite 158