stop start MERCEDES-BENZ SL CLASS 2011 Owner's Manual
[x] Cancel search | Manufacturer: MERCEDES-BENZ, Model Year: 2011, Model line: SL CLASS, Model: MERCEDES-BENZ SL CLASS 2011Pages: 316, PDF Size: 6.55 MB
Page 106 of 316
vehicle is stopped. Otherwise the
automatic transmission could be damaged.
iShifting the automatic transmission out of
park position P is only possible with the
brake pedal depressed.
Only depressing the brake pedal releases
the gear selector lever lock.
iThe current gear selector lever position
corresponds with the current transmission
position.
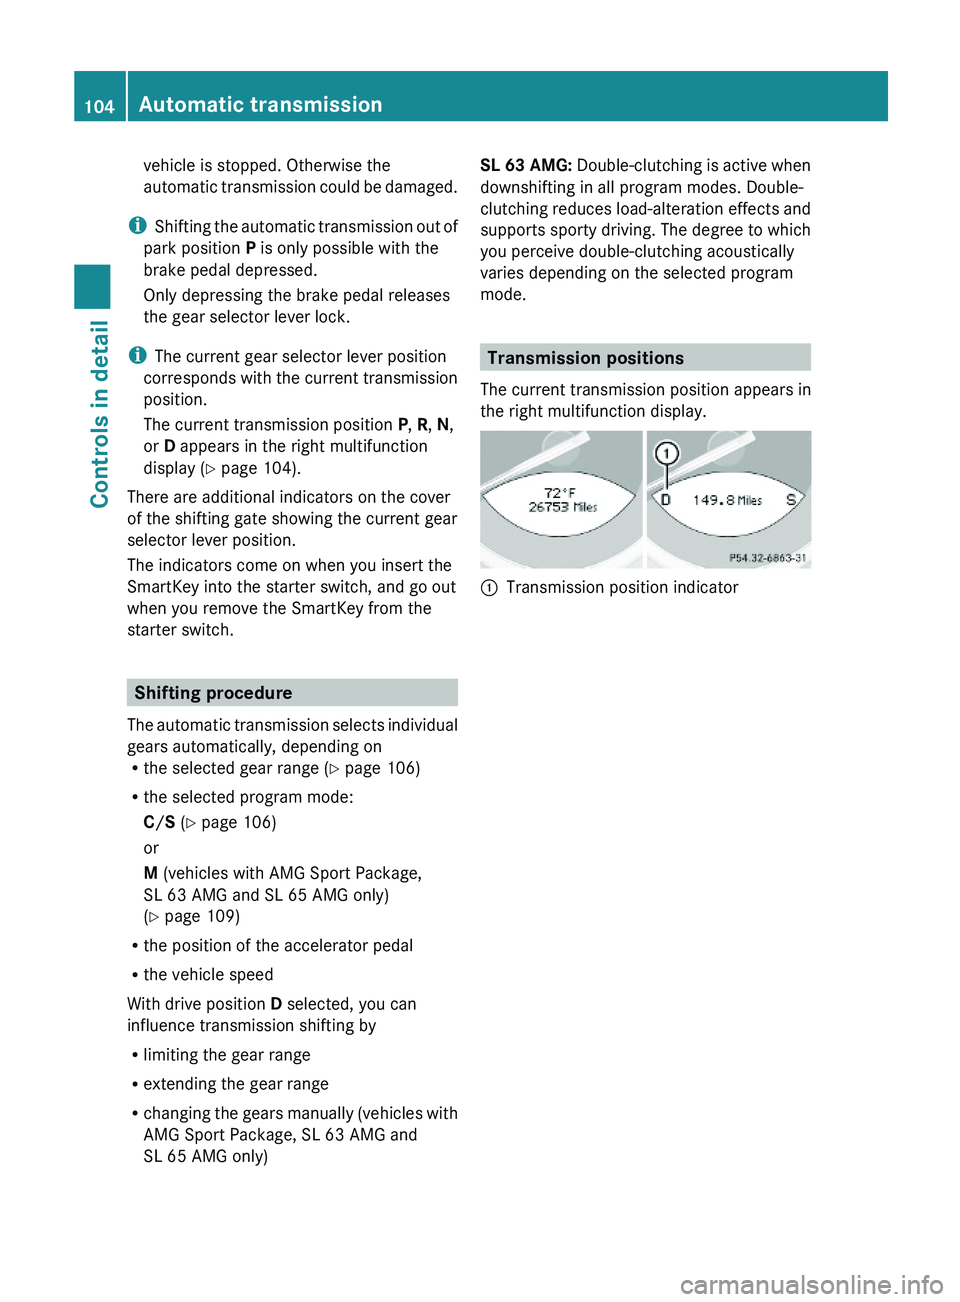
The current transmission position P, R, N,
or D appears in the right multifunction
display (Y page 104).
There are additional indicators on the cover
of the shifting gate showing the current gear
selector lever position.
The indicators come on when you insert the
SmartKey into the starter switch, and go out
when you remove the SmartKey from the
starter switch.
Shifting procedure
The automatic transmission selects individual
gears automatically, depending onRthe selected gear range (Y page 106)
Rthe selected program mode:
C/S (Y page 106)
or
M (vehicles with AMG Sport Package,
SL 63 AMG and SL 65 AMG only)
(Y page 109)
Rthe position of the accelerator pedal
Rthe vehicle speed
With drive position D selected, you can
influence transmission shifting by
Rlimiting the gear range
Rextending the gear range
Rchanging the gears manually (vehicles with
AMG Sport Package, SL 63 AMG and
SL 65 AMG only)
SL 63 AMG: Double-clutching is active when
downshifting in all program modes. Double-
clutching reduces load-alteration effects and
supports sporty driving. The degree to which
you perceive double-clutching acoustically
varies depending on the selected program
mode.
Transmission positions
The current transmission position appears in
the right multifunction display.
\000FTransmission position indicator 104Automatic transmissionControls in detail
230_AKB; 6; 22, en-USd2ureepe,Version: 2.11.8.12009-07-28T18:49:58+02:00 - Seite 104
Page 107 of 316
Effect0045Park position
Shift the automatic transmission
into park position P only when the
vehicle is stopped. The park
position is not intended to serve as
a brake when the vehicle is parked.
Rather, the driver should always
engage the parking brake in
addition to shifting the automatic
transmission into park position P to
secure the vehicle.
The SmartKey can only be removed
from the starter switch with the
gear selector lever in park position
P . With the SmartKey removed from
the starter switch, the gear selector
lever is locked in park position P.
If the vehicle’s electrical system is
malfunctioning, the gear selector
lever could remain locked in park
position P.XHave the vehicle’s electrical
system checked at an authorized
Mercedes-Benz Center as soon
as possible.0046Reverse gear
Shift the automatic transmission
into reverse gear R only when the
vehicle is stopped.Effect0044Neutral position
No power is transmitted from the
engine to the drive axle. When the
brakes are released, the vehicle can
be moved freely (pushed or towed).
To avoid damage to the
transmission, never shift the
automatic transmission into neutral
position N while driving.
Exception: If the ESP ®
is switched
off or malfunctioning, shift the
automatic transmission into neutral
position N if the vehicle is in danger
of skidding.
! Coasting the vehicle, or driving
for any other reason with the
automatic transmission in
neutral position N can result in
transmission damage that is not
covered by the Mercedes-Benz
Limited Warranty.003ADrive position
The automatic transmission shifts
automatically. All forward gears are
available.
Driving tips
Kickdown
Use the kickdown when you want maximum
acceleration.
XU.S. vehicles except AMG vehicles:
Fully depress the accelerator pedal.
Depending on the engine speed the
automatic transmission shifts into a lower
gear.XCanada vehicles and AMG vehicles:
Depress the accelerator pedal past the
point of resistance.
Depending on the engine speed the
automatic transmission shifts into a lower
gear.Automatic transmission105Controls in detail230_AKB; 6; 22, en-USd2ureepe,Version: 2.11.8.12009-07-28T18:49:58+02:00 - Seite 105Z
Page 113 of 316

the maximum engine speed for each gear
without overrevving the engine.XShift the automatic transmission from
current gear 0046 into the next higher gear.
The fuel supply will otherwise be
interrupted to prevent the engine from
overrevving.
Downshifting
GWarning!
On slippery road surfaces, never downshift in
order to obtain braking action. This could
result in drive wheel slip and reduced vehicle
control. Your vehicle’s ABS will not prevent
this type of loss of control.
XBriefly press the gear selector lever to the
left in the D- direction.
or
XBriefly pull left gearshift control 0046
( Y page 108).
The automatic transmission shifts into the
next lower gear.
i For maximum acceleration, press and
hold the gear selector lever to the left in the
D- direction or pull and hold the left
gearshift control. Depending on the engine
speed the automatic transmission selects
the optimal gear for maximum
acceleration.
i When you brake or stop, the automatic
transmission shifts down into a gear from
which you can easily accelerate or take off.
Kickdown
Using the kickdown while driving in manual
program mode M is not possible.
Deactivating manual shift program
XAll models except SL 63 AMG: Press the
program mode selector switch repeatedly
until C or S appears in the right
multifunction display.XSL 63 AMG: Turn the program mode
selector dial until C or S appears in the right
multifunction display.
or
XRestart the engine.
The automatic transmission will go to
automatic program mode C.
Manual program mode M is not stored.
Emergency operation (limp-home
mode)
If vehicle acceleration becomes less
responsive or sluggish or the automatic
transmission no longer shifts, the automatic
transmission is most likely operating in limp-
home (emergency operation) mode. In this
mode only second gear and reverse gear R
can be selected.
XStop the vehicle in a safe location.XShift the automatic transmission into park
position P.XTurn off the engine.XWait at least 10 seconds before restarting.XRestart the engine.XShift the automatic transmission into drive
position D (for second gear) or reverse gear
R .XHave the automatic transmission checked
at an authorized Mercedes-Benz Center as
soon as possible.
Instrument cluster
Introduction
For a full view illustration of the instrument
cluster, see “Instrument cluster”
( Y page 30).
GWarning!
No messages will be displayed if either the
instrument cluster or the multifunction
display is inoperative.
Instrument cluster111Controls in detail230_AKB; 6; 22, en-USd2ureepe,Version: 2.11.8.12009-07-28T18:49:58+02:00 - Seite 111Z
Page 120 of 316
RACETIMER stops timing. Timing is resumed
when you press button \000Z after switching
the ignition back on or restarting the engine.
Saving lap time and starting a new lap
You can save up to nine laps.
XPress button \000[ while the timer is
running.
The intermediate time will be shown for
5 seconds.
XPress button \000[ within 5 seconds.
The intermediate time shown will be saved
as a lap time.
The RACETIMER begins timing the new lap.
The new lap begins to be timed as soon as
the intermediate time is called up.
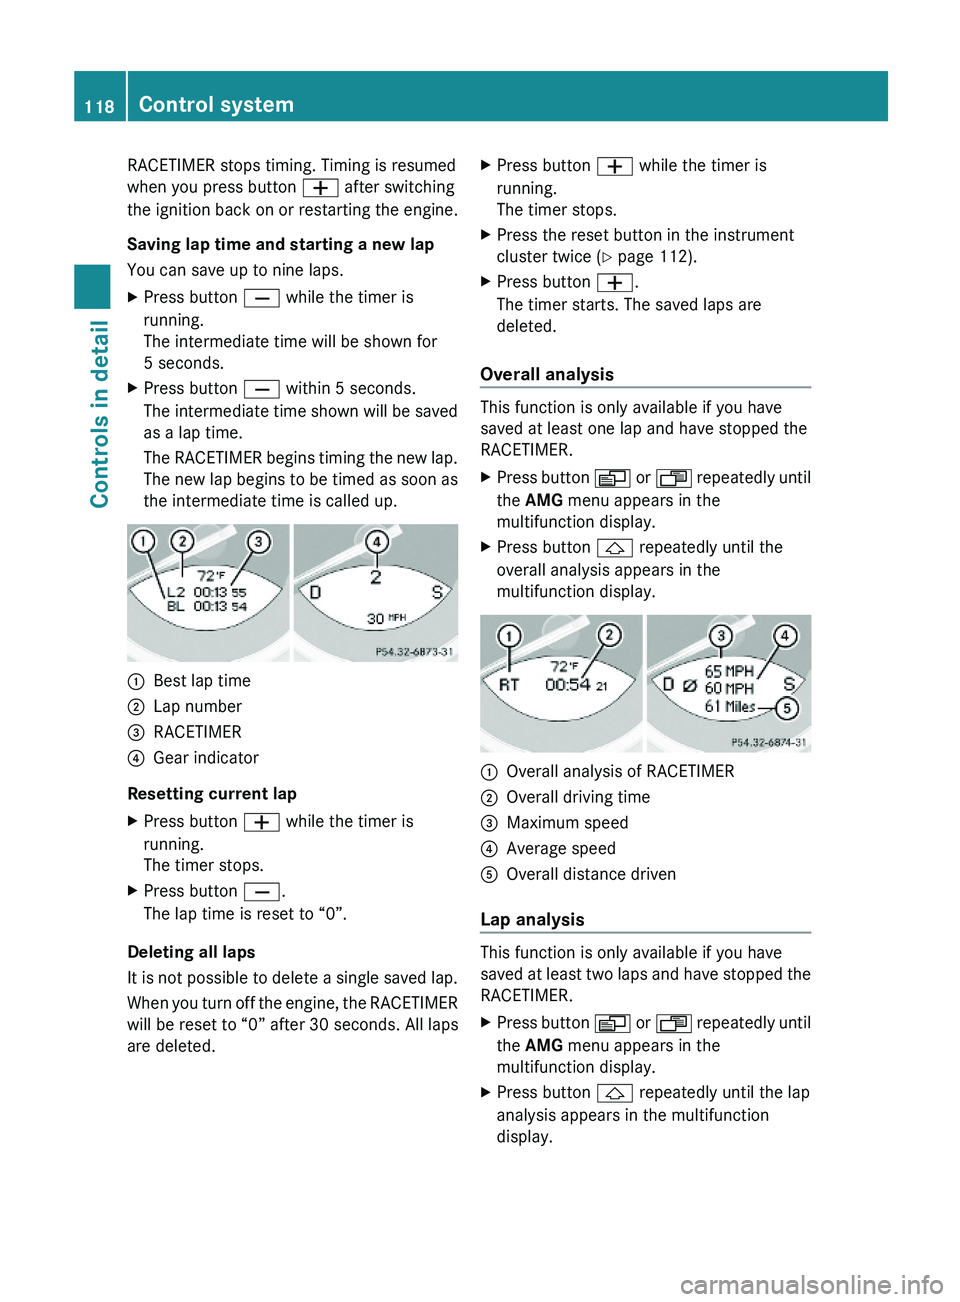
\000FBest lap time\000GLap number\000
Page 123 of 316
The Vehicle status message memory menu
only appears if messages have been stored.
GWarning!
Malfunction and warning messages are only
indicated for certain systems and are
intentionally not very detailed. The
malfunction and warning messages are
simply a reminder with respect to the
operation of certain systems. They do not
replace the owner’s and/or driver’s
responsibility to maintain the vehicle’s
operating safety. Have all required
maintenance and safety checks performed on
the vehicle. Bring the vehicle to an authorized
Mercedes-Benz Center to address the
malfunction and warning messages.
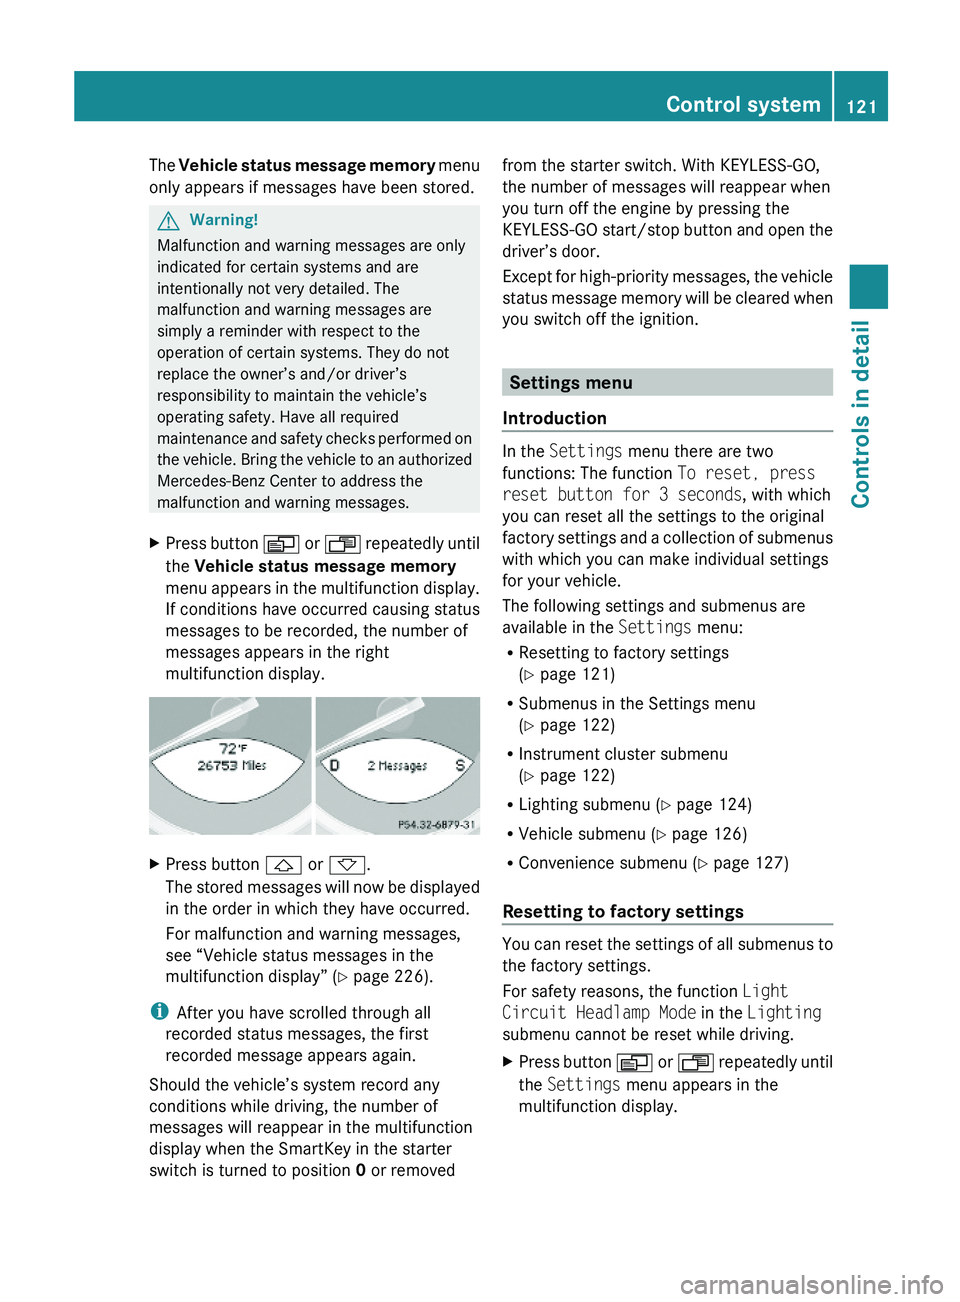
XPress button \000Y or \000X repeatedly until
the Vehicle status message memory
menu appears in the multifunction display.
If conditions have occurred causing status
messages to be recorded, the number of
messages appears in the right
multifunction display.
XPress button \000\) or \000-.
The stored messages will now be displayed
in the order in which they have occurred.
For malfunction and warning messages,
see “Vehicle status messages in the
multifunction display” (Y page 226).
iAfter you have scrolled through all
recorded status messages, the first
recorded message appears again.
Should the vehicle’s system record any
conditions while driving, the number of
messages will reappear in the multifunction
display when the SmartKey in the starter
switch is turned to position 0 or removed
from the starter switch. With KEYLESS-GO,
the number of messages will reappear when
you turn off the engine by pressing the
KEYLESS-GO start/stop button and open the
driver’s door.
Except for high-priority messages, the vehicle
status message memory will be cleared when
you switch off the ignition.
Settings menu
Introduction
In the Settings menu there are two
functions: The function To reset, press
reset button for 3 seconds, with which
you can reset all the settings to the original
factory settings and a collection of submenus
with which you can make individual settings
for your vehicle.
The following settings and submenus are
available in the Settings menu:
RResetting to factory settings
(Y page 121)
RSubmenus in the Settings menu
(Y page 122)
RInstrument cluster submenu
(Y page 122)
RLighting submenu (Y page 124)
RVehicle submenu (Y page 126)
RConvenience submenu (Y page 127)
Resetting to factory settings
You can reset the settings of all submenus to
the factory settings.
For safety reasons, the function Light
Circuit Headlamp Mode in the Lighting
submenu cannot be reset while driving.
XPress button \000Y or \000X repeatedly until
the Settings menu appears in the
multifunction display.
Control system121Controls in detail230_AKB; 6; 22, en-USd2ureepe,Version: 2.11.8.12009-07-28T18:49:58+02:00 - Seite 121Z
Page 143 of 316
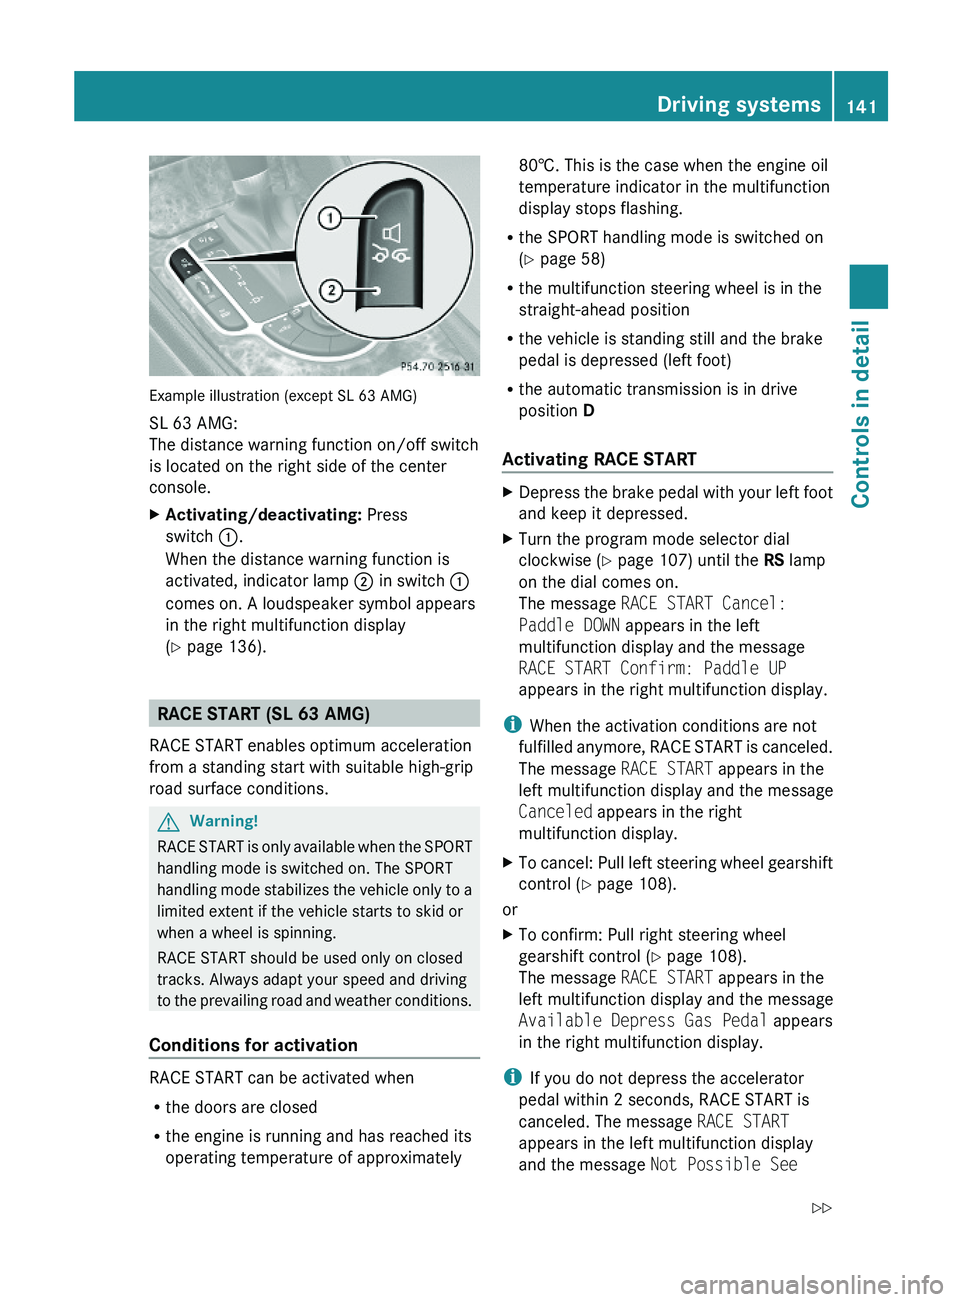
Example illustration (except SL 63 AMG)
SL 63 AMG:
The distance warning function on/off switch
is located on the right side of the center
console.
XActivating/deactivating: Press
switch \000F.
When the distance warning function is
activated, indicator lamp \000G in switch \000F
comes on. A loudspeaker symbol appears
in the right multifunction display
(Y page 136).
RACE START (SL 63 AMG)
RACE START enables optimum acceleration
from a standing start with suitable high-grip
road surface conditions.
GWarning!
RACE START is only available when the SPORT
handling mode is switched on. The SPORT
handling mode stabilizes the vehicle only to a
limited extent if the vehicle starts to skid or
when a wheel is spinning.
RACE START should be used only on closed
tracks. Always adapt your speed and driving
to the prevailing road and weather conditions.
Conditions for activation
RACE START can be activated when
Rthe doors are closed
Rthe engine is running and has reached its
operating temperature of approximately
80†. This is the case when the engine oil
temperature indicator in the multifunction
display stops flashing.
Rthe SPORT handling mode is switched on
(Y page 58)
Rthe multifunction steering wheel is in the
straight-ahead position
Rthe vehicle is standing still and the brake
pedal is depressed (left foot)
Rthe automatic transmission is in drive
position D
Activating RACE START
XDepress the brake pedal with your left foot
and keep it depressed.
XTurn the program mode selector dial
clockwise (Y page 107) until the RS lamp
on the dial comes on.
The message RACE START Cancel:
Paddle DOWN appears in the left
multifunction display and the message
RACE START Confirm: Paddle UP
appears in the right multifunction display.
iWhen the activation conditions are not
fulfilled anymore, RACE START is canceled.
The message RACE START appears in the
left multifunction display and the message
Canceled appears in the right
multifunction display.
XTo cancel: Pull left steering wheel gearshift
control (Y page 108).
or
XTo confirm: Pull right steering wheel
gearshift control (Y page 108).
The message RACE START appears in the
left multifunction display and the message
Available Depress Gas Pedal appears
in the right multifunction display.
iIf you do not depress the accelerator
pedal within 2 seconds, RACE START is
canceled. The message RACE START
appears in the left multifunction display
and the message Not Possible See
Driving systems141Controls in detail230_AKB; 6; 22, en-USd2ureepe,Version: 2.11.8.12009-07-28T18:49:58+02:00 - Seite 141Z
Page 195 of 316
XPress button \000\) or \000- repeatedly until
you see the current inflation pressures for
each tire appear in the display or the
following message appears in the
multifunction display:
Tire pressure
displayed after
driving for
a few minutes.
XPress the reset button (Y page 111).
The following message will appear in the
multifunction display:
Restart tire
pressure monitor?
XIf you wish to confirm: Press button
\000Z.
The following message will appear in the
multifunction display:
Tire Pressure Monitor
Restarted
After driving a few minutes the system
verifies that the current tire inflation
pressures are within the system’s specified
range. Afterwards the current tire inflation
pressures are accepted as reference values
and then monitored.
XIf you wish to cancel: Press button \000[.
iWhen the wheel positions have been
changed, the inflation pressure of a tire
may be displayed for the wrong position
temporarily. After driving for a few minutes,
the inflation pressure will be shown for the
correct position.
Maximum tire inflation pressure
GWarning!
Never exceed the maximum tire inflation
pressure. Follow recommended tire inflation
pressures.
Do not underinflate tires. Underinflated tires
wear excessively and/or unevenly, adversely
affect handling and fuel economy, and are
more likely to fail from being overheated.
Do not overinflate tires. Overinflated tires can
adversely affect handling and ride comfort,
wear unevenly, increase stopping distance,
and result in sudden deflation (blowout)
because they are more likely to become
punctured or damaged by road debris,
potholes etc.
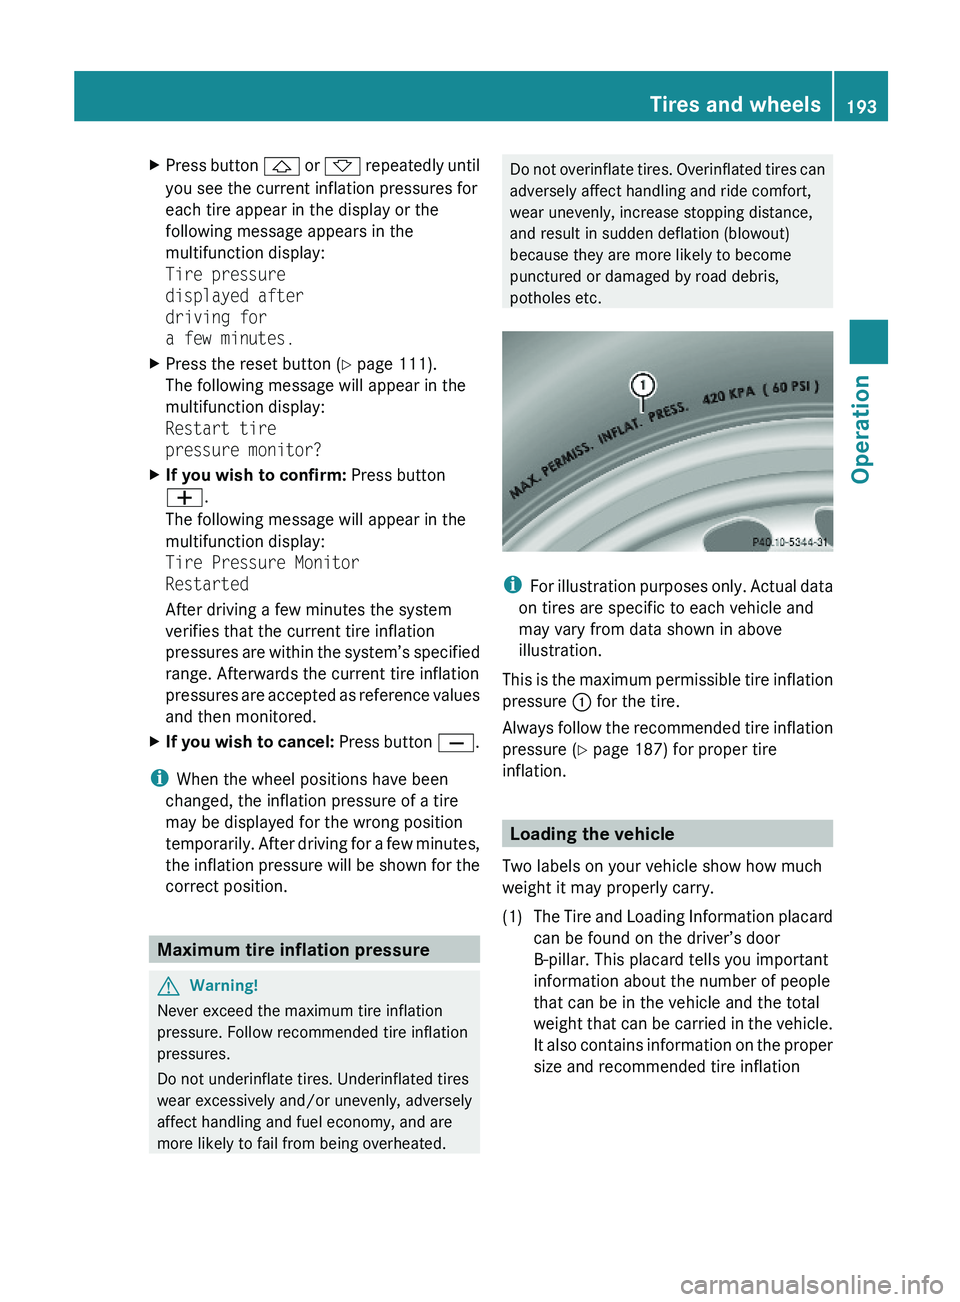
iFor illustration purposes only. Actual data
on tires are specific to each vehicle and
may vary from data shown in above
illustration.
This is the maximum permissible tire inflation
pressure \000F for the tire.
Always follow the recommended tire inflation
pressure (Y page 187) for proper tire
inflation.
Loading the vehicle
Two labels on your vehicle show how much
weight it may properly carry.
(1)The Tire and Loading Information placard
can be found on the driver’s door
B-pillar. This placard tells you important
information about the number of people
that can be in the vehicle and the total
weight that can be carried in the vehicle.
It also contains information on the proper
size and recommended tire inflation
Tires and wheels193Operation230_AKB; 6; 22, en-USd2ureepe,Version: 2.11.8.12009-07-28T18:49:58+02:00 - Seite 193Z
Page 213 of 316
considerable force prior to parking. The heat
generated serves to dry the brakes.
Salt-covered roadsGWarning!
A layer of salt on the brake discs and the brake
linings may cause a delay in the braking
effect, resulting in a significantly increased
braking distance, which could lead to an
accident.
To avoid this danger, you should:
R occasionally brake carefully when you are
driving on salt-covered roads, so that any
layer of salt that may have built up on the
brake discs and the brake linings is
removed without putting other road users
at risk
R maintain a greater distance to the vehicle
ahead and drive with particular care
R carefully apply the brakes at the end of a
trip and immediately after commencing a
new trip, so that salt residues are removed
from the brake disc
Brake service
! The brake fluid level in the reservoir may
be too low or the electro-hydraulic brake
system may be malfunctioning if the brake
warning lamp in the instrument cluster
comes on and an acoustic warning sounds
although the parking brake is released.
Observe additional messages in the
multifunction display that may appear.
Brake pad wear or a leak in the system may
be the reason for low brake fluid in the
reservoir.
Have the brake system inspected
immediately. Contact an authorized
Mercedes-Benz Center.
All checks and service work on the brake
system should be carried out by qualified
technicians only. Contact an authorized
Mercedes-Benz Center.
Only install brake pads and use brake fluid
recommended by Mercedes-Benz.GWarning!
If other than recommended brake pads are
installed, or other than recommended brake
fluid is used, the braking properties of the
vehicle can be degraded to an extent that safe
braking is substantially impaired. This could
result in an accident.
! Because the ESP ®
operates
automatically, the engine and ignition must
be shut off (SmartKey in starter switch
position 0 or 1 or KEYLESS-GO start/stop
button in position 0 or 1) when the parking
brake is being tested on a brake test
dynamometer or when the vehicle is being
towed with the front axle raised.
Active braking action through the ESP ®
may otherwise seriously damage the brake
system which is not covered by the
Mercedes-Benz Limited Warranty.
If your brake system is only subjected to
moderate loads, you should occasionally test
the effectiveness of the brakes by applying
above-normal braking pressure at higher
speeds. This will also enhance the grip of the
brake pads.
GWarning!
Make sure not to endanger any other road
users when carrying out these braking
maneuvers.
Refer to the description of the Brake Assist
System (BAS) ( Y page 56).
High-performance brake system
The high-performance brake system is only
available on SL 63 AMG and SL 65 AMG.
GWarning!
New vehicle brake pads and disks, and
replacement brake pads and disks may take
several hundred miles of driving until they
Driving instructions211Operation230_AKB; 6; 22, en-USd2ureepe,Version: 2.11.8.12009-07-28T18:49:58+02:00 - Seite 211Z
Page 221 of 316
To clean Distronic system sensor cover 0046
and the bumper area near sensors 0047 observe
the following:
R Use a mild vehicle wash detergent, such as
Mercedes-Benz approved Car Shampoo,
with plenty of water.
R Use a soft, non-scratching cloth.
! If you use a power washer to clean the
sensor covers, observe the following:
R Follow the instructions provided by the
power washer manufacturer.
R Maintain a distance between the sensor
covers and the nozzle of the power
washer.
Cleaning the windows and the wiper
blades
! The windshield wipers must be in a
vertical position before folding them away
from the windshield. They could otherwise
damage the hood.
Never open the hood when the wiper arms
are folded forward.
XMake sure the hood is fully closed.XSwitch on the ignition.XTurn combination switch to wiper setting
II (Y page 95).XWith wiper arms in vertical position, switch
off the ignition.GWarning!
For safety reasons, switch off wipers and
remove SmartKey from starter switch before
cleaning the windshield and/or the wiper
blades. Vehicles with KEYLESS-GO: Make
sure the vehicle’s on-board electronics have
status 0. Otherwise, the wiper motor could
suddenly turn on and cause injury.
! Do not pull on the wiper blade inserts.
They could tear.
XFold the wiper arms forward until they snap
into place.XClean the windshield and the wiper blade
inserts with a clean cloth and mild
detergent solution.XUse a soft, clean cloth and a mild window
cleaning solution on all outside and inside
glass surfaces.
An automotive glass cleaner is
recommended.
! Fold the windshield wiper arms back onto
the windshield before turning the SmartKey
in the starter switch or pressing the
KEYLESS-GO start/stop button.
Hold on to the wiper when folding the wiper
arm back. If released, the force of the
impact from the tensioning spring could
crack the windshield.
! To clean the window interior, do not use
a dry cloth, abrasives, solvents or cleaners
containing solvents. Do not touch the
inside of the windows with hard objects
such as an ice scraper or ring. Doing so may
damage the windows.
Rear window cleaning
Clean the rear window with the hardtop fully
raised and closed.
GWarning!
Do not clean the rear window with the hardtop
in a position other than the fully raised and
closed position. Otherwise, the hardtop may
move unexpectedly which may result in
personal injury to you or others.
XUse a soft, clean cloth and a mild window
cleaning solution on all outside and inside
glass surfaces.
An automotive glass cleaner is
recommended.Vehicle care219Operation230_AKB; 6; 22, en-USd2ureepe,Version: 2.11.8.12009-07-28T18:49:58+02:00 - Seite 219Z
Page 233 of 316
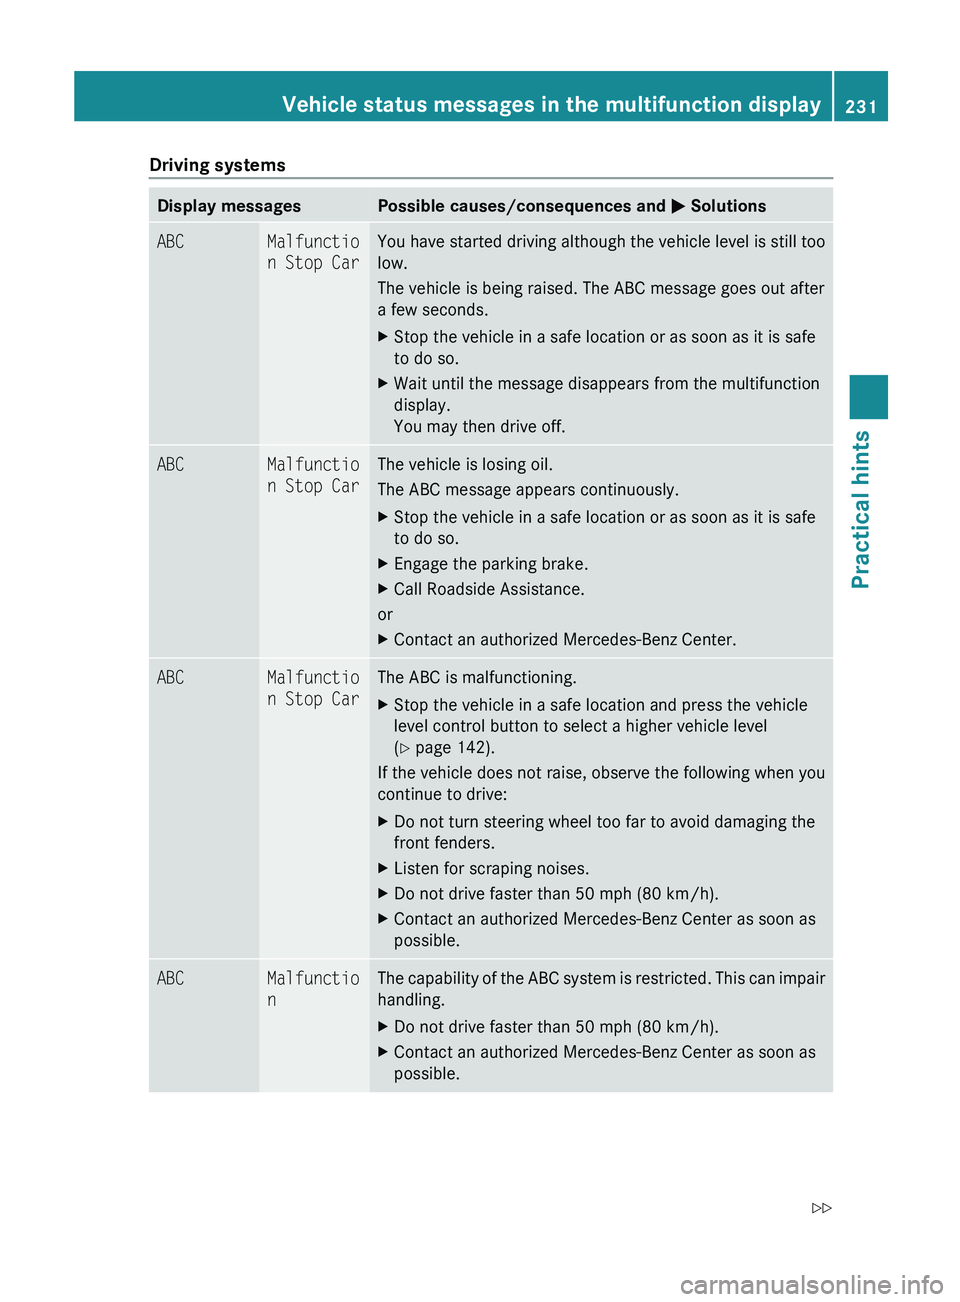
Driving systemsDisplay messagesPossible causes/consequences and 0050 SolutionsABCMalfunctio
n Stop CarYou have started driving although the vehicle level is still too
low.
The vehicle is being raised. The ABC message goes out after
a few seconds.XStop the vehicle in a safe location or as soon as it is safe
to do so.XWait until the message disappears from the multifunction
display.
You may then drive off.ABCMalfunctio
n Stop CarThe vehicle is losing oil.
The ABC message appears continuously.XStop the vehicle in a safe location or as soon as it is safe
to do so.XEngage the parking brake.XCall Roadside Assistance.
or
XContact an authorized Mercedes-Benz Center.ABCMalfunctio
n Stop CarThe ABC is malfunctioning.XStop the vehicle in a safe location and press the vehicle
level control button to select a higher vehicle level
( Y page 142).
If the vehicle does not raise, observe the following when you
continue to drive:
XDo not turn steering wheel too far to avoid damaging the
front fenders.XListen for scraping noises.XDo not drive faster than 50 mph (80 km/h).XContact an authorized Mercedes-Benz Center as soon as
possible.ABCMalfunctio
nThe capability of the ABC system is restricted. This can impair
handling.XDo not drive faster than 50 mph (80 km/h).XContact an authorized Mercedes-Benz Center as soon as
possible.Vehicle status messages in the multifunction display231Practical hints230_AKB; 6; 22, en-USd2ureepe,Version: 2.11.8.12009-07-28T18:49:58+02:00 - Seite 231Z