engine MERCEDES-BENZ SL-Class 2013 R131 Owner's Guide
[x] Cancel search | Manufacturer: MERCEDES-BENZ, Model Year: 2013, Model line: SL-Class, Model: MERCEDES-BENZ SL-Class 2013 R131Pages: 590, PDF Size: 9.73 MB
Page 94 of 590
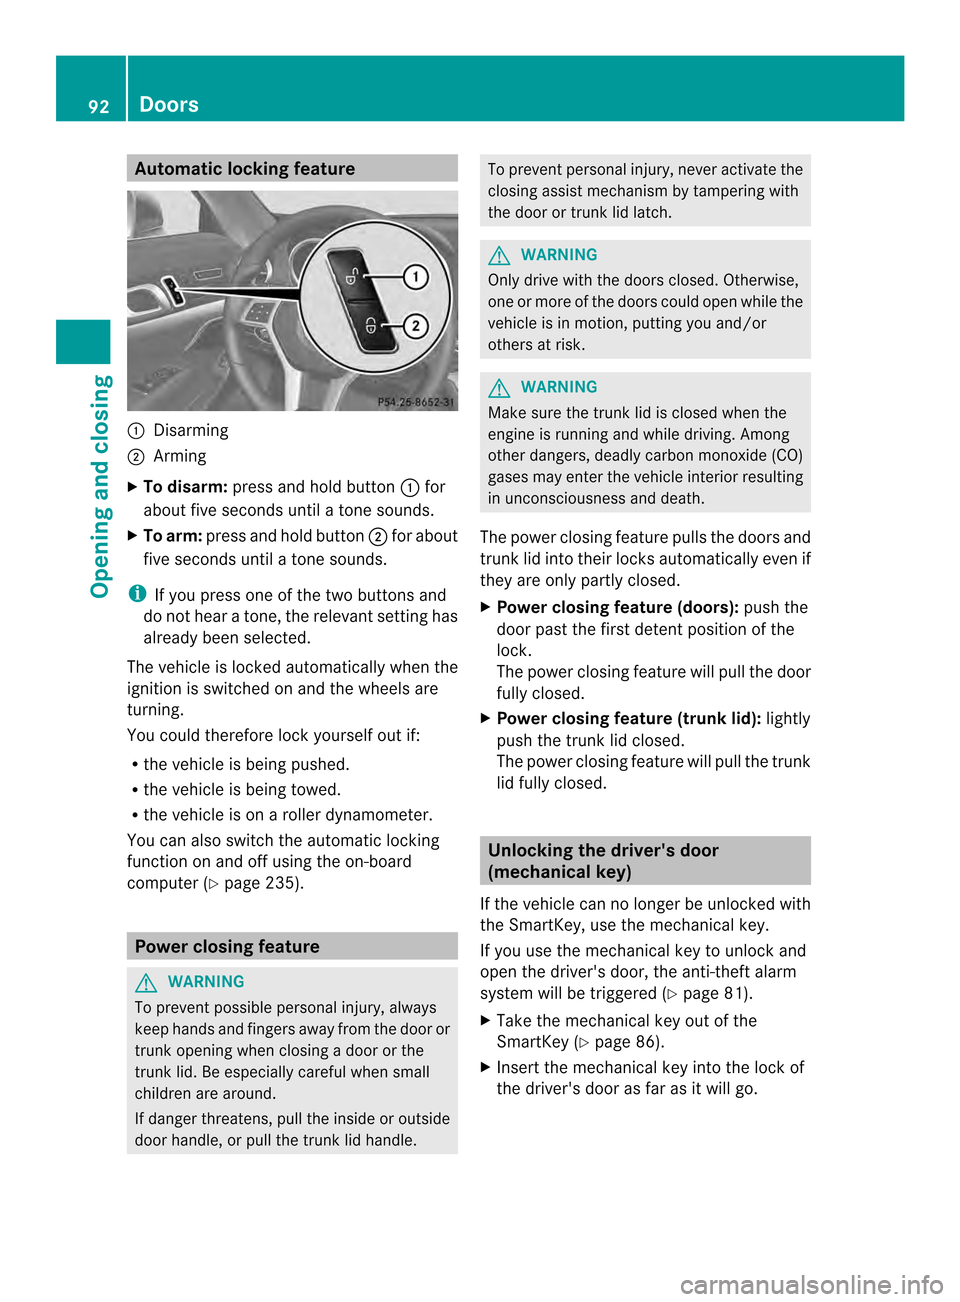
Automatic locking feature
0002
Disarming
0003 Arming
X To disarm: press and hold button 0002for
about five seconds until a tone sounds.
X To arm: press and hold button 0003for about
five seconds until a tone sounds.
i If you press one of th etwo buttons and
do not hear a tone, the relevant setting has
already been selected.
The vehicle is locked automatically when the
ignitio nis switched on and the wheels are
turning.
You could therefore lock yourselfo ut if:
R the vehicle is being pushed.
R the vehicle is being towed.
R the vehicle is on a roller dynamometer.
You can also switch the automatic locking
function on and off using the on-board
computer (Y page 235). Power closing feature
G
WARNING
To preven tpossible personal injury, always
keep hands and fingers away from the door or
trunk opening when closing a door or the
trunk lid. Be especially careful when small
children are around.
If danger threatens, pull the inside or outside
door handle, or pull the trunk lid handle. To prevent personal injury, never activate the
closing assist mechanism by tampering with
the door or trunk lid latch. G
WARNING
Only drive with the doors closed. Otherwise,
one or more of the doors could open while the
vehicle is in motion, putting you and/or
others at risk. G
WARNING
Make sure the trunk lid is closed when the
engine is running and while driving. Among
other dangers, deadly carbon monoxide (CO)
gases may enter the vehicle interior resulting
in unconsciousness and death.
The power closing feature pulls the doors and
trunk lid into their locks automatically even if
they are only partly closed.
X Power closing feature (doors): push the
door past the first detent position of the
lock.
The power closing feature will pull the door
fully closed.
X Power closing feature (trunk lid): lightly
push the trunk lid closed.
The power closing feature will pull the trunk
lid fully closed. Unlocking the driver's door
(mechanical key)
If the vehicle can no longer be unlocked with
the SmartKey, use the mechanical key.
If you use the mechanical key to unlock and
open the driver's door, the anti-theft alarm
system will be triggered (Y page 81).
X Take the mechanical key out of the
SmartKey (Y page 86).
X Insert the mechanical key into the lock of
the driver's door as far as it will go. 92
DoorsOpening and closing
Page 96 of 590
seat adjustment, steering wheel
adjustment or memory function.
If children open a door, they could cause
severe or even fatal injury to other persons; if
they get out of the vehicle, they could injure
themselves when doing so or be seriously or
even fatally injured by any passing traffic.
Do not expose the child restraint system to
direct sunlight. The child restraint system's
metal parts, for example, could become very
hot, and a child could be burned on these
parts. G
WARNING
Do not carry heavy or hard objects in the
passenger compartment or trunk unless they
are firmly secured in place.
Unsecured or improperly positioned cargo
increases a child's risk of injury in the event
of
R strong braking maneuvers
R sudden changes of direction
R an accident G
WARNING
Make sure the trunk lid is closed when the
engine is running and while driving. Among
other dangers, deadly carbon monoxide (CO)
gases may enter the vehicle interior resulting
in unconsciousness and death.
! The trunk lid swings upwards when
opened. Therefore, make sure that there is
sufficient clearance above the trunk lid.
! Only close the trunk once the roof is
lowered completely. Otherwise, you could
damage the roof.
If you close the trunk lid before the roof is
lowered completely, the loading aid switch
lights up and a warning tone sounds.
i Opening dimensions of the trunk lid
(Y page 585).
i To make loading easier, the stowed roof
can be raised with the loading aid after the trunk lid has been opened. The trunk
partition can also be detached. The trunk
partition must be closed againa
fter
loading. Otherwise, the roof cannot be
lowered.
You can unlock the trunk lid if the vehicle is
stationary and the roof is completely open or
closed.
Do not leave the SmartKey in the trunk. You
could otherwise lock yoursel fout.
The trunk lid can be:
R opened and closed from outside
R opened automatically from outside
(vehicles without trunk lid remote closing
feature)
R opened and closed automatically from
outside (vehicles with trunk lid remote
closing feature)
R opened and closed from outside (vehicles
with KEYLESS-GO and HANDS-FREE
ACCESS)
R opened and closed automatically from
inside (vehicles with trunk lid remote
closing feature)
R locked separately
R unlocked with the mechanical key
R opened with the emergency release button Opening/closing from outside
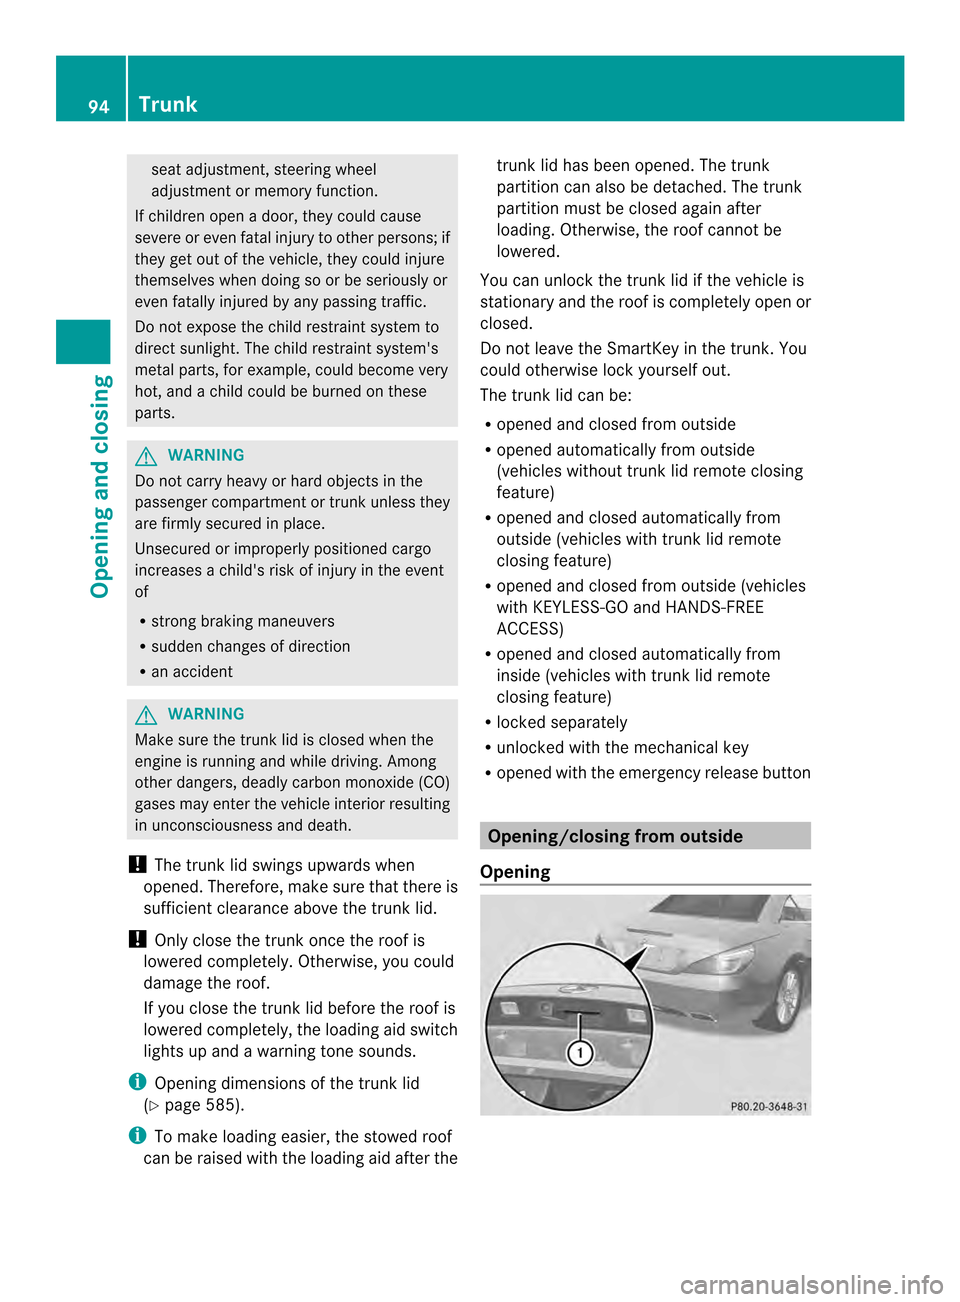
Opening 94
TrunkOpening and closing
Page 97 of 590
X
Press the 000Ebutton on the SmartKey.
X Pull handle 0002.
X Raise the trunkl id.
i With the roof open, you can use the
loading aid ( Ypage 492) to raise the
folded-up roof in the trunk, enabling you to
load and unload more easily. For this
purpose, you can also open the trunk
partition.
Do not forget to close the trunk partition
again afterwards .Otherwise, it will not be
possible to close the roof.
Closing G
WARNING
To prevent possible personal injury, always
keep hands and fingers away fro mthe trunk
opening when closing the trunk lid. Be
especially careful when small children are
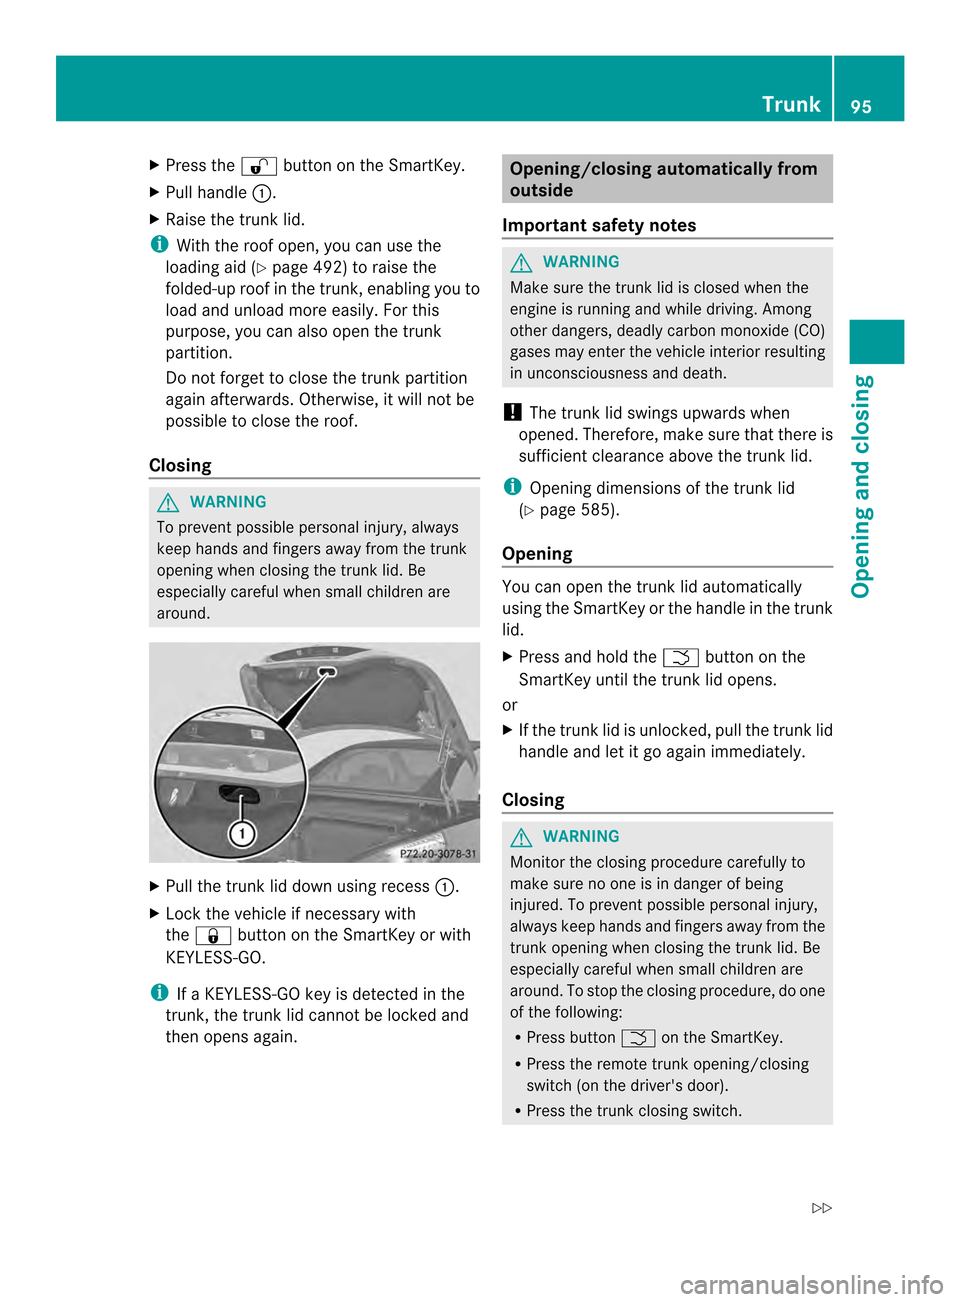
around. X
Pull the trunk lid down using recess 0002.
X Lock the vehicle if necessary with
the 000D button on the SmartKey or with
KEYLESS-GO.
i If a KEYLESS-GO key is detected in the
trunk, the trunk lid cannot be locked and
then opens again. Opening/closing automatically from
outside
Important safety notes G
WARNING
Make sure the trunk lid is closed when the
engine is running and while driving. Among
other dangers, deadly carbon monoxide (CO)
gases may enter the vehicle interior resulting
in unconsciousness and death.
! The trunk lid swings upwards when
opened. Therefore, make sure that there is
sufficient clearance above the trunk lid.
i Opening dimensions of the trunk lid
(Y page 585).
Opening You can open the trunk lid automatically
using the SmartKey or the handle in the trunk
lid.
X
Press and hold the 0005button on the
SmartKey until the trunk lid opens.
or
X If the trunk lid is unlocked, pull the trunk lid
handle and let it go again immediately.
Closing G
WARNING
Monitor the closing procedure carefully to
make sure no one is in danger of being
injured. To prevent possible personal injury,
always keep hands and fingers away from the
trunk opening when closing the trunk lid. Be
especially careful when small children are
around. To stop the closing procedure, do one
of the following:
R Press button 0005on the SmartKey.
R Press the remote trunk opening/closing
switch (on the driver's door).
R Press the trunk closing switch. Trunk
95Opening and closing
Z
Page 100 of 590

the door mounted switch
.Monitor the closing
procedure carefully to make sure no one is in
danger of being injured.
To interrupt the closing procedure, release
the door mounted remote trunk opening/
closing switch again.
Even with the SmartKey removed from the
starter switch or the SmartKey with KEYLESS-
GO removed from the vehicle, the remote
trunk opening/closing switch can be
operated. Therefore, do not leave children
unattended in the vehicle, or with access to
an unlocked vehicle. Achild's unsupervised
access to a vehicle could result in an accident
and/or serious personal injury. G
WARNING
Make sure the trunk lid is closed when the
engine is running and while driving. Among
other dangers, deadly carbon monoxide (CO)
gases may enter the vehicle interior resulting
in unconsciousness and death.
! The trunk lid swings upwards when
opened. Therefore, make sure that there is
sufficient clearance above the trunk lid.
i The opening dimensions of the trunk lid
can be found in the "Vehicle data" section
(Y page 585).
Opening and closing X
To open: pull remote operating switch for
trunk lid 0002until the trunk lid opens.
X To close: press remote operating switch
for trunk lid 0002until the trunk lid is closed.
You can open and close the trunk lid from the
driver's seat when the vehicle is stationary
and unlocked. Locking the trunk separately
You can lock the trunk separately.Ify ou then
unlock the vehicle centrally, the trunk
remains locked and cannot be opened.
X Close the trunk lid.
X Take the mechanical key out of the
SmartKey (Y page 86). 0007
Basic position
0008 Locking
X Insert the mechanical key into the trunk lid
lock as far as the stop.
X Turn the mechanical key clockwise from
position 0007to position 0008.
X Remove the mechanical key.
X Insert the mechanical key into the
SmartKey. Unlocking the trunk (mechanical key)
! The trunk lid swings upwards when
opened. Therefore, make sure that there is
sufficient clearance above the trunk lid. 98
TrunkOpening and closing
Page 102 of 590
The closing of the door windows can be
immediately halted by releasing the switch or,
if the switch was pulled past the resistance
point and released, by pressing or pulling the
respective switch.
If a door window encounters an obstruction
that blocks its path in a circumstance where
you are closing the windows by pressing and
holding 000Dbutton on the SmartKey or by
pressing and holding the lock button (vehicles
with KEYLESS-GO) on an outside door handle,
the anti-entrapment feature will not operate. Opening and closing the side
windows
Opening and closing the side windows
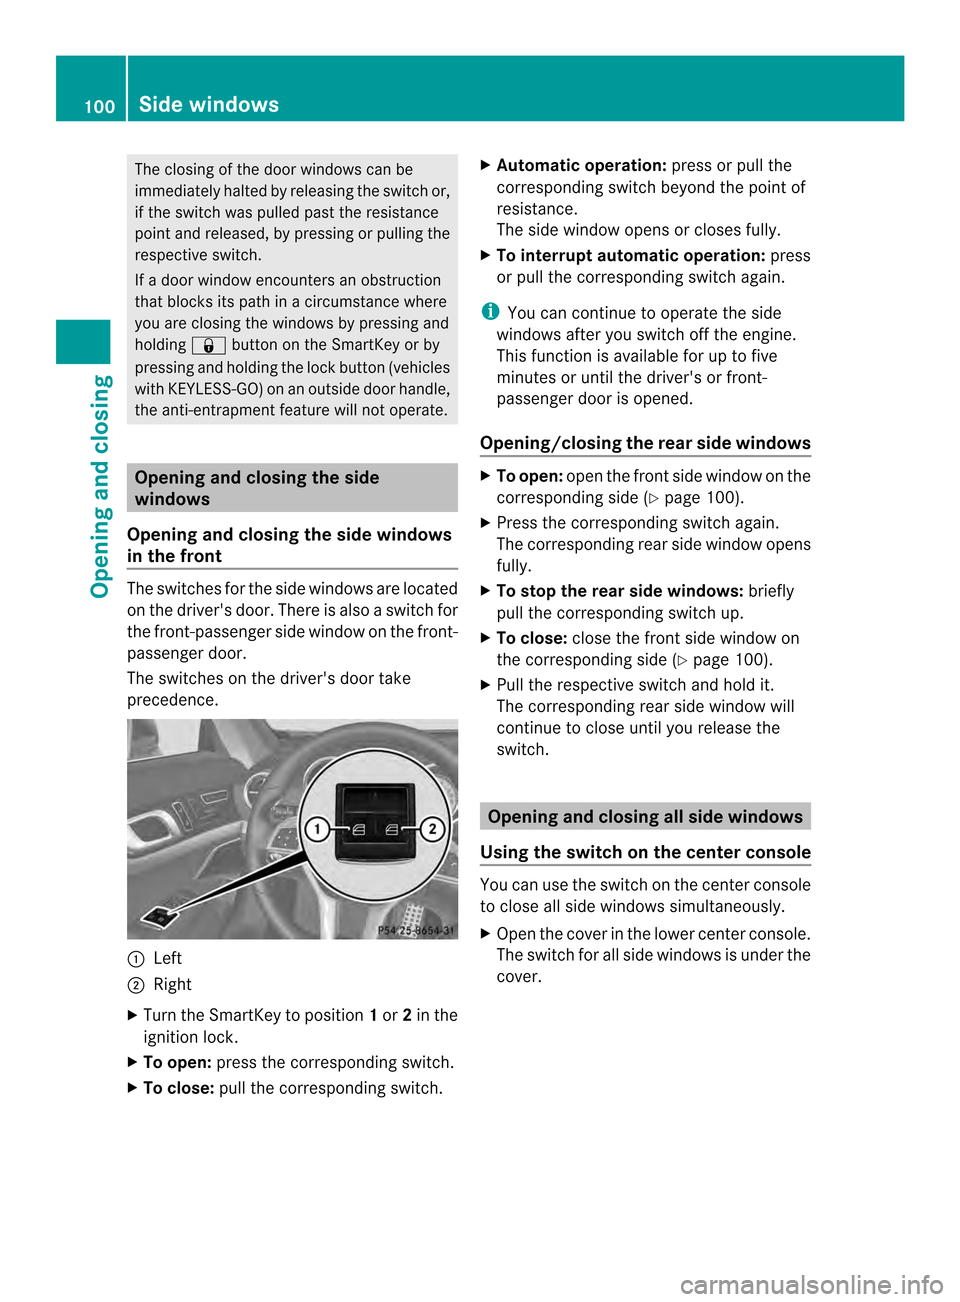
in the front The switches for the side windows are located
on the driver's door. There is also a switch for
the front-passenger side window on the front-
passenger door.
The switches on the driver's door take
precedence. 0002
Left
0003 Right
X Turn the SmartKey to position 1or 2in the
ignition lock.
X To open: press the corresponding switch.
X To close: pull the corresponding switch. X
Automatic operation: press or pull the
corresponding switch beyond the point of
resistance.
The side window opens or closes fully.
X To interrupt automatic operation: press
or pull the corresponding switch again.
i You can continue to operate the side
windows after you switch off the engine.
This function is available for up to five
minutes or until the driver's or front-
passenger door is opened.
Opening/closing the rear side windows X
To open: open the fronts ide window on the
corresponding side (Y page 100).
X Press the corresponding switc hagain.
The corresponding rear side window opens
fully.
X To stop the rear side windows: briefly
pull the corresponding switch up.
X To close: close the front side window on
the corresponding side (Y page 100).
X Pull the respective switch and hold it.
The corresponding rear side window will
continue to close until you release the
switch. Opening and closing all side windows
Using the switch on the center console You can use the switch on the center console
to close all side windows simultaneously.
X
Open the cover in the lower center console.
The switch for all side windows is under the
cover. 100
Side windowsOpening and closing
Page 112 of 590
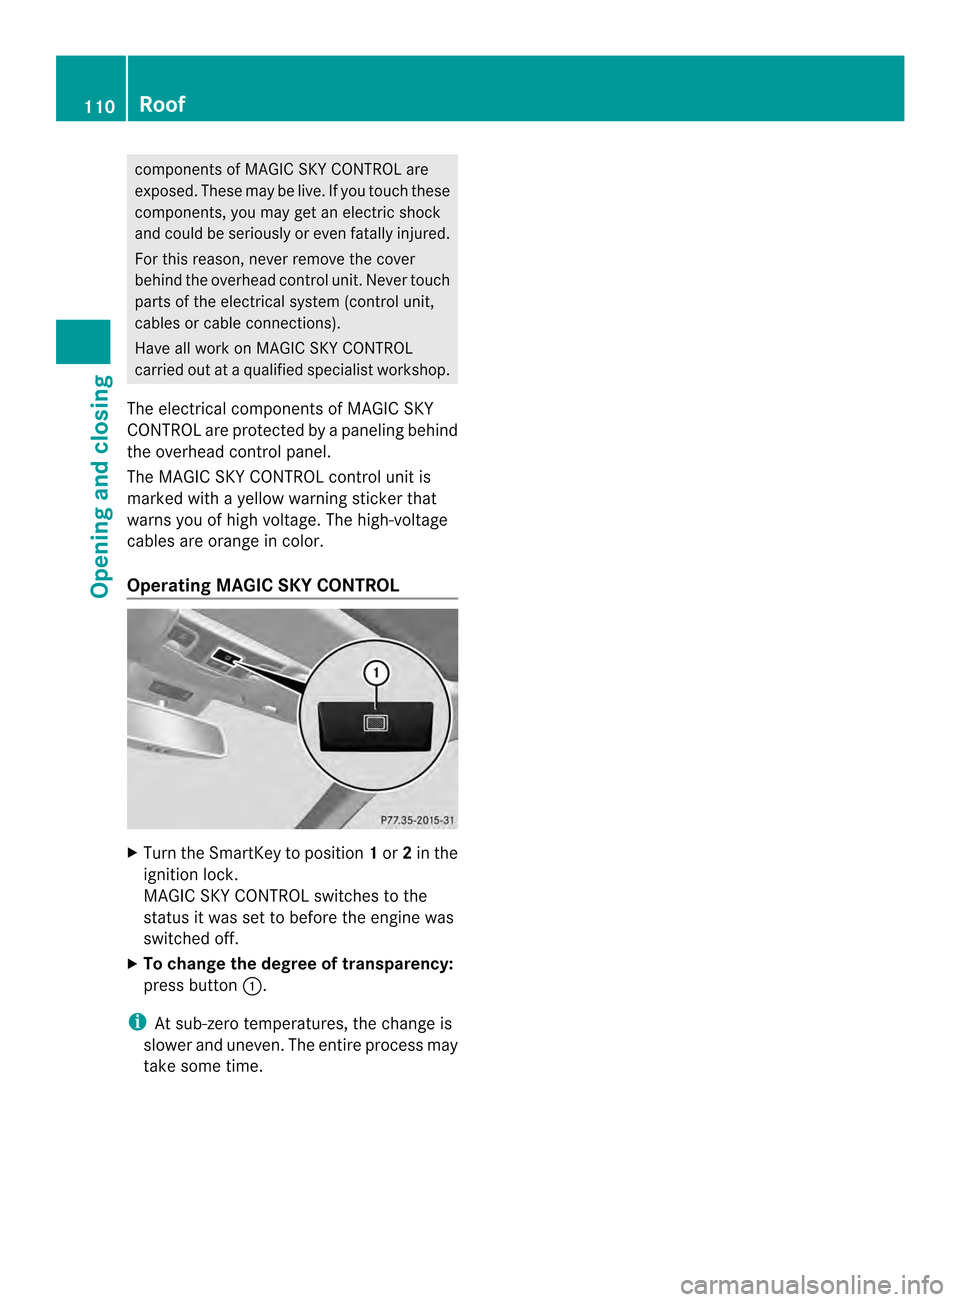
components of MAGIC SKY CONTROL are
exposed
.These may be live. If you touch these
components, you may get an electric shock
and could be seriously or even fatally injured.
For this reason, never remove the cover
behind the overhead control unit. Never touch
parts of the electrical system (control unit,
cables or cable connections).
Have all work on MAGIC SKY CONTROL
carried out at a qualified specialist workshop.
The electrical components of MAGIC SKY
CONTROL are protected by a paneling behind
the overhead control panel.
The MAGIC SKY CONTROL control unit is
marked with a yellow warning sticker that
warns you of high voltage. The high-voltage
cables are orange in color.
Operating MAGIC SKY CONTROL X
Turn the SmartKey to position 1or 2in the
ignition lock.
MAGIC SKY CONTROL switches to the
status it was set to before the engine was
switched off.
X To change the degree of transparency:
press button 0002.
i At sub-zero temperatures, the change is
slower and uneven. The entire process may
take some time. 110
RoofOpening and closing
Page 113 of 590
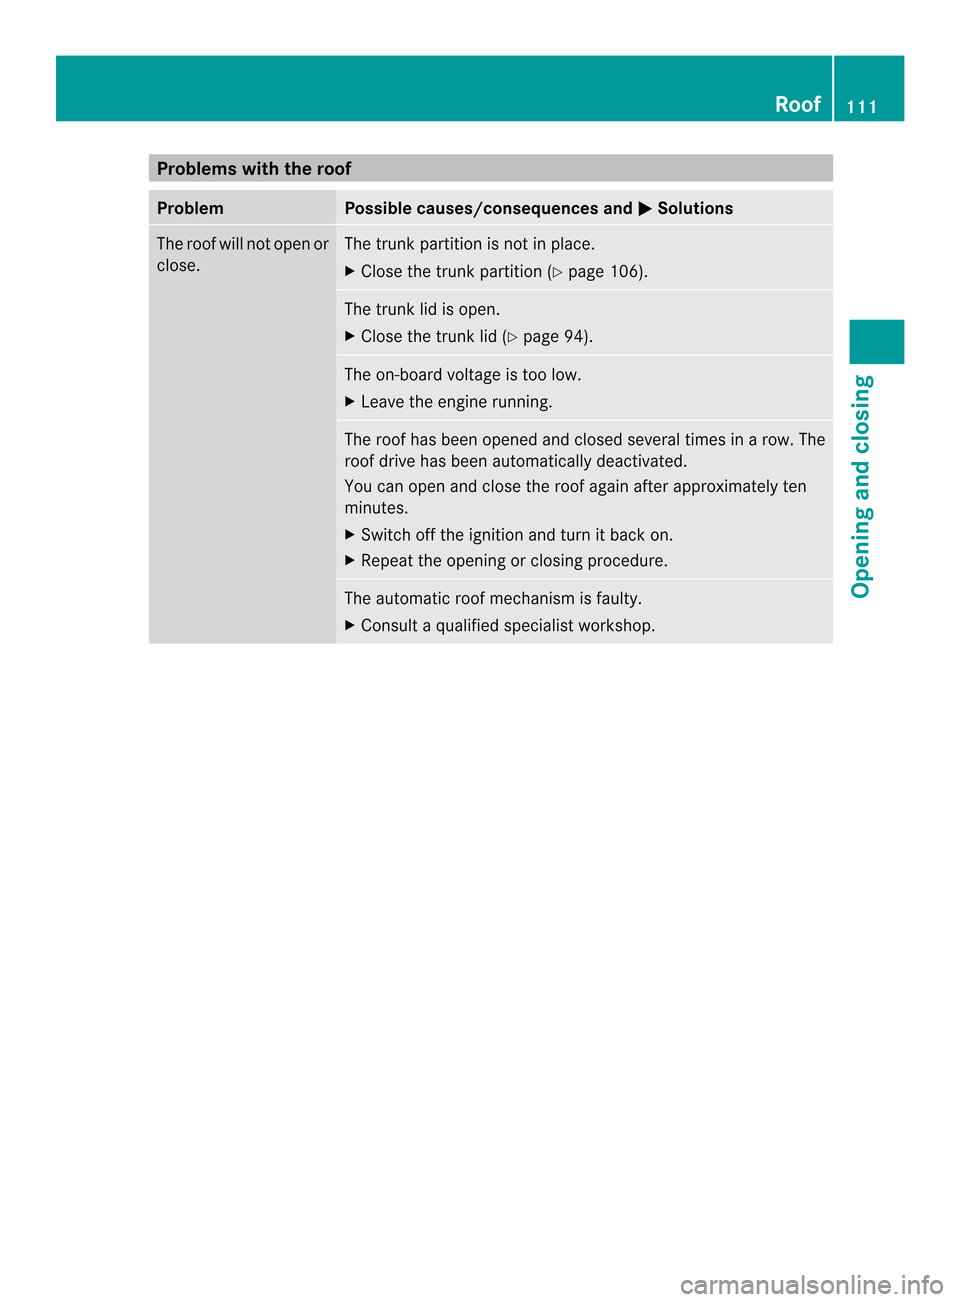
Problems with the roof
Problem Possible causes/consequences and
0003 Solutions
The roof will not open or
close. The trunk partition is not in place.
X
Close the trunk partition (Y page 106). The trunk lid is open.
X
Close the trunk lid (Y page 94). The on-board voltage is too low.
X
Leave the engine running. The roof has been opened and closed several times in
arow. The
roof drive has been automatically deactivated.
You can open and close the roof again after approximately ten
minutes.
X Switch off the ignition and turn it back on.
X Repeat the opening or closing procedure. The automatic roof mechanism is faulty.
X
Consult a qualified specialist workshop. Roof
111Opening and closing Z
Page 129 of 590

causes of poo
rvisibility due to the weather
conditions such as spray. There is a risk of an
accident.
In such situations, turn the light switch to
000A.
The automatic headlamp feature is only an
aid. The drive ris responsible for the vehicle's
lighting at all times. 0007000C
Left-hand standing lamps
0008000E Right-hand standing lamps
00090012 Parking lamps, license plate and
instrument cluster lighting
000E0006 Automatic headlamp mode,
controlled by the light sensor
000F000A Low-beam/high-beam headlamps
0006 is the favored light switch setting. The
light setting is automaticallys elected
according to the brightness of the ambient
light (exception: poor visibility due to weather
conditions such as fog, snow or spray):
R SmartKey in position 1in the ignition lock:
the parking lamps are switched on or off
automatically depending on the brightness
of the ambient light.
R With the engine running: if you have
activated the daytime running lamps
function via the on-board computer, the
daytime running lamps or the low-beam
headlamps and side lamps are switched on
or off automatically depending on the
brightness of the ambient light.
X To switch on automatic headlamp
mode: turn the light switch to 0006.Only for Canada:
The daytime running lamps improve the
visibility of your vehicle during the day. The
daytime running lamps function is required by
law in Canada. It cannot therefore be
deactivated.
When the engine is running and the vehicle is
stationary: if you move the selector lever from
a drive position to P, the daytime running
lamps/low-beam headlamps go out after
three minutes.
When the engine is running, the vehicle is
stationary and in high ambient light
conditions :ifyou turn the light switch
to 0012, you turn on the daytime running
lamps and parking lamps.
If the engine is running and you turn the light
switch to 000A, the manual settings take
precedence over the daytime running lamps.
USA only:
The daytime running lamps improve the
visibility of your vehicle during the day. To do
this, the daytime running lamps function must
be switched on using the on-board computer
(Y page 233).
If the engine is running and you turn the light
switch to 0012or000A, the manual settings
take precedence over the daytime running
lamps.
i In the USA, the daytime running lamps are
deactivated upon delivery from the factory.
Low-beam headlamps G
WARNING
When the light switch is set to 0006, the low-
beam headlamps may not be switched on
automatically if there is fog, snow or other
causes of poor visibility due to the weather
conditions such as spray. There is a risk of an
accident.
In such situations, turn the light switch to
000A. Exterior lighting
127Lights and windshield wipers Z
Page 130 of 590

0007000C
Left-hand standing lamps
0008000E Right-hand standing lamps
00090012 Parking lamps, license plate and
instrument cluster lighting
000E0006 Automatic headlamp mode,
controlled by the lights ensor
000F000A Low-beam/high-beam headlamps
Even if the light sensor does not detec tthat
is dark, the side lamps and low-beam
headlamps switch on when the ignition is
switched on and the light switch is set to the
000A position. This is a particularly useful
function in the event of rain and fog.
X To switch on the low-beam headlamps:
turn the SmartKey in the ignition lock to
position 2or start the engine.
X Turn the light switch to 000A.
The green 000Aindicator lamp in the
instrumentc luster lights up.
Parking lamps
! If the battery has been excessively
discharged, the parking lamps or standing
lamps are automatically switched off to
enable the nex tengine start. Always park
your vehicle safely and sufficiently lit
according to legal standards .Avoid the
continuous use of the 0012parking lamps
for several hours .Ifpossible, switch on the
000E right or the 000Cleft standing lamp. 0007000C
Left-hand standing lamps
0008000E Right-hand standing lamps
00090012 Parking lamps, license plate and
instrument cluster lighting
000E0006 Automatic headlamp mode,
controlled by the light sensor
000F000A Low-beam/high-beam headlamps
X To switch on: turn light switch to 0012.
AMG vehicles: the green0012indicator
lamp in the instrument cluster lights up.
Standing lamps 0007000C
Left-hand standing lamps
0008000E Right-hand standing lamps
00090012 Parking lamps, license plate and
instrument cluster lighting
000E0006 Automatic headlamp mode,
controlled by the light sensor
000F000A Low-beam/high-beam headlamps
Switching on the standing lamps ensures the
corresponding side of the vehicle is
illuminated. 128
Exterior lightingLights and windshield wipers
Page 131 of 590

X
To switch on the standing lamps: the
SmartKey is not in the ignition lock or it is
in position 0.
X Turn the light switch to 000C(left-hand side
of the vehicle) or 000E(right-hand side of
the vehicle). Combination switch
Turn signal 0002
High-bea mheadlamps
0003 Turn signal, right
0027 High-beam flasher
0026 Turn signal, left
X To indicate briefly: press the combination
switch briefly to the pressure point in the
direction of arrow 0003or0026.
The corresponding turn signal flashes three
times.
X To indicate: press the combination switch
beyond the pressure point in the direction
of arrow 0003or0026. High-beam headlamps 0002
High-beam headlamps
0003 Turn signal, right
0027 High-beam flasher
0026 Turn signal, left
X To switch on the high-beam headlamps:
turn the SmartKey in the ignition lock to
position 2or start the engine.
X Turn the light switch to 000Aor0006.
X Press the combination switch beyond the
pressure point in the direction of
arrow 0002.
In the 0006position, the high-beam
headlamps are only switched on when it is
dark and the engine is running.
The 0009 indicator lamp in the instrument
cluster lights up when the high-beam
headlamps are switched on.
X To switch off the high-beam
headlamps: move the combination switch
back to its normal position.
The 0009 indicator lamp in the instrument
cluster goes out. Exterior lighting
129Lights and windshield wipers Z