ECO mode MERCEDES-BENZ SL-Class 2014 R131 Comand Manual
[x] Cancel search | Manufacturer: MERCEDES-BENZ, Model Year: 2014, Model line: SL-Class, Model: MERCEDES-BENZ SL-Class 2014 R131Pages: 274, PDF Size: 5.76 MB
Page 87 of 274
format is based on the open GPX (GPS
Exchange) format.
Option 1
X Insert the SD memory card (Y page 197).
X To switch on navigation mode: press the
0012 function button.
X Hide the menu to show the map in full
screen mode (Y page 61).
X Press 0037the COMAND controlle rfor longer
than two seconds.
The current position of the vehicle is saved
as a personal POI on the SD memory card
in the Not Classified category.
i The crosshair position is saved in the
scrolling map function (Y page 108).
Option 2:
X Insert the SD memory card (Y page 197).
X To switch on navigation mode: press the
0012 function button.
X To show the menu: press0037the COMAND
controller.
X Select Position in the navigation system
menu bar by turning 003C0012003Dthe COMAND
controller and press 0037to confirm.
X Select Save Position As Personal POI or
Save Crosshair Pos. as Personal POI ("Move map" function
active) and press 0037to confirm.
The list of personal categories appears.
X Select a category and press 0037to confirm.
X Name for the personal point of interest.
Character entry (Y page 34).
Option 3
X Insert the SD memory card (Y page 197).
X To switch on navigation mode: press the
0012 function button.
X Call up the address entry menu
(Y page 64).
X Select Save from the address entry menu
and press 0037to confirm.
X Select Save As Personal POI and press
0037 to confirm. X
Select a category.
X Enter the name.
The current address is saved as a personal
point of interest on the SD memory card. Importing personal POIs via the online
function
You can import personal POIs (destinations,
routes) via the online function (Y page 167).
When importing, you can choose whether to
write files to the SD memory card or to file
them in the address book. The imported
personal POIs have their own icon and are
filed in the COMAND Online category.
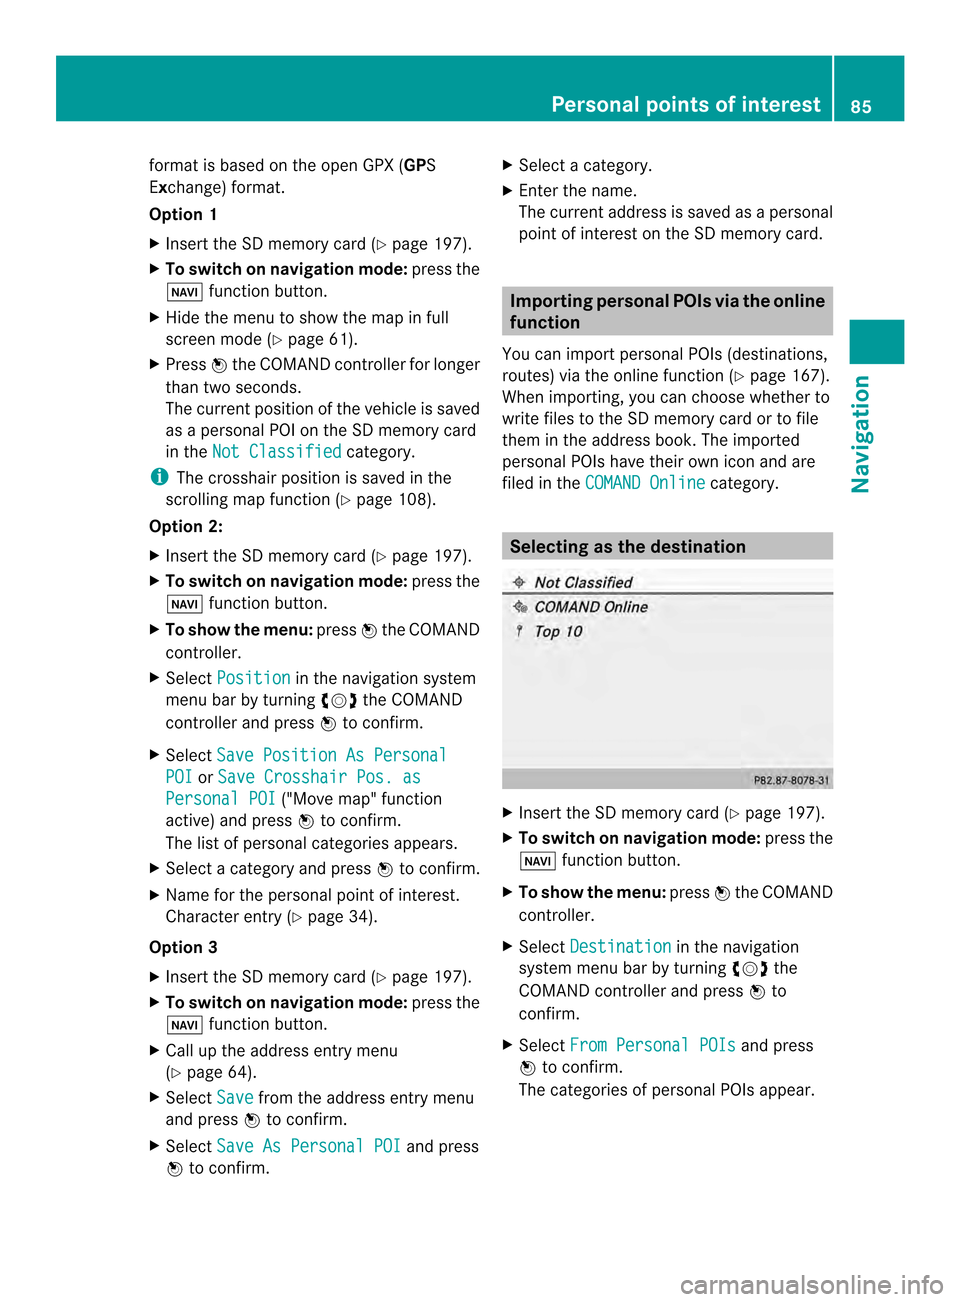
Selecting as the destination
X
Insert the SD memory card (Y page 197).
X To switch on navigation mode: press the
0012 function button.
X To show the menu: press0037the COMAND
controller.
X Select Destination in the navigation
system menu bar by turning 003C0012003Dthe
COMAND controller and press 0037to
confirm.
X Select From Personal POIs and press
0037 to confirm.
The categories of personal POIs appear. Personal points of interest
85Navigation Z
Page 90 of 274
Route guidance
Important notes
COMAND calculates the route to the
destination withou ttaking accoun tofthe
following, for example:
R traffic lights
R stop and give way signs
R merging lanes
R parking or stopping in a no parking/no
stopping zone
R other road and traffic rules and regulations
R narrow bridges
COMAND may give differing navigation
commands if the actual street/traffic
situation does not correspond with the digital
map's data. For example, if the road layout or
the direction of a one-way street has been
changed.
For this reason, you must always observe
road and traffic rules and regulations during
your journey. Road and traffic rules and
regulations always have priority over the
system's driving recommendations.
Route guidance begins once aroute has been
calculated (Y page 69).
COMAND guides you to your destination by
means of navigation announcements in the
form of audible navigation announcements
and route guidance displays.
The route guidance displays can be seen if the
display is switched to navigation mode.
If you do not follow the navigation
announcements or if you leave the calculated
route, COMAND automatically calculates a
new route to the destination.
If the digital map contains the corresponding
information, the following applies:
R during route guidance, COMAND tries to
avoid roads with restricted access. Those
roads, for example, that are closed to
through-traffic.
R roads that have time restrictions (e.g.
closed on Sundays and public holidays) are considered for route guidance on days
when they are open. For this purpose, the
relevant times must be correctly stored in
the database. Displays during route guidance
Change of direction Changes of direction have three phases:
R
preparation phase
R announcement phase
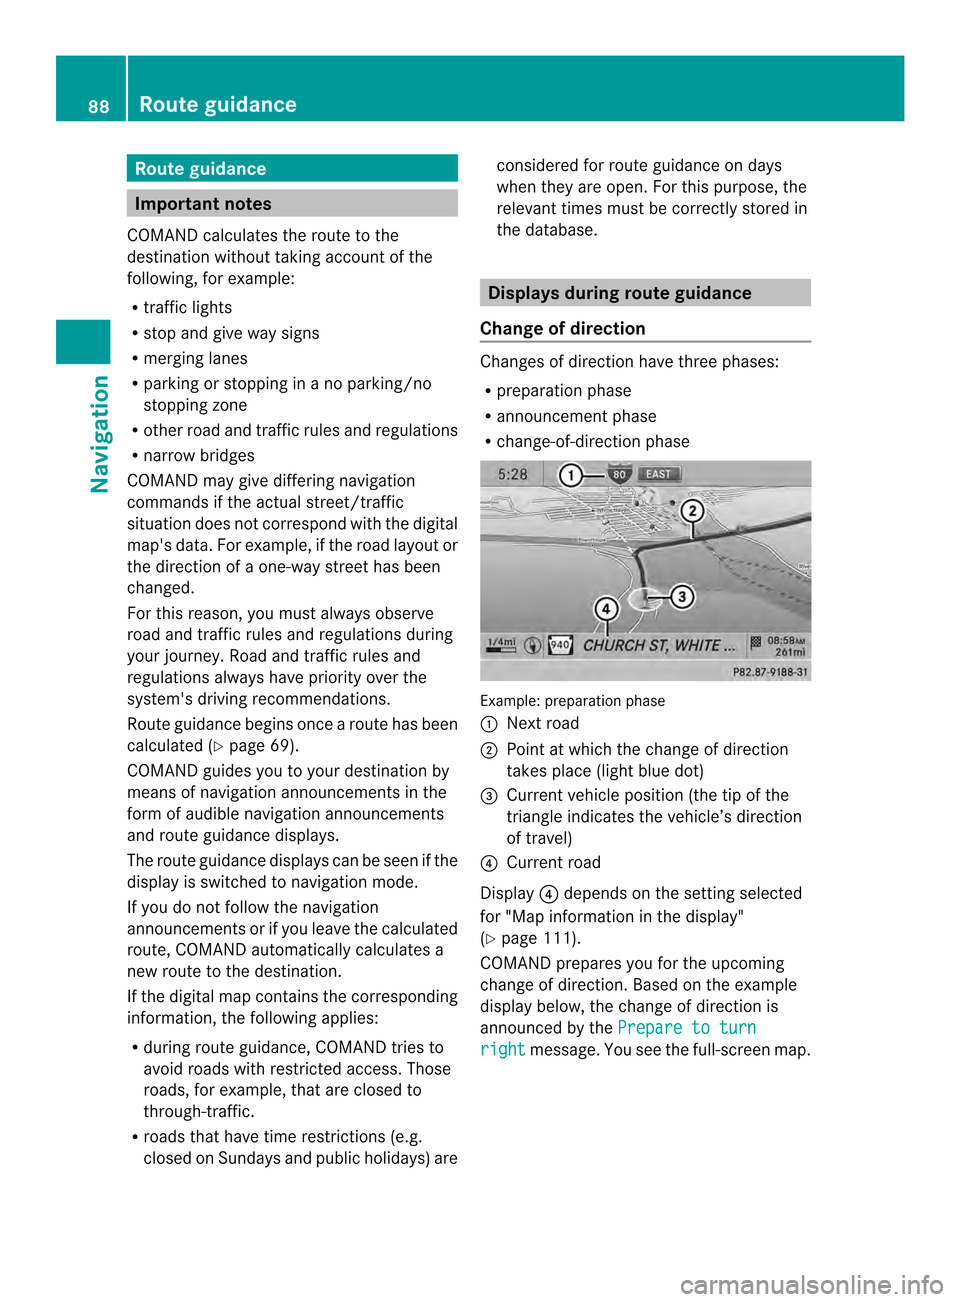
R change-of-direction phase Example: preparation phase
0001
Next road
0002 Point at which the change of direction
takes place (light blue dot)
0014 Current vehicle position (the tip of the
triangle indicates the vehicle’s direction
of travel)
0013 Current road
Display 0013depends on the setting selected
for "Map information in the display"
(Y page 111).
COMAND prepares you for the upcoming
change of direction .Based on the example
display below, the change of direction is
announced by the Prepare to turn right message. You see the full-scree
nmap. 88
Route guidanceNavigation
Page 92 of 274
0013
Map orientation selected
0011 Map scale selected
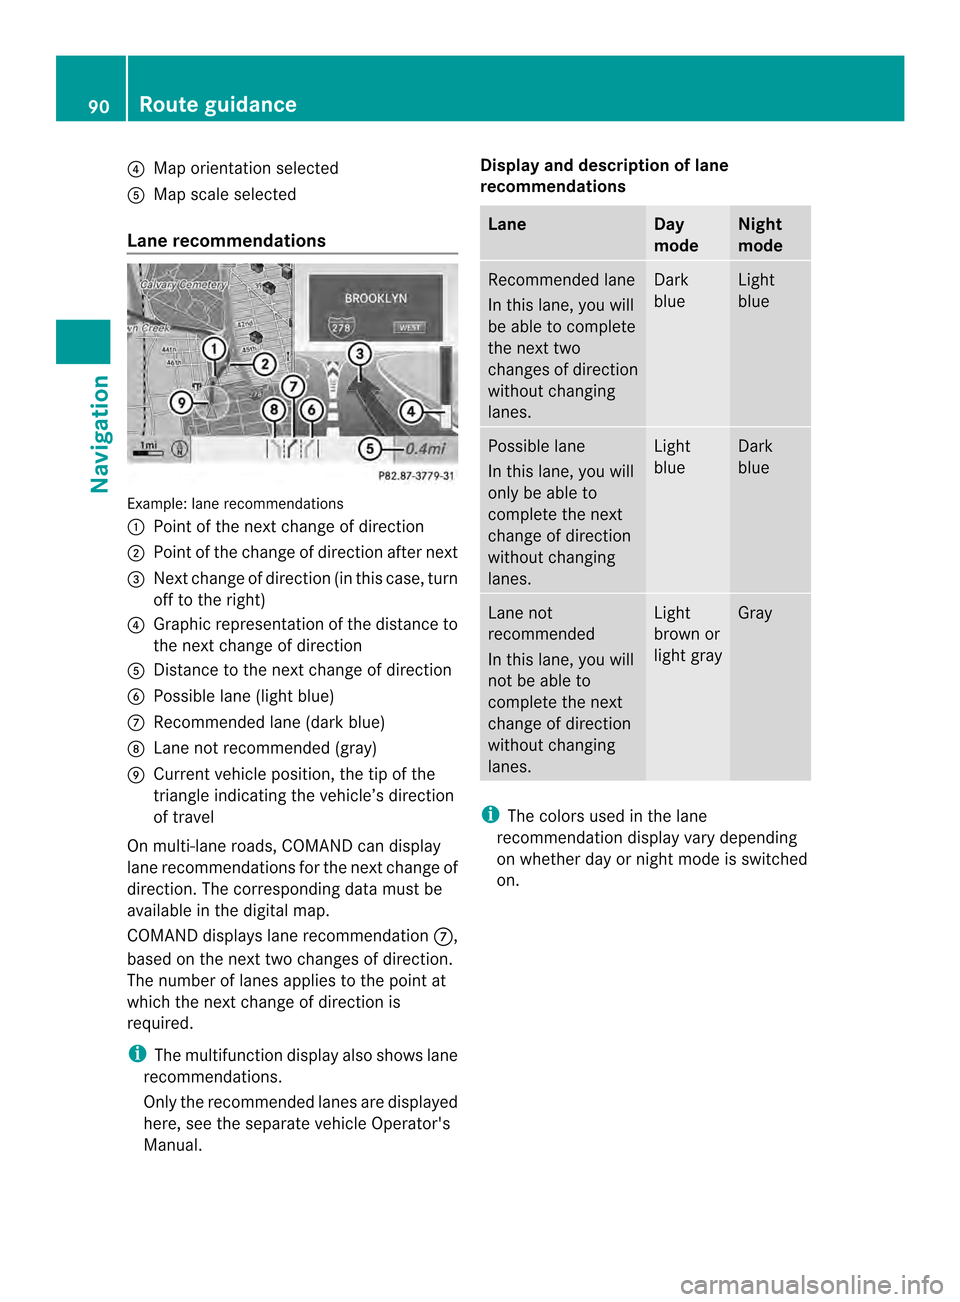
Lane recommendations Example: lane recommendations
0001 Point of the next change of direction
0002 Point of the change of direction after next
0014 Next change of direction (in this case, turn
off to the right)
0013 Graphic representation of the distance to
the next change of direction
0011 Distance to the next change of direction
0012 Possible lane (light blue)
0005 Recommended lane (dark blue)
0006 Lane not recommended (gray)
0007 Current vehicle position, the tip of the
triangle indicating the vehicle’s direction
of travel
On multi-lane roads, COMAND can display
lane recommendations for the next change of
direction. The corresponding data must be
available in the digital map.
COMAND displays lane recommendation 0005,
based on the next two changes of direction.
The number of lanes applies to the point at
which the next change of direction is
required.
i The multifunction display also shows lane
recommendations.
Only the recommended lanes are displayed
here, see the separate vehicle Operator's
Manual. Display and description of lane
recommendations Lane Day
mode Night
mode
Recommended lane
In this lane, you will
be able to complete
the next two
changes of direction
without changing
lanes. Dark
blue Light
blue
Possible lane
In this lane, you will
only be able to
complete the next
change of direction
without changing
lanes. Light
blue Dark
blue
Lane not
recommended
In this lane, you will
not be able to
complete the next
change of direction
without changing
lanes. Light
brown or
light gray Gray
i
The colors used in the lane
recommendation display vary depending
on whether day or night mode is switched
on. 90
Route guidanceNavigation
Page 95 of 274
X
Select Route in the navigation system
menu bar by turning 003C0012003Dthe COMAND
controlle rand press 0037to confirm.
X Select Detour and press
0037to confirm.
X To block a section of the route: select
Longer or
Shorter repeatedly and confirm
using 0037until the desired sectio nhas been
selected.
i The total length of the sectio nthat can be
blocked is defined by the digital map. The
menu items are available accordingly.
X To start route calculation: selectStart and press
0037to confirm.
X To delete the blockeds ection:select
Delete while the message is shown and
press 0037to confirm.
COMAND calculates the rout ewithout the
block.
Selecting an alternative route With the "Alternative route" function, routes
other than the original one can be calculated.
Routes 1to3a re calculated with the current
settings for the route type and route options
and are show nwith a dark blue line
(Y page 62).
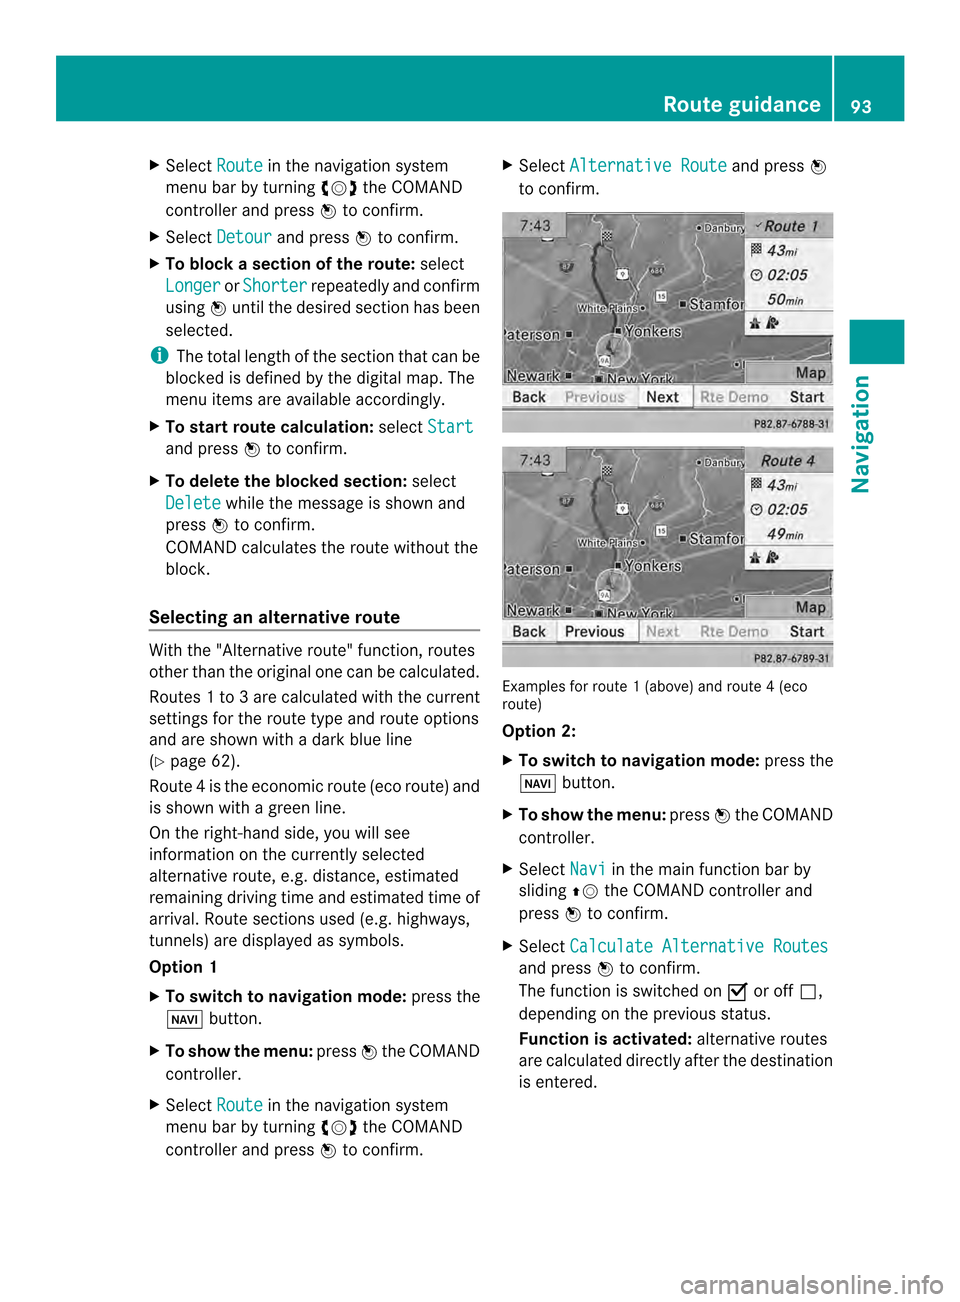
Route 4is the economic route (eco route) and
is shown with a green line.
On the right-hand side, you will see
information on the currently selected
alternative route, e.g. distance, estimated
remaining driving time and estimated time of
arrival. Route sections used (e.g. highways,
tunnels) are displayed as symbols.
Option 1
X To switch to navigation mode: press the
0012 button.
X To show the menu: press0037the COMAND
controller.
X Select Route in the navigation system
menu bar by turning 003C0012003Dthe COMAND
controller and press 0037to confirm. X
Select Alternative Route and press
0037
to confirm. Examples for route
1(above) and route 4(eco
route)
Option 2:
X To switch to navigation mode: press the
0012 button.
X To show the menu: press0037the COMAND
controller.
X Select Navi in the main function bar by
sliding 00360012the COMAND controller and
press 0037to confirm.
X Select Calculate Alternative Routes and press
0037to confirm.
The function is switched on 0010or off 0003,
depending on the previous status.
Function is activated: alternative routes
are calculated directly after the destination
is entered. Route guidance
93Navigation Z
Page 97 of 274
Route display
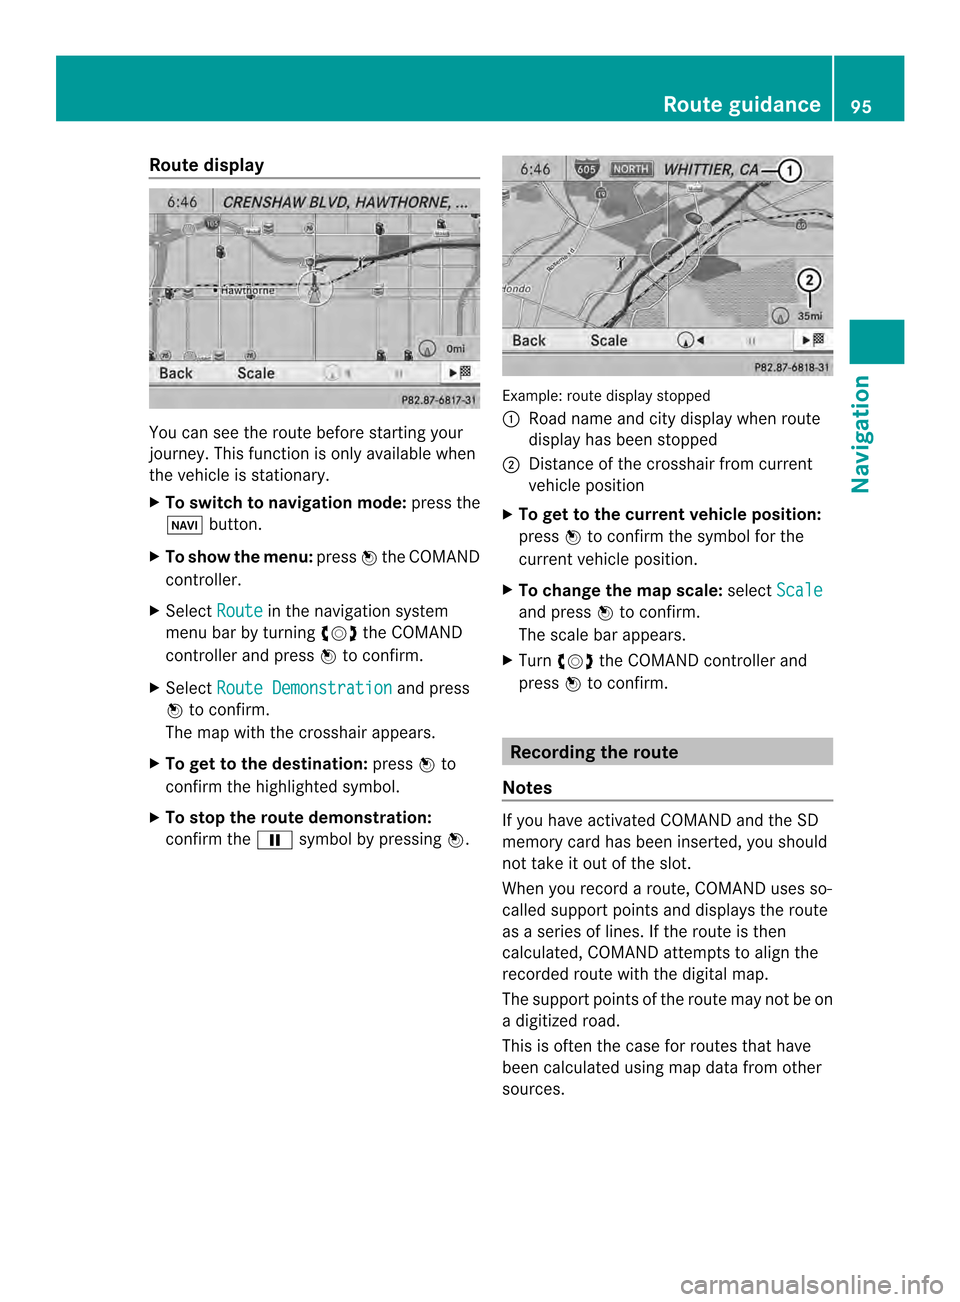
You can see the route before starting your
journey .This function is only available when
the vehicle is stationary.
X To switch to navigation mode: press the
0012 button.
X To show the menu: press0037the COMAND
controller.
X Select Route in the navigation system
menu bar by turning 003C0012003Dthe COMAND
controller and press 0037to confirm.
X Select Route Demonstration and press
0037 to confirm.
The map with the crosshair appears.
X To get to the destination: press0037to
confirm the highlighted symbol.
X To stop the route demonstration:
confirm the 0009symbol by pressing 0037. Example: route display stopped
0001
Road name and city display when route
display has been stopped
0002 Distance of the crosshair from current
vehicle position
X To get to the current vehicle position:
press 0037to confirm the symbol for the
current vehicle position.
X To change the map scale: selectScale and press
0037to confirm.
The scale bar appears.
X Turn 003C0012003D the COMAND controller and
press 0037to confirm. Recording the route
Notes If you have activated COMAND and the SD
memory card has been inserted, you should
not take it out of the slot.
When you record a route, COMAND uses so-
called support points and displays the route
as a series of lines. If the route is then
calculated, COMAND attemptst
o align the
recorded route with the digital map.
The support points of the route may not be on
a digitized road.
This is often the case for routes that have
been calculated using map data from other
sources. Route guidance
95Navigation Z
Page 98 of 274
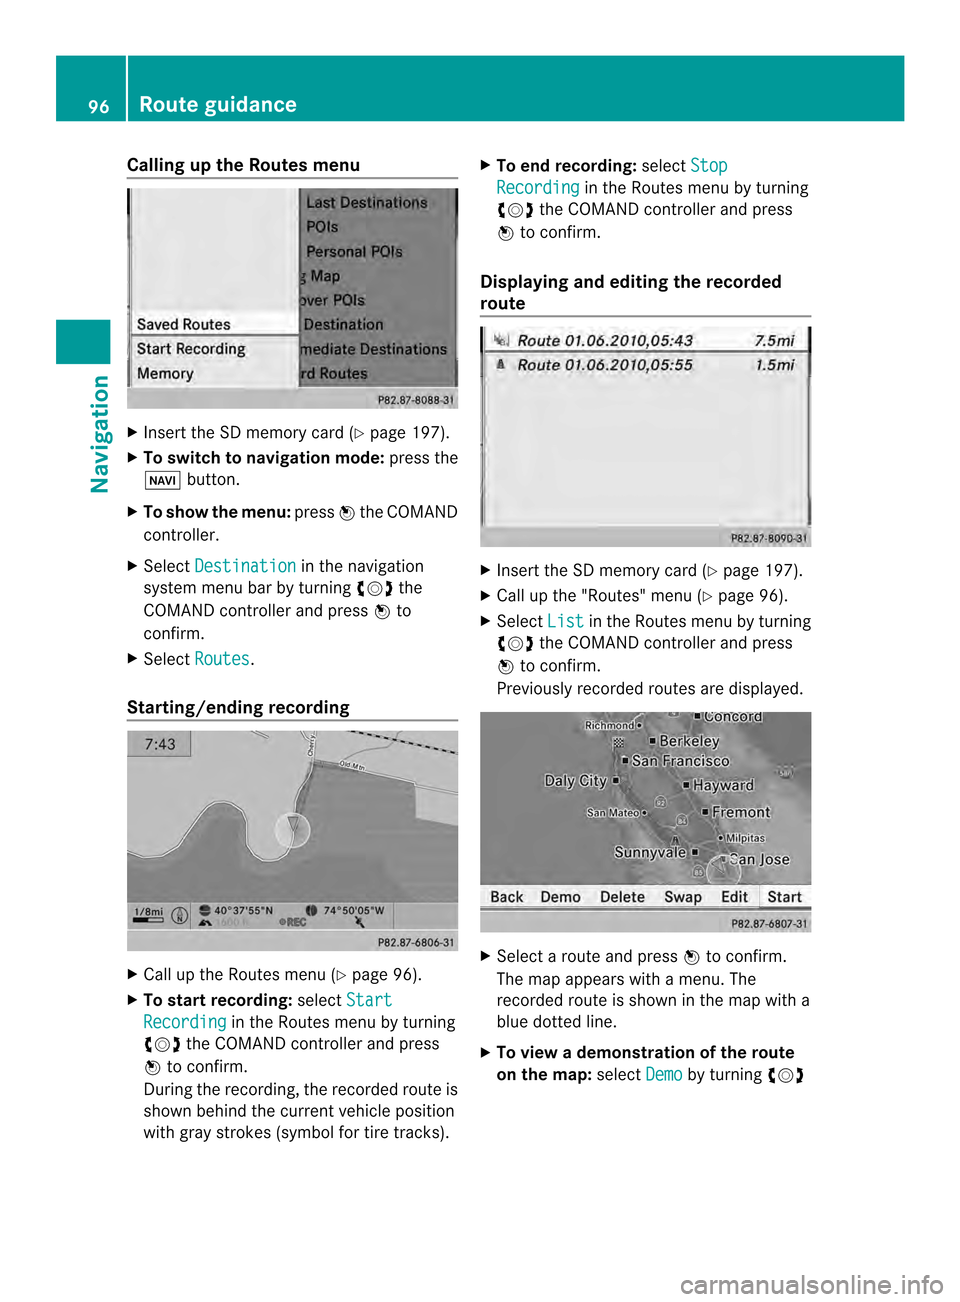
Calling up the Routes menu
X
Insert the SD memory car d(Ypage 197).
X To switch to navigation mode: press the
0012 button.
X To show the menu: press0037the COMAND
controller.
X Select Destination in the navigation
system menu bar by turning 003C0012003Dthe
COMAND controller and press 0037to
confirm.
X Select Routes .
Starting/ending recording X
Call up the Routes menu (Y page 96).
X To start recording: selectStart Recording in the Routes menu by turning
003C0012003D the COMAND controller and press
0037 to confirm.
During the recording, the recorded route is
shown behind the curren tvehicle position
with gray strokes (symbol for tire tracks). X
To end recording: selectStop Recording in the Routes menu by turning
003C0012003D the COMAND controller and press
0037 to confirm.
Displaying and editing the recorded
route X
Insert the SD memory card (Y page 197).
X Call up the "Routes" menu (Y page 96).
X Select List in the Routes menu by turning
003C0012003D the COMAND controller and press
0037 to confirm.
Previously recorded routes are displayed. X
Select a route and press 0037to confirm.
The map appears with a menu. The
recorded route is shown in the map with a
blue dotted line.
X To view a demonstration of the route
on the map: selectDemo by turning
003C0012003D 96
Route guidanceNavigation
Page 121 of 274
Updating the digital map
Introduction The digital maps generated by the map
software become outdated in the same way
as conventional road maps. Optimal route
guidance can only be provided by
the navigation system in conjunction with the
most up-to-date map software.
Information about new versions of the digital
map can be obtained from an authorized
Mercedes-Benz Center. You can have the
digital map updated there with a DVD, or you
can update it yourself.
Important safety notes G
WARNING
Never leave the engine running in an enclosed
space. The exhaust gases contain carbon
monoxide. Inhaling exhaust gases constitutes
a health hazard and could lead to loss of
consciousness or even death.
Carrying out a manual update i
The update process can tak ealong time
(over an hour), depending on the size of the
digital map. During this time, you will only
be able to switch on radio mode and to
accept incoming calls. The update will be
completed more quickly if the vehicle is
stationary.
If you start the update with the engine
switched off and the starter battery has
insufficient power, COMAND may
automatically switch off .This protects the
battery. If this occurs, restart the update
with the engine running.
X Insert the DVD:
R
in the single DVD drive (Y page 194)
R in the DVD changer (Y page 194)
COMAND checks whether the digital map
on the DVD is compatible with the
navigation system and system software. Ap
rompt then appears asking if you want
to install the database. Versions of the
database currently installed and the
database that is to be installed are
displayed.
X Select Yes or
No and press
0037to confirm.
After selecting Yes , an activation code
must be entered when installing a database
for the first time. You will receive the
activation code when you buy the
navigation DVD.
If you select No , the process will be
canceled.
X Enter the activation code.
After entering the activation code
correctly, COMAND starts updating the
digital map. Once the update is finished,
you will see a message.
X To confirm the message: press0037the
COMAND controller.
X Take the DVD out of the slot.
While the update is running, you will see a
message to this effect and a progress bar.
The navigation system is not operational
until the update is complete.
i You cannot eject the DVD during the
update. If you switch off COMAND during
the update, the update is interrupted. It
then continues from where it was
interrupted when the system is restarted.
COMAND may prompt you to change the DVD
during the update.
X Press the 0009(for DVD changer) or
0007 (for single DVD drive) load/eject
button.
X Take the DVD out of the slot.
X Insert the requested DVD.
Once the update has been successfully
completed, you will see a message to this
effect.
X To confirm the message: press0037the
COMAND controller.
X Take the DVD out of the slot.
The update is complete. Additional settings
119Navigation Z
Page 128 of 274
Your COMAND equipment
These operating instructions describe all the
standard and optional equipmen tfor your
COMAND system, as available at the time of
going to print. Country-specific differences
are possible. Please note that your COMAND
system may not be equipped with all the
features described. General notes
Important safety notes
G
WARNING
If you operate mobile communication
equipment while driving, you will be
distracted from traffic conditions. You could
also lose control of the vehicle. There is a risk
of an accident.
Only operate this equipment when the vehicle
is stationary.
If you make a call on your mobile phone while
driving, always use hands-free mode. Only
use the mobile phone when road, weather
and traffic conditions permit. Some
jurisdictions prohibit the driver from using a
mobile phone while driving a vehicle.
Bear in mind that at a speed of only 30 mph
(approximately 50 km/h), the vehicle covers
a distance of 44 feet (approximately 14 m)
per second.
Excessive levels of electromagnetic radiation
may cause damage to your health and the
health of others.
There is scientific discussion surrounding the
possible health risks posed by
electromagnetic fields. You can reduce this
risk by using an exterior antenna.
Therefore, only use mobile communication
equipment if it is connected to the exterior
antenna of the vehicle. Introduction
COMAND provides telephony via the
Bluetooth ®
interface.
When connecting Bluetooth ®
-capable mobile
phones with PBAP (Phone BookAccess
Profile), the contacts are automatically
downloaded to COMAND.
With a suitable mobile phone, you can use the
hands-free system and receive vCards via the
Bluetooth ®
interface.
You can use the text message function
(receiving and reading) if the mobile phone
supports the MAP (Message AccessProfile)
Bluetooth ®
profile.
You can obtain more detailed information
about suitable mobile phones and about
connecting Bluetooth ®
-capable mobile
phones to COMAND on the Internet at
http://www.mbusa-mobile.com. Or call
the Mercedes-Benz Customer Assistance
center at
1-800-FOR-MERCedes(1-800-367-6372) for
the USA or at 1-800-387-0100 for Canada. Call disconnection while the vehicle is
in motion
Ac all may be disconnected if:
R there is insufficient network coverage in
certain areas.
R you move from one transmitter/receiver
area (cell) into another and no channels are
free.
R you use a SIM card which is no tcompatible
with the network available. Operating options
You can operate the telephone by:
R using the COMAND controller:
turn 003C0012003D
slide 003400120035 or003600120008 126
General notesTelephone
Page 196 of 274
Handle discs only whe
nthe vehicle is
stationary.
Bear in mind that at a speed of just 30 mph
(approximately 50 km/h), your vehicle is
covering a distance of 44 feet (approximately
14 m) every second. Inserting/ejecting CDs/DVDs
Notes If the CD/DVDh
as a printed side, this must
face upwards when the CD/DV Dis inserted.
If neither side is printed, the side to be played
should face downwards. The system may not
be able to play CDs/DVDsw ith copy
protection.
i If a medium contains other files in
additio nto music files, the loading time
before the first track starts to play may be
longer.
Inserting adisc into the single DVD
drive X
Press the 0007eject button.
If there is a disc already inserted, it will be
ejected.
X Take the disc out of the slot.
X Insert a disc into the slot.
If the disc is correctly inserted and is a
suitable disc, it is drawn in by the drive and
played.
Ejecting adisc from the single DVD
drive X
Press the 0007eject button.
X Take the disc out of the slot.
If you do not take the disc out of the slot, it
is drawn in again automatically after a short
while and reloaded. Inserting discs into the DVD changer The DVD changer has a fixed magazine with
six trays.
X
To insert aCD/DVD into the magazine
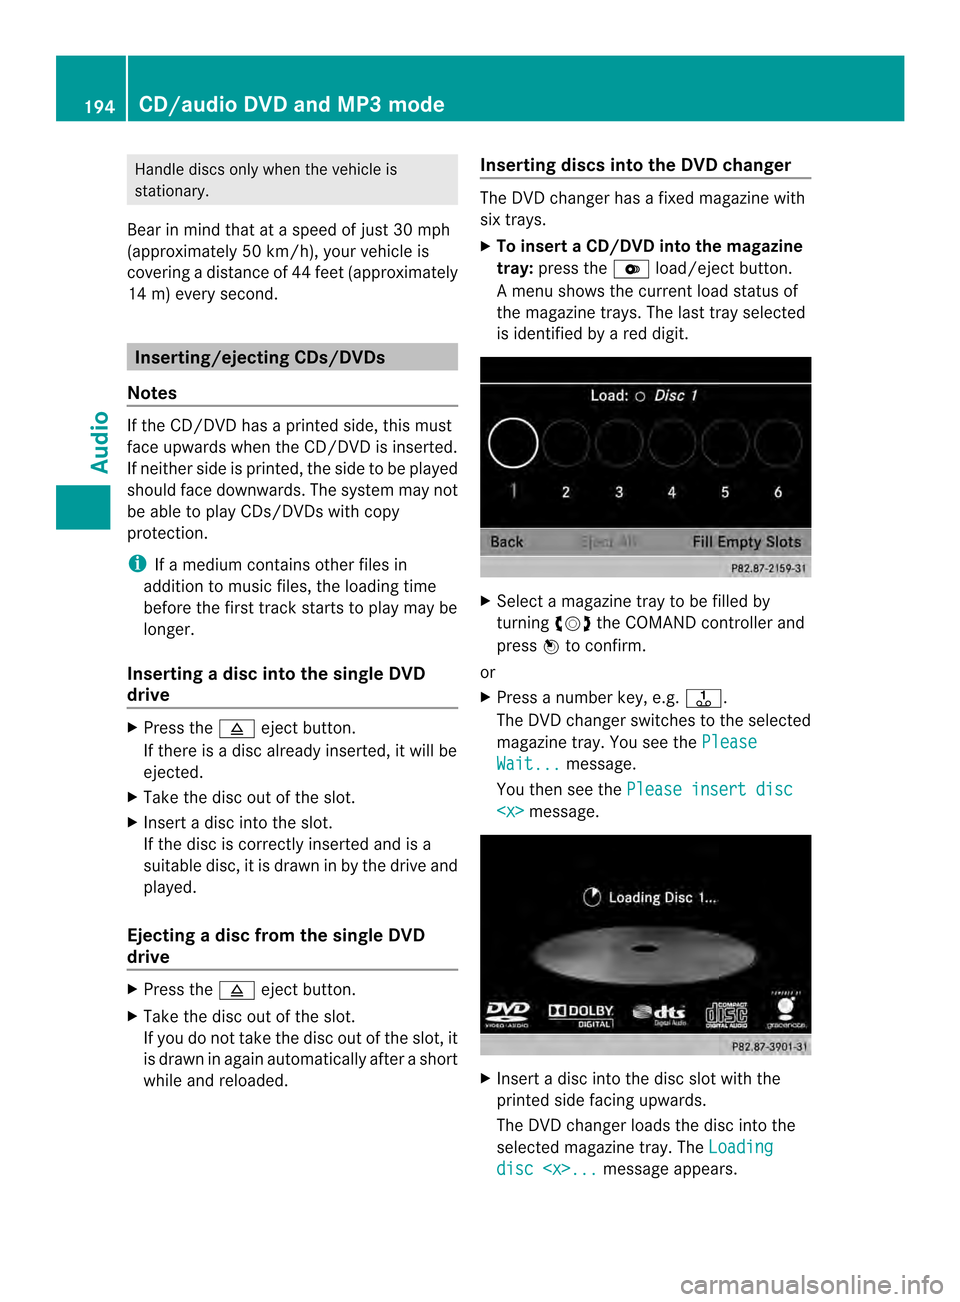
tray: press the 0009load/ejec tbutton.
Am enu shows the curren tload status of
the magazine trays. The last tray selected
is identified by a red digit. X
Select a magazine tray to be filled by
turning 003C0012003Dthe COMAND controller and
press 0037to confirm.
or
X Press a number key, e.g. 0029.
The DVD changer switches to the selected
magazine tray. You see the Please Wait... message.
You then see the Please insert disc
X
Insert a disc into the disc slot with the
printed side facing upwards.
The DVD changer loads the disc into the
selected magazine tray. The Loading disc
CD/audio DVD and MP3 modeAudio
Page 197 of 274
i
It may take some time for the disc to be
loaded, depending on the type of disc. If no
disc is inserted for approximately 20
seconds, the display returns to the
magazine menu.
The DVD changer plays the disc if:
R it has been inserted correctly.
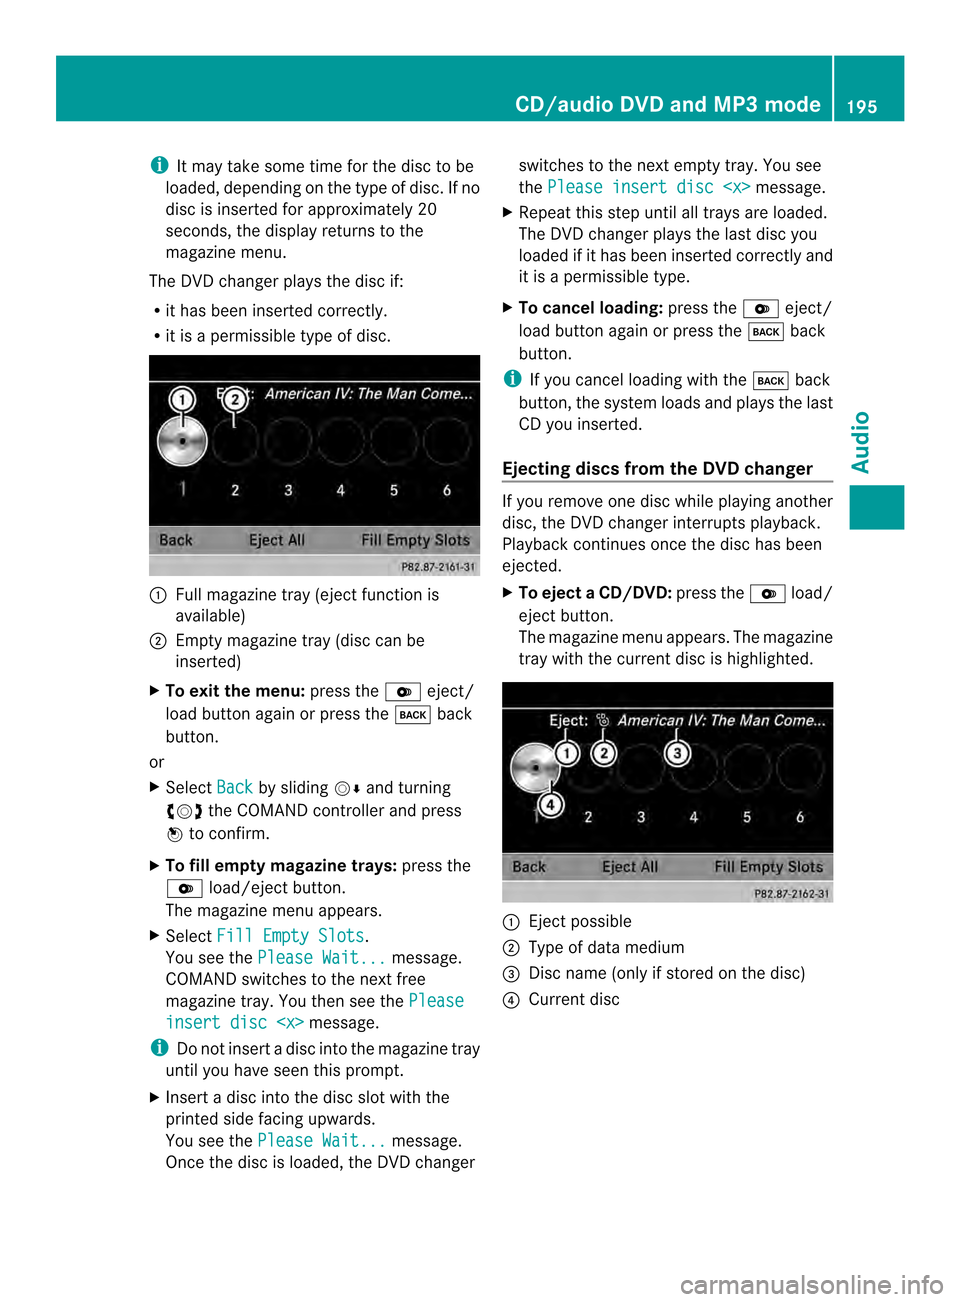
R it is a permissible type of disc. 0001
Full magazine tray (eject function is
available)
0002 Empty magazine tray (disc can be
inserted)
X To exit the menu: press the0009eject/
load button again or press the 000Aback
button.
or
X Select Back by sliding
00120008and turning
003C0012003D the COMAND controller and press
0037 to confirm.
X To fill empty magazine trays: press the
0009 load/eject button.
The magazine menu appears.
X Select Fill Empty Slots .
You see the Please Wait... message.
COMAND switches to the next free
magazine tray. You then see the Pleaseinsert disc
i Do not insert a disc into the magazine tray
until you have seen this prompt.
X Insert a disc into the disc slot with the
printed side facing upwards.
You see the Please Wait... message.
Once the disc is loaded, the DVD changer switches to the next empty tray. You see
the
Please insert disc
X Repeat this step until all trays are loaded.
The DVD changer plays the last disc you
loaded if it has been inserted correctly and
it is a permissible type.
X To cancel loading: press the0009eject/
load button again or press the 000Aback
button.
i If you cancel loading with the 000Aback
button, the system loads and plays the last
CD you inserted.
Ejecting discs from the DVD changer If you remove one disc while playing another
disc, the DVD changer interrupts playback.
Playback continues once the disc has been
ejected.
X
To eject aCD/DVD: press the 0009load/
eject button.
The magazine menu appears .The magazine
tray with the current disc is highlighted. 0001
Ejectp ossible
0002 Type of data medium
0014 Disc name (only if stored on the disc)
0013 Current disc CD/audio DVD and MP3 mode
195Audio Z