sensor MERCEDES-BENZ SL-Class 2014 R131 Service Manual
[x] Cancel search | Manufacturer: MERCEDES-BENZ, Model Year: 2014, Model line: SL-Class, Model: MERCEDES-BENZ SL-Class 2014 R131Pages: 618, PDF Size: 7.88 MB
Page 264 of 618
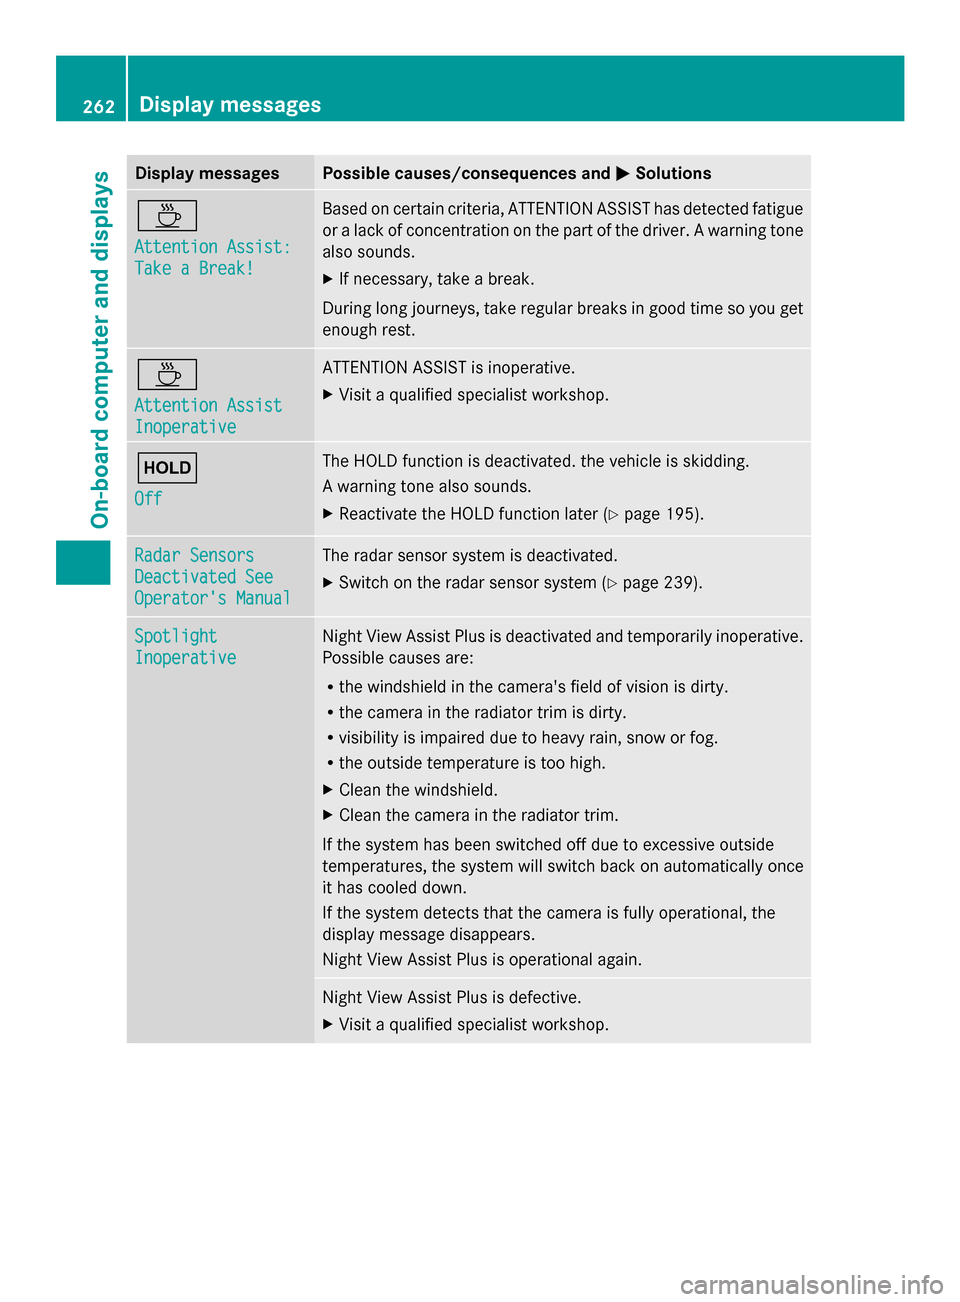
Display messages Possible causes/consequences and
0050
0050Solutions 00AD
Attention Assist: Attention Assist:
Take a Break! Take a Break! Based on certain criteria, ATTENTION ASSIST has detected fatigue
or a lack of concentration on the part of the driver. A warning tone
also sounds.
X
If necessary, take a break.
During long journeys, take regular breaks in good time so you get
enough rest. 00AD
Attention Assist Attention Assist
Inoperative Inoperative ATTENTION ASSIST is inoperative.
X
Visit a qualified specialist workshop. 00D9
Off Off The HOLD function is deactivated. the vehicle is skidding.
A warning tone also sounds.
X
Reactivate the HOLD function later (Y page 195).Radar Sensors Radar Sensors
Deactivated See Deactivated See
Operator's Manual Operator's Manual The radar sensor system is deactivated.
X
Switch on the radar sensor system (Y page 239).Spotlight Spotlight
Inoperative Inoperative Night View Assist Plus is deactivated and temporarily inoperative.
Possible causes are:
R
the windshield in the camera's field of vision is dirty.
R the camera in the radiator trim is dirty.
R visibility is impaired due to heavy rain, snow or fog.
R the outside temperature is too high.
X Clean the windshield.
X Clean the camera in the radiator trim.
If the system has been switched off due to excessive outside
temperatures, the system will switch back on automatically once
it has cooled down.
If the system detects that the camera is fully operational, the
display message disappears.
Night View Assist Plus is operational again. Night View Assist Plus is defective.
X
Visit a qualified specialist workshop. 262
Display
messagesOn-board computer and displays
Page 265 of 618
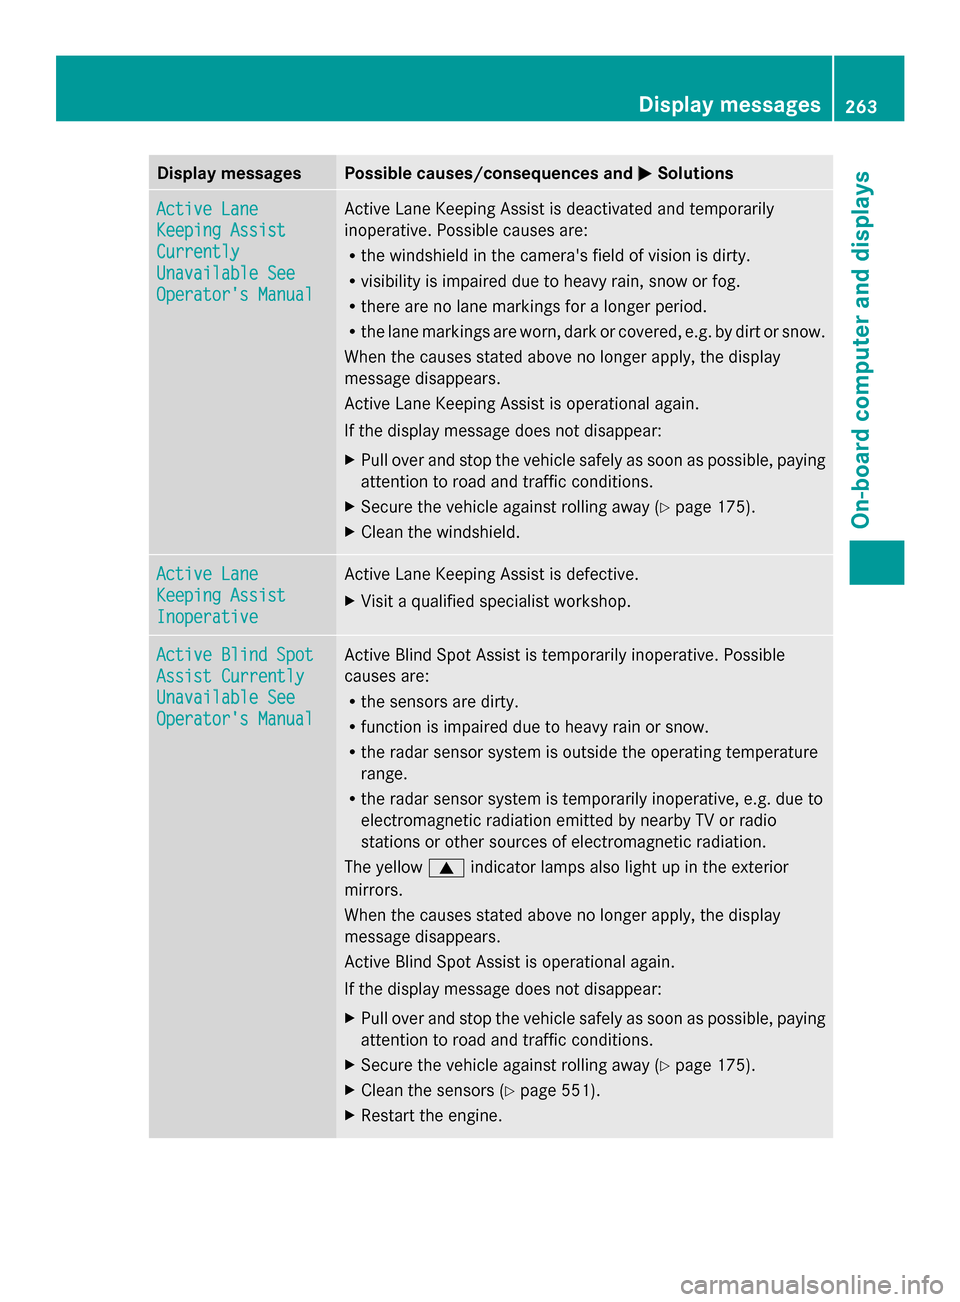
Display messages Possible causes/consequences and
0050
0050Solutions Active Lane
Active Lane
Keeping Assist Keeping Assist
Currently Currently
Unavailable See Unavailable See
Operator's Manual Operator's Manual Active Lane Keeping Assist is deactivated and temporarily
inoperative. Possible causes are:
R
the windshield in the camera's field of vision is dirty.
R visibility is impaired due to heavy rain, snow or fog.
R there are no lane markings for a longer period.
R the lane markings are worn, dark or covered, e.g. by dirt or snow.
When the causes stated above no longer apply, the display
message disappears.
Active Lane Keeping Assist is operational again.
If the display message does not disappear:
X Pull over and stop the vehicle safely as soon as possible, paying
attention to road and traffic conditions.
X Secure the vehicle against rolling away ( Ypage 175).
X Clean the windshield. Active Lane Active Lane
Keeping Assist Keeping Assist
Inoperative Inoperative Active Lane Keeping Assist is defective.
X
Visit a qualified specialist workshop. Active Blind Spot Active Blind Spot
Assist Currently Assist Currently
Unavailable See Unavailable See
Operator's Manual Operator's Manual Active Blind Spot Assist is temporarily inoperative. Possible
causes are:
R
the sensors are dirty.
R function is impaired due to heavy rain or snow.
R the radar sensor system is outside the operating temperature
range.
R the radar sensor system is temporarily inoperative, e.g. due to
electromagnetic radiation emitted by nearby TV or radio
stations or other sources of electromagnetic radiation.
The yellow 0063indicator lamps also light up in the exterior
mirrors.
When the causes stated above no longer apply, the display
message disappears.
Active Blind Spot Assist is operational again.
If the display message does not disappear:
X Pull over and stop the vehicle safely as soon as possible, paying
attention to road and traffic conditions.
X Secure the vehicle against rolling away ( Ypage 175).
X Clean the sensors (Y page 551).
X Restart the engine. Display
messages
263On-board computer and displays Z
Page 267 of 618
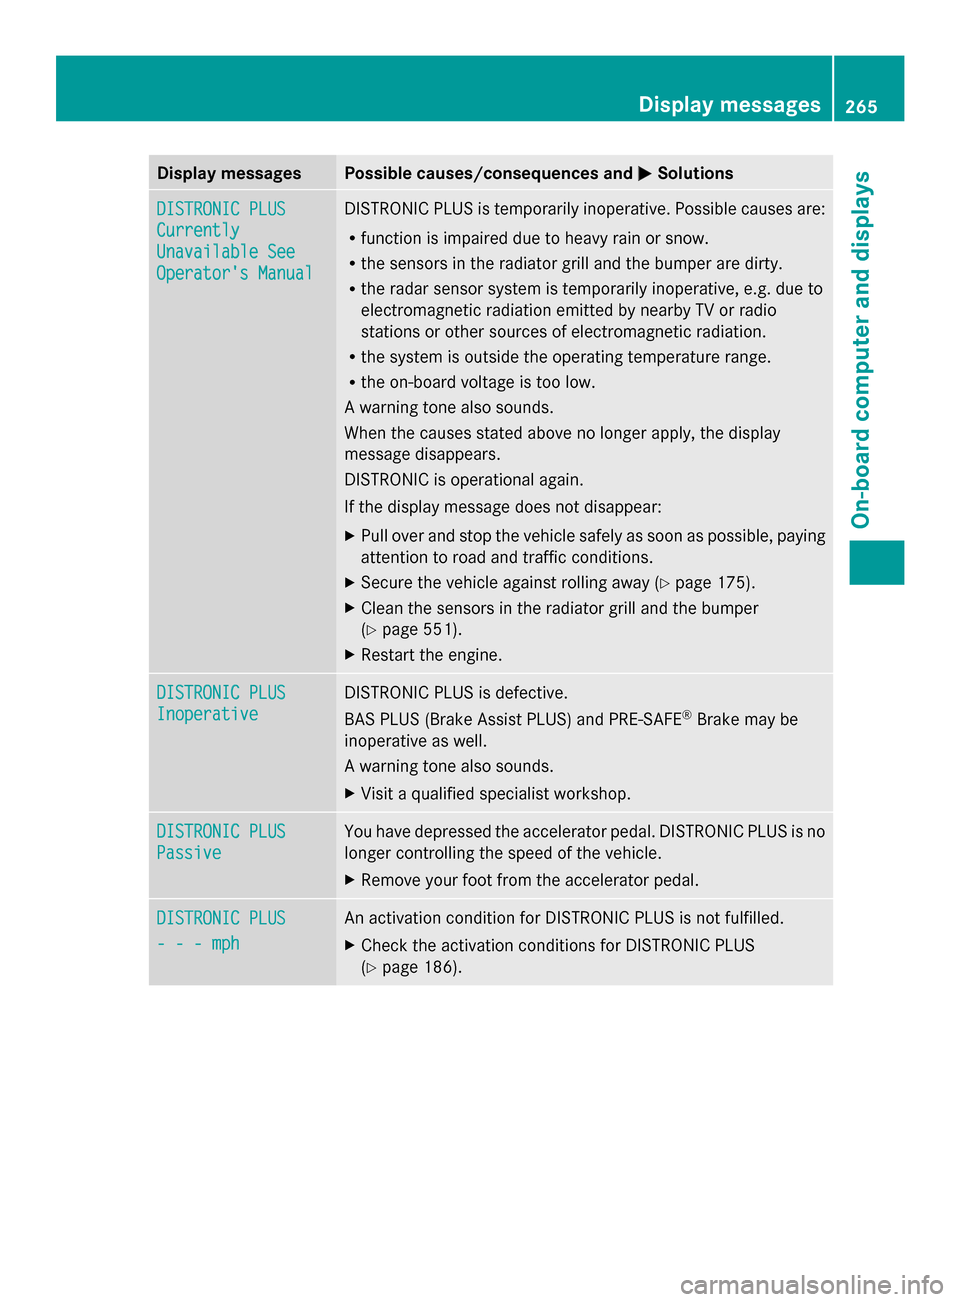
Display messages Possible causes/consequences and
0050
0050Solutions DISTRONIC PLUS
DISTRONIC PLUS
Currently Currently
Unavailable See Unavailable See
Operator's Manual Operator's Manual DISTRONIC PLUS is temporarily inoperative. Possible causes are:
R
function is impaired due to heavy rain or snow.
R the sensors in the radiator grill and the bumper are dirty.
R the radar sensor system is temporarily inoperative, e.g. due to
electromagnetic radiation emitted by nearby TV or radio
stations or other sources of electromagnetic radiation.
R the system is outside the operating temperature range.
R the on-board voltage is too low.
A warning tone also sounds.
When the causes stated above no longer apply, the display
message disappears.
DISTRONIC is operational again.
If the display message does not disappear:
X Pull over and stop the vehicle safely as soon as possible, paying
attention to road and traffic conditions.
X Secure the vehicle against rolling away ( Ypage 175).
X Clean the sensors in the radiator grill and the bumper
(Y page 551).
X Restart the engine. DISTRONIC PLUS DISTRONIC PLUS
Inoperative Inoperative DISTRONIC PLUS is defective.
BAS PLUS (Brake Assist PLUS) and PRE-SAFE
®
Brake may be
inoperative as well.
A warning tone also sounds.
X Visit a qualified specialist workshop. DISTRONIC PLUS DISTRONIC PLUS
Passive Passive You have depressed the accelerator pedal. DISTRONIC PLUS is no
longer controlling the speed of the vehicle.
X
Remove your foot from the accelerator pedal. DISTRONIC PLUS DISTRONIC PLUS
- - - mph - - - mph An activation condition for DISTRONIC PLUS is not fulfilled.
X
Check the activation conditions for DISTRONIC PLUS
(Y page 186). Display
messages
265On-board computer and displays Z
Page 270 of 618
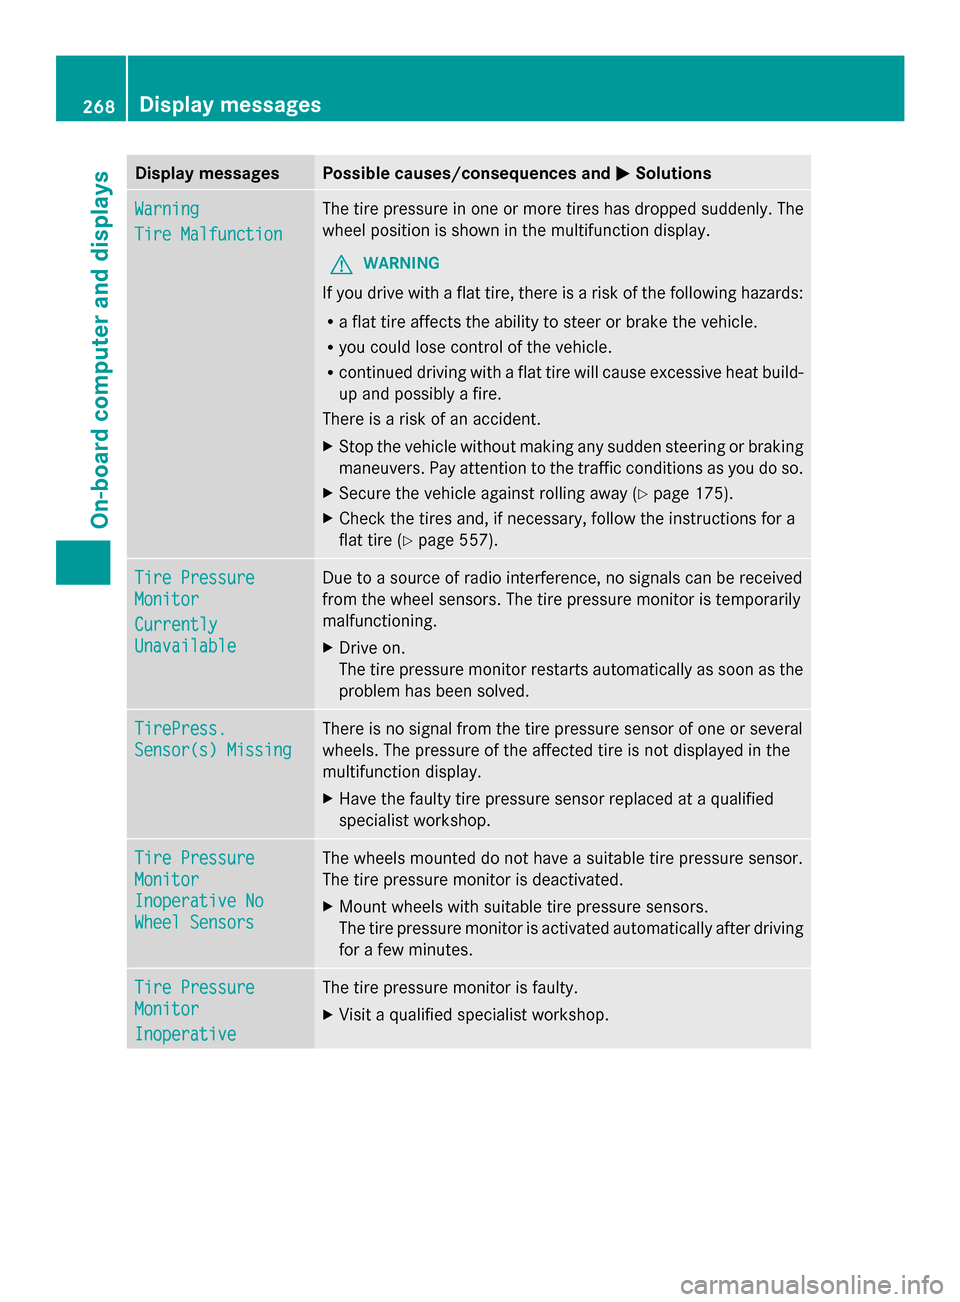
Display messages Possible causes/consequences and
0050
0050Solutions Warning
Warning
Tire Malfunction Tire Malfunction The tire pressure in one or more tires has dropped suddenly. The
wheel position is shown in the multifunction display.
G WARNING
If you drive with a flat tire, there is a risk of the following hazards:
R a flat tire affects the ability to steer or brake the vehicle.
R you could lose control of the vehicle.
R continued driving with a flat tire will cause excessive heat build-
up and possibly a fire.
There is a risk of an accident.
X Stop the vehicle without making any sudden steering or braking
maneuvers. Pay attention to the traffic conditions as you do so.
X Secure the vehicle against rolling away ( Ypage 175).
X Check the tires and, if necessary, follow the instructions for a
flat tire (Y page 557). Tire Pressure Tire Pressure
Monitor Monitor
Currently Currently
Unavailable Unavailable Due to a source of radio interference, no signals can be received
from the wheel sensors. The tire pressure monitor is temporarily
malfunctioning.
X
Drive on.
The tire pressure monitor restarts automatically as soon as the
problem has been solved. TirePress. TirePress.
Sensor(s) Missing Sensor(s) Missing There is no signal from the tire pressure sensor of one or several
wheels. The pressure of the affected tire is not displayed in the
multifunction display.
X
Have the faulty tire pressure sensor replaced at a qualified
specialist workshop. Tire Pressure Tire Pressure
Monitor Monitor
Inoperative No Inoperative No
Wheel Sensors Wheel Sensors The wheels mounted do not have a suitable tire pressure sensor.
The tire pressure monitor is deactivated.
X
Mount wheels with suitable tire pressure sensors.
The tire pressure monitor is activated automatically after driving
for a few minutes. Tire Pressure Tire Pressure
Monitor Monitor
Inoperative Inoperative The tire pressure monitor is faulty.
X
Visit a qualified specialist workshop. 268
Display
messagesOn-board computer and displays
Page 283 of 618

Engine
Problem Possible causes/consequences and
0050
0050Solutions 00B9
The yellow Check
Engine warning lamp
lights up while the
engine is running.
There may be a malfunction, for example:
R
in the engine management
R in the fuel injection system
R in the exhaust system
R in the ignition system
R in the fuel system
The emission limit values may be exceeded and the engine may
be running in emergency mode.
X Have the vehicle checked as soon as possible at a qualified
specialist workshop.
i In some states, you must immediately visit a qualified
specialist workshop as soon as the yellow Check Engine warning
lamp lights up. This is due to the legal requirements in effect in
these states. If in doubt, check whether such legal regulations
apply in the state in which you are currently driving. 00B6
The yellow reserve fuel
warning lamp lights up
while the engine is
running.
The fuel level has dropped into the reserve range.
X
Refuel at the nearest gas station. 00B6
The yellow reserve fuel
warning lamp flashes
while the vehicle is in
motion.
In addition, the
00B9
Check Engine warning
lamp may light up. The fuel system pressure is too low. The fuel filler cap is not closed
correctly or the fuel system is leaking.
X
Check that the fuel filler cap is correctly closed.
X If the fuel filler cap is not correctly closed: close the fuel filler
cap.
X If the fuel filler cap is closed: visit a qualified specialist
workshop. 00AC
The red coolant
warning lamp lights up
while the engine is
running and the coolant
temperature gauge is
at the start of the scale.
The temperature sensor for the coolant temperature gauge is
defective.
The coolant temperature is no longer being monitored. There is a
risk of engine damage if the coolant temperature is too high.
X
Pull over and stop the vehicle safely and switch off the engine,
paying attention to road and traffic conditions. Do not continue
driving under any circumstances.
X Secure the vehicle against rolling away (Y page 175).
X Consult a qualified specialist workshop. Warning and indicator lamps
281On-board computer and displays Z
Page 312 of 618

00790052007A
the COMAND controller and press
0098 to confirm.
X Select 0044in the menu bar and confirm.
SPLITVIEW symbol 0043appears in the
display, and display 0044switches to Off
Off.
X Select 00A7in the main function bar with the
remote control.
The carousel view appears.
X Select Mercedes-Benz Apps
Mercedes-Benz Apps with the
remote control.
You see the selection of Mercedes-Benz
Apps.
X Select Google Local Search Google Local Search with the
remote control.
Using a menu you can select a category for
the destination.
X Select At Current Position At Current Position, for
example.
Using a menu you can determine the type
of search inquiry.
X Select Enter a search term: Enter a search term:, for
example.
An input field appears.
X Enter the destination with the remote
control and confirm the entry with 0070.
You see the results list from Google.
X Select the exact destination with the
remote control.
An additional menu appears.
X Select Navigate to
Navigate to.
X A pop-up window appears on the driver's
side with the message: Should the Should the
navigation data from Mercedes-
navigation data from Mercedes-
Benz Apps be accepted? Benz Apps be accepted? System settings
Your COMAND equipment
These operating instructions describe all the
standard and optional equipment for your
COMAND system, as available at the time of
going to print. Country-specific differences
are possible. Please note that your COMAND system may not be equipped with all the
features described. Display settings
Setting the brightness The brightness detected by the display light
sensor affects the setting options for this
function.
X
Press 0066.
X Select Settings Settings by turning 00790052007Athe
COMAND controller and press 0098to
confirm.
X Select Display
Display and press 0098to confirm.
X Select Brightness
Brightness and press0098to
confirm.
X Adjust the brightness by turning 00790052007Athe
COMAND controller and press 0098to
confirm.
Display design Your COMAND display features optimized
designs for operation during daytime and
night-time hours. You can customize the
design by manually selecting day or night
design, or opt for an automatic setting.
X
Press 0066.
X Select Settings
Settings by turning 00790052007Athe
COMAND controller and press 0098to
confirm. 310
System settingsCOMAND
Page 313 of 618
X
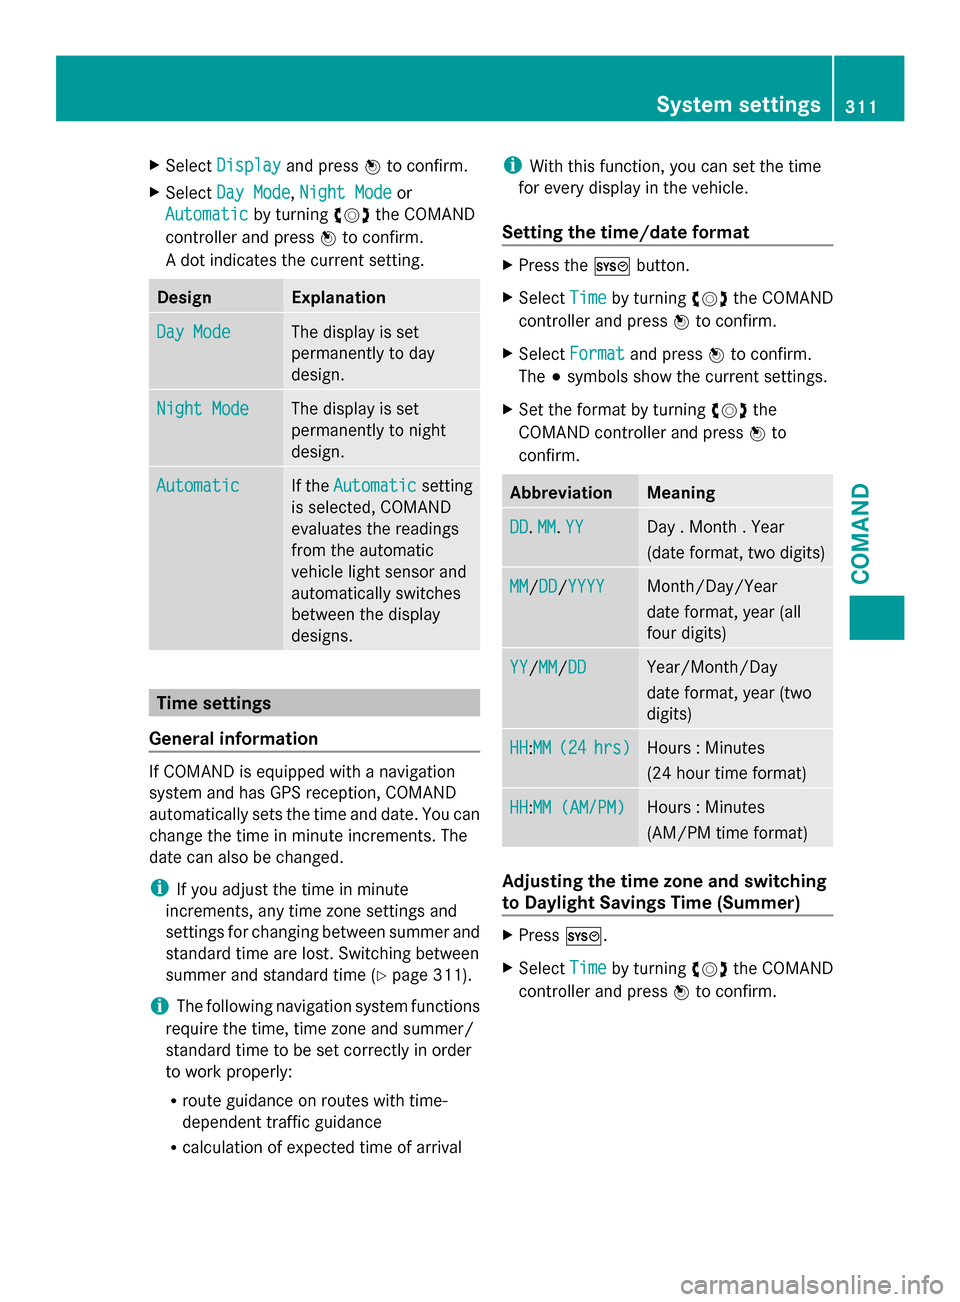
Select Display
Display and press 0098to confirm.
X Select Day Mode
Day Mode, Night Mode
Night Mode or
Automatic
Automatic by turning00790052007Athe COMAND
controller and press 0098to confirm.
A dot indicates the current setting. Design Explanation
Day Mode
Day Mode The display is set
permanently to day
design.
Night Mode Night Mode The display is set
permanently to night
design.
Automatic Automatic If the
Automatic
Automatic setting
is selected, COMAND
evaluates the readings
from the automatic
vehicle light sensor and
automatically switches
between the display
designs. Time settings
General information If COMAND is equipped with a navigation
system and has GPS reception, COMAND
automatically sets the time and date. You can
change the time in minute increments. The
date can also be changed.
i If you adjust the time in minute
increments, any time zone settings and
settings for changing between summer and
standard time are lost. Switching between
summer and standard time (Y page 311).
i The following navigation system functions
require the time, time zone and summer/
standard time to be set correctly in order
to work properly:
R route guidance on routes with time-
dependent traffic guidance
R calculation of expected time of arrival i
With this function, you can set the time
for every display in the vehicle.
Setting the time/date format X
Press the 0066button.
X Select Time Timeby turning 00790052007Athe COMAND
controller and press 0098to confirm.
X Select Format
Format and press 0098to confirm.
The 003Bsymbols show the current settings.
X Set the format by turning 00790052007Athe
COMAND controller and press 0098to
confirm. Abbreviation Meaning
DD
DD
.MM
MM .YY
YY Day . Month . Year
(date format, two digits)
MM MM
/DDDD /YYYYYYYY Month/Day/Year
date format, year (all
four digits)
YY YY
/MMMM /DDDD Year/Month/Day
date format, year (two
digits)
HH HH
:MMMM (24
(24 hrs)
hrs) Hours : Minutes
(24 hour time format)
HH HH
:MM (AM/PM)MM (AM/PM) Hours : Minutes
(AM/PM time format)
Adjusting the time zone and switching
to Daylight Savings Time (Summer)
X
Press 0066.
X Select Time Timeby turning 00790052007Athe COMAND
controller and press 0098to confirm. System settings
311COMAND Z
Page 553 of 618

!
Clean the water drainage channels of the
windshield and the rear window at regular
intervals. Deposits such as leaves, petals
and pollen may under certain
circumstances prevent water from draining
away. This can lead to corrosion damage
and damage to electronic components.
X Clean the inside and outside of the
windows with a damp cloth and a cleaning
agent that is recommended and approved
by Mercedes-Benz.
Cleaning wiper blades G
WARNING
You could become trapped by the windshield
wipers if they start moving while cleaning the
windshield or wiper blades. There is a risk of
injury.
Always switch off the windshield wipers and
the ignition before cleaning the windshield or
wiper blades.
! Do not pull the wiper blade. Otherwise,
the wiper blade could be damaged.
! Do not clean wiper blades too often and
do not rub them too hard. Otherwise, the
graphite coating could be damaged. This
could cause wiper noise.
! Hold the wiper arm securely when folding
back. The windshield could be damaged if
the wiper arm smacks against it suddenly.
X Fold the windshield wiper arms away from
the windshield.
X Carefully clean the wiper blades with a
damp cloth.
X Fold the windshield wiper arms back again
before switching on the ignition.
Cleaning the exterior lighting !
Only use cleaning agents or cleaning
cloths which are suitable for plastic light
lenses. Unsuitable cleaning agents or
cleaning cloths could scratch or damage
the plastic light lenses. X
Clean the plastic lenses of the exterior
lighting using a wet sponge and a mild
cleaning agent, e.g. Mercedes-Benz car
shampoo or cleaning cloths.
Mirror turn signals !
Only use cleaning agents or cleaning
cloths that are suitable for plastic lenses.
Unsuitable cleaning agents or cleaning
cloths could scratch or damage the plastic
lenses of the mirror turn signals.
X Clean the plastic lenses of the mirror turn
signals in the exterior mirror housing using
a wet sponge and mild cleaning agent, e.g.
Mercedes-Benz car shampoo or cleaning
cloths.
Cleaning the sensors !
If you clean the sensors with a power
washer, make sure that you keep a
distance of at least 11.8 in (30 cm) between
the vehicle and the power washer nozzle.
Information about the correct distance is
available from the equipment
manufacturer. X
Clean sensors 0043of the driving systems
with water, car shampoo and a soft cloth. Care
551Maintenance and care Z
Page 585 of 618

Information on air pressure for the tires on
your vehicle can be found:
R on the vehicle's Tire and Loading
Information placard on the B-pillar
(Y page 586)
R on the tire pressure label on the fuel filler
flap (Y page 173)
R in the "Tire pressure" section
Checking tire pressures manually To determine and set the correct tire
pressure, proceed as follows:
X Remove the valve cap of the tire that is to
be checked.
X Press the tire pressure gauge securely onto
the valve.
X Read the tire pressure and compare it with
the recommended value on the Tire and
Loading Information placard (Y page 579).
X If the tire pressure is too low, increase it to
the recommended value.
X If the tire pressure is too high, release air
by pressing down the metal pin in the valve.
Use the tip of a pen, for example. Then,
check the tire pressure again using the tire
pressure gauge.
X Screw the valve cap onto the valve.
X Repeat these steps for the other tires. Tire pressure monitor
General notes If a tire pressure monitor is installed, the
vehicle's wheels have sensors that monitor
the tire pressures in all four tires. The tire
pressure monitor warns you if the pressure
drops in one or more of the tires. The tire
pressure monitor only functions if the correct
sensors are installed on all wheels.
Information on tire pressures is displayed in
the multifunction display. After a few minutes
of driving, the current tire pressure of each tire is shown in the
Service
Service menu of the
multifunction display. Example: current tire pressure display
For information on the message display, refer
to the "Checking the tire pressure
electronically" section (Y
page 585).
Important safety notes G
WARNING
Each tire, including the spare (if provided),
should be checked at least once a month
when cold and inflated to the pressure
recommended by the vehicle manufacturer
on the Tire and Loading Information placard
on the driver's door B-pillar or the tire
pressure label on the inside of the fuel filler
flap. If your vehicle has tires of a different size
than the size indicated on the Tire and Loading
Information placard or the tire pressure label,
you should determine the proper tire pressure
for those tires.
As an added safety feature, your vehicle has
been equipped with a tire pressure monitoring
system (TPMS) that illuminates a low tire
pressure telltale when one or more of your
tires are significantly underinflated.
Accordingly, when the low tire pressure
telltale illuminates, you should stop and check
your tires as soon as possible, and inflate
them to the proper pressure. Driving on a
significantly underinflated tire causes the tire
to overheat and can lead to tire failure.
Underinflation also reduces fuel efficiency
and tire tread life, and may affect the vehicle's
handling and stopping ability.
Please note that the TPMS is not a substitute
for proper tire maintenance, and it is the
driver's responsibility to maintain correct tire
pressure, even if underinflation has not Tire pressure
583Wheels and tires
Z
Page 587 of 618
headphones, two-way radios) that may be
being operated in or near the vehicle.
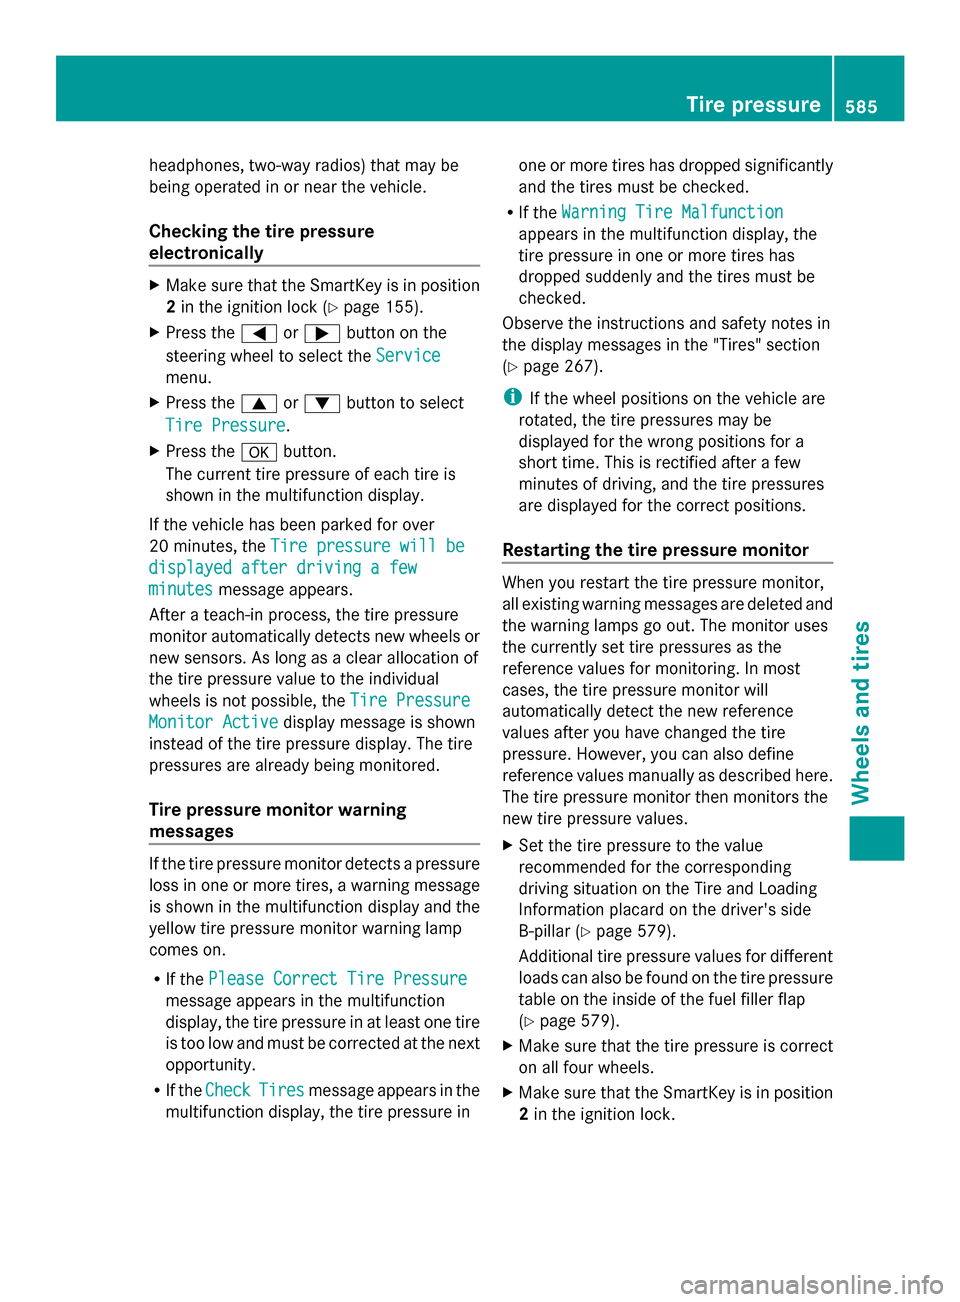
Checking the tire pressure
electronically X
Make sure that the SmartKey is in position
2 in the ignition lock (Y page 155).
X Press the 0059or0065 button on the
steering wheel to select the Service Service
menu.
X Press the 0063or0064 button to select
Tire Pressure
Tire Pressure.
X Press the 0076button.
The current tire pressure of each tire is
shown in the multifunction display.
If the vehicle has been parked for over
20 minutes, the Tire pressure will be
Tire pressure will be
displayed after driving a few displayed after driving a few
minutes minutes message appears.
After a teach-in process, the tire pressure
monitor automatically detects new wheels or
new sensors. As long as a clear allocation of
the tire pressure value to the individual
wheels is not possible, the Tire Pressure
Tire Pressure
Monitor Active Monitor Active display message is shown
instead of the tire pressure display. The tire
pressures are already being monitored.
Tire pressure monitor warning
messages If the tire pressure monitor detects a pressure
loss in one or more tires, a warning message
is shown in the multifunction display and the
yellow tire pressure monitor warning lamp
comes on.
R If the Please Correct Tire Pressure Please Correct Tire Pressure
message appears in the multifunction
display, the tire pressure in at least one tire
is too low and must be corrected at the next
opportunity.
R If the Check
Check Tires Tiresmessage appears in the
multifunction display, the tire pressure in one or more tires has dropped significantly
and the tires must be checked.
R If the Warning Tire Malfunction
Warning Tire Malfunction
appears in the multifunction display, the
tire pressure in one or more tires has
dropped suddenly and the tires must be
checked.
Observe the instructions and safety notes in
the display messages in the "Tires" section
(Y page 267).
i If the wheel positions on the vehicle are
rotated, the tire pressures may be
displayed for the wrong positions for a
short time. This is rectified after a few
minutes of driving, and the tire pressures
are displayed for the correct positions.
Restarting the tire pressure monitor When you restart the tire pressure monitor,
all existing warning messages are deleted and
the warning lamps go out. The monitor uses
the currently set tire pressures as the
reference values for monitoring. In most
cases, the tire pressure monitor will
automatically detect the new reference
values after you have changed the tire
pressure. However, you can also define
reference values manually as described here.
The tire pressure monitor then monitors the
new tire pressure values.
X
Set the tire pressure to the value
recommended for the corresponding
driving situation on the Tire and Loading
Information placard on the driver's side
B-pillar (Y page 579).
Additional tire pressure values for different
loads can also be found on the tire pressure
table on the inside of the fuel filler flap
(Y page 579).
X Make sure that the tire pressure is correct
on all four wheels.
X Make sure that the SmartKey is in position
2in the ignition lock. Tire pressure
585Wheels and tires Z