instrument cluster MERCEDES-BENZ SL-Class 2015 R131 Service Manual
[x] Cancel search | Manufacturer: MERCEDES-BENZ, Model Year: 2015, Model line: SL-Class, Model: MERCEDES-BENZ SL-Class 2015 R131Pages: 610, PDF Size: 12.21 MB
Page 234 of 610
R
Calling up display messages
(Y page 239)
R Checking the tire pressure electronically
(Y page 575)
R Calling up the service due date
(Y page 539) Settings menu
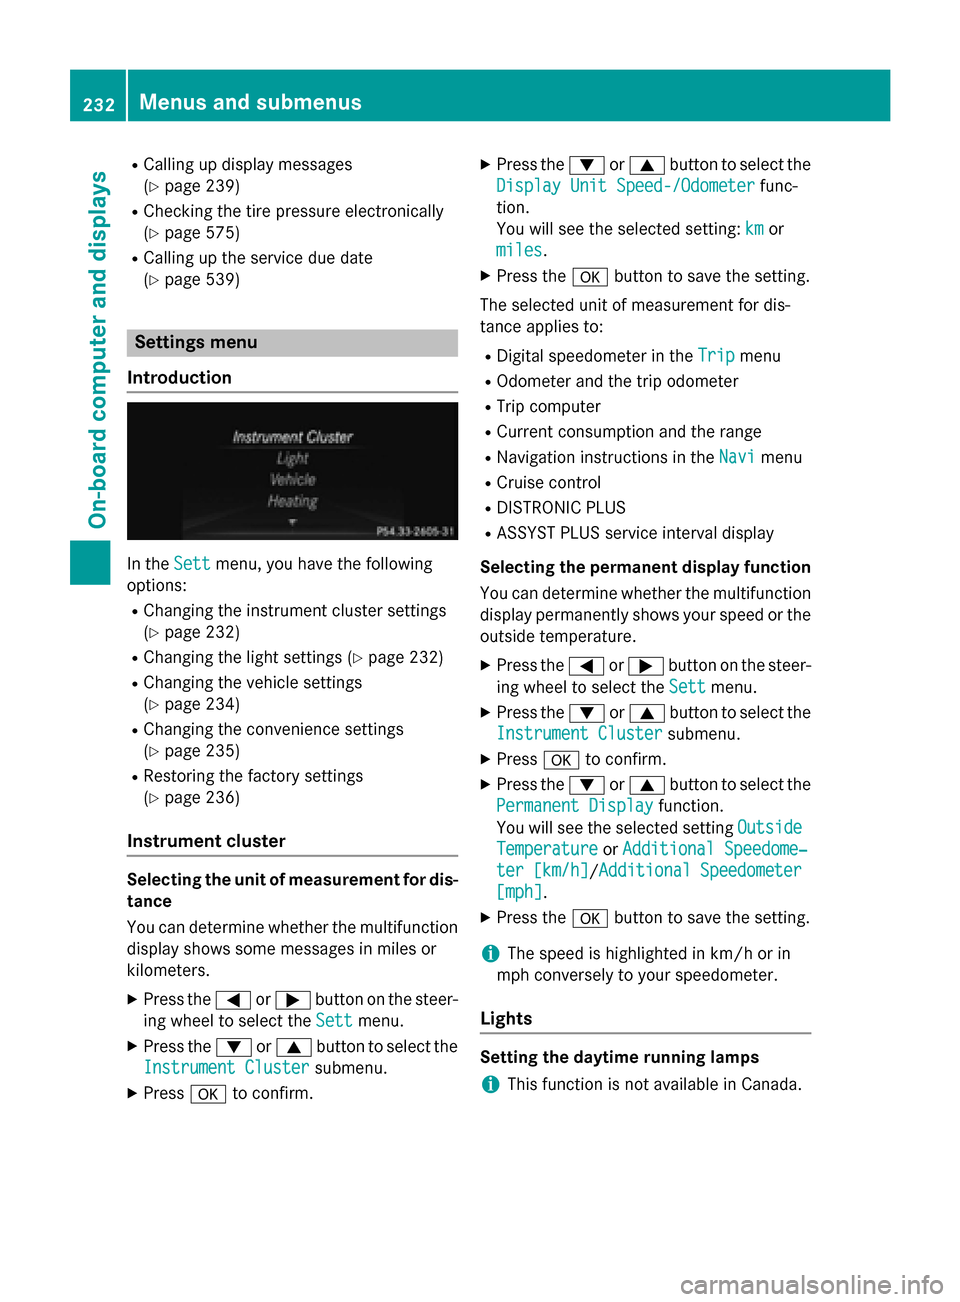
Introduction In the
Sett Settmenu, you have the following
options:
R Changing the instrument cluster settings
(Y page 232)
R Changing the light settings (Y page 232)
R Changing the vehicle settings
(Y page 234)
R Changing the convenience settings
(Y page 235)
R Restoring the factory settings
(Y page 236)
Instrument cluster Selecting the unit of measurement for dis-
tance
You can determine whether the multifunction display shows some messages in miles or
kilometers.
X Press the 0059or0065 button on the steer-
ing wheel to select the Sett
Sett menu.
X Press the 0064or0063 button to select the
Instrument Cluster
Instrument Cluster submenu.
X Press 0076to confirm. X
Press the 0064or0063 button to select the
Display Unit Speed-/Odometer Display Unit Speed-/Odometer func-
tion.
You will see the selected setting: km kmor
miles
miles.
X Press the 0076button to save the setting.
The selected unit of measurement for dis-
tance applies to: R Digital speedometer in the Trip
Trip menu
R Odometer and the trip odometer
R Trip computer
R Current consumption and the range
R Navigation instructions in the Navi Navimenu
R Cruise control
R DISTRONIC PLUS
R ASSYST PLUS service interval display
Selecting the permanent display function
You can determine whether the multifunction display permanently shows your speed or the
outside temperature.
X Press the 0059or0065 button on the steer-
ing wheel to select the Sett
Sett menu.
X Press the 0064or0063 button to select the
Instrument Cluster Instrument Cluster submenu.
X Press 0076to confirm.
X Press the 0064or0063 button to select the
Permanent Display
Permanent Display function.
You will see the selected setting Outside
Outside
Temperature
Temperature orAdditional Speedome‐
Additional Speedome‐
ter [km/h]
ter [km/h] /AdditionalAdditional Speedometer
Speedometer
[mph]
[mph].
X Press the 0076button to save the setting.
i The speed is highlighted in km/h or in
mph conversely to your speedometer.
Lights Setting the daytime running lamps
i This function is not available in Canada. 232
Menus and submenusOn-board computer and displays
Page 242 of 610
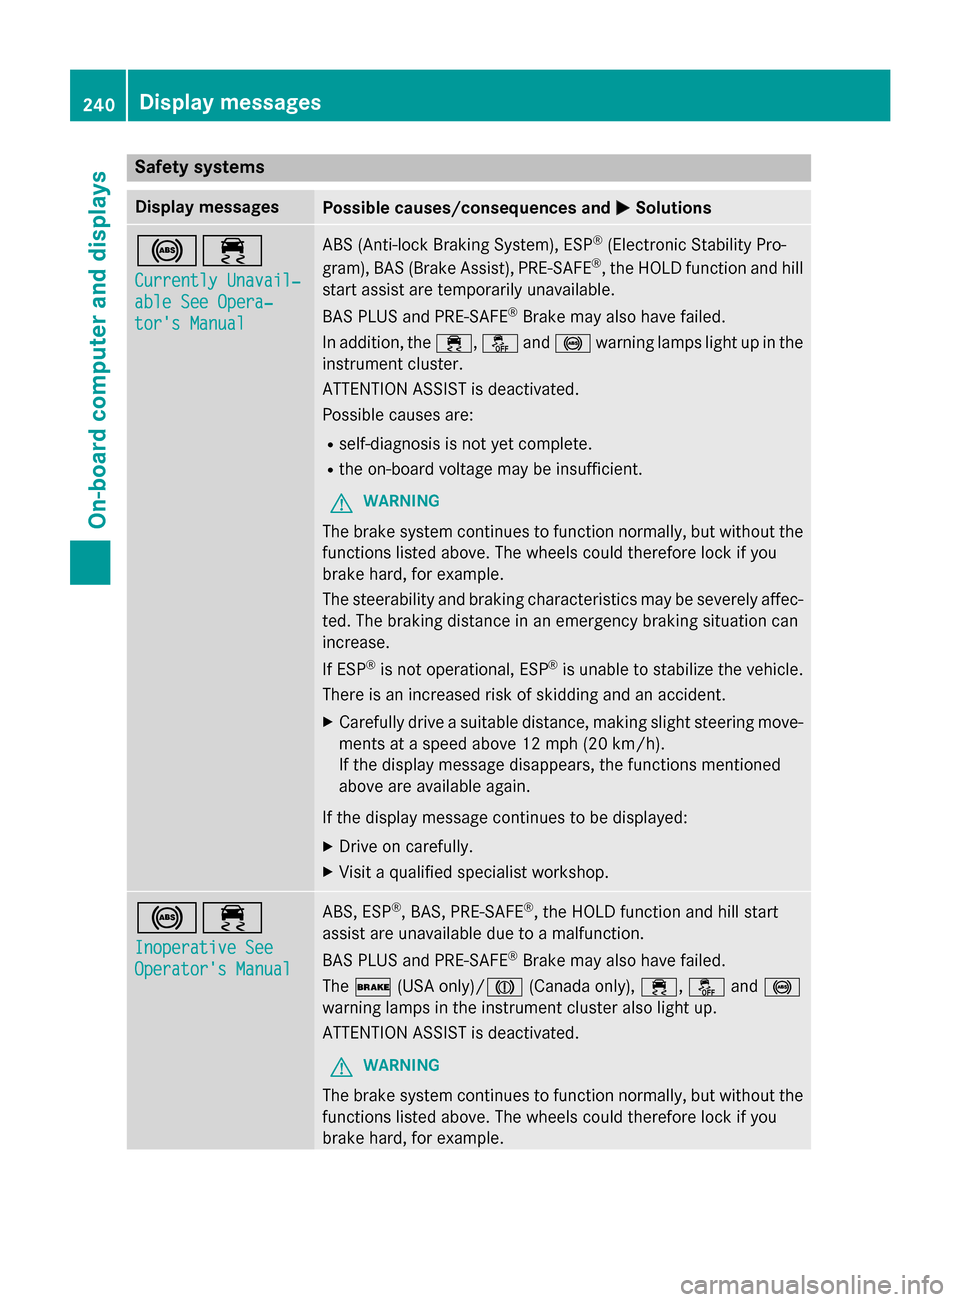
Safety systems
Display messages
Possible causes/consequences and
0050
0050Solutions 002500E5
Currently Unavail‐ Currently Unavail‐
able See Opera‐ able See Opera‐
tor's Manual tor's Manual ABS (Anti-lock Braking System), ESP
®
(Electronic Stability Pro-
gram), BAS (Brake Assist), PRE ‑SAFE®
, the HOLD function and hill
start assist are temporarily unavailable.
BAS PLUS and PRE‑SAFE ®
Brake may also have failed.
In addition, the 00E5,00BBand0025 warning lamps light up in the
instrument cluster.
ATTENTION ASSIST is deactivated.
Possible causes are:
R self-diagnosis is not yet complete.
R the on-board voltage may be insufficient.
G WARNING
The brake system continues to function normally, but without the functions listed above. The wheels could therefore lock if you
brake hard, for example.
The steerability and braking characteristics may be severely affec-ted. The braking distance in an emergency braking situation can
increase.
If ESP ®
is not operational, ESP ®
is unable to stabilize the vehicle.
There is an increased risk of skidding and an accident.
X Carefully drive a suitable distance, making slight steering move-
ments at a speed above 12 mph (20 km/h).
If the display message disappears, the functions mentioned
above are available again.
If the display message continues to be displayed: X Drive on carefully.
X Visit a qualified specialist workshop. 002500E5
Inoperative See Inoperative See
Operator's Manual Operator's Manual ABS, ESP
®
, BAS, PRE‑SAFE ®
, the HOLD function and hill start
assist are unavailable due to a malfunction.
BAS PLUS and PRE‑ SAFE®
Brake may also have failed.
The 0027 (USA only)/004D (Canada only),00E5,00BBand0025
warning lamps in the instrument cluster also light up.
ATTENTION ASSIST is deactivated.
G WARNING
The brake system continues to function normally, but without the functions listed above. The wheels could therefore lock if you
brake hard, for example. 240
Display messagesOn-board computer and displays
Page 243 of 610
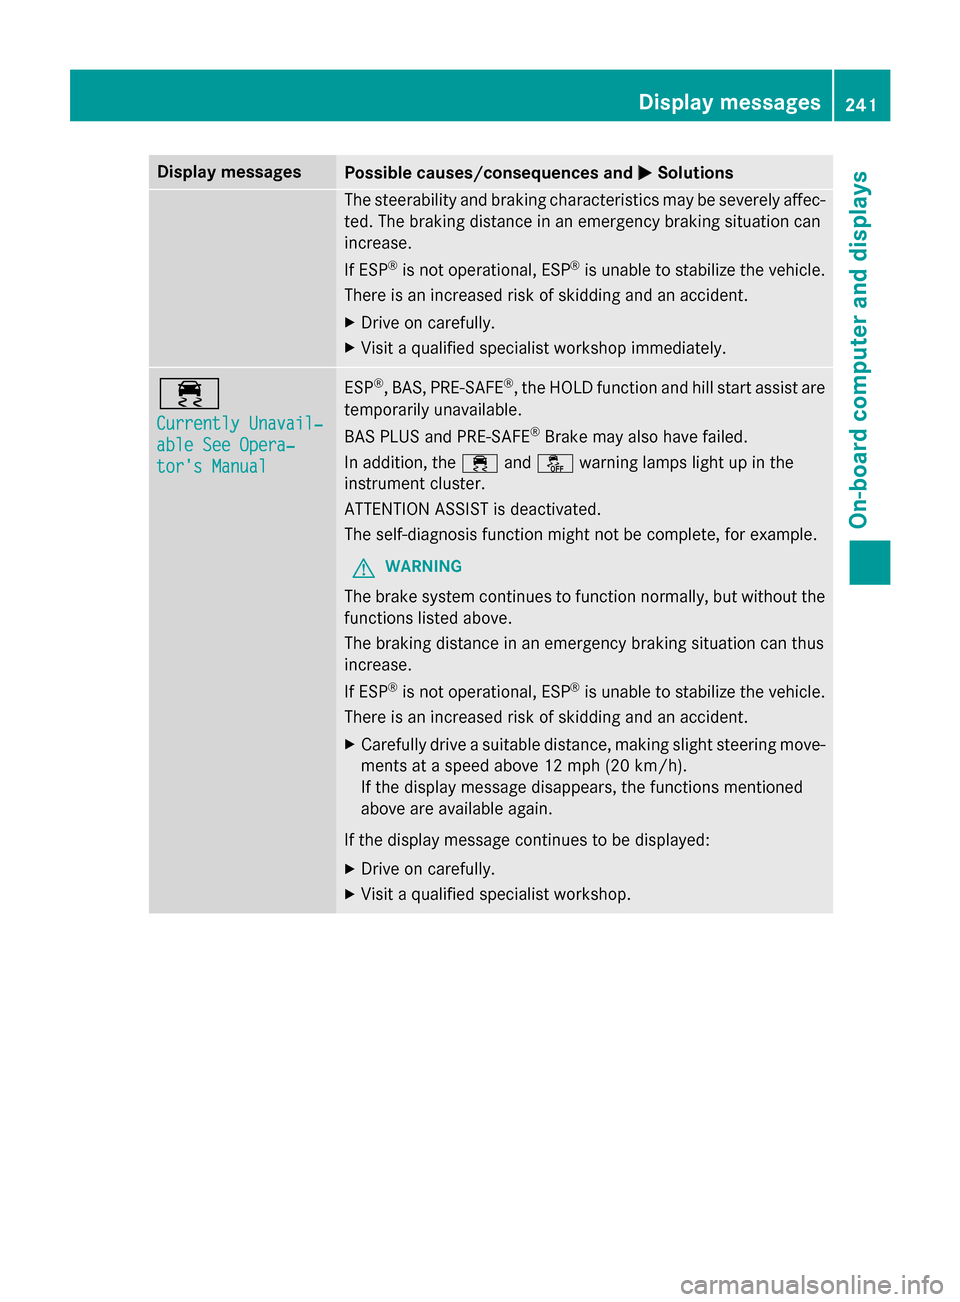
Display messages
Possible causes/consequences and
0050
0050Solutions The steerability and braking characteristics may be severely affec-
ted. The braking distance in an emergency braking situation can
increase.
If ESP ®
is not operational, ESP ®
is unable to stabilize the vehicle.
There is an increased risk of skidding and an accident.
X Drive on carefully.
X Visit a qualified specialist workshop immediately. 00E5
Currently Unavail‐ Currently Unavail‐
able See Opera‐ able See Opera‐
tor's Manual tor's Manual ESP
®
, BAS, PRE‑SAFE ®
, the HOLD function and hill start assist are
temporarily unavailable.
BAS PLUS and PRE‑ SAFE®
Brake may also have failed.
In addition, the 00E5and00BB warning lamps light up in the
instrument cluster.
ATTENTION ASSIST is deactivated.
The self-diagnosis function might not be complete, for example.
G WARNING
The brake system continues to function normally, but without the functions listed above.
The braking distance in an emergency braking situation can thus
increase.
If ESP ®
is not operational, ESP ®
is unable to stabilize the vehicle.
There is an increased risk of skidding and an accident.
X Carefully drive a suitable distance, making slight steering move-
ments at a speed above 12 mph (20 km/h).
If the display message disappears, the functions mentioned
above are available again.
If the display message continues to be displayed:
X Drive on carefully.
X Visit a qualified specialist workshop. Display
messages
241On-board computer and displays Z
Page 244 of 610
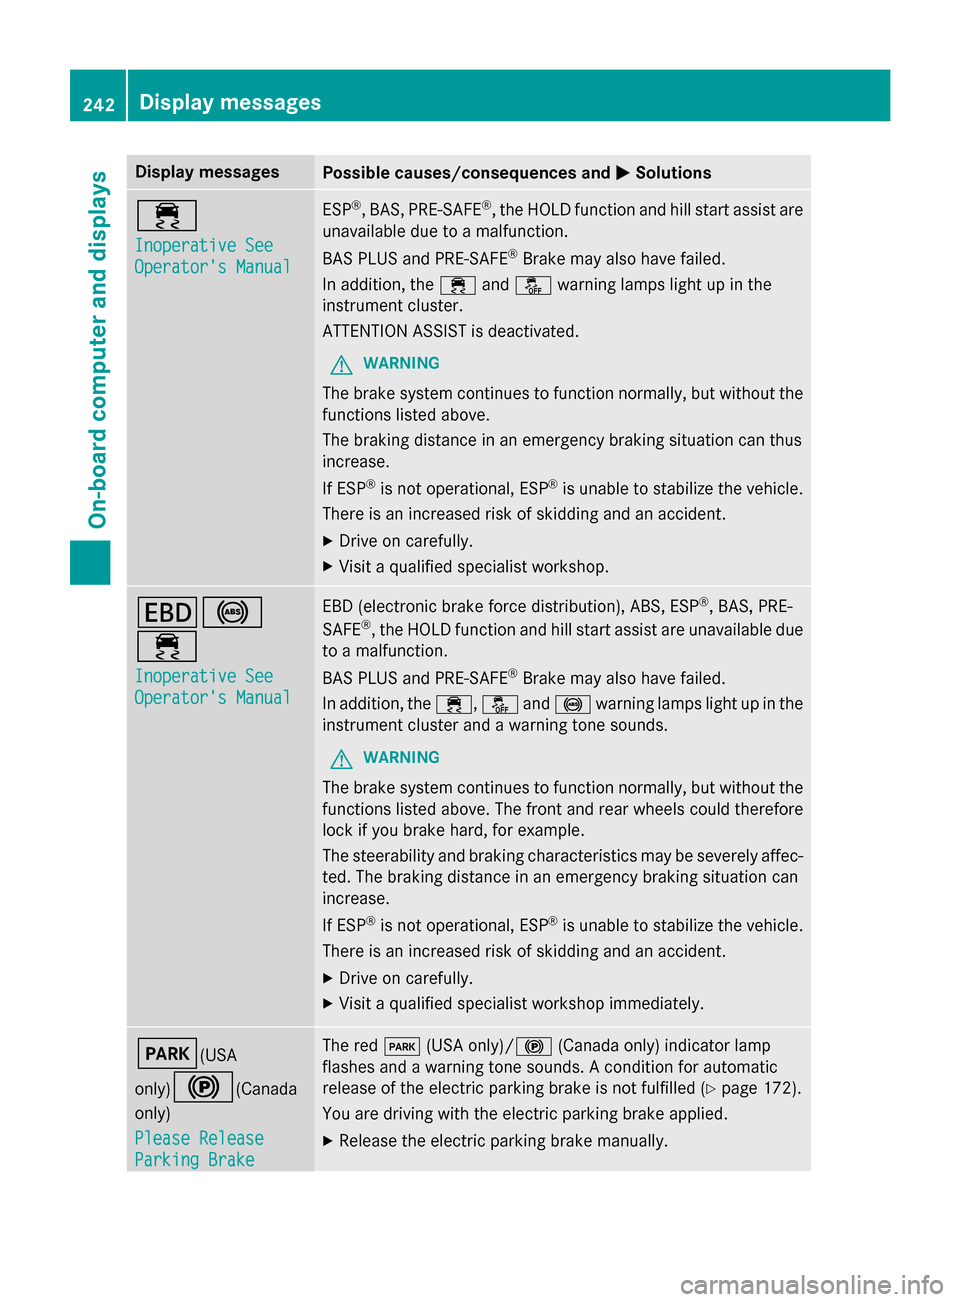
Display messages
Possible causes/consequences and
0050
0050Solutions 00E5
Inoperative See Inoperative See
Operator's Manual Operator's Manual ESP
®
, BAS, PRE‑SAFE ®
, the HOLD function and hill start assist are
unavailable due to a malfunction.
BAS PLUS and PRE‑ SAFE®
Brake may also have failed.
In addition, the 00E5and00BB warning lamps light up in the
instrument cluster.
ATTENTION ASSIST is deactivated.
G WARNING
The brake system continues to function normally, but without the functions listed above.
The braking distance in an emergency braking situation can thus
increase.
If ESP ®
is not operational, ESP ®
is unable to stabilize the vehicle.
There is an increased risk of skidding and an accident.
X Drive on carefully.
X Visit a qualified specialist workshop. 007A0025
00E5
Inoperative See Inoperative See
Operator's Manual Operator's Manual EBD (electronic brake force distribution), ABS, ESP
®
, BAS, PRE-
SAFE ®
, the HOLD function and hill start assist are unavailable due
to a malfunction.
BAS PLUS and PRE‑SAFE ®
Brake may also have failed.
In addition, the 00E5,00BBand0025 warning lamps light up in the
instrument cluster and a warning tone sounds.
G WARNING
The brake system continues to function normally, but without the functions listed above. The front and rear wheels could therefore
lock if you brake hard, for example.
The steerability and braking characteristics may be severely affec-ted. The braking distance in an emergency braking situation can
increase.
If ESP ®
is not operational, ESP ®
is unable to stabilize the vehicle.
There is an increased risk of skidding and an accident.
X Drive on carefully.
X Visit a qualified specialist workshop immediately. 0049(USA
only)0024
(Canada
only)
Please Release Please Release
Parking Brake Parking Brake The red
0049(USA only)/0024 (Canada only) indicator lamp
flashes and a warning tone sounds. A condition for automatic
release of the electric parking brake is not fulfilled (Y page 172).
You are driving with the electric parking brake applied.
X Release the electric parking brake manually. 242
Display
messagesOn-board computer and displays
Page 248 of 610
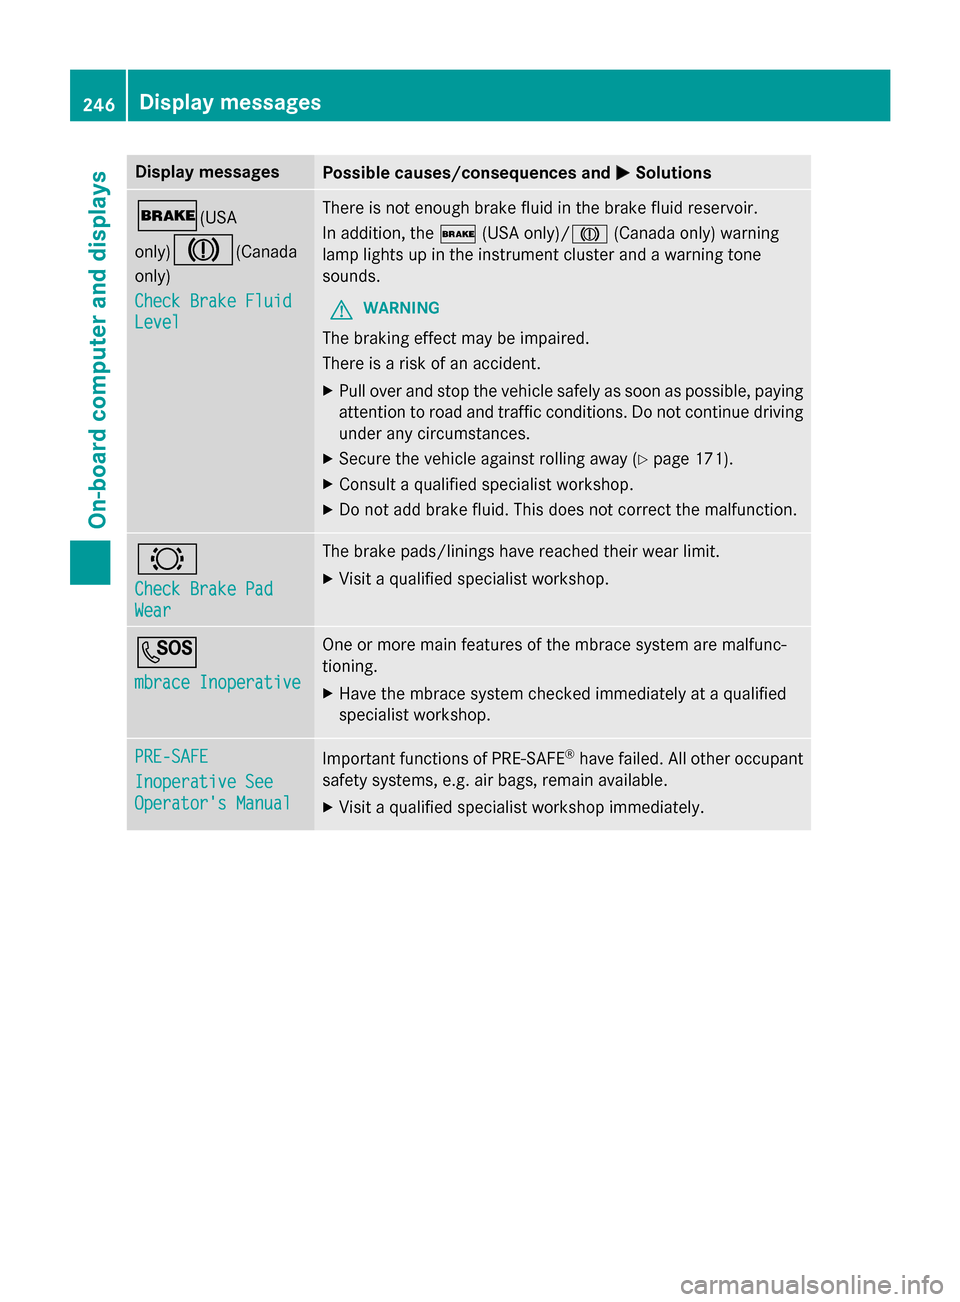
Display messages
Possible causes/consequences and
0050
0050Solutions 0027(USA
only)004D
(Canada
only)
Check Brake Fluid Check Brake Fluid
Level Level There is not enough brake fluid in the brake fluid reservoir.
In addition, the
0027(USA only)/ 004D(Canada only) warning
lamp lights up in the instrument cluster and a warning tone
sounds.
G WARNING
The braking effect may be impaired.
There is a risk of an accident. X Pull over and stop the vehicle safely as soon as possible, paying
attention to road and traffic conditions. Do not continue driving
under any circumstances.
X Secure the vehicle against rolling away (Y page 171).
X Consult a qualified specialist workshop.
X Do not add brake fluid. This does not correct the malfunction. 0026
Check Brake Pad Check Brake Pad
Wear Wear The brake pads/linings have reached their wear limit.
X Visit a qualified specialist workshop. 0053
mbrace Inoperative mbrace Inoperative One or more main features of the mbrace system are malfunc-
tioning.
X Have the mbrace system checked immediately at a qualified
specialist workshop. PRE-SAFE PRE-SAFE
Inoperative See Inoperative See
Operator's Manual Operator's Manual
Important functions of PRE-SAFE
®
have failed. All other occupant
safety systems, e.g. air bags, remain available.
X Visit a qualified specialist workshop immediately. 246
Display
messagesOn-board computer and displays
Page 250 of 610
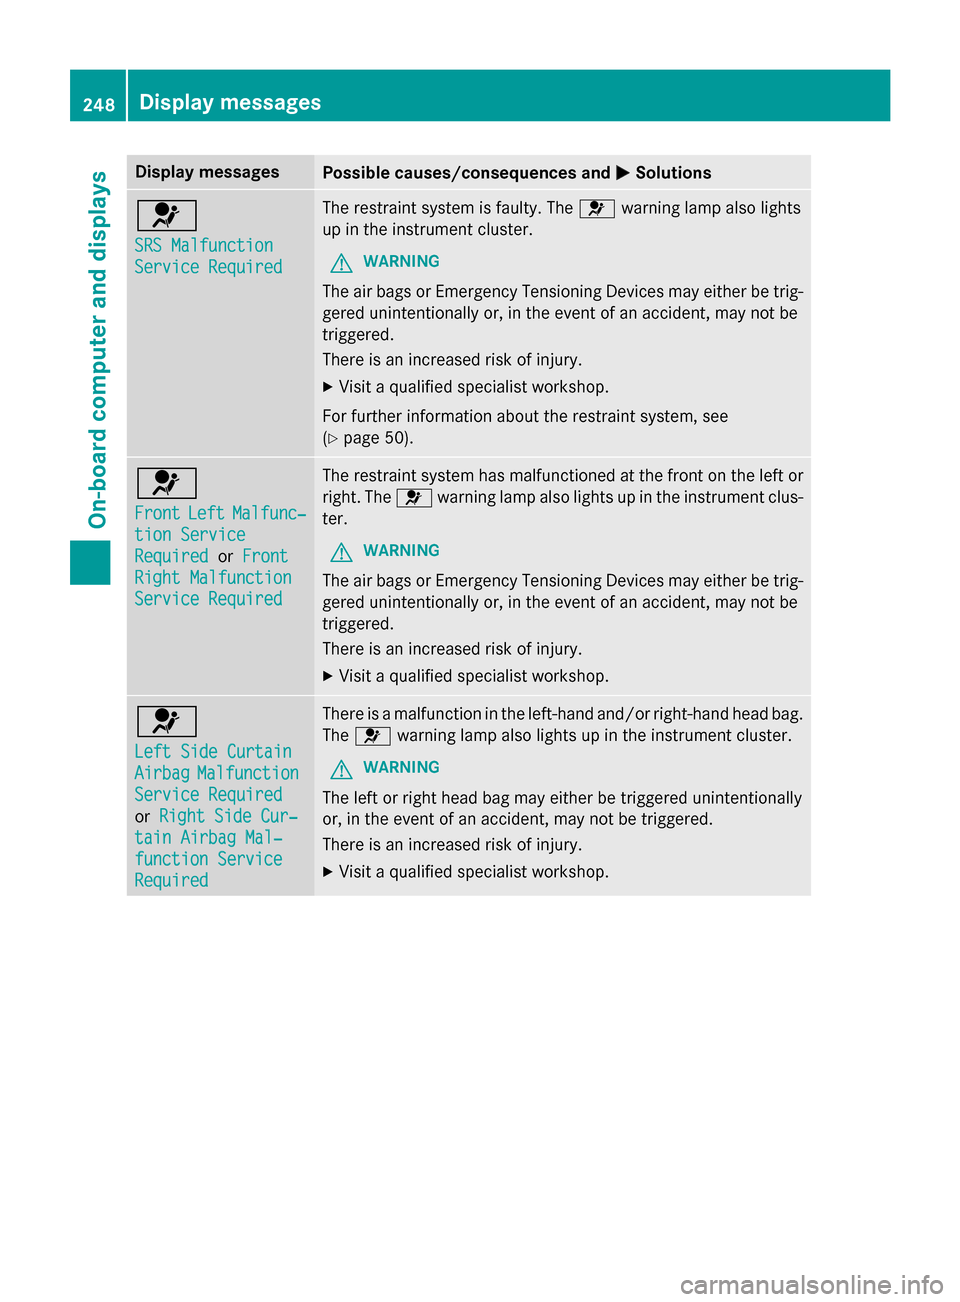
Display messages
Possible causes/consequences and
0050
0050Solutions 0075
SRS Malfunction SRS Malfunction
Service Required Service Required The restraint system is faulty. The
0075warning lamp also lights
up in the instrument cluster.
G WARNING
The air bags or Emergency Tensioning Devices may either be trig- gered unintentionally or, in the event of an accident, may not be
triggered.
There is an increased risk of injury.
X Visit a qualified specialist workshop.
For further information about the restraint system, see
(Y page 50). 0075
Front Front
Left
LeftMalfunc‐
Malfunc‐
tion Service
tion Service
Required Required orFront
Front
Right Malfunction
Right Malfunction
Service Required Service Required The restraint system has malfunctioned at the front on the left or
right. The 0075warning lamp also lights up in the instrument clus-
ter.
G WARNING
The air bags or Emergency Tensioning Devices may either be trig- gered unintentionally or, in the event of an accident, may not be
triggered.
There is an increased risk of injury.
X Visit a qualified specialist workshop. 0075
Left Side Curtain Left Side Curtain
Airbag Airbag
Malfunction
Malfunction
Service Required
Service Required
or Right Side Cur‐ Right Side Cur‐
tain Airbag Mal‐
tain Airbag Mal‐
function Service function Service
Required Required There is a malfunction in the left-hand and/or right-hand head bag.
The 0075 warning lamp also lights up in the instrument cluster.
G WARNING
The left or right head bag may either be triggered unintentionally
or, in the event of an accident, may not be triggered.
There is an increased risk of injury.
X Visit a qualified specialist workshop. 248
Display
messagesOn-board computer and displays
Page 367 of 610

If you select
No
No, the process will be can-
celed. Map operation and map settings
General notes Company logos displayed on the map are
trademarks of the respective companies and
used solely for the purpose of indicating the
locations of these companies. The use of such logos on the map does not indicate approval
of, support of or advertising by these compa-
nies for the navigation system itself.
Setting the map scale 0043
Set map scale as a number with unit
0044 Currently set map scale as indicated by
the needle on the scale bar
0087 New map scale
0085 Scale bar
Unit of measurement 0043in the COMAND dis-
play depends on the selection made in the
instrument cluster; see the separate vehicle
Operator's Manual.
X To hide the menu: slide00970052the COMAND
controller and, when the Full Screen
Full Screen
menu item is shown, press 0098.
X To call up the scale bar: as soon as you
turn 00790052007A the COMAND controller, scale
bar 0087appears.
X Turn 00790052007A until the desired scale is set. Moving the map Showing the crosshair
Map with crosshair
0043
Current vehicle position
0044 Crosshair
0087 Details of the crosshair position
0085 Map scale selected
X To hide the menu: slide00970052the COMAND
controller and, when the Full Screen Full Screen
menu item is shown, press 0098.
X To scroll the weather map: slide009500520096,
009700520064 or009100520078 the COMAND controller.
A crosshair appears on the map. If you slide
it again, the map under the crosshair moves in the corresponding direction.
Display 0087may be the name of a street, for
example, provided the digital map contains
the necessary data. It shows the geo-coordi-
nate position of the crosshair if the Geo- Geo-
coordinates
coordinates display is switched on
(Y page 368).
Hiding the crosshair and centering the
map on the vehicle position or destination X Press the 0038back button twice.
The crosshair disappears and the map is
set to the vehicle position.
Centering the map on the vehicle's posi-
tion
X To show the menu: press0098the COMAND
controller.
X Select Position Position in the navigation system
menu bar by sliding 00520064and turning 00790052007A Navigation
365COMAND Z
Page 490 of 610
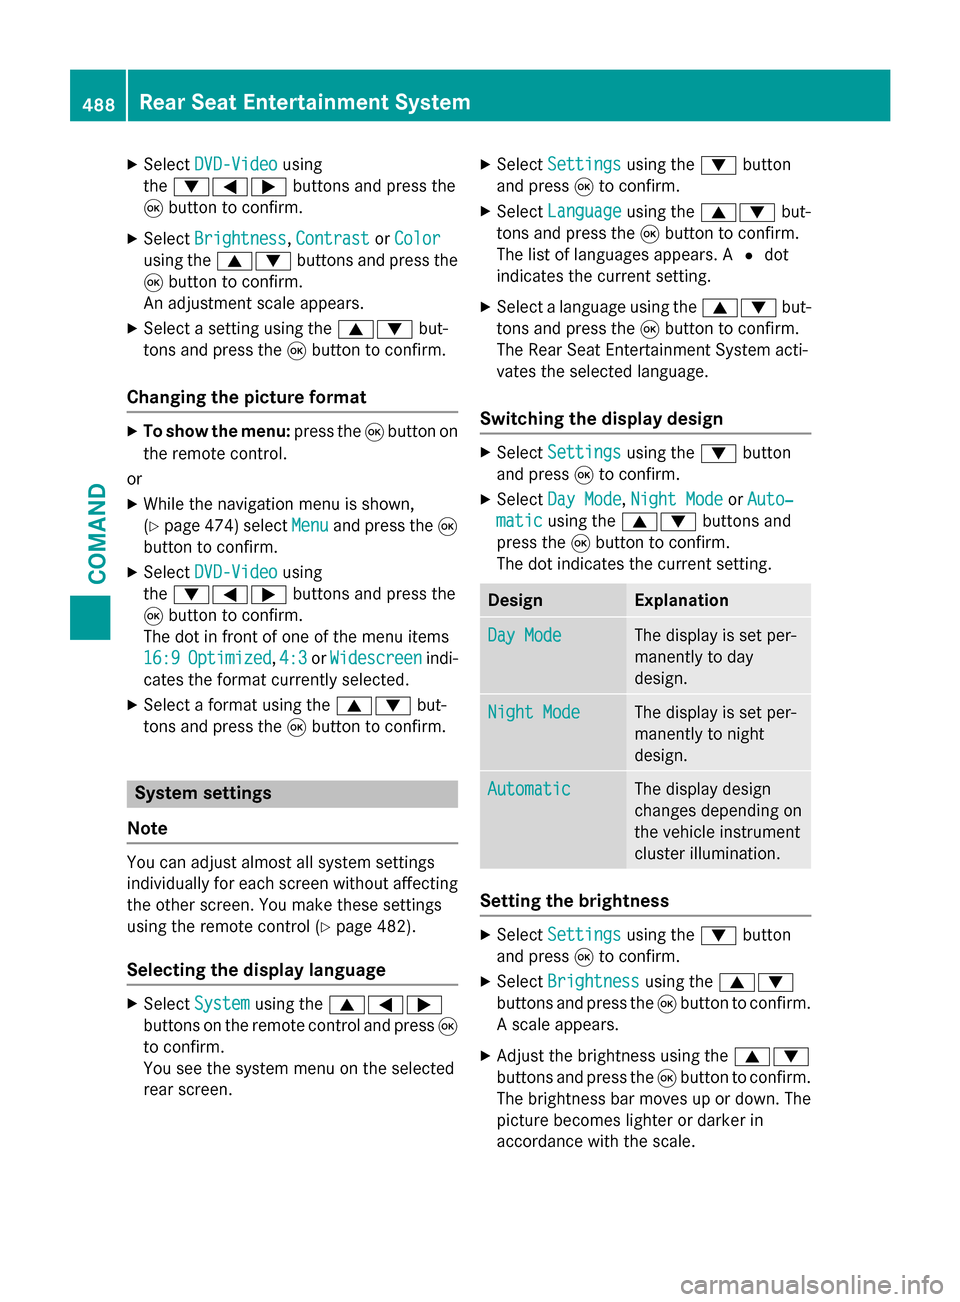
X
Select DVD-Video
DVD-Video using
the 006400590065 buttons and press the
008B button to confirm.
X Select Brightness
Brightness, Contrast
ContrastorColor
Color
using the 00630064 buttons and press the
008B button to confirm.
An adjustment scale appears.
X Select a setting using the 00630064but-
tons and press the 008Bbutton to confirm.
Changing the picture format X
To show the menu: press the008Bbutton on
the remote control.
or
X While the navigation menu is shown,
(Y page 474) select Menu
Menu and press the 008B
button to confirm.
X Select DVD-Video
DVD-Video using
the 006400590065 buttons and press the
008B button to confirm.
The dot in front of one of the menu items
16:9
16:9 Optimized
Optimized ,4:3
4:3 orWidescreen
Widescreen indi-
cates the format currently selected.
X Select a format using the 00630064but-
tons and press the 008Bbutton to confirm. System settings
Note You can adjust almost all system settings
individually for each screen without affecting
the other screen. You make these settings
using the remote control (Y page 482).
Selecting the display language X
Select System System using the 006300590065
buttons on the remote control and press 008B
to confirm.
You see the system menu on the selected
rear screen. X
Select Settings
Settings using the0064button
and press 008Bto confirm.
X Select Language
Language using the00630064 but-
tons and press the 008Bbutton to confirm.
The list of languages appears. A 0036dot
indicates the current setting.
X Select a language using the 00630064but-
tons and press the 008Bbutton to confirm.
The Rear Seat Entertainment System acti-
vates the selected language.
Switching the display design X
Select Settings Settings using the0064button
and press 008Bto confirm.
X Select Day Mode
Day Mode, Night Mode
Night Mode orAuto‐
Auto‐
matic
matic using the 00630064 buttons and
press the 008Bbutton to confirm.
The dot indicates the current setting. Design Explanation
Day Mode
Day Mode The display is set per-
manently to day
design.
Night Mode Night Mode The display is set per-
manently to night
design.
Automatic Automatic The display design
changes depending on
the vehicle instrument
cluster illumination.
Setting the brightness
X
Select Settings Settings using the0064button
and press 008Bto confirm.
X Select Brightness
Brightness using the00630064
buttons and press the 008Bbutton to confirm.
A scale appears.
X Adjust the brightness using the 00630064
buttons and press the 008Bbutton to confirm.
The brightness bar moves up or down. The picture becomes lighter or darker in
accordance with the scale. 488
Rear Seat Entertainment SystemCOMAND
Page 554 of 610
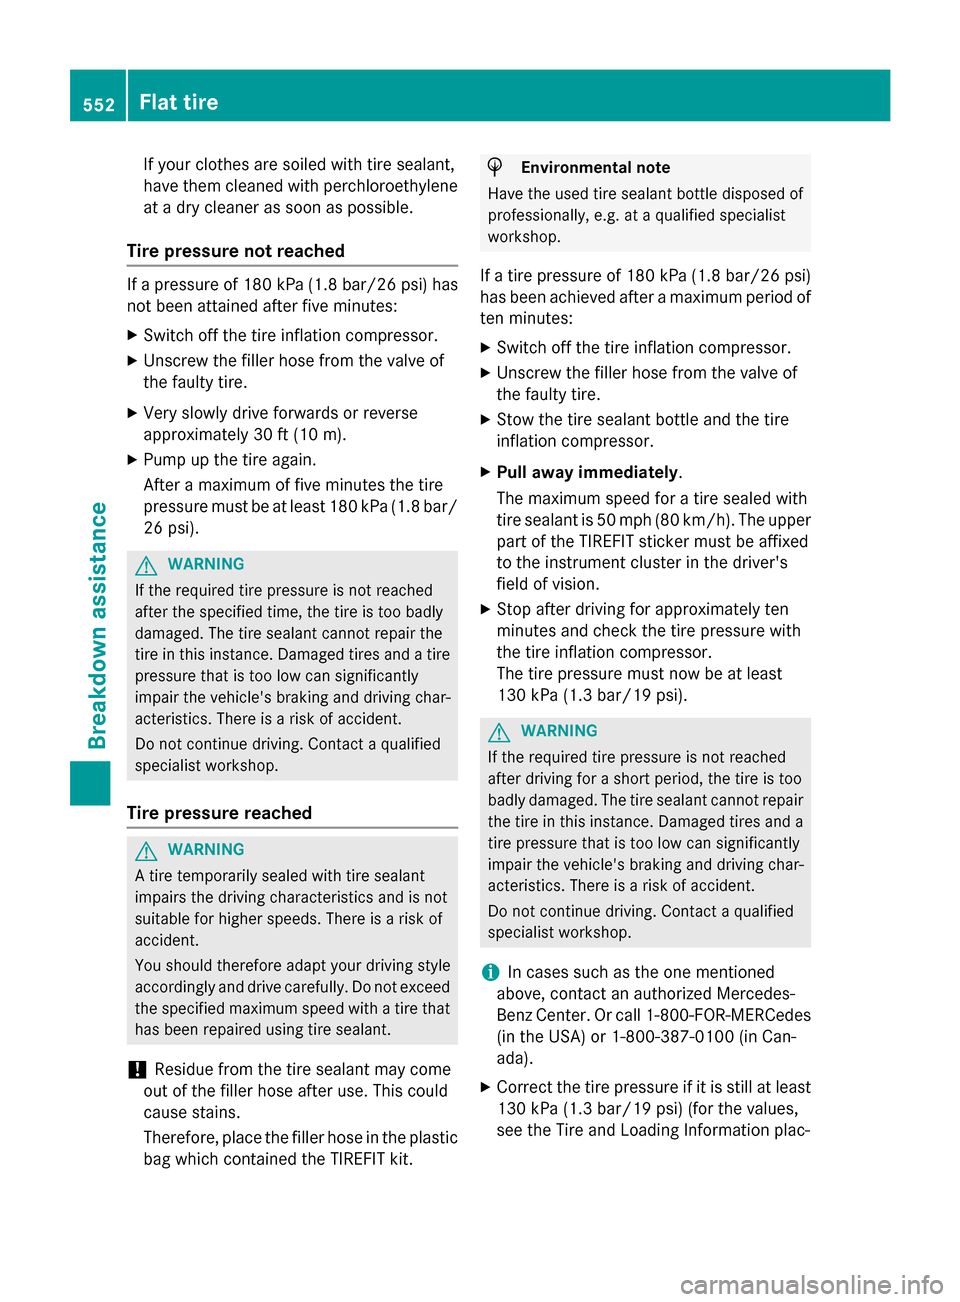
If your clothes are soiled with tire sealant,
have them cleaned with perchloroethylene at a dry cleaner as soon as possible.
Tire pressure not reached If a pressure of 180 kPa (1.8 bar/26 psi) has
not been attained after five minutes:
X Switch off the tire inflation compressor.
X Unscrew the filler hose from the valve of
the faulty tire.
X Very slowly drive forwards or reverse
approximately 30 ft (10 m).
X Pump up the tire again.
After a maximum of five minutes the tire
pressure must be at least 180 kPa (1.8 bar/
26 psi). G
WARNING
If the required tire pressure is not reached
after the specified time, the tire is too badly
damaged. The tire sealant cannot repair the
tire in this instance. Damaged tires and a tire pressure that is too low can significantly
impair the vehicle's braking and driving char-
acteristics. There is a risk of accident.
Do not continue driving. Contact a qualified
specialist workshop.
Tire pressure reached G
WARNING
A tire temporarily sealed with tire sealant
impairs the driving characteristics and is not
suitable for higher speeds. There is a risk of
accident.
You should therefore adapt your driving style
accordingly and drive carefully. Do not exceed the specified maximum speed with a tire that
has been repaired using tire sealant.
! Residue from the tire sealant may come
out of the filler hose after use. This could
cause stains.
Therefore, place the filler hose in the plastic
bag which contained the TIREFIT kit. H
Environmental note
Have the used tire sealant bottle disposed of
professionally, e.g. at a qualified specialist
workshop.
If a tire pressure of 180 kPa (1.8 bar/26 psi) has been achieved after a maximum period of
ten minutes:
X Switch off the tire inflation compressor.
X Unscrew the filler hose from the valve of
the faulty tire.
X Stow the tire sealant bottle and the tire
inflation compressor.
X Pull away immediately.
The maximum speed for a tire sealed with
tire sealant is 50 mph (80 km/h). The upper
part of the TIREFIT sticker must be affixed
to the instrument cluster in the driver's
field of vision.
X Stop after driving for approximately ten
minutes and check the tire pressure with
the tire inflation compressor.
The tire pressure must now be at least
130 kPa (1.3 bar/19 psi). G
WARNING
If the required tire pressure is not reached
after driving for a short period, the tire is too
badly damaged. The tire sealant cannot repair the tire in this instance. Damaged tires and a
tire pressure that is too low can significantly
impair the vehicle's braking and driving char-
acteristics. There is a risk of accident.
Do not continue driving. Contact a qualified
specialist workshop.
i In cases such as the one mentioned
above, contact an authorized Mercedes-
Benz Center. Or call 1-800-FOR-MERCedes
(in the USA) or 1-800-387-0100 (in Can-
ada).
X Correct the tire pressure if it is still at least
130 kPa (1.3 bar/19 psi) (for the values,
see the Tire and Loading Information plac- 552
Flat tireBreakdown assistance
Page 556 of 610
R
if you push or pull the battery across the
carpet or other synthetic materials
R if you wipe the battery with a cloth G
WARNING
During the charging process, a battery produ- ces hydrogen gas. If a short circuit occurs or
sparks are created, the hydrogen gas can
ignite. There is a risk of an explosion.
R Make sure that the positive terminal of a
connected battery does not come into con- tact with vehicle parts.
R Never place metal objects or tools on a bat-
tery.
R It is important that you observe the descri-
bed order of the battery terminals when
connecting and disconnecting a battery.
R When jump-starting, make sure that the
battery poles with identical polarity are
connected.
R It is particularly important to observe the
described order when connecting and dis-
connecting the jumper cables.
R Never connect or disconnect the battery
terminals while the engine is running. G
WARNING
Battery acid is caustic. There is a risk of injury. Avoid contact with the skin, eyes or clothing.
Do not inhale any battery gases. Do not lean
over the battery. Keep children away from
batteries. Wash battery acid immediately with water and seek medical attention. H
Environmental note Batteries contain dangerous
substances. It is against the
law to dispose of them with
the household rubbish. They
must be collected separately
and recycled to protect the
environment. Dispose of batteries in an
environmentally friendly
manner. Take discharged
batteries to a qualified spe- cialist workshop or a special
collection point for used bat-
teries.
! Have the battery checked regularly at a
qualified specialist workshop.
Observe the service intervals in the Main-
tenance Booklet or contact a qualified spe-
cialist workshop for more information.
! You should have all work involving the
battery carried out at a qualified specialist
workshop. In the exceptional case that it is
necessary for you to disconnect the battery yourself, make sure that:
R you switch off the engine and remove the
SmartKey. On vehicles with KEYLESS-
GO, ensure that the ignition is switched
off. Check that all the indicator lamps in
the instrument cluster are off. Otherwise, electronic components, such as the
alternator, may be damaged.
R you first remove the negative terminal
clamp and then the positive terminal
clamp. Never swap the terminal clamps.
Otherwise, the vehicle's electronic sys-
tem may be damaged.
R the transmission is locked in position P
after disconnecting the battery. The vehi-
cle is secured against rolling away. You
can then no longer move the vehicle.
The battery and the cover of the positive
terminal clamp must be installed securely
during operation.
In order for the battery to achieve the maxi-
mum possible service life, it must always be
sufficiently charged.
Comply with safety precautions and take pro-
tective measures when handling batteries. Risk of explosion.
Fire, open flames and smoking are
prohibited when handling the bat-
tery. Avoid creating sparks. 554
Battery (vehicle)Breakdown assistance