fuel cap MERCEDES-BENZ SL-Class 2015 R131 Owner's Manual
[x] Cancel search | Manufacturer: MERCEDES-BENZ, Model Year: 2015, Model line: SL-Class, Model: MERCEDES-BENZ SL-Class 2015 R131Pages: 610, PDF Size: 12.21 MB
Page 14 of 610
Engine
Check Engine warning lamp .......... .277
Display message ............................ 254
ECO start/stop function ................ 155
Engine number ............................... 601
Irregular running ............................ 158
Jump-starting ................................. 557
Starting problems .......................... 158
Starting the engine with the
SmartKey ....................................... 154
Starting with KEYLESS-GO ............. 154
Switching off .................................. 172
Tow-starting (vehicle) ..................... 562
Engine electronics
Problem (malfunction) ................... 158
Engine oil
Adding .......................................... .536
Additives ........................................ 604
Checking the oil level ..................... 535
Checking the oil level using the
dipstick .......................................... 535
Display message ............................ 256
Filling capacity ............................... 604
Notes about oil grades ................... 603
Notes on oil level/consumption .... 535
Temperature (on-board com-
puter) ............................................. 236
Viscosity ........................................ 604
Entering an intersection name ......... 325
Entering a street name ..................... 323
Entering the address (example) ....... 322
Entering the city ................................ 323
Entering the house number .............. 323
Entry Deleting ......................................... 302
Saving ............................................ 300
ESP ®
(Electronic Stability Pro-
gram) AMG menu (on-board computer) ... 236
Characteristics ................................. 75
Deactivating/activating (AMG
vehicles) .......................................... 76
Deactivating/activating (notes;
except AMG vehicles) ..................... .75
Display message ............................ 240
ETS .................................................. 74
Function/note s................................ 74 General notes .................................. 74
Important safety information ........... 74
Warning lamp ................................. 273
ETS (Electronic Traction System) ....... 74
Example display Audio CD mode .............................. 446
MUSIC REGISTER ........................... 455
Exhaust check ................................... 175
Exhaust pipe (cleaning instruc-
tions) .................................................. 544
Exterior lighting Setting options .............................. 122
see Lights
Exterior mirrors
Adjusting ....................................... 116
Dipping (automatic) ....................... 117
Folding in/out (electrically) ........... 117
Folding in when locking (on-board
computer) ...................................... 235
Out of position (troubleshooting) ... 117
Storing settings (memory func-
tion) ............................................... 119
Storing the parking position .......... 118
Eyeglasses compartment ................. 513 F
Factory setting (reset function) ....... 311
Fast forward Audio mode (CD, MP3) .................. 448
Video DVD ..................................... 475
Fast rewind
Audio mode (CD, MP3) .................. 448
Video DVD ..................................... 475
Favorites (Internet) ........................... 431
Favorites button ................................ 309
Filler cap see Fuel filler flap
Filling capacities (Technical data) ... 601
Flat tire MOExtended tire s.......................... 549
Preparing the vehicle ..................... 548
TIREFIT kit ...................................... 550
Floormats ........................................... 531
Frequencies Adjusting for radio stations ............ 437 12
Index
Page 15 of 610
Front-passenger seat
Adjusting from the driver's seat .... .110
Fuel
Additives ........................................ 603
Consumption statistics .................. 225
Displaying consumption ................. 313
Displaying the current consump-
tion ................................................ 226
Displaying the range ..................... .226
Driving tips ................................... .174
E10 ................................................ 602
Fuel gauge ....................................... 41
Grade (gasoline) ............................ 602
Important safety notes .................. 602
Problem (malfunction) ................... 171
Refueling ........................................ 168
Tank content/reserve fuel ............. 602
Fuel filler flap
Opening ......................................... 169
Fuel level
Calling up the range (on-board
computer) ...................................... 226
Fuel tank
Capacity ........................................ 602
Problem (malfunction) ................... 171
Fuse allocation chart (vehicle tool
kit) ...................................................... 548
Fuses Allocation chart ............................ .562
Before changing ............................ .562
Dashboard fuse box ....................... 563
Fuse box in the engine compart-
ment .............................................. 563
Fuse box in the rear compartment .. 564
Important safety notes .................. 562 G
Garage door opener Clearing the memory ..................... 530
General notes ................................ 527
Important safety notes .................. 528
Opening/closing the garage door .. 530
Programming (button in the rear-
view mirror) ................................... 528
Gasoline ............................................. 602
Gear indicator (on-board com-
puter) ................................................. .236 Genuine parts
...................................... 30
Glass roof (sunblind) ......................... 104
Glove box .......................................... .512
Google™ Local Search Importing a destination/route ....... 419
Popular Searches ........................... 420
Search .......................................... .418
Search history ............................... 420
Selecting a search position ............ 419
Using as the destination ................ 419
GPS reception ................................... .319
Gracenote ®
Media Database ............ 448 H
Handbrake see Parking brake
HANDS-FREE ACCESS .......................... 93
Harman/kardon ®
Logic 7 ®
sur-
round sound system see Surround sound (harman/
kardon ®
surround sound system)
Hazard warning lamps
Display message ............................ 267
Switching on/off ........................... 126
Head bags
Display message ............................ 248
Operation ......................................... 58
Heading up (navigation) ................... 366
Headlamps Cleaning system (notes) ................ 606
Fogging up ..................................... 128
see Automatic headlamp mode
Head level heating (AIRSCARF) ........113
Headphones Changing batteries ........................ 485
Head restraints
Adjusting ....................................... 111
see NECK-PRO head restraints
Heating
see Climate control
High-beam headlamps
Display message ............................ 252
Switching on/off ........................... 125
Highway information ........................ 369
Hill start assist .................................. 154 Index
13
Page 26 of 610
Suspension tuning
Active Body Control (AMG vehi-
cles) ............................................... 198
Active Body Control (except AMG
vehicles) ........................................1 95
SETUP (on-board computer) .......... 236
Switching air-recirculation mode
on/off ................................................. 146
Switching between picture for-
mats (TV, video) ................................. 473
Switching between summer time
and standard time .............................307
Switching HD Radio on/off see Radio
Switching the hands-free micro-
phone on/off ..................................... 388
Switching wavebands (radio) ........... 436
System settings
Bluetooth ®
..................................... 308
Date ............................................... 306
Language ....................................... 308
Text reader speed .......................... 308
Time ............................................... 306
Time zone ...................................... 307
Voice Control System .................... 308 T
Tachometer ........................................ 223
Tail lamps Display message ............................ 252
see Lights
Tank content
Fuel gauge ....................................... 41
Technical data
Capacities ...................................... 601
Information ................................... .600
Tires/wheels ................................. 593
Vehicle data ................................... 607
TELEAID
Call priority ................................... .523
Downloading destinations
(COMAND) ..................................... 523
Downloading routes ....................... 526
Emergency call .............................. 520
General notes ................................ 519
Geo fencing ................................... 527 Locating a stolen vehicle ..............
.525
MB info call button ........................ 522
Remote vehicle locking .................. 525
Roadside Assistance button .......... 521
Search & Send ............................... 524
Self-test ......................................... 520
Speed alert ................................... .527
System .......................................... 520
Triggering the vehicle alarm ........... 527
Vehicle remote malfunction diag-
nosis .............................................. 526
Vehicle remote unlocking .............. 524
Telephone
Accepting/ending a call ................ 387
Accepting a call ............................ .229
Adjusting the volume for calls ....... 296
Calling (outgoing call ).................... 387
Conference connection .................. 390
Connecting a mobile phone (gen-
eral information) ............................ 381
De-authorizing a mobile phone ...... 385
Display message ............................ 266
Ending an active cal l...................... 390
Entering a number ......................... 387
Entering phone numbers ................ 387
External authorization (Blue-
tooth ®
) ........................................... 384
Function restrictions ...................... 380
General notes ................................ 379
Incoming call ................................. 387
Making a call ................................. 390
Making a call via speed dial ........... 388
Menu (on-board computer) ............ 229
Number from the phone book ........ 230
Operating options .......................... 380
Overview of functions .................... 388
Reception and transmission vol-
ume ............................................... 386
Redialing ........................................ 230
Rejecting/accepting a waiting
call ................................................. 389
Rejecting/ending a call ................. 229
Rejecting a call .............................. 387
Safety notes .................................. 379
Sending DTMF tones ...................... 389
Single call ...................................... 388
Switching hands-free microphone on/of f............................................ 388 24
Index
Page 171 of 610
!
Do not use diesel to refuel vehicles with a
gasoline engine. Do not switch on the igni- tion if you accidentally refuel with the
wrong fuel. Otherwise, the fuel will enter
the fuel system. Even small amounts of the
wrong fuel could result in damage to the
fuel system and the engine. Notify a quali-
fied specialist workshop and have the fuel
tank and fuel lines drained completely.
! Overfilling the fuel tank could damage the
fuel system.
! Take care not to spill any fuel on painted
surfaces. You could otherwise damage the paintwork.
! Use a filter when refueling from a fuel can.
Otherwise, the fuel lines and/or injection
system could be blocked by particles from
the fuel can.
Do not get into the vehicle again during the
refueling process. Otherwise, electrostatic
charge could build up again.
If you overfill the fuel tank, fuel could spray
out when the fuel pump nozzle is removed.
For further information on fuel and fuel quality
(Y page 602). Refueling
General information The fuel filler flap is unlocked or locked auto-
matically when you open or close the vehicle with the SmartKey or with KEYLESS-GO.
The position of the fuel filler cap is displayed
00B6 in the instrument cluster. The arrow
next to the filling pump indicates the side of
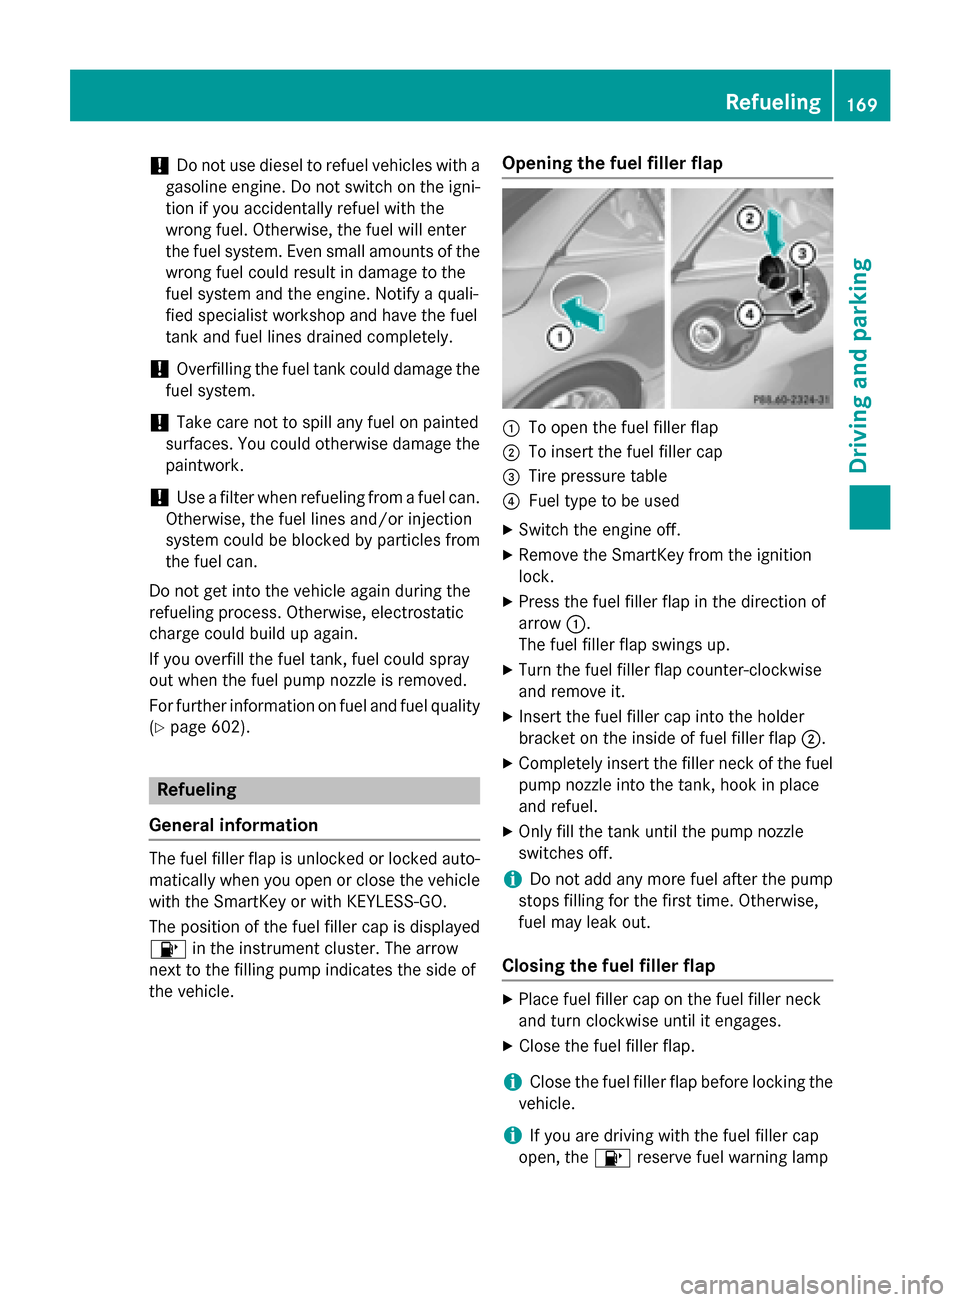
the vehicle. Opening the fuel filler flap 0043
To open the fuel filler flap
0044 To insert the fuel filler cap
0087 Tire pressure table
0085 Fuel type to be used
X Switch the engine off.
X Remove the SmartKey from the ignition
lock.
X Press the fuel filler flap in the direction of
arrow 0043.
The fuel filler flap swings up.
X Turn the fuel filler flap counter-clockwise
and remove it.
X Insert the fuel filler cap into the holder
bracket on the inside of fuel filler flap 0044.
X Completely insert the filler neck of the fuel
pump nozzle into the tank, hook in place
and refuel.
X Only fill the tank until the pump nozzle
switches off.
i Do not add any more fuel after the pump
stops filling for the first time. Otherwise,
fuel may leak out.
Closing the fuel filler flap X
Place fuel filler cap on the fuel filler neck
and turn clockwise until it engages.
X Close the fuel filler flap.
i Close the fuel filler flap before locking the
vehicle.
i If you are driving with the fuel filler cap
open, the 00B6reserve fuel warning lamp Refueling
169Driving and parking Z
Page 258 of 610
Display messages
Possible causes/consequences and
0050
0050Solutions 00B2
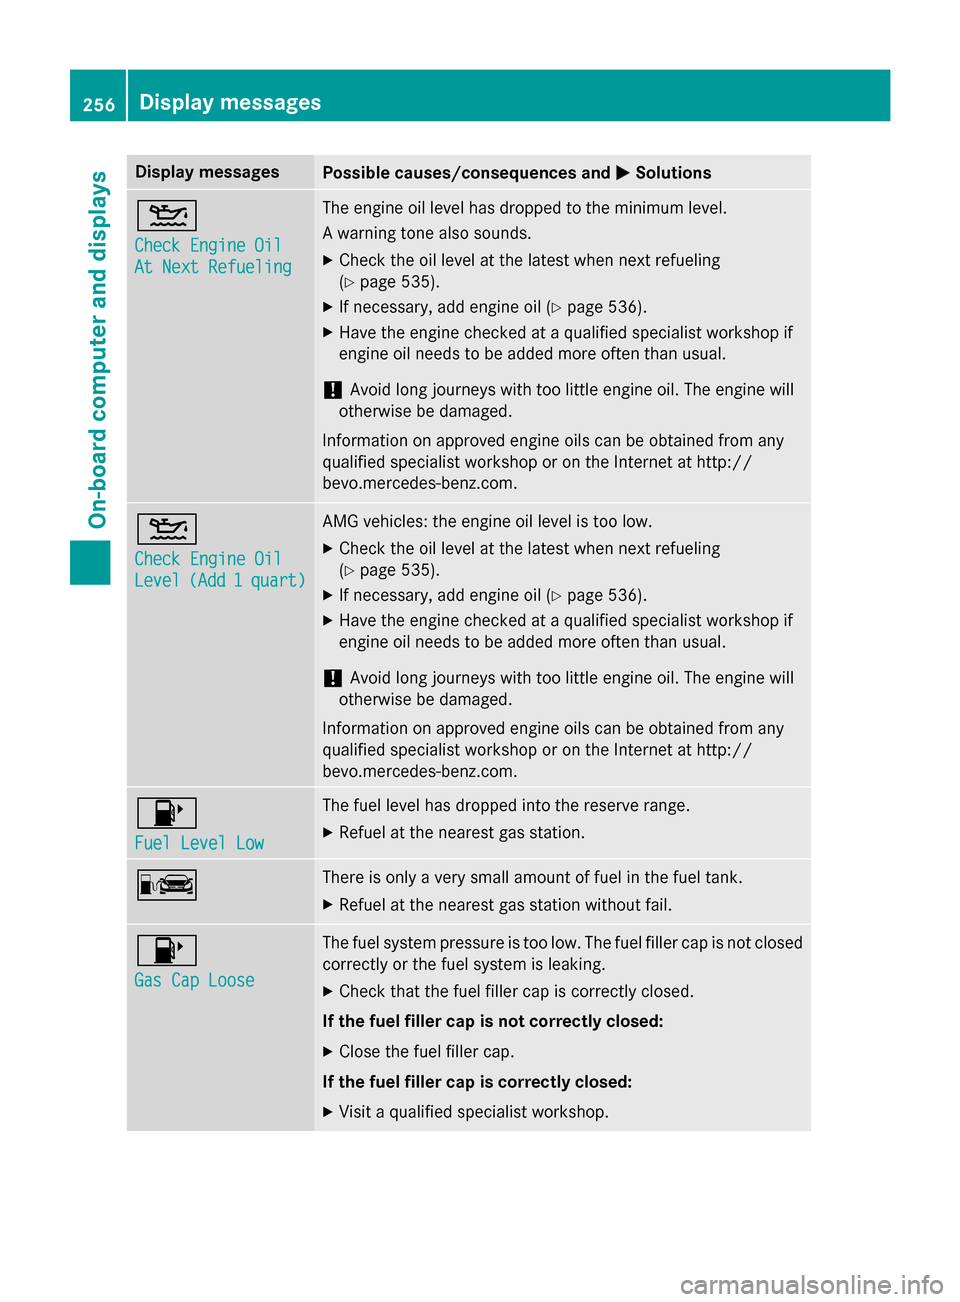
Check Engine Oil Check Engine Oil
At Next Refueling At Next Refueling The engine oil level has dropped to the minimum level.
A warning tone also sounds.
X Check the oil level at the latest when next refueling
(Y page 535).
X If necessary, add engine oil (Y page 536).
X Have the engine checked at a qualified specialist workshop if
engine oil needs to be added more often than usual.
! Avoid long journeys with too little engine oil. The engine will
otherwise be damaged.
Information on approved engine oils can be obtained from any
qualified specialist workshop or on the Internet at http://
bevo.mercedes-benz.co m.00B2
Check Engine Oil Check Engine Oil
Level Level
(Add
(Add1
1quart)
quart) AMG vehicles: the engine oil level is too low.
X Check the oil level at the latest when next refueling
(Y page 535).
X If necessary, add engine oil (Y page 536).
X Have the engine checked at a qualified specialist workshop if
engine oil needs to be added more often than usual.
! Avoid long journeys with too little engine oil. The engine will
otherwise be damaged.
Information on approved engine oils can be obtained from any
qualified specialist workshop or on the Internet at http://
bevo.mercedes-benz.com. 00B6
Fuel Level Low Fuel Level Low The fuel level has dropped into the reserve range.
X Refuel at the nearest gas station. 00A8 There is only a very small amount of fuel in the fuel tank.
X Refuel at the nearest gas station without fail. 00B6
Gas Cap Loose Gas Cap Loose The fuel system pressure is too low. The fuel filler cap is not closed
correctly or the fuel system is leaking.
X Check that the fuel filler cap is correctly closed.
If the fuel filler cap is not correctly closed: X Close the fuel filler cap.
If the fuel filler cap is correctly closed: X Visit a qualified specialist workshop. 256
Display messagesOn-board computer and displays
Page 279 of 610
Engine
Problem
Possible causes/consequences and
0050
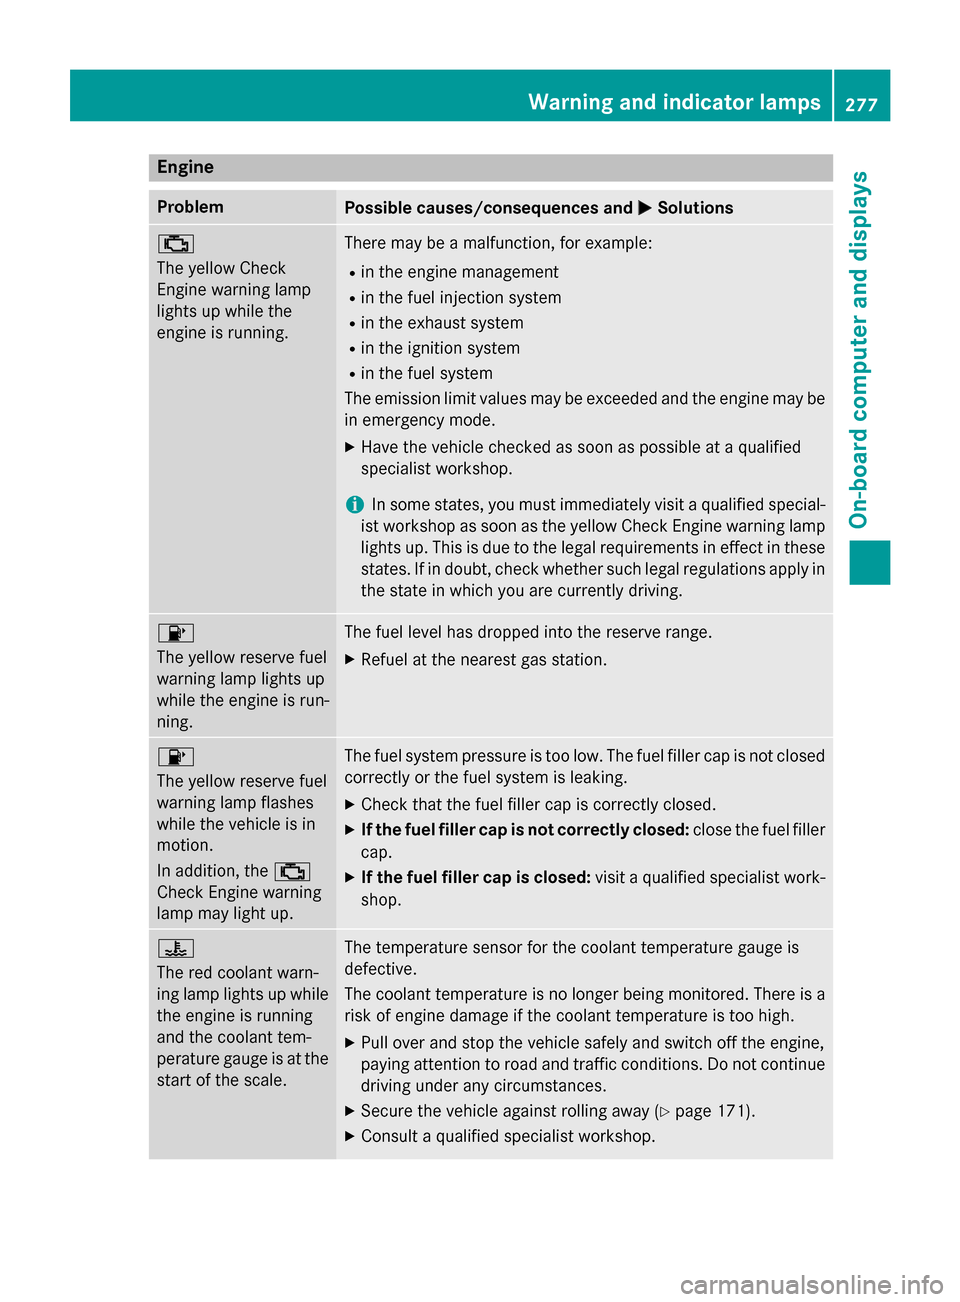
0050Solutions 00B9
The yellow Check
Engine warning lamp
lights up while the
engine is running.
There may be a malfunction, for example:
R in the engine management
R in the fuel injection system
R in the exhaust system
R in the ignition system
R in the fuel system
The emission limit values may be exceeded and the engine may be
in emergency mode.
X Have the vehicle checked as soon as possible at a qualified
specialist workshop.
i In some states, you must immediately visit a qualified special-
ist workshop as soon as the yellow Check Engine warning lamp
lights up. This is due to the legal requirements in effect in these
states. If in doubt, check whether such legal regulations apply in the state in which you are currently driving. 00B6
The yellow reserve fuel
warning lamp lights up
while the engine is run-
ning.
The fuel level has dropped into the reserve range.
X Refuel at the nearest gas station. 00B6
The yellow reserve fuel
warning lamp flashes
while the vehicle is in
motion.
In addition, the
00B9
Check Engine warning
lamp may light up. The fuel system pressure is too low. The fuel filler cap is not closed
correctly or the fuel system is leaking.
X Check that the fuel filler cap is correctly closed.
X If the fuel filler cap is not correctly closed: close the fuel filler
cap.
X If the fuel filler cap is closed: visit a qualified specialist work-
shop. 00AC
The red coolant warn-
ing lamp lights up while
the engine is running
and the coolant tem-
perature gauge is at the start of the scale. The temperature sensor for the coolant temperature gauge is
defective.
The coolant temperature is no longer being monitored. There is a risk of engine damage if the coolant temperature is too high.
X Pull over and stop the vehicle safely and switch off the engine,
paying attention to road and traffic conditions. Do not continue
driving under any circumstances.
X Secure the vehicle against rolling away (Y page 171).
X Consult a qualified specialist workshop. Warning and indicator lamps
277On-board computer and displays Z
Page 539 of 610
X
Replace cap 0043on the filler neck and turn
clockwise.
Ensure that the cap locks into place
securely.
X Check the oil level again with the oil dip-
stick (Y page 535).
Further information on engine oil
(Y page 603). Checking and adding other service
products
Checking coolant level G
WARNING
Certain components in the engine compart-
ment, such as the engine, radiator and parts
of the exhaust system, can become very hot.
Working in the engine compartment poses a
risk of injury.
Where possible, let the engine cool down and touch only the components described in the
following. G
WARNING
The engine cooling system is pressurized, par- ticularly when the engine is warm. When
opening the cap, you could be scalded by hotcoolant spraying out. There is a risk of injury.
Let the engine cool down before opening the
cap. Wear eye and hand protection when
opening the cap. Open the cap slowly half a
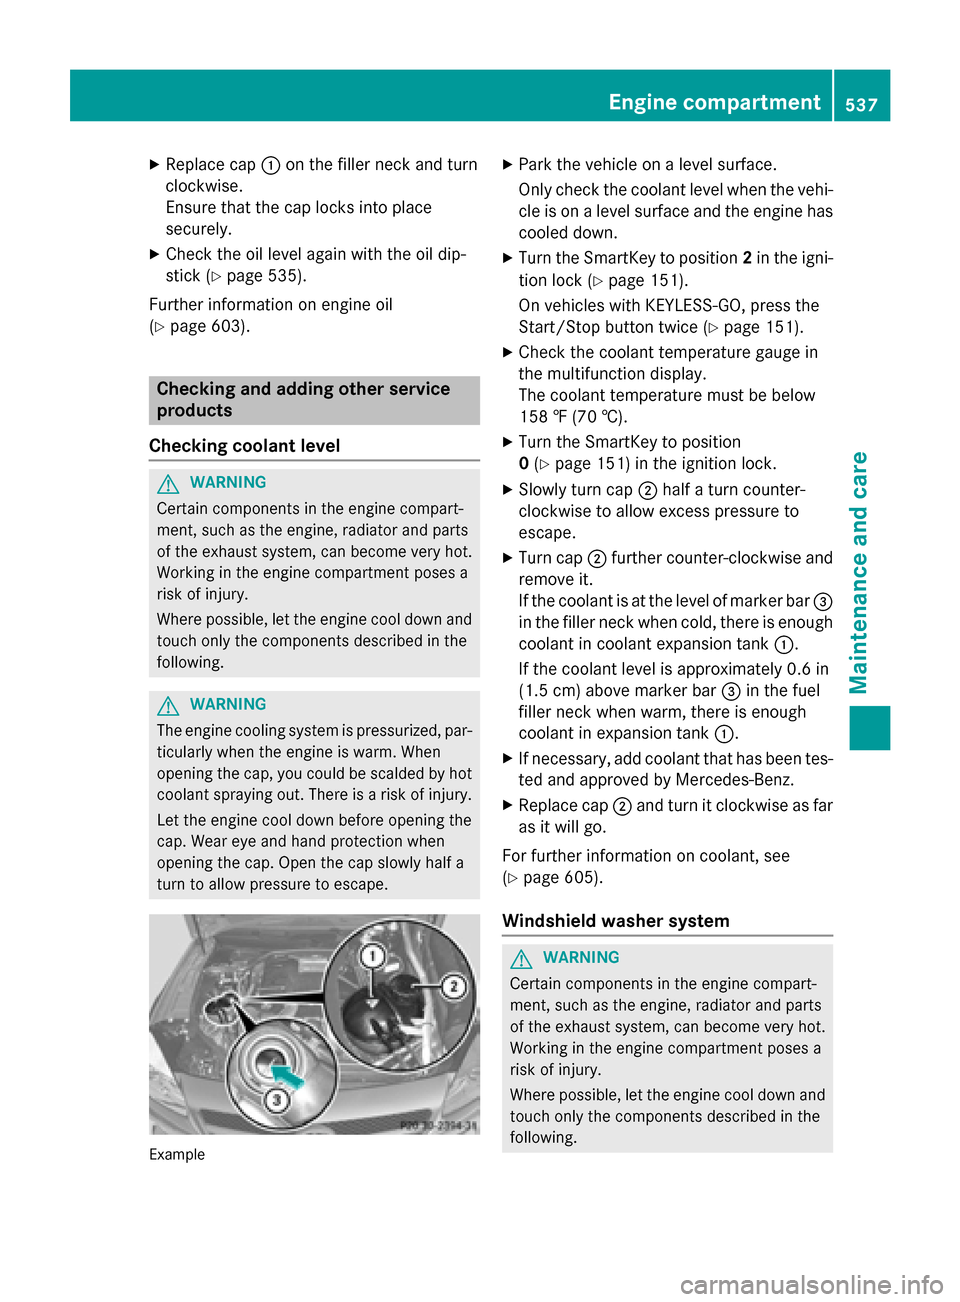
turn to allow pressure to escape. Example X
Park the vehicle on a level surface.
Only check the coolant level when the vehi- cle is on a level surface and the engine has
cooled down.
X Turn the SmartKey to position 2in the igni-
tion lock (Y page 151).
On vehicles with KEYLESS-GO, press the
Start/Stop button twice (Y page 151).
X Check the coolant temperature gauge in
the multifunction display.
The coolant temperature must be below
158 ‡ (70 †).
X Turn the SmartKey to position
0(Y page 151) in the ignition lock.
X Slowly turn cap 0044half a turn counter-
clockwise to allow excess pressure to
escape.
X Turn cap 0044further counter-clockwise and
remove it.
If the coolant is at the level of marker bar 0087
in the filler neck when cold, there is enough coolant in coolant expansion tank 0043.
If the coolant level is approximately 0.6 in
(1.5 cm) above marker bar 0087in the fuel
filler neck when warm, there is enough
coolant in expansion tank 0043.
X If necessary, add coolant that has been tes-
ted and approved by Mercedes-Benz.
X Replace cap 0044and turn it clockwise as far
as it will go.
For further information on coolant, see
(Y page 605).
Windshield washer system G
WARNING
Certain components in the engine compart-
ment, such as the engine, radiator and parts
of the exhaust system, can become very hot.
Working in the engine compartment poses a
risk of injury.
Where possible, let the engine cool down and touch only the components described in the
following. Engine compartment
537Maintenance and care Z
Page 555 of 610
ard on the driver's side B-pillar or tire pres-
sure table on the fuel filler flap).
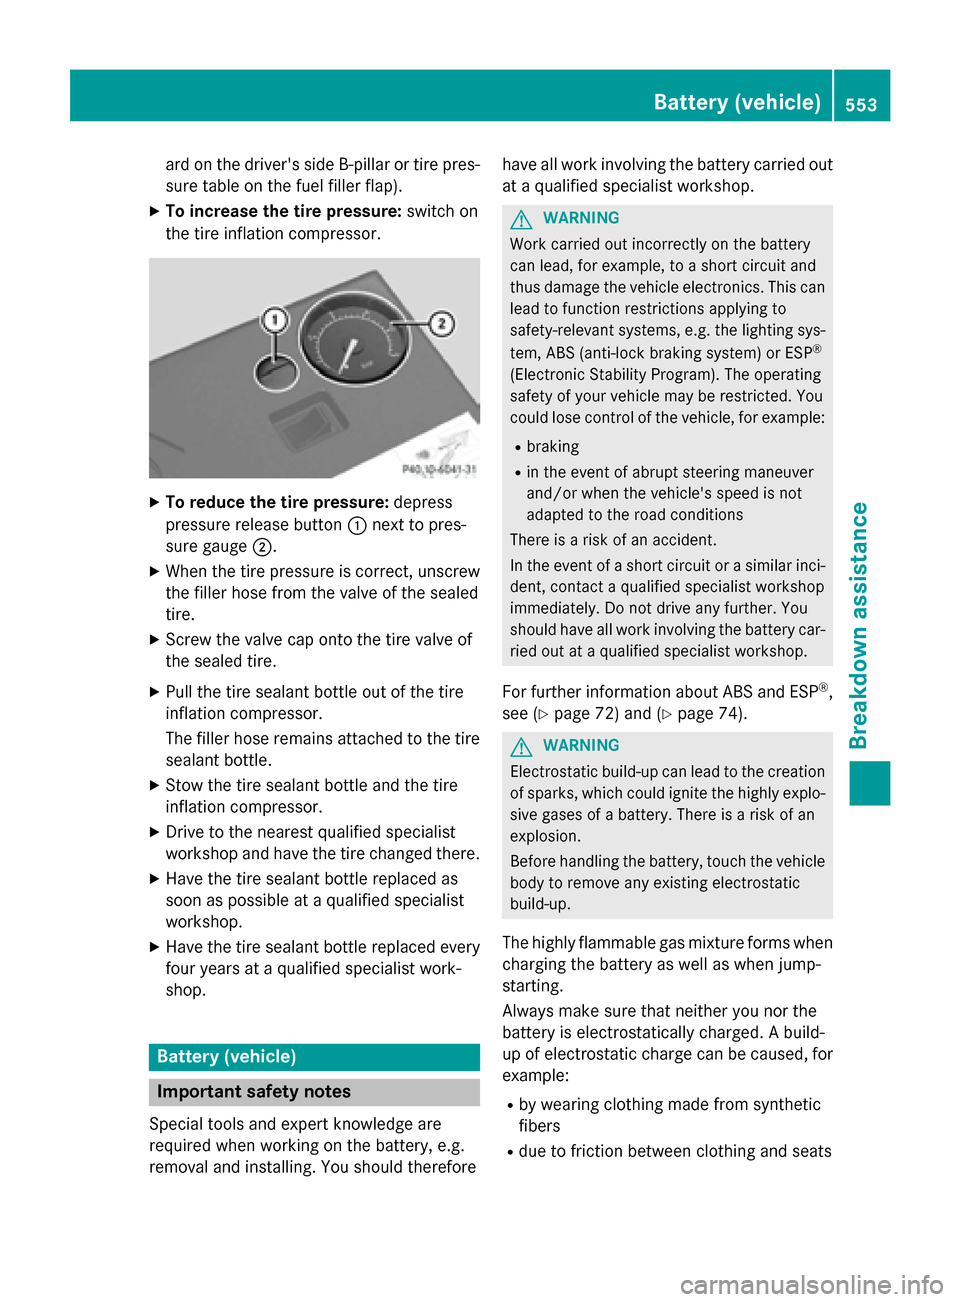
X To increase the tire pressure: switch on
the tire inflation compressor. X
To reduce the tire pressure: depress
pressure release button 0043next to pres-
sure gauge 0044.
X When the tire pressure is correct, unscrew
the filler hose from the valve of the sealed
tire.
X Screw the valve cap onto the tire valve of
the sealed tire.
X Pull the tire sealant bottle out of the tire
inflation compressor.
The filler hose remains attached to the tire
sealant bottle.
X Stow the tire sealant bottle and the tire
inflation compressor.
X Drive to the nearest qualified specialist
workshop and have the tire changed there.
X Have the tire sealant bottle replaced as
soon as possible at a qualified specialist
workshop.
X Have the tire sealant bottle replaced every
four years at a qualified specialist work-
shop. Battery (vehicle)
Important safety notes
Special tools and expert knowledge are
required when working on the battery, e.g.
removal and installing. You should therefore have all work involving the battery carried out
at a qualified specialist workshop. G
WARNING
Work carried out incorrectly on the battery
can lead, for example, to a short circuit and
thus damage the vehicle electronics. This can lead to function restrictions applying to
safety-relevant systems, e.g. the lighting sys-
tem, ABS (anti-lock braking system) or ESP ®
(Electronic Stability Program). The operating
safety of your vehicle may be restricted. You
could lose control of the vehicle, for example:
R braking
R in the event of abrupt steering maneuver
and/or when the vehicle's speed is not
adapted to the road conditions
There is a risk of an accident.
In the event of a short circuit or a similar inci- dent, contact a qualified specialist workshop
immediately. Do not drive any further. You
should have all work involving the battery car-
ried out at a qualified specialist workshop.
For further information about ABS and ESP ®
,
see (Y page 72) and (Y page 74). G
WARNING
Electrostatic build-up can lead to the creation of sparks, which could ignite the highly explo-
sive gases of a battery. There is a risk of an
explosion.
Before handling the battery, touch the vehicle body to remove any existing electrostatic
build-up.
The highly flammable gas mixture forms when
charging the battery as well as when jump-
starting.
Always make sure that neither you nor the
battery is electrostatically charged. A build-
up of electrostatic charge can be caused, for
example:
R by wearing clothing made from synthetic
fibers
R due to friction between clothing and seats Battery (vehicle)
553Breakdown assistance Z
Page 559 of 610
Jump-starting
For the jump-starting procedure, use only the jump-starting connection point, consisting of a positive terminal and a ground point, in the engine compartment. G
WARNING
Battery acid is caustic. There is a risk of injury.
Avoid contact with the skin, eyes or clothing. Do not inhale any battery gases. Do not lean over the battery. Keep children away from batteries. Wash battery acid immediately with water and seek
medical attention. G
WARNING
During charging and jump-starting, explosive gases can escape from the battery. There is a risk of an explosion.
Particularly avoid fire, open flames, creating sparks and smoking. Ensure there is sufficient ven-
tilation while charging and jump-starting. Do not lean over a battery. G
WARNING
During the charging process, a battery produces hydrogen gas. If a short circuit occurs or sparks
are created, the hydrogen gas can ignite. There is a risk of an explosion.
R Make sure that the positive terminal of a connected battery does not come into contact with
vehicle parts.
R Never place metal objects or tools on a battery.
R It is important that you observe the described order of the battery terminals when connecting
and disconnecting a battery.
R When jump-starting, make sure that the battery poles with identical polarity are connected.
R It is particularly important to observe the described order when connecting and disconnecting
the jumper cables.
R Never connect or disconnect the battery terminals while the engine is running. G
WARNING
A discharged battery can freeze at temperatures below freezing point. When jump-starting the
vehicle or charging the battery, gases can escape from the battery. There is a risk of an explosion.
Allow the frozen battery to thaw out before charging it or jump-starting.
! Avoid repeated and lengthy starting attempts. Otherwise, the catalytic converter could be
damaged by the non-combusted fuel.
If, at low temperatures, the indicator lamps/warning lamps in the instrument cluster do not
light up, it is highly likely that the discharged battery has frozen. In this case, you may neither
charge the battery nor jump-start the vehicle. The service life of a thawed-out battery may be
shorter. The starting characteristics can be impaired, particularly at low temperatures. Have
the thawed-out battery checked at a qualified specialist workshop. Jump-starting
557Breakdown assistance Z
Page 577 of 610
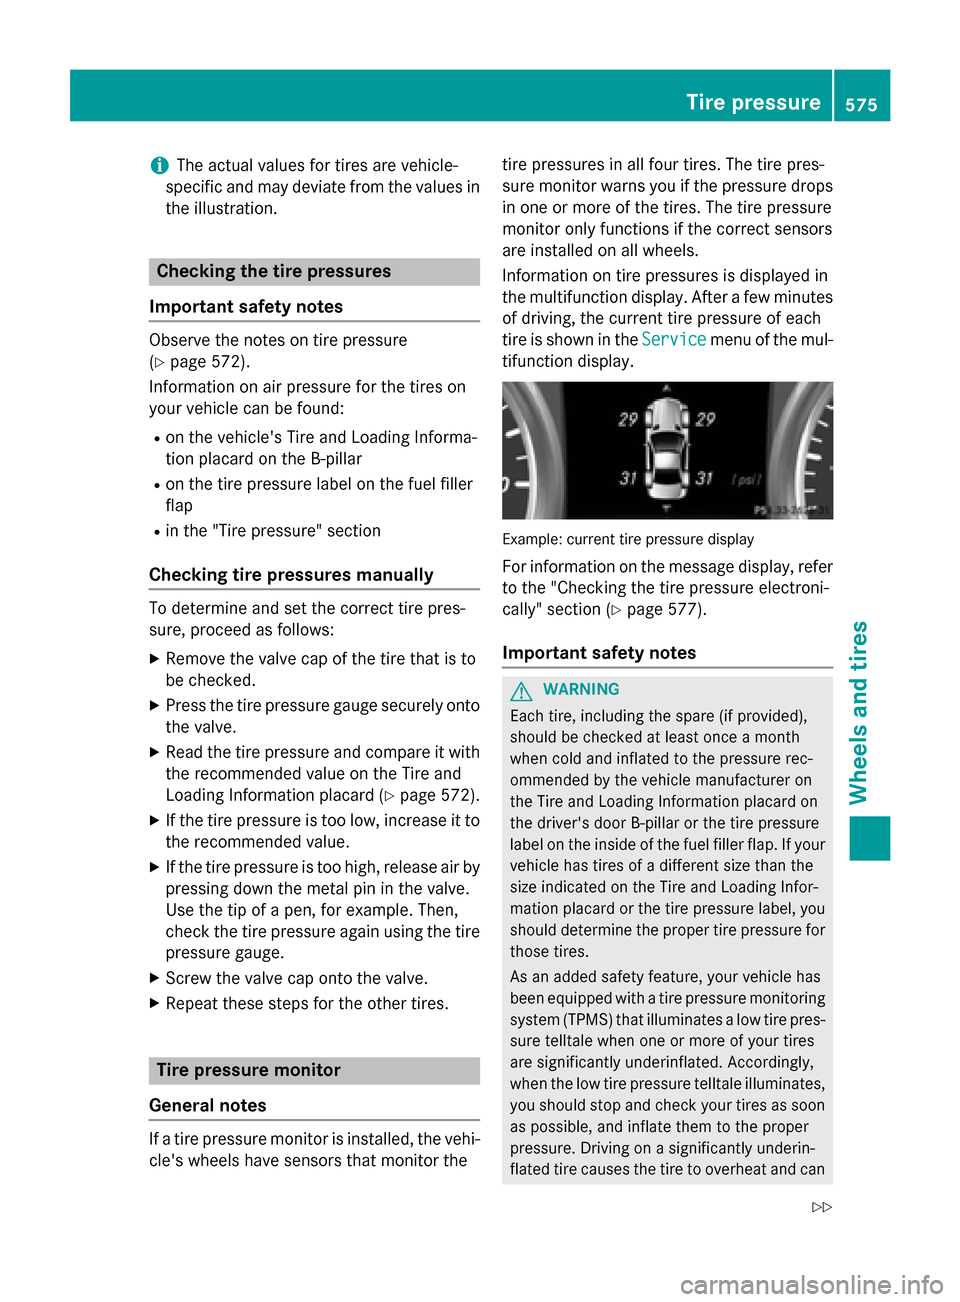
i
The actual values for tires are vehicle-
specific and may deviate from the values in
the illustration. Checking the tire pressures
Important safety notes Observe the notes on tire pressure
(Y
page 572).
Information on air pressure for the tires on
your vehicle can be found:
R on the vehicle's Tire and Loading Informa-
tion placard on the B-pillar
R on the tire pressure label on the fuel filler
flap
R in the "Tire pressure" section
Checking tire pressures manually To determine and set the correct tire pres-
sure, proceed as follows:
X Remove the valve cap of the tire that is to
be checked.
X Press the tire pressure gauge securely onto
the valve.
X Read the tire pressure and compare it with
the recommended value on the Tire and
Loading Information placard (Y page 572).
X If the tire pressure is too low, increase it to
the recommended value.
X If the tire pressure is too high, release air by
pressing down the metal pin in the valve.
Use the tip of a pen, for example. Then,
check the tire pressure again using the tire
pressure gauge.
X Screw the valve cap onto the valve.
X Repeat these steps for the other tires. Tire pressure monitor
General notes If a tire pressure monitor is installed, the vehi-
cle's wheels have sensors that monitor the tire pressures in all four tires. The tire pres-
sure monitor warns you if the pressure drops
in one or more of the tires. The tire pressure
monitor only functions if the correct sensors
are installed on all wheels.
Information on tire pressures is displayed in
the multifunction display. After a few minutes of driving, the current tire pressure of each
tire is shown in the Service Servicemenu of the mul-
tifunction display. Example: current tire pressure display
For information on the message display, refer to the "Checking the tire pressure electroni-
cally" section (Y page 577).
Important safety notes G
WARNING
Each tire, including the spare (if provided),
should be checked at least once a month
when cold and inflated to the pressure rec-
ommended by the vehicle manufacturer on
the Tire and Loading Information placard on
the driver's door B-pillar or the tire pressure
label on the inside of the fuel filler flap. If your vehicle has tires of a different size than the
size indicated on the Tire and Loading Infor-
mation placard or the tire pressure label, you should determine the proper tire pressure for
those tires.
As an added safety feature, your vehicle has
been equipped with a tire pressure monitoring system (TPMS) that illuminates a low tire pres-
sure telltale when one or more of your tires
are significantly underinflated. Accordingly,
when the low tire pressure telltale illuminates,
you should stop and check your tires as soon
as possible, and inflate them to the proper
pressure. Driving on a significantly underin-
flated tire causes the tire to overheat and can Tire pressure
575Wheels and tires
Z