glove box MERCEDES-BENZ SL-Class 2015 R131 Owner's Manual
[x] Cancel search | Manufacturer: MERCEDES-BENZ, Model Year: 2015, Model line: SL-Class, Model: MERCEDES-BENZ SL-Class 2015 R131Pages: 610, PDF Size: 12.21 MB
Page 7 of 610
Air bags
Deployment .................................... .64
Display message ............................ 250
Front air bag (driver, front
passenger) ....................................... 57
Head bag ......................................... 58
Important safety note s.................... 56
Introduction ..................................... 56
Knee bag .......................................... 57
PASSENGER AIR BAG OFF indica-
tor lamp ........................................... 51
Side impact air ba g.......................... 57
Air-conditioning system
see Climate control
AIR FLOW ........................................... 141
AIRSCARF Switching on/of f........................... 113
AIRSCARF vents
Setting the blower output .............. 148
Air vents
Glove box ....................................... 148
Important safety notes .................. 147
Setting ........................................... 147
Setting the blower output of the
AIRSCARF vents ............................. 148
Setting the center air vents ........... 147
Setting the side air vents ............... 148
Switching AIRSCARF on/of f.......... 113
Alarm
ATA (Anti-Theft Alarm system) ......... 80
Switching off (ATA) .......................... 80
Switching the function on/off
(ATA) ................................................ 80
Alarm system
see ATA (Anti-Theft Alarm system)
Alternative Route .............................. 349
Ambient lighting Setting the brightness (on-board
computer) ...................................... 233
Setting the color (on-board com-
puter) ............................................. 233
AMG
Button for AMG menu .................... 164
SETUP ............................................ 164
AMG menu (on-board computer) ..... 236
Anti-lock braking system see ABS (Anti-lock Braking System) Anti-Theft Alarm system
see ATA (Anti-Theft Alarm system)
Ashtray ............................................... 518
Assistance display (on-board com-
puter) .................................................. 230
Assistance menu (on-board com-
puter) .................................................. 230
ASSYST PLUS Displaying a service message ........ 539
Hiding a service message .............. 538
Resetting the service interval dis-
play ................................................ 539
Service message ............................ 538
Special service requirements ......... 539
ATA (Anti-Theft Alarm system)
Activating/deactivating ................... 80
Function ........................................... 80
Switching off the alarm .................... 80
ATTENTION ASSIST
Activating/deactivating ................. 231
Display message ............................ 258
Function/note s............................. 209
Audio
Radio mod e................................... 435
Audio CD/DVD and MP3 mode
Switching to (Rear Seat Entertain-ment System) ................................ 489
Audio format, setting
Video DVD ..................................... 477
Audio menu (on-board computer) .... 228
Authorized Mercedes-Benz Center see Qualified specialist workshop
Authorized workshop
see Qualified specialist workshop
AUTO lights
Display message ............................ 253
see Lights
Automatic engine start (ECO start/
stop function) .................................... 156
Automatic engine switch-off (ECO
start/stop function) .......................... 155
Automatic headlamp mode .............. 122
Automatic transmission Accelerator pedal position ............. 162
Automatic drive program ............... 164
Changing gear ............................... 162
Display message ............................ 265 Index
5
Page 15 of 610
Front-passenger seat
Adjusting from the driver's seat .... .110
Fuel
Additives ........................................ 603
Consumption statistics .................. 225
Displaying consumption ................. 313
Displaying the current consump-
tion ................................................ 226
Displaying the range ..................... .226
Driving tips ................................... .174
E10 ................................................ 602
Fuel gauge ....................................... 41
Grade (gasoline) ............................ 602
Important safety notes .................. 602
Problem (malfunction) ................... 171
Refueling ........................................ 168
Tank content/reserve fuel ............. 602
Fuel filler flap
Opening ......................................... 169
Fuel level
Calling up the range (on-board
computer) ...................................... 226
Fuel tank
Capacity ........................................ 602
Problem (malfunction) ................... 171
Fuse allocation chart (vehicle tool
kit) ...................................................... 548
Fuses Allocation chart ............................ .562
Before changing ............................ .562
Dashboard fuse box ....................... 563
Fuse box in the engine compart-
ment .............................................. 563
Fuse box in the rear compartment .. 564
Important safety notes .................. 562 G
Garage door opener Clearing the memory ..................... 530
General notes ................................ 527
Important safety notes .................. 528
Opening/closing the garage door .. 530
Programming (button in the rear-
view mirror) ................................... 528
Gasoline ............................................. 602
Gear indicator (on-board com-
puter) ................................................. .236 Genuine parts
...................................... 30
Glass roof (sunblind) ......................... 104
Glove box .......................................... .512
Google™ Local Search Importing a destination/route ....... 419
Popular Searches ........................... 420
Search .......................................... .418
Search history ............................... 420
Selecting a search position ............ 419
Using as the destination ................ 419
GPS reception ................................... .319
Gracenote ®
Media Database ............ 448 H
Handbrake see Parking brake
HANDS-FREE ACCESS .......................... 93
Harman/kardon ®
Logic 7 ®
sur-
round sound system see Surround sound (harman/
kardon ®
surround sound system)
Hazard warning lamps
Display message ............................ 267
Switching on/off ........................... 126
Head bags
Display message ............................ 248
Operation ......................................... 58
Heading up (navigation) ................... 366
Headlamps Cleaning system (notes) ................ 606
Fogging up ..................................... 128
see Automatic headlamp mode
Head level heating (AIRSCARF) ........113
Headphones Changing batteries ........................ 485
Head restraints
Adjusting ....................................... 111
see NECK-PRO head restraints
Heating
see Climate control
High-beam headlamps
Display message ............................ 252
Switching on/off ........................... 125
Highway information ........................ 369
Hill start assist .................................. 154 Index
13
Page 25 of 610
Loss .................................................87
Mechanical key ................................ 84
Opening/closing the roof .............. 102
Overview .......................................... 82
Positions (ignition lock) ................. 151
Problem (malfunction) ..................... 87
Starting the engine ........................ 154
Snow chains ...................................... 571
Sockets Front-passenger footwell ............... 519
General notes ................................ 518
Trunk ............................................. 519
Under the armrest .........................5 19
Sound
Switching on/off ........................... 295
Sound menu ....................................... 296
Sound mode ....................................... 298
Sound settings Calling up the sound menu ............ 296
Surround sound ............................ .297
Treble and bas s............................. 296
Specialist workshop ............................ 35
Special seat belt retractor .................. 69
Speed, controlling see Cruise control
Speed dial list
Storing a phone book entry in the
speed dial list ................................ 397
Speedometer
Digital ............................................ 226
In the Instrument cluster ................. 41
Segments ...................................... 223
Selecting the unit of measure-
ment .............................................. 232
SPLITVIEW ......................................... 303
SPORT handling mode Activating/deactivating (AMG
vehicles) .......................................... 76
Warning lamp ................................. 274
Standing lamps
Display message ............................ 252
Switching on/of f........................... 124
Start/stop function
see ECO start/stop function
Starting (engine) ................................ 153
Station search ................................... 436
STEER CONTROL .................................. 79 Steering (display message)
.............. 266
Steering assistant STEER CON-
TROL see STEER CONTROL
Steering wheel
Adjusting (electrically) ................... 114
Button overview ............................... 43
Buttons (on-board computer) ......... 223
Cleaning ......................................... 545
Important safety notes .................. 114
Paddle shifters ............................... 164
Storing settings (memory func-
tion) ............................................... 119
Steering wheel paddle shifters ........ 164
Stop function Video DVD ..................................... 475
Stopwatch (RACETIMER) ................... 237
Storing stations Radi o............................................. 437
Stowage areas ................................... 512
Stowage compartments Armrest (under) ............................. 513
Center console .............................. 513
Center console (rear) ..................... 514
Cup holders ................................... 516
Eyeglasses compartment ............... 513
Glove box ....................................... 512
Important safety information ......... 512
Rear ............................................... 514
Stowage net ................................... 514
Stowage net ....................................... 514
Stowage space Umbrella holde r............................. 513
Stowage well beneath the trunk
floor .................................................... 516
Street View ........................................ 331
Summer tires ..................................... 570
Sun visor ............................................ 517
Surround lighting (on-board com-
puter) .................................................. 233
Surround sound ................................. 297
Surround sound (harman/kardon ®
surround sound system) Notes ............................................. 297
Switching on/of f........................... 297 Index
23
Page 59 of 610
R
no hard objects, e.g. coat hangers, hang on
the grab handles or coat hooks.
R no accessories, such as cup holders, are
attached to the vehicle within the deploy-
ment area of an air bag, e.g. to doors or side
windows.
R no heavy, sharp-edged or fragile objects
are in the pockets of your clothing. Store
such objects in a suitable place. G
WARNING
If you modify the air bag cover or affix objects
such as stickers to it, the air bag can no longer function correctly. There is an increased risk
of injury.
Never modify an air bag cover or affix objectsto it. G
WARNING
Sensors to control the air bags are located in the doors. Modifications or work not per-
formed correctly to the doors or door panel-
ing, as well as damaged doors, can lead to the
function of the sensors being impaired. The air bags might therefore not function properly
any more. Consequently, the air bags cannot
protect vehicle occupants as they are
designed to do. There is an increased risk of
injury.
Never modify the doors or parts of the doors.
Always have work on the doors or door pan-
eling carried out at a qualified specialist work- shop.
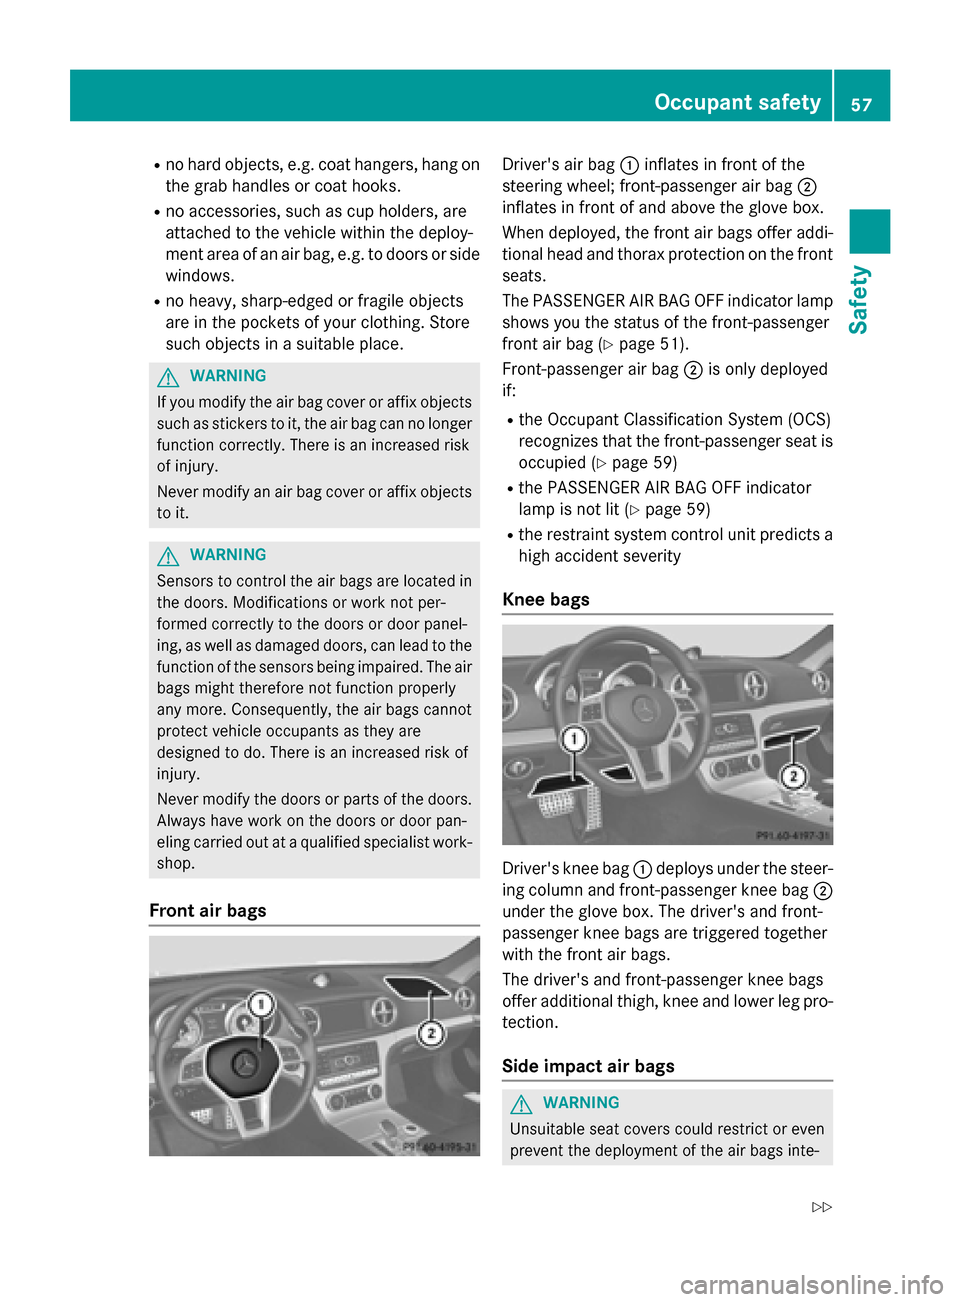
Front air bags Driver's air bag
0043inflates in front of the
steering wheel; front-passenger air bag 0044
inflates in front of and above the glove box.
When deployed, the front air bags offer addi-
tional head and thorax protection on the front
seats.
The PASSENGER AIR BAG OFF indicator lamp
shows you the status of the front-passenger
front air bag (Y page 51).
Front-passenger air bag 0044is only deployed
if:
R the Occupant Classification System (OCS)
recognizes that the front-passenger seat is
occupied (Y page 59)
R the PASSENGER AIR BAG OFF indicator
lamp is not lit (Y page 59)
R the restraint system control unit predicts a
high accident severity
Knee bags Driver's knee bag
0043deploys under the steer-
ing column and front-passenger knee bag 0044
under the glove box. The driver's and front-
passenger knee bags are triggered together
with the front air bags.
The driver's and front-passenger knee bags
offer additional thigh, knee and lower leg pro-
tection.
Side impact air bags G
WARNING
Unsuitable seat covers could restrict or even
prevent the deployment of the air bags inte- Occupant safety
57Safety
Z
Page 82 of 610
the system is not operational. Contact an
authorized Mercedes-Benz Center or call
1-800-FOR-MERCede s (in the USA) or
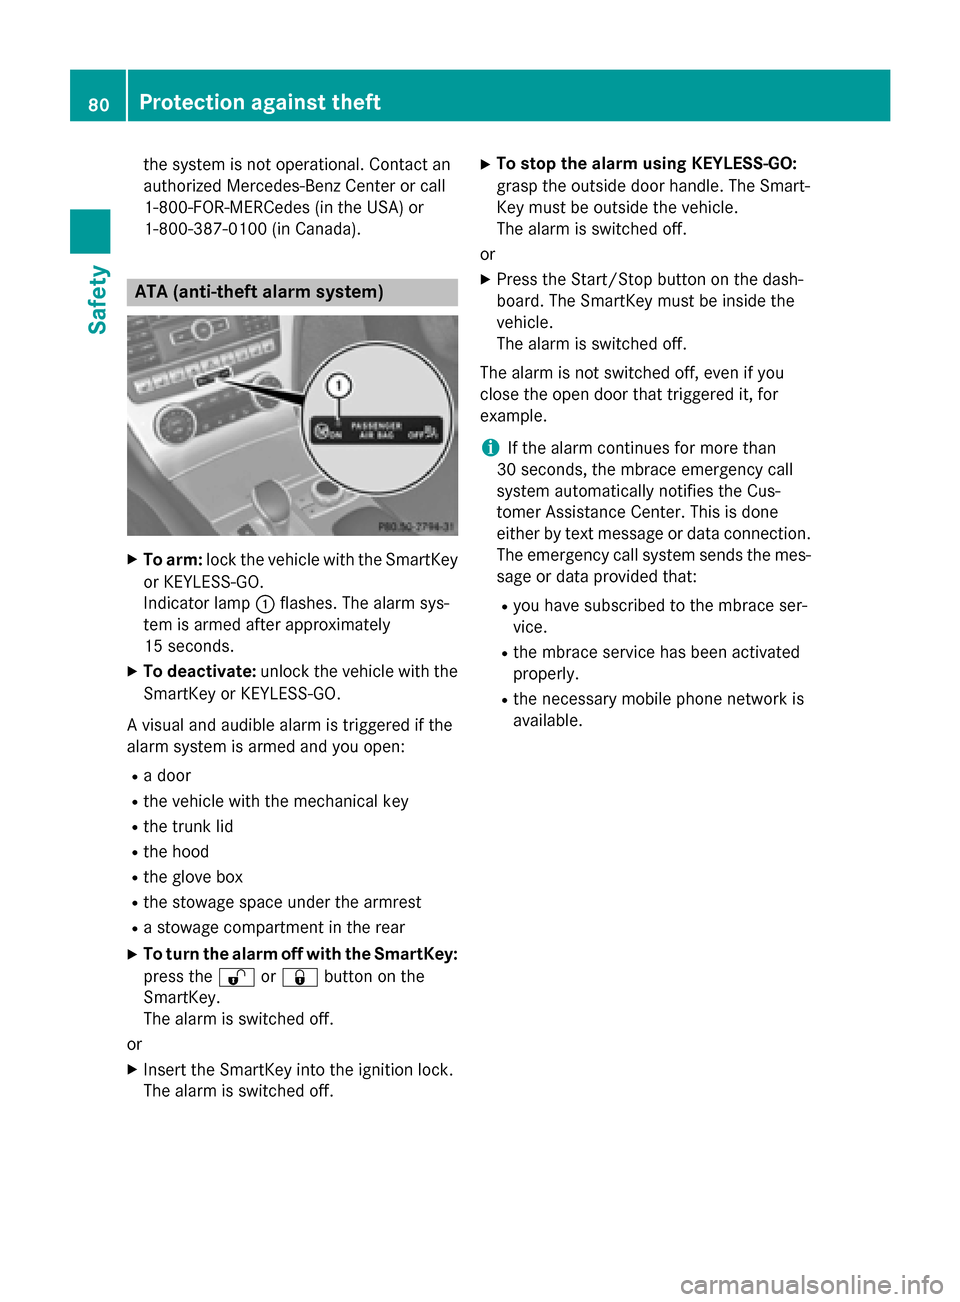
1-800-387-010 0(in Canada). ATA (anti-theft alarm system)
X
To arm: lock the vehicle with the SmartKey
or KEYLESS-GO.
Indicator lamp 0043flashes. The alarm sys-
tem is armed after approximately
15 seconds.
X To deactivate: unlock the vehicle with the
SmartKey or KEYLESS-GO.
A visual and audible alarm is triggered if the
alarm system is armed and you open:
R a door
R the vehicle with the mechanical key
R the trunk lid
R the hood
R the glove box
R the stowage space under the armrest
R a stowage compartment in the rear
X To turn the alarm off with the SmartKey:
press the 0036or0037 button on the
SmartKey.
The alarm is switched off.
or
X Insert the SmartKey into the ignition lock.
The alarm is switched off. X
To stop the alarm using KEYLESS-GO:
grasp the outside door handle. The Smart-
Key must be outside the vehicle.
The alarm is switched off.
or
X Press the Start/Stop button on the dash-
board. The SmartKey must be inside the
vehicle.
The alarm is switched off.
The alarm is not switched off, even if you
close the open door that triggered it, for
example.
i If the alarm continues for more than
30 seconds, the mbrace emergency call
system automatically notifies the Cus-
tomer Assistance Center. This is done
either by text message or data connection.
The emergency call system sends the mes- sage or data provided that:
R you have subscribed to the mbrace ser-
vice.
R the mbrace service has been activated
properly.
R the necessary mobile phone network is
available. 80
Protection against theftSafety
Page 85 of 610
The SmartKey centrally locks/unlocks:
R the doors
R the trunk lid
R the glove box
R the stowage compartment under the arm-
rest
R the stowage compartment in the rear com-
partment
R the fuel filler flap
The turn signals flash once when unlocking
and three times when locking.
You can also set an audible signal to confirm that the vehicle has been locked. The audiblesignal can be activated and deactivated using
the on-board computer (Y page 234).
When it is dark, the surround lighting also
comes on if it is activated in the on-board
computer (Y page 233). KEYLESS-GO
General notes Bear in mind that the engine can be started by
any of the vehicle occupants if there is a KEY- LESS-GO key in the vehicle.
Locking/unlocking centrally You can start, lock or unlock the vehicle using
KEYLESS-GO. To do this, you only need carry
the SmartKey with you. You can combine the functions of KEYLESS-GO with those of a con-
ventional SmartKey. Unlock the vehicle by
using KEYLESS-GO, for instance, and lock it
using the 0037button on the SmartKey.
When locking or unlocking with KEYLESS-GO,
the distance between the key and the corre-
sponding door handle must not be greater
than 3 ft (1 m). A check which periodically establishes a radio
connection between the vehicle and the
SmartKey determines whether a valid Smart- Key is in the vehicle. This occurs, for example:
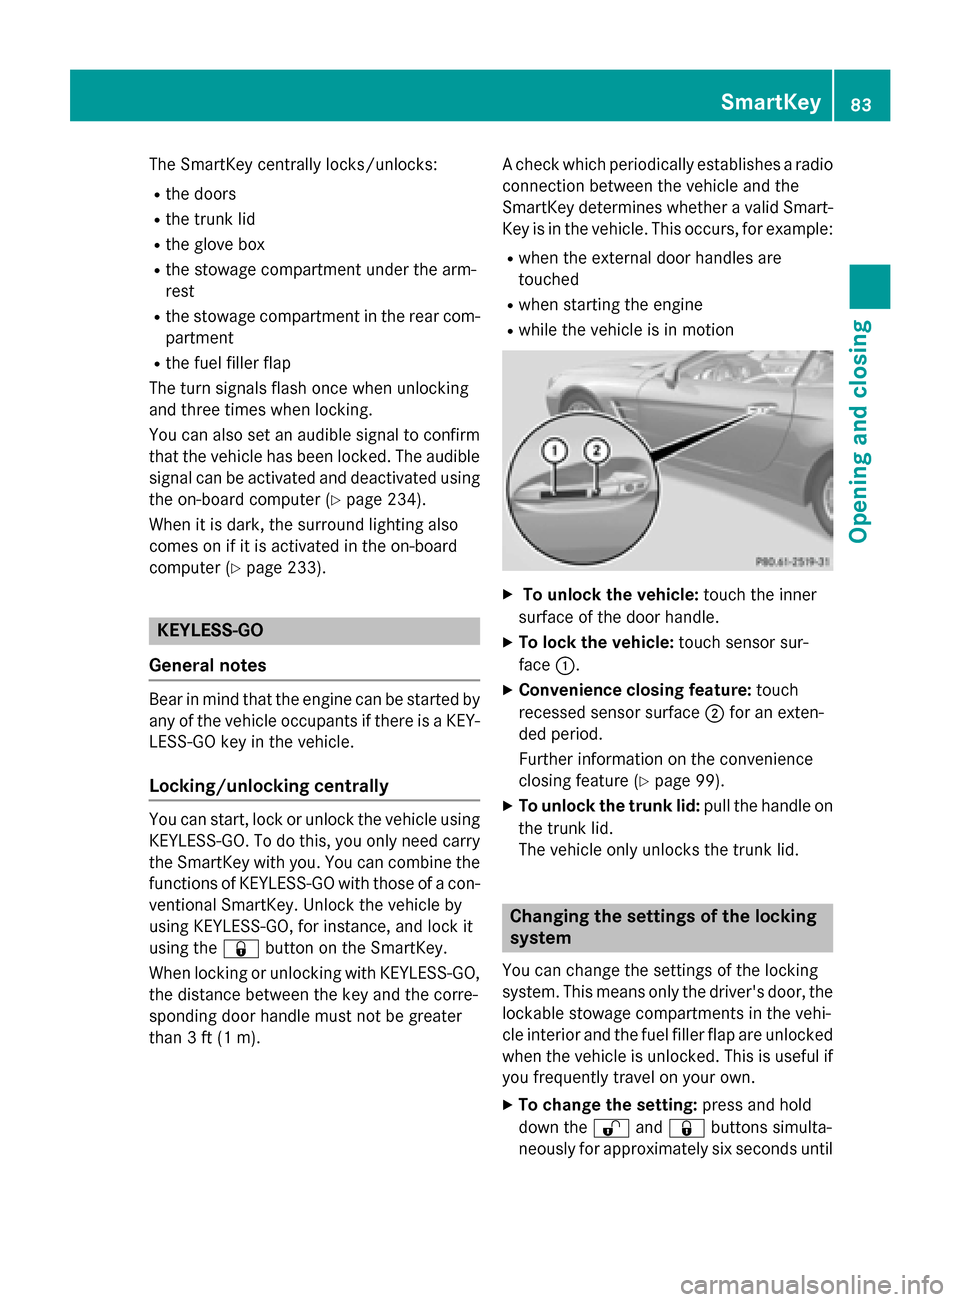
R when the external door handles are
touched
R when starting the engine
R while the vehicle is in motion X
To unlock the vehicle: touch the inner
surface of the door handle.
X To lock the vehicle: touch sensor sur-
face 0043.
X Convenience closing feature: touch
recessed sensor surface 0044for an exten-
ded period.
Further information on the convenience
closing feature (Y page 99).
X To unlock the trunk lid: pull the handle on
the trunk lid.
The vehicle only unlocks the trunk lid. Changing the settings of the locking
system
You can change the settings of the locking
system. This means only the driver's door, the
lockable stowage compartments in the vehi-
cle interior and the fuel filler flap are unlocked when the vehicle is unlocked. This is useful if
you frequently travel on your own.
X To change the setting: press and hold
down the 0036and0037 buttons simulta-
neously for approximately six seconds until SmartKey
83Opening and closing Z
Page 91 of 610
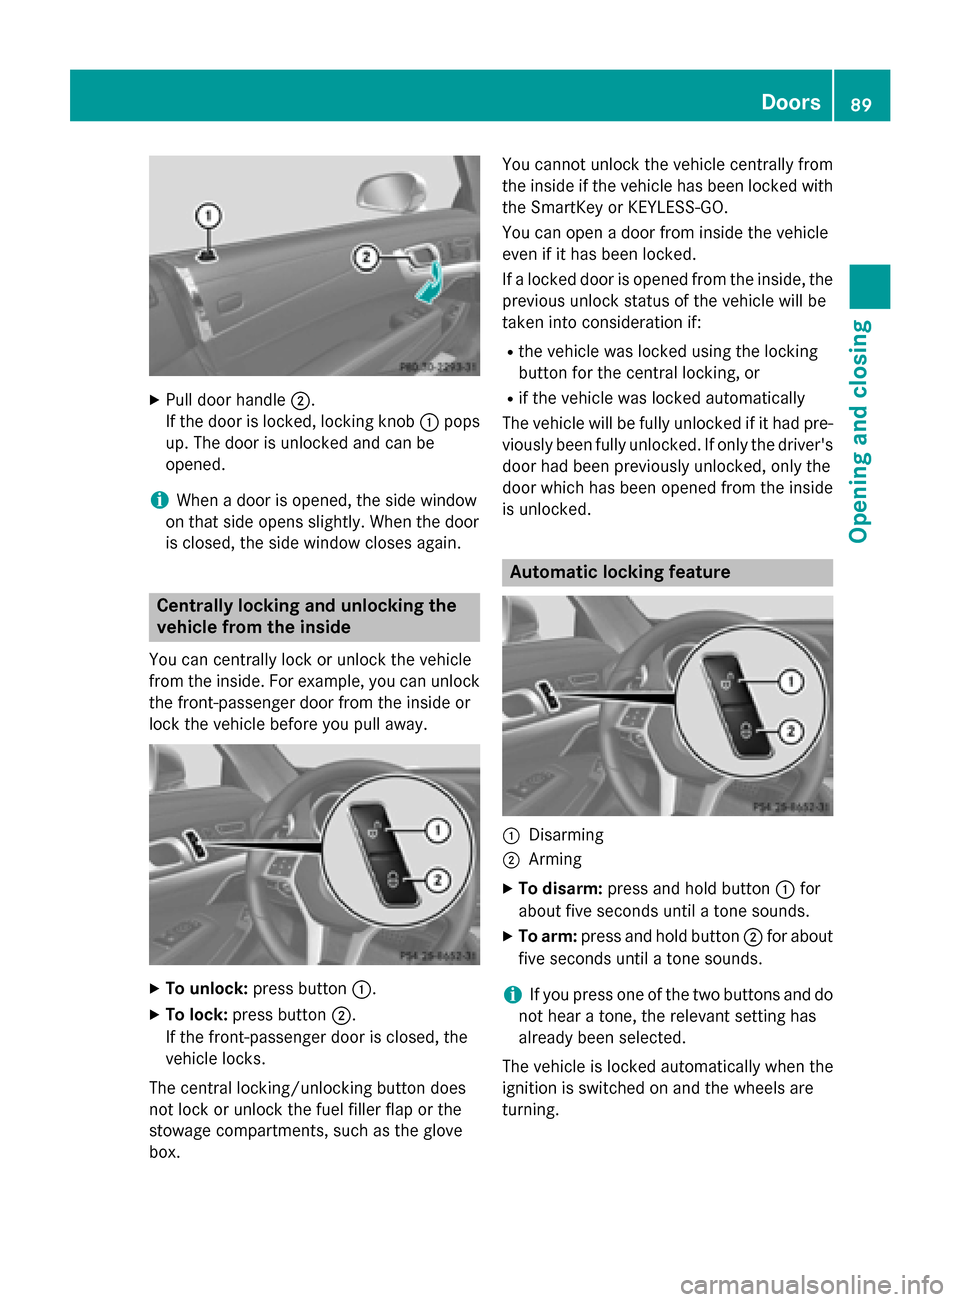
X
Pull door handle 0044.
If the door is locked, locking knob 0043pops
up. The door is unlocked and can be
opened.
i When a door is opened, the side window
on that side opens slightly. When the door
is closed, the side window closes again. Centrally locking and unlocking the
vehicle from the inside
You can centrally lock or unlock the vehicle
from the inside. For example, you can unlock
the front-passenger door from the inside or
lock the vehicle before you pull away. X
To unlock: press button 0043.
X To lock: press button 0044.
If the front-passenger door is closed, the
vehicle locks.
The central locking/unlocking button does
not lock or unlock the fuel filler flap or the
stowage compartments, such as the glove
box. You cannot unlock the vehicle centrally from
the inside if the vehicle has been locked with
the SmartKey or KEYLESS-GO.
You can open a door from inside the vehicle
even if it has been locked.
If a locked door is opened from the inside, the
previous unlock status of the vehicle will be
taken into consideration if:
R the vehicle was locked using the locking
button for the central locking, or
R if the vehicle was locked automatically
The vehicle will be fully unlocked if it had pre- viously been fully unlocked. If only the driver's
door had been previously unlocked, only the
door which has been opened from the inside
is unlocked. Automatic locking feature
0043
Disarming
0044 Arming
X To disarm: press and hold button 0043for
about five seconds until a tone sounds.
X To arm: press and hold button 0044for about
five seconds until a tone sounds.
i If you press one of the two buttons and do
not hear a tone, the relevant setting has
already been selected.
The vehicle is locked automatically when the
ignition is switched on and the wheels are
turning. Doors
89Opening and closing Z
Page 150 of 610
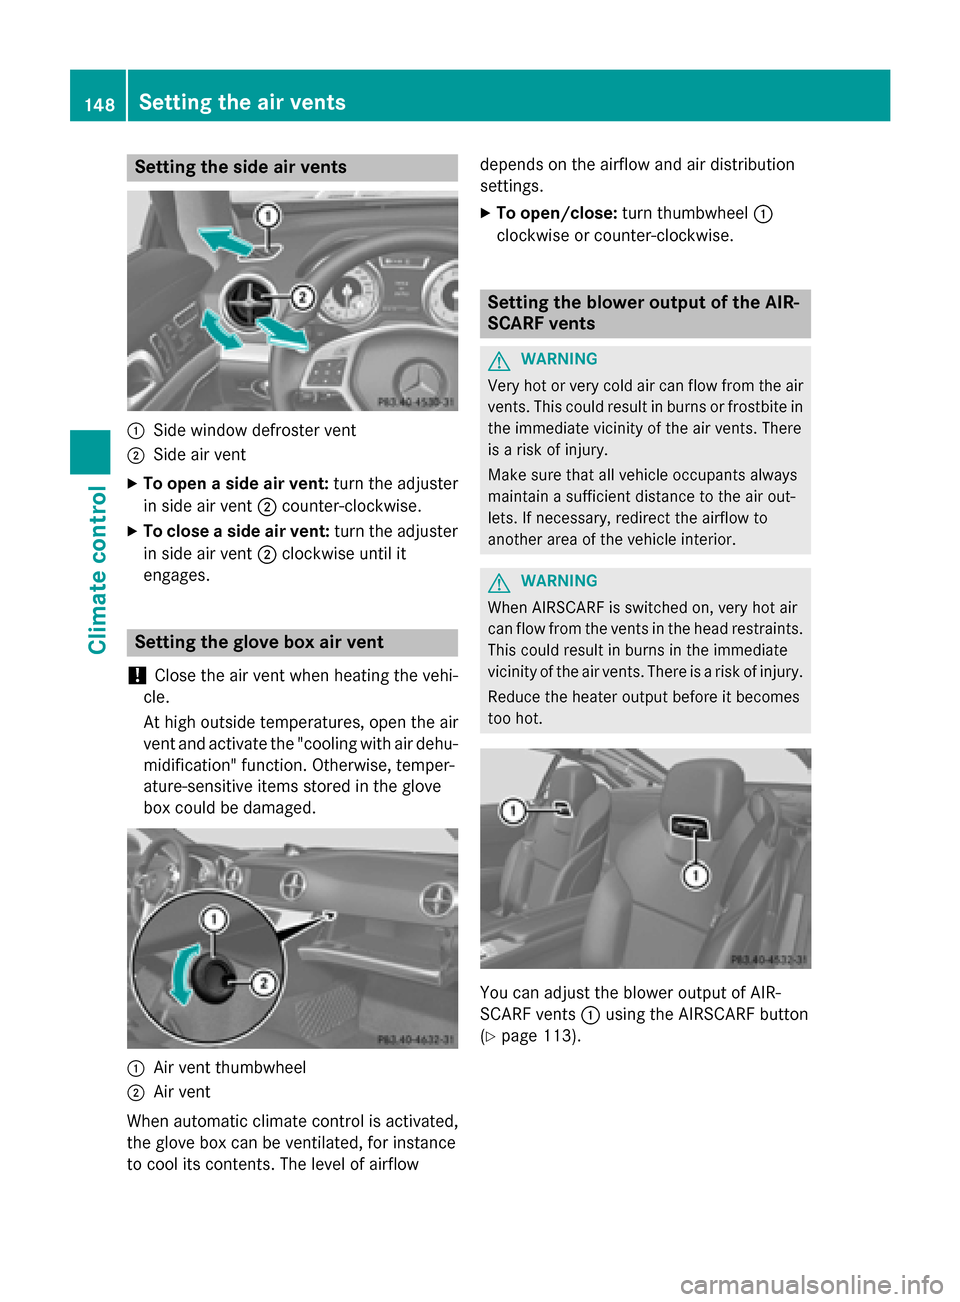
Setting the side air vents
0043
Side window defroster vent
0044 Side air vent
X To open a side air vent: turn the adjuster
in side air vent 0044counter-clockwise.
X To close a side air vent: turn the adjuster
in side air vent 0044clockwise until it
engages. Setting the glove box air vent
! Close the air vent when heating the vehi-
cle.
At high outside temperatures, open the air
vent and activate the "cooling with air dehu- midification" function. Otherwise, temper-
ature-sensitive items stored in the glove
box could be damaged. 0043
Air vent thumbwheel
0044 Air vent
When automatic climate control is activated,
the glove box can be ventilated, for instance
to cool its contents. The level of airflow depends on the airflow and air distribution
settings.
X To open/close: turn thumbwheel 0043
clockwise or counter-clockwise. Setting the blower output of the AIR-
SCARF vents
G
WARNING
Very hot or very cold air can flow from the air vents. This could result in burns or frostbite in the immediate vicinity of the air vents. There
is a risk of injury.
Make sure that all vehicle occupants always
maintain a sufficient distance to the air out-
lets. If necessary, redirect the airflow to
another area of the vehicle interior. G
WARNING
When AIRSCARF is switched on, very hot air
can flow from the vents in the head restraints. This could result in burns in the immediate
vicinity of the air vents. There is a risk of injury.
Reduce the heater output before it becomes
too hot. You can adjust the blower output of AIR-
SCARF vents
0043using the AIRSCARF button
(Y page 113). 148
Setting the air ventsClimate control
Page 180 of 610
stances. An aggressive driving style will lead
to high wear. You can obtain more informa-
tion on this from a qualified specialist work-
shop.
New and replaced brake pads and discs only
reach their optimum braking effect after sev-
eral hundred kilometers of driving. Compen-
sate for this by applying greater force to the
brake pedal. Keep this in mind, and adapt
your driving and braking accordingly during
this break-in period.
Excessive heavy braking results in corre-
spondingly high brake wear. Observe the
brake system warning lamp in the instrument cluster and note any brake status messages
in the multifunction display. Especially for
high performance driving, it is important to
maintain and have the brake system checked
regularly.
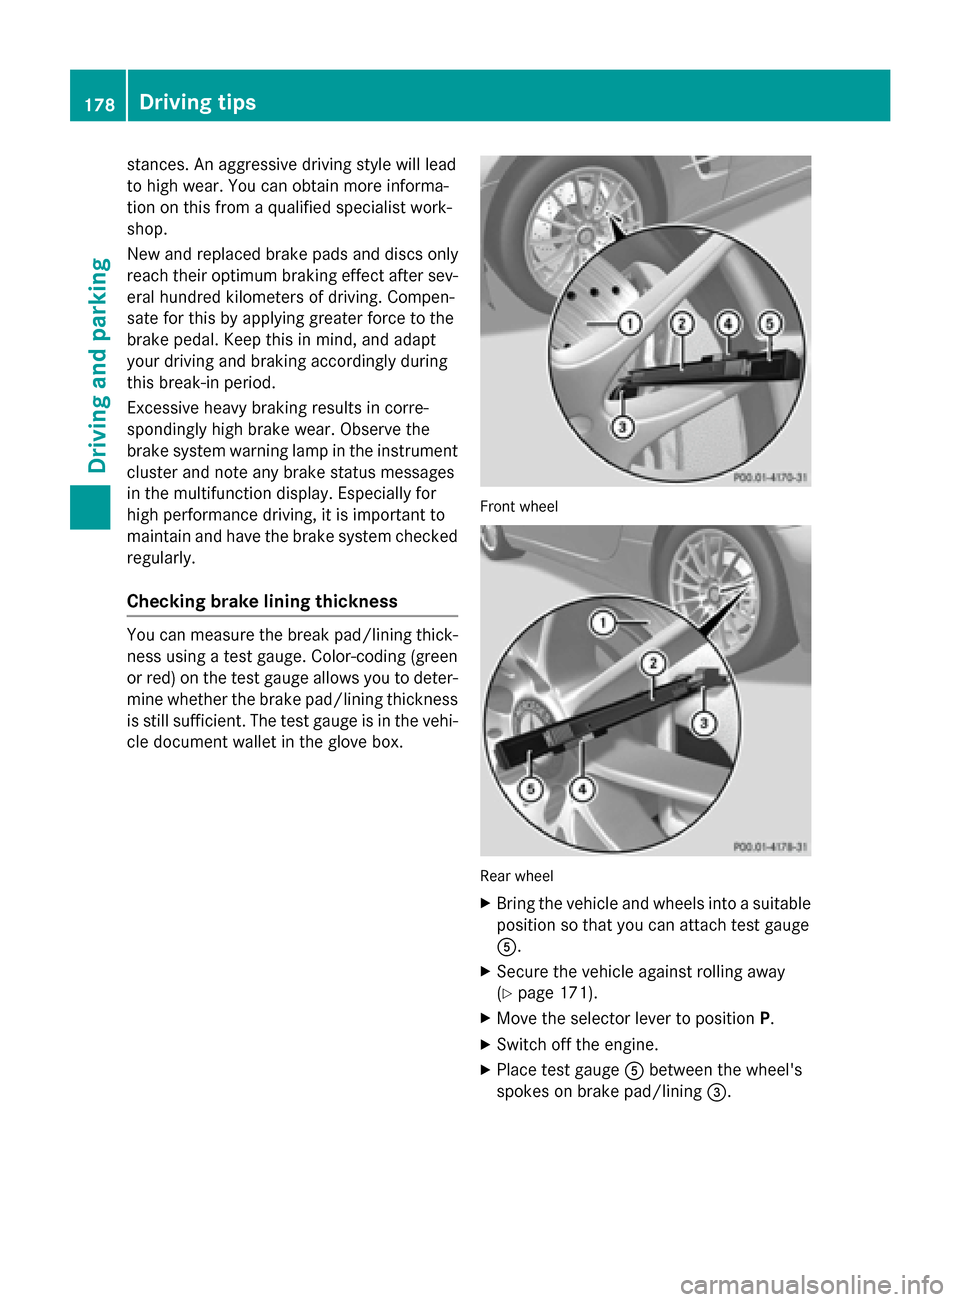
Checking brake lining thickness You can measure the break pad/lining thick-
ness using a test gauge. Color-coding (green
or red) on the test gauge allows you to deter- mine whether the brake pad/lining thickness
is still sufficient. The test gauge is in the vehi- cle document wallet in the glove box. Front wheel
Rear wheel
X Bring the vehicle and wheels into a suitable
position so that you can attach test gauge
0083.
X Secure the vehicle against rolling away
(Y page 171).
X Move the selector lever to position P.
X Switch off the engine.
X Place test gauge 0083between the wheel's
spokes on brake pad/lining 0087.178
Driving tipsDriving and parking
Page 514 of 610
Useful information
i This Operator's manual describes all
models and all standard and optional equip- ment of your vehicle available at the time of
publication of the Operator's manual.
Country-specific differences are possible.
Please note that your vehicle may not be
equipped with all features described. This
also applies to safety-related systems and
functions.
i Read the information on qualified special-
ist workshops (Y page 35). Stowage areas
Stowage space
Important safety notes G
WARNING
If you do not correctly store objects in the
vehicle interior, they can slip or be flung
around, thus striking vehicle occupants.
There is a risk of injury, especially when brak- ing or abruptly changing directions.
R Always store objects so that they cannot be
flung around in these or in similar situa-
tions.
R Always make sure that objects do not pro-
trude from stowage compartments, parcel
nets or stowage nets.
R Close lockable stowage compartments
while driving.
R Stow and secure objects that are heavy,
hard, pointy, sharp-edged, fragile or too
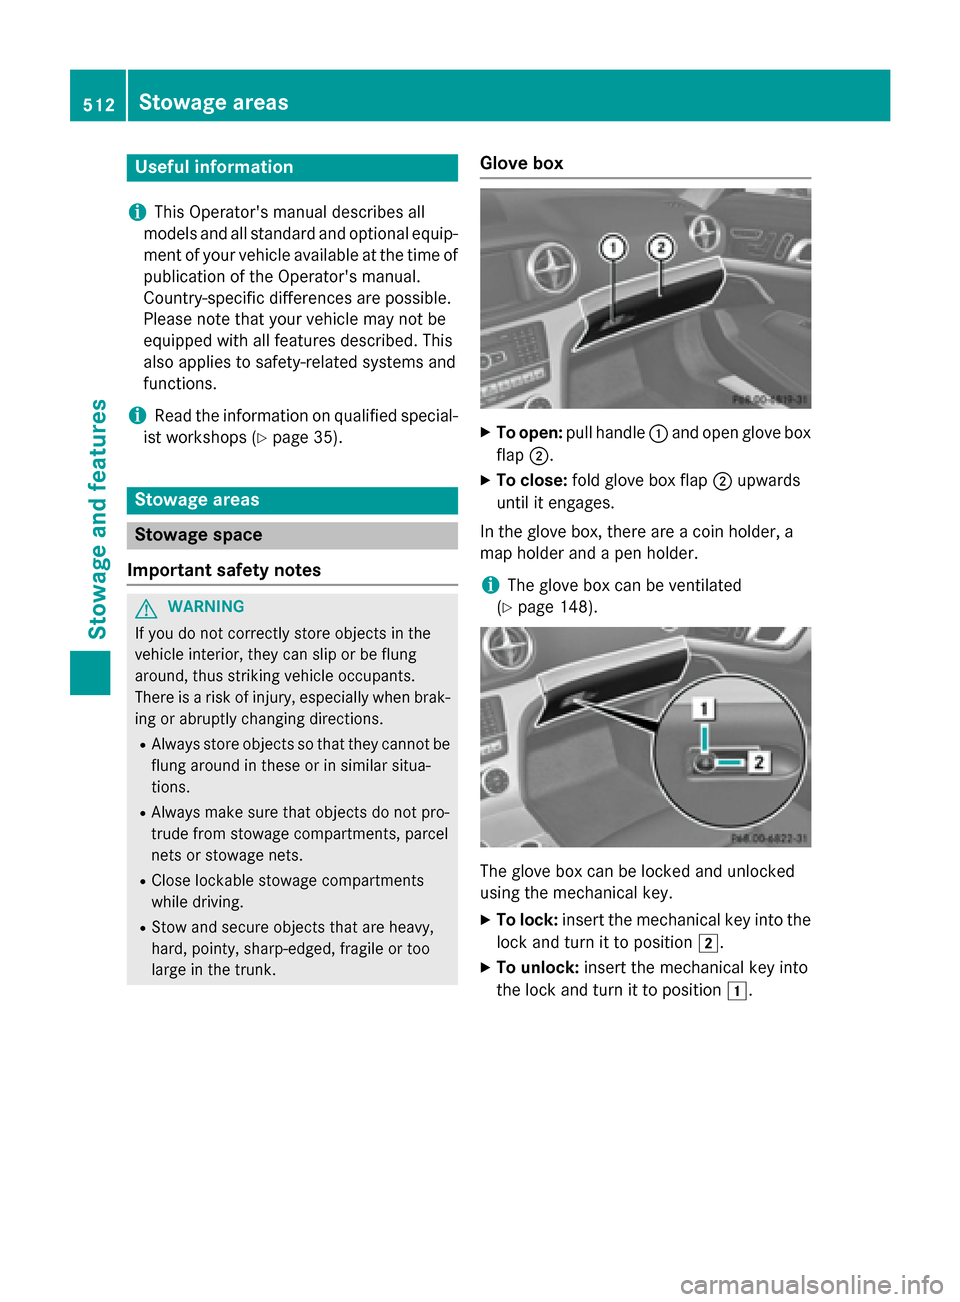
large in the trunk. Glove box X
To open: pull handle 0043and open glove box
flap 0044.
X To close: fold glove box flap 0044upwards
until it engages.
In the glove box, there are a coin holder, a
map holder and a pen holder.
i The glove box can be ventilated
(Y page 148). The glove box can be locked and unlocked
using the mechanical key.
X To lock: insert the mechanical key into the
lock and turn it to position 0048.
X To unlock: insert the mechanical key into
the lock and turn it to position 0047.512
Stowage areasStowage and features