Rear Indicator MERCEDES-BENZ SL-Class 2016 R231 User Guide
[x] Cancel search | Manufacturer: MERCEDES-BENZ, Model Year: 2016, Model line: SL-Class, Model: MERCEDES-BENZ SL-Class 2016 R231Pages: 614, PDF Size: 15.67 MB
Page 114 of 614
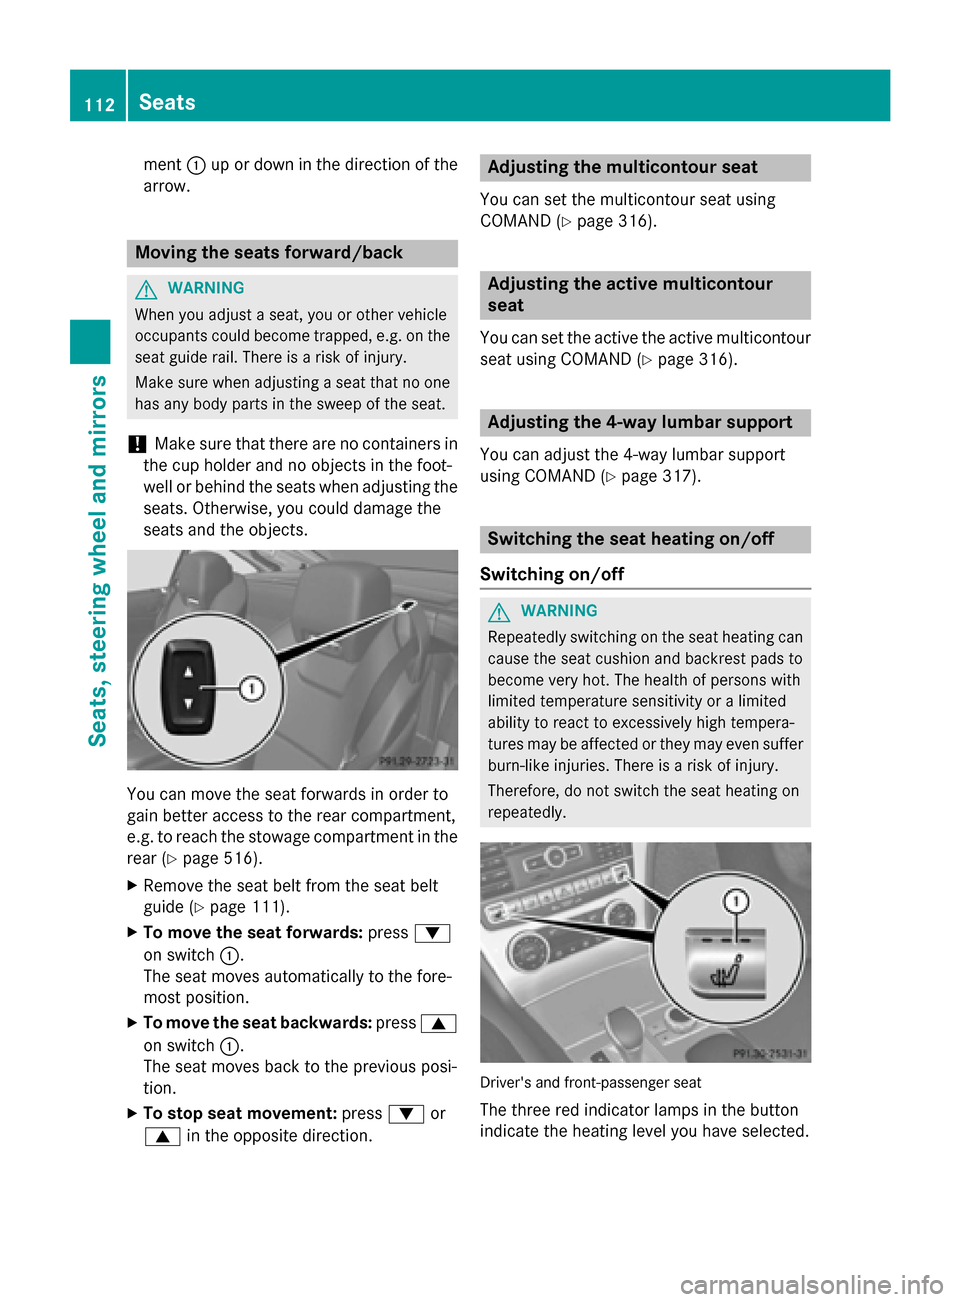
ment:up or down in the direction of the
arrow.
Moving the seats forward/back
GWARNING
When you adjust a seat, you or other vehicle
occupants could become trapped, e.g. on the seat guide rail. There is a risk of injury.
Make sure when adjusting a seat that no one
has any body parts in the sweep of the seat.
!Make sure that there are no containers in
the cup holder and no objects in the foot-
well or behind the seats when adjusting the
seats. Otherwise, you could damage the
seats and the objects.
You can move the seat forwards in order to
gain better access to the rear compartment,
e.g. to reach the stowage compartment in the
rear (
Ypage 516).
XRemove the seat belt from the seat belt
guide (
Ypage 111).
XTo move the seat forwards: press:
on switch :.
The seat moves automatically to the fore-
most position.
XTo move the seat backwards: press9
on switch :.
The seat moves back to the previous posi-
tion.
XTo stop seat movement: press:or
9 in the opposite direction.
Adjusting the multicontour seat
You can set the multicontour seat using
COMAND (
Ypage 316).
Adjusting the active multicontour
seat
You can set the active the active multicontour
seat using COMAND (
Ypage 316).
Adjusting the 4-way lumbar support
You can adjust the 4-way lumbar support
using COMAND (
Ypage 317).
Switching the seat heating on/off
Switching on/off
GWARNING
Repeatedly switching on the seat heating can
cause the seat cushion and backrest pads to
become very hot. The health of persons with
limited temperature sensitivity or a limited
ability to react to excessively high tempera-
tures may be affected or they may even suffer
burn-like injuries. There is a risk of injury.
Therefore, do not switch the seat heating on
repeatedly.
Driver's and front-passenger seat
The three red indicator lamps in the button
indicate the heating level you have selected.
112Seats
Seats, steering wheel and mirrors
Page 115 of 614
The system automatically switches down
from level3to level 2after approximately
eight minutes.
The system automatically switches down
from level 2to level 1after approximately ten
minutes.
The system automatically switches off
approximately 20 minutes after it is set to
level 1.
You can set the distribution of the heated
sections of the seat cushion and backrest
using COMAND (
Ypage 318).
XMake sure that the SmartKey is in position 1 or 2in the ignition lock.
XTo switch on: press button:repeatedly
until the desired heating level is set.
XTo switch off: press button:repeatedly
until all the indicator lamps go out.
iIf the battery voltage is too low, the seat
heating may switch off.
Problems with the seat heating
The seat heating has switched off prema-
turely or cannot be switched on. The vehicle's
electrical system voltage is too low because
too many electrical consumers are switched
on.
XSwitch off electrical consumers that you do
not need, such as the rear window
defroster or interior lighting.
XOnce the battery is sufficiently charged,
switch on the seat heating again.
Switching the seat ventilation on/off
Activating/deactivating
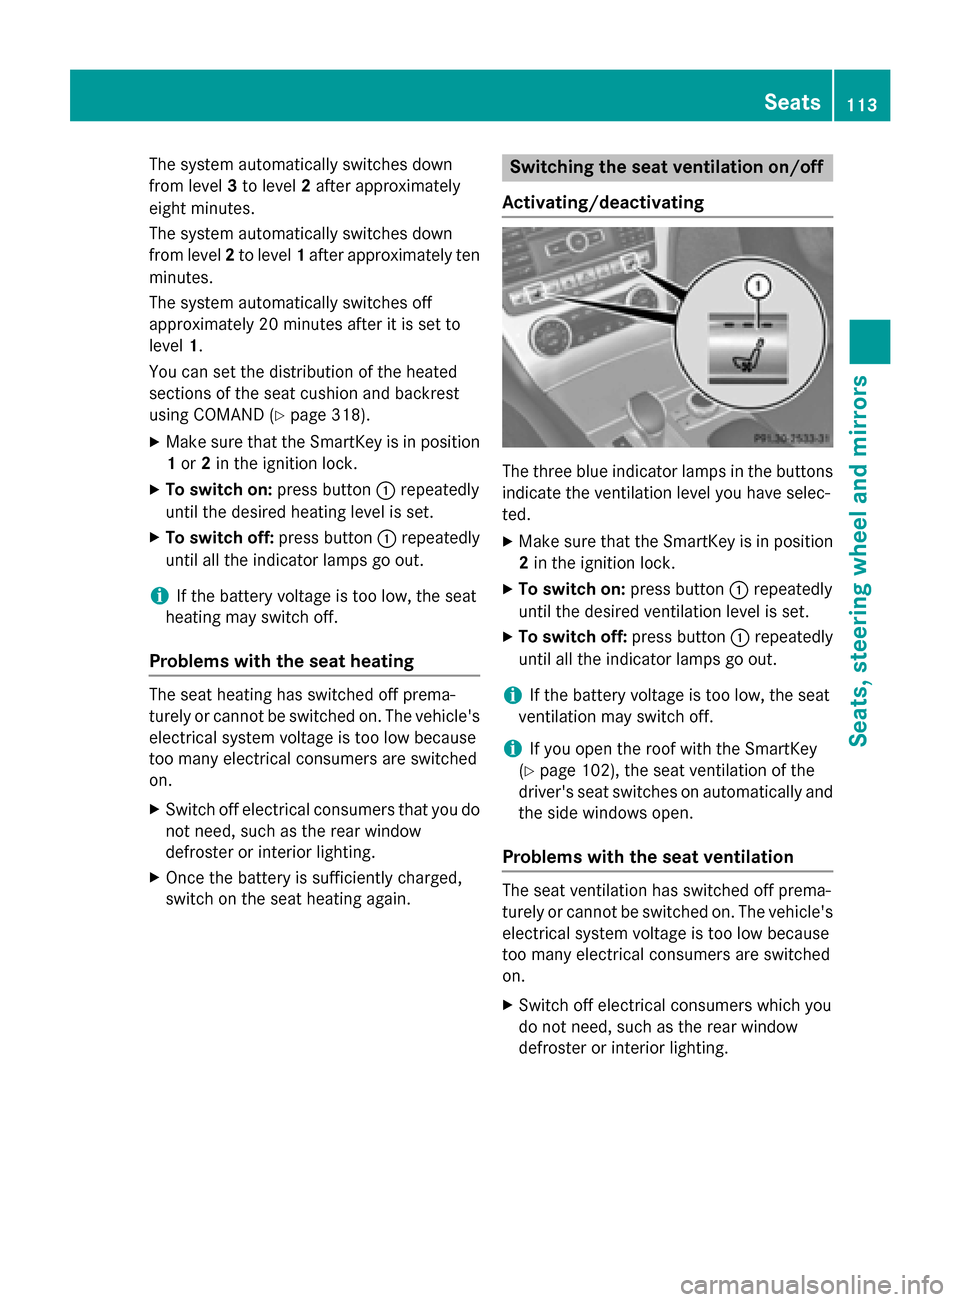
The three blue indicator lamps in the buttons
indicate the ventilation level you have selec-
ted.
XMake sure that the SmartKey is in position
2 in the ignition lock.
XTo switch on: press button:repeatedly
until the desired ventilation level is set.
XTo switch off: press button:repeatedly
until all the indicator lamps go out.
iIf the battery voltage is too low, the seat
ventilation may switch off.
iIf you open the roof with the SmartKey
(
Ypage 102), the seat ventilation of the
driver's seat switches on automatically and
the side windows open.
Problems with the seat ventilation
The seat ventilation has switched off prema-
turely or cannot be switched on. The vehicle's
electrical system voltage is too low because
too many electrical consumers are switched
on.
XSwitch off electrical consumers which you
do not need, such as the rear window
defroster or interior lighting.
Seats113
Seats, steering wheel and mirrors
Z
Page 140 of 614
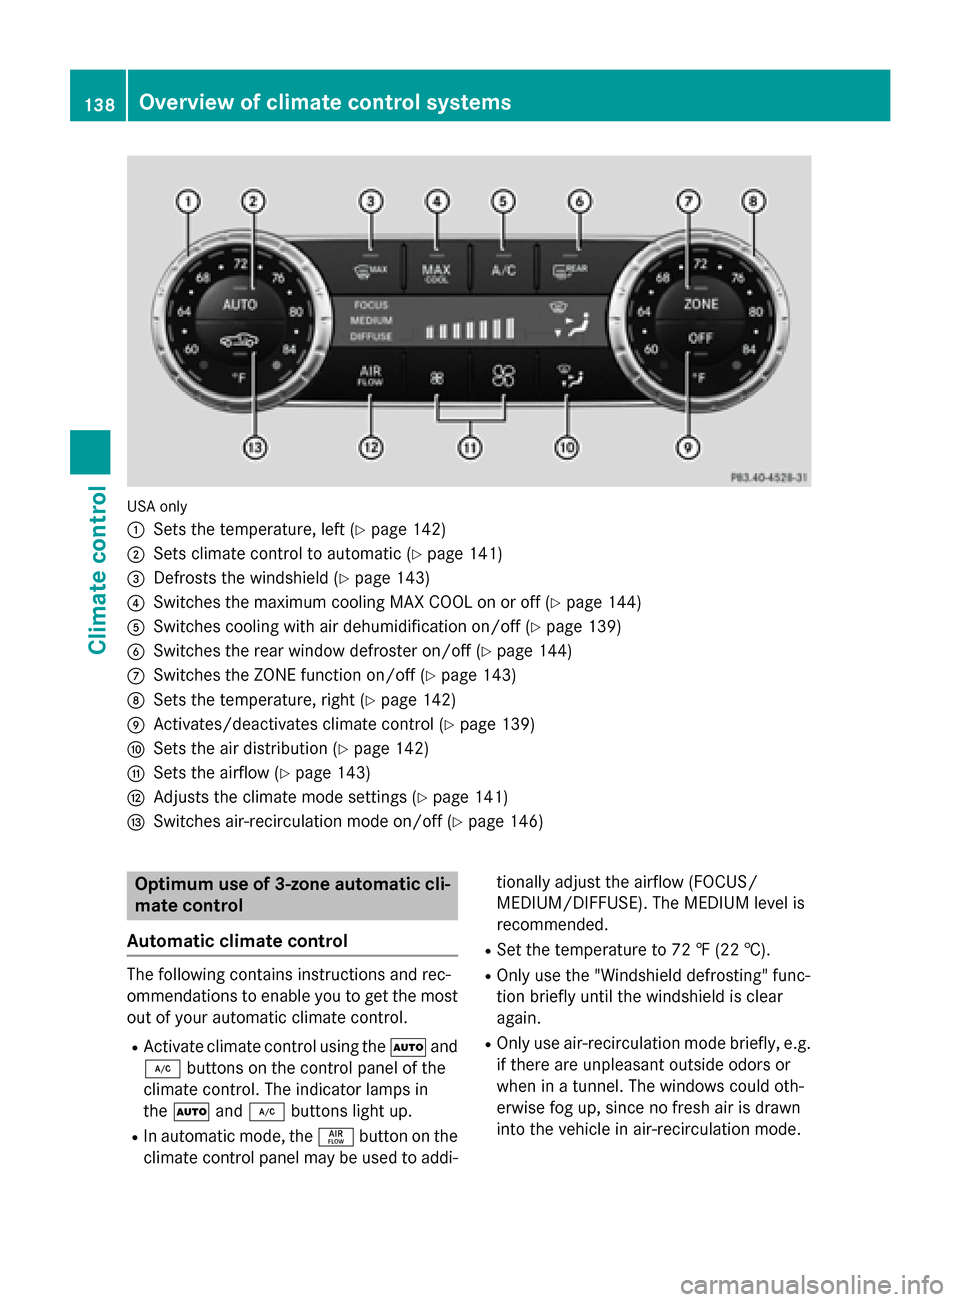
USA only
:
Sets the temperature, left (Ypage 142)
;Sets climate control to automatic (Ypage 141)
=Defrosts the windshield (Ypage 143)
?Switches the maximum cooling MAX COOL on or off (Ypage 144)
ASwitches cooling with air dehumidification on/off (Ypage 139)
BSwitches the rear window defroster on/off (Ypage 144)
CSwitches the ZONE function on/off (Ypage 143)
DSets the temperature, right (Ypage 142)
EActivates/deactivates climate control (Ypage 139)
FSets the air distribution (Ypage 142)
GSets the airflow (Ypage 143)
HAdjusts the climate mode settings (Ypage 141)
ISwitches air-recirculation mode on/off (Ypage 146)
Optimum use of 3-zone automatic cli-
mate control
Automatic climate control
The following contains instructions and rec-
ommendations to enable you to get the most
out of your automatic climate control.
RActivate climate control using the Ãand
¿ buttons on the control panel of the
climate control. The indicator lamps in
the à and¿ buttons light up.
RIn automatic mode, the ñbutton on the
climate control panel may be used to addi- tionally adjust the airflow (FOCUS/
MEDIUM/DIFFUSE). The MEDIUM level is
recommended.
RSet the temperature to 72 ‡ (22 †).
ROnly use the "Windshield defrosting" func-
tion briefly until the windshield is clear
again.
ROnly use air-recirculation mode briefly, e.g.
if there are unpleasant outside odors or
when in a tunnel. The windows could oth-
erwise fog up, since no fresh air is drawn
into the vehicle in air-recirculation mode.
138Overview of climate control systems
Climate control
Page 146 of 614
restored. Air-recirculation mode remains
deactivated.
or
XPress the Ãbutton.
The indicator lamp in the ¬button goes
out. Airflow and air distribution are set to
automatic mode.
or
XTurn the temperature control on the cli-
mate control panel counter-clockwise or
clockwise.
Turn temperature control :orD counter-
clockwise or clockwise (
Ypage 137).
or
XPress the KorI button.
MAX COOL maximum cooling
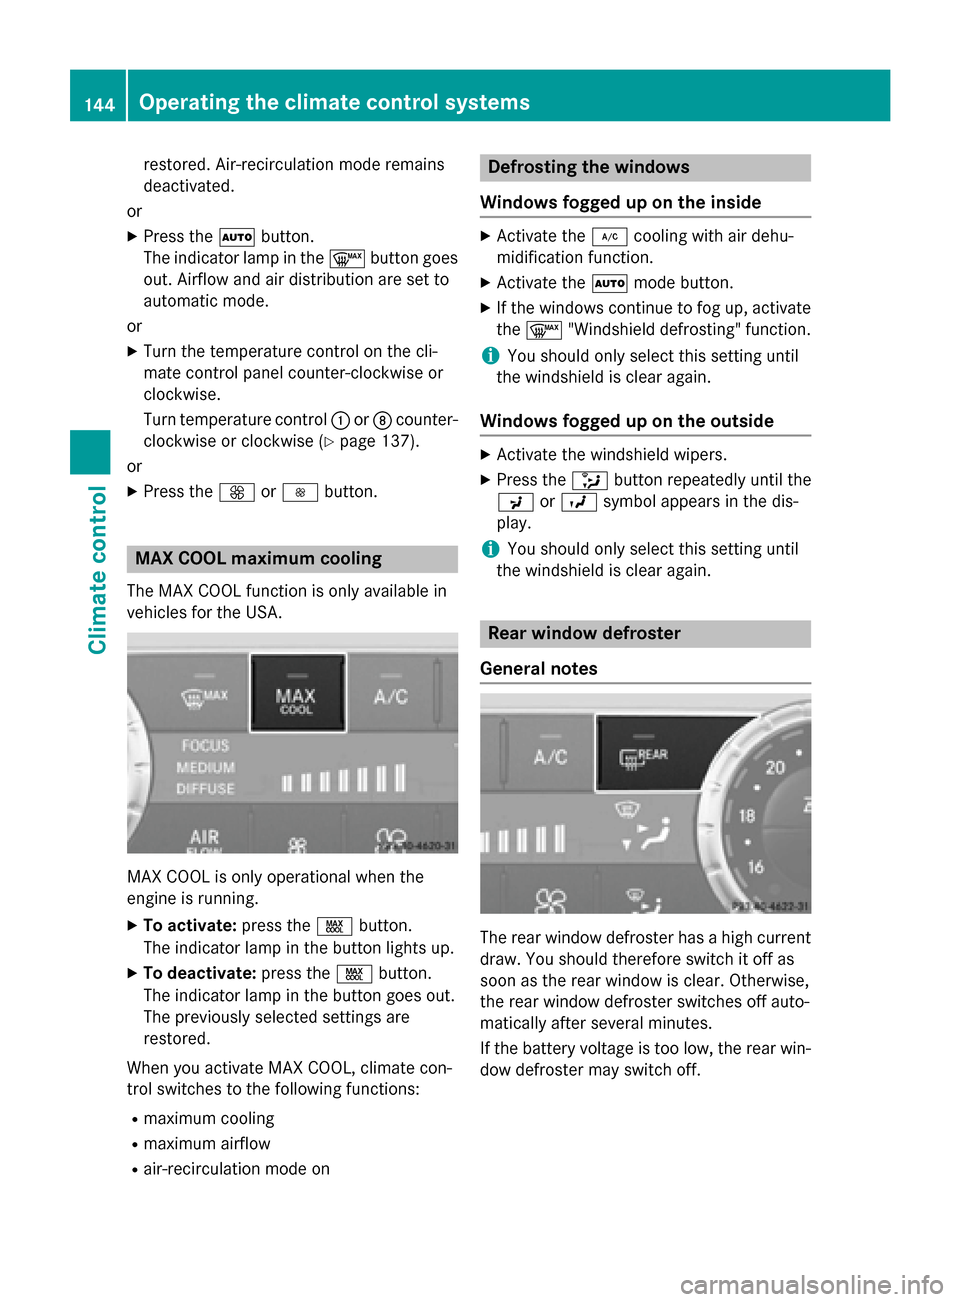
The MAX COOL function is only available in
vehicles for the USA.
MAX COOL is only operational when the
engine is running.
XTo activate: press theÙbutton.
The indicator lamp in the button lights up.
XTo deactivate: press theÙbutton.
The indicator lamp in the button goes out.
The previously selected settings are
restored.
When you activate MAX COOL, climate con-
trol switches to the following functions:
Rmaximum cooling
Rmaximum airflow
Rair-recirculation mode on
Defrosting the windows
Windows fogged up on the inside
XActivate the ¿cooling with air dehu-
midification function.
XActivate the Ãmode button.
XIf the windows continue to fog up, activate
the¬ "Windshield defrosting" function.
iYou should only select this setting until
the windshield is clear again.
Windows fogged up on the outside
XActivate the windshield wipers.
XPress the _button repeatedly until the
P orO symbol appears in the dis-
play.
iYou should only select this setting until
the windshield is clear again.
Rear window defroster
General notes
The rear window defroster has a high current
draw. You should therefore switch it off as
soon as the rear window is clear. Otherwise,
the rear window defroster switches off auto-
matically after several minutes.
If the battery voltage is too low, the rear win-
dow defroster may switch off.
144Operating the climate control systems
Climate control
Page 148 of 614
Problems with the rear window defroster
ProblemPossible causes/consequences andMSolutions
The rear window
defroster has deactiva-
ted prematurely or can-
not be activated.The on-board voltage is too low because too many electrical con-
sumers are switched on.
XSwitch off any consumers that are not required, e.g. reading
lamps, interior lighting or the seat heating.
When the battery is sufficiently charged, the rear window
defroster can be activated again.
Switching air-recirculation mode
on/off
General notes
If you switch on air-recirculation mode, the
windows can fog up more quickly, in particu-
lar at low temperatures. Only use air-recircu-
lation mode briefly to prevent the windows
from fogging up.
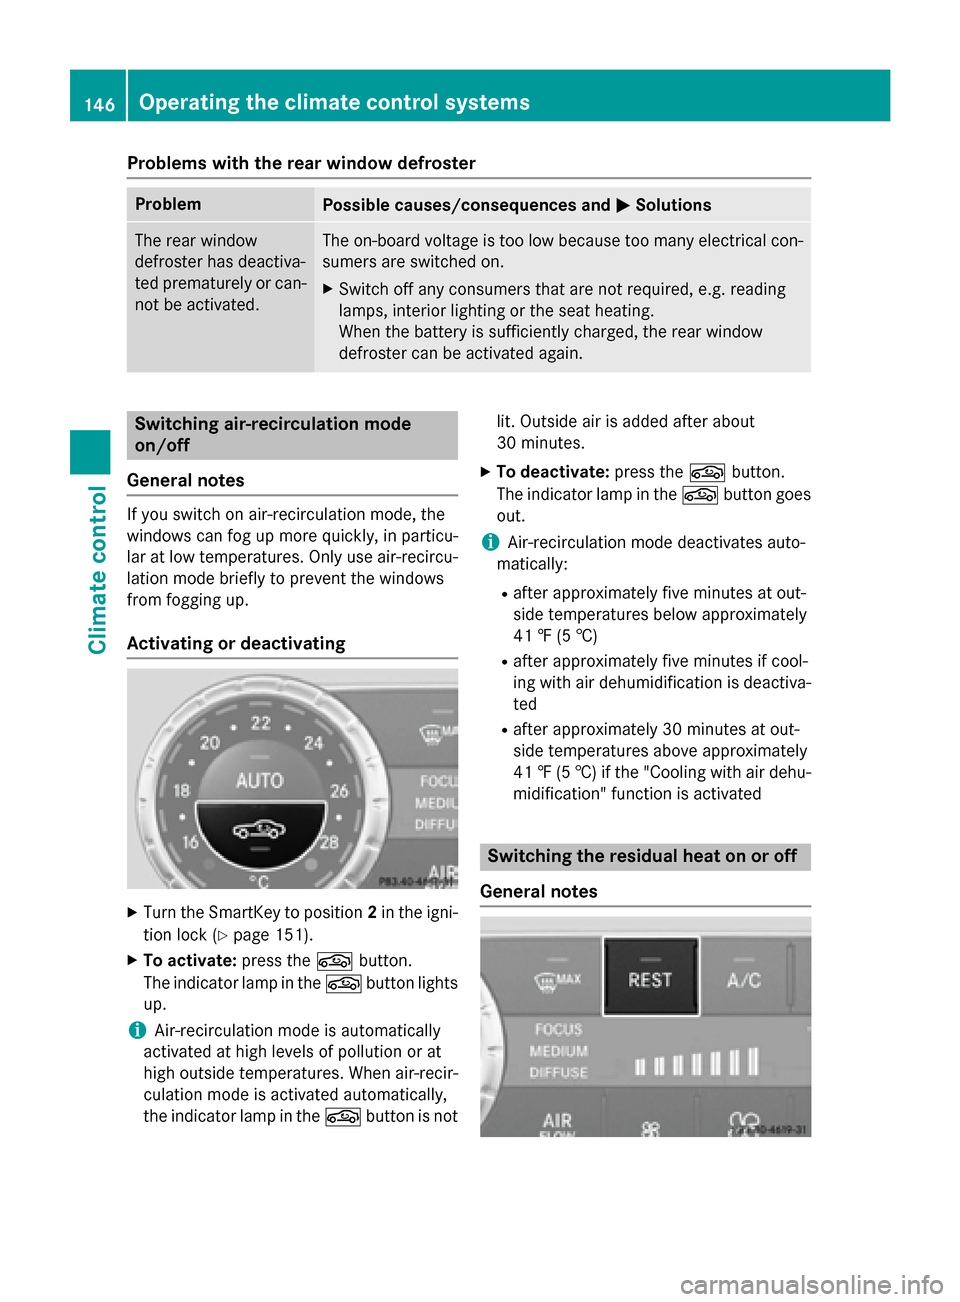
Activating or deactivating
XTurn the SmartKey to position 2in the igni-
tion lock (
Ypage 151).
XTo activate: press thegbutton.
The indicator lamp in the gbutton lights
up.
iAir-recirculation mode is automatically
activated at high levels of pollution or at
high outside temperatures. When air-recir-
culation mode is activated automatically,
the indicator lamp in the gbutton is not lit. Outside air is added after about
30 minutes.
XTo deactivate:
press thegbutton.
The indicator lamp in the gbutton goes
out.
iAir-recirculation mode deactivates auto-
matically:
Rafter approximately five minutes at out-
side temperatures below approximately
41 ‡ (5 †)
Rafter approximately five minutes if cool-
ing with air dehumidification is deactiva-
ted
Rafter approximately 30 minutes at out-
side temperatures above approximately
41 ‡ (5 †) if the "Cooling with air dehu-
midification" function is activated
Switching the residual heat on or off
General notes
146Operating the climate control systems
Climate control
Page 203 of 614
mine which warning display is active when the
engine is running.
Transmission
positionWarning display
DFront area activated
R,Nor the vehicle
is rolling back-
wardsRear and front areas
activated
PNo areas activated
One or more segments light up as the vehicle
approaches an obstacle, depending on the
vehicle's distance from the obstacle.
From the:
Rsixth segment onwards, you will hear an
intermittent warning tone for approx-
imately two seconds.
Rseventh segment onwards, you will hear a
warning tone for approximately two sec-
onds. This indicates that you have now
reached the minimum distance.
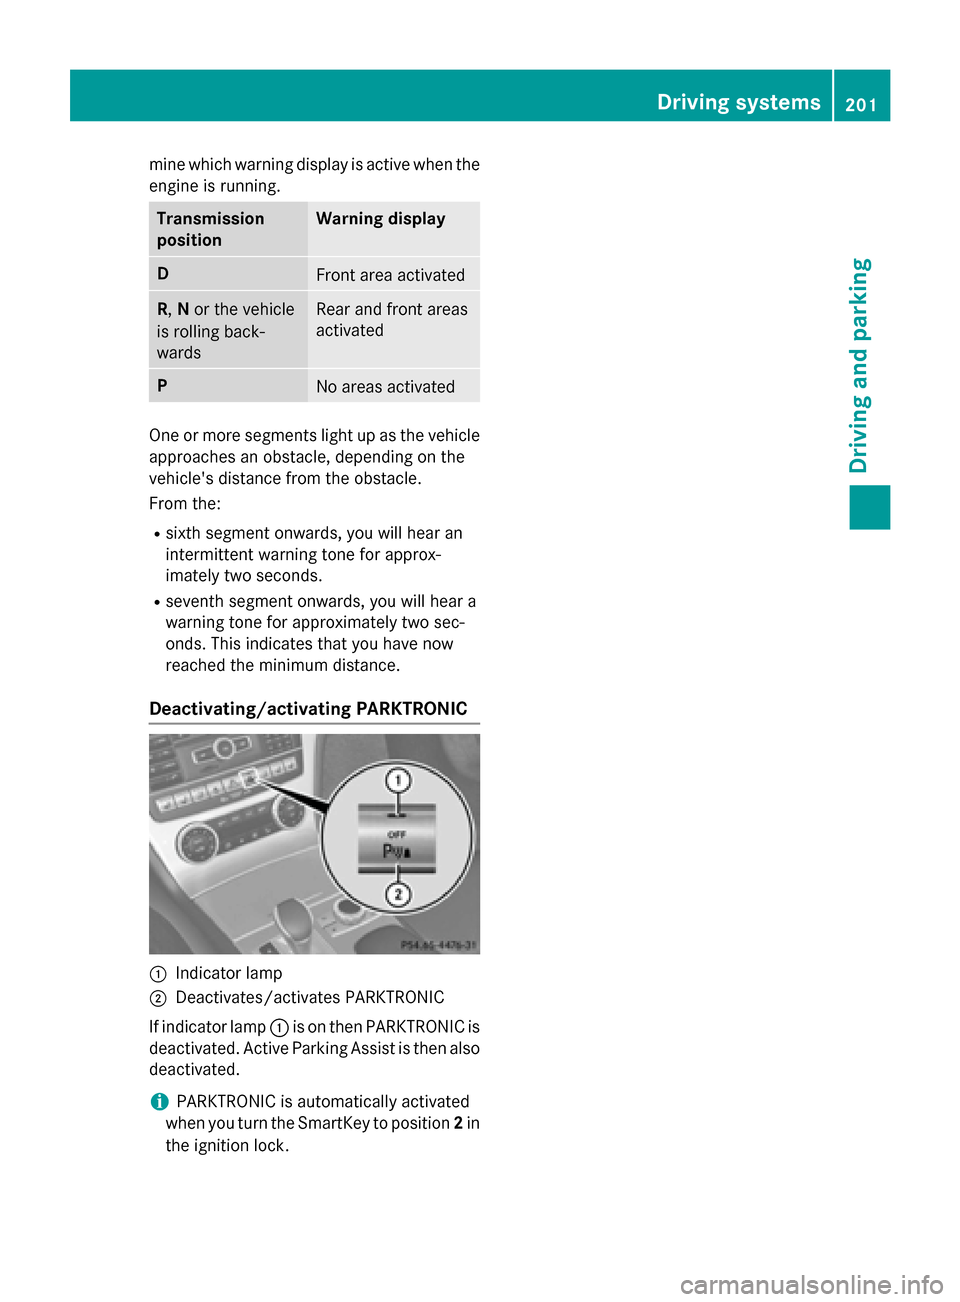
Deactivating/activating PARKTRONIC
:Indicator lamp
;Deactivates/activates PARKTRONIC
If indicator lamp :is on then PARKTRONIC is
deactivated. Active Parking Assist is then also
deactivated.
iPARKTRONIC is automatically activated
when you turn the SmartKey to position 2in
the ignition lock.
Driving systems201
Driving and parking
Z
Page 210 of 614
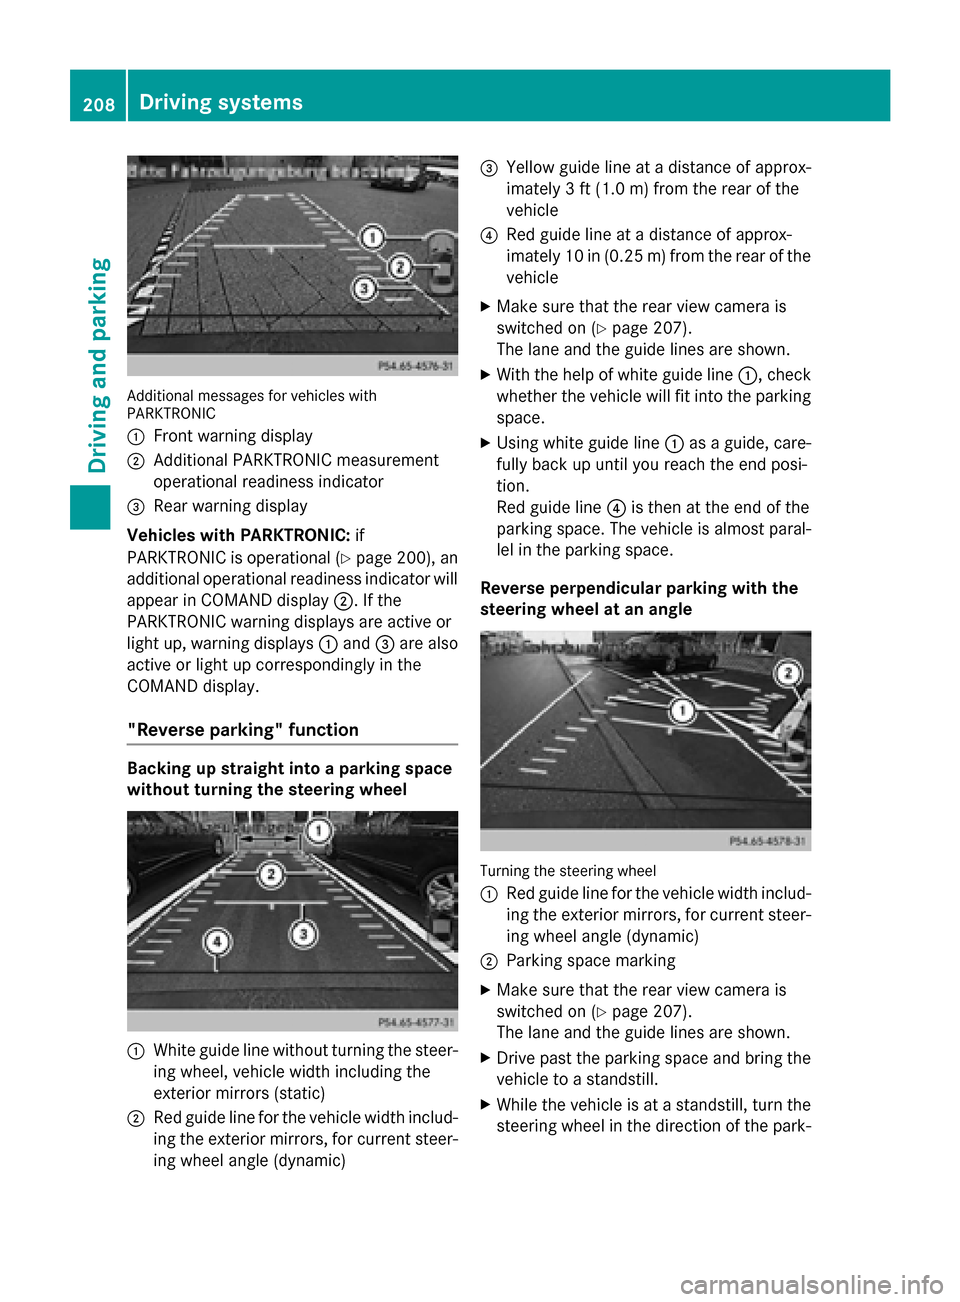
Additional messages for vehicles with
PARKTRONIC
:
Front warning display
;Additional PARKTRONIC measurement
operational readiness indicator
=Rear warning display
Vehicles with PARKTRONIC: if
PARKTRONIC is operational (
Ypage 200), an
additional operational readiness indicator will
appear in COMAND display ;. If the
PARKTRONIC warning displays are active or
light up, warning displays :and =are also
active or light up correspondingly in the
COMAND display.
"Reverse parking" function
Backing up straight into a parking space
without turning the steering wheel
:White guide line without turning the steer-
ing wheel, vehicle width including the
exterior mirrors (static)
;Red guide line for the vehicle width includ-
ing the exterior mirrors, for current steer-
ing wheel angle (dynamic)
=Yellow guide line at a distance of approx-
imately 3 ft (1.0 m) fromthe rear of the
vehicle
?Red guide line at a distance of approx-
imately 10 in (0.25 m) fromthe rear of the
vehicle
XMake sure that the rear view camera is
switched on (
Ypage 207).
The lane and the guide lines are shown.
XWith the help of white guide line :, check
whether the vehicle will fit into the parking
space.
XUsing white guide line :as a guide, care-
fully back up until you reach the end posi-
tion.
Red guide line ?is then at the end of the
parking space. The vehicle is almost paral-
lel in the parking space.
Reverse perpendicular parking with the
steering wheel at an angle
Turning the steering wheel
:
Red guide line for the vehicle width includ-
ing the exterior mirrors, for current steer-
ing wheel angle (dynamic)
;Parking space marking
XMake sure that the rear view camera is
switched on (
Ypage 207).
The lane and the guide lines are shown.
XDrive past the parking space and bring the vehicle to a standstill.
XWhile the vehicle is at a standstill, turn the
steering wheel in the direction of the park-
208Driving system s
Driving an d parking
Page 275 of 614
ProblemPossible causes/consequences andMSolutions
!
The yellow ABS warning
lamp is lit while the
engine is running.ABS is temporarily unavailable. BAS, BAS PLUS, ESP®, EBD (elec-
tronic brake force distribution), PRE‑SAFE®, PRE‑SAFE®Brake, the
HOLD function, hill start assist are therefore also deactivated, for example.
Possible causes are:
Rself-diagnosis is not yet complete.
Rthe on-board voltage may be insufficient.
ATTENTION ASSIST is deactivated.
GWARNING
The brake system continues to function normally, but without the
functions listed above. The front and rear wheels could therefore
lock if you brake hard, for example.
The steerability and braking characteristics may be severely affec-
ted. The braking distance in an emergency braking situation can
increase.
If ESP
®is not operational, ESP®is unable to stabilize the vehicle.
There is a risk of an accident.
XCarefully drive a suitable distance, making slight steering move-
ments at a speed above 12 mph (20 km/h).
The functions mentioned above are available again when the
warning lamp goes out.
If the warning lamp is still on:
XObserve the additional display messages in the multifunction
display.
XDrive on carefully.
XVisit a qualified specialist workshop.
Warning and indicator lamps273
On-board computer and displays
Z
Page 276 of 614
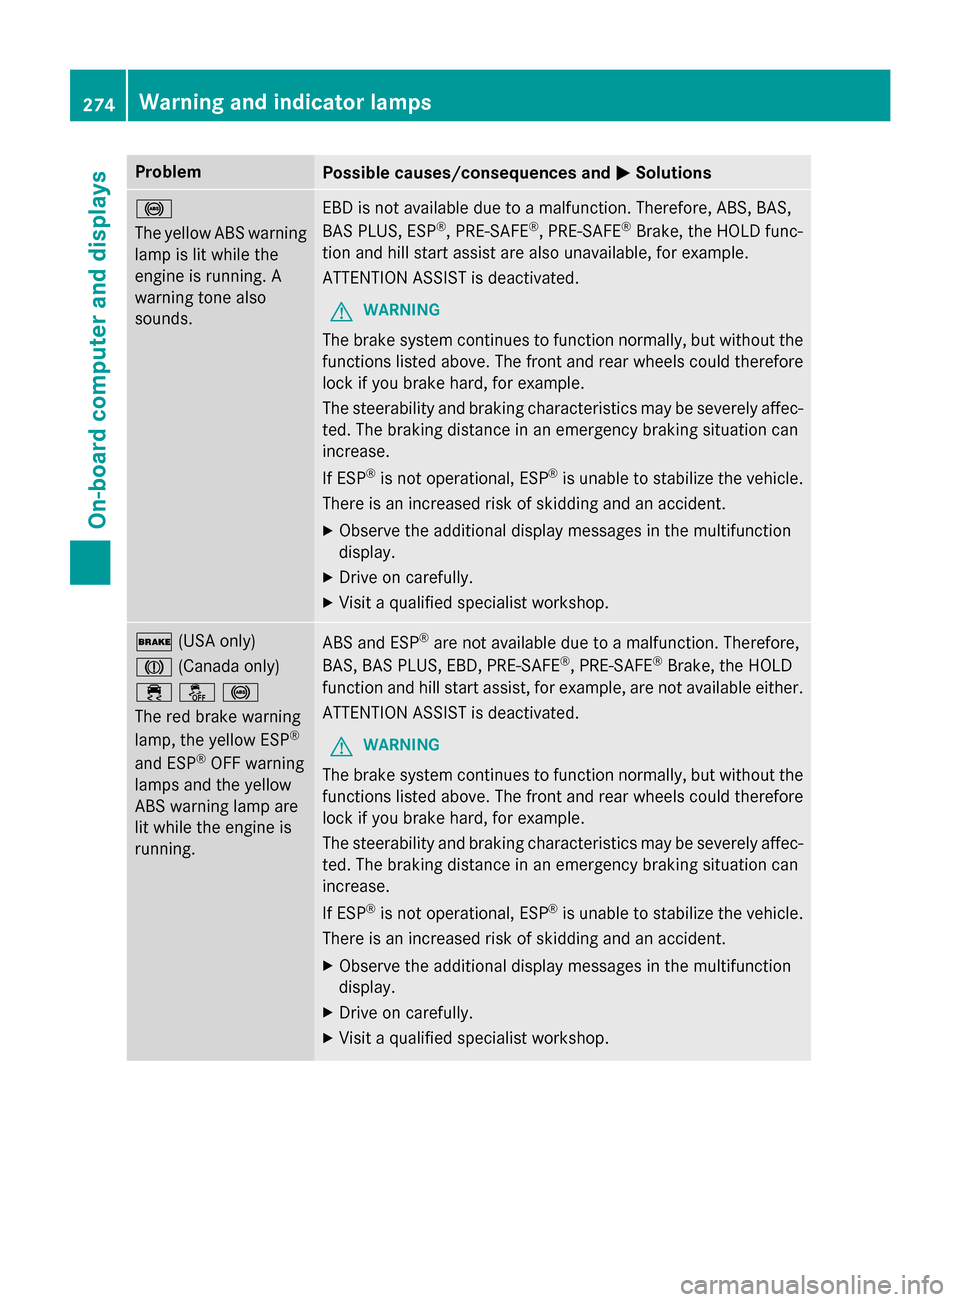
ProblemPossible causes/consequences andMSolutions
!
The yellow ABS warning
lamp is lit while the
engine is running. A
warning tone also
sounds.EBD is not available due to a malfunction. Therefore, ABS, BAS,
BAS PLUS, ESP®, PRE-SAFE®, PRE-SAFE®Brake, the HOLD func-
tion and hill start assist are also unavailable, for example.
ATTENTION ASSIST is deactivated.
GWARNING
The brake system continues to function normally, but without the
functions listed above. The front and rear wheels could therefore
lock if you brake hard, for example.
The steerability and braking characteristics may be severely affec-
ted. The braking distance in an emergency braking situation can
increase.
If ESP
®is not operational, ESP®is unable to stabilize the vehicle.
There is an increased risk of skidding and an accident.
XObserve the additional display messages in the multifunction
display.
XDrive on carefully.
XVisit a qualified specialist workshop.
$ (USA only)
J (Canada only)
֌!
The red brake warning
lamp, the yellow ESP
®
and ESP®OFF warning
lamps and the yellow
ABS warning lamp are
lit while the engine is
running.
ABS and ESP®are not available due to a malfunction. Therefore,
BAS, BAS PLUS, EBD, PRE ‑SAFE®, PRE‑SAFE®Brake, the HOLD
function and hill start assist, for example, are not available either.
ATTENTION ASSIST is deactivated.
GWARNING
The brake system continues to function normally, but without the
functions listed above. The front and rear wheels could therefore
lock if you brake hard, for example.
The steerability and braking characteristics may be severely affec-
ted. The braking distance in an emergency braking situation can
increase.
If ESP
®is not operational, ESP®is unable to stabilize the vehicle.
There is an increased risk of skidding and an accident.
XObserve the additional display messages in the multifunction
display.
XDrive on carefully.
XVisit a qualified specialist workshop.
274Warning and indicator lamps
On-board computer and displays
Page 488 of 614
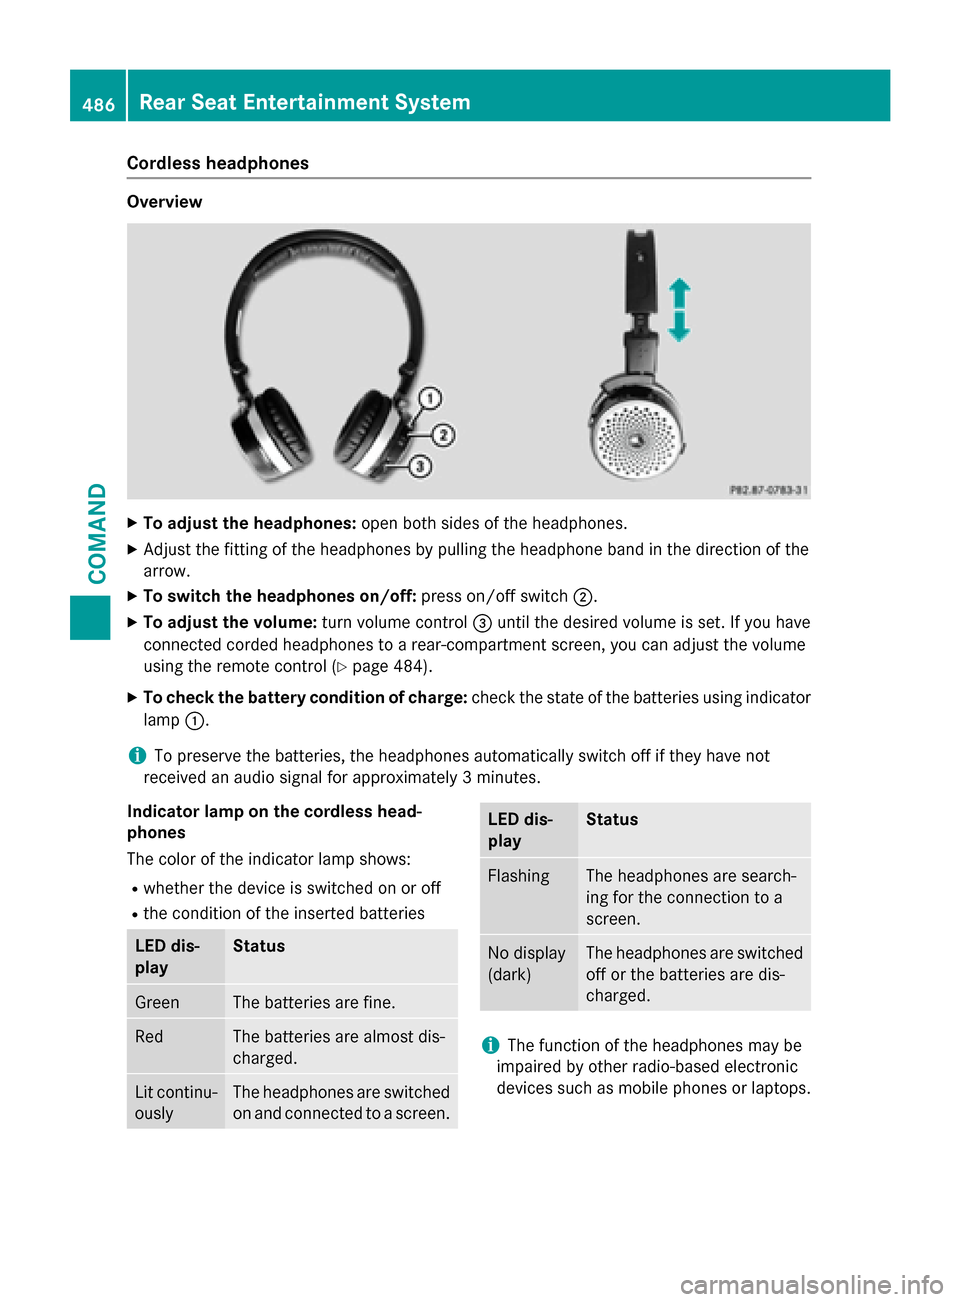
Cordless headphones
Overview
XTo adjust the headphones:open both sides of the headphones.
XAdjust the fitting of the headphones by pulling the headphone band in the direction of the
arrow.
XTo switch the headphones on/off: press on/off switch;.
XTo adjust the volume: turn volume control=until the desired volume is set. If you have
connected corded headphones to a rear-compartment screen, you can adjust the volume
using the remote control (
Ypage 484).
XTo check the battery condition of charge: check the state of the batteries using indicator
lamp :.
iTo preserve the batteries, the headphones automatically switch off if they have not
received an audio signal for approximately 3 minutes.
Indicator lamp on the cordless head-
phones
The color of the indicator lamp shows:
Rwhether the device is switched on or off
Rthe condition of the inserted batteries
LED dis-
playStatus
GreenThe batteries are fine.
RedThe batteries are almost dis-
charged.
Lit continu-
ouslyThe headphones are switched
on and connected to a screen.
LED dis-
playStatus
FlashingThe headphones are search-
ing for the connection to a
screen.
No display
(dark)The headphones are switched
off or the batteries are dis-
charged.
iThe function of the headphones may be
impaired by other radio-based electronic
devices such as mobile phones or laptops.
486Rear Seat Entertainment System
COMAND