instrument display MERCEDES-BENZ SL-Class 2016 R231 User Guide
[x] Cancel search | Manufacturer: MERCEDES-BENZ, Model Year: 2016, Model line: SL-Class, Model: MERCEDES-BENZ SL-Class 2016 R231Pages: 614, PDF Size: 15.67 MB
Page 168 of 614
If manual drive programMhas been deacti-
vated, the automatic transmission shifts into
the automatic drive program that was last
selected, i.e. Eor S.
You can also deactivate manual drive pro-
gram Myourself:
XPull on the right-hand steering wheel pad-
dle shifter and hold it in place (
Ypage 164).
or
XUse the lever to switch the transmission
position.
or
XUse the program selector button to change the drive program (
Ypage 163).
Manual drive program Mis deactivated.
The automatic transmission switches into
the automatic drive program that was last
selected, i.e. Eor S.
Manual drive program
General information
In this drive program, you can permanently
change gear yourself by using the steering
wheel paddle shifters. The transmission must be in position D.
iAs well as this permanent drive program
M, you can also activate temporary drive
program M(
Ypage 165).
Switching on the manual drive program
Manual drive program Mis different from
drive program Swith regard to spontaneity,
responsiveness and smoothness of gear
changes.
You can select manual drive program Mwith
the program selector button or the drive pro- gram selector (Mercedes-AMG vehicles). In
manual drive program M, you can change
gear using the steering wheel paddle shifters
if the transmission is in position D. The selec-
ted gear appears in the multifunction display.
XPress the program selector button
(
Ypage 163) repeatedly until Mappears in
the multifunction display.
XMercedes-AMG vehicles: turn the drive
program selector until Mappears in the
multifunction display (
Ypage 163).
Shifting gears
XTo shift up: pull the right-hand steering
wheel paddle shifter (
Ypage 164).
The automatic transmission shifts up to the
next gear.
XTo shift down: pull on the left-hand steer-
ing wheel paddle shifter (
Ypage 164).
The automatic transmission shifts down to
the next gear.
XMaximum acceleration: pull the left-hand
steering wheel paddle shifter until the
transmission selects the optimum gear for
the current speed.
iIf you brake the vehicle or stop without
shifting down, the automatic transmission
will shift down to a gear that will allow the
vehicle to accelerate or pull away again.
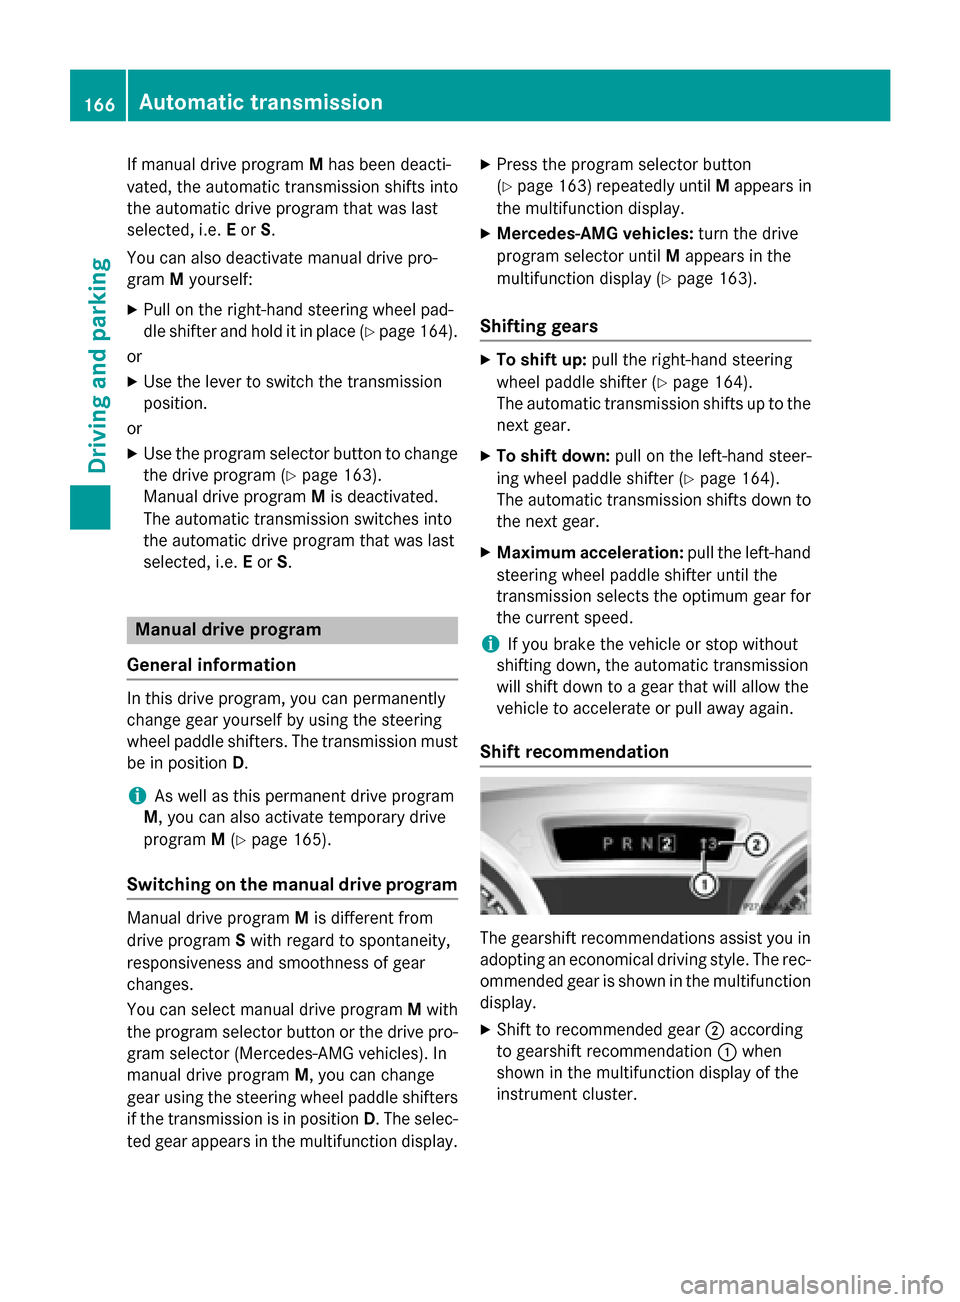
Shift recommendation
The gearshift recommendations assist you in
adopting an economical driving style. The rec-
ommended gear is shown in the multifunction
display.
XShift to recommended gear ;according
to gearshift recommendation :when
shown in the multifunction display of the
instrument cluster.
166Automatic transmission
Driving and parking
Page 171 of 614
Do not get into the vehicle again during the
refueling process. Otherwise, electrostatic
charge could build up again.
!Do not use diesel to refuel vehicles with a
gasoline engine. Do not switch on the igni-
tion if you accidentally refuel with the
wrong fuel. Otherwise, the fuel will enter
the fuel system. Even small amounts of the wrong fuel could result in damage to the
fuel system and the engine. Notify a quali-
fied specialist workshop and have the fuel
tank and fuel lines drained completely.
!Overfilling the fuel tank could damage the
fuel system.
!Take care not to spill any fuel on painted
surfaces. You could otherwise damage the
paintwork.
!Use a filter when refueling from a fuel can.
Otherwise, the fuel lines and/or injection
system could be blocked by particles from
the fuel can.
If you overfill the fuel tank, fuel could spray
out when the fuel pump nozzle is removed.
For further information on fuel and fuel quality
(
Ypage 603).
Refueling
General information
The fuel filler flap is unlocked or locked auto-
matically when you unlock or lock the vehicle
with the key or using KEYLESS-GO.
The position of the fuel filler cap is displayed
8 in the instrument cluster. The arrow
next to the filling pump indicates the side of
the vehicle.
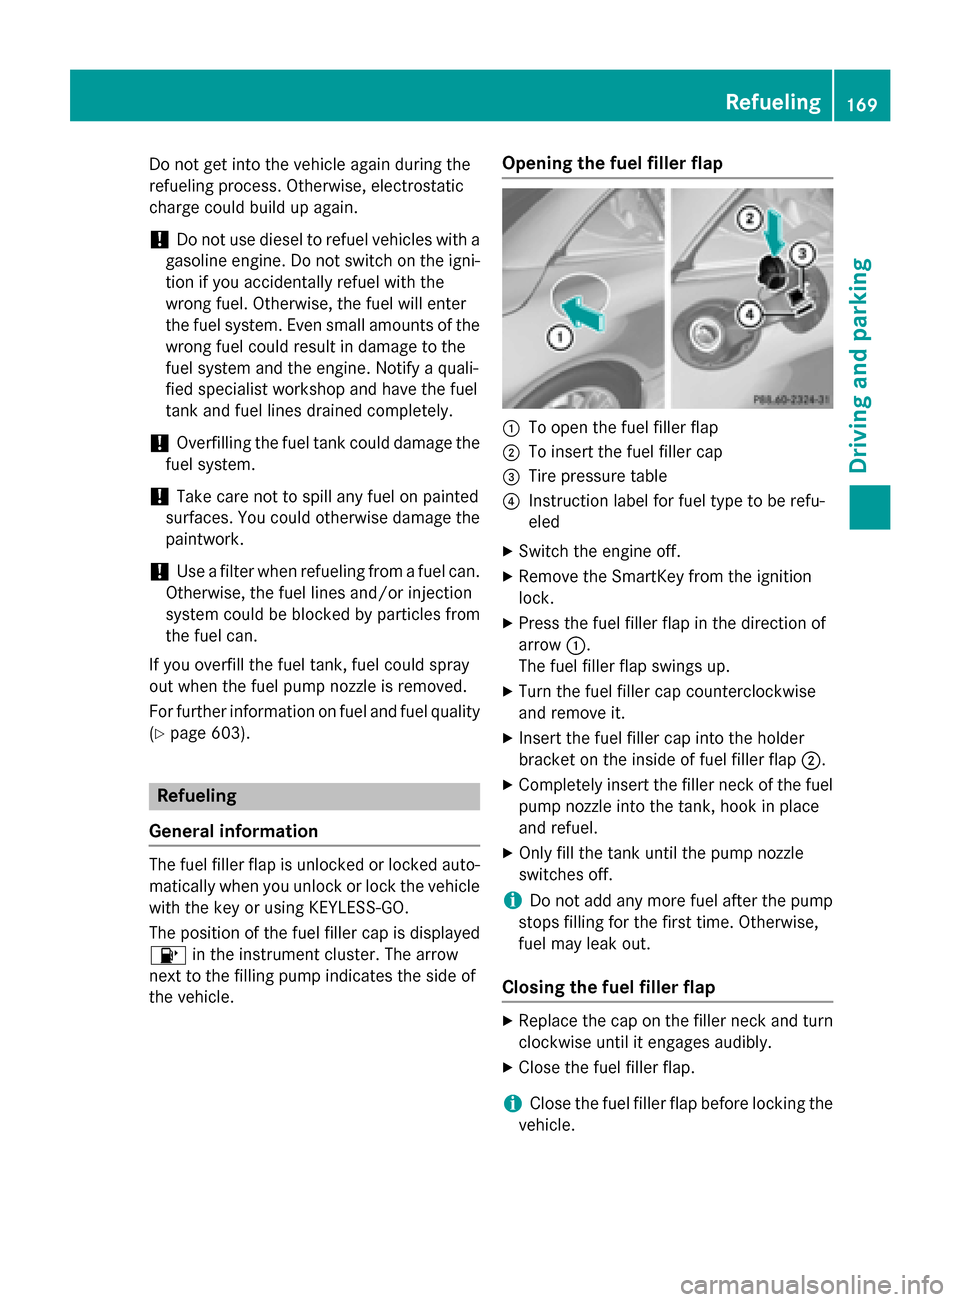
Opening the fuel filler flap
:To open the fuel filler flap
;To insert the fuel filler cap
=Tire pressure table
?Instruction label for fuel type to be refu-
eled
XSwitch the engine off.
XRemove the SmartKey from the ignition
lock.
XPress the fuel filler flap in the direction of
arrow :.
The fuel filler flap swings up.
XTurn the fuel filler cap counterclockwise
and remove it.
XInsert the fuel filler cap into the holder
bracket on the inside of fuel filler flap ;.
XCompletely insert the filler neck of the fuel
pump nozzle into the tank, hook in place
and refuel.
XOnly fill the tank until the pump nozzle
switches off.
iDo not add any more fuel after the pump
stops filling for the first time. Otherwise,
fuel may leak out.
Closing the fuel filler flap
XReplace the cap on the filler neck and turn
clockwise until it engages audibly.
XClose the fuel filler flap.
iClose the fuel filler flap before locking the
vehicle.
Refueling169
Driving an d parking
Z
Page 172 of 614
iIf you are driving with the fuel filler cap
open, the 8reserve fuel warning lamp
flashes. The ;Check Engine warning
lamp may also light up. A message appears
in the multifunction display (
Ypage 258).
For further information on warning and indi- cator lamps in the instrument cluster, see
(
Ypage 278).
170Refueling
Driving and parking
Page 174 of 614
Switching off the engine
Important safety notes
GWARNING
The automatic transmission switches to neu-
tral position Nwhen you switch off the engine.
The vehicle may roll away. There is a risk of an
accident.
After switching off the engine, always switch
to parking position P. Prevent the parked vehi-
cle from rolling away by applying the parking
brake.
Vehicles with automatic transmission
XWith the SmartKey: shift the transmission
to position P.
XTurn the SmartKey to position 0in the igni-
tion lock and remove it.
The immobilizer is activated.
XWith KEYLESS-GO: press the KEYLESS-
GO Start/Stop button (
Ypage 152).
The engine stops and all the indicator
lamps in the instrument cluster go out.
When the driver's door is closed, this cor-
responds to key position 1. When the driv-
er's door is open, this corresponds to key
position 0(
Ypage 151).
If you try to switch off the engine when the
transmission is not in position P, a message
appears in the multifunction display. A signal
sounds.
iThe engine can be switched off while the
vehicle is in motion by pressing and holding the Start/Stop button for about three sec-
onds. This function operates independently
of the ECO start/stop automatic engine
switch-off function.
Electric parking brake
General notes
GWARNING
If you leave children unsupervised in the vehi-
cle, they could set it in motion by, for example:
Rrelease the parking brake.
Rshift the automatic transmission out of the
parking position P.
Rstart the engine.
In addition, they may operate vehicle equip-
ment and become trapped. There is a risk of
an accident and injury.
When leaving the vehicle, always take the
SmartKey with you and lock the vehicle. Never
leave children unsupervised in the vehicle.
The function of the electric parking brake is
dependent on the on-board voltage. If the on-
board voltage is low or there is a malfunction
in the system, it may not be possible to apply
the released parking brake.
XIf this is the case, only park the vehicle on
level ground and secure it to prevent it roll-
ing away.
XShift the automatic transmission to posi-
tion P.
It may not be possible to release an applied
parking brake if the on-board voltage is low or
there is a malfunction in the system. Contact a qualified specialist workshop.
iThe electric parking brake performs a
function test at regular intervals while the
engine is switched off. The sounds that can
be heard while this is occurring are normal.
172Parking
Driving and parking
Page 176 of 614
brake handle is depressed, the greater the
braking force.
During braking:
Ra warning tone sounds
Rthe Please Release Parking Brake
message appears
Rthe red F(USA only) or !(Canada
only) indicator lamp in the instrument clus- ter flashes
When the vehicle has been braked to a stand-
still, the electric parking brake is engaged.
Parking the vehicle for a long period
If you leave the vehicle parked for longer than
four weeks, the battery may be damaged by
exhaustive discharging.
If you leave the vehicle parked for longer than
six weeks, the vehicle may suffer damage as a
result of lack of use.
XVisit a qualified specialist workshop and
seek advice.
iYou can obtain information about trickle
chargers from a qualified specialist work-
shop.
Driving tips
General notes
Important safety notes
GWARNING
If you switch off the ignition while driving,
safety-relevant functions are only available
with limitations, or not at all. This could affect, for example, the power steering and the brake
boosting effect. You will require considerably
more effort to steer and brake. There is a risk
of an accident.
Do not switch off the ignition while driving.
GWARNING
If you operate mobile communication equip-
ment while driving, you will be distracted from traffic conditions. You could also lose control
of the vehicle. There is a risk of an accident.
Only operate this equipment when the vehicle
is stationary.
Observe the legal requirements for the coun-
try in which you are driving. Some jurisdic-
tions prohibit the driver from using a mobile
phone while driving a vehicle.
If you make a call while driving, always use
hands-free mode. Only operate the telephone
when the traffic situation permits. If you are
unsure, pull over to a safe location and stop
before operating the telephone.
Bear in mind that at a speed of only 30 mph
(approximately 50 km/h), the vehicle covers
a distance of 44 ft (approximately 14 m) per
second.
Drive sensibly – save fuel
Observe the following tips to save fuel:
RThe tires should always be inflated to the
recommended tire pressure.
RRemove unnecessary loads.
RWarm up the engine at low engine speeds.
RAvoid frequent acceleration or braking.
RObserve the service intervals in the Main-
tenance Booklet or in the service interval
display. Have all the maintenance work car-ried in accordance with Daimler AG regu-
lations.
Fuel consumption also increases when driv-
ing in cold weather, in stop-start traffic and in
hilly terrain.
Drinking and driving
GWARNING
Drinking and driving and/or taking drugs and driving are very dangerous combinations.
Even a small amount of alcohol or drugs can
174Driving tips
Driving and parking
Page 179 of 614
!Depressing the brake pedal constantly
results in excessive and premature wear to
the brake pads.
If the brakes have been subjected to a heavy
load, do not stop the vehicle immediately, but
drive on for a short while. This allows the air-
flow to cool the brakes more quickly.
Wet roads
If you have driven for a long time in heavy rain
without braking, there may be a delayed reac-
tion from the brakes when braking for the first
time. This may also occur after the vehicle has been washed or driven through deep water.
You then have to depress the brake pedal
more firmly. Maintain a greater distance from
the vehicle in front.
After driving on a wet road or having the vehi- cle washed, brake firmly while paying atten-
tion to the traffic conditions. This will warm up
the brake discs, thereby drying them more
quickly and protecting them against corro-
sion.
Limited braking performance on salt-
treated roads
If you drive on salted roads, a layer of salt
residue may form on the brake discs and
brake pads. This can result in a significantly
longer braking distance.
RBrake occasionally to remove any possible
salt residue. Make sure that you do not
endanger other road users when doing so.
RCarefully depress the brake pedal and the
beginning and end of a journey.
RMaintain a greater distance to the vehicle
ahead.
Servicing the brakes
!If the brake warning lamp lights up in the
instrument cluster and you hear a warning
tone even though the parking brake has
been released, the brake fluid level may be too low. Observe additional warning mes-
sages in the multifunction display.
The brake fluid level may be too low due to
brake pad wear or leaking brake lines.
Have the brake system checked immedi-
ately. This work should be carried out at a
qualified specialist workshop.
!As the ESP®system operates automati-
cally, the engine and the ignition system
must be switched off (SmartKey in position
0 or 1in the ignition lock or Start/Stop
button in position 0or 1) when:
Rtesting the parking brake on a brake
dynamometer.
Ryou intend to have the vehicle towed with
the front axle raised.
Braking maneuvers triggered automatically by ESP
®may seriously damage the brake
system.
All checks and maintenance work on the
brake system must be carried out at a quali-
fied specialist workshop.
Have brake pads installed and brake fluid
replaced at a qualified specialist workshop.
If the brake system has only been subject to
moderate loads, you should test the function-
ality of your brakes at regular intervals.
Information on BAS (Brake Assist)
(
Ypage 72).
Mercedes-Benz recommends that you only
have brake pads/linings installed on your
vehicle which have been approved for
Mercedes-Benz vehicles or which correspond
to an equivalent quality standard. Brake
pads/linings which have not been approved
for Mercedes-Benz vehicles or which are not
of an equivalent quality could affect your vehi-
cle's operating safety.
Mercedes-Benz recommends that you only
use brake fluid that has been specially
approved for your vehicle by Mercedes-Benz,
or which corresponds to an equivalent quality
standard. Brake fluid which has not been
approved for Mercedes-Benz vehicles or
Driving tips177
Driving and parking
Z
Page 180 of 614
which is not of an equivalent quality could
affect your vehicle's operating safety.
High-performance and ceramic brake
system (Mercedes-AMG vehicles)
The AMG brake systems are designed for
heavy loads. This may lead to noise when
braking. This will depend on:
RSpeed
RBraking force
RAmbient conditions, e.g. temperature and
humidity
The wear of individual components of the
brake system, such as the brake pads/linings
or brake discs, depends on the individual driv-
ing style and operating conditions.
For this reason, it is impossible to state a
mileage that will be valid under all circum-
stances. An aggressive driving style will lead
to high wear. You can obtain more informa-
tion on this from a qualified specialist work-
shop.
New and replaced brake pads and discs only
reach their optimum braking effect after sev-
eral hundred kilometers of driving. Compen-
sate for this by applying greater force to the
brake pedal. Keep this in mind, and adapt
your driving and braking accordingly during
this break-in period.
Excessive heavy braking results in corre-
spondingly high brake wear. Observe the
brake system warning lamp in the instrument cluster and note any brake status messages
in the multifunction display. Especially for
high performance driving, it is important to
maintain and have the brake system checked
regularly.
Checking brake lining thickness
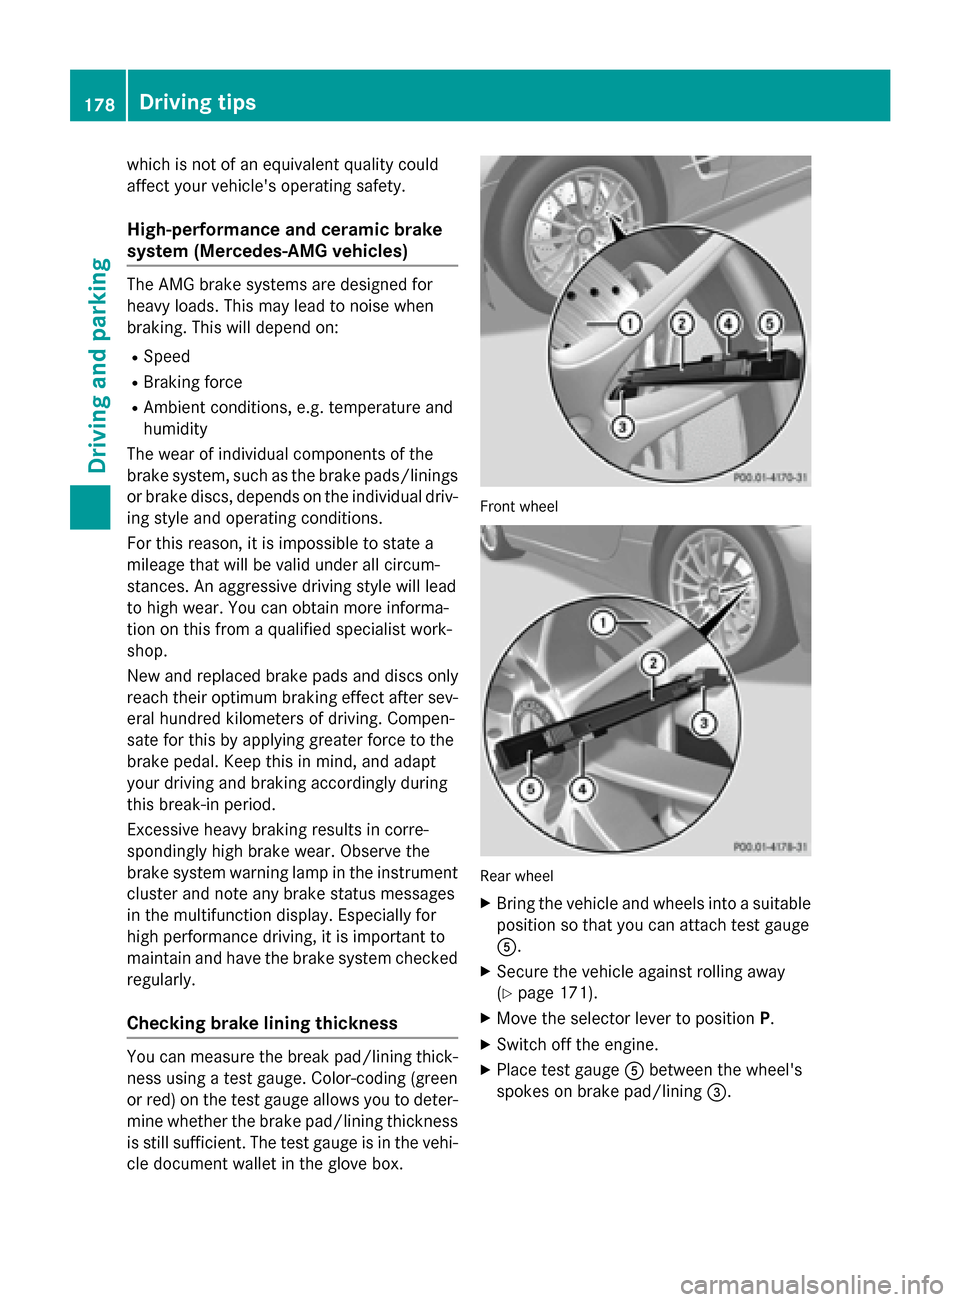
You can measure the break pad/lining thick-ness using a test gauge. Color-coding (green
or red) on the test gauge allows you to deter-
mine whether the brake pad/lining thickness
is still sufficient. The test gauge is in the vehi- cle document wallet in the glove box.
Front wheel
Rear wheel
XBring the vehicle and wheels into a suitable
position so that you can attach test gauge
A.
XSecure the vehicle against rolling away
(
Ypage 171).
XMove the selector lever to position P.
XSwitch off the engine.
XPlace test gauge Abetween the wheel's
spokes on brake pad/lining =.
178Driving tips
Driving and parking
Page 205 of 614
!If unavoidable, you should drive over
obstacles such as curbs slowly and not at a
sharp angle. Otherwise, you may damage
the wheels or tires.
Active Parking Assist may possibly indicate
parking spaces which are not suitable for
parking, for example:
Rwhere parking or stopping is prohibited
Rin front of driveways or entrances and exits
Ron unsuitable surfaces
Parking tips:
ROn narrow roads, drive as close to the park-
ing space as possible.
RParking spaces that are littered or over-
grown might be identified or measured
incorrectly.
RParking spaces that are partially occupied
by trailer drawbars might not be identified
as such or be measured incorrectly.
RSnowfall or heavy rain may lead to a parking
space being measured inaccurately.
RPay attention to the PARKTRONIC
(
Ypage 200) warning messages during the
parking procedure.
RYou can intervene in the steering procedure
to correct it at any time. Active Parking
Assist will then be canceled.
RWhen transporting a load which protrudes
from your vehicle, you should not use
Active Parking Assist.
RNever use Active Parking Assist when snow
chains are installed.
RMake sure that the tire pressures are
always correct. This has a direct influence
on the parking characteristics of the vehi-
cle.
Parking
Important safety notes
Objects located above the height range of
Active Parking Assist will not be detected
when the parking space is measured. These
are not taken into account when the parking procedure is calculated, e.g. overhanging
loads, tail sections or loading ramps of goods
vehicles. In some circumstances, Active Park-
ing Assist may therefore guide you into the
parking space too early.
GWARNING
If there are objects above the detection range, Active Parking Assist may turn prematurely.
You may cause a collision as a result. There is
a risk of an accident.
If there are objects above the detection range,
stop and deactivate Active Parking Assist.
GWARNING
Active Parking Assist merely aids you by inter- vening actively in the steering. If you do not
brake there is a risk of an accident.
Always apply the brakes yourself when
maneuvering and parking.
Detecting parking spaces
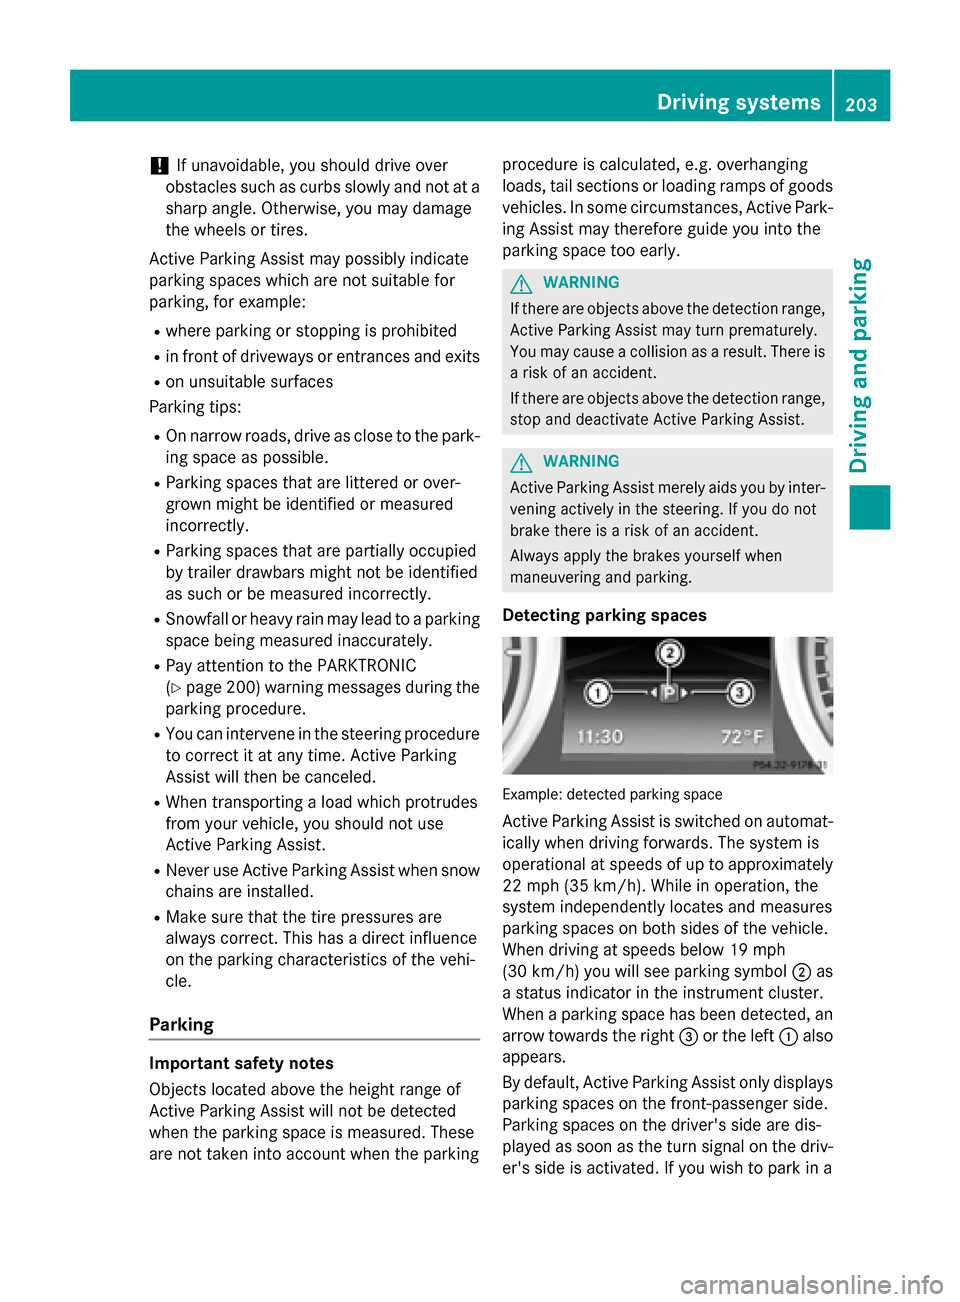
Example: detected parking space
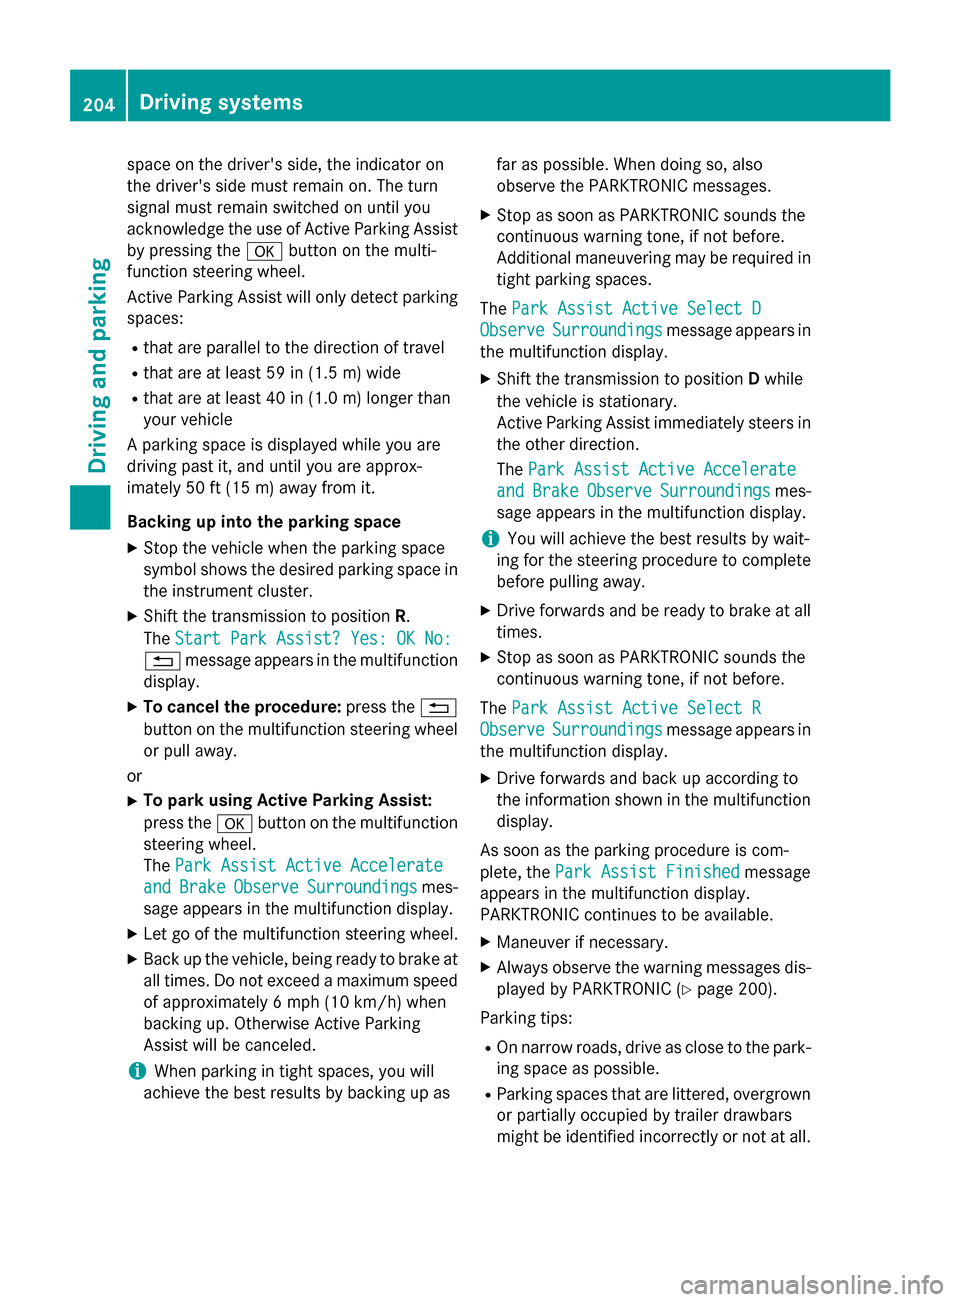
Active Parking Assist is switched on automat-ically when driving forwards. The system is
operational at speeds of up to approximately
22 mph (35 km/h). While in operation, the
system independently locates and measures
parking spaces on both sides of the vehicle.
When driving at speeds below 19 mph
(30 km/h) you will see parking symbol ;as
a status indicator in the instrument cluster.
When a parking space has been detected, an
arrow towards the right =or the left :also
appears.
By default, Active Parking Assist only displays
parking spaces on the front-passenger side.
Parking spaces on the driver's side are dis-
played as soon as the turn signal on the driv-
er's side is activated. If you wish to park in a
Driving systems203
Driving and parking
Z
Page 206 of 614
space on the driver's side, the indicator on
the driver's side must remain on. The turn
signal must remain switched on until you
acknowledge the use of Active Parking Assist
by pressing theabutton on the multi-
function steering wheel.
Active Parking Assist will only detect parking
spaces:
Rthat are parallel to the direction of travel
Rthat are at least 59 in (1.5 m) wide
Rthat are at least 40 in (1.0 m) longer than
your vehicle
A parking space is displayed while you are
driving past it, and until you are approx-
imately 50 ft (15 m) away from it.
Backing up into the parking space
XStop the vehicle when the parking space
symbol shows the desired parking space in
the instrument cluster.
XShift the transmission to position R.
The Start Park Assist? Yes: OK No:
% message appears in the multifunction
display.
XTo cancel the procedure: press the%
button on the multifunction steering wheel
or pull away.
or
XTo park using Active Parking Assist:
press the abutton on the multifunction
steering wheel.
The Park Assist Active Accelerate
andBrakeObserveSurroundingsmes-
sage appears in the multifunction display.
XLet go of the multifunction steering wheel.
XBack up the vehicle, being ready to brake at
all times. Do not exceed a maximum speed of approximately 6 mph (10 km/h) when
backing up. Otherwise Active Parking
Assist will be canceled.
iWhen parking in tight spaces, you will
achieve the best results by backing up as far as possible. When doing so, also
observe the PARKTRONIC messages.
XStop as soon as PARKTRONIC sounds the
continuous warning tone, if not before.
Additional maneuvering may be required in
tight parking spaces.
The Park Assist Active Select D
ObserveSurroundingsmessage appears in
the multifunction display.
XShift the transmission to position Dwhile
the vehicle is stationary.
Active Parking Assist immediately steers in
the other direction.
The Park Assist Active Accelerate
andBrakeObserveSurroundingsmes-
sage appears in the multifunction display.
iYou will achieve the best results by wait-
ing for the steering procedure to complete
before pulling away.
XDrive forwards and be ready to brake at all
times.
XStop as soon as PARKTRONIC sounds the
continuous warning tone, if not before.
The Park Assist Active Select R
ObserveSurroundingsmessage appears in
the multifunction display.
XDrive forwards and back up according to
the information shown in the multifunction
display.
As soon as the parking procedure is com-
plete, the Park Assist Finished
message
appears in the multifunction display.
PARKTRONIC continues to be available.
XManeuver if necessary.
XAlways observe the warning messages dis-
played by PARKTRONIC (
Ypage 200).
Parking tips:
ROn narrow roads, drive as close to the park-
ing space as possible.
RParking spaces that are littered, overgrown
or partially occupied by trailer drawbars
might be identified incorrectly or not at all.
204Driving systems
Driving and parking
Page 208 of 614
XStop the movement of the multifunction
steering wheel or steer yourself.
Active Parking Assist will be canceled at
once. ThePark Assist Canceled
mes-
sage appears in the multifunction display.
or
XPress the PARKTRONIC button on the cen-
ter console (
Ypage 201).
PARKTRONIC is switched off and Active
Parking Assist is immediately canceled.
The Park Assist Canceled
message
appears in the multifunction display.
Active Parking Assist is canceled automati-
cally if:
Rparking using Active Parking Assist is no
longer possible
Ryou are driving faster than 6 mph (10 km/h)
Ra wheel spins, ESP®intervenes or fails. The
÷ ESP warning lamp lights up in the
instrument cluster
A warning tone sounds. The parking symbol
goes out and the Park Assist Canceled
message appears in the multifunction dis-
play.
If Active Parking Assist is canceled, you must
steer again yourself.
Rear view camera
General notes
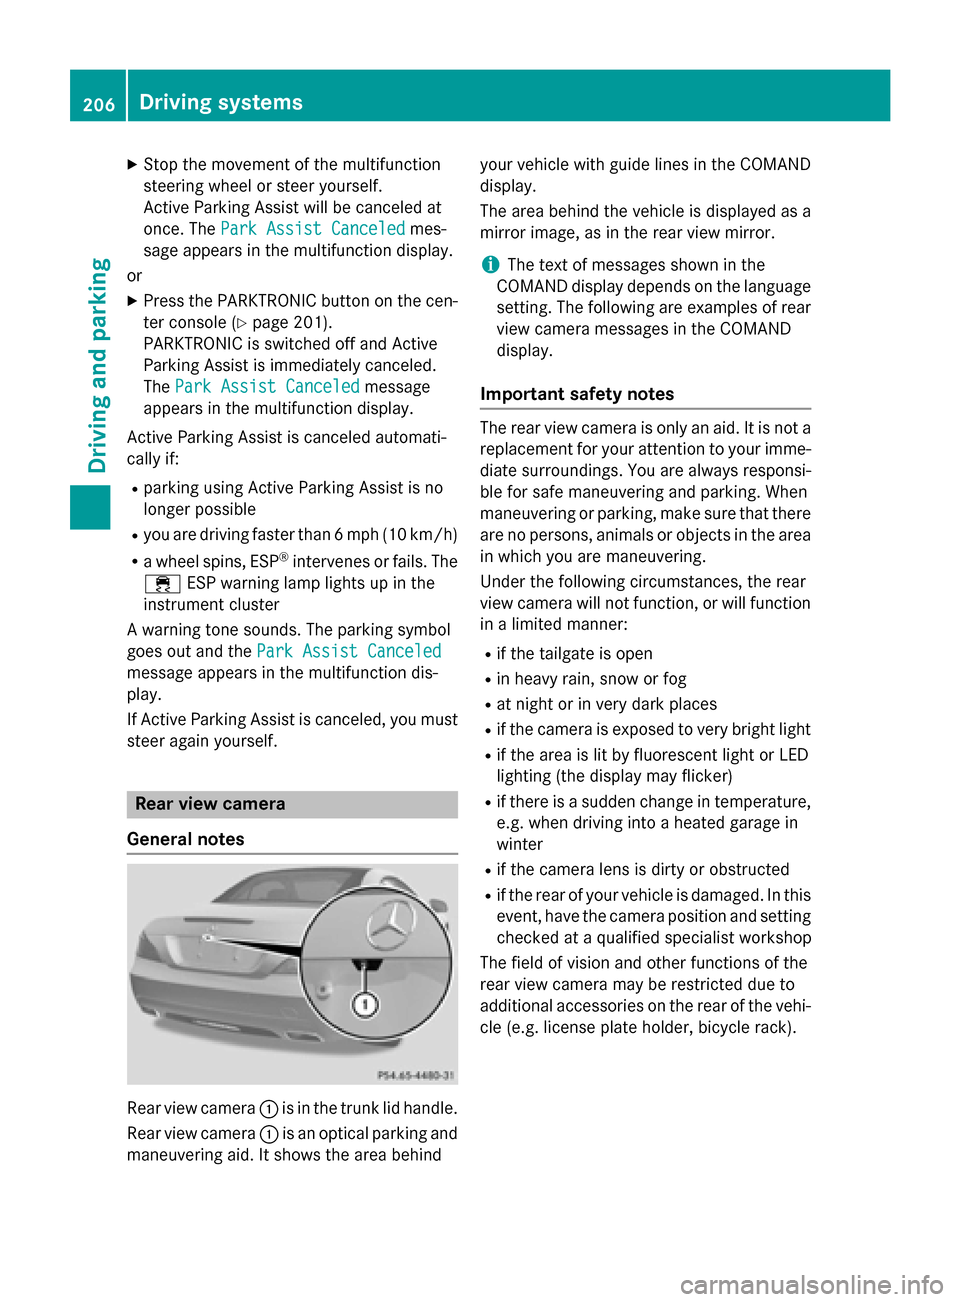
Rear view camera :is in the trunk lid handle.
Rear view camera :is an optical parking and
maneuvering aid. It shows the area behind your vehicle with guide lines in the COMAND
display.
The area behind the vehicle is displayed as a
mirror image, as in the rear view mirror.
iThe text of messages shown in the
COMAND display depends on the language
setting. The following are examples of rear
view camera messages in the COMAND
display.
Important safety notes
The rear view camera is only an aid. It is not a
replacement for your attention to your imme-
diate surroundings. You are always responsi-
ble for safe maneuvering and parking. When
maneuvering or parking, make sure that there
are no persons, animals or objects in the area
in which you are maneuvering.
Under the following circumstances, the rear
view camera will not function, or will function in a limited manner:
Rif the tailgate is open
Rin heavy rain, snow or fog
Rat night or in very dark places
Rif the camera is exposed to very bright light
Rif the area is lit by fluorescent light or LED
lighting (the display may flicker)
Rif there is a sudden change in temperature,
e.g. when driving into a heated garage in
winter
Rif the camera lens is dirty or obstructed
Rif the rear of your vehicle is damaged. In this
event, have the camera position and setting
checked at a qualified specialist workshop
The field of vision and other functions of the
rear view camera may be restricted due to
additional accessories on the rear of the vehi-
cle (e.g. license plate holder, bicycle rack).
206Driving systems
Driving and parking