ignition MERCEDES-BENZ SL-Class 2016 R231 Owner's Manual
[x] Cancel search | Manufacturer: MERCEDES-BENZ, Model Year: 2016, Model line: SL-Class, Model: MERCEDES-BENZ SL-Class 2016 R231Pages: 614, PDF Size: 15.67 MB
Page 16 of 614
I
Ignition locksee Key positions
Immobilizer .......................................... 79
Incident (traffic report) .....................357
Indicator lamps
see Warning and indicator lamps
Indicators
see Turn signals
Instrument cluster
Overview .......................................... 41
Warning and indicator lamps ........... 42
Instrument cluster lighting .............. 222
Interface (USB, iPod
®)
see Media Interface
Interior lighting
Automatic control .......................... 129
Delayed switch-off (on-board
computer) ...................................... 234
Emergency lighting ........................ 129
Manual control ............................... 129
Overview ........................................ 128
Reading lamp ................................. 128
Setting the brightness of the
ambient lighting (on-board com-
puter) ............................................. 233
Setting the color of the ambient
lighting (on-board computer) ......... 233
Internet
Calling up the carousel view .......... 428
Conditions for access .................... 411
Creating favorites .......................... 434
Entering the URL ............................ 429
Favorites manager ......................... 434
Favorites menu .............................. 434
Menu functions .............................. 431
Opening favorites .......................... 433
Selecting favorites ......................... 430
Selecting/setting access data ....... 413
Internet radio
Calling up ....................................... 428
Searching for stations .................... 428
iPod
®
Alphabetic track selection ............. 471
Connecting to the Media Inter-
face ............................................... 467
Selecting a category/playlist ......... 470 iTunes
®............................................... 471
J
Jack
Storage location ............................ 550
Using ............................................. 590
Jump starting (engine) ...................... 559
K
Key positions
KEYLESS-GO .................................. 152
SmartKey ....................................... 151
KEYLESS-GO
Convenience closing feature ............ 99
Deactivation ..................................... 83
Display message ............................ 269
Locking ............................................ 83
Removing the Start/Stop button ... 153
Start/Stop button .......................... 152
Starting the engine ........................ 154
Unlocking ......................................... 83
Kickdown
Driving tips .................................... 163
Manual drive program .................... 167
Knee bag .............................................. 57
L
Lamps
see Warning and indicator lamps
Lane Keeping Assist
see Active Lane Keeping Assist
Lane recommendations
Explanation .................................... 348
Presentation .................................. 348
Lap time (RACETIMER) ...................... 237
License plate lamp (display mes-
sage) ................................................... 253
Light function, active
Display message ............................ 254
Light sensor (display message) ....... 254
Lights
Activating/deactivating the inte-
rior lighting delayed switch-off ....... 234
Active light function ....................... 126
Automatic headlamp mode ............ 122
Cornering light function ................. 126
14Index
Page 24 of 614
Seat functions (COMAND) ............. 316
Seat heating problem .................... 113
Seat ventilation problem ................ 113
Selecting for adjustment
(COMAND) ..................................... 316
Sliding forward/back ..................... 112
Storing settings (memory func-
tion) ............................................... 119
Switching AIRSCARF on/off .......... 114
Switching seat heating on/off ....... 112
Switching seat ventilation on/off .. 113
Selecting a province ......................... 325
Selecting a state ............................... 325
Selecting stations
Radio ............................................. 438
Selector lever
Cleaning ......................................... 547
Positions ........................................ 159
Sending DTMF tones ......................... 391
Sensors (cleaning instructions) ....... 546
Service menu (on-board com-
puter) .................................................. 232
Service message
see ASSYST PLUS
Service products
Brake fluid ..................................... 606
Coolant (engine) ............................ 606
Engine oil ....................................... 605
Fuel ................................................ 603
Important safety notes .................. 603
Refrigerant (air-conditioning sys-
tem) ............................................... 608
Washer fluid ................................... 607
Setting the air distribution ............... 142
Setting the airflow ............................ 143
Setting the audio format
Rear Seat Entertainment System ... 498
Setting the language
COMAND ....................................... 310
Rear Seat Entertainment System ... 498
Setting the night design ................... 308
Setting the text reader speed .......... 310
Setting the volume
Telephone calls .............................. 298
Video AUX ..................................... 481
Settings
Factory (on-board computer) ......... 236 Menu overview .............................. 290
On-board computer ....................... 232
Picture (COMAND) ......................... 475
Sound settings ............................... 298
SETUP (on-board computer) ............. 236
Side impact air bag ............................. 58
Side windows
Cleaning ......................................... 545
Convenience closing feature ............ 99
Imp
ortant safety information ........... 96
Opening/closing (all) ....................... 98
Opening/closing (front) ................... 97
Opening/closing (rear) .................... 98
Overview .......................................... 96
Problem (malfunction) ................... 100
Resetting ......................................... 99
Reversing feature ............................. 97
SIRIUS weather display
5-day forecast ................................ 503
Daily forecast ................................. 502
Detail information .......................... 503
Information chart ........................... 502
Selecting a location for the
weather forecast ............................ 503
Switching on/off ........................... 502
Weather map ................................. 505
SmartKey
Changing the battery ....................... 86
Changing the programming ............. 84
Checking the battery ....................... 85
Convenience opening feature .......... 98
Display message ............................ 269
Door central locking/unlocking ....... 82
Important safety notes .................... 82
Loss ................................................. 87
Mechanical key ................................ 84
Opening/closing the roof .............. 102
Overview .......................................... 82
Positions (ignition lock) ................. 151
Problem (malfunction) ..................... 87
Starting the engine ........................ 154
Snow chains ...................................... 571
Sockets
Front-passenger footwell ............... 521
General notes ................................ 520
Trunk ............................................. 521
Under the armrest ......................... 521
22Index
Page 42 of 614
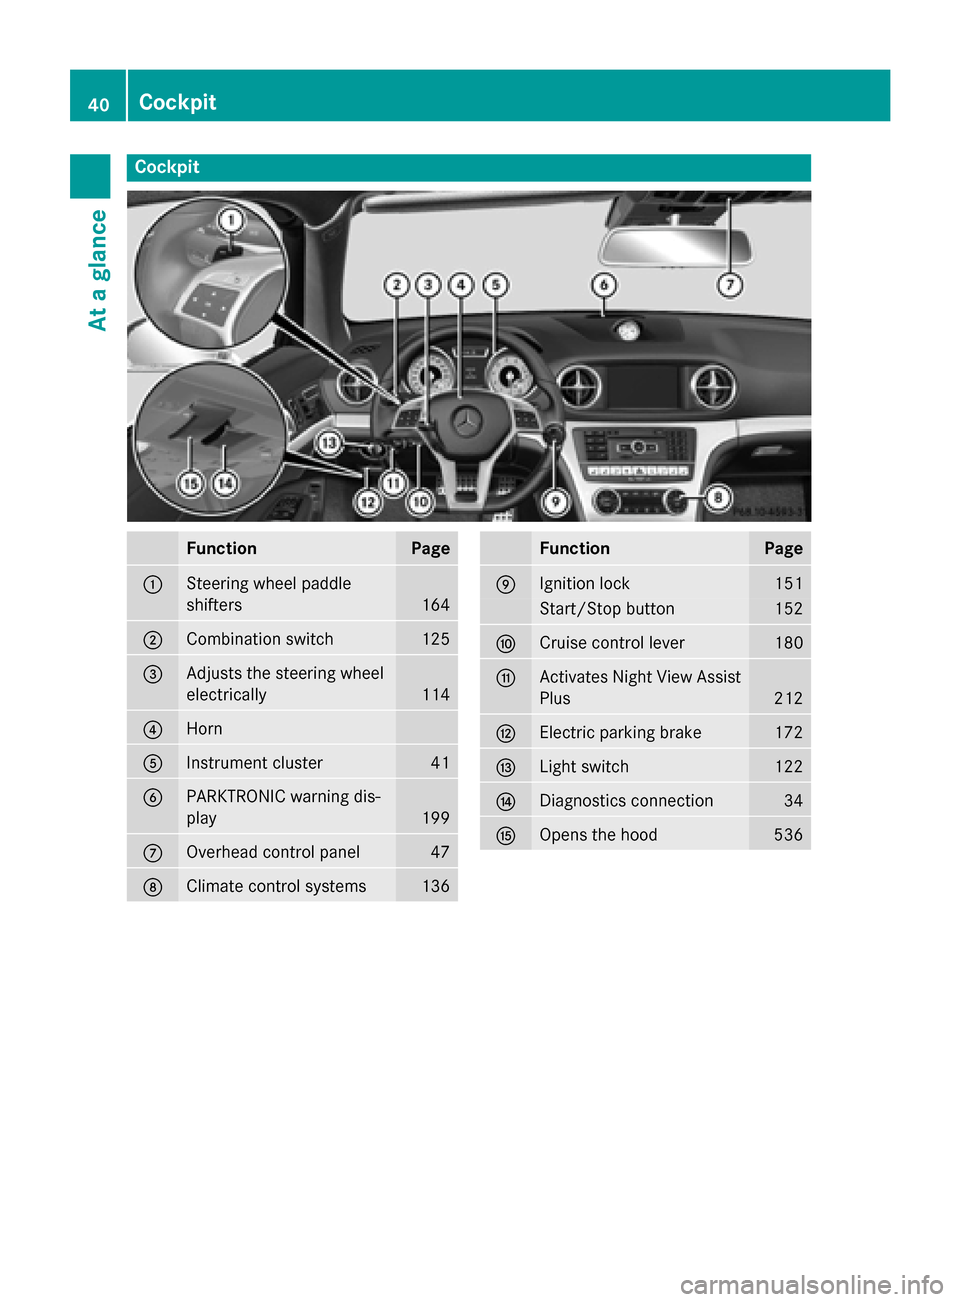
Cockpit
FunctionPage
:Steering wheel paddle
shifters
164
;Combination switch125
=Adjusts the steering wheel
electrically
114
?Horn
AInstrument cluster41
BPARKTRONIC warning dis-
play
199
COverhead control panel47
DClimate control systems136
FunctionPage
EIgnition lock151
Start/Stop button152
FCruise control lever180
GActivates Night View Assist
Plus
212
HElectric parking brake172
ILight switch122
JDiagnostics connection34
KOpens the hood536
40Cockpit
At a glance
Page 52 of 614
Useful information
i
This Operator's Manual describes all
models and all standard and optional equip-
ment of your vehicle available at the time of
publication of the Operator's Manual.
Country-specific differences are possible.
Please note that your vehicle may not be
equipped with all features described. This
also applies to safety-related systems and
functions.
iRead the information on qualified special-
ist workshops (
Ypage 34).
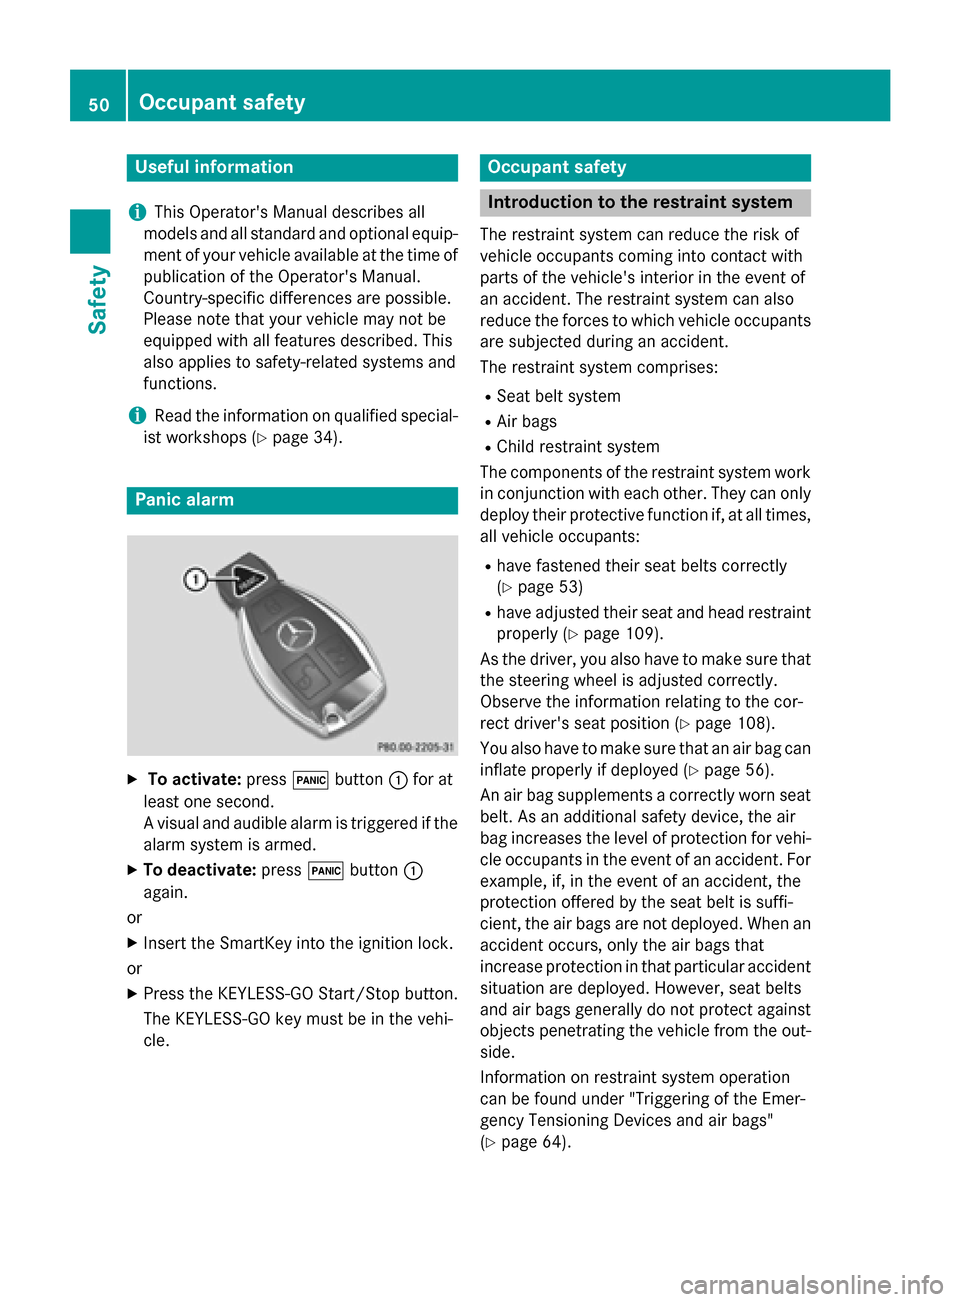
Panic alarm
XTo activate: press!button :for at
least one second.
A visual and audible alarm is triggered if the
alarm system is armed.
XTo deactivate: press!button :
again.
or
XInsert the SmartKey into the ignition lock.
or
XPress the KEYLESS-GO Start/Stop button.
The KEYLESS-GO key must be in the vehi-
cle.
Occupant safety
Introduction to the restraint system
The restraint system can reduce the risk of
vehicle occupants coming into contact with
parts of the vehicle's interior in the event of
an accident. The restraint system can also
reduce the forces to which vehicle occupants
are subjected during an accident.
The restraint system comprises:
RSeat belt system
RAir bags
RChild restraint system
The components of the restraint system work
in conjunction with each other. They can only
deploy their protective function if, at all times,
all vehicle occupants:
Rhave fastened their seat belts correctly
(
Ypage 53)
Rhave adjusted their seat and head restraint
properly (
Ypage 109).
As the driver, you also have to make sure that
the steering wheel is adjusted correctly.
Observe the information relating to the cor-
rect driver's seat position (
Ypage 108).
You also have to make sure that an air bag can inflate properly if deployed (
Ypage 56).
An air bag supplements a correctly worn seat
belt. As an additional safety device, the air
bag increases the level of protection for vehi-
cle occupants in the event of an accident. For
example, if, in the event of an accident, the
protection offered by the seat belt is suffi-
cient, the air bags are not deployed. When an
accident occurs, only the air bags that
increase protection in that particular accident
situation are deployed. However, seat belts
and air bags generally do not protect against objects penetrating the vehicle from the out-
side.
Information on restraint system operation
can be found under "Triggering of the Emer-
gency Tensioning Devices and air bags"
(
Ypage 64).
50Occupant safety
Safety
Page 53 of 614
For more information about children traveling
with you in the vehicle and on child restraint
systems, see "Children in the vehicle"
(
Ypage 68).
Important safety notes
GWARNING
Modifications to the restraint system may
cause it to no longer work as intended. The
restraint system may then not perform its
intended protective function and may fail in an
accident or trigger unexpectedly, for example.
This poses an increased risk of injury or even fatal injury.
Never modify parts of the restraint system.
Never tamper with the wiring, the electronic
components or their software.
If it is necessary to modify an air bag system to
accommodate a person with disabilities, con-
tact an authorized Mercedes-Benz Center for
details. USA only: for further information con-
tact our Customer Assistance Center at
1-800-FOR-MERCedes (1‑800‑367 ‑6372).
Restraint system warning lamp
The functions of the restraint system are
checked after the ignition is switched on and
at regular intervals while the engine is run-
ning. Therefore, malfunctions can be detec-
ted in good time.
The 6 restraint system warning lamp in
the instrument cluster lights up when the igni-
tion is switched on. It goes out no later than a
few seconds after the vehicle is started. The
components of the restraint system are in
operational readiness.
A malfunction has occurred if the 6
restraint system warning lamp:
Rdoes not light up after the ignition is
switched on
Rdoes not go out after a few seconds with
the engine running
Rlights up again while the engine is running
GWARNING
If restraint system is malfunctioning, restraint
system components may be triggered unin-
tentionally or might not be triggered at all in
the event of an accident with a high rate of
vehicle deceleration. This can affect the Emer- gency Tensioning Device or air bag, for exam-
ple. This poses an increased risk of injury or
even fatal injury.
Have the restraint system checked and
repaired in a qualified specialist workshop as
soon as possible.
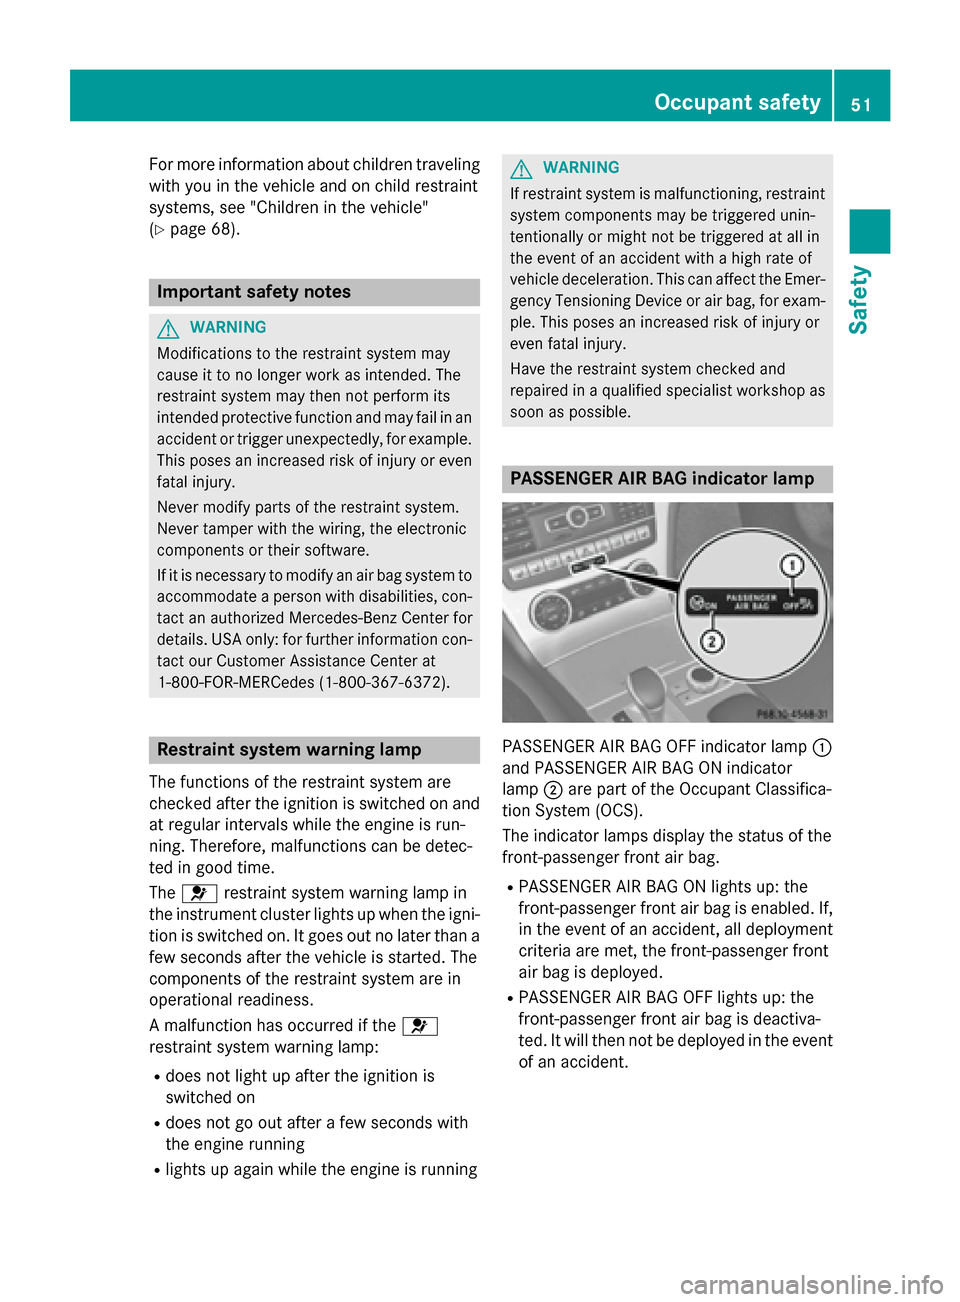
PASSENGER AIR BAG indicator lamp
PASSENGER AIR BAG OFF indicator lamp :
and PASSENGER AIR BAG ON indicator
lamp ;are part of the Occupant Classifica-
tion System (OCS).
The indicator lamps display the status of the
front-passenger front air bag.
RPASSENGER AIR BAG ON lights up: the
front-passenger front air bag is enabled. If,
in the event of an accident, all deployment
criteria are met, the front-passenger front
air bag is deployed.
RPASSENGER AIR BAG OFF lights up: the
front-passenger front air bag is deactiva-
ted. It will then not be deployed in the event of an accident.
Occupant safety51
Safety
Z
Page 57 of 614
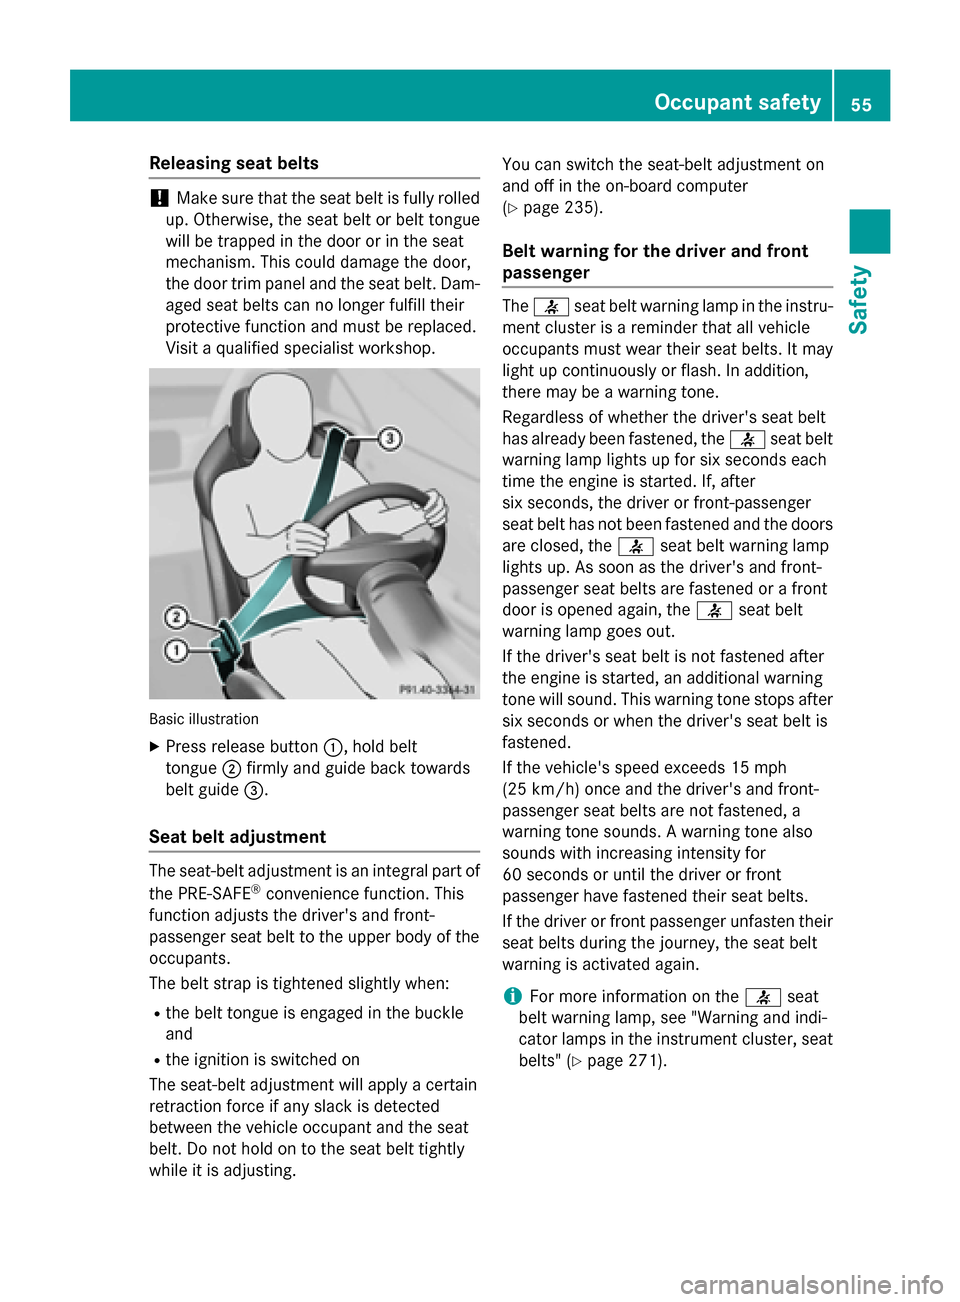
Releasing seat belts
!Make sure that the seat belt is fully rolled
up. Otherwise, the seat belt or belt tongue
will be trapped in the door or in the seat
mechanism. This could damage the door,
the door trim panel and the seat belt. Dam-
aged seat belts can no longer fulfill their
protective function and must be replaced.
Visit a qualified specialist workshop.
Basic illustration
XPress release button :, hold belt
tongue ;firmly and guide back towards
belt guide =.
Seat belt adjustment
The seat-belt adjustment is an integral part of
the PRE-SAFE®convenience function. This
function adjusts the driver's and front-
passenger seat belt to the upper body of the
occupants.
The belt strap is tightened slightly when:
Rthe belt tongue is engaged in the buckle
and
Rthe ignition is switched on
The seat-belt adjustment will apply a certain
retraction force if any slack is detected
between the vehicle occupant and the seat
belt. Do not hold on to the seat belt tightly
while it is adjusting. You can switch the seat-belt adjustment on
and off in the on-board computer
(
Ypage 235).
Belt warning for the driver and front
passenger
The
7 seat belt warning lamp in the instru-
ment cluster is a reminder that all vehicle
occupants must wear their seat belts. It may
light up continuously or flash. In addition,
there may be a warning tone.
Regardless of whether the driver's seat belt
has already been fastened, the 7seat belt
warning lamp lights up for six seconds each
time the engine is started. If, after
six seconds, the driver or front-passenger
seat belt has not been fastened and the doors
are closed, the 7seat belt warning lamp
lights up. As soon as the driver's and front-
passenger seat belts are fastened or a front
door is opened again, the 7seat belt
warning lamp goes out.
If the driver's seat belt is not fastened after
the engine is started, an additional warning
tone will sound. This warning tone stops after
six seconds or when the driver's seat belt is
fastened.
If the vehicle's speed exceeds 15 mph
(25 km/h) once and the driver's and front-
passenger seat belts are not fastened, a
warning tone sounds. A warning tone also
sounds with increasing intensity for
60 seconds or until the driver or front
passenger have fastened their seat belts.
If the driver or front passenger unfasten their
seat belts during the journey, the seat belt
warning is activated again.
iFor more information on the 7seat
belt warning lamp, see "
Warning and indi-
cator lamps in the instrument cluster, seat belts" (
Ypage 271).
Occupant safety55
Safety
Z
Page 61 of 614
Occupant Classification System
(OCS)
Introduction
The Occupant Classification System (OCS)
categorizes the person in the front-passenger
seat. Depending on that result, the front-
passenger front air bag and front-passenger
knee bag are either enabled or deactivated.
The system does not deactivate:
Rthe side impact air bag
Rthe front-passenger head bag
Rthe Emergency Tensioning Devices
Prerequisites
To be classified correctly, the front passenger
must sit:
Rwith the seat belt fastened correctly
Rin an almost upright position with their
back against the seat backrest
Rwith their feet resting on the floor, if possi-
ble
If the front passenger does not observe these
conditions, OCS may produce a false classi-
fication, e.g. because the front passenger:
Rtransfers their weight by supporting them-
selves on a vehicle armrest
Rsits in such a way that their weight is raised from the seat cushion
If you install a child restraint system on the
front-passenger seat, be sure to observe the
correct positioning of the child restraint sys-
tem. Never place objects under or behind the
child restraint system, e.g. cushions. Fully
retract the seat cushion length. The entire
base of the child restraint system must
always rest on the seat cushion of the front-
passenger seat. The backrest of the forward- facing child restraint system must lie as flat as
possible against the backrest of the front-
passenger seat.
The child restraint system must not touch the roof or be subjected to a load by the head
restraint. Adjust the angle of the seat back- rest and the head restraint position accord-
ingly.
Only then can OCS be guaranteed to function
correctly. Always observe the child restraint
system manufacturer's installation instruc-
tions.
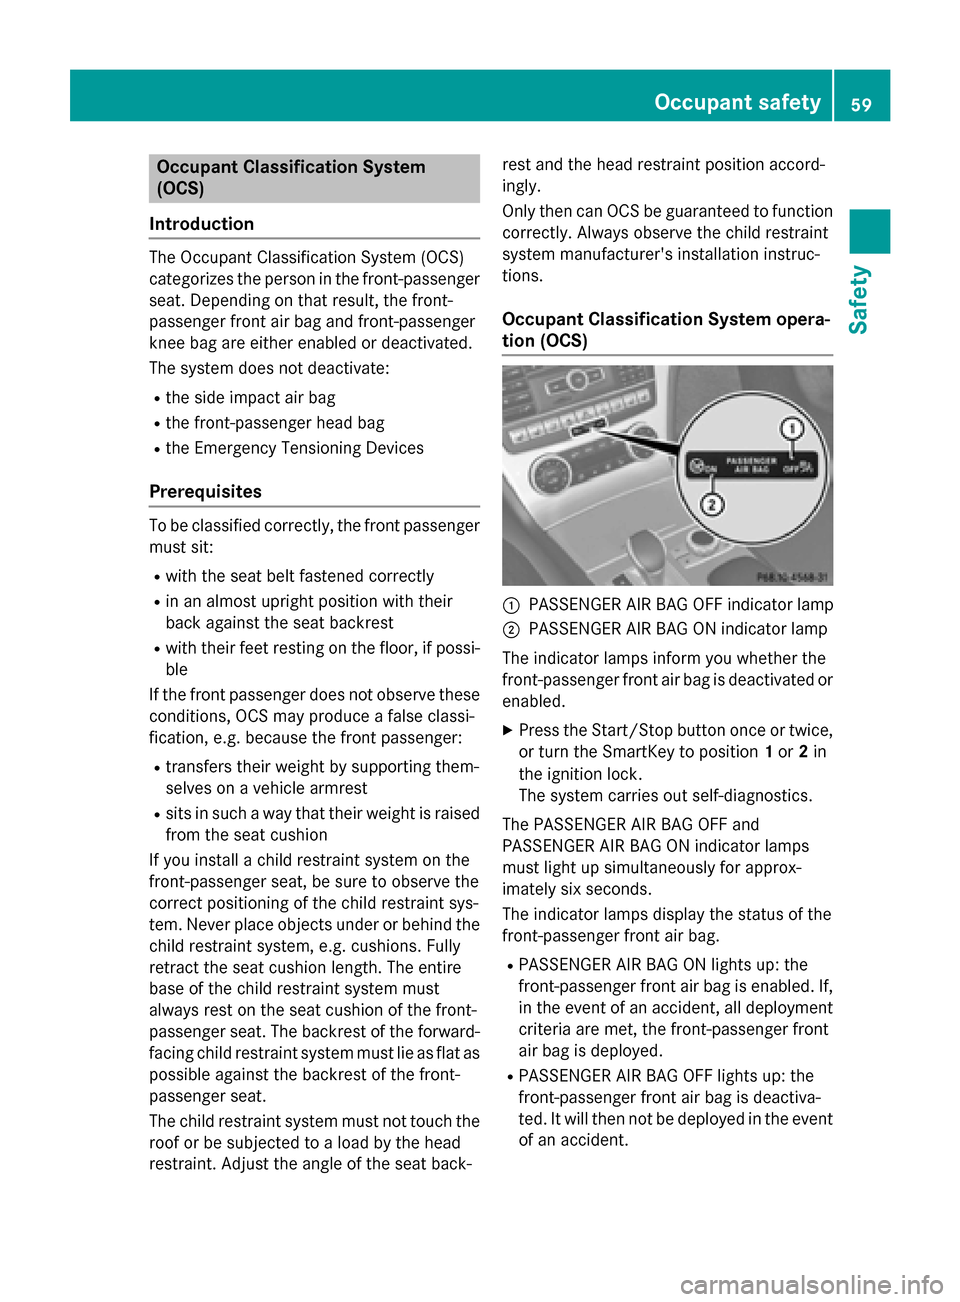
Occupant Classification System opera-
tion (OCS)
:PASSENGER AIR BAG OFF indicator lamp
;PASSENGER AIR BAG ON indicator lamp
The indicator lamps inform you whether the
front-passenger front air bag is deactivated or
enabled.
XPress the Start/Stop button once or twice,
or turn the SmartKey to position 1or 2in
the ignition lock.
The system carries out self-diagnostics.
The PASSENGER AIR BAG OFF and
PASSENGER AIR BAG ON indicator lamps
must light up simultaneously for approx-
imately six seconds.
The indicator lamps display the status of the
front-passenger front air bag.
RPASSENGER AIR BAG ON lights up: the
front-passenger front air bag is enabled. If,
in the event of an accident, all deployment
criteria are met, the front-passenger front
air bag is deployed.
RPASSENGER AIR BAG OFF lights up: the
front-passenger front air bag is deactiva-
ted. It will then not be deployed in the event of an accident.
Occupant safety59
Safety
Z
Page 67 of 614
be released. The6restraint system warn-
ing lamp lights up.
Only in rare cases will the bang affect your
hearing. The powder that is released gener-
ally does not constitute a health hazard, but it may cause short-term breathing difficulties in
people with asthma or other respiratory prob-
lems. To avoid this, you may wish to get out of
the vehicle or open the windows as soon as it
is safe to do so.
Air bags and pyrotechnic Emergency Tension-
ing Devices (ETDs) contain perchlorate mate-
rial, which may require special handling and
regard for the environment. National guide-
lines must be observed during disposal. In
California, see www.dtsc.ca.gov/
HazardousWaste/Perchlorate/
index.cfm .
Method of operation
During the first stage of a collision, the
restraint system control unit evaluates impor-
tant physical data relating to vehicle deceler-
ation or acceleration, such as:
Rduration
Rdirection
Rintensity
Based on the evaluation of this data, the
restraint system control unit triggers the
Emergency Tensioning Devices during a fron-
tal or rear collision.
An Emergency Tensioning Device can only be triggered, if:
Rthe ignition is switched on
Rthe components of the restraint system are
operational; see "Restraint system warning
lamp" (
Ypage 51)
Rthe belt tongue has engaged in the belt
buckle of the respective seat
If the restraint system control unit detects a
more severe accident, further components of
the restraint system are activated independ- ently of each other in certain frontal collision
situations:
RFront air bags as well as driver's and front-
passenger knee bags
The front-passenger front air bag is activated or deactivated depending on the person on
the front-passenger seat. The front-
passenger front air bag can only deploy in an
accident if the PASSENGER AIR BAG ON indi- cator lamp is lit. Observe the information on
the PASSENGER AIR BAG indicator lamps
(
Ypage 51).
Your vehicle has two-stage front air bags.
During the first deployment stage, the front
air bag is filled with propellant gas to reduce
the risk of injuries. The front air bag is fully
deployed with the maximum amount of pro-
pellant gas if a second deployment threshold
is reached within a few milliseconds.
The activation threshold of the Emergency
Tensioning Devices and the air bag are deter-
mined by evaluating the rate of vehicle decel-
eration or acceleration which occurs at vari-
ous points in the vehicle. This process is pre- emptive in nature. Deployment should take
place in good time at the start of the collision.
The rat
e of vehicle deceleration or accelera-
tion and the direction of the force are essen-
tially determined by:
Rthe distribution of forces during the colli-
sion
Rthe collision angle
Rthe deformation characteristics of the vehi-
cle
Rthe characteristics of the object with which
the vehicle has collided
Factors which can only be seen and measured
after a collision has occurred do not play a
decisive role in the deployment of an air bag.
Nor do they provide an indication of air bag
deployment.
The vehicle can be deformed considerably,
without an air bag being deployed. This is the
case if only parts which are relatively easily
deformed are affected and the rate of decel-
eration is not high. Conversely, air bags may
Occupant safety65
Safety
Z
Page 74 of 614
ABS (Anti-lock Braking System)
Gene ral inform ation
ABSregulates brak epressur ein suc h away
that th ewheels do no tloc kwhen you brake.
This allows you to continu esteering th evehi-
cle when braking .
The ! ABSwarning lamp in th einstrumen t
cluste rlights up when th eignition is switched
on .It goes out when th eengin eis running.
AB Sworks from aspee dof about 5mph
(8 km/h), regardless of road-surface condi-
tions. AB Sworks on slippery surfaces, eve n
when you only brak egently.
Import ant safety notes
iObserveth e"Importan tsafet ynotes" sec -
tion (
Ypage 71).
GWARNIN G
If AB Sis faulty, th ewheels could loc kwhen
braking .The steerabilit yand braking charac -
teristics may be severely impaired. Addition -
ally, further drivin gsafet ysystems are deac -
tivated. There is an increased danger of skid-
din gand accidents .
Drive on carefully. Hav eAB Schecke dimme-
diately at aqualified specialis tworkshop .
When ABSis malfunctioning ,other systems ,
includin gdriving safet ysystems ,will also
become inoperative. Observeth einformation
on th eAB Swarning lamp (
Ypage 272) and
display message swhic hmay be shown in th e
instrumen tcluste r (
Ypage 240).
Braking
XIf ABS intervenes: continueto depress th e
brak epedal vigorously until th ebraking sit -
uation is over.
XTo make a full brak eapplication:
depress th ebrak epedal wit hfull force .
If AB Sintervenes when braking ,you will fee l a
pulsing in th ebrak epedal . The pulsating brak
epedal can be an indica-
tion of hazardous road condition s,and func-
tion sas areminder to tak eextr acar ewhile
driving .
BAS (Brake Assist System)
Gene ral inform ation
BASoperate sin emergenc ybraking situa-
tions. If you depress th ebrak epedal quickly,
BA Sautomatically boosts th ebraking force ,
thus shortening th e stopping distance.
Important safety notes
iObserveth e"Importan t safetynotes" sec-
tion (
Ypage 71) .
GWARNIN G
If BA Sis malfunctioning ,th ebraking distanc e
in an emergenc ybraking situation is
increased. There is aris kof an accident.
In an emergenc ybraking situation ,depress
th ebrak epedal wit hfull force .AB Sprevents
th ewheels from locking .
Braking
XKeepth ebrak epedal firmly depressed until
th eemergenc ybraking situation is over.
AB Sprevents th ewheels from locking .
The brakes will function as usual once you
release th ebrak epedal .BA Sis deactivated.
BAS PLUS (Brake Assist System
PLUS)
Gene ral inform ation
BASPLU Scan help you to minimiz eth eris kof
a collision wit h avehicl eor reduce th eeffects
of such a collision .If BA S PLUS detects a
danger of collision ,you are assisted when
braking .
iObserveth e"Importan t safetynotes" sec-
tion (
Ypage 71) .
72Driving safety systems
Safety
Page 81 of 614
distance warning lamp will light up in the
instrument cluster.
XBrake immediately to defuse the situation.
or
XTake evasive action provided it is safe to do
so.
PRE-SAFE
®Brake can also brake the vehicle
automatically under the following conditions:
Rthe driver and front-passenger have their
seat belts fastened
and
Rthe vehicle speed is between approx-
imately 4 mph (7 km/h) and 124 mph
(200 km/ h)
At speeds of up to approximately 40 mph
(70 km/h) PRE-SAFE
®Brake can also detect
stationary objects. Examples of stationary
objects are stopped or parked vehicles.
iIf there is an increased risk of collision,
preventive passenger protection measures
(PRE-SAFE
®) are activated.
If the risk of collision with the vehicle in front
remains and you do not brake, take evasive
action or accelerate significantly, the vehicle
may perform automatic emergency braking,
up to the point of full brake application. Auto-
matic emergency braking is not performed
until immediately prior to an imminent acci-
dent.
You can prevent the intervention of the PRE-
SAFE
®Brake at any time by:
Rdepressing the accelerator pedal further.
Ractivating kickdown.
Rreleasing the brake pedal.
The braking action of PRE-SAFE
®Brake is
ended automatically if:
Ryou maneuver to avoid the obstacle.
Rthere is no longer any danger of a collision.
Rthere is no longer an obstacle detected in
front of your vehicle.
STEER CONTROL
General information
STEER CONTROL helps you by transmitting a noticeable steering force to the steering
wheel in the direction required for vehicle
stabilization.
This steering assistance is provided in partic-
ular if:
Rboth right wheels or both left wheels are on
a wet or slippery road surface when you
brake.
Rthe vehicle starts to skid.
Important safety notes
iObserve the "Important safety notes" sec-
tion (
Ypage 71).
No steering support is provided from STEER
CONTROL, if:
RESP®is malfunctioning.
Rthe lighting is faulty.
Power steering will, however, continue to
function.
Protection against theft
Immobilizer
XTo activate with the SmartKey: remove
the SmartKey from the ignition lock.
XTo activate with KEYLESS-GO: switch the
ignition off and open the driver's door.
XTo deactivate: switch on the ignition.
The immobilizer prevents your vehicle from
being started without the correct SmartKey.
When leaving the vehicle, always take the
SmartKey with you and lock the vehicle. The
engine can be started by anyone with a valid
SmartKey that is left inside the vehicle.
iThe immobilizer is always deactivated
when you start the engine.
In the event that the engine cannot be star-
ted (yet the vehicle's battery is charged),
Protection against theft79
Safety
Z