ECU MERCEDES-BENZ SL-Class 2017 R131 Comand Manual
[x] Cancel search | Manufacturer: MERCEDES-BENZ, Model Year: 2017, Model line: SL-Class, Model: MERCEDES-BENZ SL-Class 2017 R131Pages: 202, PDF Size: 6.35 MB
Page 36 of 202
Your multimediasyste mequipment
These operatin ginstruction sdescribe all th e
standar dan doptional equipment of your multi-
media system, as available at th etime of going
to press. Country-specifi cdifference sare pos -
sible. Bear in min dthat your vehicle may no t
feature all function sdescribed here. Thi salso
applies to safety-relevan tsystems an dfunc-
tions.
Read th einformation on qualifie dspecialis t
workshop sin th evehicle Operator's Manual.
Important safet ynotes
GWARNING
If you operat emobile communication equip-
men twhil edriving, you will be distracted from
traffic conditions. You could also los econtro l
of th evehicle. There is aris kof an accident.
Only operat ethis equipment when th evehicle
is stationary.
GWARNING
SD cards are small parts .The ycan be swal -
lowe dan dcause choking. Thi sposes an
increase dris kof injury or eve nfatal injury.
Kee pth eSD car dout of th ereach of children .
If aSD car dis swallowed, see kmedical atten-
tion immediately.
You mus tobserv eth elegal requirements fo rth e
country in whic hyou are currentl ydrivin gwhen
operatin gmobile communication sequipment in
th evehicle.
Display settings
Setting th ebrightness
The brightness detecte dby th edisplay ligh tsen -
sor affects th esetting option sfo rthis function .
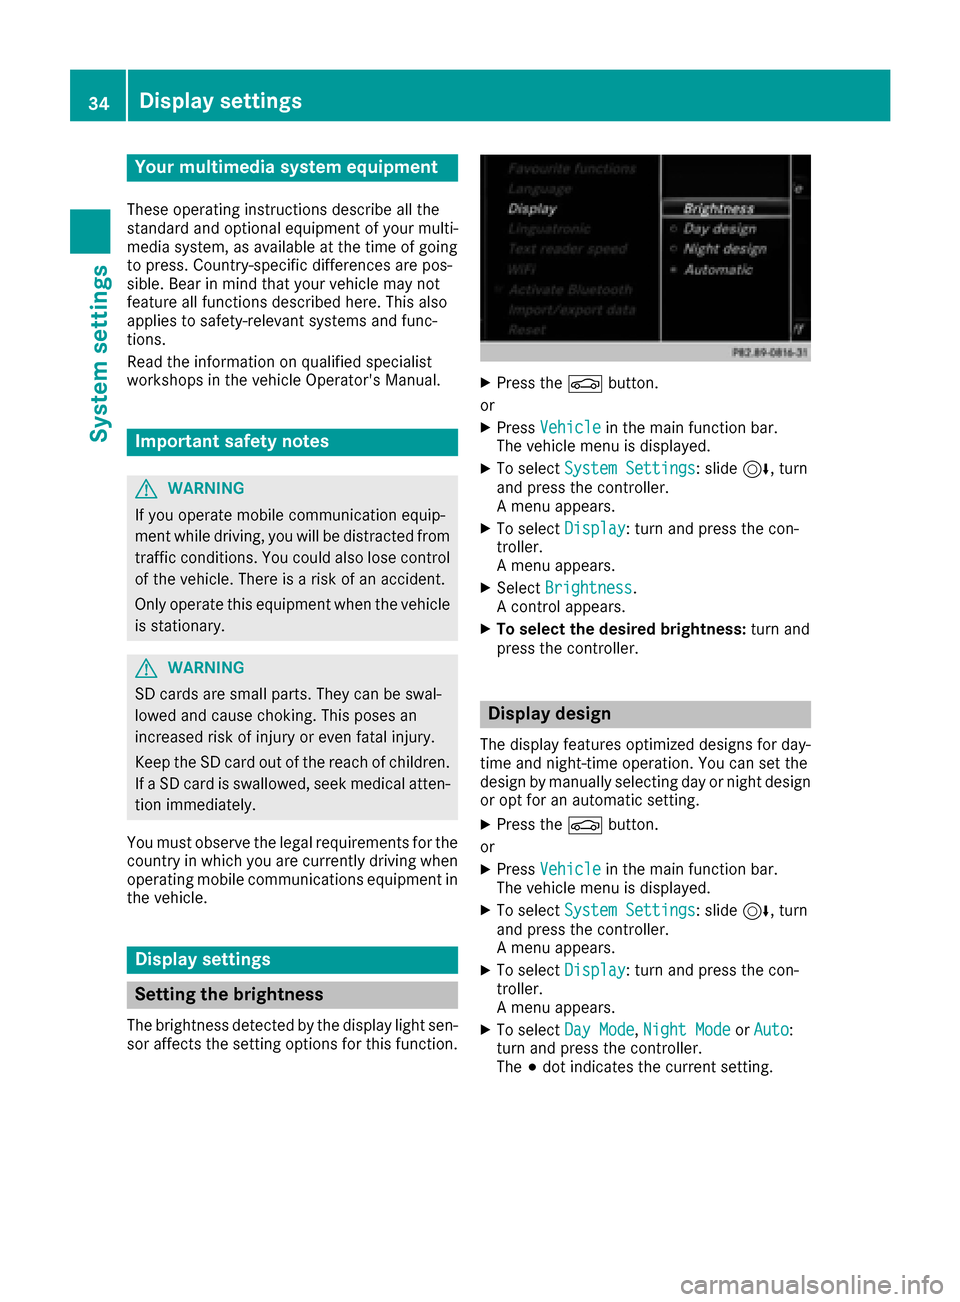
XPress theØ button.
or
XPress Vehicl ein themain function bar .
The vehicle men uis displayed.
XTo selec tSystem Settings:slid e6 ,turn
an dpress th econtroller .
A men uappears .
XTo selec tDispla y:turn an dpress th econ-
troller.
A men uappears .
XSelectBrightness.
A contro lappears .
XTo select th edesired brightness: turn and
press th econtroller .
Display design
The display feature soptimize ddesign sfo rday-
time an dnight-time operation .You can set th e
design by manually selecting day or night design
or opt fo ran automatic setting .
XPress theØ button.
or
XPress Vehicl ein themain function bar .
The vehicle men uis displayed.
XTo selec tSystem Settings:slid e6 ,turn
an dpress th econtroller .
A men uappears .
XTo selec tDispla y:turn an dpress th econ-
troller.
A men uappears .
XTo selec tDa yMode,Nigh tModeor Auto:
turn an dpress th econtroller .
The #dot indicates th ecurren tsetting .
34Display settings
System settings
Page 37 of 202
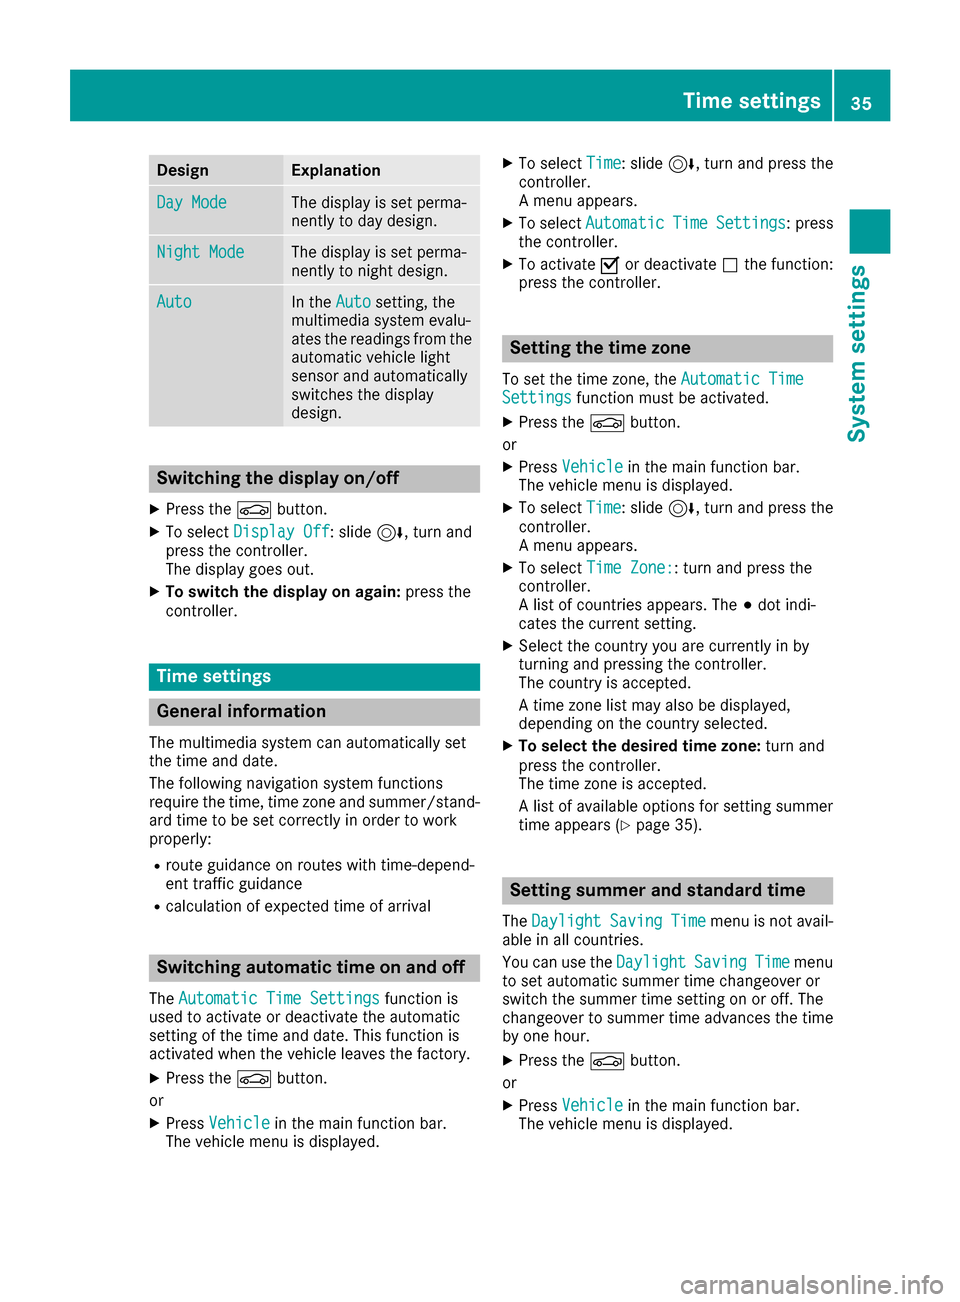
DesignExplanation
Day ModeThe display is set perma-
nently to day design .
Night ModeThe display is set perma-
nently to night design .
AutoIn th eAut osetting ,th e
multimedia system evalu-
ate sth ereading sfrom th e
automatic vehicl eligh t
sensor and automatically
switches th edisplay
design .
Switching the display on/off
XPress th eØ button.
XTo select DisplayOff:slid e6, turnand
press th econtroller .
The display goe sout .
XTo switch th edispla yon again: press the
controller .
Time settings
Gene ral inform ation
The multimedia system can automatically set
thetime and date.
The followin gnavigation system function s
require th etime, time zone and summer/stand-
ard time to be set correctl yin order to wor k
properly:
Rrout eguidance on routes wit htime-depend -
en ttraffic guidance
Rcalculation of expecte dtime of arrival
Switching automatic ti me onand off
TheAutomatic Tim eSettingsfunction is
used to activat eor deactivat eth eautomatic
setting of th etime and date. This function is
activated when th evehicl eleaves th efactory.
XPress th eØ button.
or
XPress Vehicl ein themain function bar.
The vehicl emen uis displayed.
XTo select Time:slid e6, turnand press th e
controller .
A men uappears.
XTo select AutomaticTimeSettings:press
th econtroller .
XTo activat eO or deactivat eª thefunction :
press th econtroller .
Setting the ti mezone
To set th etime zone ,th eAutomatic Tim eSettingsfunction mustbe activated.
XPress th eØ button.
or
XPress Vehicl ein themain function bar.
The vehicl emen uis displayed.
XTo select Time:slid e6, turnand press th e
controller .
A men uappears.
XTo select TimeZone::tur nand press th e
controller .
A list of countrie sappears. The #dot indi-
cates th ecurren tsetting .
XSelectth ecountry you are currentl yin by
turnin gand pressing th econtroller .
The country is accepted.
A time zone list may also be displayed,
depending on th ecountry selected.
XTo select th edesired time zone: turnand
press th econtroller .
The time zone is accepted.
A list of available option sfor setting summer
time appear s (
Ypage 35).
Setting sum mer and standard ti me
TheDaylightSavingTimemen uis no tavail -
able in all countries.
You can use th eDaylight
SavingTim emen u
to set automatic summer time changeover or
switch th esummer time setting on or off .The
changeover to summer time advance sth etime
by on ehour .
XPress th eØ button.
or
XPress Vehicl ein themain function bar.
The vehicl emen uis displayed.
Time settings35
System settings
Z
Page 42 of 202
Connecting a device via WPS PBC (Can-
ada)
Requirement: for this type of connection, the
device to be connected must support "Connect
via push button".
XPress theØbutton on the control panel.
or
XPress Vehiclein the main function bar.
The vehicle menu is displayed.
XTo switch to the menu bar: slide 6the con-
troller.
XTo select System Settings: press the con-
troller.
XSelect WiFi.
The WiFi menu appears.
XTo select one of the hotspots that has been
found: turn and press the controller.
A menu for making the connection appears.
XSelect Connect via WPS PBC.
XPress the pushbutton on your device.
XTo confirm the entry: press the controller.
Generating a new security key (USA)
XPress theØbutton on the control panel.
or
XPress Vehiclein the main function bar.
The vehicle menu is displayed.
XTo switch to the menu bar: slide 6the con-
troller.
XTo select System Settings: press the con-
troller.
XTo select WiFi: turn and press the controller.
The WiFi menu appears.
XTo select GenerateSecurityKey: turn and
press the controller.
XTo select Regenerate: press the controller.
A new security key is generated.
XTo save the security key: turn the controller
and select Save.
The WiFi menu appears. The new security key will now be displayed and verified when a
connection is established via the security key.
The connection must be re-established with
the newly created security key.
iDevice connections established using the
previous security key will no longer work after
the security key is changed. You have to
reconnect these devices (
Ypage 38).
Changing the name of the SSID (USA)
XPress the Øbutton on the control panel.
or
XPress Vehiclein the main function bar.
The vehicle menu is displayed.
XTo switch to the menu bar: slide 6the con-
troller.
XTo select System Settings: press the con-
troller.
XTo select WiFi: turn and press the controller.
The WiFi menu appears.
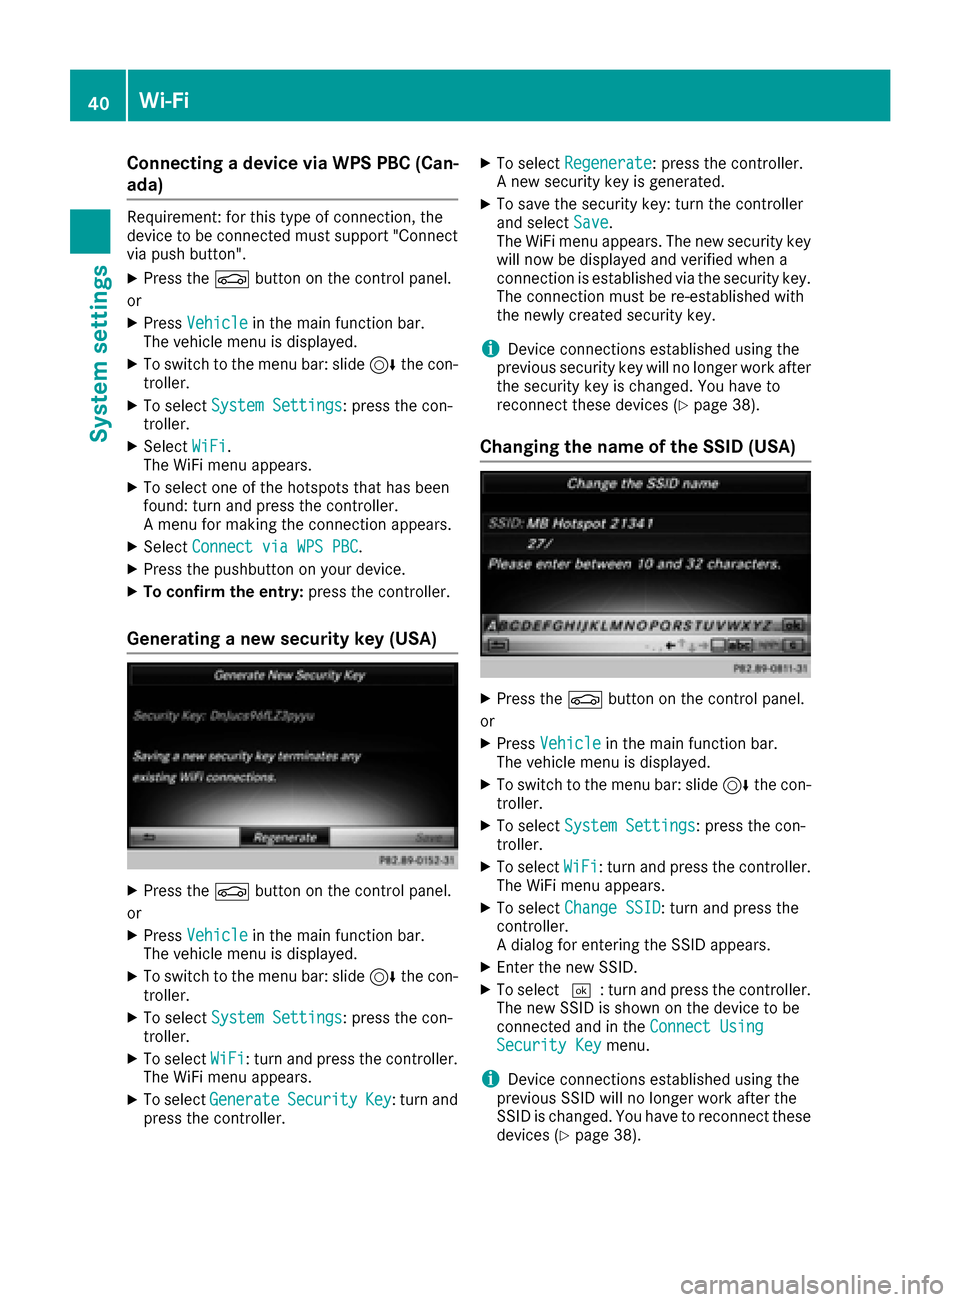
XTo select Change SSID: turn and press the
controller.
A dialog for entering the SSID appears.
XEnter the new SSID.
XTo select ¬: turn and press the controller.
The new SSID is shown on the device to be
connected and in the Connect Using
Security Keymenu.
iDevice connections established using the
previous SSID will no longer work after the
SSID is changed. You have to reconnect these
devices (
Ypage 38).
40Wi-Fi
System settings
Page 74 of 202

Announcement phase
:Pointat whic hth echang eof direction takes
plac e(whit edot )
;Change of direction (turn right here)
=Distanc eto th enext chang eof direction
The multimedia system announce sth eimmi-
nent chang eof direction .The chang eof direc -
tion is announce dahead of time, wit hth e
announcemen t"Turn right in 30 0meters", for
example.
The display is no wspli tint otwo sectors. The
map is shown on th elef tside of th edisplay, and
a detailed imag eof th eintersection or a3D
imag eof th eimminent chang eof direction is
shown on th eright side of th edisplay.
Change-of-directi onphase
The multimedia system announce sth eimmedi-
ate chang eof direction .The chang eof direction
is announce dahead of time, e.g. wit hth e
announcemen t"Now tur nright".
The display is spli tin two lik ein th eannounce -
men tphase.
The chang eof direction is performed when th e
light-colored bar on th eright drops down to 0ft
and th ecurren tvehicl eposition symbol has
reached th ewhit echange-of-direction point. When th
echang eof direction is completed, th e
map will appear in full scree nmod eagain .
Display onhighways
The imag eshows an exampl eof rout eguidance
at ahighway intersection when drivin gon a
highway.
Lane rec ommendations
Display on multi-lane roads
:Lanes no trecommended (dar kgray)
;Possibl elan e(ligh tgray)
=Recommended lanes (white)
If th edigital map contain sth erelevan tdata, th e
multimedia system can display lan erecommen -
dation son multi-lane road sfor th enext chang e
of direction .
Lan eno trecommended ::you will no tbe able
to complete th enext chang eof direction if you
stay in this lane.
Possibl elan e;: you will be able to complete
th enext chang eof direction in this lane.
Recommended lan e=: in this lan eyou will be
able to complete th enext chang eof direction
and th eon eafter that.
72Route guidance
Navigation
Page 78 of 202

Route 1is calculated wit hth ecurren tsetting s
for th erout etyp eand rout eoption sand shown
wit h a dark blue line.
Routes 2and 3are alternatives to rout e 1and
also displayed wit h adark blue line.
Rout e 4is th emos teconomi crout eand is dis-
played wit h agreen line.
XTo switch to navigation mode: press the
Ø button.
XTo sho wthemenu: slide6 thecontroller .
XTo selectRoute,tur nand press th econtroller .
XSelectAlternative Route.
Rout e 1is shown.
XTo display additional routes: select Nextor
Previous.
XTo star t anew route guidance: select
Start
.
Route list
XTo switch to navigation mode: press the
Ø button.
XTo sho wthemenu: slide6 thecontroller .
XTo selectRoute,tur nand press th econtroller .
XSelectRoute Lis t.
The rout elist shows th enext chang eof direc-
tion and th eimmediat edistances from th e
curren tvehicl eposition .
XTo displa yadditiona lroute sections: turn
th econtroller .
The position of th echang eof direction that
belong sto th erespective rout esection is
indicated on th emap wit h across .
Where am I?
XTo switch to navigation mode: press the
Ø button.
XTo sho wthemenu: slide6 thecontroller .
XTo select Position:tur nand press th econ-
troller .
XSelectWhere am I?.
The stree tyou are currentl yon and th epre -
vious and next intersection sare displayed.
Traffic jam function
XTo switch to navigation mode: press the
Ø button.
XTo sho wthemenu: slide6 thecontroller .
XTo selectRoute,tur nand press th econtroller .
XSelectDetour.
XTo specify th estar tof th etraffic ja msec-
tion: select Beginning
.
The next possibl etraffic jam section starting
poin tis marked.
XTurn th econtroller .
The markin gmoves alon gth erout eto th e
next starting position .
XPress thecontroller .
The start of th etraffic jam is set .
76Route guidance
Navigation
Page 92 of 202
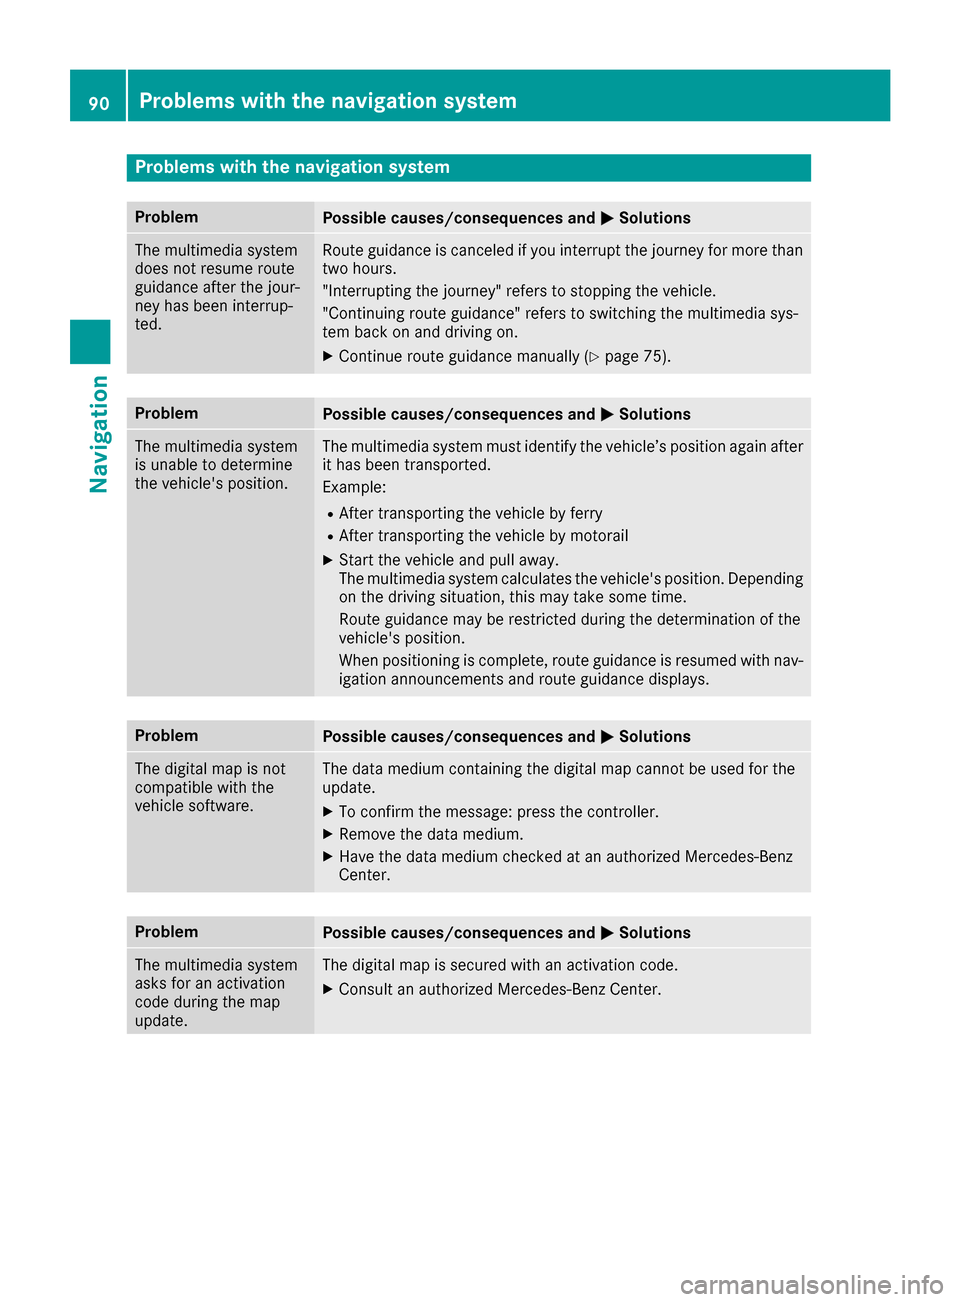
Problems with the navigation system
ProblemPossible causes/consequences andMSolutions
The multimedia system
does not resume route
guidance after the jour-
ney has been interrup-
ted.Route guidance is canceled if you interrupt the journey for more than
two hours.
"Interrupting the journey" refers to stopping the vehicle.
"Continuing route guidance" refers to switching the multimedia sys-
tem back on and driving on.
XContinue route guidance manually (Ypage 75).
ProblemPossible causes/consequences andMSolutions
The multimedia system
is unable to determine
the vehicle's position.The multimedia system must identify the vehicle’s position again after
it has been transported.
Example:
RAfter transporting the vehicle by ferry
RAfter transporting the vehicle by motorail
XStart the vehicle and pull away.
The multimedia system calculates the vehicle's position. Depending
on the driving situation, this may take some time.
Route guidance may be restricted during the determination of the
vehicle's position.
When positioning is complete, route guidance is resumed with nav-
igation announcements and route guidance displays.
ProblemPossible causes/consequences andMSolutions
The digital map is not
compatible with the
vehicle software.The data medium containing the digital map cannot be used for the
update.
XTo confirm the message: press the controller.
XRemove the data medium.
XHave the data medium checked at an authorized Mercedes-Benz
Center.
ProblemPossible causes/consequences andMSolutions
The multimedia system
asks for an activation
code during the map
update.The digital map is secured with an activation code.
XConsult an authorized Mercedes-Benz Center.
90Problems with the navigation system
Navigation
Page 95 of 202

Function restrictions
You may have to wait to use telephonyvia th e
multimedia system in th efollowin gsituations:
Rth emobile phon eis switched off
RBluetoot h®is switched off on th emobile
phon e
Rthemobile phon ehas no tlogged on to a
mobile phon enetwork
Rth eBluetoot h®function is switched off in th e
multimedia system
The telephon eautomatically tries to log on to a
network .If no network is available, you may no t
be able to mak e a "911"emergenc ycall .If you
attemp tto mak ean outgoin gcall ,th eNo Ser ‐
vicemessage will appear for ashort while .
Telephone menu overview
:Mobile phon enetwork provide r
;Signal strengthof th emobile phon enetwork
=Receiver ico n¢ or¡
?Telephon emen ucharacte rbar
ABluetoot h®device nam eof th ecurrentl y
connected mobile phon e
BDisplays thephon ebook
Symbols :to= and Aare no tshown until
after amobile phon ehas been connected to th e
multimedia system. The symbols depend on
your mobile phon eand your mobile phon enet-
work provider. Further information on connect -
ing amobile phon e (
Ypage 93).
Symbol ;shows th ecurren tsignal strengt hof
th emobile phon enetwork .If all bars are filled,
you have optimum reception .
If no bars are shown, reception is either ver y
poor or there is none at all.
Receiver ico nshows whether acall is active/
bein gconnected ¡or no t¢. Calling up th
etelephone men u
XPress%.
Showing th emen ubar
XSlide 6thecontroller.
If th emobile phon econnected support sth e
MA PBluetoot h
®profile(M essage Access
Profile), th e1 men uitem is available. Further
information on text message sand e-mail
(
Ypage 114).
If you have an unread text message or e-mail,
th e0 mail symbol is displayed in th estatus
bar. The symbol disappear sonce you have read
th etext message or e-mail. The úsymbol i
s
displayed as soo nas th emessage memory on
th econnected mobile phon eis full. The symbol
disappear sonce you delet eat least on emes -
sage .
Connecting/disconnecting a mobile
phone
Requirements
Fortelephon yvia th eBluetoot h®interface ,you
require aBluetoot h®-capable mobile phone. The
mobile phon emust support Hands-Free Profile
1. 0or above.
On th emultimedia system
XActivat eBluetoot h®(Ypage 41).
On th emobile phone
XSwitc hon th emobile phon eand ente rth ePIN
when prompted to do so (see th emanufac -
turer' soperating instructions).
XActivat eBluetoot h®and,if necessary, Blue -
toot h®visibilit yfor other device s(see th e
manufacturer' soperating instructions).
This visibilit yis for restricted periods of time
on som emobile phones (see th emanufactur -
er' soperating instructions).
XSe tth eBluetoot h®device nam efor th e
mobile phon eif necessary.
The device names for all of on emanufacturer' s
product smight be identical. To mak eit possible
to clearly identify your mobile phone, chang e
th edevice nam e(see th emanufacturer' soper -
ating instructions). The nam ecan be freely
selected.
Connecting/disconnecting a mobile phone93
Telephone
Z
Page 96 of 202
If the mobile phone supports the PBAP (Phone
BookAccess Profile) and MAP (Message
A ccess Profile) Bluetooth
®profiles, the follow-
ing information will be transmitted after you
connect:
RPhone book
RCall lists
RText messages and e-mail
Further information on allowing or suppressing
the automatic download of the phone book
(
Ypage 109).
The battery of the mobile phone should always
be kept sufficiently charged in order to prevent
malfunctions.
iNot all mobile phones available on the mar-
ket are equally suitable. You can obtain fur-
ther information about suitable mobile
phones and about the connection between
the mobile phone and the multimedia system
on the Internet at http://www.mercedes-
benz.com/connect .
You can also obtain more information by call-
ing.
In the USA, you can get in touch with the
Mercedes-Benz Customer Assistance Center
on 1-800-FOR-MERCedes (1-800-367-6372).
In Canada, you can get in touch with the Cus-
tomer Relations Center on 1-800-387-0100.
iSome displays (e.g. the signal strength)
depend on the supported version of the
Hands-Free Profile.
Procedure and general information
Authorizing a mobile phone (connect-
ing)
Before using your mobile phone with the multi-
media system for the first time, you will need to search for the phone (
Ypage 94) and then
authorize it (Ypage 95). Depending on the
mobile phone, authorization either takes place
by means of Secure Simple Pairing or by enter-
ing a passkey. The multimedia system automat-
ically makes the procedure that is relevant for
your mobile phone available. You can recognize
Secure Simple Pairing by the fact that a code is
displayed on the mobile phone and on the mul-
timedia system. You can recognize the passkey system by the fact that you have to enter a code
on the mobile phone and on the multimedia sys- tem. The mobile phone is connected automati-
cally after authorization. Further information
about automatically reconnecting authorized
mobile phones (
Ypage 96).
If the multimedia system does not detect your
mobile phone, this may be due to particular
security settings on your mobile phone. You can
also start the search procedure and authoriza-
tion on the mobile phone (
Ypage 96).
Device-specific information on authorizing and
connecting Bluetooth
®-capable mobile phones
can be obtained from an authorized Mercedes-
Benz Center or via the Internet at http://
www.mercedes-benz.com/connect .
You can authorize up to 15 mobile phones. After authorization, the connection of the last two tel-
ephones used always functions automatically.
For telephony, only one mobile phone can be
connected to the multimedia system at any one
time.
De-authorizing (disconnecting) a mobile
phone
The connection is terminated automatically if
you leave the receiver range of the multimedia
system or deactivate Bluetooth
®on your mobile
phone.
If you no longer want the Bluetooth
®connection
to be established automatically, the mobile
phone must be de-authorized (disconnected)
(
Ypage 97).
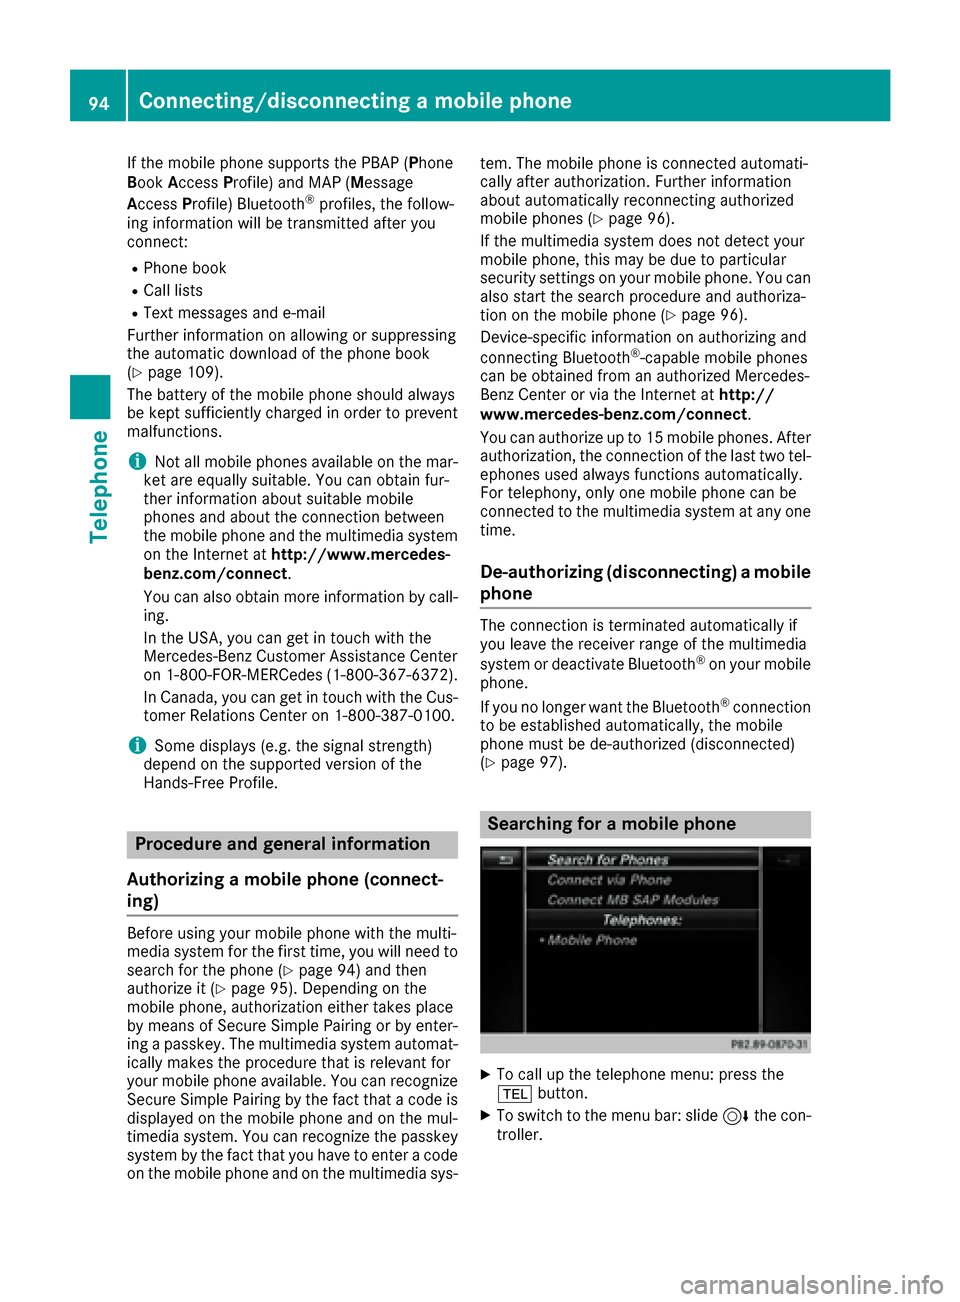
Searching for a mobile phone
XTo call up the telephone menu: press the
% button.
XTo switch to the menu bar: slide 6the con-
troller.
94Connecting/disconnecting a mobile phone
Telephone
Page 97 of 202
XTo selectConn. Device: turn and press the
controller.
The device list is displayed.
XTo select Search for Phones: turn and
press the controller.
A message is displayed that Bluetooth
®must
be activated on the mobile phone and must be
made visible to other devices.
XTo select StartSearch: press the controller.
The available mobile phones are displayed in
the device list.
The duration of the search depends on the num- ber of Bluetooth
®telephones within range and
their characteristics.
If a new phone is found, it appears in the device list with the Ïsymbol. You can now author-
ize (connect) the mobile phone found
(
Ypage 95).
If the maximum number of authorized devices in
the device list is reached, you will be requested
to de-authorize a mobile phone (
Ypage 97).
When you call up the device list again, de-
authorized devices will be removed from the list.
To update the device list, start the search again.
Symbols in the device list
Sym-
bolExplanation
ÏNew mobile phone found, not yet
authorized.
ÑMobile phone is authorized, but is
not connected.
#Mobile phone is authorized and
connected.
Authorizing a mobile phone (connect-
ing)
Authorization via Secure Simple Pairing
If the multimedia system has found your mobile
phone, you can authorize (connect) it.
XTo select a mobile phone from the device list: turn the controller and press to confirm.
A code is displayed in the multimedia system
and on the mobile phone. The code is the same
XMultimedia system:
selectYes.
XMobile phone: confirm the code. Depending
on the mobile phone used, you may have to
confirm the connection to the multimedia sys-
tem and for the PBAP and MAP Bluetooth
®
profiles separately. You may also save the
confirmation on the mobile phone (see the
manufacturer's operating instructions).
The mobile phone is now authorized and con-
nected to the multimedia system. You can
now speak using the hands-free system.
To ensure an optimum language quality, you can
set the mobile phone's transmission and recep-
tion volume (
Ypage 97).
The code is different
XMultimedia system: selectNo.
The process is canceled. Repeat the authori-
zation.
Authorization via passkey entry (access
code)
If the multimedia system has found your mobile
phone, you can authorize (connect) it.
XTo select a mobile phone from the device list: turn the controller and press to confirm.
The input menu for the passkey is displayed.
The passkey is a one- to sixteen-digit number
combination which you can choose yourself.
Depending on the mobile phone used, you
may have to enter a number sequence of four
digits or more.
XMultimedia system: enter the passkey using
the character bar.
XSelect ¬once all the numbers have been
entered.
XMobile phone: enter the same passkey and
confirm your entry. Depending on the mobile
phone used, you may have to confirm the
connection to the multimedia system and for
the PBAP and MAP Bluetooth
®profiles sepa-
rately. You may also save the confirmation on
the mobile phone (see the manufacturer's
operating instructions).
The mobile phone is now authorized and con-
nected to the multimedia system. You can
now speak using the hands-free system.
To ensure an optimum language quality, you can
set the mobile phone's transmission and recep-
tion volume (
Ypage 97).
Connecting/disconnecting a mobile phone95
Telephone
Z
Page 98 of 202
If theAuthorization Failedmessage
appears, you may have entered a different pass-
key or exceeded the prescribed time limit.
Repeat the procedure.
iIf you wish to re-authorize the mobile phone
after de-authorizing it, you can choose
another passkey for it.
iMercedes-Benz recommends de-authoriza-
tion in the multimedia system as well as on
the mobile phone (
Ypage 97). Subsequent
authorization may otherwise fail.
Establishing the connection from the
mobile phone
The Bluetooth®device name of the multimedia
system is MB Bluetooth.
XMultimedia system: call up the telephone
menu.
XTo switch to the menu bar: slide 6the con-
troller.
XTo select Conn. Device: turn and press the
controller.
The device list is displayed.
XTo select Connect via Phone: turn and
press the controller.
A message is displayed, stating that you can
start the search on your mobile phone.
XMobile phone: start the search for a Blue-
tooth®device (see manufacturer's operating
instructions).
The multimedia system is displayed with the
name MB Bluetooth
in the mobile phone's
device list.
XSelect MB Bluetooth.
A prompt appears in the multimedia system's
display asking if the mobile phone should be
authorized.
XMultimedia system:select Yes.
If No
is selected, the procedure is canceled.
If your mobile phone supports Secure Simple
Pairing, a code is now displayed on both devi-
ces.
The code is the same
XMultimedia system:select Yes.
XMobile phone:confirm the code. Depending
on the mobile phone used, you may have to
confirm the connection to the multimedia sys-
tem and for the PBAP and MAP Bluetooth
®
profiles separately. You may also save the
confirmation on the mobile phone (see the
manufacturer's operating instructions).
The mobile phone is now authorized and con-
nected to the multimedia system. You can
now speak using the hands-free system.
To ensure an optimum language quality, you
can set the mobile phone's transmission and
reception volume (
Ypage 97).
The code is different
XMultimedia system:select No.
The process is canceled. Repeat the proce-
dure.
If your mobile phone does not support Secure
Simple Pairing, an input menu is displayed for
the passkey. The passkey is a one- to sixteen-
digit number combination which you can choose
yourself. Enter the same passkey in both the
multimedia system and on the mobile phone and
confirm. Depending on the mobile phone used,
you may have to confirm the connection to the
multimedia system and for the PBAP and MAP
Bluetooth
®profiles.
Reconnecting automatically
The multimedia system always searches for the
last connected mobile phone.
If no connection can be made to the most
recently connected mobile phone, the system
searches for the mobile phone that was con-
nected before that one.
Switching between mobile phones
If you have authorized more than one mobile
phone, you can switch between the individual
phones.
XTo call up the telephone menu: press the
% button.
XTo switch to the menu bar: slide 6the con-
troller.
XTo select Conn. Device: turn and press the
controller.
The device list is displayed.
XTo select the desired mobile phone: turn and press the controller.
The selected mobile phone is connected if it is
within Bluetooth
®range and if Bluetooth®is
activated.
96Connecting/disconnecting a mobile phone
Telephone