buttons MERCEDES-BENZ SL CLASS 2019 Owners Manual
[x] Cancel search | Manufacturer: MERCEDES-BENZ, Model Year: 2019, Model line: SL CLASS, Model: MERCEDES-BENZ SL CLASS 2019Pages: 330, PDF Size: 16.53 MB
Page 20 of 330

Door central locking/unlocking ....... 74
Important safety notes.................... 74
Loss ................................................. 78
Mechanical key ................................ 76
Opening/closing the roof................ 92
Overview .......................................... 74
Positions (ignition lock) ................. 126
Problem (malfunction) ..................... 78
Starting the engine ........................ 128
SMS
see also Digital Operator's Man-
ual .................................................. 243
Snow chains...................................... 295
Sockets
Front-passenger footwell ............... 255
General notes ................................ 254
Trunk ............................................. 255
Sound
Switching on/off........................... 244
Special seat belt retractor.................. 57
Specialist workshop............................ 28
Speed, controlling
see Cruise control
Speedometer
Digital ............................................ 194
In the Instrument cluster ................. 33
Segments ...................................... 190
Selecting the display unit............... 199
SPORT handling mode
Deactivating/activating
(Mercedes-AMG vehicles) ................ 68
Warning lamp ................................. 238
Standing lamps
Display message ............................ 217
Switching on/off........................... 110
Start/stop function
see ECO start/stop function
Starting (engine)................................ 127
STEER CONTROL.................................. 72
Steering
Display message ............................ 230
Steering assistant STEER CON-
TROL
see STEER CONTROL
Steering wheel
Adjusting (electrically) ................... 103
Button overview ............................... 34
Buttons (on-board computer) ......... 191
Important safety notes .................. 103
Storing settings (memory func-
tion) ............................................... 107
Steering wheel paddle shifters........ 141
Stopwatch (RACETIMER)................... 203
Stowage areas................................... 249
Stowage compartments
Armrest (under) ............................. 249
Center console .............................. 250
Center console (rear) ..................... 250
Cup holders ................................... 252
Eyeglasses compartment ............... 250
Glove box ....................................... 249
Important safety information ......... 249
Rear ............................................... 251
Stowage net ................................... 251
Stowage net....................................... 251
Stowage space
Umbrella holder............................. 250
Stowage well beneath the trunk
floor.................................................... 252
Summer tires..................................... 295
Sun visor............................................ 253
Surround lighting (on-board com-
puter).................................................. 200
Suspension settings
Active Body Control (ABC)
(except Mercedes-AMG vehicles) .. 169
Active Body Control (ABC)
(Mercedes-AMG vehicles) .............. 171
Suspension tuning
SETUP (on-board computer,
Mercedes-AMG vehicles) ............... 203
SVHC (Substances of Very High
Concern)............................................... 28
Switching air-recirculation mode
on/off................................................. 122
Switching on media mode
Via the device list .......................... 248
T
Tachometer........................................ 190
Tail lamps
Display message ............................ 217
see Lights
18Index
Page 61 of 330

If you install a child restraint system on thefront passenger seat, be sure to observe theinstructions and safety notes on the "Occu-pant Classification System (OCS)" (Ypage 48).There you will also find information on disa-bling the front passenger front air bag.
All child restraint systems must meet the fol-lowing standards:
RU.S. Federal Motor Vehicle Safety Standards213 and 225
RCanadian Motor Vehicle Safety Standards213 and 210.2
Confirmation that the child restraint systemcorresponds to the standards can be found onan instruction label on the child restraint sys-tem. This confirmation can also be found inthe installation instructions that are includedwith the child restraint system.
Observe the warning labels in the vehicle inte-rior and on the child restraint system.
Child restraint system on the front-
passenger seat
General notes
If you install a child restraint system on thefront-passenger seat, always observe theinstructions and safety notes on the "Occu-pant Classification System (OCS)" (Ypage 48).
You can thus avoid the risks that could ariseas a result of:
Ran incorrectly categorized person in thefront-passenger seat
Rdeactivating the front passenger front airbag unintentionally
Rthe unsuitable positioning of the childrestraint system, e.g. too close to the dash-board
Rearward-facing child restraint system
If circumstances require you to secure a childin a rearward-facing child restraint system onthe front-passenger seat, always make surethat the front passenger front air bag is deacti-vated. Only if the PASSENGER AIR BAG OFFindicator lamp is lit continuously (Ypage 41),is the front passenger front air bag deactiva-ted.
Always observe the child restraint systemmanufacturer's installation and operatinginstructions.
Forward-facing child restraint system
If you secure a child in a forward-facing childrestraint system on the front-passenger seat,always move the front-passenger seat as farback as possible. Fully retract the seat cushionlength. The entire base of the child restraintsystem must always rest on the seat cushionof the front-passenger seat. The backrest ofthe child restraint system must lie as flat aspossible against the backrest of the front-passenger seat. The child restraint systemmust not touch the roof or be subjected to aload by the head restraint. Adjust the angle ofthe seat backrest and the head restraint posi-tion accordingly. Always make sure that theshoulder belt strap is correctly routed from thefront-passenger seat belt guide to the shoulderbelt guide on the child restraint system. Theshoulder belt strap must be routed forwardand down from the front-passenger seat beltguide. If necessary, adjust the front-passengerseat accordingly.
Always observe the child restraint systemmanufacturer's installation and operatinginstructions.
Pets in the vehicle
GWARNING
If you leave animals unsupervised or unse-
cured in the vehicle, they may press buttons
or switches, for instance.
In this way, animals may:
Ractivate vehicle equipment and become
trapped, for example
Rswitch systems on or off and thereby
endanger other road users
Furthermore, unsecured animals may be
flung around inside the vehicle in the event
of an accident or abrupt steering or braking
maneuver, and thereby injure vehicle occu-
pants. There is a risk of accident and injury.
Never leave animals unattended in the vehi-
cle.
Pets in the vehicle59
Safety
Z
Page 77 of 330

Locking/unlocking centrally
You can start, lock or unlock the vehicle usingKEYLESS-GO. To do this, you only need carrythe SmartKey with you. You can combine thefunctions of KEYLESS-GO with those of a con-ventional SmartKey. Unlock the vehicle byusing KEYLESS-GO, for instance, and lock itusing the�7button on the SmartKey.
The driver's door and the door at which thehandle is used, must both be closed. TheSmartKey must be outside the vehicle. Whenlocking or unlocking with KEYLESS-GO, thedistance between the key and the correspond-ing door handle must not be greater than 3 ft(1 m).
A check which periodically establishes a radioconnection between the vehicle and theSmartKey determines whether a valid Smart-Key is in the vehicle. This occurs, for example:
Rwhen starting the engine
Rwhile driving
Rwhen using HANDS-FREE ACCESS
Rwhen the external door handles are touched
XTo unlock the vehicle:touch the inner sur-face of the door handle.
XTo lock the vehicle:touch sensor sur-face�Cor�D.
Make sure that you do not touch the innersurface of the door handle.
XConvenience closing feature:touchrecessed sensor surface�Dfor an extendedperiod.
Further information on the convenienceclosing feature (Ypage 89).
Deactivating and activating
If you do not intend to use a SmartKey for anextended period of time, you can deactivatethe KEYLESS-GO function of the key. TheSmartKey will then use very little power,thereby conserving battery power. For the pur-poses of activation/deactivation, the vehiclemust not be nearby.
XTo deactivate:press the�7button onthe SmartKey twice in rapid succession.The battery check lamp (Ypage 77) of theSmartKey flashes twice briefly and lights uponce, then KEYLESS-GO is deactivated.
XTo activate:press any button on the Smart-Key.
or
XInsert the SmartKey into the ignition lock.KEYLESS-GO and all of its associated fea-tures are available again.
Changing the settings of the locking
system
You can change the settings of the lockingsystem. This means only the driver's door, thelockable stowage compartments in the vehicleinterior and the fuel filler flap are unlockedwhen the vehicle is unlocked. This is useful ifyou frequently travel alone.
XTo change the setting:press and holddown the�6and�7buttons simultane-ously for about six seconds until the batteryindicator lamp (Ypage 77) flashes twice.
If the setting of the locking system is changedwithin the signal range of the vehicle, pressingthe�7or�6button:
Rlocks or
Runlocks the vehicle
The SmartKey now functions as follows:
XTo unlock:press the�6button once.
XTo unlock centrally:press the�6buttontwice.
XTo lock centrally:press the�7button.
SmartKey75
Opening and closing
Z
Page 78 of 330

The KEYLESS-GO function is changed as fol-lows:
XTo unlock the driver's door:touch theinner surface of the door handle on the driv-er's door.
XTo unlock centrally:touch the inner sur-face of the driver or front-passenger doorhandle.
XTo lock centrally:touch the outer sensorsurface on one of the door handles.
XTo restore the factory settings:press andhold down the�6and�7buttonssimultaneously for approximately six sec-onds until the battery check lamp(Ypage 77) flashes twice.
Mechanical key
General notes
If the vehicle can no longer be locked orunlocked with the SmartKey or with KEYLESS-GO, use the mechanical key.
If you use the mechanical key to unlock andopen the driver's door or the trunk lid, theanti-theft alarm system will be triggered.Switch off the alarm (Ypage 72).
Removing the mechanical key
XPush release catch�Cin the direction of thearrow and at the same time removemechanical key�Dfrom the SmartKey.
For further information about:
Runlocking the driver's door (Ypage 81)
Runlocking the trunk (Ypage 86)
Rlocking the vehicle (Ypage 81)
Inserting the mechanical key
XPush mechanical key�Dcompletely into theSmartKey until it engages and releasecatch�Cis back in its basic position.
SmartKey battery
Important safety notes
GWARNING
Batteries contain toxic and corrosive sub-
stances. If batteries are swallowed, it can
result in severe health problems. There is a
risk of fatal injury.
Keep batteries out of the reach of children.
If a battery is swallowed, seek medical
attention immediately.
HEnvironmental note
Batteries contain pollutants.
It is illegal to dispose of
them with the household
rubbish. They must be col-
lected separately and dis-
posed of in an environmen-
tally responsible recycling
system.
Dispose of batteries in an
environmentally responsible
manner. Take discharged
batteries to a qualified spe-
cialist workshop or to a col-
lection point for used bat-
teries.
The SmartKey batteries contain perchloratematerial, which may require special handlingand regard for the environment. Nationalguidelines must be observed during disposal.In California, seewww.dtsc.ca.gov/HazardousWaste/Perchlorate/index.cfm.
Mercedes-Benz recommends that you havethe batteries replaced at a qualified specialistworkshop.
76SmartKey
Opening and closing
Page 83 of 330
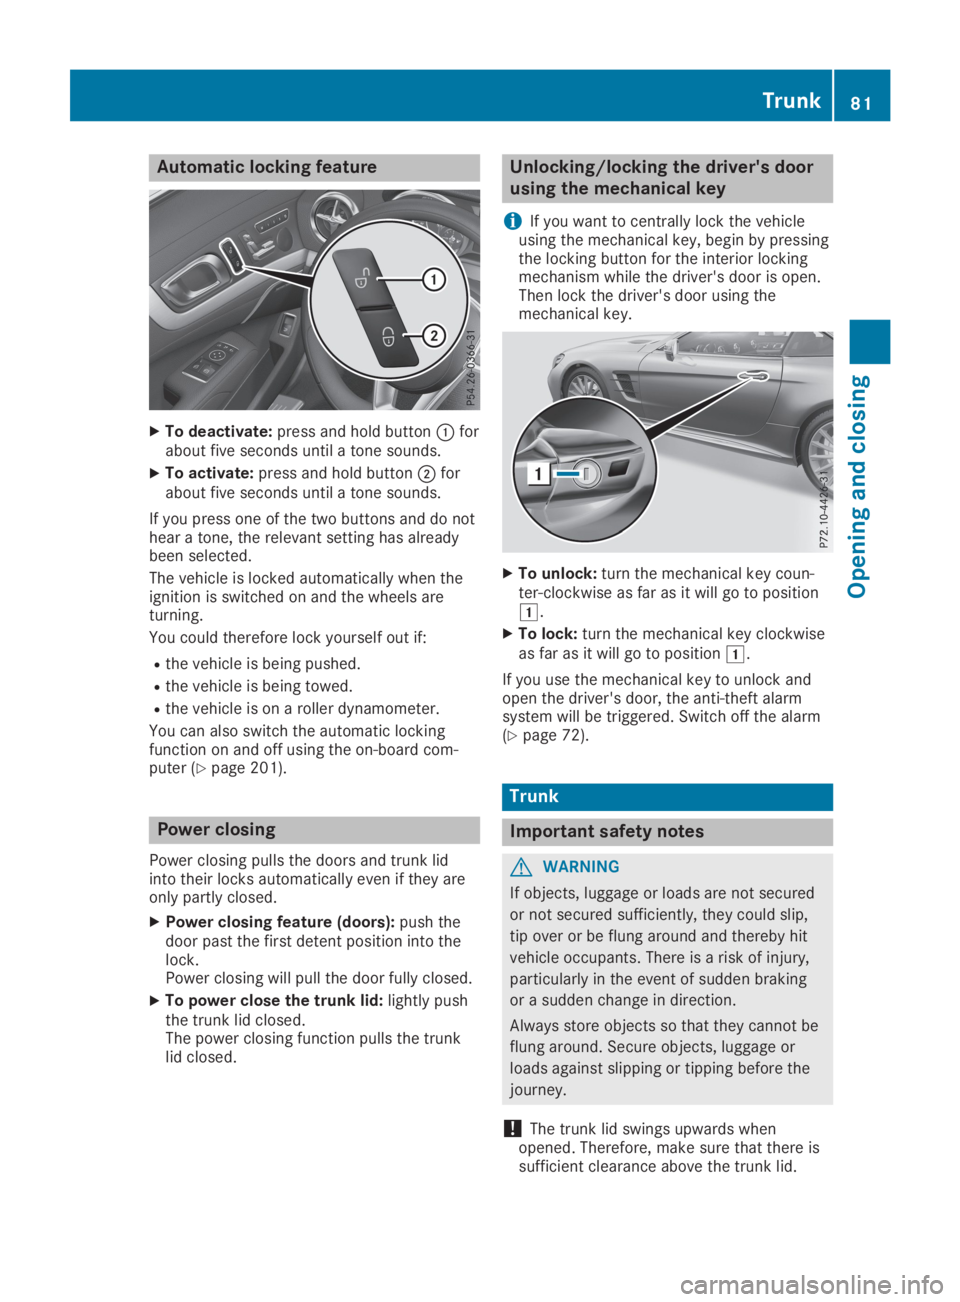
Automatic locking feature
XTo deactivate:press and hold button�Cforabout five seconds until a tone sounds.
XTo activate:press and hold button�Dforabout five seconds until a tone sounds.
If you press one of the two buttons and do nothear a tone, the relevant setting has alreadybeen selected.
The vehicle is locked automatically when theignition is switched on and the wheels areturning.
You could therefore lock yourself out if:
Rthe vehicle is being pushed.
Rthe vehicle is being towed.
Rthe vehicle is on a roller dynamometer.
You can also switch the automatic lockingfunction on and off using the on-board com-puter (Ypage 201).
Power closing
Power closing pulls the doors and trunk lidinto their locks automatically even if they areonly partly closed.
XPower closing feature (doors):push thedoor past the first detent position into thelock.Power closing will pull the door fully closed.
XTo power close the trunk lid:lightly pushthe trunk lid closed.The power closing function pulls the trunklid closed.
Unlocking/locking the driver's door
using the mechanical key
iIf you want to centrally lock the vehicleusing the mechanical key, begin by pressingthe locking button for the interior lockingmechanism while the driver's door is open.Then lock the driver's door using themechanical key.
XTo unlock:turn the mechanical key coun-ter-clockwise as far as it will go to position�G.
XTo lock:turn the mechanical key clockwiseas far as it will go to position�G.
If you use the mechanical key to unlock andopen the driver's door, the anti-theft alarmsystem will be triggered. Switch off the alarm(Ypage 72).
Trunk
Important safety notes
GWARNING
If objects, luggage or loads are not secured
or not secured sufficiently, they could slip,
tip over or be flung around and thereby hit
vehicle occupants. There is a risk of injury,
particularly in the event of sudden braking
or a sudden change in direction.
Always store objects so that they cannot be
flung around. Secure objects, luggage or
loads against slipping or tipping before the
journey.
!The trunk lid swings upwards whenopened. Therefore, make sure that there issufficient clearance above the trunk lid.
Trunk81
Opening and closing
Z
Page 100 of 330
The seats can still be adjusted when there isno SmartKey in the ignition lock.
GWARNING
When you adjust a seat, you or other vehicle
occupants could become trapped, e.g. on
the seat guide rail. There is a risk of injury.
When adjusting a seat, make sure that no
one has any body parts in the sweep of the
seat.
GWARNING
If the driver's seat is not engaged, it could
move forwards as far as the next catch dur-
ing movement such as braking or abrupt
changes of direction. As a result, you would
be pushed against your seat belt by the
unsecured driver's seat.
This could cause you to lose control of the
vehicle. The seat belt cannot protect as
intended and could result in additional
injury.
There is a risk of an accident and injury.
Before every journey, make sure that the
driver's seat is fully engaged.
Observe the safety notes on "Air bags"(Ypage 45) and "Children in the vehicle"(Ypage 57).
GWARNING
If you adjust the seat height carelessly, you
or other vehicle occupants could be trapped
and thereby injured. Children in particular
could accidentally press the electrical seat
adjustment buttons and become trapped.
There is a risk of injury.
While moving the seats, make sure that your
hands or other body parts do not get under
the lever assembly of the seat adjustment
system.
GWARNING
If the head restraints are not installed or not
adjusted correctly, they cannot provide pro-
tection as intended. There is an increased
risk of injury in the head and neck area, e.g.
in the event of an accident or when braking.
Always drive with the head restraints instal-
led. Before driving off, make sure for every
vehicle occupant that the center of the head
restraint supports the back of the head at
about eye level.
GWARNING
You could lose control of your vehicle if you
do the following while driving:
Radjust the driver's seat, head restraint,
steering wheel or mirrors
Rfasten the seat belt
There is a risk of an accident.
Adjust the driver's seat, head restraint,
steering wheel and mirror and fasten your
seat belt before starting the engine.
!To prevent damage to the seats and theseat heating, observe the following notes:
RDo not spill liquids onto the seats. Dry theseats as soon as possible if liquid doesget spilled on the seats.
RIf the seat covers are damp or wet, do notswitch on the seat heating. Also, do notuse the seat heating to dry the seats.
RClean the seat covers as recommended;see the "Interior care" section.
RDo not transport heavy loads on theseats. Do not place pointed objects onthe seat cushions such as knives, nails ortools. Where possible, use the seats onlyfor carrying passengers.
RWhen operating the seat heating, do notcover the seats with insulating materials,e.g. blankets, coats, bags, protective cov-ers, child seats or booster seats.
RWhen the seat heating is switched on, theseat surface can be damaged as a resultof objects being placed on the seats, forexample, seat cushions, child seats andprotective covers not approved byMercedes-Benz.
!Make sure that there are no objects in thefootwell under or behind the seats whenmoving the seats back. There is a risk thatthe seats and/or the objects could be dam-aged.
iThe head restraints cannot be removed.
98Seats
Seats, steering wheel and mirrors
Page 104 of 330

Switching the seat ventilation on/off
Switching on/off
The three blue indicator lamps in the buttonsindicate the blower setting you have selected.
XEnsure that the SmartKey is in position�Hin the ignition lock.
XTo switch on:press button�Crepeatedlyuntil the desired blower setting is set.
XTo switch off:press button�Crepeatedlyuntil all the indicator lamps go out.
iIf the battery voltage is too low, the seatventilation may switch off.
iIf you open the roof using the SmartKey(Ypage 92), the driver's seat ventilation isautomatically switched on and the side win-dows open.
Problems with the seat ventilation
The seat ventilation has switched off prema-turely or cannot be switched on. The vehicle'selectrical system voltage is too low becausetoo many electrical consumers are switchedon.
XSwitch off electrical consumers that you donot need, such as the rear window defrosteror interior lighting.
XOnce the battery is sufficiently charged,switch on the seat heating again.
AIRSCARF
Setting head level heating (AIRSCARF)
GWARNING
When AIRSCARF is switched on, very hot air
can flow from the vents in the head
restraints. This could result in burns in the
immediate vicinity of the air vents. There is a
risk of injury.
Reduce the heater output before it becomes
too hot.
The AIRSCARF function warms the head andneck area of vehicle occupants with warm air.The warm air flows out of the holes in the headrestraints.
The three red indicator lamps in the buttonindicate the heating level you have selected.
XEnsure that the SmartKey is in position�Hin the ignition lock.
XTo switch on:press button�C.Three red indicator lamps in the button lightup. The blower starts up after a preheatingphase of seven seconds.
XPress button�Crepeatedly until the desiredheating level is set.
XTo switch off:press button�Crepeatedlyuntil all the indicator lamps go out.
iThe blower continues running for sevenseconds to cool down the heating elements.
iIf the battery voltage is too low, AIRSCARFmay switch off.
102Seats
Seats, steering wheel and mirrors
Page 106 of 330
If somebody becomes trapped:
Rpress one of the memory function posi-
tion buttons, or
Rmove the switch for steering wheel
adjustment in the opposite direction to
that in which the steering wheel is mov-
ing.
The adjustment process is stopped.
GWARNING
When the EASY-ENTRY/EXIT feature adjusts
the steering wheel and the driver's seat, you
and other vehicle occupants – particularly
children – could become trapped. There is a
risk of injury.
While the EASY-ENTRY/EXIT feature is mak-
ing adjustments, make sure that no one has
any body parts in the sweep of the seat and
the steering wheel.
If somebody becomes trapped:
Rpress one of the memory function posi-
tion buttons, or
Rpress one of the memory function mem-
ory buttons, or
Rmove the switch for steering wheel
adjustment in the opposite direction to
that in which the steering wheel is moving
The adjustment process is stopped.
GWARNING
If you use openings in the bodywork or
detachable parts as steps, you could:
Rslip and/or fall
Rdamage the vehicle and cause yourself to
fall.
There is a risk of injury.
Always use secure climbing aids, e.g. a suit-
able ladder.
The EASY-ENTRY/EXIT feature makes gettingin and out of your vehicle easier.
You can activate and deactivate the EASY-ENTRY/EXIT feature in the on-board computer(Ypage 201).
Position of the steering wheel when
the EASY-ENTRY/EXIT feature is active
The steering wheel swings up when you:
Rremove the SmartKey from the ignition lock
Ropen the driver's door with KEYLESS-GO inposition1
Ropen the driver's door and the SmartKey isin position�
Page 110 of 330
When leaving the vehicle, always take the
SmartKey with you and lock the vehicle. This
also applies for the Digital Vehicle Key if the
"Digital Vehicle Key" function is activated via
Mercedes me connect.
The memory function can be activated at anytime, e.g. even when the SmartKey is not inthe ignition lock.
With the memory function, you can store up tothree different settings, e.g. for three differentpeople.
The following settings are stored as a singlememory preset:
RPosition of the seat, backrest and headrestraint
RDriver's side: steering wheel position
RDriver's side: position of the exterior mirrorson the driver's and front-passenger sides
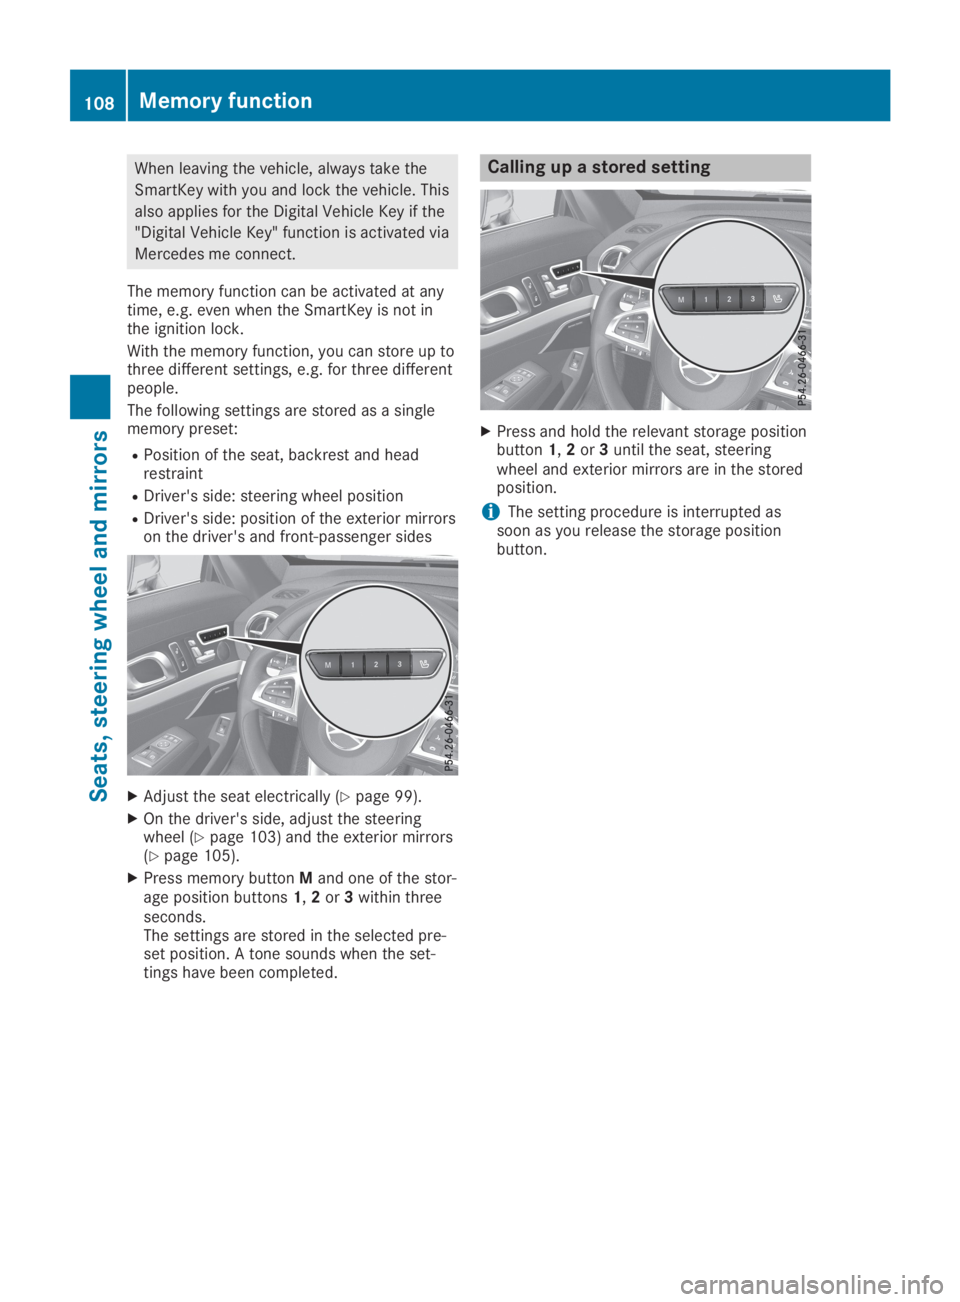
XAdjust the seat electrically (Ypage 99).
XOn the driver's side, adjust the steeringwheel (Ypage 103) and the exterior mirrors(Ypage 105).
XPress memory buttonMand one of the stor-age position buttons1,2or3within threeseconds.The settings are stored in the selected pre-set position. A tone sounds when the set-tings have been completed.
Calling up a stored setting
XPress and hold the relevant storage positionbutton1,2or3until the seat, steeringwheel and exterior mirrors are in the storedposition.
iThe setting procedure is interrupted assoon as you release the storage positionbutton.
108Memory function
Seats, steering wheel and mirrors
Page 203 of 330
automatic headlamp mode is activated(Ypage 109).
Rexterior lighting delayed switch-off:theexterior lighting remains lit for 60 secondsafter the engine is switched off. If you closeall the doors and the trunk lid, the exteriorlighting goes off after 15 seconds.
Depending on your vehicle's equipment, whenthe surround lighting and delayed switch-offexterior lighting are on, the following light up:
Rparking lamps
Rlow-beam headlamps
Rdaytime running lamps
Rside marker lamps
Rsurround lighting in the exterior mirrors
Activating/deactivating the interior
lighting delayed switch-off
If you activate theInterior LightingInterior LightingDelayDelayfunction, the interior lighting remainson for 20 seconds after you remove the Smart-Key from the ignition lock.
XPress the�Yor�ebutton on the steer-ing wheel to select theSett.Sett.menu.
XPress the�dor�cbutton to select theLightLightsubmenu.
XPress�vto confirm.
XPress the�dor�cbutton to select theInterior Lighting DelayInterior Lighting Delayfunction.When theInterior Lighting DelayInterior Lighting Delayfunc-tion is activated, the vehicle interior is dis-played in orange in the multifunction dis-play.
XPress the�vbutton to save the setting.
Vehicle
Activating/deactivating the automatic
door locking mechanism
If you activate theAutomatic Door LockAutomatic Door Lockfunction, the vehicle is centrally locked abovea speed of approximately 9 mph (15 km/h).
XPress the�Yor�ebutton on the steer-ing wheel to select theSett.Sett.menu.
XPress the�dor�cbutton to select theVehicleVehiclesubmenu.
XPress�vto confirm.
XPress the�dor�cbutton to select theAutomatic Door LockAutomatic Door Lockfunction.When theAutomatic Door LockAutomatic Door Lockfunctionis activated, the multifunction display showsthe left-hand vehicle door in orange.
XPress the�vbutton to save the setting.
For further information on the automatic lock-ing feature, see (Ypage 81).
Activating/deactivating the acoustic
locking verification signal
If you switch on theAcoustic LockAcoustic Lockfunction,an acoustic signal sounds when you lock thevehicle.
XPress the�Yor�ebutton on the steer-ing wheel to select theSett.Sett.menu.
XPress the�dor�cbutton to select theVehicleVehiclesubmenu.
XPress�vto confirm.
XPress the�dor�cbutton to select theAcoustic LockAcoustic Lockfunction.If theAcoustic LockAcoustic Lockfunction is activated,the�7symbol in the multifunction displaylights up orange.
XPress the�vbutton to save the setting.
Comfort
Activating/deactivating the EASY-
ENTRY/EXIT feature
GWARNING
When the EASY-ENTRY/EXIT feature adjusts
the steering wheel, you and other vehicle
occupants – particularly children – could
become trapped. There is a risk of injury.
While the EASY-ENTRY/EXIT feature is mak-
ing adjustments, make sure that no one has
any body parts in the sweep of the steering
wheel.
If somebody becomes trapped:
Rpress one of the memory function posi-
tion buttons, or
Rmove the switch for steering wheel
adjustment in the opposite direction to
that in which the steering wheel is mov-
ing.
The adjustment process is stopped.
Menus and submenus201
On-board computer and displays
Z