lock MERCEDES-BENZ SL-CLASS ROADSTER 2013 Owners Manual
[x] Cancel search | Manufacturer: MERCEDES-BENZ, Model Year: 2013, Model line: SL-CLASS ROADSTER, Model: MERCEDES-BENZ SL-CLASS ROADSTER 2013Pages: 572, PDF Size: 9.23 MB
Page 328 of 572
Announcing street names
If
the
function is switched on, the name of the
street which you are turning into is
announced.
Announcements are not made in the chosen
language in all countries. They are made when
relevant street names for the selected
language are available in the database.
X To switch on navigation mode: press
the
Ø function button.
X To show the menu:
press W
the COMAND
controller.
X Select Navi in the main function bar by
sliding ZV the COMAND controller and
press W to confirm.
X Select Announce Street
Names and press
W to confirm.
The function is switched on O or off ª,
depending on the previous status.
Ending route guidance Canceling or continuing route guidance
X
To switch on navigation mode: press
the
Ø function button.
X To show the menu: press W
the COMAND
controller.
X Select Destination in the navigation
system menu bar by turning cVd the
COMAND controller and pressing W to
confirm.
X To cancel route guidance: select
Cancel
Route Guidance
and press W to confirm.
or
X To continue route guidance: select
Continue Route Guidance and press W
to confirm.
COMAND calculates the route. Destination or area of destination
reached
When you reach your destination, COMAND
displays
a
checkered flag and route guidance
is automatically ended.
If the destination is not in close proximity to
a digitized street, the Area of
destination reached message appears
when the destination is reached.
Influencing route guidance Avoiding a section of the route blocked by
a traffic jam
This function blocks a section of the route
ahead of you. You can set the length of the
blocked route section. If possible, COMAND
calculates a detour around the blocked
section of the route.
X
To switch on navigation mode: press
the
Ø function button.
X To show the menu:
press W
the COMAND
controller.
X Select Route in the navigation system
menu bar by turning cVd the COMAND
controller and press W to confirm.
X Select Detour and press W to confirm.
X To block a section of the route: select
Longer or
Shorter
repeatedly and confirm
using W until the desired section has been
selected.
i The total
length of the section that can be
blocked is defined by the digital map. The
menu items are available accordingly.
X To start route calculation: select Start
and press W to confirm.
X To delete the blocked section: select
Delete while the message is shown and
press W to confirm.
COMAND calculates the route without the
block. 326
Navigation
COMAND
Page 336 of 572
Symbol for real-time traffic reports
Warning (red)
On the map:
symbol appears at the beginning of the affected route section if route
guidance is active and the route leads through an affected area.
Traffic reports: symbol appears with the warning entry typeTraffic incident (yellow)
On the map:
symbol appears at the beginning of the affected route section if route
guidance is active and the route leads through an affected area.
Traffic reports: symbol appears with the caution entry typeTraffic jam on route (stop-and-go traffic)
On
the
map: symbol appears when approaching a traffic jam if route guidance is active
and the route passes through the area affected by the traffic jam.
The symbol marks average speeds of 25 – 45 mph(40 – 72 km/h).
Yellow car symbols may appear in conjunction with this symbol.
Traffic reports: symbol appears with the traffic jam on route entry type (stop-and-go
traffic) Traffic jam on the route
On
the
map: symbol appears when approaching a traffic jam if route guidance is active
and the route passes through the area affected by the traffic jam.
The symbol marks average speeds of 5 – 20 mph(8 – 32 km/h).
Red car symbols may appear in conjunction with this symbol.
Traffic reports: symbol appears with the traffic jam on route entry typeBlocked route section on the route
On the map:
symbol appears at the beginning of a blocked section if route guidance is
active and the route passes through the blocked section.
The XXXX symbols may appear in conjunction with this symbol.
Traffic reports: symbol appears with the blocked route section entry type
Yellow line
with arrows Traffic incidents
On the map:
possible delays (e.g. roadwork)
Appears on the side of the road affected (direction of travel)
Green line
with arrows Unimpeded traffic flow
On the map:
only appears on the side of the road (direction of
travel) on which traffic flow is unimpeded
Red line
with arrows Warning message
On the map:
incident on road
Appears on the side of the road affected (direction of travel) 334
Navigation
COMAND
Page 351 of 572
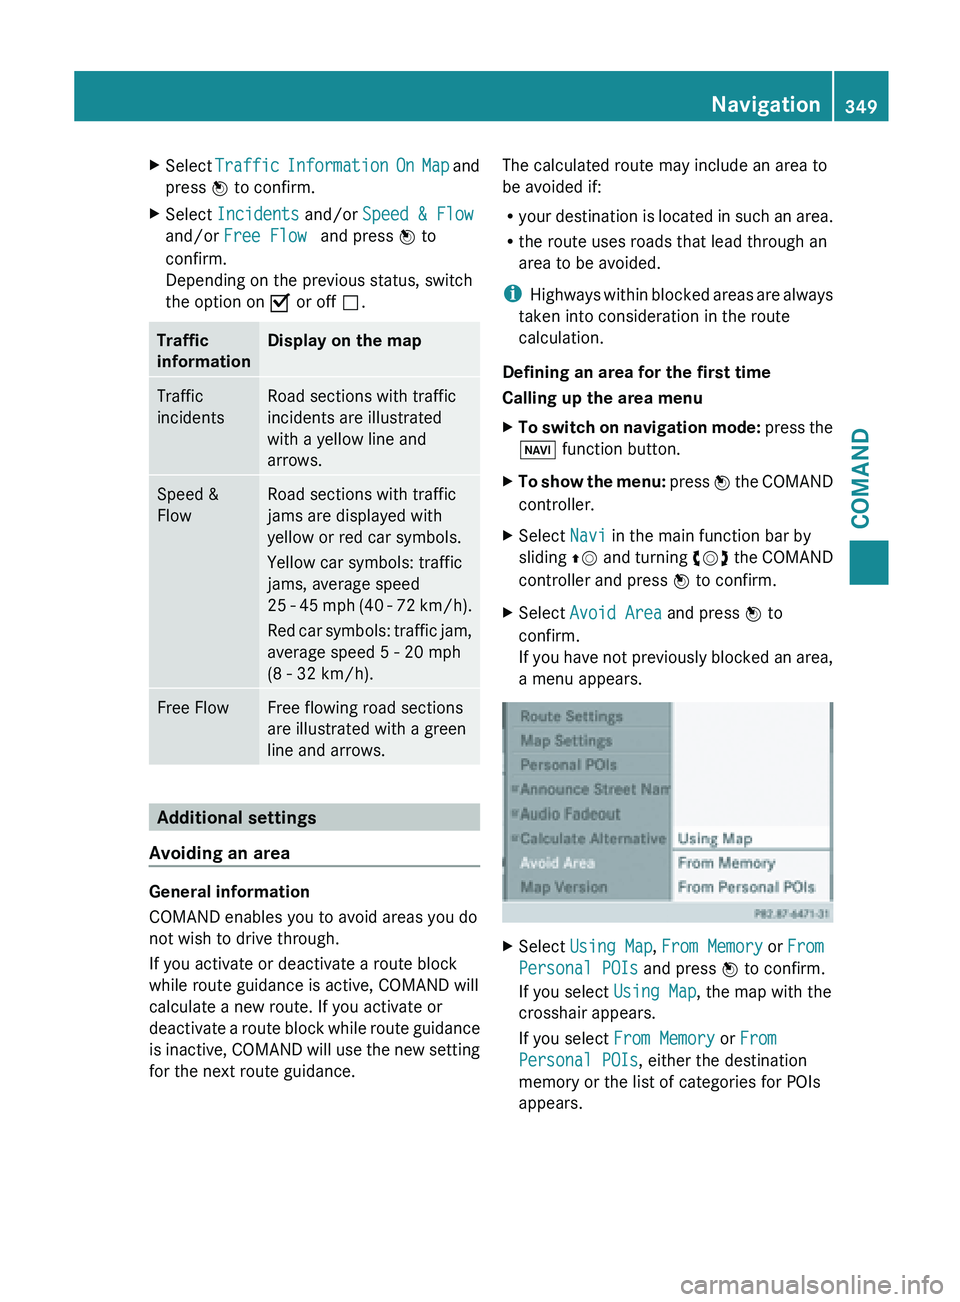
X
Select Traffic Information On Map and
press W to confirm.
X Select Incidents and/or Speed & Flow
and/or Free Flow and press W to
confirm.
Depending on the previous status, switch
the option on O or off ª.Traffic
information Display on the map
Traffic
incidents Road sections with traffic
incidents are illustrated
with a yellow line and
arrows.
Speed &
Flow Road sections with traffic
jams are displayed with
yellow or red car symbols.
Yellow car symbols: traffic
jams, average speed
25
-
45 mph (40 - 72 km/h).
Red car symbols: traffic jam,
average speed 5 - 20 mph
(8 - 32 km/h). Free Flow Free flowing road sections
are illustrated with a green
line and arrows.
Additional settings
Avoiding an area General information
COMAND enables you to avoid areas you do
not wish to drive through.
If you activate or deactivate a route block
while route guidance is active, COMAND will
calculate a new route. If you activate or
deactivate
a
route block while route guidance
is inactive, COMAND will use the new setting
for the next route guidance. The calculated route may include an area to
be avoided if:
R
your destination
is located in such an area.
R the route uses roads that lead through an
area to be avoided.
i Highways within blocked areas are always
taken into consideration in the route
calculation.
Defining an area for the first time
Calling up the area menu
X To switch on navigation mode: press
the
Ø function button.
X To show the menu:
press W
the COMAND
controller.
X Select Navi in the main function bar by
sliding ZV and
turning cVd the COMAND
controller and press W to confirm.
X Select Avoid Area and press W to
confirm.
If you
have not previously blocked an area,
a menu appears. X
Select Using Map , From Memory or From
Personal POIs and press W to confirm.
If you select Using Map, the map with the
crosshair appears.
If you select From Memory or From
Personal POIs, either the destination
memory or the list of categories for POIs
appears. Navigation
349
COMAND Z
Page 352 of 572
R
Destination memory ( Y page 304)
R List of categories for personal POIs
(Y page 319)
X Select the desired destination or personal
POI and press W to confirm.
X When the destination address is displayed,
select Continue and press W to confirm.
The map appears.
The crosshair marks the center of the area
that is to be avoided.
X To scroll the map: slide XVY, ZVÆ or
aVb the COMAND controller.
X To set the map scale: as
soon as you turn
cVd the COMAND controller, the scale bar
appears. Turning clockwise zooms out from
the map; turning counter-clockwise zooms
in.
X Turn cVd until the desired scale is set.
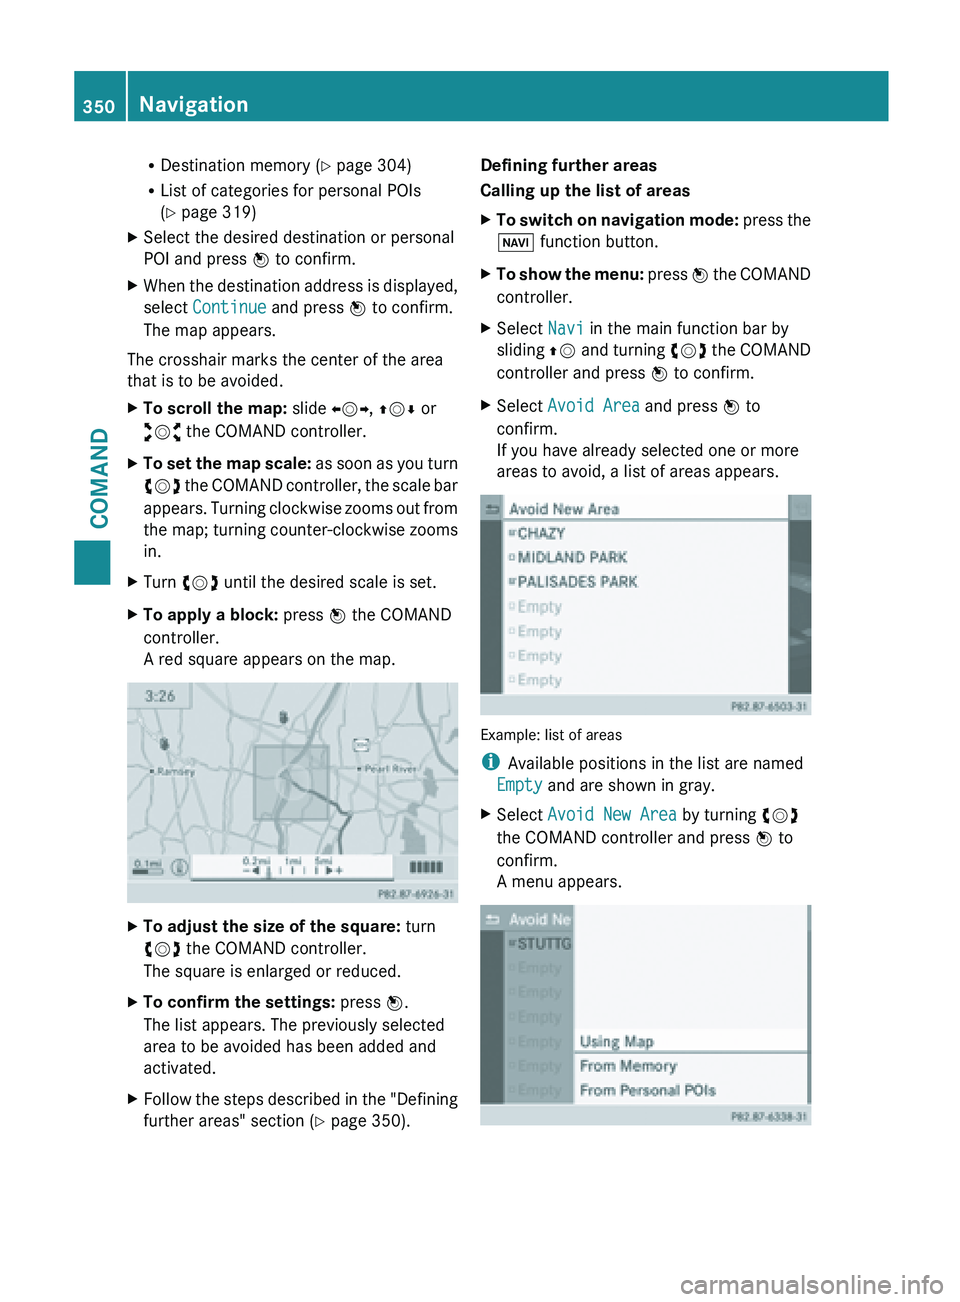
X To apply a block: press W the COMAND
controller.
A red square appears on the map. X
To adjust the size of the square: turn
cVd the COMAND controller.
The square is enlarged or reduced.
X To confirm the settings: press W.
The list appears. The previously selected
area to be avoided has been added and
activated.
X Follow the steps described in the "Defining
further areas" section ( Y page 350).Defining further areas
Calling up the list of areas
X
To switch on navigation mode: press
the
Ø function button.
X To show the menu:
press W
the COMAND
controller.
X Select Navi in the main function bar by
sliding ZV and
turning cVd the COMAND
controller and press W to confirm.
X Select Avoid Area and press W to
confirm.
If you have already selected one or more
areas to avoid, a list of areas appears. Example: list of areas
i
Available positions in the list are named
Empty and are shown in gray.
X Select Avoid New Area by turning cVd
the COMAND controller and press W to
confirm.
A menu appears. 350
Navigation
COMAND
Page 412 of 572
Exiting
X
Call up the Favorites menu ( Y page 408).
X Select Exit by turning cVd or sliding
ZVÆ the COMAND controller and press
W to confirm.
or
X Press the % back button on the left next
to the COMAND controller.
The menu closes.
Deleting favorites
Deleting favorites in the carousel view
X Call up the carousel view ( Y page 402).
X Select Delete by sliding VÆ and turning
cVd the COMAND controller and press
W to confirm.
A prompt appears.
X Select Yes and press W to confirm.
The favorite is deleted.
If you select No, the process will be
canceled.
Deleting favorites in the Favorites menu
X Select Delete by turning cVd or sliding
ZVÆ the COMAND controller and press
W to confirm (
Y page 408).
or
X Press the j button to the right of the
COMAND controller.
The favorite is deleted.
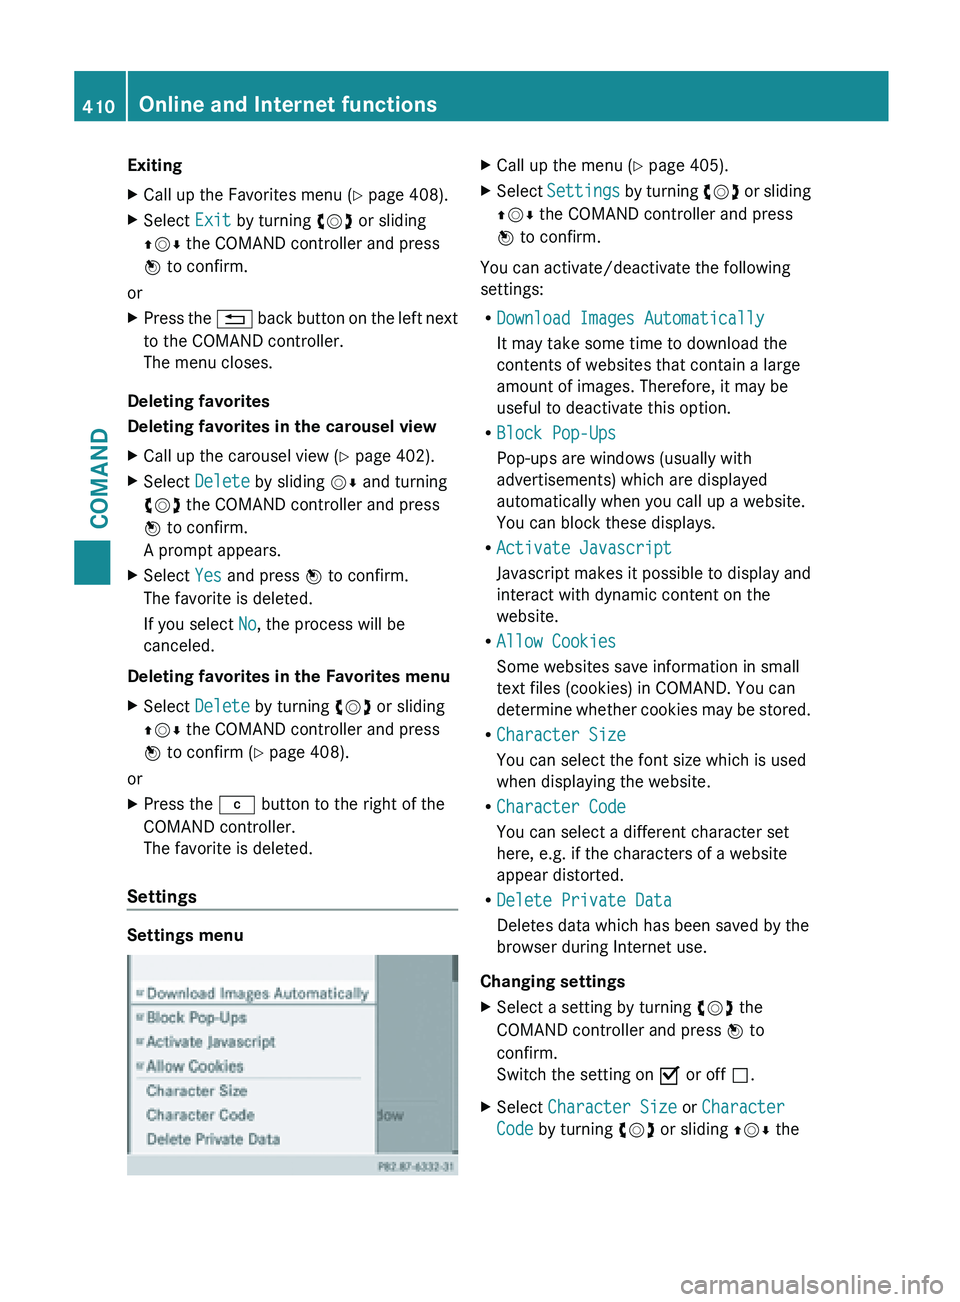
Settings Settings menu X
Call up the menu ( Y page 405).
X Select Settings by
turning cVd or sliding
ZVÆ the COMAND controller and press
W to confirm.
You can activate/deactivate the following
settings:
R Download Images Automatically
It may take some time to download the
contents of websites that contain a large
amount of images. Therefore, it may be
useful to deactivate this option.
R Block Pop-Ups
Pop-ups are windows (usually with
advertisements) which are displayed
automatically when you call up a website.
You can block these displays.
R Activate Javascript
Javascript makes
it possible to display and
interact with dynamic content on the
website.
R Allow Cookies
Some websites save information in small
text files (cookies) in COMAND. You can
determine whether cookies may be stored.
R Character Size
You can select the font size which is used
when displaying the website.
R Character Code
You can select a different character set
here, e.g. if the characters of a website
appear distorted.
R Delete Private Data
Deletes data which has been saved by the
browser during Internet use.
Changing settings
X Select a setting by turning cVd the
COMAND controller and press W to
confirm.
Switch the setting on O or off ª.
X Select Character Size or Character
Code by turning cVd or sliding ZVÆ the410
Online and Internet functions
COMAND
Page 418 of 572
X
Select Info in the radio display by sliding
VÆ and turning cVd the COMAND
controller and press W to confirm.
Information on the currently selected
station is displayed. Content is dependent
on the station.
X To return to the radio display: confirm
Info by pressing W.
X Slide ZV the COMAND controller up. Satellite radio
Important notes i
The satellite
radio mode described below
requires optionally available satellite radio
equipment and registration with a satellite
radio provider.
i Note that the categories and channels
shown in the illustrations depend on the
program content offered by the provider.
The program content may vary. The
illustrations and descriptions in these
operating instructions may therefore differ
from the channels and categories offered
by the provider.
Satellite radio mode may be temporarily
unavailable or interrupted for a variety of
reasons. These reasons include
environmental or topographical conditions
as well as other issues beyond the control
of Mercedes-Benz USA, LLC. This means
operation may not be possible in certain
areas.
These include:
R tunnels
R parking garages
R locations inside or next to buildings
R locations in the vicinity of other
structures
i SIRIUS XM Radio offers more than 130
radio stations in digital quality, for example
100% commercial-free music, sports, news
and entertainment. SIRIUS XM Radio employs a fleet of high-
performance
satellites
to broadcast around
the clock throughout the USA and Canada.
The satellite radio program is available for
a monthly fee. Details are available from
the SIRIUS XM Service Center and at
http://www.sirius.com (USA) or
http://www.siriuscanada.com
(Canada).
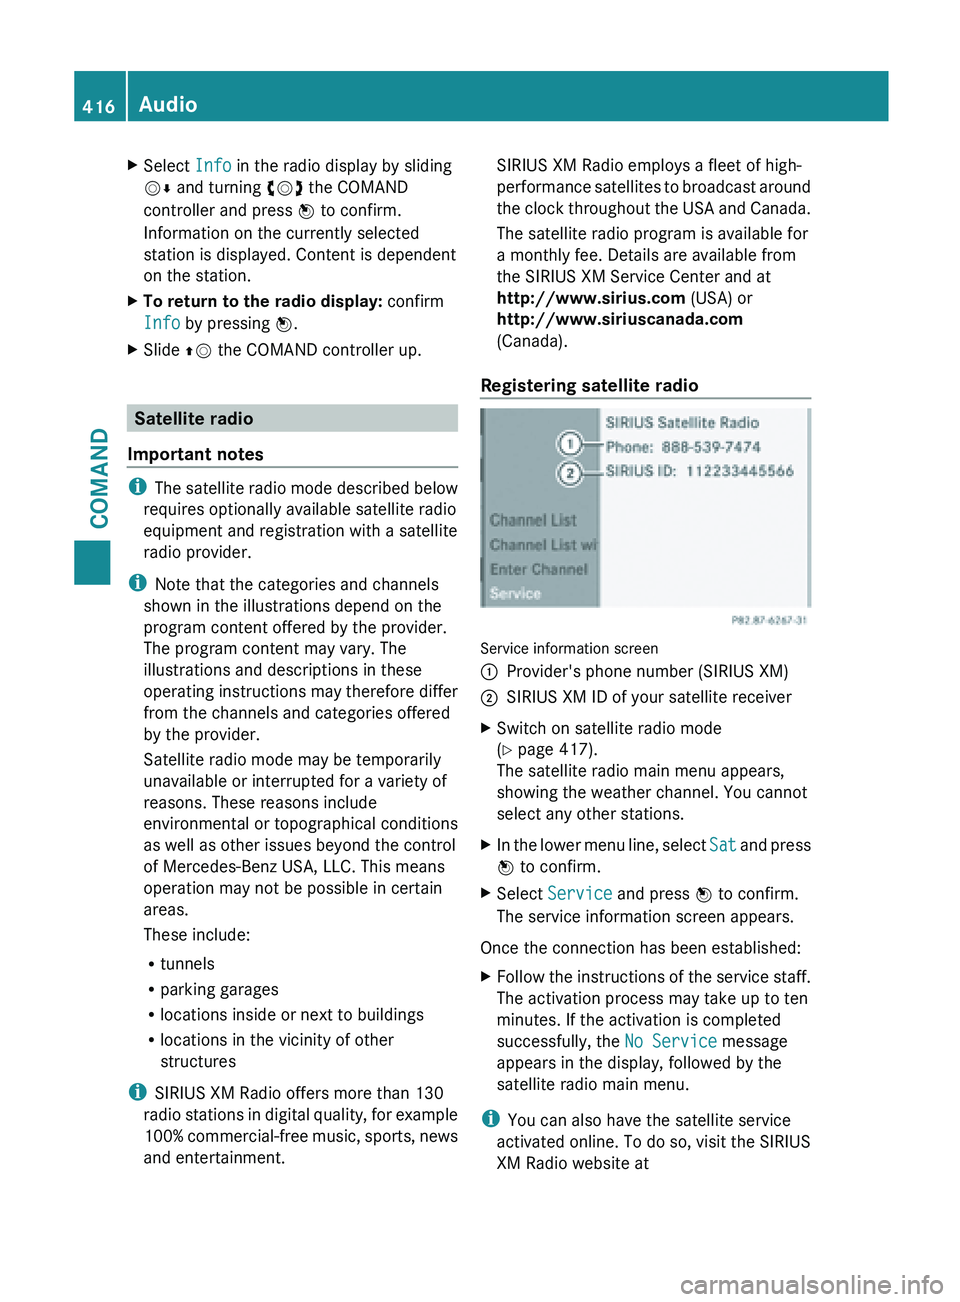
Registering satellite radio Service information screen
:
Provider's phone number (SIRIUS XM)
; SIRIUS XM ID of your satellite receiver
X Switch on satellite radio mode
(Y page 417).
The satellite radio main menu appears,
showing the weather channel. You cannot
select any other stations.
X In the lower menu line, select Sat and
press
W to confirm.
X Select Service and press W to confirm.
The service information screen appears.
Once the connection has been established:
X Follow the instructions of the service staff.
The activation process may take up to ten
minutes. If the activation is completed
successfully, the No Service message
appears in the display, followed by the
satellite radio main menu.
i You can also have the satellite service
activated online. To do so, visit the SIRIUS
XM Radio website at 416
Audio
COMAND
Page 456 of 572
COMAND is capable of playing back video
DVDs produced according to the following
standards:
R
region code 1 or region code 0 (no region
code)
R PAL or NTSC standard
You will generally find the relevant details
either on the DVD itself or on the DVD case.
i If you insert a video DVD with a different
region code,
you will see a message to this
effect.
i COMAND is set to region code 1 at the
factory. This setting can be changed at an
authorized Mercedes-Benz Center. This will
allow you to play video DVDs with a
different region code, provided that they
are produced in accordance with the PAL
or NTSC standard. The region code can be
changed up to five times.
Function restrictions Depending on the DVD, it is possible that
certain functions or actions will be
temporarily
blocked
or may not function at all.
As soon as you try to activate these functions
or actions, you will see the K symbol in the
display.
Inserting and removing DVDs X
Proceed as described in the "Inserting and
ejecting CDs and DVDs" section
(Y page 421).
Switching to video DVD mode Option 1
X
Single DVD drive: insert a video DVD.
COMAND loads the medium inserted and
starts to play it. X
DVD changer: insert a video DVD.
X Press h.
or
X Press the % back button.
COMAND loads the medium inserted and
starts to play it.
Option 2
X Press the h function
button one or more
times.
COMAND switches to the previous disc
operating mode.
By pressing the function button repeatedly,
you can change the operating mode in the
following order:
R audio CD/DVD / video DVD/MP3 in the
DVD changer or DVD single drive (disc
mode)
audio CD/DVD, video DVD or MP3 disc in
the DVD changer
R memory card mode
R MUSIC REGISTER
R USB storage device
R Media Interface or audio AUX mode
R Bluetooth ®
audio mode
X DVD changer: select
Media
or Changer by
sliding VÆ and turning cVd the COMAND
controller and press W to confirm.
Single DVD drive: select Media by sliding
VÆ and turning cVd the COMAND
controller and press W to confirm.
X Select a ý video
DVD from the media list
(Y page 456).
Option 3
X Select Video in the main function bar by
sliding ZV and
turning cVd the COMAND
controller and press W to confirm.
Video DVD mode is switched on.
Hiding/showing the navigation menu This function is not available while the DVD's
own menu (Y page 457) is being displayed.454
Video
COMAND
Page 462 of 572
Data medium Supported picture
formats
CD/DVD with
picture files jpeg, jpg
USB devices (sticks,
hard drives)
SD memory card jpeg, jpg
Calling up a category list
X
Select a data medium with pictures (e.g. a
memory card):
R
In the Audio menu (Y page 411)
R In the media list ( Y page 426)
X Select Search in the basic display by
sliding VÆ and
turning cVd the COMAND
controller and press W to confirm.
The category list appears ( Y page 433).
Displaying pictures X
Select (Y page 433)Photos in the category
list
by turning cVd the COMAND controller
and press W to confirm.
A folder directory appears.
X Select a folder with photos and press W to
confirm.
The
folder displays the existing picture files
(example). X
Select a photo and press W to confirm.
The photo is displayed and the music is
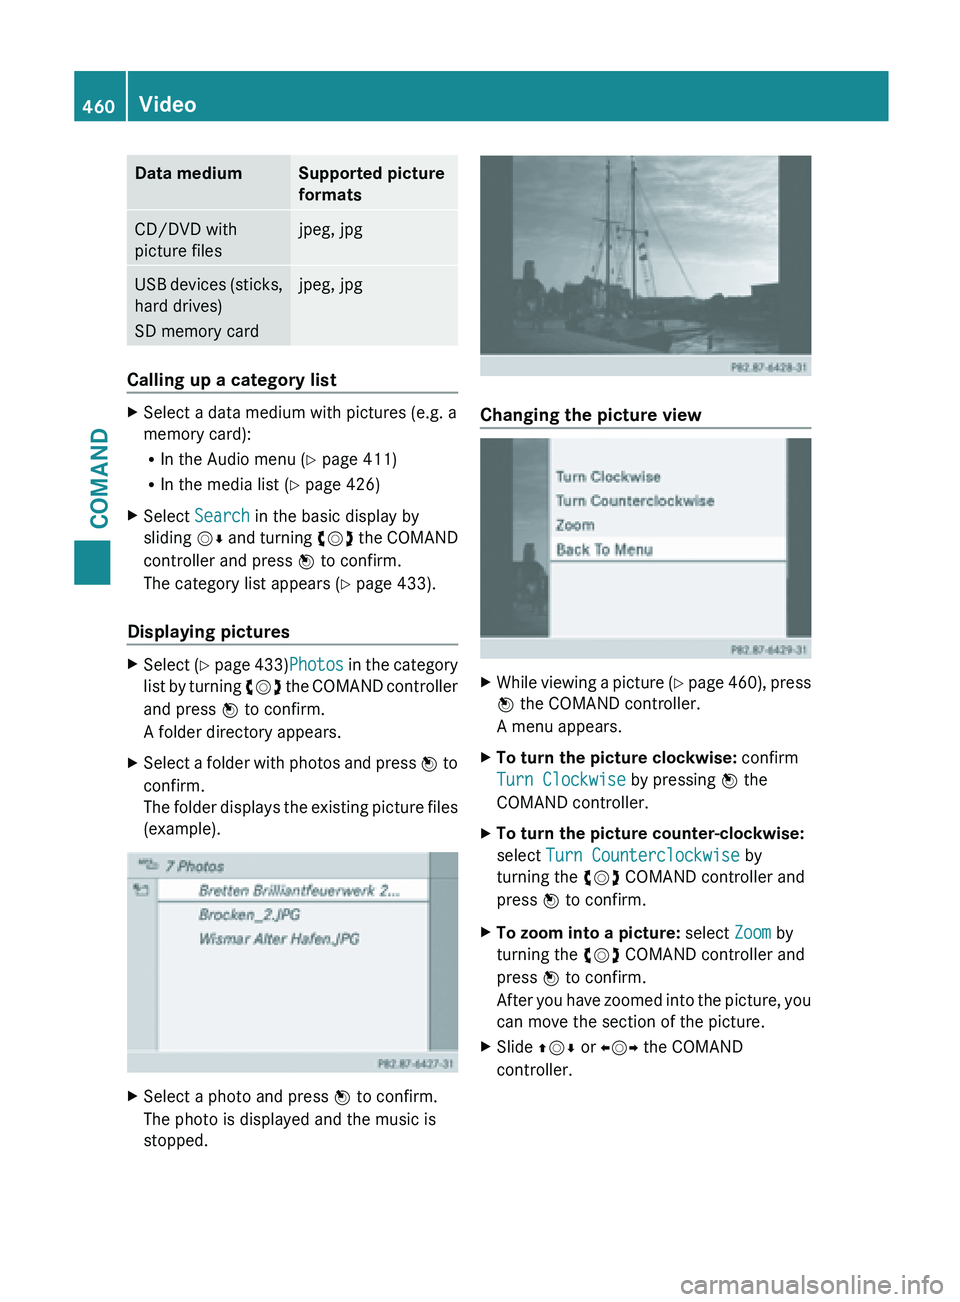
stopped. Changing the picture view
X
While viewing a picture (Y page
460), press
W the COMAND controller.
A menu appears.
X To turn the picture clockwise: confirm
Turn Clockwise by pressing W the
COMAND controller.
X To turn the picture counter-clockwise:
select Turn Counterclockwise by
turning the cVd COMAND controller and
press W to confirm.
X To zoom into a picture: select Zoom by
turning the cVd COMAND controller and
press W to confirm.
After you
have zoomed into the picture, you
can move the section of the picture.
X Slide ZVÆ or XVY the COMAND
controller. 460
Video
COMAND
Page 476 of 572
Useful information
i This Operator's Manual describes all
models and all standard and optional
equipment of your vehicle available at the
time of publication of the Operator's
Manual. Country-specific differences are
possible. Please
note that your vehicle may
not be equipped with all features
described. This also applies to safety-
related systems and functions.
i Read the information on qualified
specialist workshops: ( Y page 31).Stowage areas
Stowage space
Important safety notes G
WARNING
To
help avoid personal injury during a collision
or sudden maneuver, exercise care when
storing objects in the vehicle. Put luggage or
cargo in the trunk if possible.
Do not pile luggage or cargo higher than the
seat backrests.
Keep compartment lids closed. This will help
to prevent stored objects from being thrown
about and injuring vehicle occupants during
R braking
R vehicle maneuvers
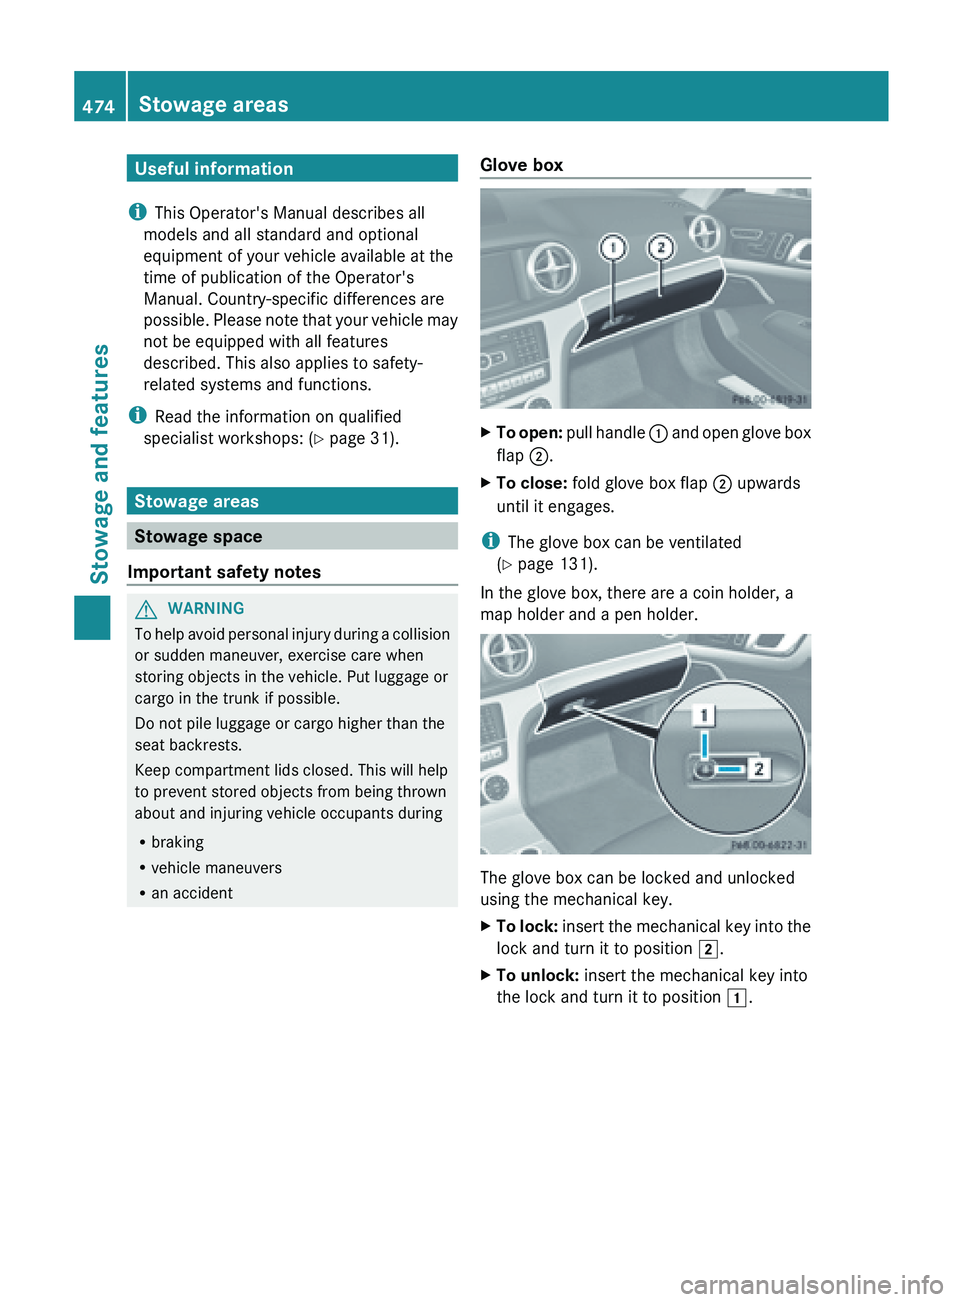
R an accident Glove box X
To open:
pull handle :
and open glove box
flap ;.
X To close: fold glove box flap ; upwards
until it engages.
i The glove box can be ventilated
(Y page 131).
In the glove box, there are a coin holder, a
map holder and a pen holder. The glove box can be locked and unlocked
using the mechanical key.
X
To
lock:
insert the mechanical key into the
lock and turn it to position 2
.
X To unlock: insert the mechanical key into
the lock and turn it to position 1.474
Stowage areas
Stowage and features
Page 482 of 572
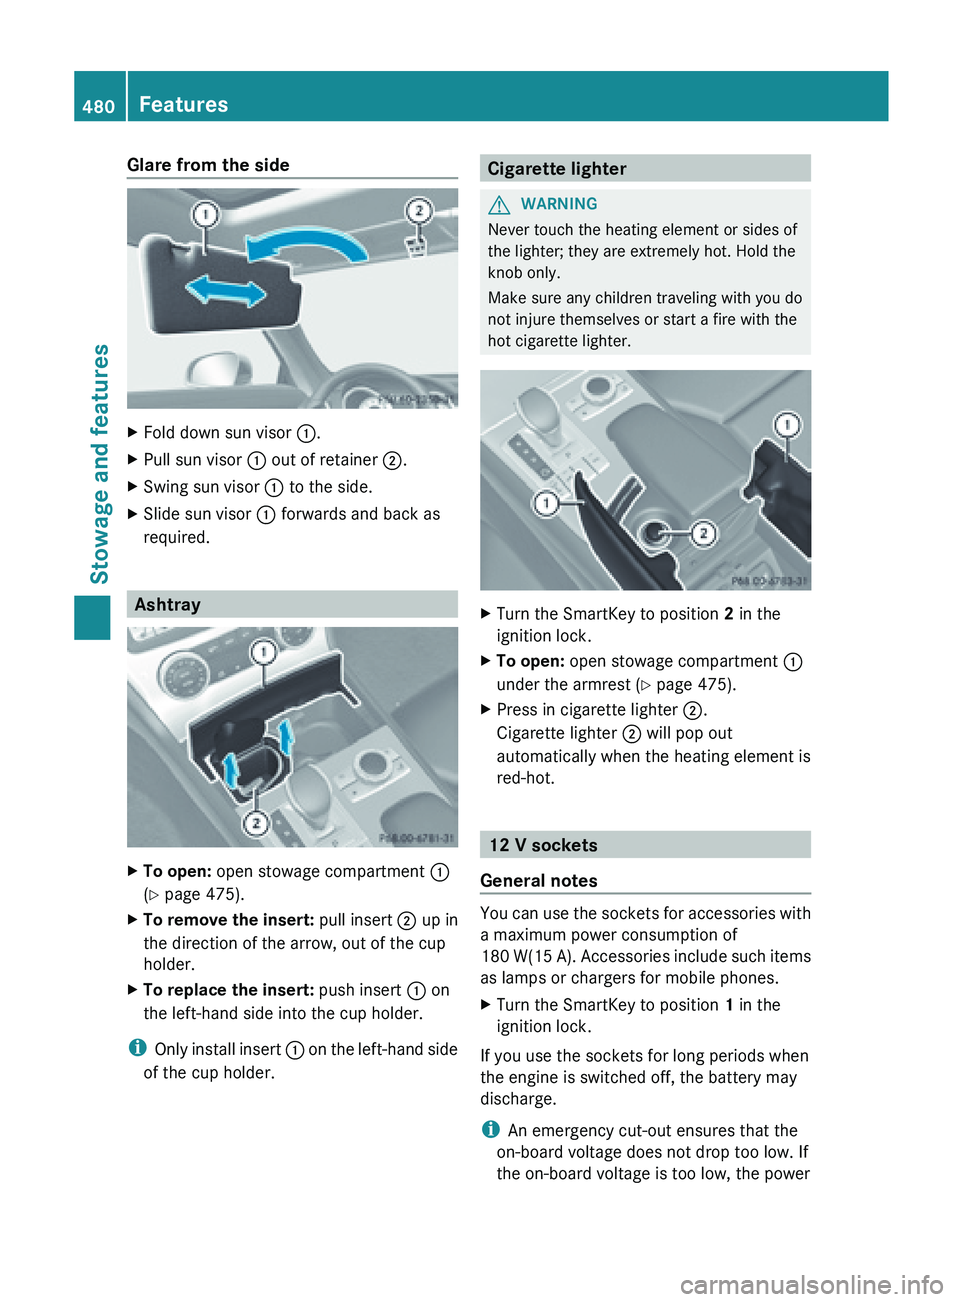
Glare from the side
X
Fold down sun visor :.
X Pull sun visor : out of retainer ;.
X Swing sun visor : to the side.
X Slide sun visor : forwards and back as
required. Ashtray
X
To open: open stowage compartment :
(Y page 475).
X To remove the insert: pull insert ; up in
the direction of the arrow, out of the cup
holder.
X To replace the insert: push insert : on
the left-hand side into the cup holder.
i Only install
insert : on the left-hand side
of the cup holder. Cigarette lighter
G
WARNING
Never touch the heating element or sides of
the lighter; they are extremely hot. Hold the
knob only.
Make sure any children traveling with you do
not injure themselves or start a fire with the
hot cigarette lighter. X
Turn the SmartKey to position 2 in the
ignition lock.
X To open: open stowage compartment :
under the armrest (Y page 475).
X Press in cigarette lighter ;.
Cigarette lighter ; will pop out
automatically when the heating element is
red-hot. 12 V sockets
General notes You can use the sockets for accessories with
a maximum power consumption of
180
W(15
A). Accessories include such items
as lamps or chargers for mobile phones.
X Turn the SmartKey to position 1 in the
ignition lock.
If you use the sockets for long periods when
the engine is switched off, the battery may
discharge.
i An emergency cut-out ensures that the
on-board voltage does not drop too low. If
the on-board voltage is too low, the power 480
Features
Stowage and features