inflation pressure MERCEDES-BENZ SL-CLASS ROADSTER 2013 Owners Manual
[x] Cancel search | Manufacturer: MERCEDES-BENZ, Model Year: 2013, Model line: SL-CLASS ROADSTER, Model: MERCEDES-BENZ SL-CLASS ROADSTER 2013Pages: 572, PDF Size: 9.23 MB
Page 43 of 572
The lighter the passenger side occupant, the
higher the vehicle deceleration rate required
(predicted at the start of the impact) for
second-stage
inflation
of the front-passenger
front air bag. In the second stage, the front
air bags are inflated with the maximum
amount of propellant gas available.
The front air bags are not deployed in
situations where a low impact severity is
predicted. You will then be protected by the
fastened seat belt.
Front-passenger front air bag ; will only
deploy if:
R the system, based on the OCS weight
sensor readings, has detected that the
front-passenger seat is occupied.
R the ^a indicator lamp on the center
console is not lit, (Y page 43)
R the air bag control unit predicts a high
impact severity.
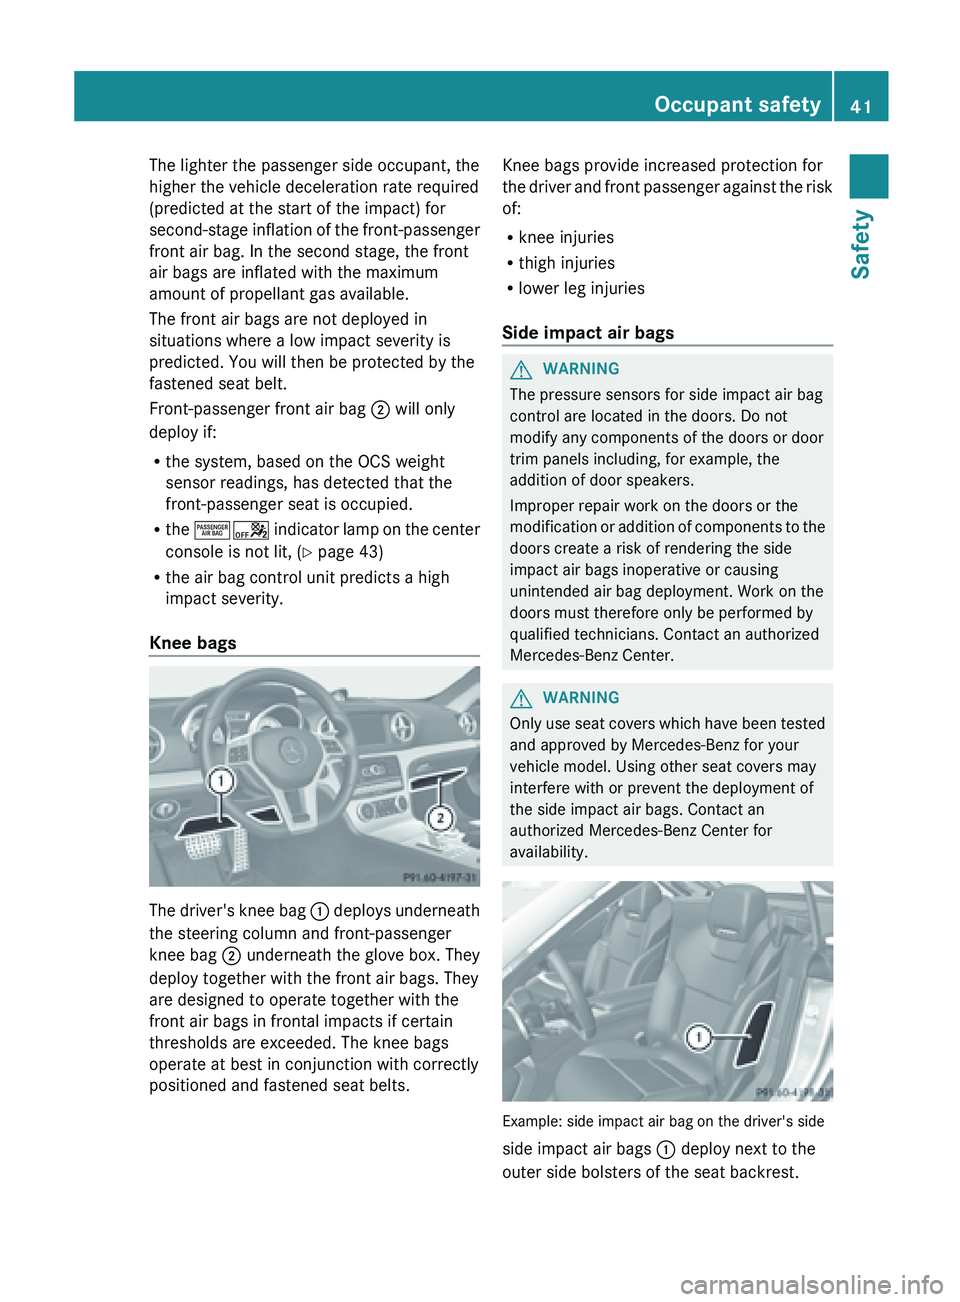
Knee bags The driver's knee bag
: deploys
underneath
the steering column and front-passenger
knee bag ; underneath the glove box. They
deploy together with the front air bags. They
are designed to operate together with the
front air bags in frontal impacts if certain
thresholds are exceeded. The knee bags
operate at best in conjunction with correctly
positioned and fastened seat belts. Knee bags provide increased protection for
the
driver
and front passenger against the risk
of:
R knee injuries
R thigh injuries
R lower leg injuries
Side impact air bags G
WARNING
The pressure sensors for side impact air bag
control are located in the doors. Do not
modify any components of the doors or door
trim panels including, for example, the
addition of door speakers.
Improper repair work on the doors or the
modification or
addition of components to the
doors create a risk of rendering the side
impact air bags inoperative or causing
unintended air bag deployment. Work on the
doors must therefore only be performed by
qualified technicians. Contact an authorized
Mercedes-Benz Center. G
WARNING
Only use seat covers which have been tested
and approved by Mercedes-Benz for your
vehicle model. Using other seat covers may
interfere with or prevent the deployment of
the side impact air bags. Contact an
authorized Mercedes-Benz Center for
availability. Example: side impact air bag on the driver's side
side impact air bags
: deploy next to the
outer side bolsters of the seat backrest. Occupant safety
41
Safety Z
Page 514 of 572
Observe the notes on the cigarette lighter
(Y page 480). Observe the notes on
sockets (
Y page 480).
X Turn the SmartKey to position 1 in the
ignition lock (Y page 135).
X Press on/off switch = on the tire inflation
compressor to I.
The tire inflation compressor is switched
on. The tire is inflated.
i First, tire sealant is pumped into the tire.
The pressure can briefly rise to
approximately 500 kPa (5.0 bar/73 psi).
Do not switch off the tire inflation
compressor during this phase.
X Allow the tire inflation compressor to run
for five minutes. The tire should then have
attained a pressure of at least 180 kPa
(1.8 bar/26 psi).
If
a tire pressure of 180 kPa (
1.8 bar/26 psi)
has been attained after five minutes:
(Y page 512).
If a tire pressure of 180 kPa (1.8 bar/26 psi)
has not been attained after five minutes:
(Y page 512).
i If tire sealant leaks out, allow it to dry. It
can then be removed like a layer of film.
If your clothes are soiled with tire sealant,
have them cleaned with perchloroethylene
at a dry cleaner as soon as possible.
Tire pressure of at least 180 kPa
(1.8 bar/26 psi) is not reached If a pressure of 180 kPa
(
1.8 bar/26 psi) has
not been achieved after five minutes:
X Switch off the tire inflation compressor.
X Unscrew the filler hose from the valve of
the faulty tire.
X Very slowly drive forwards or reverse
approximately 30 ft
(10 m).
X Pump up the tire again.
After a maximum of five minutes the tire
pressure must
be at least 180 kPa (1.8 bar/
26 psi). G
WARNING
If the required tire pressure is not reached
after the specified time, the tire is too badly
damaged. The tire sealant cannot repair the
tire in
this instance. Damaged tires and a tire
pressure that is too low can significantly
impair the vehicle's braking and driving
characteristics. There is a risk of accident.
Do not continue driving. Contact a qualified
specialist workshop.
Tire pressure of 180 kPa (1.8 bar/
26 psi) is reached G
WARNING
A tire temporarily sealed with tire sealant
impairs the driving characteristics and is not
suitable for higher speeds. There is a risk of
accident.
You should therefore adapt your driving style
accordingly and
drive carefully. Do not exceed
the specified maximum speed with a tire that
has been repaired using tire sealant.
! Residue from the tire sealant may come
out of the filler hose after use. This could
cause stains.
Therefore, place the filler hose in the plastic
bag which contained the TIREFIT kit. H
Environmental note
Have the used tire sealant bottle disposed of
professionally, e.g. at a qualified specialist
workshop.
X Switch off the tire inflation compressor.
X Unscrew the filler hose from the valve of
the faulty tire.
X Stow the tire sealant bottle and the tire
inflation compressor.
X Pull away immediately.
The maximum speed for a tire sealed with
tire sealant
is 50 mph (80 km/h). The "max.
80 km/h" sticker must be affixed to the 512
Flat tire
Roadside Assistance
Page 515 of 572
instrument cluster within the driver's field
of vision.
X Stop after driving for approximately ten
minutes and check the tire pressure with
the tire inflation compressor.
The tire pressure must now be at least
130 kPa (1.3 bar/19 psi). G
WARNING
If the required tire pressure is not reached
after driving for a short period, the tire is too
badly damaged.
The tire sealant cannot repair
the tire in this instance. Damaged tires and a
tire pressure that is too low can significantly
impair the vehicle's braking and driving
characteristics. There is a risk of accident.
Do not continue driving. Contact a qualified
specialist workshop.
X Correct the tire pressure if it is still at least
130 kPa (1.3 bar/19 psi) (for the values,
see the Tire and Loading Information
placard on the driver's side B-pillar or tire
pressure table on the fuel filler flap).
X To increase the tire pressure: switch on
the tire inflation compressor. X
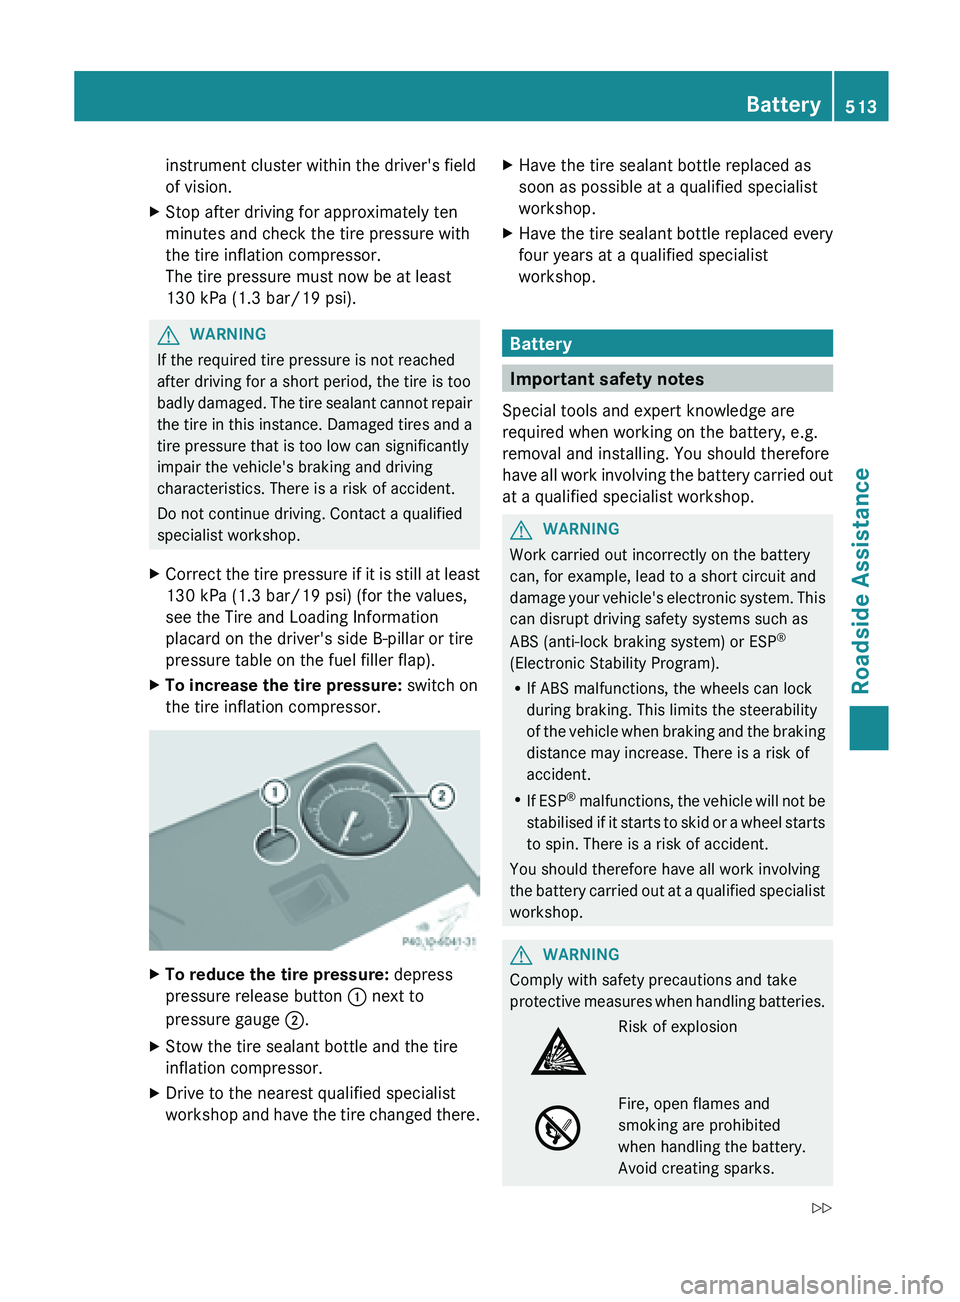
To reduce the tire pressure: depress
pressure release button : next to
pressure gauge ;.
X Stow the tire sealant bottle and the tire
inflation compressor.
X Drive to the nearest qualified specialist
workshop and
have the tire changed there. X
Have the tire sealant bottle replaced as
soon as possible at a qualified specialist
workshop.
X Have the tire sealant bottle replaced every
four years at a qualified specialist
workshop. Battery
Important safety notes
Special tools and expert knowledge are
required when working on the battery, e.g.
removal and installing. You should therefore
have all
work involving the battery carried out
at a qualified specialist workshop. G
WARNING
Work carried out incorrectly on the battery
can, for example, lead to a short circuit and
damage your
vehicle's electronic system. This
can disrupt driving safety systems such as
ABS (anti-lock braking system) or ESP ®
(Electronic Stability Program).
R If ABS malfunctions, the wheels can lock
during braking. This limits the steerability
of the vehicle when braking and the braking
distance may increase. There is a risk of
accident.
R If ESP ®
malfunctions, the vehicle will not be
stabilised if it starts to skid or a wheel starts
to spin. There is a risk of accident.
You should therefore have all work involving
the battery carried out at a qualified specialist
workshop. G
WARNING
Comply with safety precautions and take
protective measures
when handling batteries. Risk of explosion
Fire, open flames and
smoking are prohibited
when handling the battery.
Avoid creating sparks. Battery
513
Roadside Assistance
Z
Page 529 of 572
Regular checking of wheels and tires
G
WARNING
Damaged tires can cause tire inflation
pressure loss. As a result, you could lose
control of your vehicle. There is a risk of
accident.
Check the tires regularly for signs of damage
and replace any damaged tires immediately.
Regularly check the wheels and tires of your
vehicle for
damage at least once a month, as
well as after driving off-road or on rough
roads. Damaged wheels can cause a loss of
tire pressure. Pay particular attention to
damage such as:
R cuts in the tires
R punctures
R tears in the tires
R bulges on tires
R deformation or severe corrosion on wheels
Regularly check the tire tread depth and the
condition of the tread across the whole width
of the tire (Y page 527). If necessary, turn
the front wheels to full lock in order to inspect
the inner side of the tire surface.
All wheels must have a valve cap to protect
the valve against dirt and moisture. Do not
mount anything onto the valve other than the
standard valve cap or other valve caps
approved by Mercedes-Benz for your vehicle.
Do not use any other valve caps or systems,
e.g. tire pressure monitoring systems.
Regularly check the pressure of all the tires
particularly prior to long trips. Adjust the tire
pressure as necessary ( Y page 529).
The service life of tires depends on the
following factors amongst other things:
R driving style
R tire pressure
R distance covered Tire tread
G
WARNING
Insufficient
tire tread will reduce tire traction.
The tire is no longer able to dissipate water.
This means
that on wet road surfaces, the risk
of hydroplaning increases, in particular where
speed is not adapted to suit the driving
conditions. There is a risk of accident.
If the tire pressure is too high or too low, tires
may exhibit different levels of wear at
different locations on the tire tread. Thus, you
should regularly check the tread depth and
the condition of the tread across the entire
width of all tires.
Minimum tire tread depth for:
R Summer tires: â in (3 mm)
R M+S tires: ã in (4 mm)
For safety reasons, replace the tires before
the legally prescribed limit for the minimum
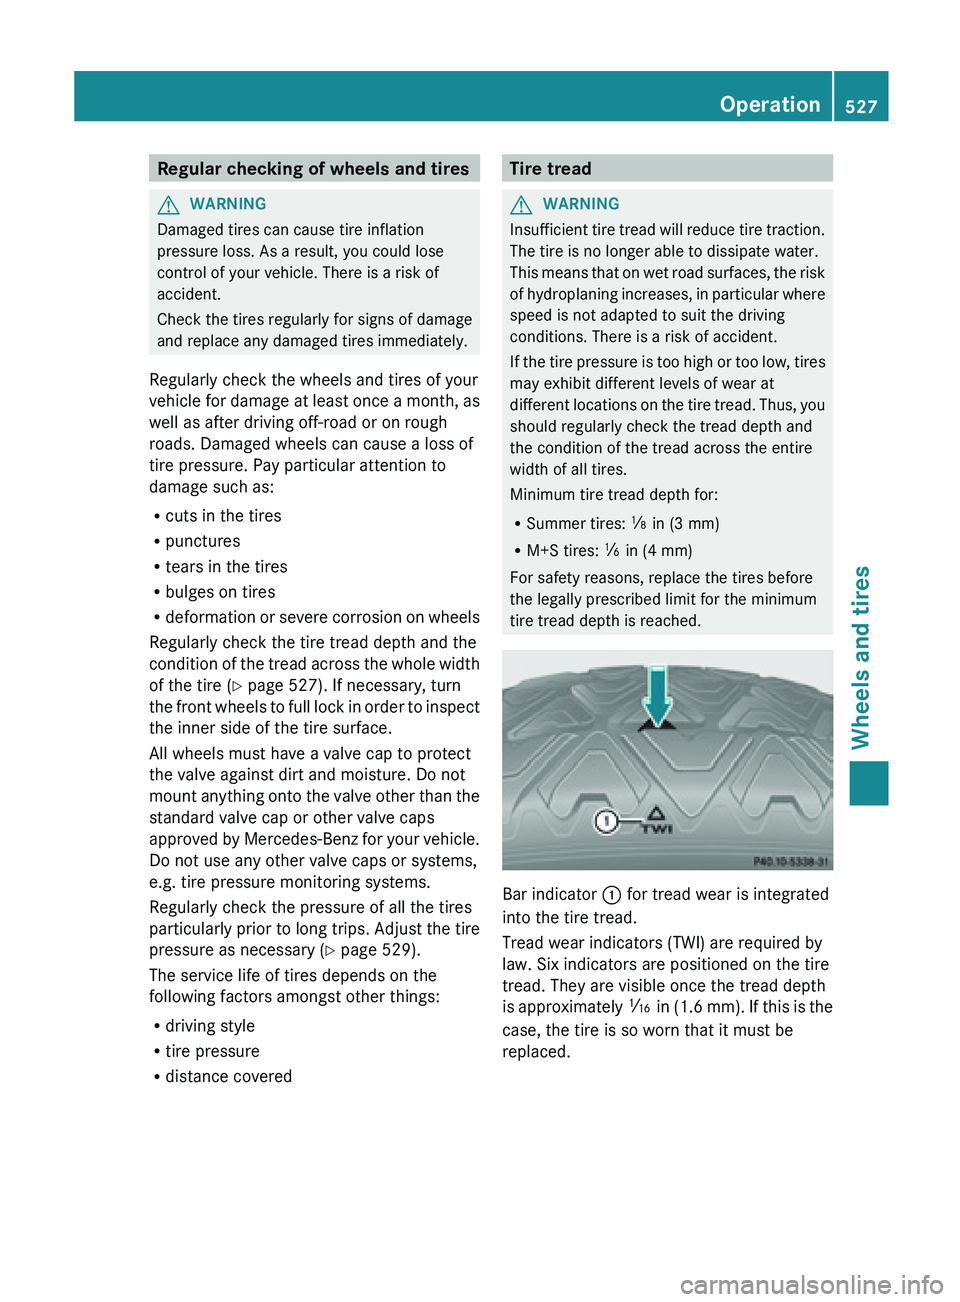
tire tread depth is reached. Bar indicator
: for tread wear is integrated
into the tire tread.
Tread wear indicators (TWI) are required by
law. Six indicators are positioned on the tire
tread. They are visible once the tread depth
is approximately á
in (1.6 mm). If this is the
case, the tire is so worn that it must be
replaced. Operation
527
Wheels and tires Z
Page 531 of 572
Once the winter tires are mounted:
X
Check the tire pressures (Y page 533).
X Restart the tire pressure monitor
(Y page 534). Snow chains
! You must drive at raised vehicle level
(level 1)
if snow chains have been mounted.
The vehicle may otherwise be damaged.
! On some tire sizes there is not enough
space for snow chains. To avoid damage to
the vehicle or tires, observe the "Wheel and
tire combinations" section under "Tires and
wheels".
! If snow chains are mounted on the front
wheels, the snow chains could grind
against the bodywork or components of the
chassis. This could result in damage to the
vehicle or the tires.
For safety reasons, Mercedes-Benz
recommends that you only use snow chains
that have been specially approved for your
vehicle by Mercedes-Benz, or are of a
corresponding standard of quality.
If you intend to mount snow chains, please
bear the following points in mind:
R Snow chains cannot be mounted on all
wheel-tire combinations; see the
information under "Wheel and tire
combinations" in the "Wheels and tires"
section.
R Mount snow chains only in pairs and only
on the rear wheels. Observe the
manufacturer's mounting instructions.
R Only use snow chains when driving on
roads completely covered by snow.
Remove the snow chains as soon as
possible when you come to a road that is
not snow-covered.
R Local regulations may restrict the use of
snow chains. Observe the relevant
regulations when mounting snow chains. R
Do not exceed the maximum permissible
speed of 30 mph ( 50 km/h).
R On vehicles
with Active Body Control (ABC),
you must drive at a raised vehicle level if
snow chains have been mounted
(Y page 179).
i You may wish to deactivate ESP ®
when
pulling away with snow chains mounted
(Y page 59). This way you can allow the
wheels to spin in a controlled manner,
achieving an increased driving force
(cutting action). Tire pressure
Tire pressure specifications
Important safety notes G
WARNING
Tires with tire pressures that are too low or
too high are associated with the following
hazards:
R they can
burst, in particular if the vehicle is
heavily laden or when driven at high
speeds.
R the tires can wear excessively and/or
unevenly, which can severely impair tire
traction.
R the driving, steering and braking
characteristics may be severely impaired.
There is a risk of accident.
Follow recommended tire inflation pressures
and check the pressure of all the tires
including the spare wheel:
R monthly, at least
R if the load changes
R before beginning a long journey
R under different operating conditions, e.g.
off-road driving
If necessary, correct the tire pressure.
i The specifications on the sample Tire and
Loading Information placard and tire
pressure tables are examples. Tire Tire pressure
529
Wheels and tires Z
Page 534 of 572
Underinflated or overinflated tires
Underinflation G
WARNING
Tires with pressure that is too low can
overheat and burst as a consequence. In
addition, they
also suffer from excessive and/
or irregular wear, which can severely impair
the braking properties and the driving
characteristics. There is a risk of an accident.
Avoid tire pressures that are too low in all the
tires, including the spare wheel.
Underinflated tires may:
R overheat, leading to tire defects
R have an adverse effect on handling
characteristics
R wear quickly and unevenly
R have an adverse effect on fuel consumption
Overinflation G
WARNING
Tires
with excessively high pressure can burst
because they are damaged more easily by
road debris, potholes etc. In addition, they
also suffer from irregular wear, which can
severely impair
the braking properties and the
driving characteristics. There is a risk of an
accident.
Avoid tire pressures that are too high in all the
tires, including the spare wheel.
Overinflated tires may:
R increase the braking distance
R have an adverse effect on handling
characteristics
R wear quickly and unevenly
R have an adverse effect on ride comfort
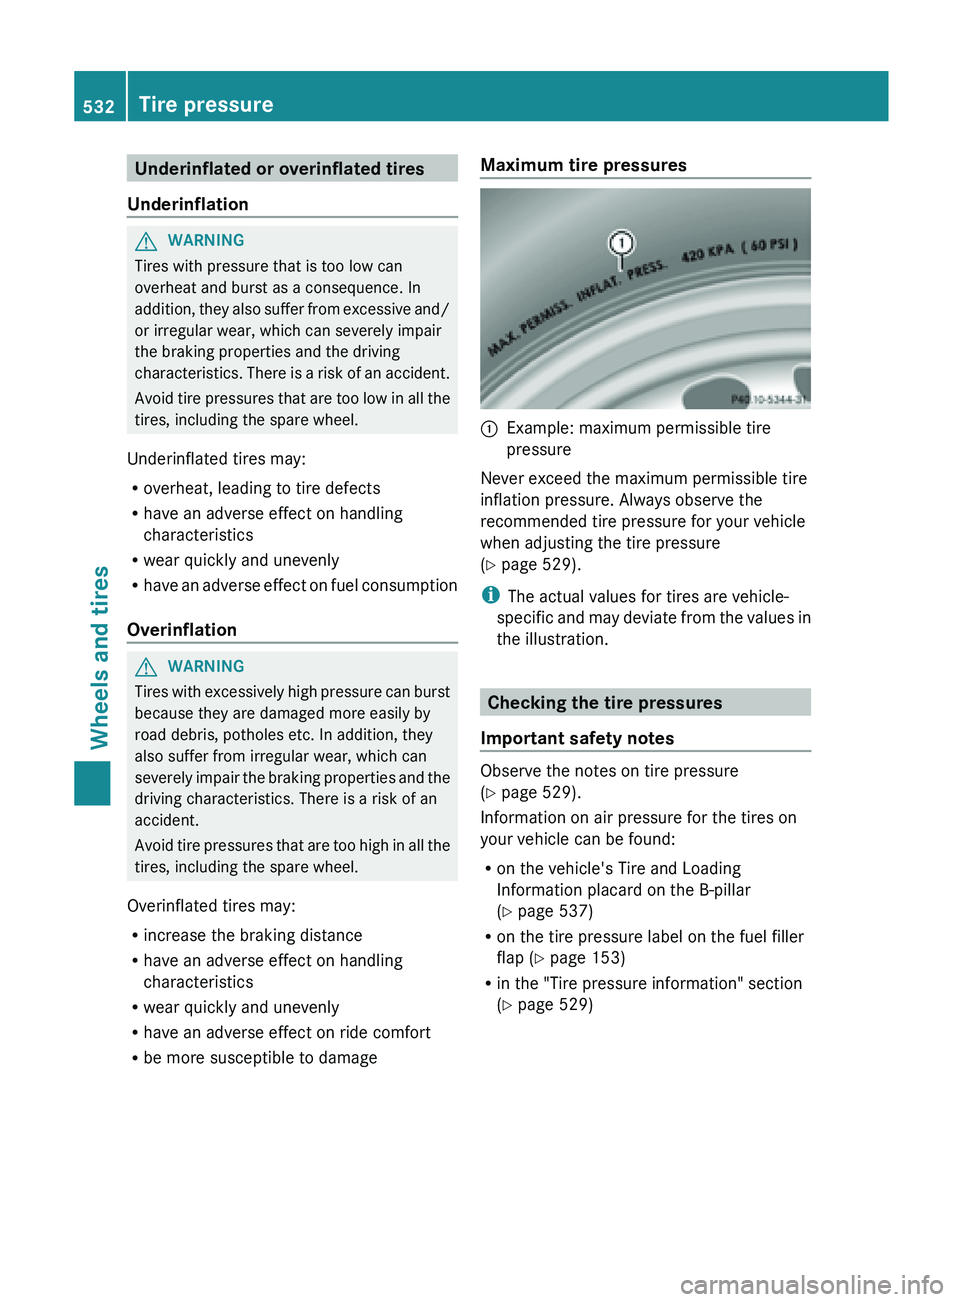
R be more susceptible to damage Maximum tire pressures
:
Example: maximum permissible tire
pressure
Never exceed the maximum permissible tire
inflation pressure. Always observe the
recommended tire pressure for your vehicle
when adjusting the tire pressure
(
Y page 529).
i The actual values for tires are vehicle-
specific and
may deviate from the values in
the illustration. Checking the tire pressures
Important safety notes Observe the notes on tire pressure
(
Y page 529).
Information on air pressure for the tires on
your vehicle can be found:
R on the vehicle's Tire and Loading
Information placard on the B-pillar
(Y page 537)
R on the tire pressure label on the fuel filler
flap ( Y page 153)
R in the "Tire pressure information" section
(Y page 529)532
Tire pressure
Wheels and tires
Page 536 of 572
X
Press the 9 or : button to select
Tire Pressure.
X Press the a button.
The Run Flat Indicator Active
Press OK to Restart message appears
in the multifunction display.
If you wish to confirm the restart:
X Press the a button.
The Tire Pressure Now OK? message
appears in the multifunction display.
X Press 9 or : to select Yes.
X Press the a button.
The Run Flat Indicator Restarted
message appears in the multifunction
display.
After a teach-in period, the tire pressure
loss warning system will monitor the set
tire pressures of all four tires.
If you wish to cancel the restart:
X Press the % button.
or
X If the Tire Pressure Now OK? message
appears, use 9 or : to select
Cancel.
X Press the a button.
The tire pressure values stored at the last
restart will continue to be monitored. Tire pressure monitor
Important safety notes G
WARNING
Each tire, including the spare (if provided),
should be checked at least once a month
when cold and inflated to the pressure
recommended by the vehicle manufacturer
on the Tire and Loading Information placard
on the driver's door B-pillar or the tire
pressure label on the inside of the fuel filler
flap. If
your vehicle has tires of a different size
than the size indicated on the Tire and Loading
Information placard or the tire pressure label, you should determine the proper tire pressure
for those tires.
As an added safety feature, your vehicle has
been
equipped
with a tire pressure monitoring
system (TPMS) that illuminates a low tire
pressure telltale when one or more of your
tires are significantly underinflated.
Accordingly, when the low tire pressure
telltale illuminates, you should stop and check
your tires as soon as possible, and inflate
them to the proper pressure. Driving on a
significantly underinflated tire causes the tire
to overheat and can lead to tire failure.
Underinflation also reduces fuel efficiency
and tire tread life, and may affect the vehicle's
handling and stopping ability.
Please note that the TPMS is not a substitute
for proper tire maintenance, and it is the
driver's responsibility to maintain correct tire
pressure, even if underinflation has not
reached the level to trigger illumination of the
TPMS low tire pressure telltale.
USA only:
Your vehicle has also been equipped with a
TPMS malfunction indicator to indicate if the
system is not operating properly. The TPMS
malfunction indicator is combined with the
low tire pressure telltale. When the system
detects a malfunction, the warning lamp will
flash for approximately a minute and then
remain continuously illuminated. This
sequence will be repeated every time the
vehicle is started as long as the malfunction
exists.
When the malfunction indicator is illuminated,
the system may not be able to detect or signal
low tire pressure as intended. TPMS
malfunctions may occur for a variety of
reasons, including the installation of
incompatible replacement or alternate tires
or wheels on the vehicle that prevent the
TPMS from functioning properly. Always
check the TPMS malfunction telltale after
replacing one or more tires or wheels on your
vehicle to ensure that the replacement or 534
Tire pressure
Wheels and tires
Page 537 of 572
alternate tires and wheels allow the TPMS to
continue to function properly.
It is the driver's responsibility to set the tire
inflation to the recommended cold tire
pressure suitable to the operating situation
( Y page 529). Note that the correct tire
pressure for the current operating situation
must first be taught-in to the tire pressure
monitor. If there is a substantial loss of
pressure, the warning threshold for the
warning message is aligned to the reference
values taught-in. Restart the tire pressure
monitor after adjusting to the cold tire
pressure. ( Y page 536) The current
pressures are
saved as new reference values.
As a result, a warning message will appear if
the tire pressure drops significantly.
The tire pressure monitor does not warn you
of an incorrectly set tire pressure. Observe
the notes on the recommended tire pressure
(Y page 529).
The tire pressure monitor is not able to warn
you of a sudden loss of pressure, e.g. if the
tire is penetrated by a foreign object. In the
event of a sudden loss of pressure, bring the
vehicle to a halt by braking carefully. Avoid
abrupt steering maneuvers.
If a tire pressure monitor system is installed,
the vehicle's wheels have sensors installed
that monitor the tire pressures in all four tires.
The tire pressure monitor warns you if the
pressure drops in one or more of the tires. The
tire pressure monitor only functions if the
correct wheel electronics units are installed
on each wheel.
The tire pressure monitor has a yellow
warning lamp in the instrument cluster for
indicating pressure loss/malfunctions (USA)
or pressure loss (Canada). Whether the
warning lamp flashes or lights up indicates
whether a tire pressure is too low or the tire
pressure monitor is malfunctioning:
R if the warning lamp is lit continuously, the
tire pressure on one or more tires is significantly too low. The tire pressure
monitor is not malfunctioning.
R USA only: if the warning lamp flashes for
around a minute and then remains lit
constantly, the tire pressure monitor is
malfunctioning.
Information on tire pressures is displayed in
the multifunction
display. After a few minutes
of driving, the current tire pressure of each
tire is shown in the multifunction display.
USA only: if there is a malfunction with the
tire pressure monitor it can take more than
ten minutes until the malfunction is shown by
the tire pressure warning lamp flashing for
approximately one minute and then lighting
up continuously. When the malfunction has
been rectified, the tire pressure warning lamp
goes out after a few minutes of driving.
The tire pressure values indicated by the on-
board computer may differ from those
measured at a gas station with a pressure
gauge. The tire pressures shown by the on-
board computer refer to those measured at
sea level. At high altitudes, the tire pressure
values indicated by a pressure gauge are
higher than those shown by the on-board
computer. In this case, do not reduce the tire
pressures.
The operation of the tire pressure monitor can
be affected by interference from radio
transmitting equipment (e.g. radio
headphones, two-way radios) that may be
being operated in or near the vehicle.
i USA only:
This device complies with Part 15 of the
FCC Rules. Operation is subject to the
following two conditions:
1. This device may not cause harmful
interference, and
2. this device must accept any interference
received, including interference that may
cause undesired operation of the device.
Any unauthorized modification to this
device could void the user’s authority to
operate the equipment. Tire pressure
535
Wheels and tires Z
Page 543 of 572
on surfaces that are not icy or covered with
snow. Take appropriate care when driving.
Further information on winter tires (M+S
tires) (Y page 528).
Temperature
G
WARNING
The temperature grade for this tire is
established for a tire that is properly inflated
and not overloaded. Excessive speed,
underinflation, or excessive loading, either
separately or in combination, can cause
excessive heat build-up and possible tire
failure.
The temperature grades are A (the highest),
B, and C. These represent the tire's
resistance to the generation of heat and its
ability to dissipate heat when tested under
controlled conditions on a specified indoor
laboratory test wheel. Sustained high
temperature can
cause the material of the tire
to degenerate and reduce tire life, and
excessive temperature can lead to sudden
tire failure. The grade C corresponds to a level
of performance which all passenger car tires
must meet under the Federal Motor Vehicle
Safety Standard No. 109. Grades B and A
represent higher levels of performance on the
laboratory test wheel than the minimum
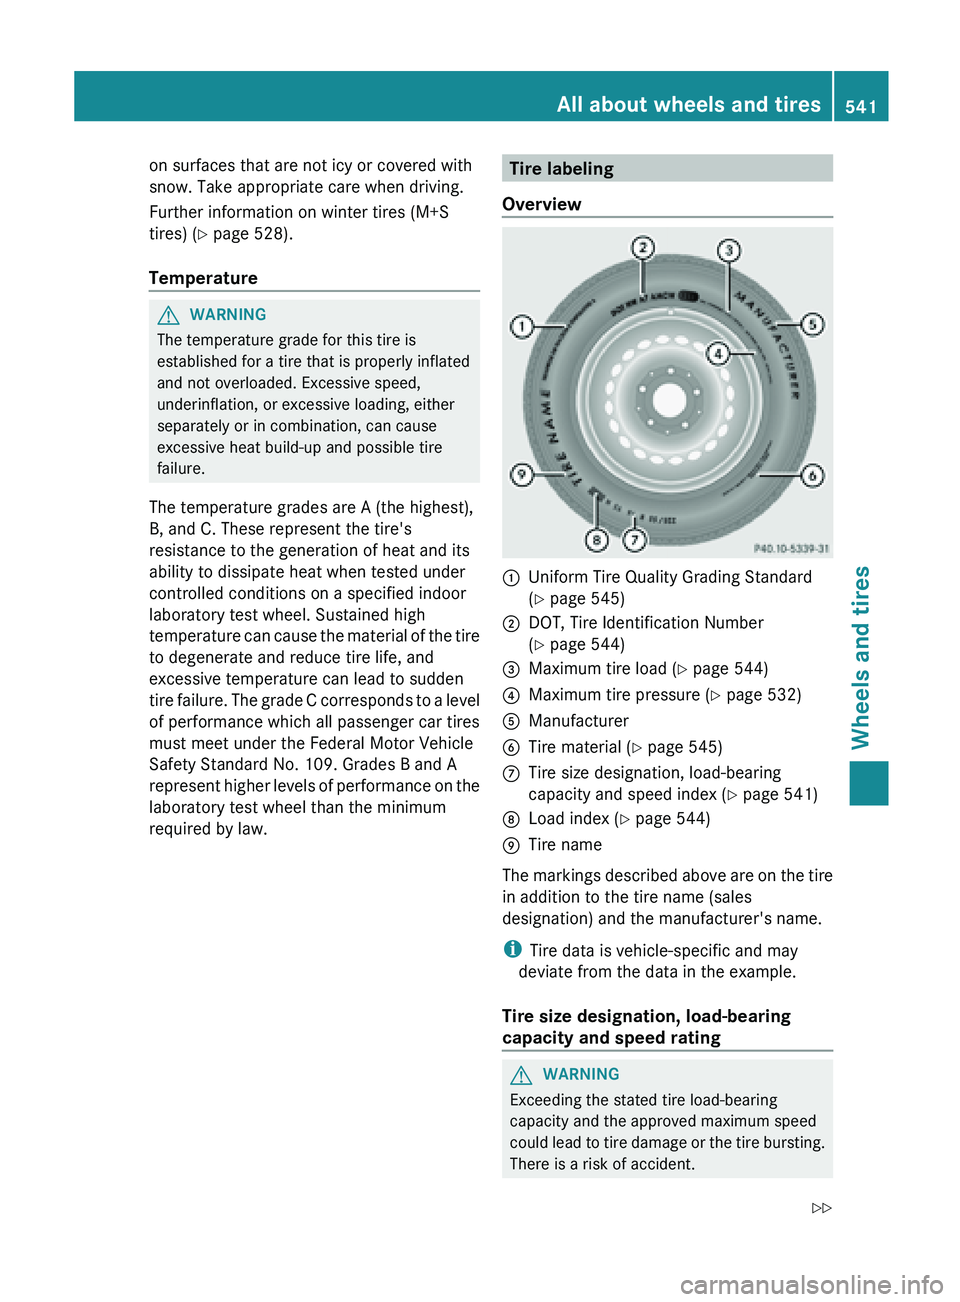
required by law. Tire labeling
Overview :
Uniform Tire Quality Grading Standard
(Y page 545)
; DOT, Tire Identification Number
(Y page 544)
= Maximum tire load ( Y page 544)
? Maximum tire pressure (Y page 532)
A Manufacturer
B Tire material ( Y page 545)
C Tire size designation, load-bearing
capacity and speed index (
Y
page 541)
D Load index ( Y page 544)
E Tire name
The markings described above are on the tire
in addition to the tire name (sales
designation) and the manufacturer's name.
i Tire data is vehicle-specific and may
deviate from the data in the example.
Tire size designation, load-bearing
capacity and speed rating G
WARNING
Exceeding the stated tire load-bearing
capacity and the approved maximum speed
could lead
to tire damage or the tire bursting.
There is a risk of accident. All about wheels and tires
541
Wheels and tires
Z