MERCEDES-BENZ SL-CLASS ROADSTER 2014 Owners Manual
Manufacturer: MERCEDES-BENZ, Model Year: 2014, Model line: SL-CLASS ROADSTER, Model: MERCEDES-BENZ SL-CLASS ROADSTER 2014Pages: 284, PDF Size: 45.52 MB
Page 201 of 284
X
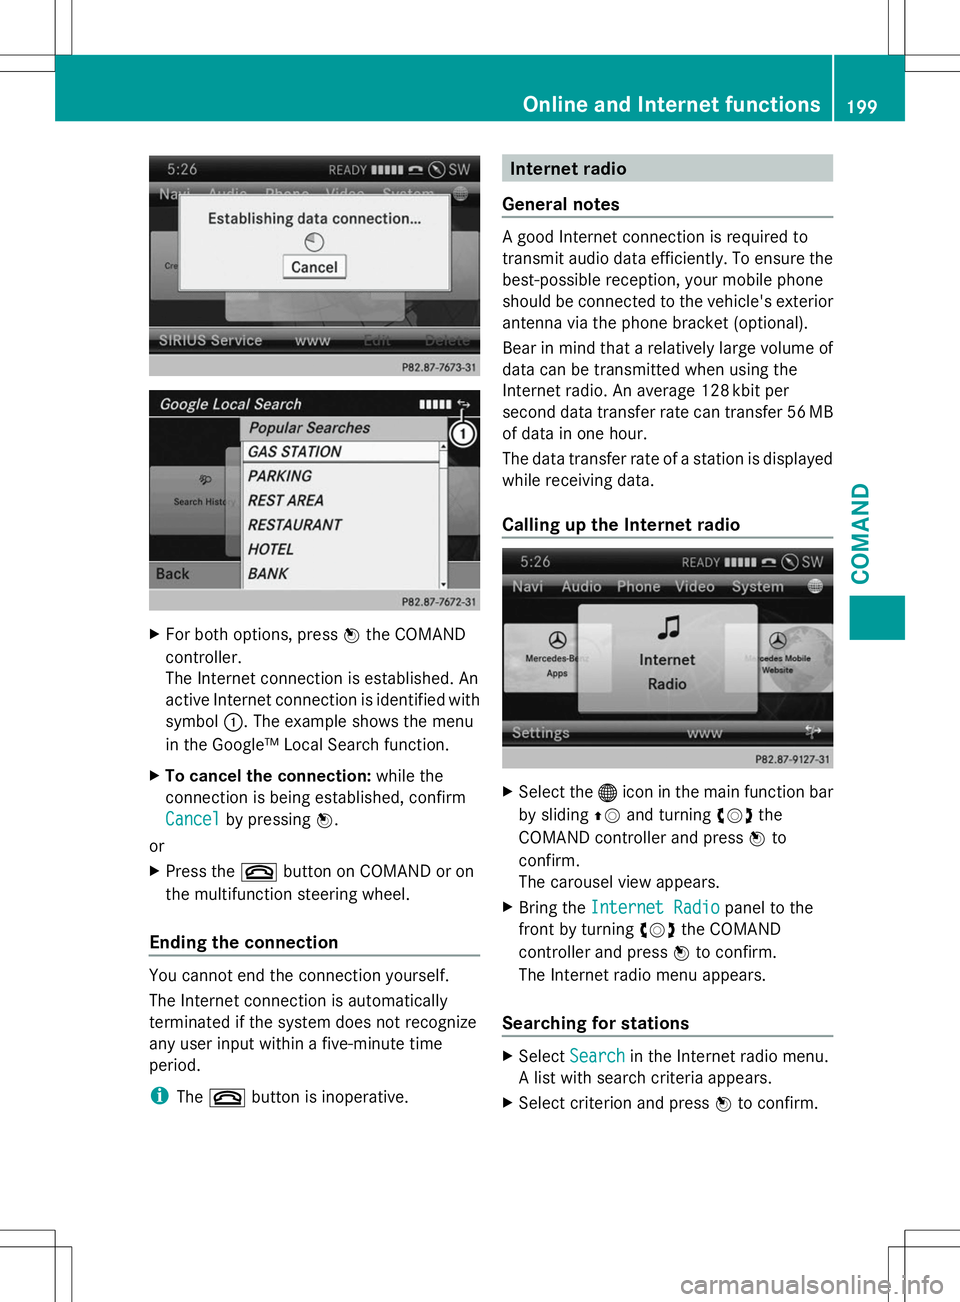
For both options, press Wthe COMAND
controller.
The Internet connection is established. An
active Internet connection is identified with
symbol :. The example shows the menu
in the Google™ Local Search function.
X To cancel the connection: while the
connection is being established, confirm
Cancel Cancel by pressing W.
or
X Press the ~button on COMAND or on
the multifunction steering wheel.
Ending the connection You cannot end the connection yourself.
The Internet connection is automatically
terminated if the system does not recognize
any user input within a five-minute time
period.
i The ~ button is inoperative. Internet radio
General notes A good Internet connection is required to
transmit audio data efficiently. To ensure the
best-possible reception, your mobile phone
should be connected to the vehicle's exterior
antenna via the phone bracket (optional).
Bear in mind that a relatively large volume of
data can be transmitted when using the
Internet radio. An average 128 kbit per
second data transfer rate can transfer 56 MB
of data in one hour.
The data transfer rate of a station is displayed
while receiving data.
Calling up the Internet radio
X
Select the ®icon in the main function bar
by sliding ZVand turning cVdthe
COMAND controller and press Wto
confirm.
The carousel view appears.
X Bring the Internet Radio Internet Radio panel to the
front by turning cVdthe COMAND
controller and press Wto confirm.
The Internet radio menu appears.
Searching for stations X
Select Search
Search in the Internet radio menu.
A list with search criteria appears.
X Select criterion and press Wto confirm. Online and Internet functions
199COMAND Z
Page 202 of 284
i
For example as a search criterion, you can
set an Internet radio station that is located
close to your navigation destination.
Connecting to a station X
Search for a station (Y page 199).
X Select ;(play) in the Internet radio
menu and press Wto confirm.
The call is placed.
If the data stream is interrupted, an automatic
attempt is made to re-establish the
connection.
Manually re-establishing a connection
X Select ;(play) again in the Internet
radio menu and press Wto confirm.
Ending data transfer:
X Select É(stop) in the Internet radio
menu and press Wto confirm.
or
X Change to another audio source, for
example Disc
Disc .
If you change to a main function that is not an
audio source, e.g. navigation, the data
connection remains on. You can continue
listening to the set station. Internet
Display restriction Internet pages cannot be shown while the
vehicle is in motion. Calling up a website Calling up the carousel view
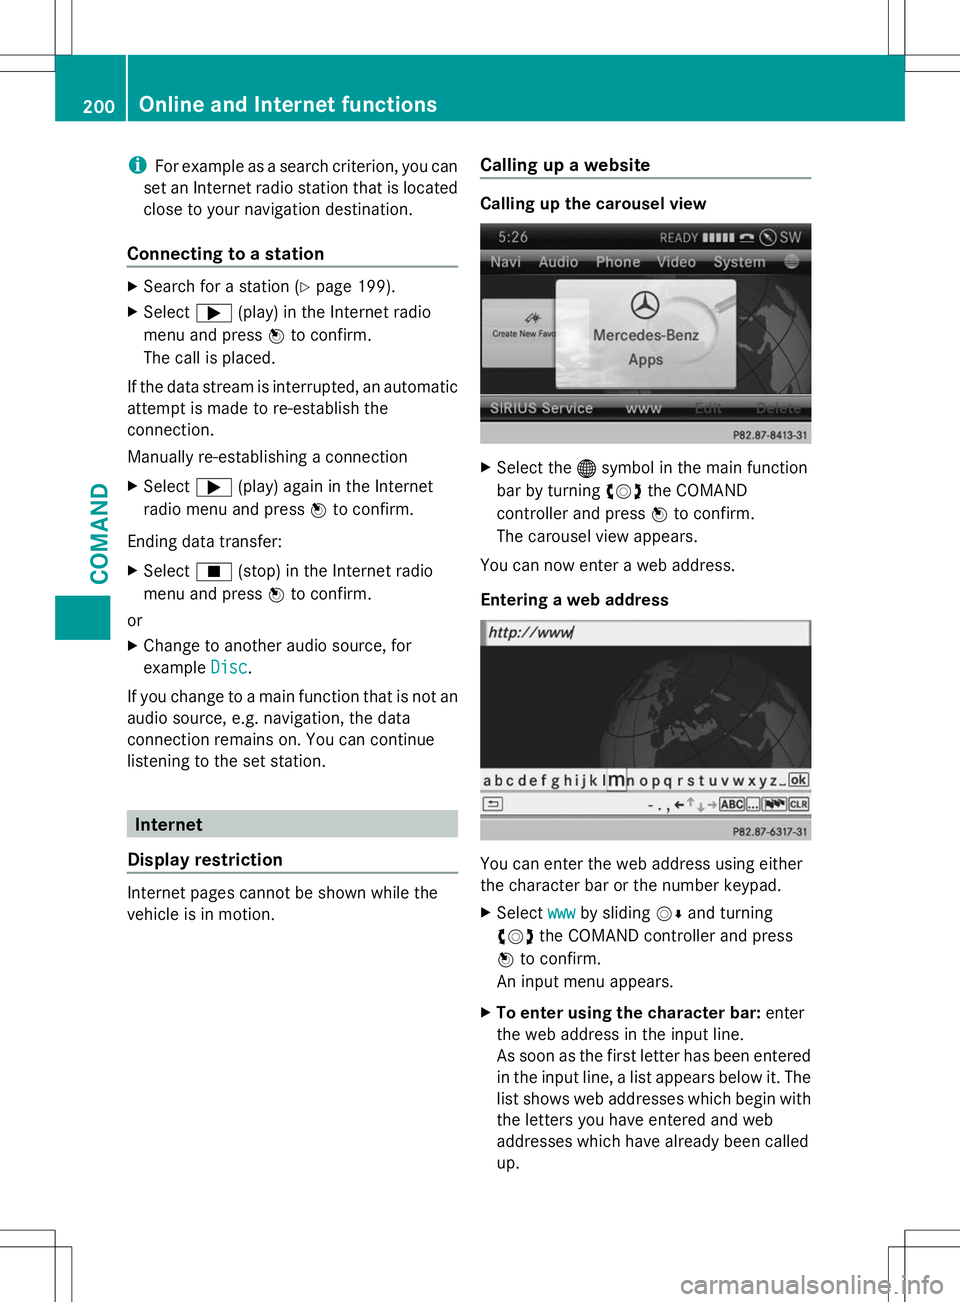
X
Select the ®symbol in the main function
bar by turning cVdthe COMAND
controller and press Wto confirm.
The carousel view appears.
You can now enter a web address.
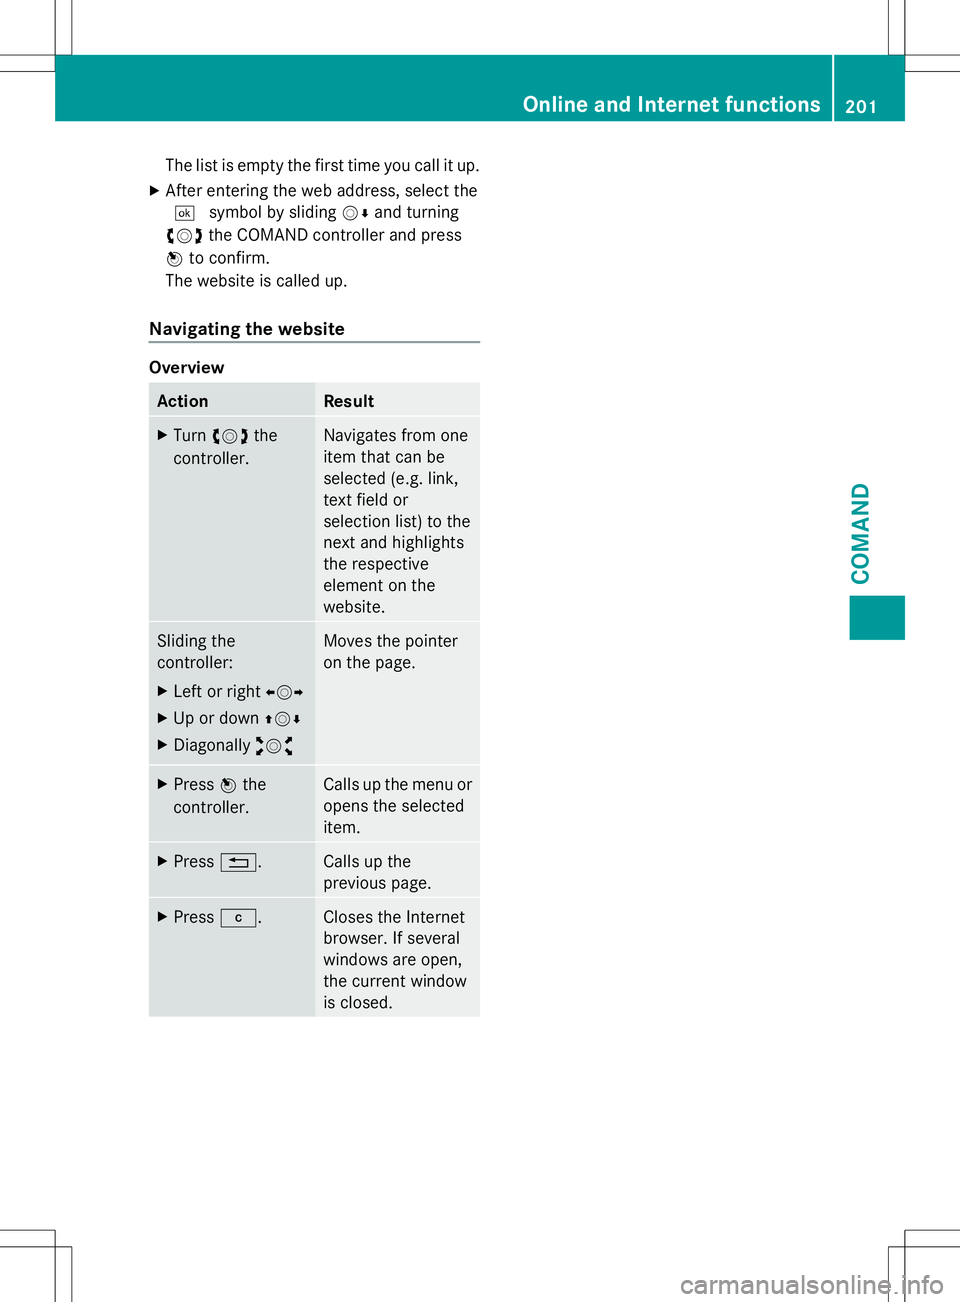
Entering a web address You can enter the web address using either
the character bar or the number keypad.
X
Select www wwwby sliding VÆand turning
cVd the COMAND controller and press
W to confirm.
An input menu appears.
X To enter using the character bar: enter
the web address in the input line.
As soon as the first letter has been entered
in the input line, a list appears below it. The
list shows web addresses which begin with
the letters you have entered and web
addresses which have already been called
up. 200
Online and Internet functionsCOMAND
Page 203 of 284
The list is empty the first time you call it up.
X After entering the web address, select the
¬ symbol by sliding VÆand turning
cVd the COMAND controller and press
W to confirm.
The website is called up.
Navigating the website Overview
Action Result
X
Turn cVd the
controller. Navigates from one
item that can be
selected (e.g. link,
text field or
selection list) to the
next and highlights
the respective
element on the
website.
Sliding the
controller:
X
Left or right XVY
X Up or down ZVÆ
X Diagonally aVb Moves the pointer
on the page.
X
Press Wthe
controller. Calls up the menu or
opens the selected
item.
X
Press %. Calls up the
previous page.
X
Press j. Closes the Internet
browser. If several
windows are open,
the current window
is closed. Online and Internet functions
201COMAND Z
Page 204 of 284
202
Page 205 of 284
Useful information
............................204
Stowage areas .................................. 204
Features ............................................. 206 203Stowage and features
Page 206 of 284
Useful information
i This Operator's Manual describes all
models and all standard and optional
equipment of your vehicle available at the
time of publication of the Operator's
Manual. Country-specific differences are
possible. Please note that your vehicle may
not be equipped with all features
described. This also applies to safety-
related systems and functions.
i Read the information on qualified
specialist workshops: (Y page 30).Stowage areas
Stowage space
Information in the Digital Operator's
Manual In the Digital Operator's Manual you will find
information on the following topics:
R Glove box
R Stowage compartment/telephone
compartment under the armrest
R Eyeglasses compartment
R Stowage compartment in the front center
console
R Umbrella holder
R Stowage compartment in the rear center
console
R Stowage compartment in the rear
Important safety notes G
WARNING
If you do not correctly store objects in the
vehicle interior, they can slip or be flung
around, thus striking vehicle occupants.
There is a risk of injury, especially when
braking or abruptly changing directions. R
Always store objects so that they cannot be
flung around in these or in similar
situations.
R Always make sure that objects do not
protrude from stowage compartments,
parcel nets or stowage nets.
R Close lockable stowage compartments
while driving.
R Stow and secure objects that are heavy,
hard, pointy, sharp-edged, fragile or too
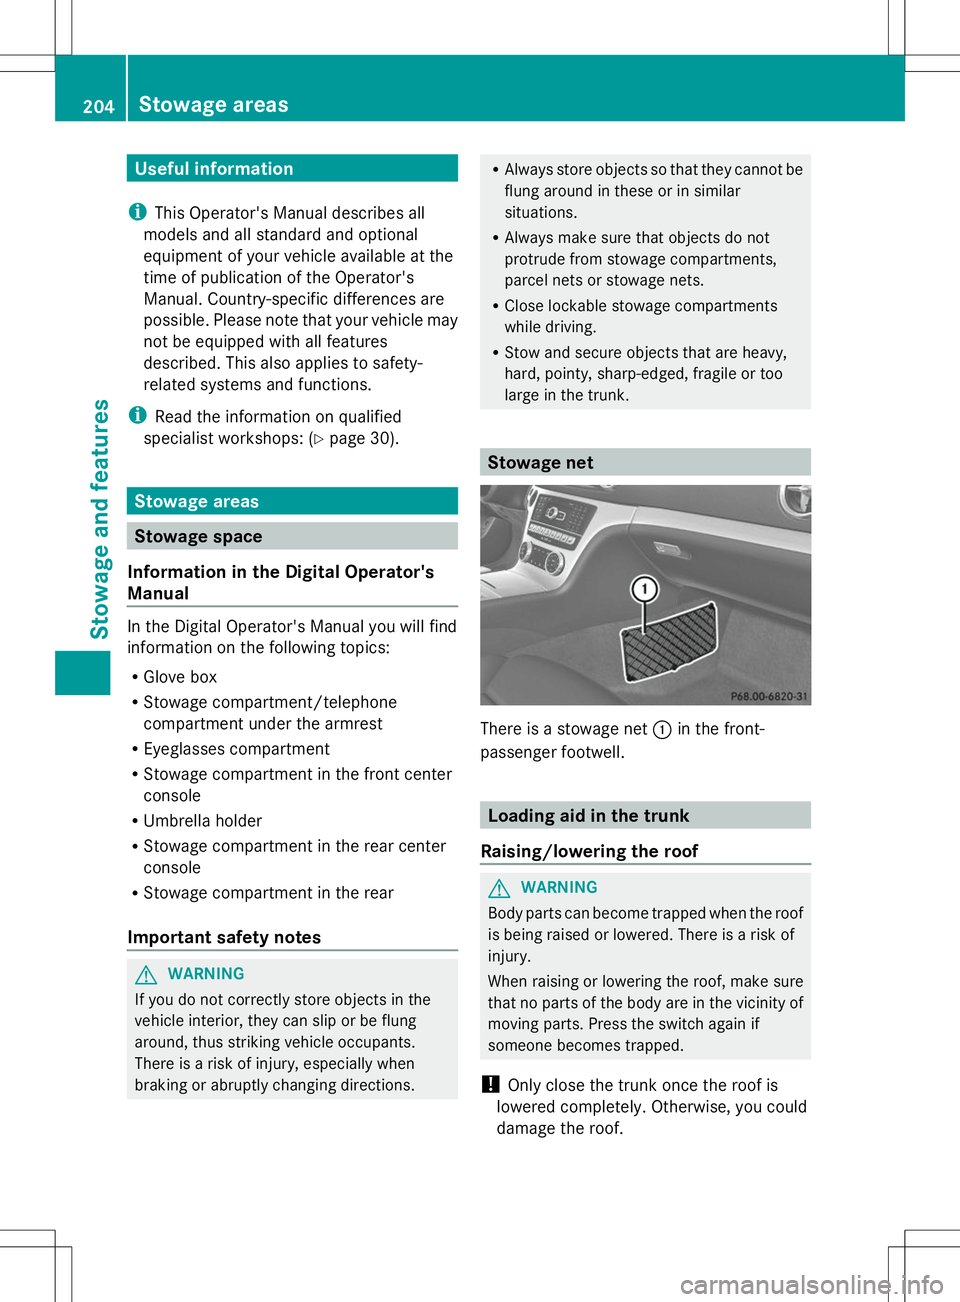
large in the trunk. Stowage net
There is a stowage net
:in the front-
passenger footwell. Loading aid in the trunk
Raising/lowering the roof G
WARNING
Body parts can become trapped when the roof
is being raised or lowered. There is a risk of
injury.
When raising or lowering the roof, make sure
that no parts of the body are in the vicinity of
moving parts. Press the switch again if
someone becomes trapped.
! Only close the trunk once the roof is
lowered completely. Otherwise, you could
damage the roof. 204
Stowage areasStowage and features
Page 207 of 284
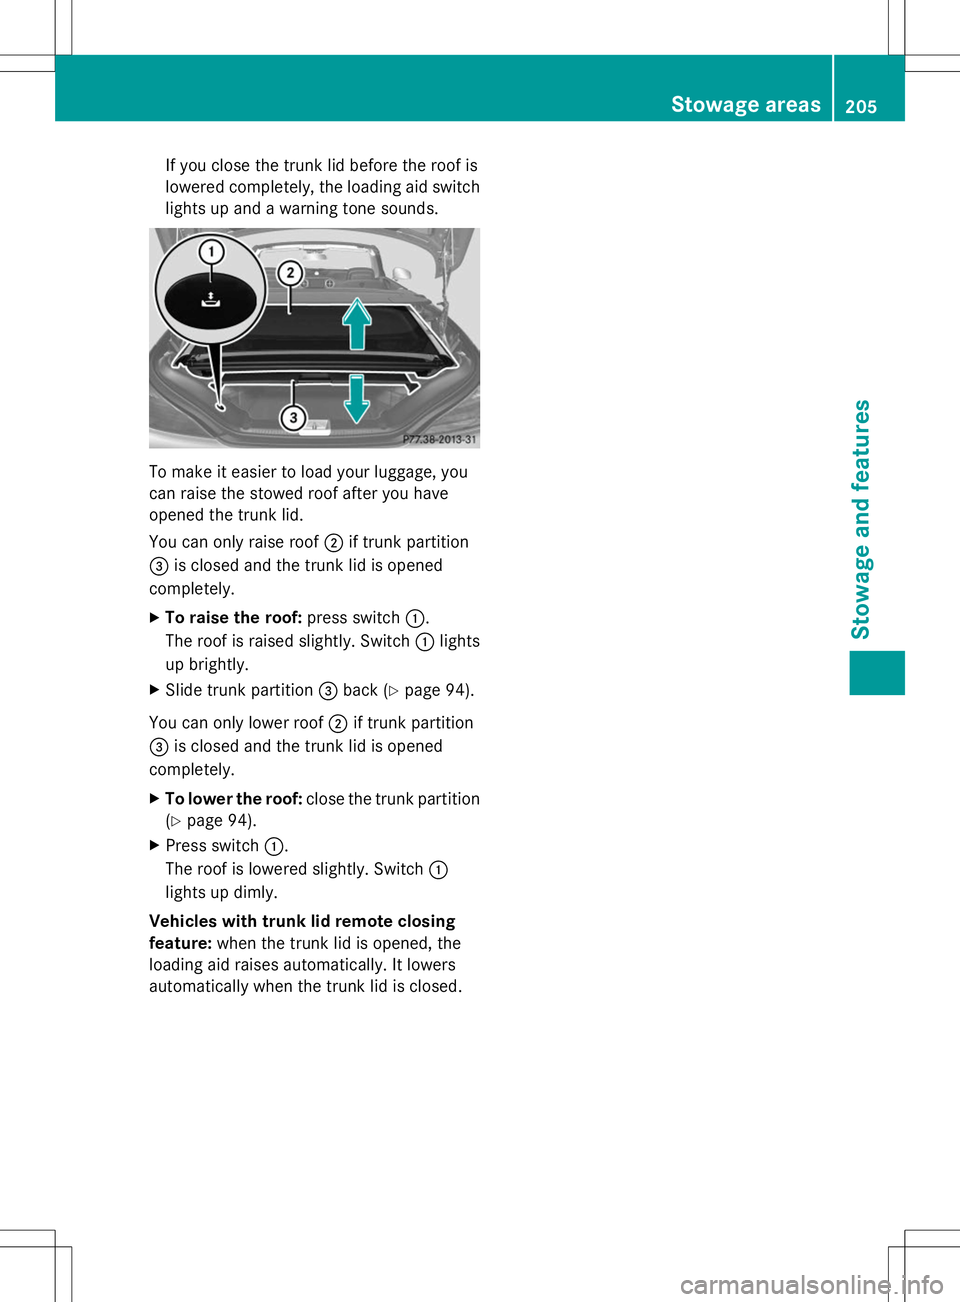
If you close the trunk lid before the roof is
lowered completely, the loading aid switch
lights up and a warning tone sounds. To make it easier to load your luggage, you
can raise the stowed roof after you have
opened the trunk lid.
You can only raise roof ;if trunk partition
= is closed and the trunk lid is opened
completely.
X To raise the roof: press switch:.
The roof is raised slightly. Switch :lights
up brightly.
X Slide trunk partition =back (Y page 94).
You can only lower roof ;if trunk partition
= is closed and the trunk lid is opened
completely.
X To lower the roof: close the trunk partition
(Y page 94).
X Press switch :.
The roof is lowered slightly. Switch :
lights up dimly.
Vehicles with trunk lid remote closing
feature: when the trunk lid is opened, the
loading aid raises automatically. It lowers
automatically when the trunk lid is closed. Stowage areas
205Stowage and features Z
Page 208 of 284
Problems with the loading aid
Problem Possible causes/consequences and
M
MSolutions It is no longer possible
to lower the stowed
roof in the trunk using
the loading aid. You cannot close the trunk any more.
X
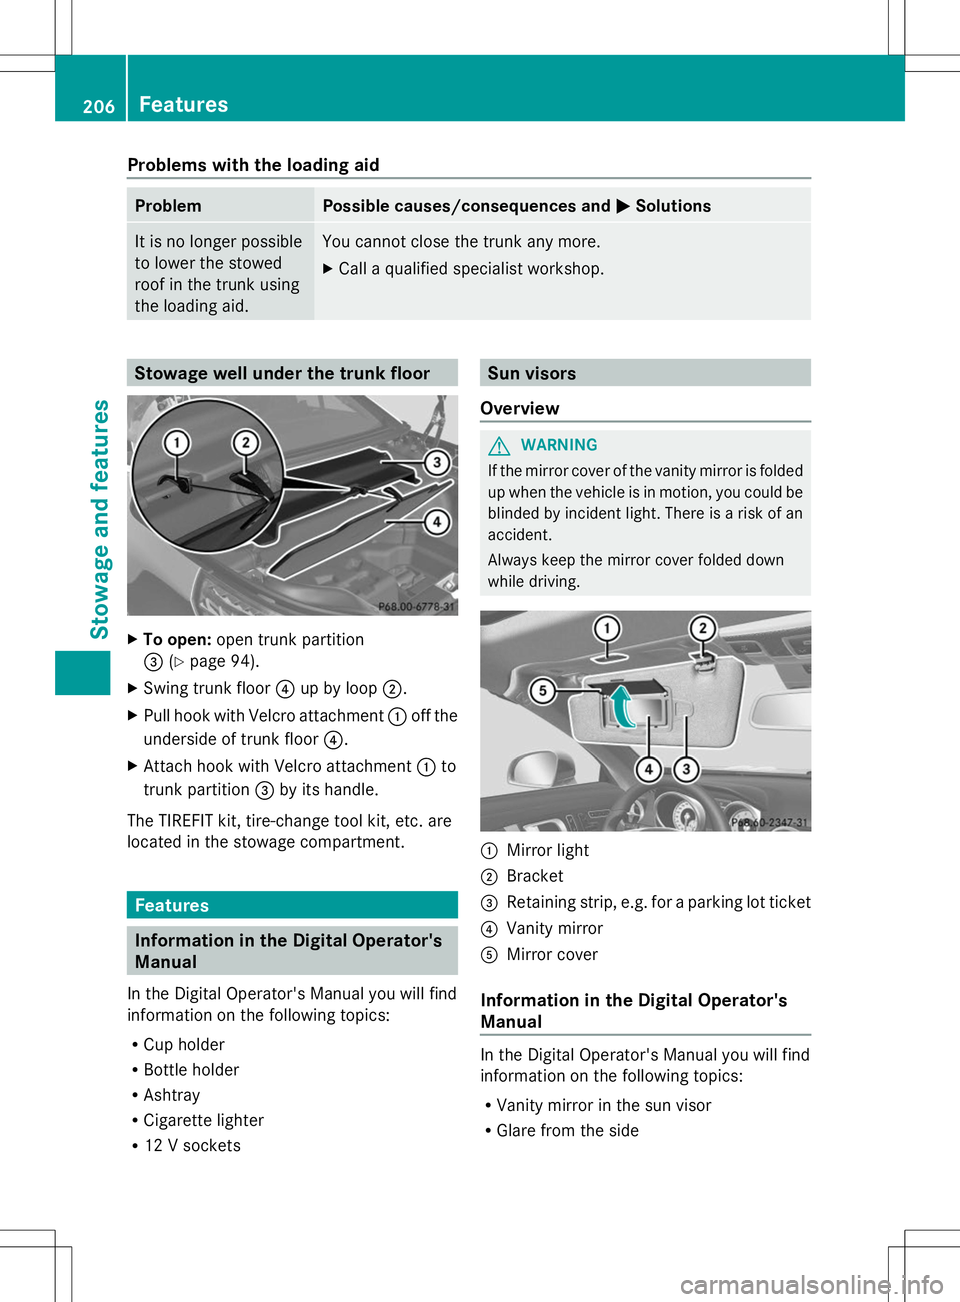
Call a qualified specialist workshop. Stowage well under the trunk floor
X
To open: open trunk partition
= (Ypage 94).
X Swing trunk floor ?up by loop ;.
X Pull hook with Velcro attachment :off the
underside of trunk floor ?.
X Attach hook with Velcro attachment :to
trunk partition =by its handle.
The TIREFIT kit, tire-change tool kit, etc. are
located in the stowage compartment. Features
Information in the Digital Operator's
Manual
In the Digital Operator's Manual you will find
information on the following topics:
R Cup holder
R Bottle holder
R Ashtray
R Cigarette lighter
R 12 V sockets Sun visors
Overview G
WARNING
If the mirror cover of the vanity mirror is folded
up when the vehicle is in motion, you could be
blinded by incident light. There is a risk of an
accident.
Always keep the mirror cover folded down
while driving. :
Mirror light
; Bracket
= Retaining strip, e.g. for a parking lot ticket
? Vanity mirror
A Mirror cover
Information in the Digital Operator's
Manual In the Digital Operator's Manual you will find
information on the following topics:
R
Vanity mirror in the sun visor
R Glare from the side 206
FeaturesStowage and features
Page 209 of 284
mbrace
Information in the Digital Operator's
Manual In the Digital Operator's Manual you will find
information on the following topics:
R Downloading destinations in COMAND
R Search and Send
R Vehicle remote opening
R Vehicle remote closing
R Stolen vehicle recovery service
R Vehicle remote malfunction diagnosis
R Downloading routes
R Speed alert
R Geo fencing
R Triggering the vehicle alarm
General notes You must have a license agreement to
activate the mbrace service. Make sure that
your system is activated and operational. To
log in, press the ïMB Info call button. If
any of the steps mentioned are not carried
out, the system may not be activated.
If you have questions about the activation,
contact one of the following telephone
hotlines:
R USA: Mercedes-Benz Customer Assistance
Center at
1-800-FOR-MERCedes (1-800-367-6372)
or 1-866-990-9007
R Canada: Customer Service at
1-888-923-8367
Shortly after successfully registering with the
service, a user ID and password will be sent
to you by post.
USA only: you can use this password to log
onto the mbrace area under "Owners Online"
at http://www.mbusa.com .The system is available if:
R
it has been activated and is operational
R the corresponding mobile phone network
is available for transmitting data to the
Customer Center
R a service subscription is available
R the starter battery is sufficiently charged
i Determining the location of the vehicle on
a map is only possible if:
R GPS reception is available.
R the vehicle position can be forwarded to
the Customer Assistance Center.
The mbrace system To adjust the volume during a call, proceed
as follows:
X
Press the WorX button on the
multifunction steering wheel.
or
X Use the volume controller of COMAND.
The system offers various services, e.g:
R Automatic and manual emergency call
R Roadside Assistance call
R MB Info call
USA only: you can find information and a
description of all available features under
"Owners Online" at http://www.mbusa.com.
System self-test After you have switched on the ignition, the
system carries out a self-diagnosis.
A malfunction in the system has been
detected if one of the following occurs:
R
The indicator lamp in the SOS button does
not come on during the system self-test.
R The indicator lamp in the FRoadside
Assistance button does not light up during
self-diagnosis of the system.
R The indicator lamp in the ïMB Info call
button does not light up during self-
diagnosis of the system. Features
207Stowage an d features Z
Page 210 of 284
R
The indicator lamp in one or more of the
following buttons continues to light up red
after the system self-diagnosis:
- SOS button
- F Roadside Assistance call button
- ï MB Info call button
R After the system self-diagnosis, the
Inoperative
Inoperative orService Not Service Not
Activated
Activated message appears in the
multifunction display.
If a malfunction is indicated as outlined
above, the system may not operate as
expected. In the event of an emergency, help
will have to be summoned by other means.
Have the system checked at the nearest
authorized Mercedes-Benz Center or contact
the following service hotlines:
R USA: Mercedes-Benz Customer Assistance
Center at
1-800-FOR-MERCedes (1-800-367-6372)
or 1-866-990-9007
R Canada: Customer Service at
1-888-923-8367
Emergency call Important safety notes
G
WARNING
It can be dangerous to remain in the vehicle,
even if you have pressed the SOS button in an
emergency if:
R you see smoke inside or outside of the
vehicle, e.g. if there is a fire after an
accident
R the vehicle is on a dangerous section of
road
R the vehicle is not visible or cannot easily be
seen by other road users, particularly when
dark or in poor visibility conditions
There is a risk of an accident and injury.
Leave the vehicle immediately in this or
similar situations as soon as it is safe to do
so. Move to a safe location along with other
vehicle occupants. In such situations, secure the vehicle in accordance with national
regulations, e. g. with a warning triangle.
You must have a license agreement to
activate the mbrace service. Make sure that
your system is activated and operational. To
register, press the ïMB Info call button.
If any of the steps mentioned are not carried
out, the system may not be activated.
If you have questions about the activation,
contact one of the following telephone
hotlines:
R USA: Mercedes-Benz Customer Assistance
Center at
1-800-FOR-MERCedes (1-800-367-6372)
or 1-866-990-9007
R Canada: Customer Service at
1-888-923-8367
General notes
An emergency call is dialed automatically if
an air bag or Emergency Tensioning Device is
triggered.
i You cannot end an automatically
triggered emergency call yourself.
An emergency call can also be initiated
manually.
As soon as the emergency call has been
initiated, the indicator lamp in the SOS button
flashes. The multifunction display shows the
Connecting Call Connecting Call message.
The audio output is muted.
Once the connection has been made, the
Call Connected Call Connected message appears in the
multifunction display.
All important information on the emergency
is transmitted, for example:
R Current location of the vehicle (as
determined by the GPS system)
R Vehicle identification number
R Information on the severity of the accident
Shortly after the emergency call has been
initiated, a voice connection is automatically
established between the Customer
Assistance Center and the vehicle occupants. 208
FeaturesStowage and features