fog light MERCEDES-BENZ SL-CLASS ROADSTER 2014 Owners Manual
[x] Cancel search | Manufacturer: MERCEDES-BENZ, Model Year: 2014, Model line: SL-CLASS ROADSTER, Model: MERCEDES-BENZ SL-CLASS ROADSTER 2014Pages: 284, PDF Size: 45.52 MB
Page 12 of 284
General notes
.................................. 69
Important safety information ...........69
Warning lamp ................................. 179
ETS (Electronic Traction System) ....... 69
Exhaust check ................................... 131
Exhaust tail pipe (cleaning
instructions) ...................................... 222
Exterior lighting Setting options .............................. 106
see Lights
Exterior mirrors
Adjusting ....................................... 102
Dipping (automatic) .......................102
Folding in when locking (on-board
computer) ...................................... 161
Storing settings (memory function) 103
Storing the parking position ..........102
Eyeglasses compartment .................204 F
Filler cap see Fuel filler flap
Filling capacities (Technical data) ...275
First-aid kit ......................................... 226
Flat tire MOExtended tires ..........................227
Preparing the vehicle .....................227
TIREFIT kit ...................................... 228
Floormats ........................................... 214
Front fog lamps Display message ............................ 163
Fuel
Consumption statistics ..................161
Displaying the current
consumption .................................. 161
Displaying the range ......................161
Driving tips .................................... 131
Fuel gauge ....................................... 35
Grade (gasoline) ............................ 276
Important safety notes ..................275
Premium-grade unleaded gasoline .276
Problem (malfunction) ...................130
Refueling ........................................ 127
Tank content/reserve fuel .............275
Fuel filler flap
Opening/closing ............................ 128Fuel level
Calling up the range (on-board
computer) ...................................... 161
Fuel tank
Capacity ........................................ 275
Problem (malfunction) ...................130
Fuse allocation chart (vehicle tool
kit) ...................................................... 226
Fuses Allocation chart ............................. 240
Before changing ............................. 240
Dashboard fuse box .......................241
Fuse box in the engine
compartment ................................. 241
Fuse box in the rear compartment .242
Important safety notes ..................240 G
Garage door opener Clearing the memory .....................214
Important safety notes ..................211
Opening/closing the garage door ..214
Programming (button in the rear-
view mirror) ................................... 212
Gasoline ............................................. 276
Gear indicator (on-board
computer) .......................................... 161
Gear or selector lever (cleaning
guidelines) ......................................... 223
Genuine parts ...................................... 26
Glass roof (sunblind) ...........................97
Glove box ........................................... 204
Google™ Local Search see also Digital Operator's Manual 188 H
HANDS-FREE ACCESS .......................... 86
Hazard warning lamps ......................106
Head bags Display message ............................ 168
Operation ........................................ .50
Headlamps
Cleaning system (notes) ................278
Fogging up ..................................... 106
see Automatic headlamp mode
Head level heating (AIRSCARF) ........101 10
Index
Page 16 of 284
Operating safety
Declaration of conformity ................30
Important safety notes ....................29
Operating system
see On-board computer
Operator's Manual
Vehicle equipment ...........................27
Outside temperature display ...........160
Overhead control panel ......................41 P
Paint code number ............................274
Paintwork (cleaning instructions) ...222
Panic alarm .......................................... 44
Parking ............................................... 130
Important safety notes ..................130
Position of exterior mirror, front-
passenger side ............................... 102
Rear view camera .......................... 147
see PARKTRONIC
Parking aid
Active Parking Assist .....................145
see Exterior mirrors
see PARKTRONIC
Parking brake
Display message ............................ 163
Parking lamps
Switching on/off ........................... 108
PARKTRONIC
Deactivating/activating .................145
Driving system ............................... 144
Function/notes ............................. 144
Important safety notes ..................144
Problem (malfunction) ...................145
Range of the sensors .....................144
Warning displa y............................. 145
PASSENGER AIR BAG OFF
Problem (malfunction) .....................56
Problems (malfunction) .................. 170
PASSENGER AIR BAG OFF indicator
lamp ...................................................... 51
Phone book see also Digital Operator's Manual 188
Plastic trim (cleaning instructions) .223
Power closing feature .........................84
Power washers .................................. 222Power windows
see Side windows
PRE-SAFE ®
(anticipatory occupant
protection) Display message ............................ 167
Operation ........................................ .57
PRE-SAFE ®
Brake
Activating/deactivating .................161
Display message ............................ 167
Function/notes ................................ 73
Warning lamp ................................. 184
Program selector button ..................126
Protection of the environment General notes .................................. 26
Pulling away (automatic
transmission) ..................................... 124 Q
Qualified specialist workshop ...........30 R
RACE START Important safety notes ..................141
RACETIMER (on-board
computer) .......................................... 161
Radar sensor system Activating/deactivating .................161
Display message ............................ 163
Radio
Selecting a station .........................161
see separate operating instructions
Radio mode
see also Digital Operator's Manual 188
Radio-wave reception/
transmission in the vehicle
Declaration of conformity ................30
Reading lamp ..................................... 110
Rear fog lamp Display message ............................ 163
Rear lamps
see Lights
Rear view camera
Cleaning instructions .....................222
Function/notes ............................. 147
Switching on/off ........................... 14814
Index
Page 108 of 284
Useful information
i This Operator's Manual describes all
models and all standard and optional
equipment of your vehicle available at the
time of publication of the Operator's
Manual. Country-specific differences are
possible. Please note that your vehicle may
not be equipped with all features
described. This also applies to safety-
related systems and functions.
i Read the information on qualified
specialist workshops: (Y page 30).Exterior lighting
General notes
For reasons of safety, Mercedes-Benz
recommends that you drive with the lights
switched on even during the daytime. In some
countries, operation of the headlamps varies
due to legal requirements and self-imposed
obligations. Driving abroad
Symmetrical low-beam headlamps Switch the headlamps to symmetrical low
beam in countries in which traffic drives on
the opposite side of the road from the country
where the vehicle is registered. This prevents
glare to oncoming traffic. When using
symmetrical lights, the edge of the road is not
lit as widely and as far ahead as normal.
Have the headlamps converted at a qualified
specialist workshop as close to the border as
possible before driving in these countries.
Asymmetrical low beam Have the headlamps converted back to
asymmetrical low-beam headlamps at a
qualified specialist workshop as soon as
possible after crossing the border again. Information in the Digital Operator's
Manual
In the Digital Operator's Manual you will find
information on the following topics:
R Hazard warning lamps
R Headlamps fogged up on the inside Setting the exterior lighting
Setting options Exterior lighting can be set using:
R
the light switch
R the combination switch (Y page 108)
R the on-board computer (Y page 161)
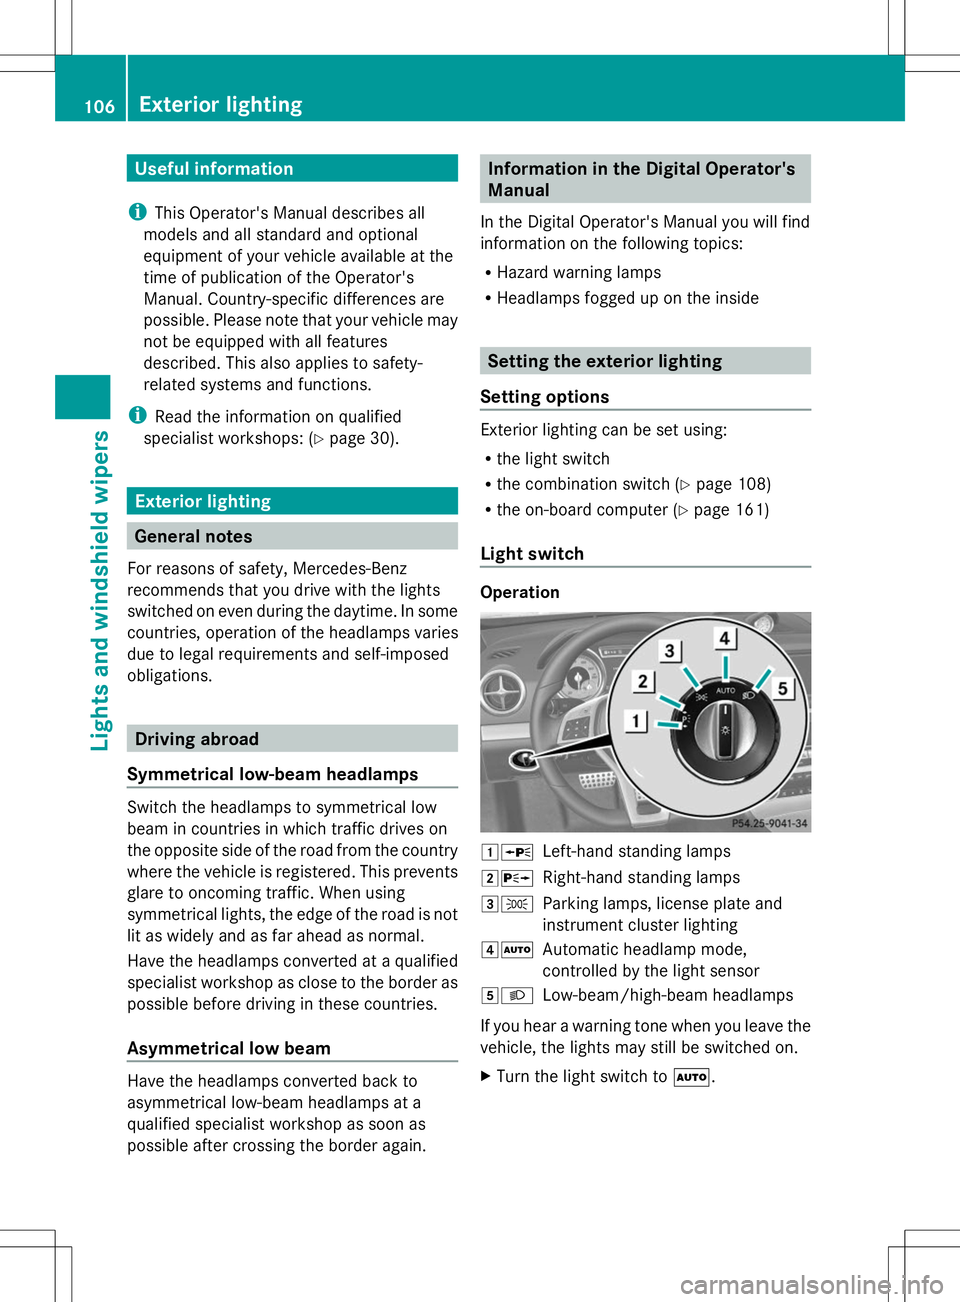
Light switch Operation
1W
Left-hand standing lamps
2X Right-hand standing lamps
3T Parking lamps, license plate and
instrument cluster lighting
4Ã Automatic headlamp mode,
controlled by the light sensor
5L Low-beam/high-beam headlamps
If you hear a warning tone when you leave the
vehicle, the lights may still be switched on.
X Turn the light switch to Ã.106
Exterior lightingLights and windshield wipers
Page 109 of 284
The exterior lighting (except the parking/
standing lamps) switches off automatically if
you:
R remove the SmartKey from the ignition lock
R open the driver's door with the SmartKey
in position 0.
Automatic headlamp mode G
WARNING
When the light switch is set to Ã, the low-
beam headlamps may not be switched on
automatically if there is fog, snow or other
causes of poor visibility due to the weather
conditions such as spray. There is a risk of an
accident.
In such situations, turn the light switch to
L.
The automatic headlamp feature is only an
aid. The driver is responsible for the vehicle's
lighting at all times.
à is the favored light switch setting. The
light setting is automatically selected
according to the brightness of the ambient
light (exception: poor visibility due to weather
conditions such as fog, snow or spray):
R SmartKey in position 1in the ignition lock:
the parking lamps are switched on or off
automatically depending on the brightness
of the ambient light.
R With the engine running: if you have
activated the daytime running lamps
function via the on-board computer, the
daytime running lamps or the low-beam
headlamps and parking lamps are switched
on or off automatically depending on the
brightness of the ambient light.
X To switch on automatic headlamp
mode: turn the light switch to Ã.
Only for Canada:
The daytime running lamps improve the
visibility of your vehicle during the day. The
daytime running lamps function is required by
law in Canada. It cannot therefore be
deactivated. When the engine is running and the vehicle is
stationary: if you move the selector lever from
a drive position to
P, the daytime running
lamps/low-beam headlamps go out after
three minutes.
When the engine is running, the vehicle is
stationary and in bright ambient light: if you
turn the light switch to T, the daytime
running lamps and parking lamps switch on.
If the engine is running and you turn the light
switch to L, the manual settings take
precedence over the daytime running lamps.
USA only:
The daytime running lamps improve the
visibility of your vehicle during the day. To do
this, the daytime running lamps function must
be switched on using the on-board computer
(Y page 161).
If the engine is running and you turn the light
switch to TorL, the manual settings
take precedence over the daytime running
lamps.
Low-beam headlamps G
WARNING
When the light switch is set to Ã, the low-
beam headlamps may not be switched on
automatically if there is fog, snow or other
causes of poor visibility due to the weather
conditions such as spray. There is a risk of an
accident.
In such situations, turn the light switch to
L.
Even if the light sensor does not detect that
it is dark, the parking lamps and low-beam
headlamps switch on when the ignition is
switched on and the light switch is set to the
L position. This is a particularly useful
function in the event of rain and fog.
X To switch on the low-beam headlamps:
turn the SmartKey in the ignition lock to
position 2or start the engine.
X Turn the light switch to L.
The green Lindicator lamp in the
instrument cluster lights up. Exterior lighting
107Lights and windshield wipers Z
Page 111 of 284
Active:
R
if you are driving at speeds below
25mph (40 km/h) and switch on the turn
signal or turn the steering wheel.
R if you are driving at speeds between
25mph (40 km/h) and45mph (70 km/h)
and turn the steering wheel
Not active: if you are driving at speeds above
25 mph (40 km/h) or switch off the turn
signals or turn the steering wheel to the
straight-ahead position.
The cornering light function may remain lit for
a short time, but is automatically switched off
after no more than three minutes. Active light function
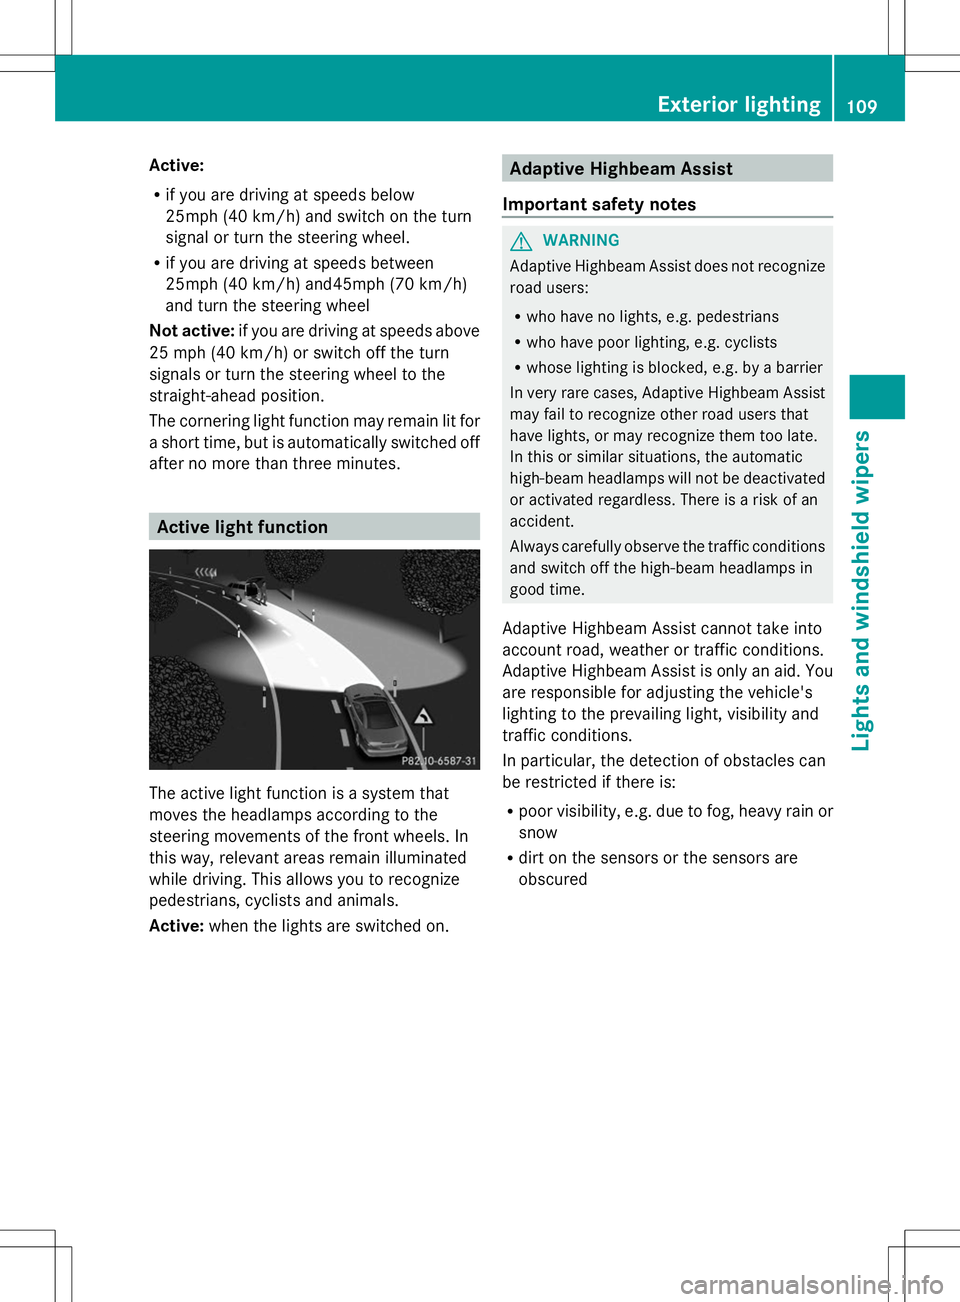
The active light function is a system that
moves the headlamps according to the
steering movements of the front wheels. In
this way, relevant areas remain illuminated
while driving. This allows you to recognize
pedestrians, cyclists and animals.
Active: when the lights are switched on. Adaptive Highbeam Assist
Important safety notes G
WARNING
Adaptive Highbeam Assist does not recognize
road users:
R who have no lights, e.g. pedestrians
R who have poor lighting, e.g. cyclists
R whose lighting is blocked, e.g. by a barrier
In very rare cases, Adaptive Highbeam Assist
may fail to recognize other road users that
have lights, or may recognize them too late.
In this or similar situations, the automatic
high-beam headlamps will not be deactivated
or activated regardless. There is a risk of an
accident.
Always carefully observe the traffic conditions
and switch off the high-beam headlamps in
good time.
Adaptive Highbeam Assist cannot take into
account road, weather or traffic conditions.
Adaptive Highbeam Assist is only an aid. You
are responsible for adjusting the vehicle's
lighting to the prevailing light, visibility and
traffic conditions.
In particular, the detection of obstacles can
be restricted if there is:
R poor visibility, e.g. due to fog, heavy rain or
snow
R dirt on the sensors or the sensors are
obscured Exterior lighting
109Lights and windshield wipers Z
Page 135 of 284
the distance to the vehicle in front, for vehicle
speed, for braking in good time and for
staying in lane.
Do not use cruise control:
R in road and traffic conditions which do not
allow you to maintain a constant speed e.g.
in heavy traffic or on winding roads
R on slippery road surfaces. Braking or
accelerating could cause the drive wheels
to lose traction and the vehicle could then
skid
R when there is poor visibility, e.g. due to fog,
heavy rain or snow
If there is a change of drivers, advise the new
driver of the speed stored. G
WARNING
If you call up the stored speed and it differs
from the current speed, the vehicle
accelerates or decelerates. If you do not know
the stored speed, the vehicle could accelerate
or brake unexpectedly. There is a risk of an
accident.
Pay attention to the road and traffic
conditions before calling up the stored speed.
If you do not know the stored speed, store the
desired speed again.
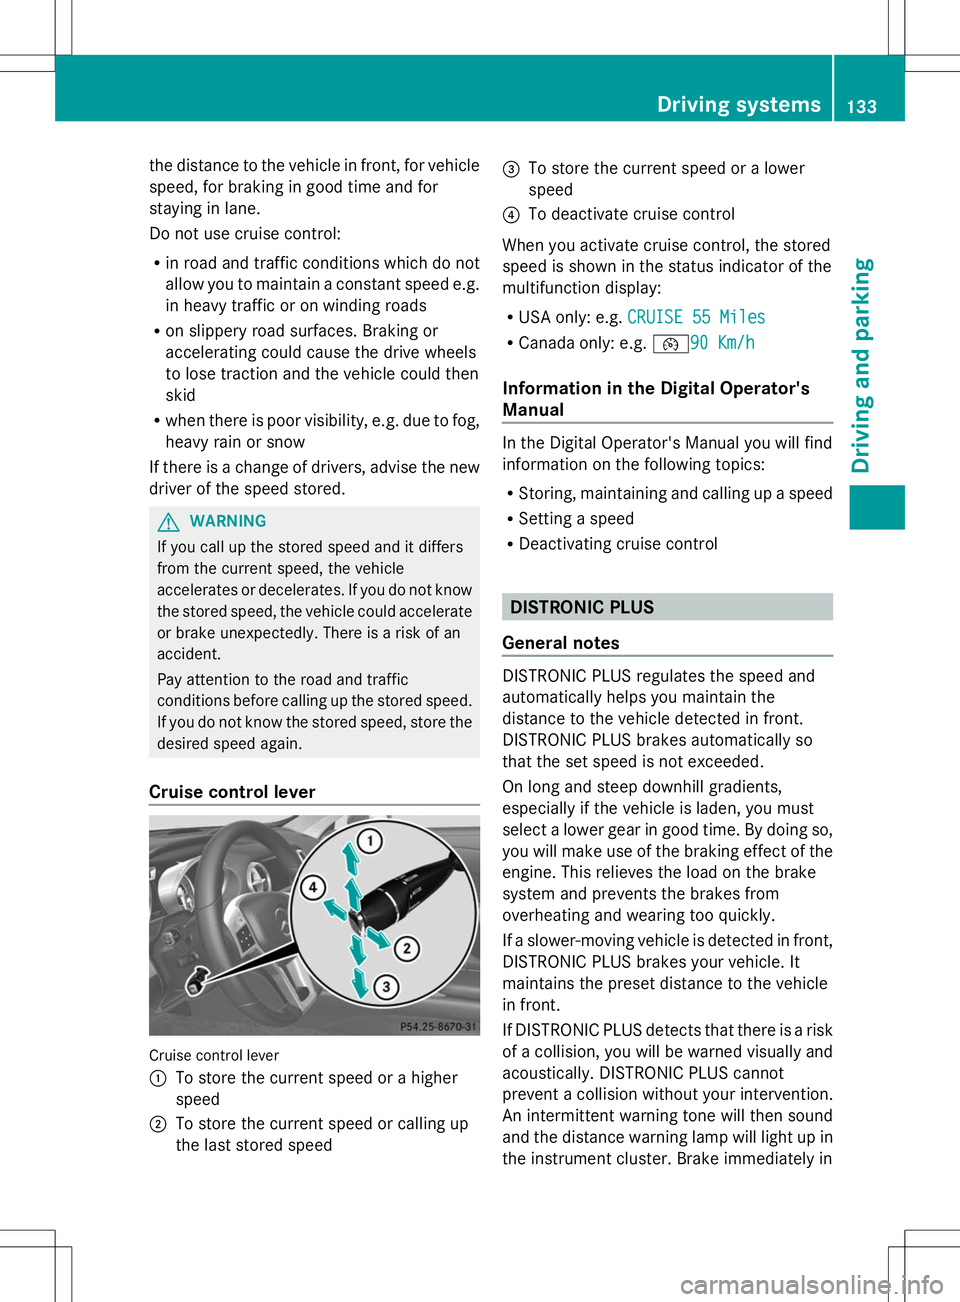
Cruise control lever Cruise control lever
:
To store the current speed or a higher
speed
; To store the current speed or calling up
the last stored speed =
To store the current speed or a lower
speed
? To deactivate cruise control
When you activate cruise control, the stored
speed is shown in the status indicator of the
multifunction display:
R USA only: e.g. CRUISE 55 Miles
CRUISE 55 Miles
R Canada only: e.g. ¯90 Km/h90 Km/h
Information in the Digital Operator's
Manual In the Digital Operator's Manual you will find
information on the following topics:
R
Storing, maintaining and calling up a speed
R Setting a speed
R Deactivating cruise control DISTRONIC PLUS
General notes DISTRONIC PLUS regulates the speed and
automatically helps you maintain the
distance to the vehicle detected in front.
DISTRONIC PLUS brakes automatically so
that the set speed is not exceeded.
On long and steep downhill gradients,
especially if the vehicle is laden, you must
select a lower gear in good time. By doing so,
you will make use of the braking effect of the
engine. This relieves the load on the brake
system and prevents the brakes from
overheating and wearing too quickly.
If a slower-moving vehicle is detected in front,
DISTRONIC PLUS brakes your vehicle. It
maintains the preset distance to the vehicle
in front.
If DISTRONIC PLUS detects that there is a risk
of a collision, you will be warned visually and
acoustically. DISTRONIC PLUS cannot
prevent a collision without your intervention.
An intermittent warning tone will then sound
and the distance warning lamp will light up in
the instrument cluster. Brake immediately in Driving systems
133Driving and parking Z
Page 149 of 284
Rear view camera
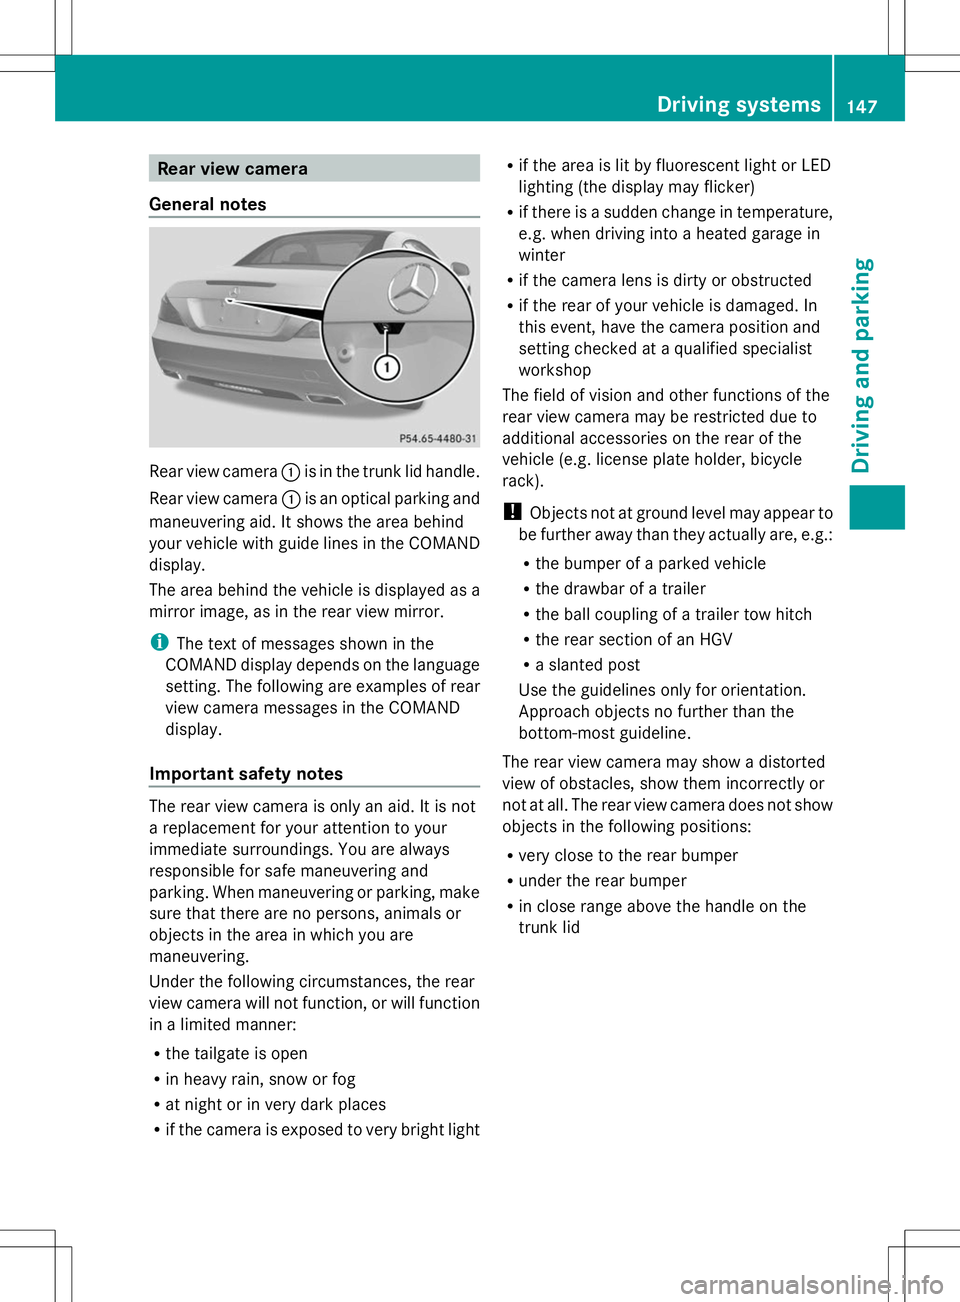
General notes Rear view camera
:is in the trunk lid handle.
Rear view camera :is an optical parking and
maneuvering aid. It shows the area behind
your vehicle with guide lines in the COMAND
display.
The area behind the vehicle is displayed as a
mirror image, as in the rear view mirror.
i The text of messages shown in the
COMAND display depends on the language
setting. The following are examples of rear
view camera messages in the COMAND
display.
Important safety notes The rear view camera is only an aid. It is not
a replacement for your attention to your
immediate surroundings. You are always
responsible for safe maneuvering and
parking. When maneuvering or parking, make
sure that there are no persons, animals or
objects in the area in which you are
maneuvering.
Under the following circumstances, the rear
view camera will not function, or will function
in a limited manner:
R the tailgate is open
R in heavy rain, snow or fog
R at night or in very dark places
R if the camera is exposed to very bright light R
if the area is lit by fluorescent light or LED
lighting (the display may flicker)
R if there is a sudden change in temperature,
e.g. when driving into a heated garage in
winter
R if the camera lens is dirty or obstructed
R if the rear of your vehicle is damaged. In
this event, have the camera position and
setting checked at a qualified specialist
workshop
The field of vision and other functions of the
rear view camera may be restricted due to
additional accessories on the rear of the
vehicle (e.g. license plate holder, bicycle
rack).
! Objects not at ground level may appear to
be further away than they actually are, e.g.:
R the bumper of a parked vehicle
R the drawbar of a trailer
R the ball coupling of a trailer tow hitch
R the rear section of an HGV
R a slanted post
Use the guidelines only for orientation.
Approach objects no further than the
bottom-most guideline.
The rear view camera may show a distorted
view of obstacles, show them incorrectly or
not at all. The rear view camera does not show
objects in the following positions:
R very close to the rear bumper
R under the rear bumper
R in close range above the handle on the
trunk lid Driving systems
147Driving and parking Z
Page 151 of 284
message appears in the multifunction
display.
X If necessary, take a break.
X Press the aor% button to confirm
the message.
On long journeys, take regular breaks in good
time to allow yourself to rest properly. If you
do not take a break and ATTENTION ASSIST
still detects increasing lapses in
concentration, you will be warned again after
15 minutes at the earliest.
ATTENTION ASSIST is reset when you
continue your journey and starts assessing
your tiredness again if:
R you switch off the engine.
R you take off your seat belt and open the
driver's door, e.g. for a change of drivers or
to take a break.
When ATTENTION ASSIST is deactivated, the
é symbol appears in the multifunction
display in the assistance graphics display. Night View Assist Plus
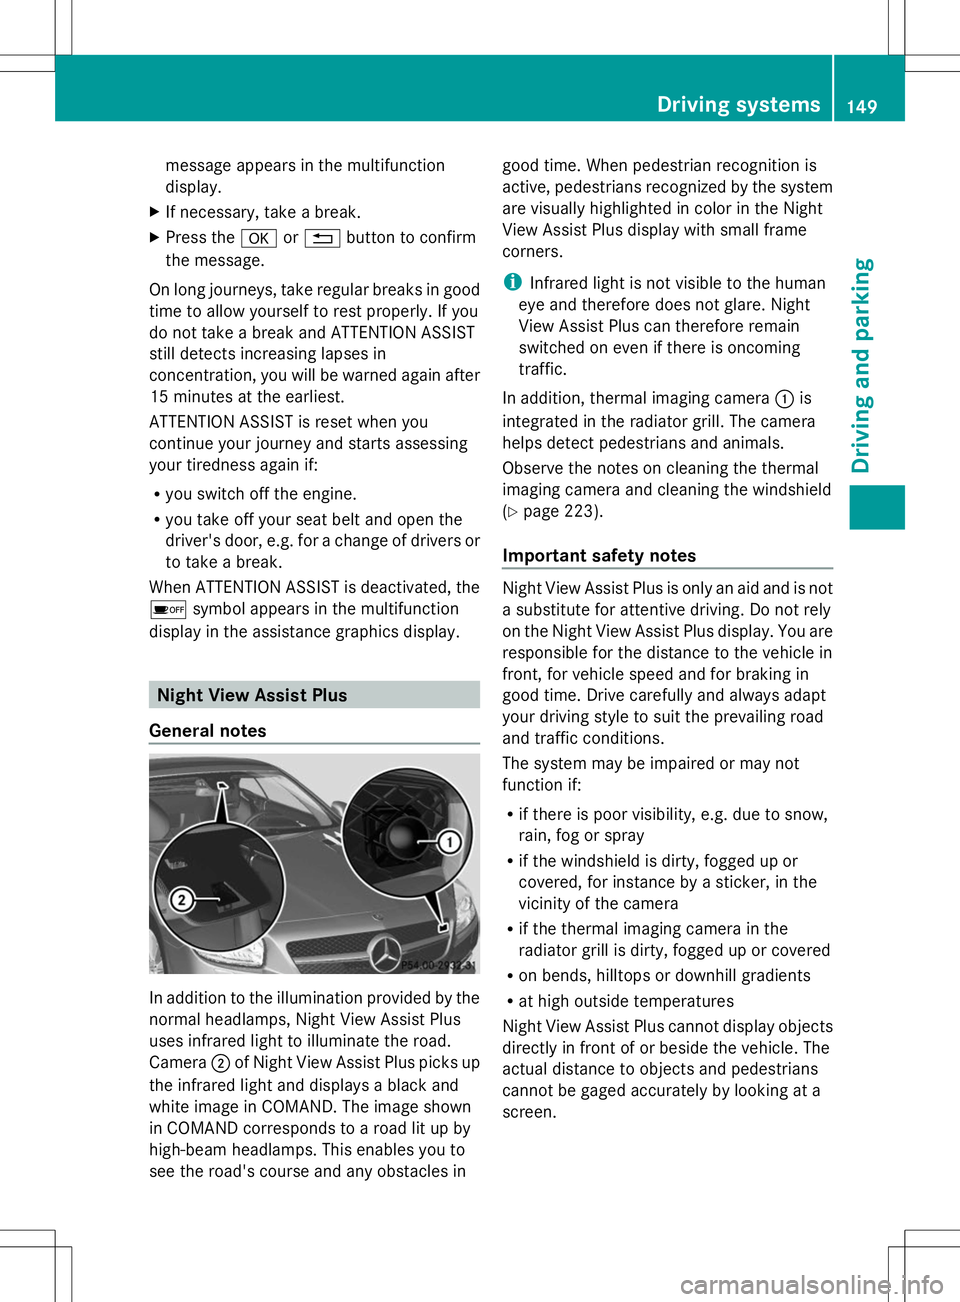
General notes In addition to the illumination provided by the
normal headlamps, Night View Assist Plus
uses infrared light to illuminate the road.
Camera
;of Night View Assist Plus picks up
the infrared light and displays a black and
white image in COMAND. The image shown
in COMAND corresponds to a road lit up by
high-beam headlamps. This enables you to
see the road's course and any obstacles in good time. When pedestrian recognition is
active, pedestrians recognized by the system
are visually highlighted in color in the Night
View Assist Plus display with small frame
corners.
i
Infrared light is not visible to the human
eye and therefore does not glare. Night
View Assist Plus can therefore remain
switched on even if there is oncoming
traffic.
In addition, thermal imaging camera :is
integrated in the radiator grill. The camera
helps detect pedestrians and animals.
Observe the notes on cleaning the thermal
imaging camera and cleaning the windshield
(Y page 223).
Important safety notes Night View Assist Plus is only an aid and is not
a substitute for attentive driving. Do not rely
on the Night View Assist Plus display. You are
responsible for the distance to the vehicle in
front, for vehicle speed and for braking in
good time. Drive carefully and always adapt
your driving style to suit the prevailing road
and traffic conditions.
The system may be impaired or may not
function if:
R
if there is poor visibility, e.g. due to snow,
rain, fog or spray
R if the windshield is dirty, fogged up or
covered, for instance by a sticker, in the
vicinity of the camera
R if the thermal imaging camera in the
radiator grill is dirty, fogged up or covered
R on bends, hilltops or downhill gradients
R at high outside temperatures
Night View Assist Plus cannot display objects
directly in front of or beside the vehicle. The
actual distance to objects and pedestrians
cannot be gaged accurately by looking at a
screen. Driving systems
149Driving and parking Z
Page 158 of 284
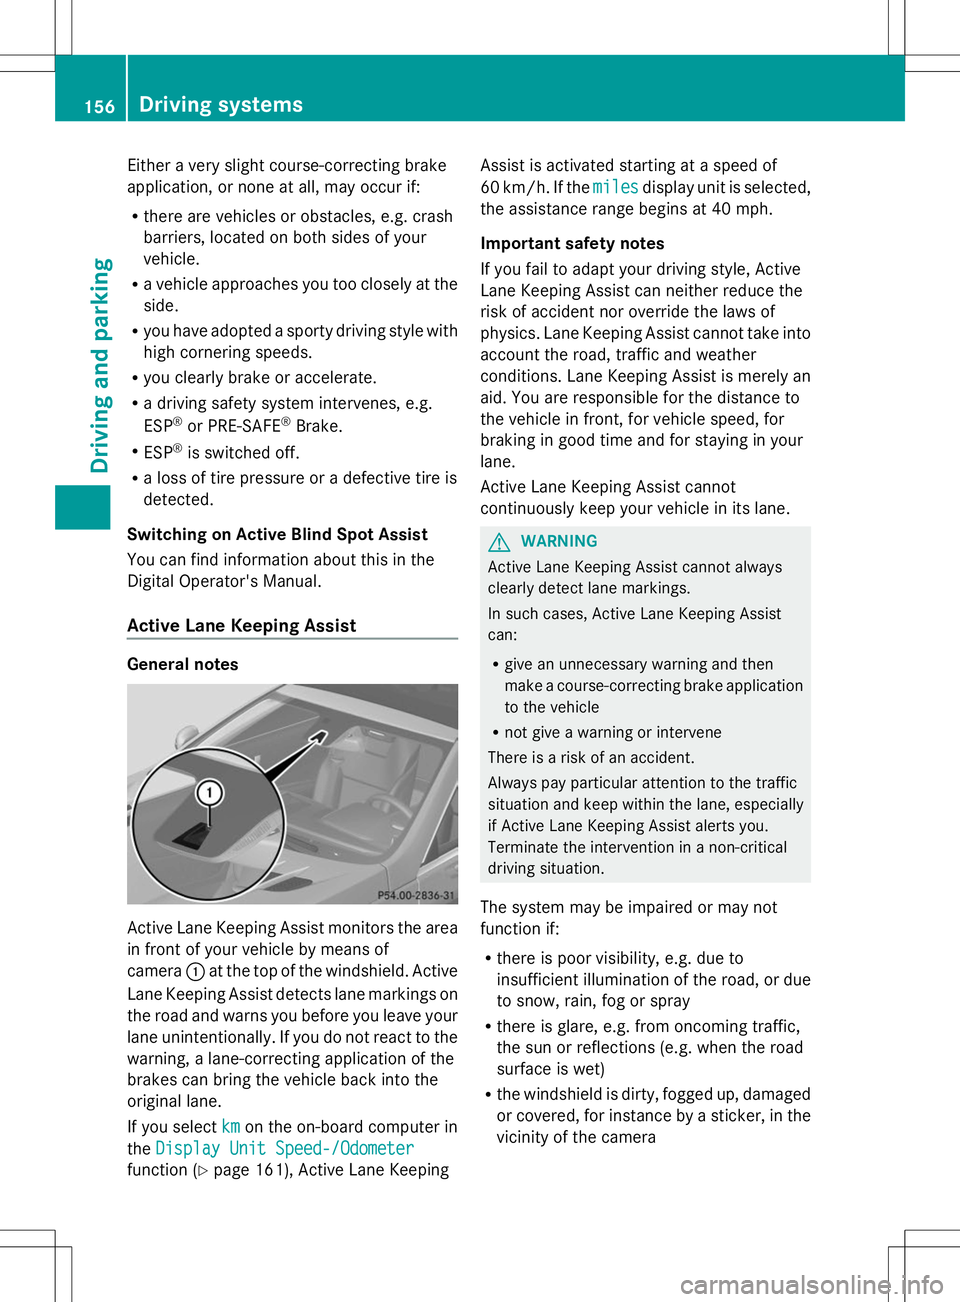
Either a very slight course-correcting brake
application, or none at all, may occur if:
R there are vehicles or obstacles, e.g. crash
barriers, located on both sides of your
vehicle.
R a vehicle approaches you too closely at the
side.
R you have adopted a sporty driving style with
high cornering speeds.
R you clearly brake or accelerate.
R a driving safety system intervenes, e.g.
ESP ®
or PRE-SAFE ®
Brake.
R ESP ®
is switched off.
R a loss of tire pressure or a defective tire is
detected.
Switching on Active Blind Spot Assist
You can find information about this in the
Digital Operator's Manual.
Active Lane Keeping Assist General notes
Active Lane Keeping Assist monitors the area
in front of your vehicle by means of
camera :at the top of the windshield. Active
Lane Keeping Assist detects lane markings on
the road and warns you before you leave your
lane unintentionally. If you do not react to the
warning, a lane-correcting application of the
brakes can bring the vehicle back into the
original lane.
If you select km
km on the on-board computer in
the Display Unit Speed-/Odometer
Display Unit Speed-/Odometer
function ( Ypage 161), Active Lane Keeping Assist is activated starting at a speed of
60 km/h. If the
miles milesdisplay unit is selected,
the assistance range begins at 40 mph.
Important safety notes
If you fail to adapt your driving style, Active
Lane Keeping Assist can neither reduce the
risk of accident nor override the laws of
physics. Lane Keeping Assist cannot take into
account the road, traffic and weather
conditions. Lane Keeping Assist is merely an
aid. You are responsible for the distance to
the vehicle in front, for vehicle speed, for
braking in good time and for staying in your
lane.
Active Lane Keeping Assist cannot
continuously keep your vehicle in its lane. G
WARNING
Active Lane Keeping Assist cannot always
clearly detect lane markings.
In such cases, Active Lane Keeping Assist
can:
R give an unnecessary warning and then
make a course-correcting brake application
to the vehicle
R not give a warning or intervene
There is a risk of an accident.
Always pay particular attention to the traffic
situation and keep within the lane, especially
if Active Lane Keeping Assist alerts you.
Terminate the intervention in a non-critical
driving situation.
The system may be impaired or may not
function if:
R there is poor visibility, e.g. due to
insufficient illumination of the road, or due
to snow, rain, fog or spray
R there is glare, e.g. from oncoming traffic,
the sun or reflections (e.g. when the road
surface is wet)
R the windshield is dirty, fogged up, damaged
or covered, for instance by a sticker, in the
vicinity of the camera 156
Driving systemsDriving an
d parking