flat tire MERCEDES-BENZ SL-CLASS ROADSTER 2016 Owner's Manual
[x] Cancel search | Manufacturer: MERCEDES-BENZ, Model Year: 2016, Model line: SL-CLASS ROADSTER, Model: MERCEDES-BENZ SL-CLASS ROADSTER 2016Pages: 614, PDF Size: 15.67 MB
Page 573 of 614
vide the best possible grip in wintry road con-
ditions.
Only these tires will allow driving safety sys-
tems such as ABS and ESP
®to function opti-
mally in winter. These tires have been devel-
oped specifically for driving in snow.
Use M+S tires of the same make and tread on all wheels to maintain safe handling charac-
teristics.
Always observe the maximum permissible
speed specified for the M+S tires you have
mounted.
When you have mounted the M+S tires:
XCheck the tire pressures (Ypage 575).
XRestart the tire pressure monitor
(
Ypage 577).
Snow chains
GWARNING
If snow chains are installed to the front
wheels, they may drag against the vehicle
body or chassis components. This could
cause damage to the vehicle or the tires.
There is a risk of an accident.
To avoid hazardous situations:
Rnever install snow chains to the front
wheels
Ralways install snow chains in pairs to the
rear wheels.
For safety reasons, Mercedes-Benz recom-
mends that you only use snow chains that
have been specially approved for your vehicle
by Mercedes-Benz, or are of a corresponding
standard of quality. For more information,
please contact a qualified specialist work-
shop. If you intend to mount snow chains, please
bear the following points in mind:
RSnow chains may not be mounted on all
wheel/tire combinations. Permissible
wheel-tire combinations (
Ypage 593).
ROnly use snow chains when driving on
roads completely covered by snow.
Remove the snow chains as soon as possi-
ble when you come to a road that is not
snow-covered.
RLocal regulations may restrict the use of
snow chains. Observe the appropriate reg-
ulations if you wish to install snow chains.
RDo not exceed the maximum permissible
speed of 30 mph (50 km/h).
ROn vehicles with Active Body Control (ABC),
you must drive at a raised vehicle level if
snow chains have been installed
(
Ypage 194).
You may wish to deactivate ESP
®when pull-
ing away with snow chains installed
(
Ypage 74). You can thereby allow the wheels
to spin in a controlled manner, achieving an
increased driving force (cutting action).
Tire pressure
Tire pressure specifications
Important safety notes
GWARNING
Underinflated or overinflated tires pose the
following risks:
Rthe tires may burst, especially as the load
and vehicle speed increase.
Rthe tires may wear excessively and/or
unevenly, which may greatly impair tire
traction.
Rthe driving characteristics, as well as steer-
ing and braking, may be greatly impaired.
There is a risk of an accident.
Tire pressure571
Wheels and tires
Z
Page 574 of 614
Follow recommended tire inflation pressures
and check the pressure of all the tires includ-
ing the spare wheel:
Rmonthly, at least
Rif the load changes
Rbefore beginning a long journey
Runder different operating conditions, e.g.
off-road driving
If necessary, correct the tire pressure.
iThe specifications on the sample Tire and
Loading Information placard and tire pres-
sure tables are examples. Tire pressure
specifications are vehicle-specific and may
deviate from the data shown here. The tire
pressure specifications that are valid for
your vehicle can be found on the Tire and
Loading Information placard and tire pres-
sure table on the vehicle.
General notes
The recommended tire pressures for the tires
mounted at the factory can be found on the
labels described here.
Further information on tire pressures can be
obtained at a qualified specialist workshop.
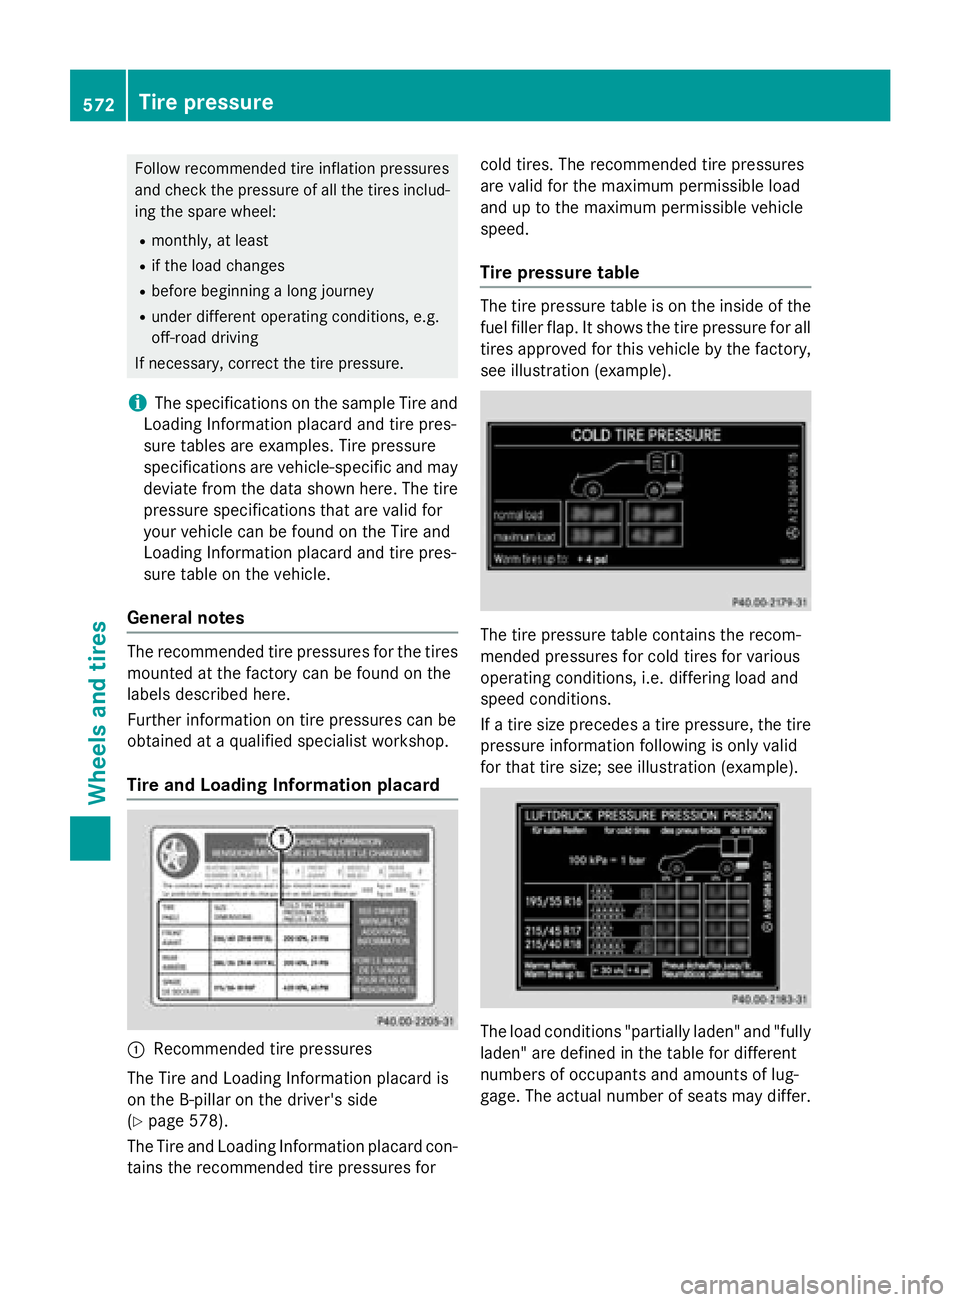
Tire and Loading Information placard
:Recommended tire pressures
The Tire and Loading Information placard is
on the B-pillar on the driver's side
(
Ypage 578).
The Tire and Loading Information placard con-
tains the recommended tire pressures for cold tires. The recommended tire pressures
are valid for the maximum permissible load
and up to the maximum permissible vehicle
speed.
Tire pressure table
The tire pressure table is on the inside of the
fuel filler flap. It shows the tire pressure for all tires approved for this vehicle by the factory,
see illustration (example).
The tire pressure table contains the recom-
mended pressures for cold tires for various
operating conditions, i.e. differing load and
speed conditions.
If a tire size precedes a tire pressure, the tire
pressure information following is only valid
for that tire size; see illustration (example).
The load conditions "partially laden" and "fully
laden" are defined in the table for different
numbers of occupants and amounts of lug-
gage. The actual number of seats may differ.
572Tire pressure
Wheels and tires
Page 576 of 614
pressure to the value specified for cold tires.
The tire pressure would otherwise be too low.
Observe the recommended tire pressures for
cold tires:
Ron the Tire and Loading Information placard on the B-pillar on the driver's side
Rin the tire pressure table on the inside of the
fuel filler flap
Underinflated or overinflated tires
Underinflation
GWARNING
Tires with pressure that is too low can over-
heat and burst as a consequence. In addition, they also suffer from excessive and/or irreg-
ular wear, which can severely impair the brak-
ing properties and the driving characteristics.
There is a risk of an accident.
Avoid tire pressures that are too low in all the
tires, including the spare wheel.
Underinflated tires may:
Roverheat, leading to tire defects
Rhave an adverse effect on handling charac-
teristics
Rwear quickly and unevenly
Rhave an adverse effect on fuel consumption
Overinflation
GWARNING
Tires with excessively high pressure can burst
because they are damaged more easily by
road debris, potholes etc. In addition, they
also suffer from irregular wear, which can
severely impair the braking properties and the driving characteristics. There is a risk of an
accident.
Avoid tire pressures that are too high in all the
tires, including the spare wheel.
Overinflated tires may:
Rincrease the braking distance
Rhave an adverse effect on handling charac-
teristics
Rwear quickly and unevenly
Rhave an adverse effect on ride comfort
Rbe more susceptible to damage
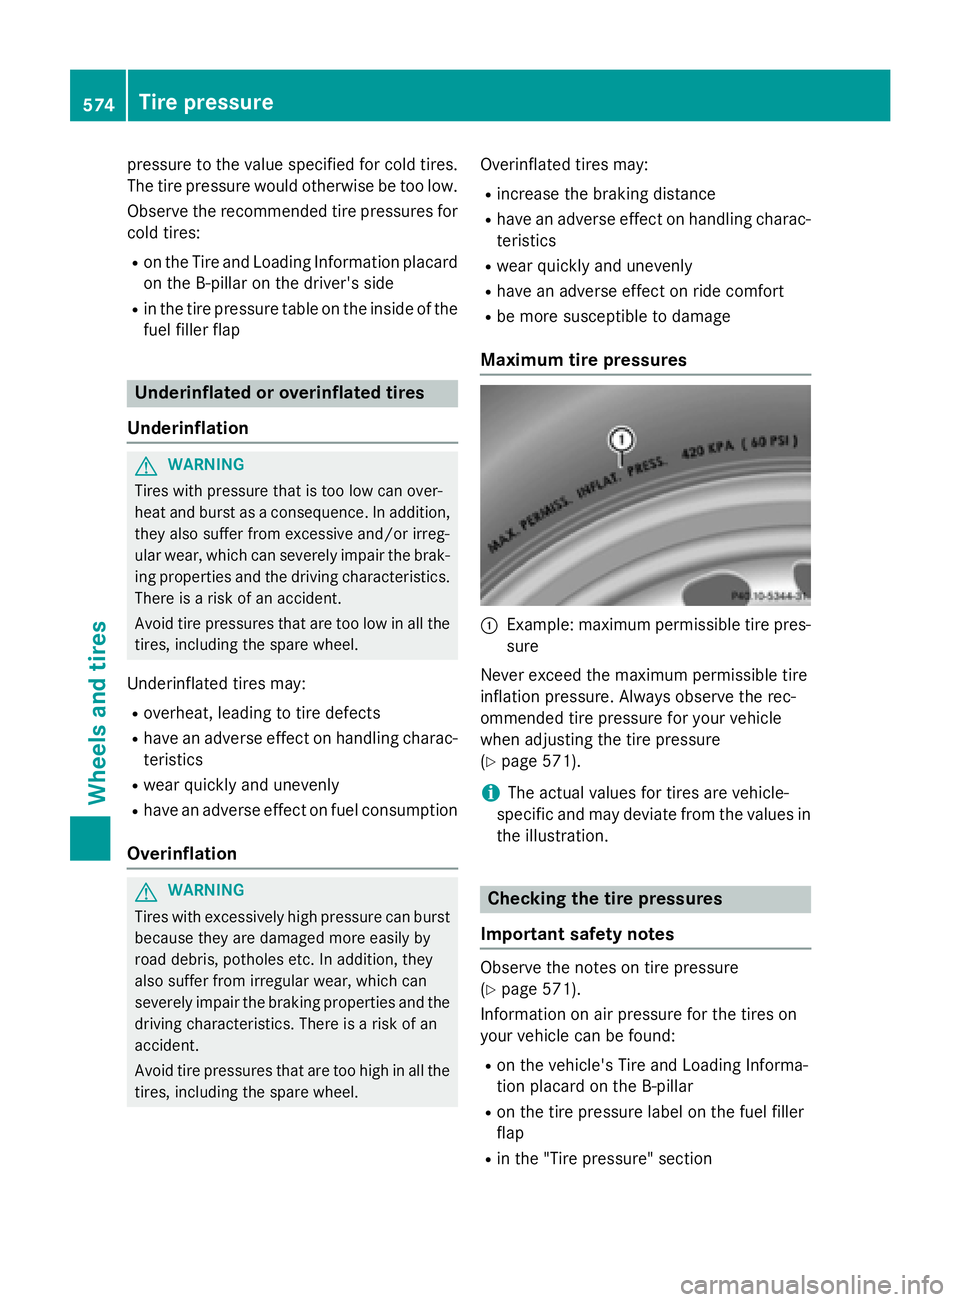
Maximum tire pressures
:Example: maximum permissible tire pres-
sure
Never exceed the maximum permissible tire
inflation pressure. Always observe the rec-
ommended tire pressure for your vehicle
when adjusting the tire pressure
(
Ypage 571).
iThe actual values for tires are vehicle-
specific and may deviate from the values in
the illustration.
Checking the tire pressures
Important safety notes
Observe the notes on tire pressure
(
Ypage 571).
Information on air pressure for the tires on
your vehicle can be found:
Ron the vehicle's Tire and Loading Informa-
tion placard on the B-pillar
Ron the tire pressure label on the fuel filler
flap
Rin the "Tire pressure" section
574Tire pressure
Wheels and tires
Page 577 of 614
Checking tire pressures manually
To determine and set the correct tire pres-
sure, proceed as follows:
XRemove the valve cap of the tire that is to
be checked.
XPress the tire pressure gauge securely onto
the valve.
XRead the tire pressure and compare it to
the recommended value on the Tire and
Loading Information placard or the tire
pressure table (
Ypage 571).
XIf the tire pressure is too low, increase the
tire pressure to the recommended value.
XIf the tire pressure is too high, release air.
To do so, press down the metal pin in the
valve, using the tip of a pen for example.
Then check the tire pressure again using
the tire pressure checker.
XScrew the valve cap onto the valve.
XRepeat these steps for the other tires.
Tire pressure monitor
General notes
If a tire pressure monitor is installed, the vehi-
cle's wheels have sensors that monitor the
tire pressures in all four tires. The tire pres-
sure monitor warns you if the pressure drops
in one or more of the tires. The tire pressure
monitor only functions if the corresponding
sensors are installed in all wheels.
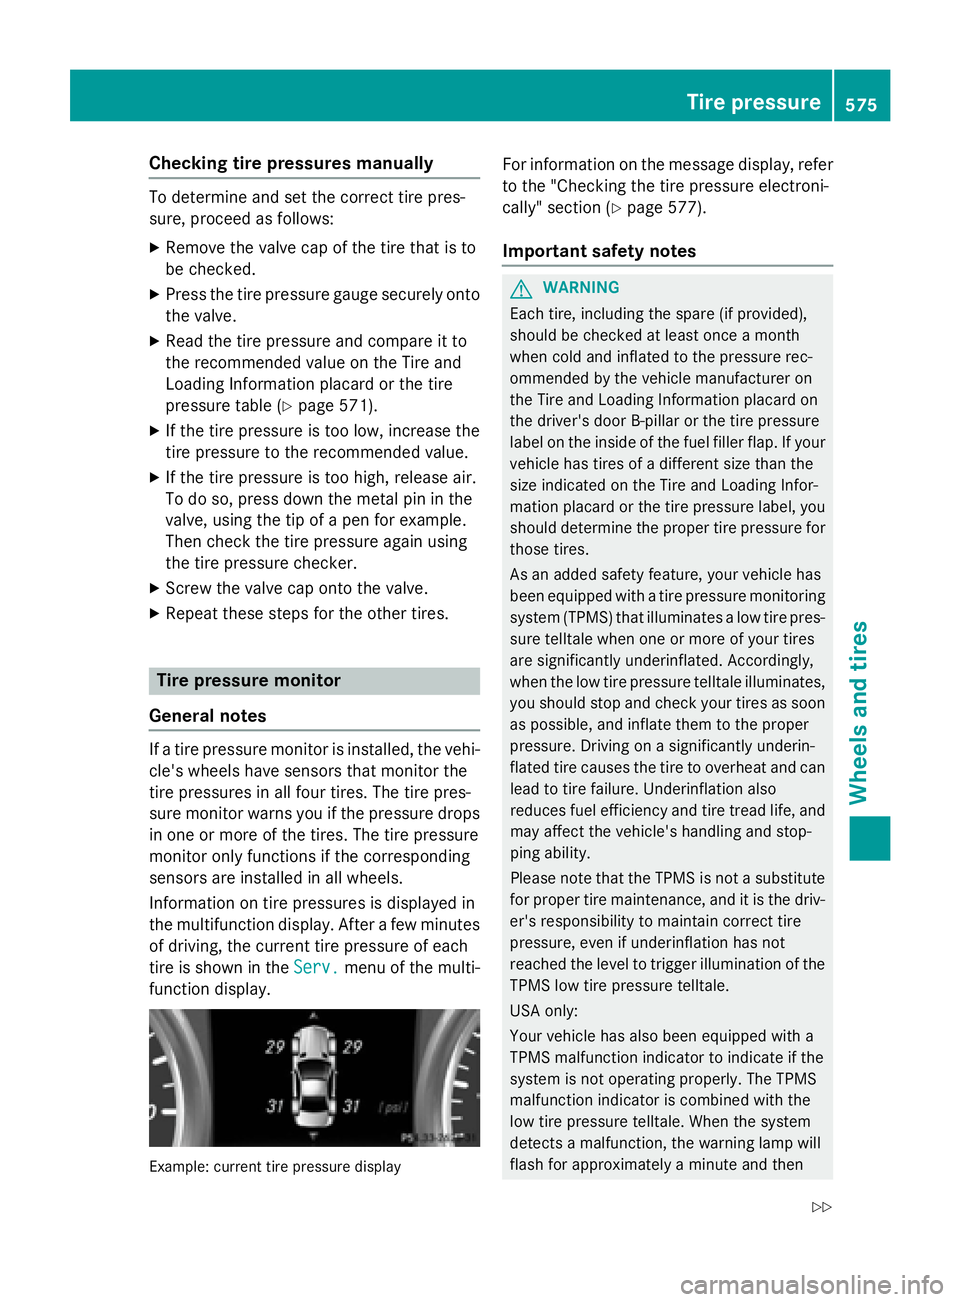
Information on tire pressures is displayed in
the multifunction display. After a few minutes
of driving, the current tire pressure of each
tire is shown in the Serv.
menu of the multi-
function display.
Example :curren ttir epressur edisplay
For information on the message display, refer
to the "Checking the tire pressure electroni-
cally" section (
Ypage 577).
Important safety notes
GWARNING
Each tire, including the spare (if provided),
should be checked at least once a month
when cold and inflated to the pressure rec-
ommended by the vehicle manufacturer on
the Tire and Loading Information placard on
the driver's door B-pillar or the tire pressure
label on the inside of the fuel filler flap. If your
vehicle has tires of a different size than the
size indicated on the Tire and Loading Infor-
mation placard or the tire pressure label, you
should determine the proper tire pressure for
those tires.
As an added safety feature, your vehicle has
been equipped with a tire pressure monitoring
system (TPMS) that illuminates a low tire pres-
sure telltale when one or more of your tires
are significantly underinflated. Accordingly,
when the low tire pressure telltale illuminates,
you should stop and check your tires as soon
as possible, and inflate them to the proper
pressure. Driving on a significantly underin-
flated tire causes the tire to overheat and can lead to tire failure. Underinflation also
reduces fuel efficiency and tire tread life, and
may affect the vehicle's handling and stop-
ping ability.
Please note that the TPMS is not a substitute
for proper tire maintenance, and it is the driv-
er's responsibility to maintain correct tire
pressure, even if unde rinf
lation has not
reached the level to trigger illumination of the
TPMS low tire pressure telltale.
USA only:
Your vehicle has also been equipped with a
TPMS malfunction indicator to indicate if the
system is not operating properly. The TPMS
malfunction indicator is combined with the
low tire pressure telltale. When the system
detects a malfunction, the warning lamp will
flash for approximately a minute and then
Tire pressure575
Wheels and tires
Z
Page 584 of 614
The safe speed on a wet, snow covered or icy
road is always lower than on dry road surfa-
ces.
You should pay special attention to road con-
ditions when temperatures are around freez-
ing point.
Mercedes-Benz recommends a minimum
tread depth ofãin (4 mm) on all four winter
tires. Observe the legally required minimum
tire tread depth (
Ypage 569). Winter tires can
reduce the braking distance on snow-covered
surfaces in comparison with summer tires.
The braking distance is still much further than
on surfaces that are not icy or covered with
snow. Take appropriate care when driving.
Further information on winter tires (M+S
tires) (
Ypage 570).
Temperature
GWARNING
The temperature grade for this tire is estab-
lished for a tire that is properly inflated and
not overloaded. Excessive speed, underinfla-
tion, or excessive loading, either separately or
in combination, can cause excessive heat
build-up and possible tire failure.
The temperature grades are A (the highest), B,
and C. These represent the tire's resistance
to the generation of heat and its ability to dis-
sipate heat when tested under controlled
conditions on a specified indoor laboratory
test wheel. Sustained high temperature can
cause the material of the tire to degenerate
and reduce tire life, and excessive tempera-
ture can lead to sudden tire failure. The grade
C corresponds to a level of performance
which all passenger car tires must meet under
the Federal Motor Vehicle Safety Standard
No. 109. Grades B and A represent higher
levels of performance on the laboratory test
wheel than the minimum required by law.
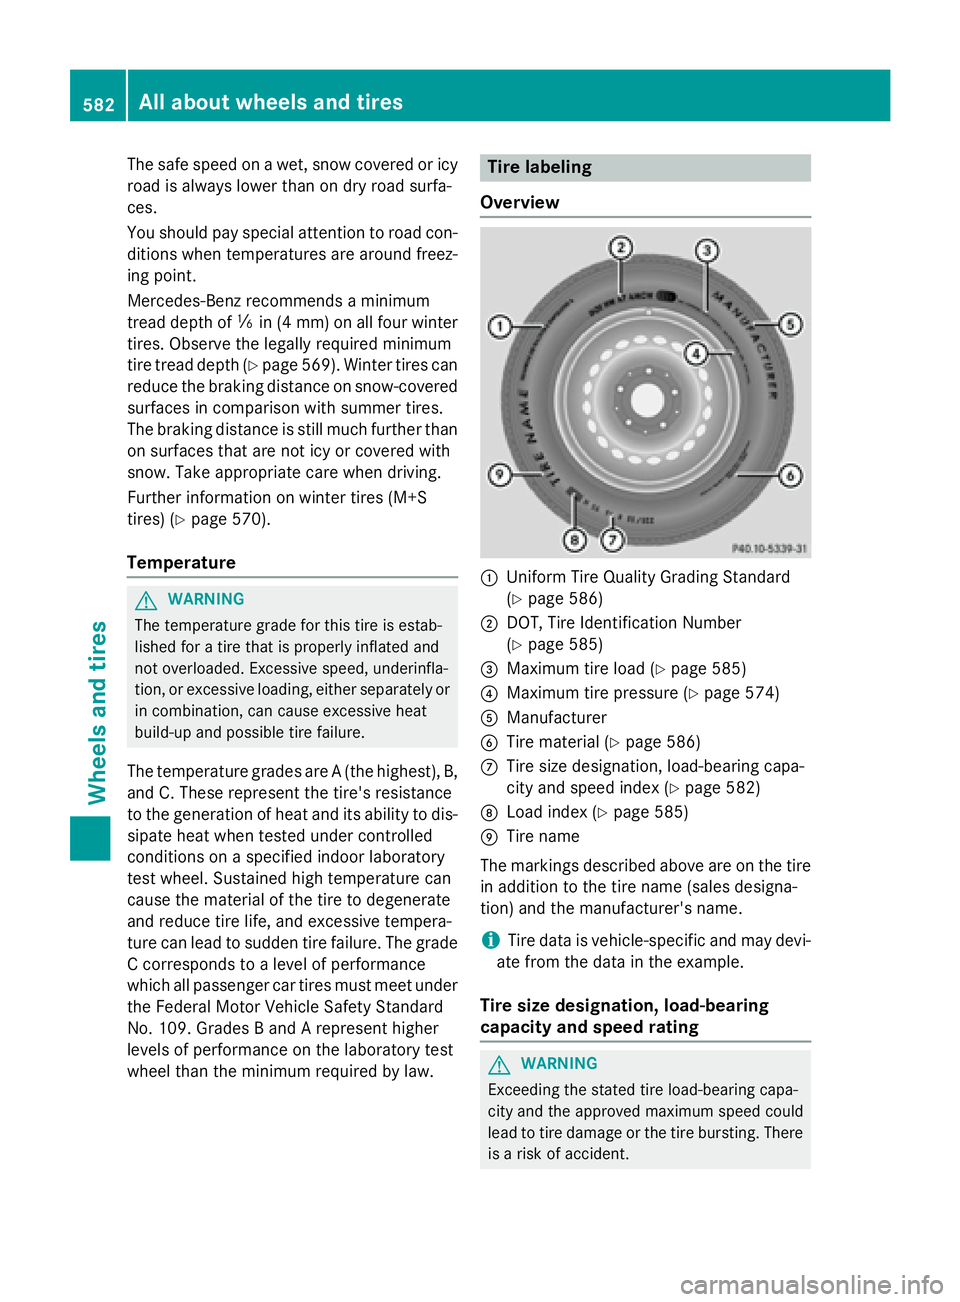
Tire labeling
Overview
:Uniform Tire Quality Grading Standard
(
Ypage 586)
;DOT, Tire Identification Number
(
Ypage 585)
=Maximum tire load (Ypage 585)
?Maximum tire pressure (Ypage 574)
AManufacturer
BTire material (Ypage 586)
CTire size designation, load-bearing capa-
city and speed index (
Ypage 582)
DLoad index (Ypage 585)
ETire name
The markings described above are on the tire
in addition to the tire name (sales designa-
tion) and the manufacturer's name.
iTire data is vehicle-specific and may devi-
ate from the data in the example.
Tire size designation, load-bearing
capacity and speed rating
GWARNING
Exceeding the stated tire load-bearing capa-
city and the approved maximum speed could
lead to tire damage or the tire bursting. There is a risk of accident.
582All about wheels and tires
Wheels and tires
Page 590 of 614
pounds per square inch (psi), in kilopascal
(kPa) or in bar. The tire pressure should only
be corrected when the tires are cold.
Cold tire pressure
The tires are cold:
Rif the vehicle has been parked without
direct sunlight on the tires for at least three
hours and
Rif the vehicle has been driven for less than
1 mile (1.6 km).
Tread
The part of the tire that comes into contact
with the road.
Bead
The tire bead ensures that the tire sits
securely on the wheel. There are several steel
wires in the bead to prevent the tire from
coming loose from the wheel rim.
Sidewall
The part of the tire between the tread and the
bead.
Weight of optional extras
The combined weight of those optional extras
that weigh more than the replaced standard
parts and more than 2.3 kilograms (5 lbs).
These optional extras, such as high-perform-
ance brakes, level control, a roof rack or a
high-performance battery, are not included in
the curb weight and the weight of the acces-
sories.
TIN (Tire Identification Number)
This is a unique identifier which can be used
by a tire manufacturer to identify tires, for
example for a product recall, and thus identify
the purchasers. The TIN is made up of the
manufacturer's identity code, tire size, tire
type code and the manufacturing date.
Load bearing index
The load bearing index (also load index) is a
code that contains the maximum load bearing
capacity of a tire. Traction
Traction is the result of friction between the
tires and the road surface.
Treadwear indicators
Narrow bars (tread wear bars) that are dis-
tributed over the tire tread. If the tire tread is
level with the bars, the wear limit of
áin
(1.6 mm) has been reached.
Occupant distribution
The distribution of occupants in a vehicle at
their designated seating positions.
Total load limit
Rated cargo and luggage load plus
68 kilograms (150 lb) multiplied by the num-
ber of seats in the vehicle.
Changing a wheel
Flat tire
The "Breakdown assistance" section
(
Ypage 550) contains information and notes
on how to deal with a flat tire. Information on
driving with MOExtended tires in the event of
a flat tire can be found under "MOExtended
tires (tires with run-flat characteristics"
(
Ypage 551).
Rotating the wheels
GWARNING
Interchanging the front and rear wheels may
severely impair the driving characteristics if
the wheels or tires have different dimensions. The wheel brakes or suspension components
may also be damaged. There is a risk of acci-
dent.
Rotate front and rear wheels only if the wheels and tires are of the same dimensions.
!On vehicles equipped with a tire pressure
monitor, electronic components are loca-
ted in the wheel.
588Changing a wheel
Wheels and tires
Page 592 of 614
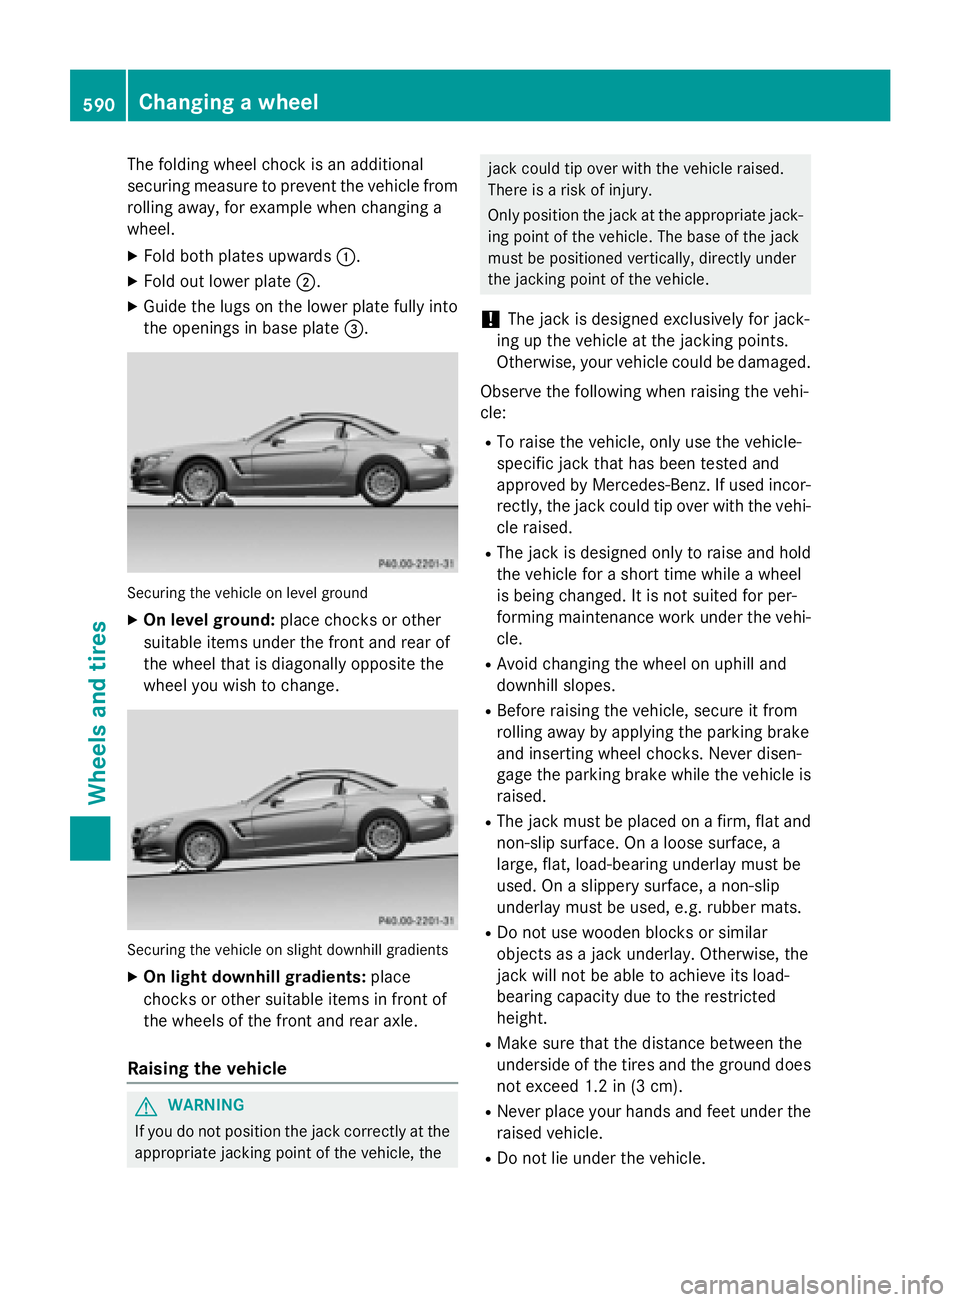
The folding wheel chock is an additional
securing measure to prevent the vehicle from
rolling away, for example when changing a
wheel.
XFold both plates upwards:.
XFold out lower plate;.
XGuide the lugs on the lower plate fully into
the openings in base plate =.
Securing the vehicle on level ground
XOn level ground:place chocks or other
suitable items under the front and rear of
the wheel that is diagonally opposite the
wheel you wish to change.
Securing the vehicle on slight downhill gradients
XOn light downhill gradients: place
chocks or other suitable items in front of
the wheels of the front and rear axle.
Raising the vehicle
GWARNING
If you do not position the jack correctly at the
appropriate jacking point of the vehicle, the
jack could tip over with the vehicle raised.
There is a risk of injury.
Only position the jack at the appropriate jack- ing point of the vehicle. The base of the jack
must be positioned vertically, directly under
the jacking point of the vehicle.
!The jack is designed exclusively for jack-
ing up the vehicle at the jacking points.
Otherwise, your vehicle could be damaged.
Observe the following when raising the vehi-
cle:
RTo raise the vehicle, only use the vehicle-
specific jack that has been tested and
approved by Mercedes-Benz. If used incor- rectly, the jack could tip over with the vehi-
cle raised.
RThe jack is designed only to raise and hold
the vehicle for a short time while a wheel
is being changed. It is not suited for per-
forming maintenance work under the vehi-
cle.
RAvoid changing the wheel on uphill and
downhill slopes.
RBefore raising the vehicle, secure it from
rolling away by applying the parking brake
and inserting wheel chocks. Never disen-
gage the parking brake while the vehicle is
raised.
RThe jack must be placed on a firm, flat and
non-slip surface. On a loose surface, a
large, flat, load-bearing underlay must be
used. On a slippery surface, a non-slip
underlay must be used, e.g. rubber mats.
RDo not use wooden blocks or similar
objects as a jack underlay. Otherwise, the
jack will not be able to achieve its load-
bearing capacity due to the restricted
height.
RMake sure that the distance between the
underside of the tires and the ground does not exceed 1.2 in (3 cm).
RNever place your hands and feet under the
raised vehicle.
RDo not lie under the vehicle.
590Changing a wheel
Wheels and tires
Page 595 of 614
XClean the wheel and wheel hub contact
surfaces.
XSlidethe wheel to be mounted onto the
alignment bolt and push iton.
XTighten the wheel bolts until they are fin-
ger-tight.
XUnscrew the alignment bolt.
XTighten the last wheel bolt until itis finger-
tight.
Lowering the vehicle
GWARNIN G
The wheels could work loos eif th ewhee lnut s
and bolt sare no ttightened to th especifie d
tightening torque .Ther eis aris kof accident.
Hav eth etightening torque immediately
checked at aqualified specialist worksho p
after awhee lis changed.
XTurn the crank of the jack counter-clock-
wise untilthe vehicle isonce again standing
firmly on the ground.
XPlace the jack to one side.
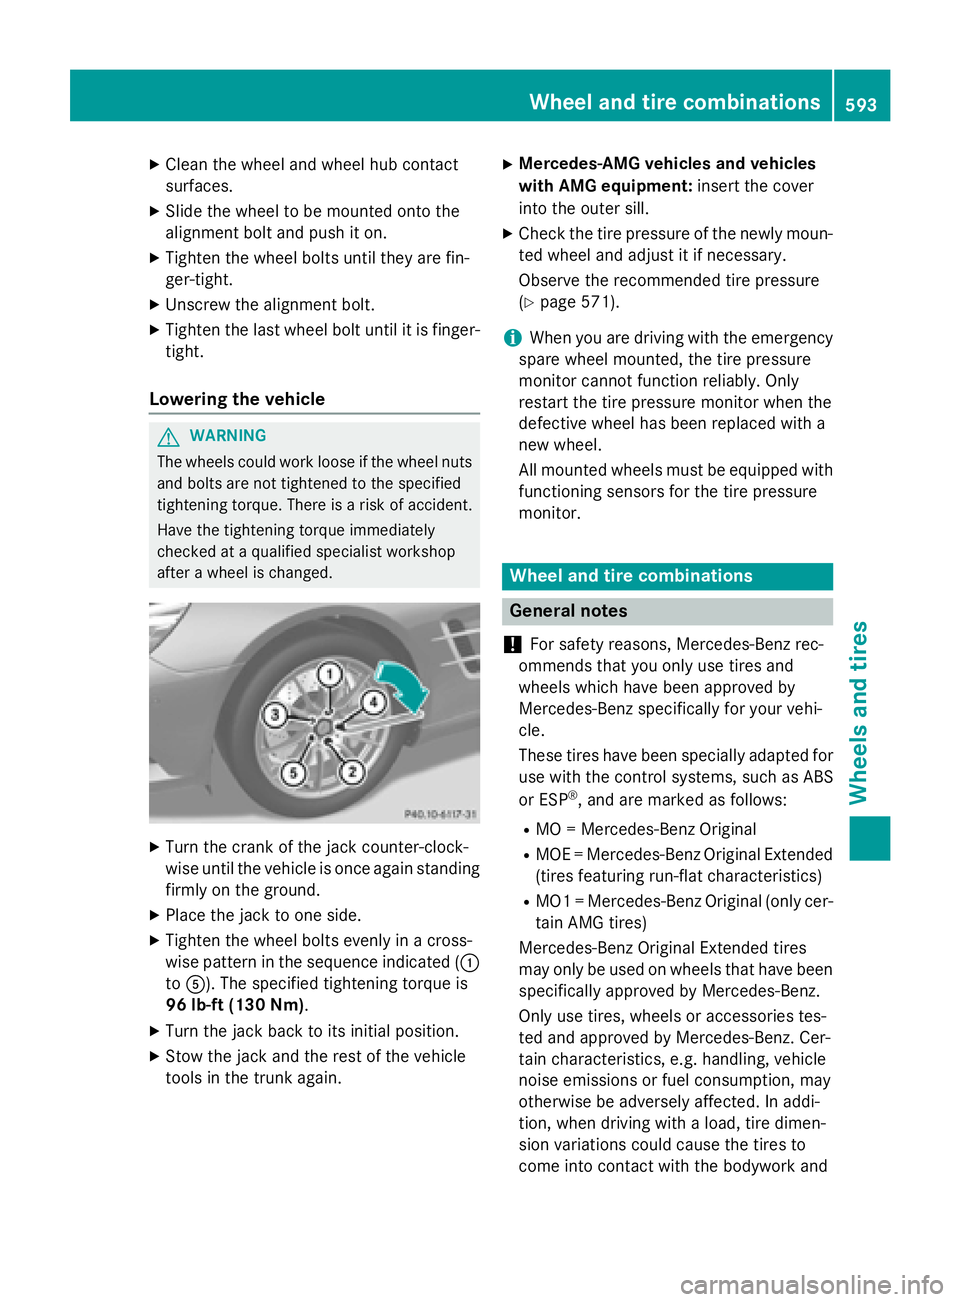
XTighten the wheel bolts evenly ina cross-
wise pattern inthe sequence indicated ( :
to A). The specified tightening torque is
96 lb-ft (130 Nm).
XTurn the jack back to its initial position.
XSt ow the jack and the rest of the vehicle
tools inthe trunk again.
XMercedes-AMG vehicles and vehicles
with AMG equipment: insert the cover
into the outer sill.
XCheck the tire pressure of the newly moun-
ted wheel and adjust it ifnecessary.
Observe the recommended tire pressure
(
Ypage 571).
iWhen you are drivingwith the emergency
spare wheel mounte d,the tire pressure
mon itor cannot function reliably. Only
restart the tire pressure monitor when the
defect ivewheel has been replaced with a
new wheel.
All mounted wheels must be equippedwith
functioning sensors for the tire pressure
mon itor.
Wheel and tire combinations
General notes
!
For safety reasons, Mercedes-Benz rec-
ommends that you only use tires and
wheels which have been approved by
Mercedes-Benz specific ally for your vehi-
cle.
These tires have been specially adapted for
use with the control systems, such as ABS
or ESP
®, and are marked as follows:
RMO = Mercedes-Benz Original
RMOE = Mercedes-Benz Original Extended
(t ires featuring run-flat characteristics)
RMO1 = Mercedes-Benz Original (only cer-
tain AMG tires)
Mercedes-Benz Original Extended tires
may only be used on wheels that have been
specifically approved byMercedes-Benz.
Only use tires, wheels or accessories tes-
ted and approved byMercedes-Benz. Cer-
tain characteristics, e.g. handlin g, vehicle
noise emissions or fuel consumption, may
otherwise beadverse lyaffected. Inaddi-
tion, when driving with a load, tire dimen-
sion variations could cause the tires to
come into contact with the bodywork and
Wheel and tire combinations593
Wheels and tires
Z
Page 596 of 614
axle components. This could result in dam-
age to the tires or the vehicle.
Mercedes-Benz accepts no liability for
damage resulting from the use of tires,
wheels or accessories other than those tes-
ted and approved.
Information on tires, wheels and approved
combinations can be obtained from any
qualified specialist workshop.
!Retreaded tires are neither tested nor rec-
ommended by Mercedes-Benz, since pre-
vious damage cannot always be detected
on retreaded tires. As a result, Mercedes-
Benz cannot guarantee vehicle safety if
retreaded tires are mounted. Do not mount
used tires if you have no information about
their previous usage.
Overview of abbreviations used in the follow-
ing tire tables:
RBA: both axles
RFA: front axle
RRA: rear axle
The recommended pressures for various
operating conditions can be found:
Ron the Tire and Loading Information placard with the recommended tire pressures on
the B-pillar on the driver's side
Rin the tire pressure table on the inside of the
fuel filler flap
Observe the notes on recommended tire
pressures under various operating conditions
(
Ypage 571).
Check tire pressures regularly, and only when
the tires are cold. Comply with the mainte-
nance recommendations of the tire manufac-
turer in the v
ehicle document wallet.
Notes on the vehicle equipment – always
equip the vehicle with:
Rwith tires of the same size on a given axle
(left and right)
Rthe same type of tires at a given time (sum-
mer tires, winter tires, MOExtended tires)
Exception: it is permissible to install a dif-
ferent type or make in the event of a flat tire. Observe the "MOExtended tires (tires
with run-flat characteristics" section
(
Ypage 551).
Vehicles equipped with MOExtended tires are not equipped with a TIREFIT kit at the factory.
It is therefore recommended that you addi-
tionally equip your vehicle with a TIREFIT kit if
you mount tires that do not feature run-flat
properties, e.g. winter tires. A TIREFIT kit may
be obtained from a qualified specialist work-
shop.
iNot all wheel and tire combinations are
available at the factory for all countries.
iThe following pages contain information
on approved wheel rims and tire sizes for
equipping your vehicle with winter tires.
Winter tires are not available at the factory
as standard equipment or optional extras.
If you want to equip your vehicle with
approved winter tires, it may be necessary
to obtain wheel rims in the corresponding
size. The size of the approved winter tires
may differ from the standard tires. This is
dependent on t
he model and the equip-
ment installed at the factory.
The tires and wheel rims, as well as further
information, can be obtained at a qualified
specialist workshop.
594Wheel and tire combinations
Wheels and tires