tow bar MERCEDES-BENZ SL ROADSTER 2008 Owners Manual
[x] Cancel search | Manufacturer: MERCEDES-BENZ, Model Year: 2008, Model line: SL ROADSTER, Model: MERCEDES-BENZ SL ROADSTER 2008Pages: 317, PDF Size: 5.35 MB
Page 34 of 317
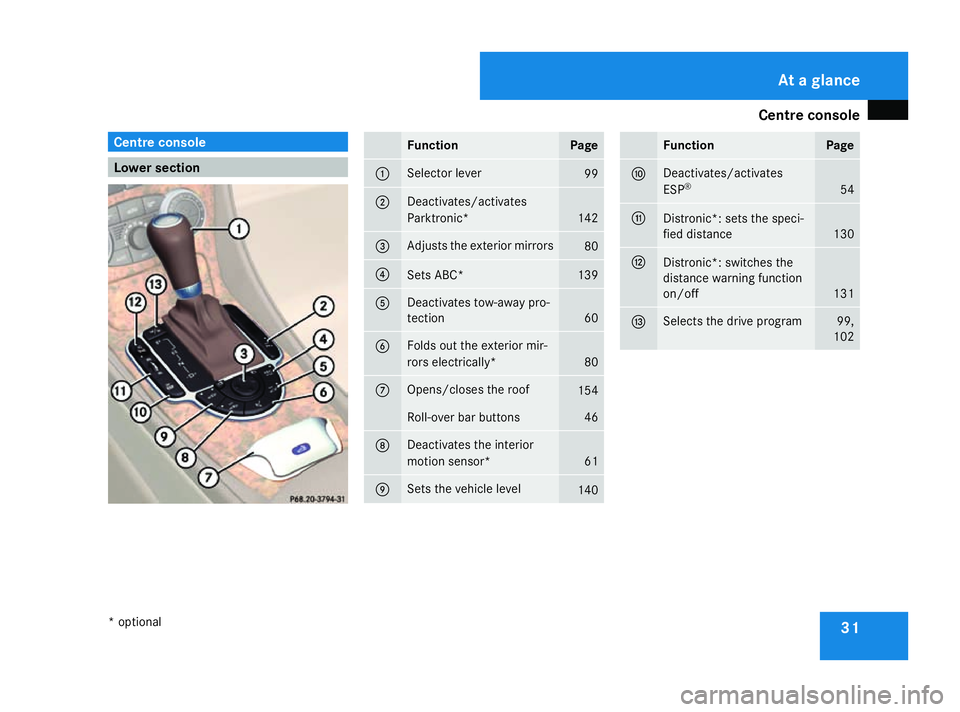
Centre console
31Centre console
Lower section Function Page
1 Selector lever
99
2 Deactivates/activates
Parktronic*
142
3 Adjusts the exterior mirrors
80
4
Set
sABC* 139
5 Deactivates tow-away pro-
tection
60
6 Folds out the exterior mir-
ror
se lectrically* 80
7 Opens/closes the roof
154
Roll-over bar buttons 46
8 Deactivates the interior
motion sensor*
61
9 Set
sthe vehicle level 140 Function Page
a Deactivates/activates
ESP
® 54
b
Distronic*: set
sthe speci-
fied distance 130
c
Distronic*: switches the
distanc
ewarnin gfunction
on/off 131
d Selects the driv
eprogram 99,
102 At
ag lance
*o ptional
230_AKB; 5; 4, en-GB
bjanott ,V ersion: 2.9.6
2008-04-08T15:09:54+02:00
-Seite 31 Dateiname: 6515_3089_02_buchblock.pdf; preflight
Page 146 of 317
Driving sys
tems 143
Front sensors Centre Approximatel
y100 cm Corners Approximatel
y60cm Rea
rsenso rs Centre Approximatel
y120 cm Corners Approximatel
y80cm !
Payp articula rattentio ntoobjects above
or belo wthe sensors when parking, such
as flower pots or trailer towbars. Parktronic
does not detect such objects when the yare
in the immediate vicinity of the vehicle. You
could damage the vehicl eorthe objects.
Ultrasonic sources such as an automatic
ca rw ash, alorry's compressed-air brakes
or ap neumati cdrill could caus eParktronic
to malfunction.
Minimum distance Centre Approximatel
y20cm Corners Approximatel
y15cm If there is an obstacle withi
nthisr ange,all
warning displays ligh tupa nd atone sounds.
If the distance fall sbelow the minimum clear-
ance, it ma ynolongerbes hown.
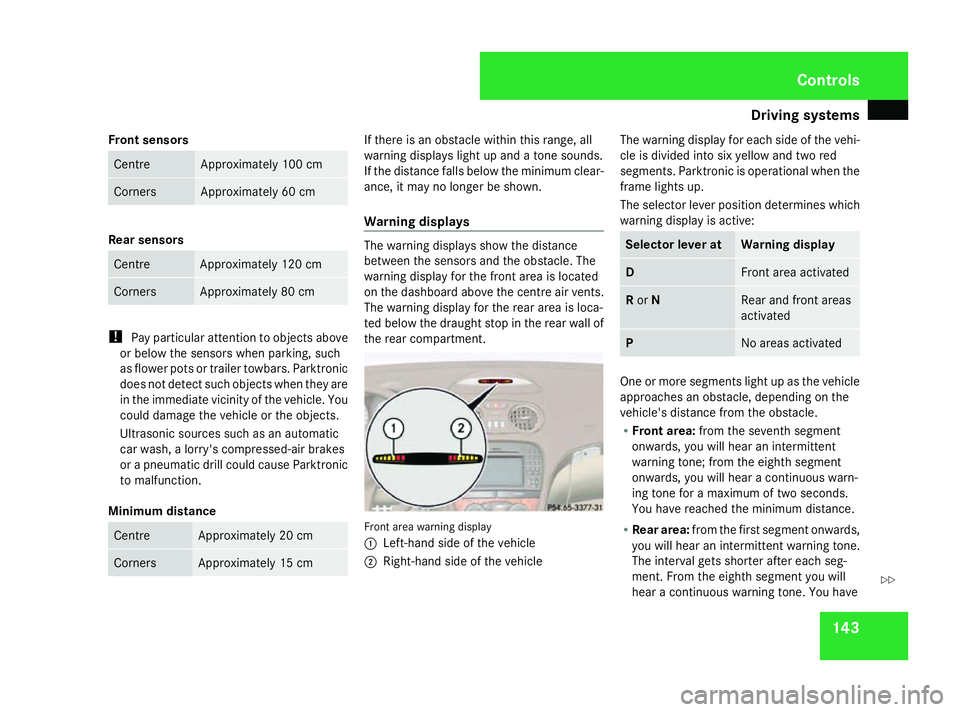
Warnin gdisplays Th
ew arning displays sho wthe distance
between the sensors and the obstacle .The
warning displa yfor the front area is located
on the dashboard above the centr eairvents.
Th ew arning displa yfor the rea rareaisl oca-
ted belo wthe draught sto pinthe rea rwallof
the rea rcompartment. Front area warning display
1
Left-hand side of the vehicle
2 Right-hand side of the vehicle Th
ew arning displa yfor each side of the vehi-
cle is divide dinto si xyello wand two red
segments. Parktronic is operational when the
frame lights up.
Th es elect or lever positio ndetermine swhich
warning displa yisactive: Selecto
rlever at Warnin
gdisplay D Front area activated
R
or N Rear and front areas
activated
P No area
sactivated One or mor
esegments ligh tupast he vehicle
approache sanobstacle ,depen ding on the
vehicle' sdistance fro mthe obstacle.
R Front area: fromt he seventh segment
onwards ,you will hear an intermittent
warning tone ;fro mt he eighth segment
onwards ,you will hear acontinuous warn-
ing tone for amaximum of two seconds.
Yo uh aver eache dthe minimum distance.
R Rea rarea: fromt he first segment onwards,
yo uw illh earani ntermittent warning tone.
Th einterva lgetss horter after each seg-
ment. Fro mthe eighth segment yo uwill
hear acontinuous warning tone .You have Controls
230_AKB; 5; 4, en-GB
bjanott,
Version: 2.9.6 2008-04-08T15:09:54+02:00-Seite 143 ZDateiname: 6515_3089_02_buchblock.pdf; preflight
Page 162 of 317
Loading and stowing
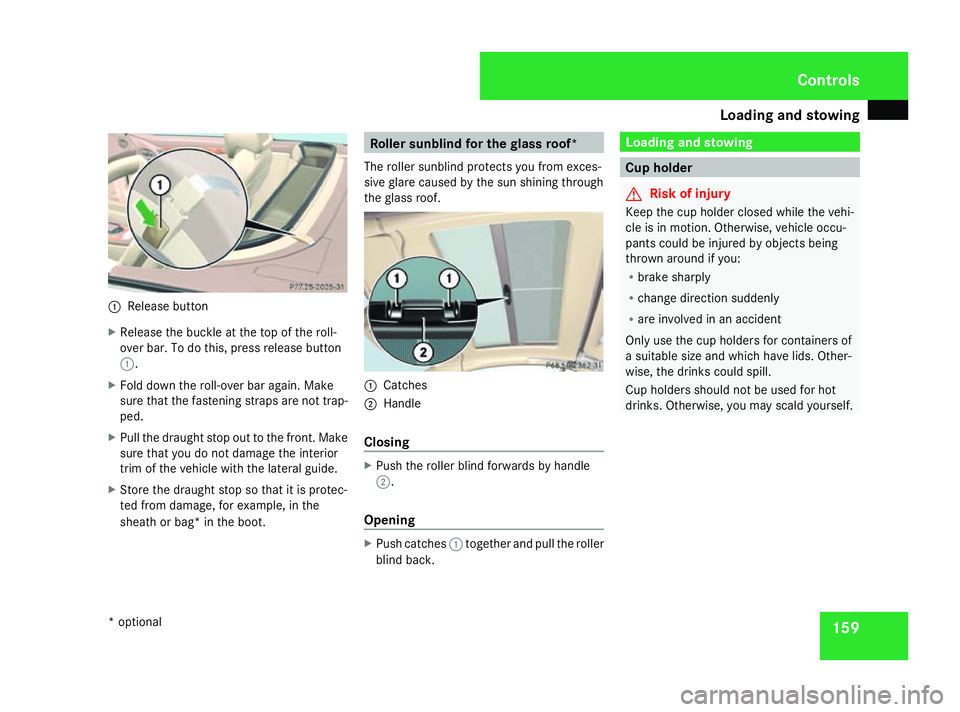
1591
Release button
X Release the buckle at the top of the roll-
over bar. To do this, press release button
1.
X Fold down the roll-over bar again. Make
sure that the fastenin gstraps are not trap-
ped.
X Pull the draught stop out to the front .Make
sure that you do not damage the interior
trim of the vehicle with the lateral guide.
X Store the draught stop so that it is protec-
ted fro mdamage, for example, in the
sheat horb ag* in the boot. Roller sunblind for th
eglass roof*
The roller sunblin dprotect syou fro mexces-
sive glare caused by the sun shining through
the glass roof. 1
Catches
2 Handle
Closing X
Push the roller blind forwards by handle
2.
Opening X
Push catches 1together and pull the roller
blind back. Loading and stowing
Cup holder
G
Risk of injury
Keep the cup holder closed while the vehi-
cle is in motion. Otherwise, vehicle occu-
pant scould be injured by object sbeing
thrown around if you:
R brak esharply
R change direction suddenly
R are involved in an accident
Only use the cup holder sfor containers of
as uitable siz eand which have lids. Other-
wise, the drinks could spill.
Cup holder sshould not be used for hot
drinks. Otherwise, you may scald yourself. Controls
*o ptional
230_AKB; 5; 4, en-GB
bjanott
,V ersion: 2.9.6
2008-04-08T15:09:54+02:00
-Seite 159 ZDateiname: 6515_3089_02_buchblock.pdf; preflight
Page 163 of 317
Loading and stowing
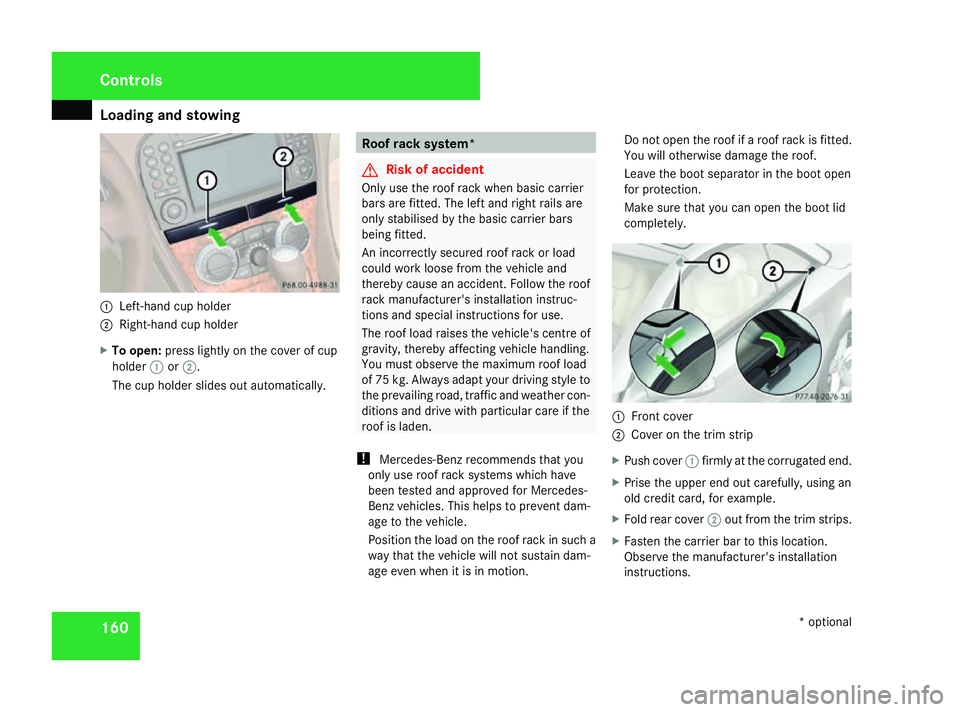
1601
Left-han dcup holder
2 Right-hand cup holder
X To open: press lightly on the cover of cup
holder 1or2.
The cup holder slides out automatically. Roof rack system*
G
Risk of accident
Only use the roof rack when basic carrier
bars are fitted. The left and right rails are
only stabilised by the basic carrier bars
being fitted.
An incorrectly secured roof rack or load
could work loose fro mthe vehicle and
thereby cause an accident .Follow the roof
rack manufacturer' sinstallation instruc-
tion sand special instructions for use.
The roof load raises the vehicle's centr eof
gravity, thereby affectin gvehicle handling.
You must observe the maximum roof load
of 75 kg. Always adapt your driving style to
the prevailing road, traffic and weather con-
ditions and drive with particular care if the
roof is laden.
! Mercedes-Ben zrecommends that you
only use roof rack systems which have
been tested and approved for Mercedes-
Ben zvehicles. This helps to prevent dam-
age to the vehicle.
Position the load on the roof rack in such a
way that the vehicle will not sustain dam-
age even when it is in motion. Do not open the roof if
aroof rack is fitted.
You will otherwise damage the roof.
Leave the boot separator in the boot open
for protection.
Make sure that you can open the boot lid
completely. 1
Front cover
2 Cover on the trim strip
X Push cover 1firmly at the corrugated end.
X Prise the upper end out carefully, using an
old credit card, for example.
X Fold rear cover 2out fro mthe trim strips.
X Fasten the carrier bar to thi slocation.
Observe the manufacturer' sinstallation
instructions. Controls
*optional
230_AKB; 5; 4, en-GB
bjanott ,V ersion: 2.9.6
2008-04-08T15:09:54+02:00
-Seite 160 Dateiname: 6515_3089_02_buchblock.pdf; preflight
Page 269 of 317
Flat tyre
266 Flat tyre
Flat tyre
Your vehicl emay be equipped with:
R aT IREFI Tkit (Ypage 201)
R as par ew heel* (Y page 201)
R theM OExtended run-flat sys-
tem* (Y page 275) Preparing th
evehicle
i Vehicl epreparation is no tneces saryon
vehicles wit hMOE tyres*.
X Stop your vehicl easfar away from traffic
as possibl eonsolid, non-slippery, level
ground.
X Switc hont hehazard warnin glamps.
X Firmly depress th eparkin gbrake.
X Mov ethe selector lever to P.
X Allo ccupant smustg et out of th evehicle.
Mak esuret hatthe ya re no tend angered as
they do so.
X Mak esuret hatnoo neis near th edanger
area whils tawheelisb eingchanged. Any-
on ew ho is no tdirectl yassistin ginthe whee
lcha ng es hould, fo rexample, stand
behin dthe barrier.
X Switc hoffthee ngine.
X Remove th ekeyfrom th eignition lock.
X Get out of th evehicle.
X Clos ethe driver's door.
X Plac ethe warnin gtriangle ( Ypage 200) at
as uitable distance. Observ elegal require-
ments. Usin
gthe TIREFIT kit
You can use th eTIREFI Tkitto seal small
punctures ,particularl ytho se in th etyret read.
You can use TIREFI Tinoutdoo rtem peratures
down to -2 0°C. G
Risk of accident
In th efollowing situations, your safet yisat
particular ris kand tyr esealant is unable to
provid ebreakdown assistance:
R if there are cut sorpunctures in th etyre
greate rtha n4mm
R if th ewhee lrim is damaged
R if you hav edriven at ver ylow tyr epres-
sures or on aflat tyre Do no
tdrive any further. Consult aqualified
specialist workshop whic hhas th eneces-
sar yspecialist knowledge and tools to carry
out th eworkr equired.
Mercedes-Ben zrecommends that you use
aM ercedes-Ben zServi ce Centr efor this
purpose .Inparticular, wor krelevan tto
safet yoro nsafety-related systems mus tbe
carrie dout at aqualified specialist work-
shop.
X Do no tremove any foreign objects which
hav epenetrated th etyre, e.g. screw sor
nails.
X Remove TIREFIT, th eaccompanying "max.
80 km/h "sticke rand the electric ai rpump
fro mt he stowage well underneath the boot
floo r(Ypage 200). Practical advice
*optional
230_AKB; 5; 4, en-GB
bjanott,
Version: 2.9.6 2008-04-08T15:09:54+02:00-Seite 266 Dateiname: 6515_3089_02_buchblock.pdf; preflight
Page 272 of 317
Flat tyre
269G
Risk of accident
If ap ressur eof1.8bar is no tachieved after
fiv em inutes, th etyreist oobadly damaged.
Do no tdrive any further. Consult aqualified
specialist workshop whic hhas th eneces-
sar yspecialist knowledge and tools to carry
out th eworkr equired. Mercedes-Ben zrec-
ommends that you use aMercedes-Benz
Service Centr efor this purpose .Inparticu-
lar, wor krelevan ttosafetyoro nsafety-
relate dsystems mus tbecarriedout at a
qualified specialist workshop.
If at yrep ressur eof1.8bar is reached:
X Press on/off switch 4on th eelectric air
pump to 0.
The electric air pump is switched off.
X Disconnect th eelectric air pump and stow
it away.
X Fold up th ewarnin gtriangle and stow it
away.
X Pull away immediately.
This distribute sthe TIREFI Tmoree venly
around th etyre.
X Stop after drivin gfor approximately ten
minute sand chec kthe tyrep ressur ewith
th ee lectric air pump. G
Risk of accident
If th etyrep ressur eisnowlower than
1. 3b ar, th etyreist oobadly damaged. Do
no td rive any further. Consult aqualified
specialist workshop whic hhas th eneces-
sar yspecialist knowledge and tools to carry
out th eworkr equired. Mercedes-Ben zrec-
ommends that you use aMercedes-Benz
Service Centr efor this purpose .Inparticu-
lar, wor krelevan ttosafetyoro nsafety-
relate dsystems mus tbecarriedout at a
qualified specialist workshop.
X If th etyrep ressur eisstill at leas t1.3bar,
correc tit(seef uel filler flap fo rvalues).
To increas ethe tyre pressure: switch on
th ee lectric air pump.
To reduce th etyrep ressure: open pres-
sur erelease screw aon pressure
gauge b.
X Drive to th eneares tworkshop and hav ethe
tyr ec hanged there.
X Hav ethe TIREFI Tkitreplaced as soo nas
possibl eataq ualified specialist workshop,
e.g. at aMercedes-Ben zServi ce Centre. G
Risk of accident
Do no texcee dthe maximum speed of
80 km/h.
The "max .80km/h" sticker mus tbeaffixed
within th edriver's field of vision.
The vehicle's handlin gcharacteristics may
be affected. H
Environmental note
Hav ethe used TIREFI Tkitdispose dofpro-
fessionally, e.g. at aMercedes-Benz
Service Centre.
X Hav ethe TIREFI Tkitreplaced every four
years at aqualified specialist workshop,
e.g. aMercedes-Ben zServi ce Centre. Practical advice
230_AKB; 5; 4, en-GB
bjanott
,V ersion: 2.9.6
2008-04-08T15:09:54+02:00
-Seite 269 ZDateiname: 6515_3089_02_buchblock.pdf; preflight
Page 276 of 317
Flat tyre
273X
Tighten th ewheel bolt suntil they are fin-
ger-tight.
X Unscrew th ecentring pin.
X Tighten th elast wheel bolt until it is finger-
tight.
Inflatin gthe collapsible emergency
spare wheel* with th eelectric air pump G
Risk of accident
Pump up th ecollapsible emergency spare
wheel before lowering th evehicle. Other-
wise, you could damage th ewheel rim.
The electric air pump is located in th estow-
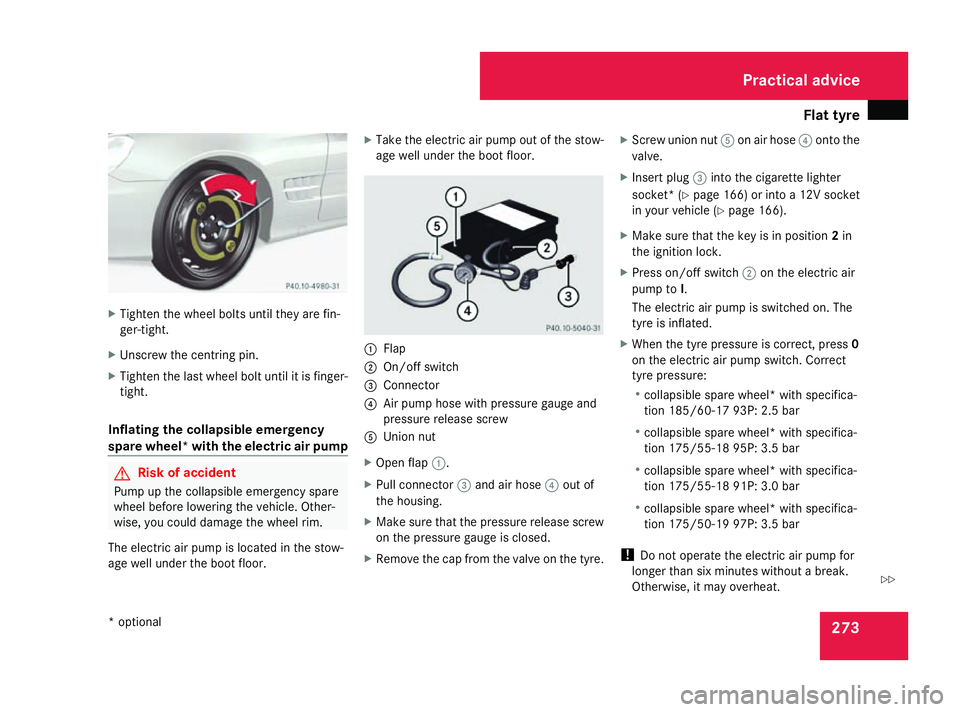
age well under th eboot floor. X
Take th eelectric air pump out of th estow-
age well under th eboot floor. 1
Flap
2 On/of fswitch
3 Connector
4 Air pump hose with pressure gauge and
pressure release screw
5 Union nut
X Open flap 1.
X Pull connector 3and air hose 4out of
th eh ousing.
X Make sure that th epressure release screw
on th epressure gauge is closed.
X Remov ethe cap from th evalv eont hetyre. X
Screw unio nnut5 on air hose 4ont othe
valve.
X Inser tplug 3intot he cigarette lighter
socket *(Ypage 166) or int oa12Vsocket
in your vehicle (Y page 166).
X Make sure that th ekey is in position 2in
th ei gnition lock.
X Pres son/off switch 2on th eelectric air
pump to I.
The electric air pump is switche don. The
tyr eisi nflated.
X When th etyrep ressure is correct, press 0
on th eelectric air pump switch. Correct
tyr ep ressure:
R collapsible spare wheel* with specifica-
tio n1 85/60-17 93P: 2.5bar
R collapsible spare wheel* with specifica-
tio n1 75/55-18 95P: 3.5bar
R collapsible spare wheel* with specifica-
tio n1 75/55-18 91P: 3.0bar
R collapsible spare wheel* with specifica-
tio n1 75/50-19 97P: 3.5bar
! Do not operate th eelectric air pump for
longer than six minutes without abreak.
Otherwise, it may overheat. Practical advice
*o ptional
230_AKB
;5;4,en-GB
bjanott, Version:2.9.6
2008-04-08T15:09:54+02:00
-Seite 273 ZDateiname: 6515_3089_02_buchblock.pdf; preflight
Page 284 of 317
Towin
gand tow-starting 281
!
Youm aytow the vehicl efor am aximum
of 50 km. Atowing spee dof50k m/h must
not be exceeded.
With towing distances ove r50km, the
entire vehicl eneeds to be lifted up and
transported.
! Onlysecur ethe tow cable or towing bar
to the towing eyes .You mayotherwise
damage the vehicle.
R Vehicle swithana utomatic transmission
must not be tow-started.
R If the engine does not start, try jum pstart-
ing (Y page 279).
R If it is not possibl etojump-star tthe vehicle,
have it towed to the neares tqualified spe-
cialist workshop ,e.g.aM ercedes-Benz
Service Centre.
R If the vehicl ehassuffered transmission
damage ,onlyt ow it with the propeller shaft
disconnected.
R Th es elect or lever must be in position Non
vehicles with automatic transmission.
R If yo uaretowing the vehicl eoverac onsid-
erabl edistance, thi smayonl ybed onew ith
the rea raxler aised. R
Th eign ition must be switched off if yo uare
towing the vehicl ewitht he front/rear axle
raised .Interventio nbyESP®
could other-
wise damage the brake system.
R Before towing the vehicle, make sure that
the battery is connected and charged. Oth-
erwise:
-Yo uc ann ot switch on the ignition
- Yo uc ann ot mov ethe selector lever to N
- Yo uh avenos upport when braking
i Switch off the automatic locking feature
befor ethe vehicl eistowed (Y page 120).
Yo uc ould otherwis ebelocked ou twhen
pushing or towing the vehicle. Fittin
gthe towin geye
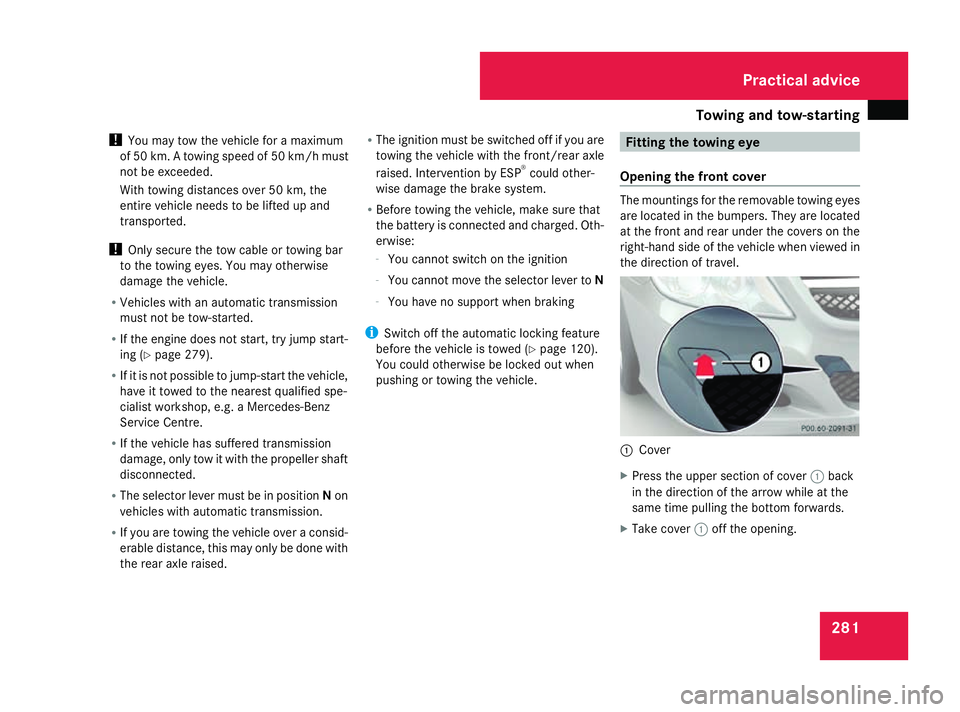
Opening the front cover Th
em ounting sfor the removabl etowing eyes
ar el ocat ed in the bumpers. They ar eloc ated
at the front and rea runder the covers on the
right-hand side of the vehicl ewhenv iewed in
the directio noftravel. 1
Cover
X Press the uppe rsectio nofc over1back
in the directio nofthe arrow whil eatthe
same tim epulling the bottom forwards.
X Take cover 1off the opening. Practical advice
230_AKB; 5; 4, en-GB
bjanott,
Version: 2.9.6
2008-04-08T15:09:54+02:0
0-Seite 281 ZDateiname: 6515_3089_02_buchblock.pdf; preflight
Page 292 of 317
Vehicle identificatio
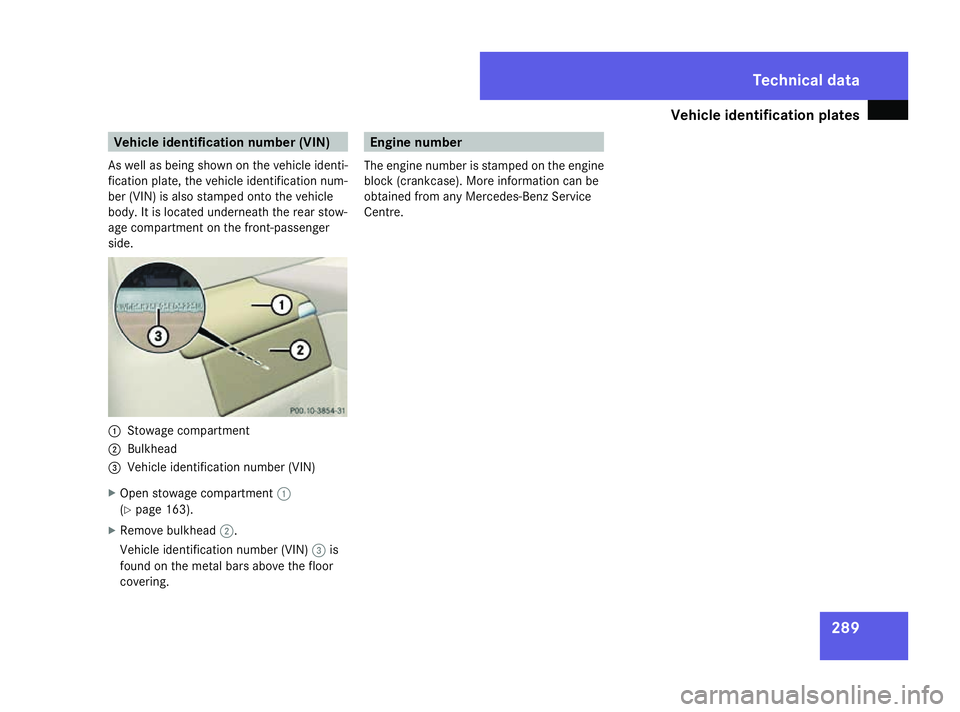
nplates 289Vehicle identificatio
nnumber (VIN)
As well as being shown on the vehicl eide nti-
fication plate ,the vehicl eide ntification num-
be r(VIN) is also stampe donto the vehicle
body .Itisloc ate dunderneath the rea rstow-
ag ec ompartment on the front-passenger
side. 1
Stowag ecompartment
2 Bulkhead
3 Vehicle identificatio nnumbe r(VIN)
X Open stowage compartment 1
(Y page 163).
X Remove bulkhead 2.
Vehicle identificatio nnumbe r(VIN) 3 is
found on the metal bars abov ethe floor
covering. Engine number
Th ee ngine number is stamped on the engine
block (crankcase). More information ca nbe
obtained fro manyMercedes-Benz Service
Centre. Te
chnical data
230_AKB; 5; 4, en-GB
bjanott
,V ersion: 2.9.6
2008-04-08T15:09:54+02:00
-Seite 289 ZDateiname: 6515_3089_02_buchblock.pdf; preflight