headlamp MERCEDES-BENZ SL ROADSTER 2012 User Guide
[x] Cancel search | Manufacturer: MERCEDES-BENZ, Model Year: 2012, Model line: SL ROADSTER, Model: MERCEDES-BENZ SL ROADSTER 2012Pages: 637, PDF Size: 20.68 MB
Page 133 of 637
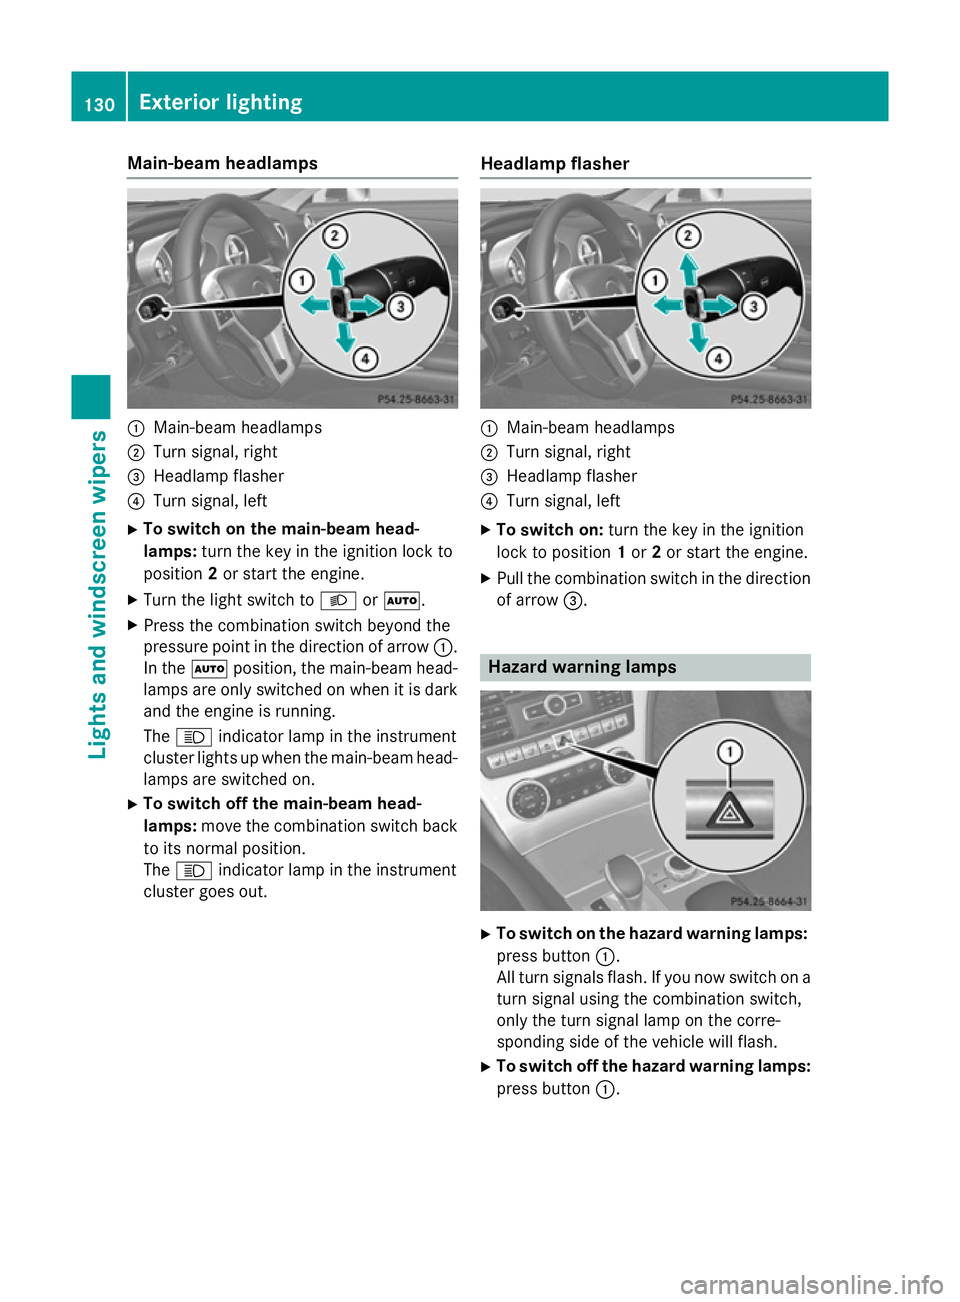
Main-beam headlamps
:
Main-beam headlamps
; Turn signal, right
= Headlamp flasher
? Turn signal, left
X To switch on the main-beam head-
lamps: turn the key in the ignition lock to
position 2or start the engine.
X Turn the light switch to LorÃ.
X Press the combination switch beyond the
pressure point in the direction of arrow :.
In the Ãposition, the main-beam head-
lamps are only switched on when it is dark
and the engine is running.
The K indicator lamp in the instrument
cluster lights up when the main-beam head-
lamps are switched on.
X To switch off the main-beam head-
lamps: move the combination switch back
to its normal position.
The K indicator lamp in the instrument
cluster goes out. Headlamp flasher :
Main-beam headlamps
; Turn signal, right
= Headlamp flasher
? Turn signal, left
X To switch on: turn the key in the ignition
lock to position 1or 2or start the engine.
X Pull the combination switch in the direction
of arrow =. Hazard warning lamps
X
To switch on the hazard warning lamps:
press button :.
All turn signals flash. If you now switch on a turn signal using the combination switch,
only the turn signal lamp on the corre-
sponding side of the vehicle will flash.
X To switch off the hazard warning lamps:
press button :.130
Exterior lightingLights and windscreen wipers
Page 134 of 637

The hazard warning lamps switch on auto-
matically if:
R an airbag is deployed or
R the vehicle decelerates rapidly from a
speed of above 70 km/h and comes to a
standstill
The hazard warning lamps switch off auto-
matically if the vehicle reaches a speed of
above 10 km/ha gain after a full brake appli-
cation.
i The hazard warning lamps continue to
operate even if the ignition is switched off. Headlamp cleaning system
The headlamps are cleaned automatically if
the "Wipe with washer fluid" function is oper-
ated five times (Y page 135) while the lights
are on and the engine is running. When you
switch off the ignition, the automatic head-
lamp cleaning system is reset and counting is
resumed from 0. Intelligent Light System
General notes The Intelligent Light System is a system that
adjusts the headlamps automatically to suit
the prevailing driving and weather conditions. It offers advanced functions for improved illu-
mination of the road surface, e.g. depending
on the vehicle speed or weather conditions.
The system includes the active light function, cornering light function, motorway mode and
extended range foglamps. The system is only
active when it is dark.
You can activate or deactivate the "Intelligent Light System" using the on-board computer
(Y page 240). Active light function
The active light function is a system that
moves the headlamps according to the steer-
ing movements of the front wheels. In this
way, relevant areas remain illuminated while
driving. This allows you to recognise pedes-
trians, cyclists and animals.
Active: when the lights are switched on
Cornering light function The cornering light function improves the illu-
mination of the road over a wide angle in the direction you are turning, enabling better vis-
ibility in tight bends, for example. The corner- ing light function can only be activated when
the dipped-beam headlamps are switched on.
Active:
R if you are driving at speeds below 40 km/h
and switch on the turn signal or turn the
steering wheel
R if you are driving at speeds between
40 km/ha nd 70 km/h and turn the steer-
ing wheel Exterior lighting
131Lights andwindscreen wipers Z
Page 135 of 637

Not active:
if you are driving at speeds above
40 km/h or switch off the turn signal or turn
the steering wheel to the straight-ahead posi- tion
The cornering lamp may remain lit for a short
time, but is automatically switched off after
no more than three minutes.
Motorway mode Motorway mode increases the range of the
beam.
Active:
R if you are driving at speeds above
110 km/h and do not make any large steer-
ing movements for at least 1,000 m
R if you are driving at speeds above
130 km/h
Not active: if you are driving at speeds below
80 km/h following activation
Extended range foglamps The extended range foglamps reduce the
glare experienced by the driver and improve the illumination of the edge of the carriage-
way.
Active:
if you are driving at speeds below
70 km/h and you switch on the rear foglamp
Not active: if, following activation, you are
driving at speeds above 100 km/h or if you
switch off the rear foglamp Adaptive Highbeam Assist
General notes You can use this function to set the head-
lamps to change between dipped beam and
main beam automatically. The system recog-
nises vehicles with their lights on, either
approaching from the opposite direction or
travelling in front of your vehicle, and conse-
quently switches the headlamps from main
beam to dipped beam.
The system automatically adapts the dipped-
beam headlamp range depending on the dis-
tance to the other vehicle. Once the system
no longer detects any other vehicles, it
switches on the main-beam headlamps again.
The system's optical sensor is located behind
the windscreen near the overhead control
panel. 132
Exterior lightingLights and
windscreen wipers
Page 136 of 637
Important safety notes
G
WARNING
Adaptive Highbeam Assist does not recognise road users:
R who have no lights, e.g. pedestrians
R who have poor lighting, e.g. cyclists
R whose lighting is blocked, e.g. by a barrier
In very rare cases, Adaptive Highbeam Assist
recognises road users too late or not at all. In
this, or in similar situations, the automatic
main-beam headlamps will not be deactivated
or activated regardless. There is a risk of an
accident.
Always carefully observe the traffic conditions and switch off the main-beam headlamps in
good time.
Adaptive Highbeam Assist cannot take into
account road, weather or traffic conditions.
Adaptive Highbeam Assist is only an aid. You
are responsible for adjusting the vehicle's
lighting to the prevailing light, visibility and
traffic conditions.
In particular, the detection of obstacles can
be restricted if there is:
R poor visibility, e.g. due to fog, heavy rain or
snow
R dirt on the sensors or if the sensors are
obscured
Switching Adaptive Highbeam Assist
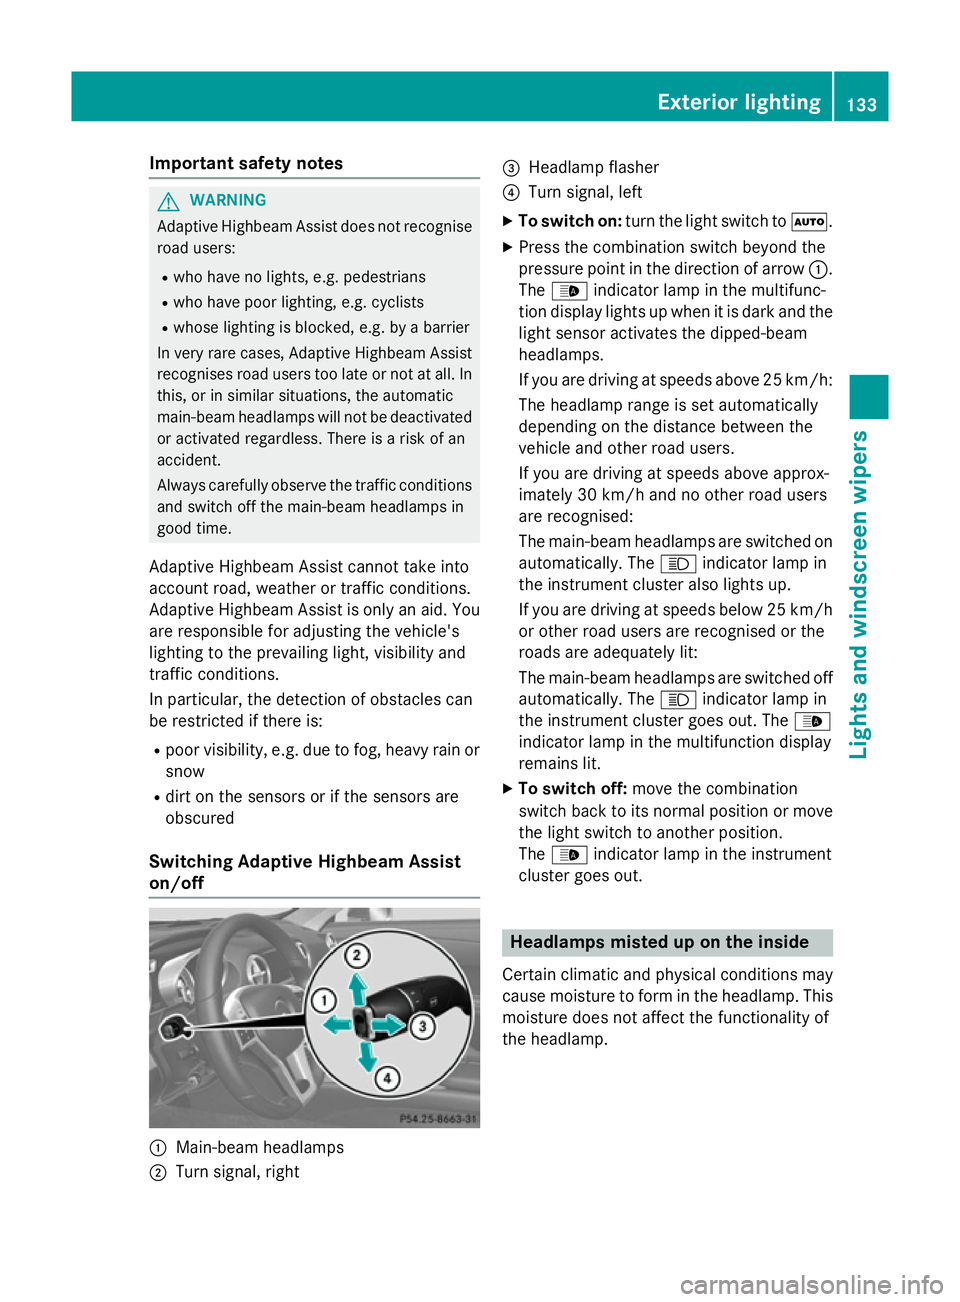
on/off :
Main-beam headlamps
; Turn signal, right =
Headlamp flasher
? Turn signal, left
X To switch on: turn the light switch to Ã.
X Press the combination switch beyond the
pressure point in the direction of arrow :.
The _ indicator lamp in the multifunc-
tion display lights up when it is dark and the
light sensor activates the dipped-beam
headlamps.
If you are driving at speeds above 25 km/h:
The headlamp range is set automatically
depending on the distance between the
vehicle and other road users.
If you are driving at speeds above approx-
imately 30 km/h and no other road users
are recognised:
The main-beam headlamps are switched on automatically. The Kindicator lamp in
the instrument cluster also lights up.
If you are driving at speeds below 25 km/h
or other road users are recognised or the
roads are adequately lit:
The main-beam headlamps are switched off automatically. The Kindicator lamp in
the instrument cluster goes out. The _
indicator lamp in the multifunction display
remains lit.
X To switch off: move the combination
switch back to its normal position or move the light switch to another position.
The _ indicator lamp in the instrument
cluster goes out. Headlamps misted up on the inside
Certain climatic and physical conditions may
cause moisture to form in the headlamp. This
moisture does not affect the functionality of
the headlamp. Exterior lighting
133Lights and windscreen wipers Z
Page 138 of 637

Manual interior lighting control
X
To switch the interior lighting on: set the
switch to the cposition.
X To switch the interior lighting off: set the
switch to the |or (if the door is closed)
to the centre position.
X To switch the reading lamps on/off:
press the pbutton. Crash-responsive emergency lighting
The interior lighting is activated automatically
if the vehicle is involved in an accident.
X To switch off the crash-responsive
emergency lighting: press the hazard
warning lamp button.
or X Lock and then unlock the vehicle using the
key. Replacing bulbs
G
DANGER
Xenon bulbs are under high voltage. You can
get an electric shock if you remove the cover
of the xenon bulb and touch the electrical
contacts. There is a risk of fatal injury.
Never touch the parts or the electrical con-
tacts of the xenon bulb. Always have work on the xenon bulbs carried out at a qualified spe- cialist workshop.
The front and rear lamps of your vehicle are
equipped with either xenon or LED bulbs. Do
not replace the bulbs yourself. Contact a
qualified specialist workshop which has the
necessary specialist knowledge and tools to
carry out the work required.
Bulbs and lamps are an important aspect of
vehicle safety. You must therefore make sure
that these function correctly at all times.
Have the headlamp setting checked regularly. Windscreen wipers
Switching the windscreen wipers on/
off
! Do not operate the windscreen wipers
when the windscreen is dry, as this could
damage the wiper blades. Moreover, dust
that has collected on the windscreen can
scratch the glass if wiping takes place when the windscreen is dry.
If it is necessary to switch on the wind-
screen wipers in dry weather conditions,
always operate them using washer fluid.
! If the windscreen wipers leave smears on
the windscreen after the vehicle has been
washed in an automatic car wash, this may
be due to wax or other residue. Clean the
windscreen with washer fluid after an auto- matic car wash.
! Intermittent wiping with rain sensor: due
to optical influences and the windscreen
becoming dirty in dry weather conditions,
the windscreen wipers may be activated
inadvertently. This could damage the wind- screen wiper blades or scratch the wind-
screen.
For this reason, you should always switch
off the windscreen wipers in dry weather. Combination switch
1
$ Windscreen wipers off
2 Ä Intermittent wipe, low (rain sensor
set to low sensitivity)
3 Å Intermittent wipe, high (rain sensor
set to high sensitivity) Windscreen wipers
135Lights and windscreen wipers Z
Page 220 of 637
Night View Assist Plus
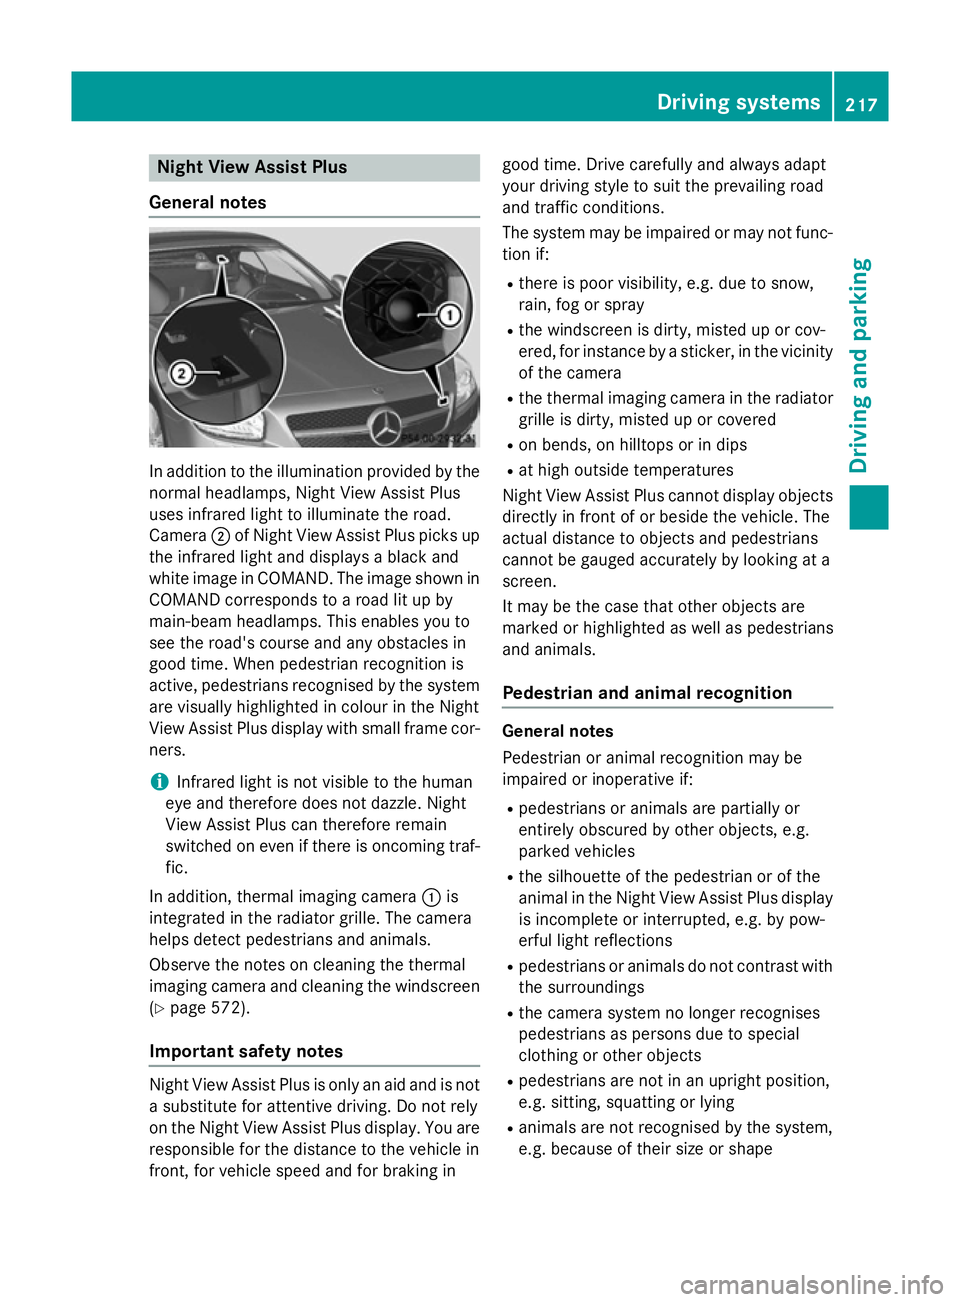
General notes In addition to the illumination provided by the
normal headlamps, Night View Assist Plus
uses infrared light to illuminate the road.
Camera ;of Night View Assist Plus picks up
the infrared light and displays a black and
white image in COMAND. The image shown in COMAND corresponds to a road lit up by
main-beam headlamps. This enables you to
see the road's course and any obstacles in
good time. When pedestrian recognition is
active, pedestrians recognised by the system are visually highlighted in colour in the Night
View Assist Plus display with small frame cor-
ners.
i Infrared light is not visible to the human
eye and therefore does not dazzle. Night
View Assist Plus can therefore remain
switched on even if there is oncoming traf- fic.
In addition, thermal imaging camera :is
integrated in the radiator grille. The camera
helps detect pedestrians and animals.
Observe the notes on cleaning the thermal
imaging camera and cleaning the windscreen (Y page 572).
Important safety notes Night View Assist Plus is only an aid and is not
a substitute for attentive driving. Do not rely
on the Night View Assist Plus display. You are
responsible for the distance to the vehicle in
front, for vehicle speed and for braking in good time. Drive carefully and always adapt
your driving style to suit the prevailing road
and traffic conditions.
The system may be impaired or may not func-
tion if:
R there is poor visibility, e.g. due to snow,
rain, fog or spray
R the windscreen is dirty, misted up or cov-
ered, for instance by a sticker, in the vicinity of the camera
R the thermal imaging camera in the radiator
grille is dirty, misted up or covered
R on bends, on hilltops or in dips
R at high outside temperatures
Night View Assist Plus cannot display objects
directly in front of or beside the vehicle. The
actual distance to objects and pedestrians
cannot be gauged accurately by looking at a
screen.
It may be the case that other objects are
marked or highlighted as well as pedestrians
and animals.
Pedestrian and animal recognition General notes
Pedestrian or animal recognition may be
impaired or inoperative if:
R pedestrians or animals are partially or
entirely obscured by other objects, e.g.
parked vehicles
R the silhouette of the pedestrian or of the
animal in the Night View Assist Plus display
is incomplete or interrupted, e.g. by pow-
erful light reflections
R pedestrians or animals do not contrast with
the surroundings
R the camera system no longer recognises
pedestrians as persons due to special
clothing or other objects
R pedestrians are not in an upright position,
e.g. sitting, squatting or lying
R animals are not recognised by the system,
e.g. because of their size or shape Driving systems
217Driving and parking Z
Page 221 of 637
Pedestrian and animal recognition is deacti-
vated at temperatures above 32 †. The spot-
light function and automatic activation are
then no longer active.
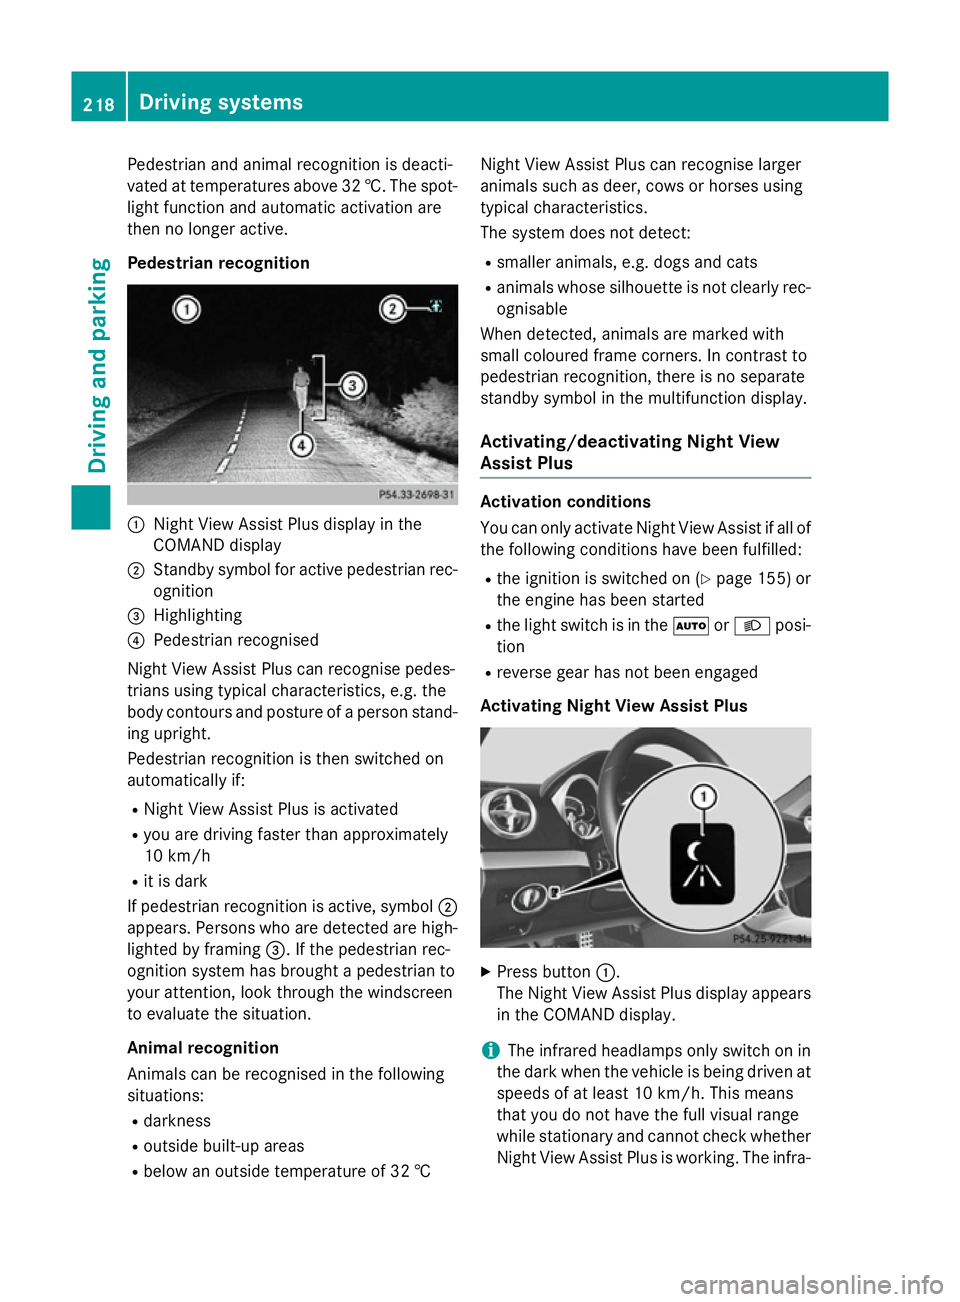
Pedestrian recognition :
Night View Assist Plus display in the
COMAND display
; Standby symbol for active pedestrian rec-
ognition
= Highlighting
? Pedestrian recognised
Night View Assist Plus can recognise pedes-
trians using typical characteristics, e.g. the
body contours and posture of a person stand- ing upright.
Pedestrian recognition is then switched on
automatically if:
R Night View Assist Plus is activated
R you are driving faster than approximately
10 km/h
R it is dark
If pedestrian recognition is active, symbol ;
appears. Persons who are detected are high-
lighted by framing =. If the pedestrian rec-
ognition system has brought a pedestrian to
your attention, look through the windscreen
to evaluate the situation.
Animal recognition
Animals can be recognised in the following
situations:
R darkness
R outside built-up areas
R below an outside temperature of 32 † Night View Assist Plus can recognise larger
animals such as deer, cows or horses using
typical characteristics.
The system does not detect:
R smaller animals, e.g. dogs and cats
R animals whose silhouette is not clearly rec-
ognisable
When detected, animals are marked with
small coloured frame corners. In contrast to
pedestrian recognition, there is no separate
standby symbol in the multifunction display.
Activating/deactivating Night View
Assist Plus Activation conditions
You can only activate Night View Assist if all of
the following conditions have been fulfilled:
R the ignition is switched on (Y page 155) or
the engine has been started
R the light switch is in the ÃorL posi-
tion
R reverse gear has not been engaged
Activating Night View Assist Plus X
Press button :.
The Night View Assist Plus display appears in the COMAND display.
i The infrared headlamps only switch on in
the dark when the vehicle is being driven at speeds of at least 10 km/h. This means
that you do not have the full visual range
while stationary and cannot check whether
Night View Assist Plus is working. The infra- 218
Driving systemsDriving and parking
Page 222 of 637
red headlamps are deactivated at speeds
below 5 km/h. The Night View image con-
tinues to be displayed.
Automatic activation
You can use COMAND Online to select the
Night View Assist Automatic activa‐
Night View Assist Automatic activa‐
tion tion option. The pedestrian and animal
search function remains active even when the
Night View image is not displayed. In the dark, in unlit surroundings and at speeds of more
than 60 km/h, the Night View image is auto-
matically displayed in the COMAND display as
soon as pedestrians or animals are detected.
X In COMAND Online, select automatic acti-
vation of Night View Assist Plus
(Y page 322).
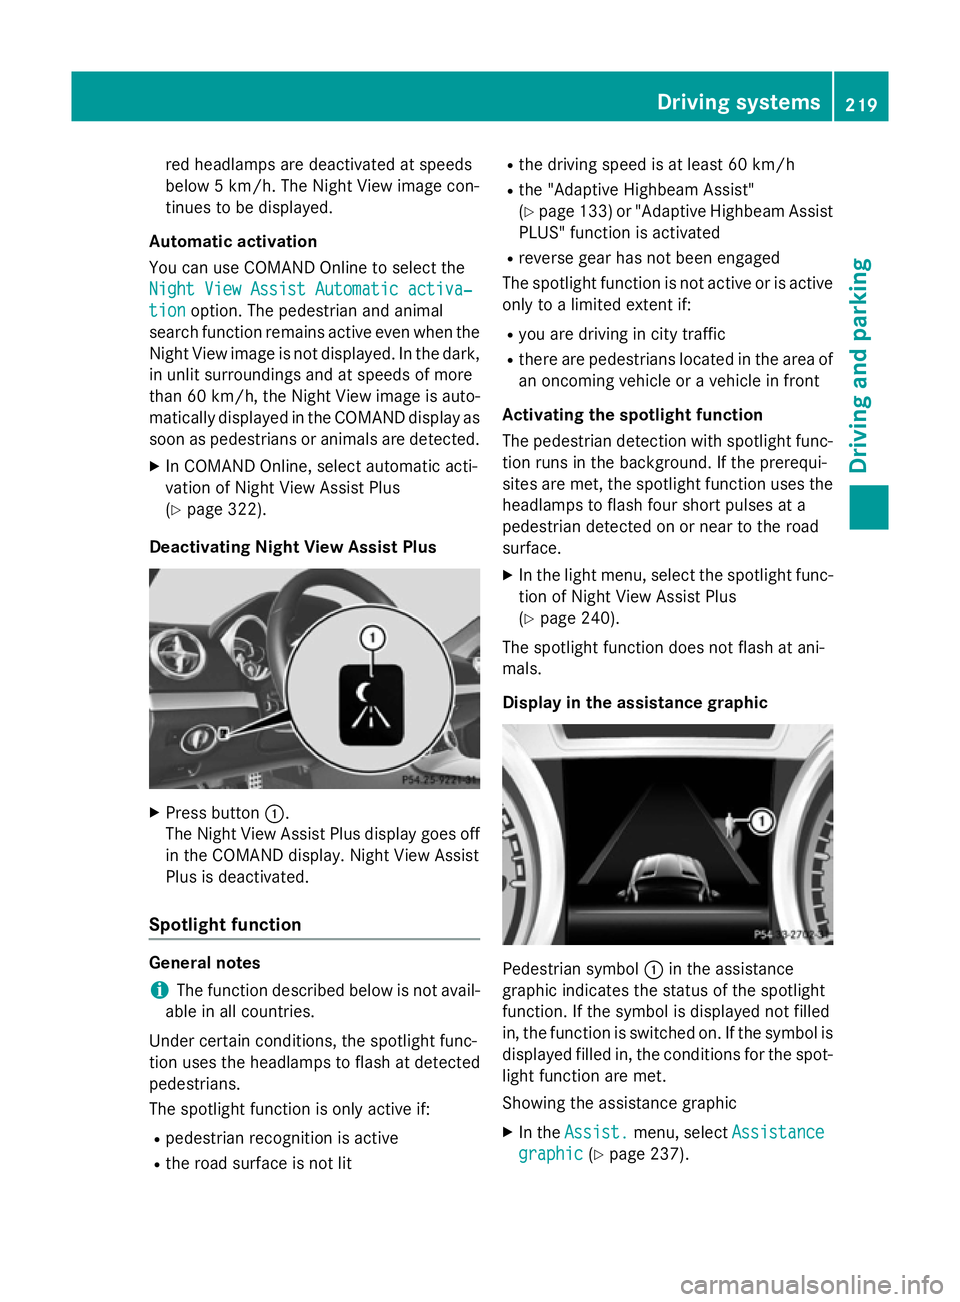
Deactivating Night View Assist Plus X
Press button :.
The Night View Assist Plus display goes off in the COMAND display. Night View Assist
Plus is deactivated.
Spotlight function General notes
i The function described below is not avail-
able in all countries.
Under certain conditions, the spotlight func-
tion uses the headlamps to flash at detected
pedestrians.
The spotlight function is only active if:
R pedestrian recognition is active
R the road surface is not lit R
the driving speed is at least 60 km/h
R the "Adaptive Highbeam Assist"
(Y page 133) or "Adaptive Highbeam Assist
PLUS" function is activated
R reverse gear has not been engaged
The spotlight function is not active or is active
only to a limited extent if:
R you are driving in city traffic
R there are pedestrians located in the area of
an oncoming vehicle or a vehicle in front
Activating the spotlight function
The pedestrian detection with spotlight func- tion runs in the background. If the prerequi-
sites are met, the spotlight function uses the
headlamps to flash four short pulses at a
pedestrian detected on or near to the road
surface.
X In the light menu, select the spotlight func-
tion of Night View Assist Plus
(Y page 240).
The spotlight function does not flash at ani-
mals.
Display in the assistance graphic Pedestrian symbol
:in the assistance
graphic indicates the status of the spotlight
function. If the symbol is displayed not filled
in, the function is switched on. If the symbol is displayed filled in, the conditions for the spot-
light function are met.
Showing the assistance graphic
X In the Assist. Assist. menu, select Assistance
Assistance
graphic
graphic (Ypage 237). Driving systems
219Driving and parking Z
Page 243 of 637
X
Press the =or; button on the steer-
ing wheel to select the Settings
Settings menu.
X Press the :or9 button to select the
Lights
Lights submenu.
X Press ato confirm.
X Press the :or9 button to select the
Daytime driving lights
Daytime driving lights function.
If the Daytime driving lights
Daytime driving lights function
has been switched on, the cone of light and the W symbol in the multifunction dis-
play are shown in orange.
X Press the abutton to save the setting.
Further information on daytime driving lights
(Y page 127).
Switching the Intelligent Light System
on/off
X Press the =or; button on the steer-
ing wheel to select the Settings
Settings menu.
X Press the :or9 button to select the
Lights Lights submenu.
X Press ato confirm.
X Press the :or9 button to select the
Intell. Light System
Intell. Light System function.
If the Intell.
Intell. Light
LightSystem
System function has
been switched on, the cone of light and the L symbol in the multifunction display
are shown in orange.
X Press the abutton to save the setting.
When you activate the Intell.
Intell.Light
LightSys‐
Sys‐
tem
tem, you activate the following functions:
R Motorway mode
R Active light function
R Cornering light function
R Extended range foglamps
If you set the dipped-beam headlamps for
driving on the right/left, the multifunction
display shows the Intell.
Intell. Light LightSystem:
System:
system inoperative Inactive for
system inoperative Inactive for
left-side traffic
left-side traffic orIntell. Light Intell. Light
System:
System: System
Systeminoperative
inoperative Inactive
Inactive
for right-side traffic
for right-side traffic display message
instead of the Intell.
Intell.Light
LightSystem
System func-
tion in the Lights
Lights submenu (Y page 240). Further information on the Intelligent Light
System (Y page 131).
Setting the dipped-beam headlamps for
driving on the left/right
X Press the =or; button on the steer-
ing wheel to select the Settings
Settingsmenu.
X Press the :or9 button to select the
Lights
Lights submenu.
X Press ato confirm.
X Press the :or9 button to select the
Dipped beams Setting for:
Dipped beams Setting for: function.
You will see the selected setting: Right-
Right-
side traffic
side traffic orLeft-side traffic
Left-side traffic.
X Press the abutton to save the setting.
If you change the setting, conversion does
not take place until the next time the vehi-
cle is stationary.
You can use this function to switch between
symmetrical and asymmetrical dipped beam
(Y page 126).
If you set the dipped-beam headlamps for
driving on the right/left, then motorway
mode and the extended range foglamps are
unavailable.
A qualified specialist workshop can set the
dipped-beam headlamps for driving on the
left/right.
Switching the spotlight function on or off
X Press the =or; button on the steer-
ing wheel to select the Settings Settingsmenu.
X Press the :or9 button to select the
Lights
Lights submenu.
X Press ato confirm.
X Press the :or9 to select the Spot‐
Spot‐
light
light function.
When the spotlight function is activated,
the assistance graphic shows the pedes-
trian symbol.
X Press the abutton to save the setting.
Further information on the spotlight function
of Night View Assist Plus (Y page 219).240
Menus and submenusOn-board computer and displays
Page 244 of 637
Setting the brightness of the ambient
lighting
X Press the =or; button on the steer-
ing wheel to select the Settings Settingsmenu.
X Press the :or9 button to select the
Lights Lights submenu.
X Press ato confirm.
X Press the :or9 button to select the
Amb. light +/-
Amb. light +/- function.
You will see the selected setting.
X Press ato confirm.
X Press the :or9 button to adjust the
brightness to a level from Off
OfftoLevel 5
Level 5
(bright).
X Press the aor% button to save the
setting.
Setting the ambient lighting colour
X Press the =or; button on the steer-
ing wheel to select the Settings
Settingsmenu.
X Press the :or9 button to select the
Lights
Lights submenu.
X Press ato confirm.
X Press the :or9 button to select the
Ambient light colour
Ambient light colour function.
X Press ato confirm.
X Press the :or9 button to set the
colour to SOLAR
SOLAR,SOLAR orange
SOLAR orange orSOLAR
SOLAR
red
red.
X Press the aor% button to save the
setting.
Activating/deactivating the surround
lighting and exterior lighting delayed
switch-off X Press the =or; button on the steer-
ing wheel to select the Settings
Settings menu.
X Press the :or9 button to select the
Lights Lights submenu.
X Press ato confirm.
X Press the :or9 button to select the
Surround lighting
Surround lighting function.
When the Surround lighting
Surround lighting function is
activated, the light cone and the area around the vehicle are displayed in orange
in the multifunction display.
X Press the abutton to save the setting.
Deactivating delayed switch-off of the exte-
rior lighting temporarily: X Before leaving the vehicle, turn the key to
position 0in the ignition lock.
X Turn the key to position 2in the ignition
lock.
The exterior lighting delayed switch-off is
deactivated.
Delayed switch-off of the exterior lighting is
reactivated the next time you start the
engine.
If you have activated the Surround light‐
Surround light‐
ing ing function and the light switch is set to
Ã, the following functions are activated
when it is dark:
R surround lighting: the exterior lighting
remains lit for 40 seconds after unlocking
with the key. If you start the engine, the
surround lighting is switched off and auto-
matic headlamp mode is activated
(Y page 127).
R exterior lighting delayed switch-off: the
exterior lighting remains lit for 60 seconds
after the engine is switched off. If you close all the doors and the boot lid, the exterior
lighting goes off after 15 seconds.
i Depending on your vehicle's equipment,
when the surround lighting and delayed
switch-off exterior lighting are on, the fol-
lowing light up:
R side lamps
R dipped-beam headlamps
R daytime driving lights
R surround lighting in the exterior mirrors
Activating/deactivating the interior light-
ing delayed switch-off
If you activate the Lighting delayed sw.- Lighting delayed sw.-
off
off function, the interior lighting remains on
for 20 seconds after you remove the key from
the ignition lock. Menus and submenus
241On-board computer and displays Z