ignition MERCEDES-BENZ SL ROADSTER 2012 User Guide
[x] Cancel search | Manufacturer: MERCEDES-BENZ, Model Year: 2012, Model line: SL ROADSTER, Model: MERCEDES-BENZ SL ROADSTER 2012Pages: 637, PDF Size: 20.68 MB
Page 67 of 637
G
WARNING
Electronic devices on the front-passenger
seat can affect the function of the automatic
child seat recognition, for example:
R laptop
R mobile phone
R transponder cards such as ski passes or
access passes
The front-passenger front airbag could deploy unintentionally or not function as intended
during an accident. This poses an increased
risk of injury or even fatal injury.
Do not place any of the devices mentioned
above or similar devices on the front-
passenger seat. :
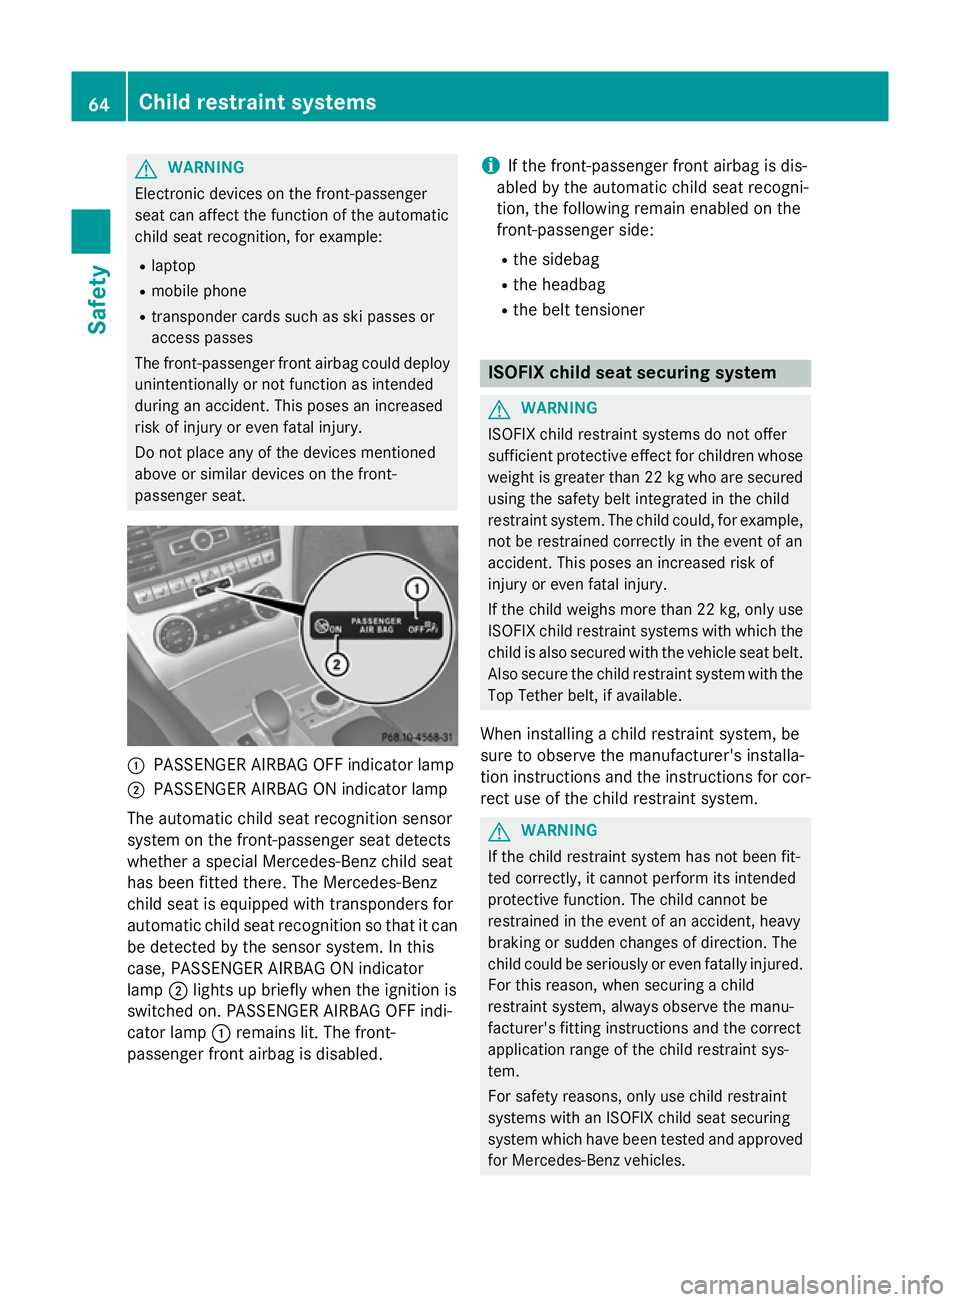
PASSENGER AIRBAG OFF indicator lamp
; PASSENGER AIRBAG ON indicator lamp
The automatic child seat recognition sensor
system on the front-passenger seat detects
whether a special Mercedes-Benz child seat
has been fitted there. The Mercedes-Benz
child seat is equipped with transponders for
automatic child seat recognition so that it can
be detected by the sensor system. In this
case, PASSENGER AIRBAG ON indicator
lamp ;lights up briefly when the ignition is
switched on. PASSENGER AIRBAG OFF indi-
cator lamp :remains lit. The front-
passenger front airbag is disabled. i
If the front-passenger front airbag is dis-
abled by the automatic child seat recogni-
tion, the following remain enabled on the
front-passenger side:
R the sidebag
R the headbag
R the belt tensioner ISOFIX child seat securing system
G
WARNING
ISOFIX child restraint systems do not offer
sufficient protective effect for children whose weight is greater than 22 kg who are securedusing the safety belt integrated in the child
restraint system. The child could, for example,not be restrained correctly in the event of an
accident. This poses an increased risk of
injury or even fatal injury.
If the child weighs more than 22 kg, only use
ISOFIX child restraint systems with which the child is also secured with the vehicle seat belt. Also secure the child restraint system with the
Top Tether belt, if available.
When installing a child restraint system, be
sure to observe the manufacturer's installa-
tion instructions and the instructions for cor- rect use of the child restraint system. G
WARNING
If the child restraint system has not been fit-
ted correctly, it cannot perform its intended
protective function. The child cannot be
restrained in the event of an accident, heavy
braking or sudden changes of direction. The
child could be seriously or even fatally injured. For this reason, when securing a child
restraint system, always observe the manu-
facturer's fitting instructions and the correct
application range of the child restraint sys-
tem.
For safety reasons, only use child restraint
systems with an ISOFIX child seat securing
system which have been tested and approved
for Mercedes-Benz vehicles. 64
Child restraint systemsSafety
Page 73 of 637
Problems with automatic child seat recognition
Problem
Possible causes/consequences and
M
MSolutions The PASSENGER AIR-
BAG OFF indicator
lamp on the centre con-
sole is lit. A special Mercedes-Benz child seat with a transponder for auto-
matic child seat recognition has been fitted to the front-passenger
seat. The front-passenger front airbag has therefore been disabled
as desired. G
WARNING
There is no child seat fitted to the front-passenger seat. Automatic child seat recognition is malfunctioning.
When you switch on the ignition, it is also possible that:
R the 6 SRS warning lamp lights up.
R the PASSENGER AIRBAG OFF indicator lamp does not light up
briefly.
R the PASSENGER AIRBAG ON indicator lamp does not light up, or
lights up and does not go out after 60 seconds.
There is a risk of injury.
X Remove electronic equipment from the front-passenger seat,
e.g.:
R laptop
R mobile phone
R cards with transponders, such as ski passes or access cards
If the PASSENGER AIRBAG OFF indicator lamp is still lit: X Visit a qualified specialist workshop. Driving safety systems
Driving safety systems overview
In this section, you will find information about the following driving safety systems:
R ABS ( Anti-lock BrakingSystem)
(Y page 71)
R BAS ( Brake Assist System) (Y page 71)
R BAS PLUS ( BrakeAssist System PLUS)
(Y page 72)
R Adaptive brake lamps (Y page 73)
R ESP ®
(Electronic StabilityProgram)
(Y page 73)
R EBD ( electronic brake force distribution)
(Y page 76) R
ADAPTIVE BRAKE (Y page 77)
R PRE-SAFE ®
Brake (Y page 77)
R STEER CONTROL (Y page 78) Important safety notes
If you fail to adapt your driving style or if you
are inattentive, the driving safety systems can
neither reduce the risk of an accident nor
override the laws of physics. Driving safety
systems are merely aids designed to assist
driving. You are responsible for the distance
to the vehicle in front, for vehicle speed and
for braking in good time. Always adapt your
driving style to suit the prevailing road and
weather conditions and maintain a safe dis- 70
Driving safety systemsSafety
Page 74 of 637
tance from the vehicle in front. Drive care-
fully.
i The driving safety systems described only
work as effectively as possible when there
is adequate contact between the tyres and the road surface. Please pay special atten-
tion to the notes on tyres, recommended
minimum tyre tread depths etc.
(Y page 596).
In wintry driving conditions, always use
winter tyres (M+S tyres) and, if necessary,
snow chains. Only in this way will the driv-
ing safety systems described in this section work as effectively as possible. ABS (Anti-lock Braking System)
General notes ABS regulates brake pressure in such a way
that the wheels do not lock when you brake.
This allows you to continue steering the vehi-
cle when braking.
The yellow !ABS warning lamp in the
instrument cluster lights up when the ignition is switched on. It goes out when the engine is
running.
Important safety notes i
Observe the "Important safety notes" sec-
tion (Y page 70). G
WARNING
If ABS is faulty, the wheels could lock when
braking. The steerability and braking charac-
teristics may be severely impaired. Addition-
ally, further driving safety systems are deac-
tivated. There is an increased danger of skid- ding and accidents.
Drive on carefully. Have ABS checked imme-
diately at a qualified specialist workshop.
If ABS is malfunctioning, other systems,
including driving safety systems, will also
become inoperative. Observe the information on the ABS warning lamp (Y page 275) anddisplay messages which may be shown in the
instrument cluster (Y page 248).
ABS works from a speed of about
8 km/hupwards, regardless of road-surface
conditions. ABS works on slippery surfaces,
even when you only brake gently.
Brakes X
If ABS intervenes: continue to depress the
brake pedal with force until the braking sit- uation is over.
X To make a full brake application:
depress the brake pedal with full force.
If ABS intervenes when braking, you will feel a
pulsing in the brake pedal.
The pulsating brake pedal can be an indica-
tion of hazardous road conditions, and func-
tions as a reminder to take extra care while
driving. BAS (Brake Assist System)
General notes BAS operates in emergency braking situa-
tions. If you depress the brake pedal quickly,
BAS automatically boosts the braking force,
thus shortening the stopping distance.
Important safety notes i
Observe the "Important safety notes" sec-
tion (Y page 70). G
WARNING
If BAS is malfunctioning, the braking distance
in an emergency braking situation is
increased. There is a risk of accident.
In an emergency braking situation, depress
the brake pedal with full force. ABS prevents
the wheels from locking. Driving safety systems
71Safety Z
Page 77 of 637
Important safety notes
G
WARNING
If ESP ®
is malfunctioning, ESP ®
is unable to
stabilise the vehicle. In addition, other driving
safety systems are switched off. This increa-
ses the risk of skidding and an accident.
Drive on carefully. Have ESP ®
checked at a
qualified specialist workshop.
! When testing the electric parking brake
on a braking dynamometer, switch off the
ignition. Application of the brakes by ESP ®
may otherwise destroy the brake system.
When towing your vehicle with the rear axle
raised, observe the notes on
ESP ®
(Y page 590).
ESP ®
is deactivated if the åwarning lamp
in the instrument cluster lights up continu-
ously when the engine is running.
If the ÷ warning lamp and the åwarn-
ing lamp are lit continuously, ESP ®
is not
available due to a malfunction.
Observe the information on warning lamps
(Y page 277) and display messages which
may be shown in the instrument cluster
(Y page 248).
i Only use wheels with the recommended
tyre sizes. Only then will ESP ®
function
properly.
Characteristics of ESP ®General notes
If the
÷ ESP warning lamp goes out before
beginning the journey, ESP ®
is automatically
active.
If ESP ®
intervenes, the ÷ESP®
warning
lamp flashes in the instrument cluster. If ESP
®
intervenes:
X Do not deactivate ESP ®
under any circum-
stances.
X When pulling away, only depress the accel-
erator pedal as far as is necessary.
X Adapt your driving style to suit the prevail-
ing road and weather conditions.
ECO start/stop function
The ECO start/stop function switches the
engine off automatically if the vehicle stops
moving. When pulling away again, the engine
starts automatically. ESP ®
remains in its pre-
viously selected status. Example:if ESP®
was deactivated before the engine was
switched off, ESP ®
remains deactivated when
the engine is switched on again.
Deactivating/activating ESP ®
(except
AMG vehicles) Important safety notes
i Observe the "Important safety notes" sec-
tion (Y page 70).
You can select between the following states
of ESP ®
:
R ESP ®
is activated
R ESP ®
is deactivated G
WARNING
If you deactivate ESP ®
, ESP ®
no longer sta-
bilises the vehicle. There is an increased risk
of skidding and an accident.
Only deactivate ESP ®
in the situations descri-
bed in the following.
It may be best to deactivate ESP ®
in the fol-
lowing situations:
R when using snow chains
R in deep snow
R on sand or gravel
i Activate ESP ®
as soon as the situations
described above no longer apply. ESP ®
will
otherwise not be able to stabilise the vehi- 74
Driving safety systemsSafety
Page 82 of 637

This steering support is provided in particular
if:
R both right wheels or both left wheels are on
a wet or slippery road surface when you
brake.
R the vehicle starts to skid.
Important safety notes i
Observe the "Important safety notes" sec-
tion (Y page 70).
No steering support is provided from STEER
CONTROL, if:
R ESP ®
is malfunctioning.
R the steering is faulty.
Power steering will, however, continue to
function. Anti-theft systems
Immobiliser
X To activate with the key: remove the key
from the ignition lock.
X To activate with KEYLESS-GO: switch the
ignition off and open the driver's door.
X To deactivate: switch on the ignition.
The immobiliser prevents your vehicle from
being started without the correct key.
When leaving the vehicle, always take the
SmartKey with you and lock the vehicle. The
engine can be started by anyone with a valid
key that is left inside the vehicle.
i The immobiliser is always deactivated
when you start the engine. ATA (Anti-Theft Alarm system)
X
To prime: lock the vehicle with the key or
KEYLESS-GO.
Indicator lamp :flashes. The alarm sys-
tem is primed after approximately
15 seconds.
X To switch off: unlock the vehicle with the
key or KEYLESS-GO.
A visual and audible alarm is triggered if the
alarm system is primed and you open:
R a door
R the vehicle with the emergency key ele-
ment
R the boot lid
R the bonnet
R the glove compartment
R the stowage space under the armrest
R a stowage compartment in the rear
X To turn the alarm off with the key: press
the % or& button on the key.
The alarm is switched off.
or
X Insert the key into the ignition lock.
The alarm is switched off.
X To stop the alarm using KEYLESS-GO:
grasp the outside door handle. The key
must be outside the vehicle.
The alarm is switched off.
or
X Press the Start/Stop button on the dash-
board. The key must be inside the vehicle.
The alarm is switched off. Anti-theft systems
79Safety Z
Page 83 of 637
The alarm is not switched off, even if you
close the open door that has triggered it, for
example. Tow-away protection
Function An audible and visual alarm is triggered if your
vehicle's angle of inclination is altered while
tow-away protection is primed. This can occur
if the vehicle is jacked up on one side, for
example.
Activating X
Make sure that:
R the doors are closed
R the boot lid is closed
Only then is the tow-away protection
primed.
X Lock the vehicle with the key or KEYLESS-
GO.
Tow-away protection is primed after
approximately 30 seconds.
Deactivating X
To switch off: unlock the vehicle with the
key or KEYLESS-GO.
Tow-away protection is switched off auto-
matically.
Deactivating X
Remove the key from the ignition lock.
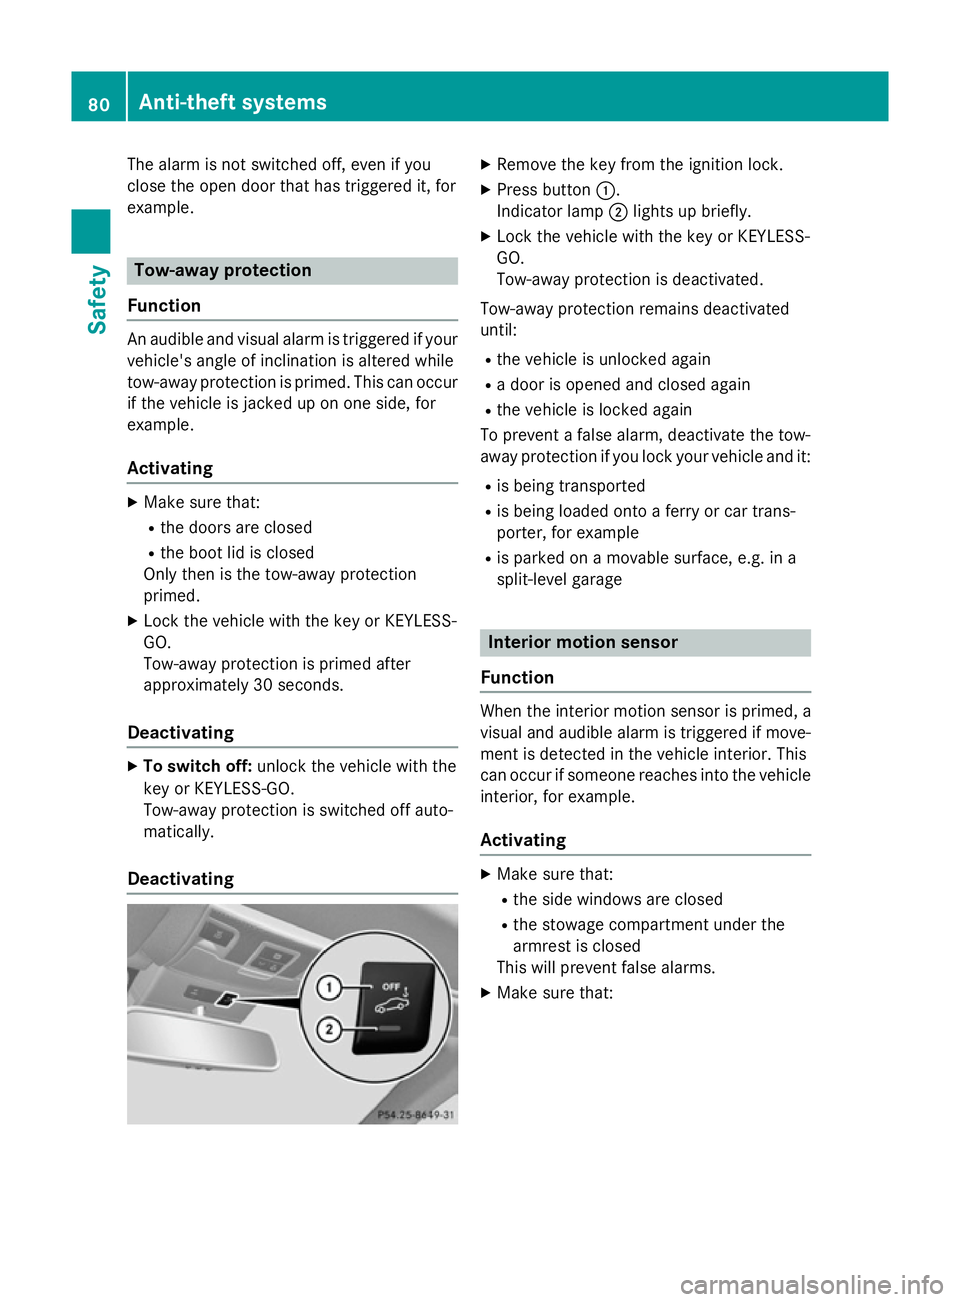
X Press button :.
Indicator lamp ;lights up briefly.
X Lock the vehicle with the key or KEYLESS-
GO.
Tow-away protection is deactivated.
Tow-away protection remains deactivated
until: R the vehicle is unlocked again
R a door is opened and closed again
R the vehicle is locked again
To prevent a false alarm, deactivate the tow-
away protection if you lock your vehicle and it:
R is being transported
R is being loaded onto a ferry or car trans-
porter, for example
R is parked on a movable surface, e.g. in a
split-level garage Interior motion sensor
Function When the interior motion sensor is primed, a
visual and audible alarm is triggered if move-
ment is detected in the vehicle interior. This
can occur if someone reaches into the vehicle interior, for example.
Activating X
Make sure that:
R the side windows are closed
R the stowage compartment under the
armrest is closed
This will prevent false alarms.
X Make sure that: 80
Anti-theft systemsSafety
Page 84 of 637
R
the roof is closed
R the doors are closed
R the boot lid is closed
Only then is the interior motion sensor
primed.
X Lock the vehicle with the key or KEYLESS-
GO.
The interior motion sensor is primed after
approximately 30 second s.
i Only
for the Netherlands and Belgium:
the interior motion sensor is primed even
when the roof is open. However, the roof
should be closed so as to prevent a false
alarm.
Deactivating X
Unlock the vehicle with the key or KEY-
LESS-GO.
The interior motion sensor is automatically
deactivated.
Deactivating X
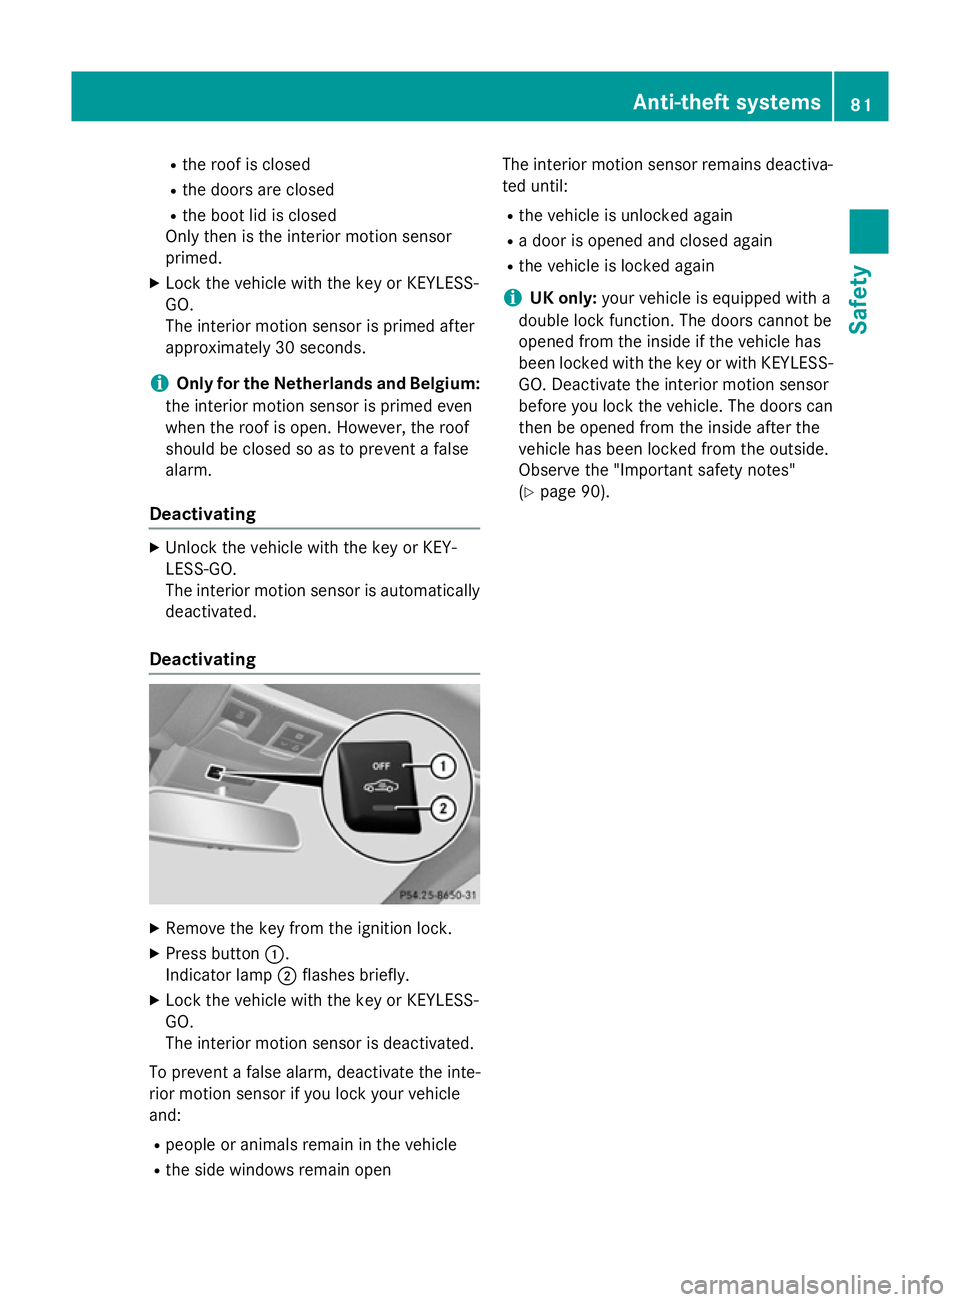
Remove the key from the ignition lock.
X Press button :.
Indicator lamp ;flashes briefly.
X Lock the vehicle with the key or KEYLESS-
GO.
The interior motion sensor is deactivated.
To prevent a false alarm, deactivate the inte-
rior motion sensor if you lock your vehicle
and:
R people or animals remain in the vehicle
R the side windows remain open The interior motion sensor remains deactiva-
ted until:
R the vehicle is unlocked again
R a door is opened and closed again
R the vehicle is locked again
i UK only:
your vehicle is equipped with a
double lock function. The doors cannot be
opened from the inside if the vehicle has
been locked with the key or with KEYLESS- GO. Deactivate the interior motion sensor
before you lock the vehicle. The doors can
then be opened from the inside after the
vehicle has been locked from the outside.
Observe the "Important safety notes"
(Y page 90). Anti-theft systems
81Safety Z
Page 87 of 637
Useful information
i This Owner's Manual describes all mod-
els, series and optional equipment for your
vehicle that were available at the time of
going to press. National variations are pos- sible. Note that your vehicle may not be
equipped with all of the functions descri-
bed. This is also the case for systems and
functions relevant to safety.
i Read the information on qualified special-
ist workshops: (Y page 34). Key
Important safety notes
United Kingdom only: G
WARNING
When the double locks are activated, the
doors can no longer be opened from the
inside. People in the vehicle can no longer get out, e.g. in hazardous situations. There is a
risk of injury.
Therefore, do not leave any people unsuper-
vised in the vehicle, particularly children, eld-
erly people or people in need of special assis-
tance. Do not activate the double lock when
people are in the vehicle.
If the vehicle has been locked from the out-
side, the double lock function is activated as
standard. It is then not possible to open the
doors from inside the vehicle. You can deac-
tivate the double-lock function by deactivat-
ing the interior motion sensor (Y page 80).
The doors can then be opened from the inside after the vehicle has been locked from the
outside. The anti-theft alarm system is trig-
gered if the door is opened from the inside.
Switch off the alarm (Y page 79).
All countries: G
WARNING
If children are left unsupervised in the vehicle, they can:
R open doors and endanger other persons or
road users
R climb out and be injured by the traffic
R operate vehicle equipment and, for exam-
ple, trap themselves.
Children could also set the vehicle in motion, for example by:
R releasing the parking brake
R shifting the automatic transmission out of
park position P
R starting the engine.
There is a risk of an accident and injury.
When leaving the vehicle, always take the key
with you and lock the vehicle. Never leave
children unattended in the vehicle. Always
keep the key out of reach of children. G
WARNING
If persons (particularly children) are exposed
to heat or cold for a prolonged period, there is a risk of serious or even fatal injuries. Never
leave persons (particularly children) unatten-
ded in the vehicle. G
WARNING
If you attach heavy or large objects to the key, the key could be unintentionally turned in the
ignition lock. This could cause the engine to
be switched off. There is a risk of an accident.
Do not attach any heavy or large objects to the
key. Remove any bulky keyrings before insert-
ing the key into the ignition lock.
! Keep the key away from strong magnetic
fields. Otherwise, the remote control func-
tion could be affected.
Strong magnetic fields can occur in the
vicinity of powerful electrical installations. 84
KeyOpening and closing
Page 89 of 637

X
To unlock the vehicle: touch the inner
surface of the door handle.
X To lock the vehicle: touch sensor sur-
face :.
X Convenience closing feature: touch
recessed sensor surface ;for an exten-
ded period.
Further information on the convenience
closing feature (Y page 101).
X To unlock the boot lid: pull the boot lid
handle.
The vehicle only unlocks the boot lid. Changing the settings of the locking
system
You can change the settings of the locking
system. This means only the driver's door, the
lockable stowage compartments in the vehi-
cle interior and the fuel filler flap are unlocked when the vehicle is unlocked. This is useful if
you frequently travel on your own.
X To change the setting: press and hold
down the %and& buttons simulta-
neously for approximately six seconds until the battery check lamp flashes twice
(Y page 87).
i If the setting of the locking system is
changed within the signal range of the vehi- cle, pressing the &or% button:
R locks or
R unlocks the vehicle The key now functions as follows:
X To unlock the driver's door: press the
% button once.
X To unlock centrally: press the%but-
ton twice.
X To lock centrally: press the&button.
The KEYLESS-GO function is changed as fol-
lows:
X To unlock the driver's door: touch the
inner surface of the door handle on the
driver's door.
X To unlock centrally: touch the inner sur-
face of the front-passenger door handle.
X To lock centrally: touch the outer sensor
surface on one of the door handles.
X To restore the factory settings: press
and hold down the %and& buttons
simultaneously for approximately six sec-
onds until the battery check lamp flashes
twice (Y page 87). Emergency key element
General notes If the vehicle can no longer be locked or
unlocked with the key, use the emergency
key element.
If you use the emergency key element to
unlock and open the driver's door or the boot
lid, the anti-theft alarm system will be trig-
gered (Y page 79).
There are several ways to deactivate the
alarm:
X To deactivate the alarm with the key:
press the %or& button on the key.
or
X Insert the key into the ignition lock.
or
X To deactivate the alarm with KEYLESS-
GO: press the Start/Stop button in the igni-
tion lock. The key must be in the vehicle. 86
KeyOpening and closing
Page 90 of 637
or
X Lock or unlock the vehicle using KEYLESS-
GO. The key must be outside the vehicle.
If you unlock the vehicle using the emergency
key element, the fuel filler flap will not auto-
matically be unlocked.
X To unlock the fuel filler flap: insert the
key into the ignition lock.
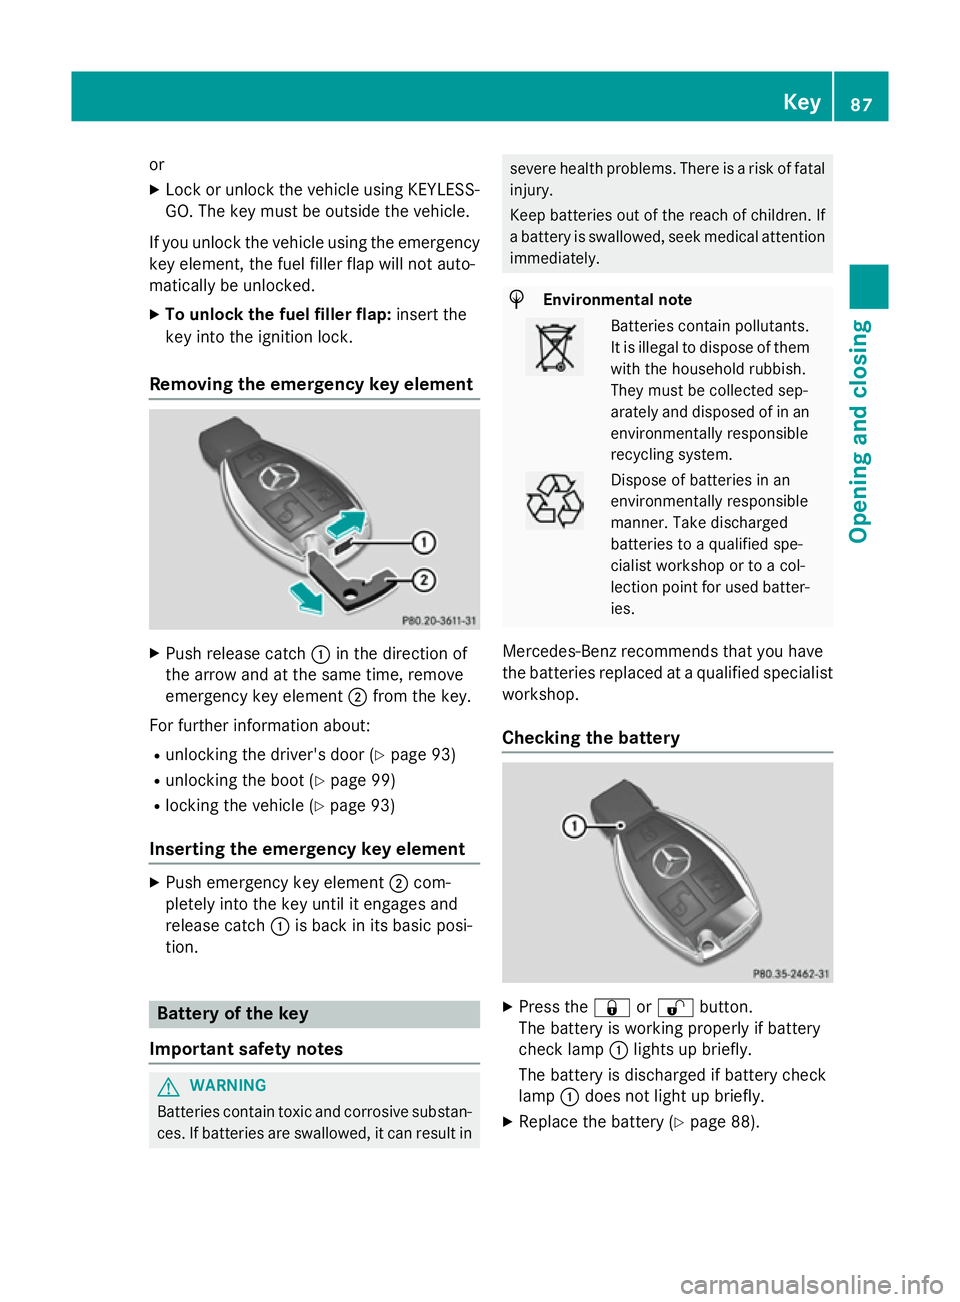
Removing the emergency key element X
Push release catch :in the direction of
the arrow and at the same time, remove
emergency key element ;from the key.
For further information about: R unlocking the driver's door (Y page 93)
R unlocking the boot (Y page 99)
R locking the vehicle (Y page 93)
Inserting the emergency key element X
Push emergency key element ;com-
pletely into the key until it engages and
release catch :is back in its basic posi-
tion. Battery of the key
Important safety notes G
WARNING
Batteries contain toxic and corrosive substan- ces. If batteries are swallowed, it can result in severe health problems. There is a risk of fatal
injury.
Keep batteries out of the reach of children. If
a battery is swallowed, seek medical attention immediately. H
Environmental note Batteries contain pollutants.
It is illegal to dispose of them
with the household rubbish.
They must be collected sep-
arately and disposed of in anenvironmentally responsible
recycling system. Dispose of batteries in an
environmentally responsible
manner. Take discharged
batteries to a qualified spe-
cialist workshop or to a col-
lection point for used batter-
ies.
Mercedes-Benz recommends that you have
the batteries replaced at a qualified specialist workshop.
Checking the battery X
Press the &or% button.
The battery is working properly if battery
check lamp :lights up briefly.
The battery is discharged if battery check
lamp :does not light up briefly.
X Replace the battery (Y page 88). Key
87Opening and closing Z