ignition MERCEDES-BENZ SL ROADSTER 2012 Manual PDF
[x] Cancel search | Manufacturer: MERCEDES-BENZ, Model Year: 2012, Model line: SL ROADSTER, Model: MERCEDES-BENZ SL ROADSTER 2012Pages: 637, PDF Size: 20.68 MB
Page 209 of 637
warning display for the front area is located
on the dashboard above the centre air vents.
The warning display for the rear area is loca-
ted on the cover behind the seats in the rear
compartment.
The warning display for each side of the vehi- cle is divided into five yellow and two red seg-ments. PARKTRONIC is operational if yellow
segments showing operational readiness =
light up.
The selected transmission position and the
direction in which the vehicle is rolling deter-
mine which warning display is active when the engine is running. Transmission
position Warning display
D
Front area activated
R,
Nor the vehicle
is rolling back-
wards Rear and front areas
activated
P
No areas activated
One or more segments light up as the vehicle
approaches an obstacle, depending on the
vehicle's distance from the obstacle.
R Front area: following the sixth segment,
you will hear an intermittent warning tone.
From the seventh segment, you will hear a
continuous warning tone for approximately two seconds. This indicates that you have
now reached the minimum distance.
R Rear area: from the first segment onwards,
you will hear an intermittent warning tone.
The interval gets shorter after each seg-
ment. At the seventh segment, you will hear a continuous warning tone for approx-
imately two seconds. This indicates that
you have now reached the minimum dis-
tance. Deactivating/activating PARKTRONIC
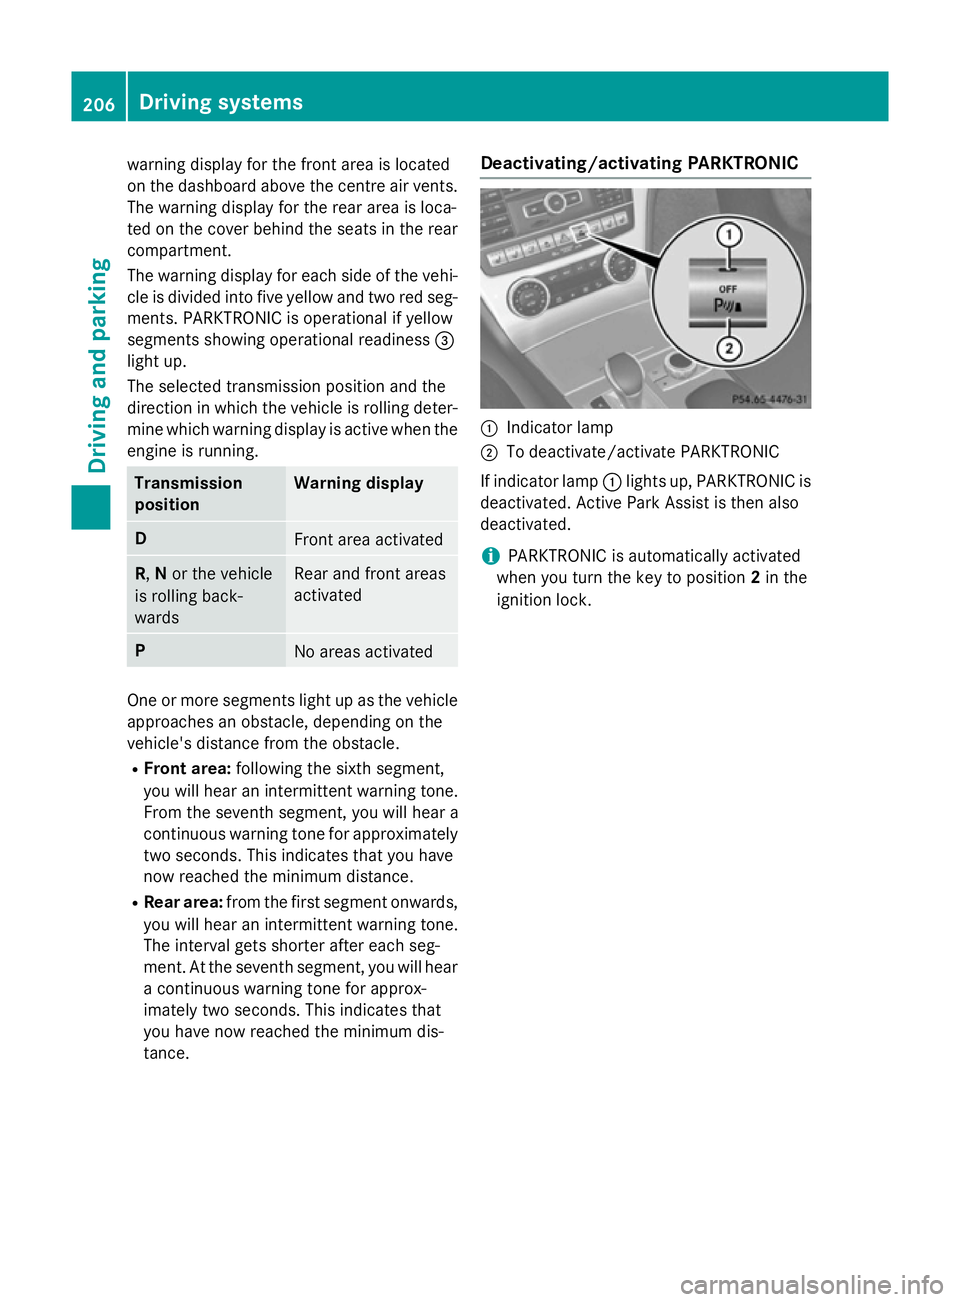
:
Indicator lamp
; To deactivate/activate PARKTRONIC
If indicator lamp :lights up, PARKTRONIC is
deactivated. Active Park Assist is then also
deactivated.
i PARKTRONIC is automatically activated
when you turn the key to position 2in the
ignition lock. 206
Driving systemsDriving and parking
Page 210 of 637
Problems with PARKTRONIC
Problem
Possible causes/consequences and
M
MSolutions Only the red segments
in the PARKTRONIC
warning displays are lit.
You also hear a warning
tone for approximately
two seconds.
PARKTRONIC is deacti-
vated after approx-
imately five seconds,
and the indicator lamp
in the PARKTRONIC
button lights up. PARKTRONIC has malfunctioned and has switched off.
X If problems persist, have PARKTRONIC checked at a qualified
specialist workshop. Only the red segments
in the PARKTRONIC
warning displays are lit.
PARKTRONIC is deacti-
vated after approx-
imately five seconds. The PARKTRONIC sensors are dirty or there is interference.
X Clean the PARKTRONIC sensors (Y page 571).
X Switch the ignition back on. The problem may be caused by an external source of radio or
ultrasound waves.
X See if PARKTRONIC functions in a different location. Active Parking Assist
General notes Active Parking Assist is an electronic parking
aid with ultrasound. Ultrasound is used to
measure the road on both sides of the vehicle. A suitable parking space is indicated by the
parking symbol. Active steering intervention
can assist you during parking.
You may also use PARKTRONIC (Y page 204).
When PARKTRONIC is switched off, Active
Parking Assist is also unavailable.
Use Active Parking Assist for parking spaces:
R that are parallel to the direction of travel
R that are on straight roads, not bends
R that are on the same level as the road, e.g.
not on the pavement Important safety notes Active Parking Assist is only an aid. It is not a
substitute for your attention to the immediate
surroundings. The responsibility for safe
manoeuvring and parking remains with you.
Make sure that there are no persons, animals
or objects in range while manoeuvring and
parking. G
WARNING
The vehicle will veer out when parking and can take you onto sections of the oncoming lane.As a result, you may collide with other road
users. There is a risk of an accident.
When parking, pay attention to other road
users. Stop the vehicle if necessary or cancel
the Active Parking Assist parking procedure.
! If unavoidable, you should drive over
obstacles such as kerbs slowly and not at a Driving systems
207Driving and parking Z
Page 215 of 637
Activating/deactivating the reversing
camera X
To activate: make sure that the key is in
position 2in the ignition lock.
X Make sure that the function "show revers-
ing camera display" is selected in COMAND Online (Y page 322).
X Engage reverse gear.
The area behind the vehicle is shown with
guide lines in the COMAND display.
To deactivate: the reversing camera deacti-
vates if you shift the transmission to Por after
driving forwards a short distance.
Displays in the COMAND display The reversing camera may show a distorted
view of obstacles or show them incorrectly or
not at all. Obstacles are not shown by the
reversing camera in the following locations:
R very close to the rear bumper
R under the rear bumper
R in the area immediately above the tailgate
handle
! Objects not at ground level may appear to
be further away than they actually are, e.g.:
R the bumper of a parked vehicle
R the drawbar of a trailer
R the ball coupling of a trailer tow hitch
R the rear section of an HGV
R a slanted post
Use the guidelines only for orientation.
Approach objects no further than the bot-
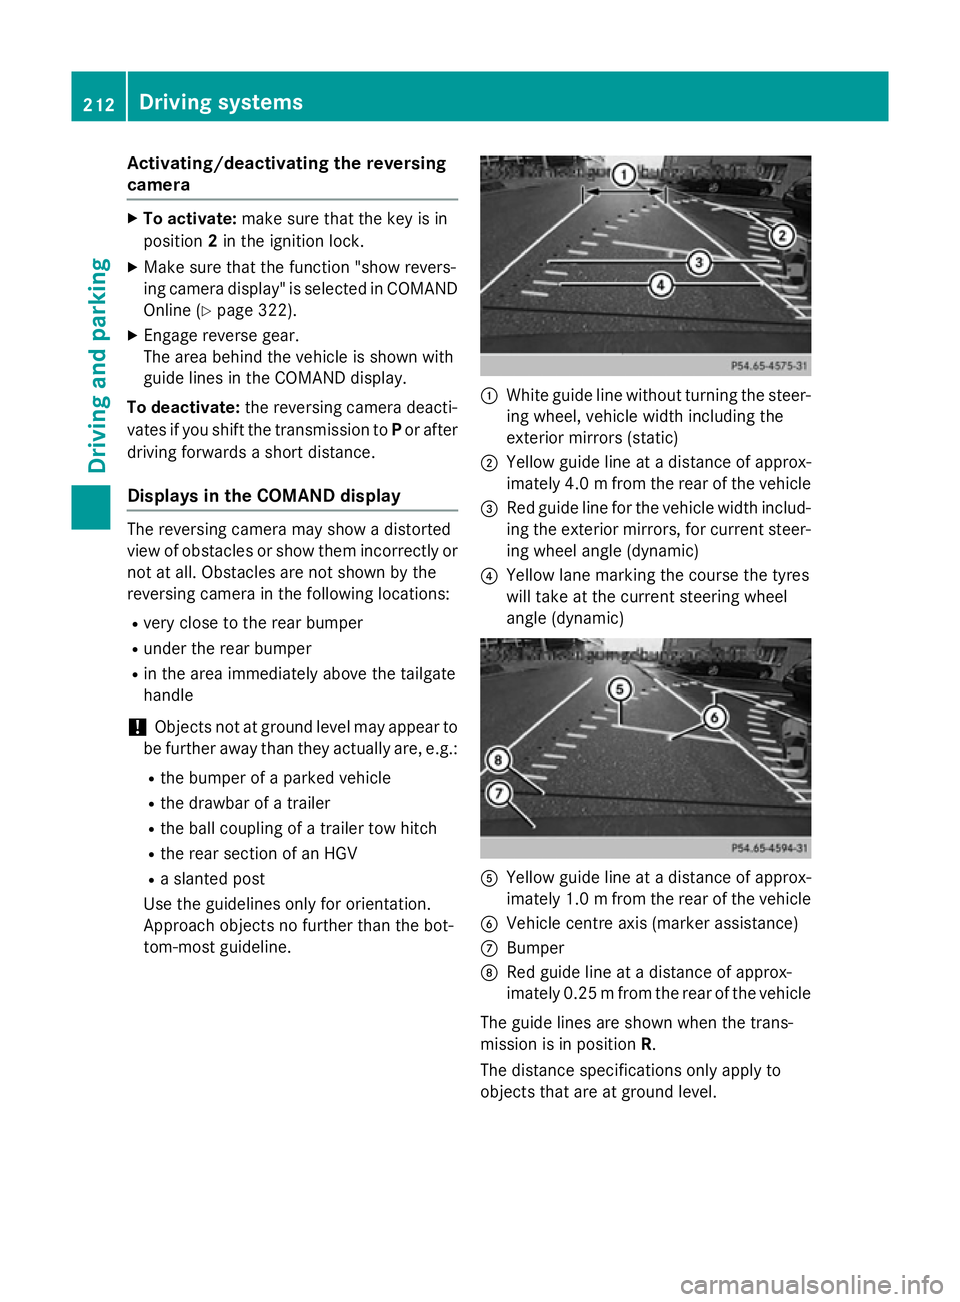
tom-most guideline. :
White guide line without turning the steer-
ing wheel, vehicle width including the
exterior mirrors (static)
; Yellow guide line at a distance of approx-
imately 4.0 mfrom the rear of the vehicle
= Red guide line for the vehicle width includ-
ing the exterior mirrors, for current steer- ing wheel angle (dynamic)
? Yellow lane marking the course the tyres
will take at the current steering wheel
angle (dynamic) A
Yellow guide line at a distance of approx-
imately 1.0 mfrom the rear of the vehicle
B Vehicle centre axis (marker assistance)
C Bumper
D Red guide line at a distance of approx-
imately 0.25 mfrom the rear of the vehicle
The guide lines are shown when the trans-
mission is in position R.
The distance specifications only apply to
objects that are at ground level. 212
Driving systemsDriving and parking
Page 221 of 637
Pedestrian and animal recognition is deacti-
vated at temperatures above 32 †. The spot-
light function and automatic activation are
then no longer active.
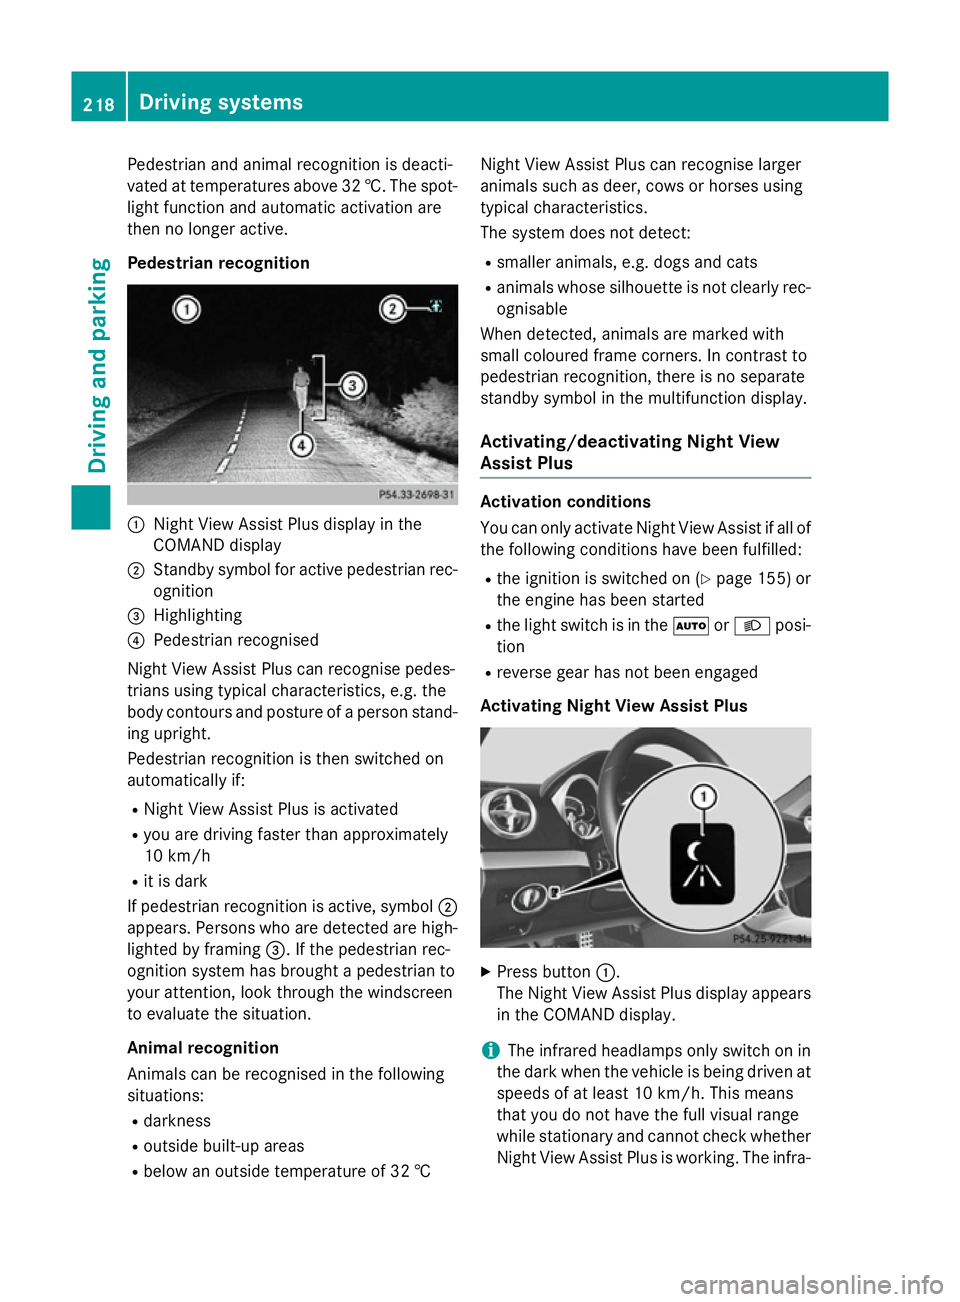
Pedestrian recognition :
Night View Assist Plus display in the
COMAND display
; Standby symbol for active pedestrian rec-
ognition
= Highlighting
? Pedestrian recognised
Night View Assist Plus can recognise pedes-
trians using typical characteristics, e.g. the
body contours and posture of a person stand- ing upright.
Pedestrian recognition is then switched on
automatically if:
R Night View Assist Plus is activated
R you are driving faster than approximately
10 km/h
R it is dark
If pedestrian recognition is active, symbol ;
appears. Persons who are detected are high-
lighted by framing =. If the pedestrian rec-
ognition system has brought a pedestrian to
your attention, look through the windscreen
to evaluate the situation.
Animal recognition
Animals can be recognised in the following
situations:
R darkness
R outside built-up areas
R below an outside temperature of 32 † Night View Assist Plus can recognise larger
animals such as deer, cows or horses using
typical characteristics.
The system does not detect:
R smaller animals, e.g. dogs and cats
R animals whose silhouette is not clearly rec-
ognisable
When detected, animals are marked with
small coloured frame corners. In contrast to
pedestrian recognition, there is no separate
standby symbol in the multifunction display.
Activating/deactivating Night View
Assist Plus Activation conditions
You can only activate Night View Assist if all of
the following conditions have been fulfilled:
R the ignition is switched on (Y page 155) or
the engine has been started
R the light switch is in the ÃorL posi-
tion
R reverse gear has not been engaged
Activating Night View Assist Plus X
Press button :.
The Night View Assist Plus display appears in the COMAND display.
i The infrared headlamps only switch on in
the dark when the vehicle is being driven at speeds of at least 10 km/h. This means
that you do not have the full visual range
while stationary and cannot check whether
Night View Assist Plus is working. The infra- 218
Driving systemsDriving and parking
Page 226 of 637
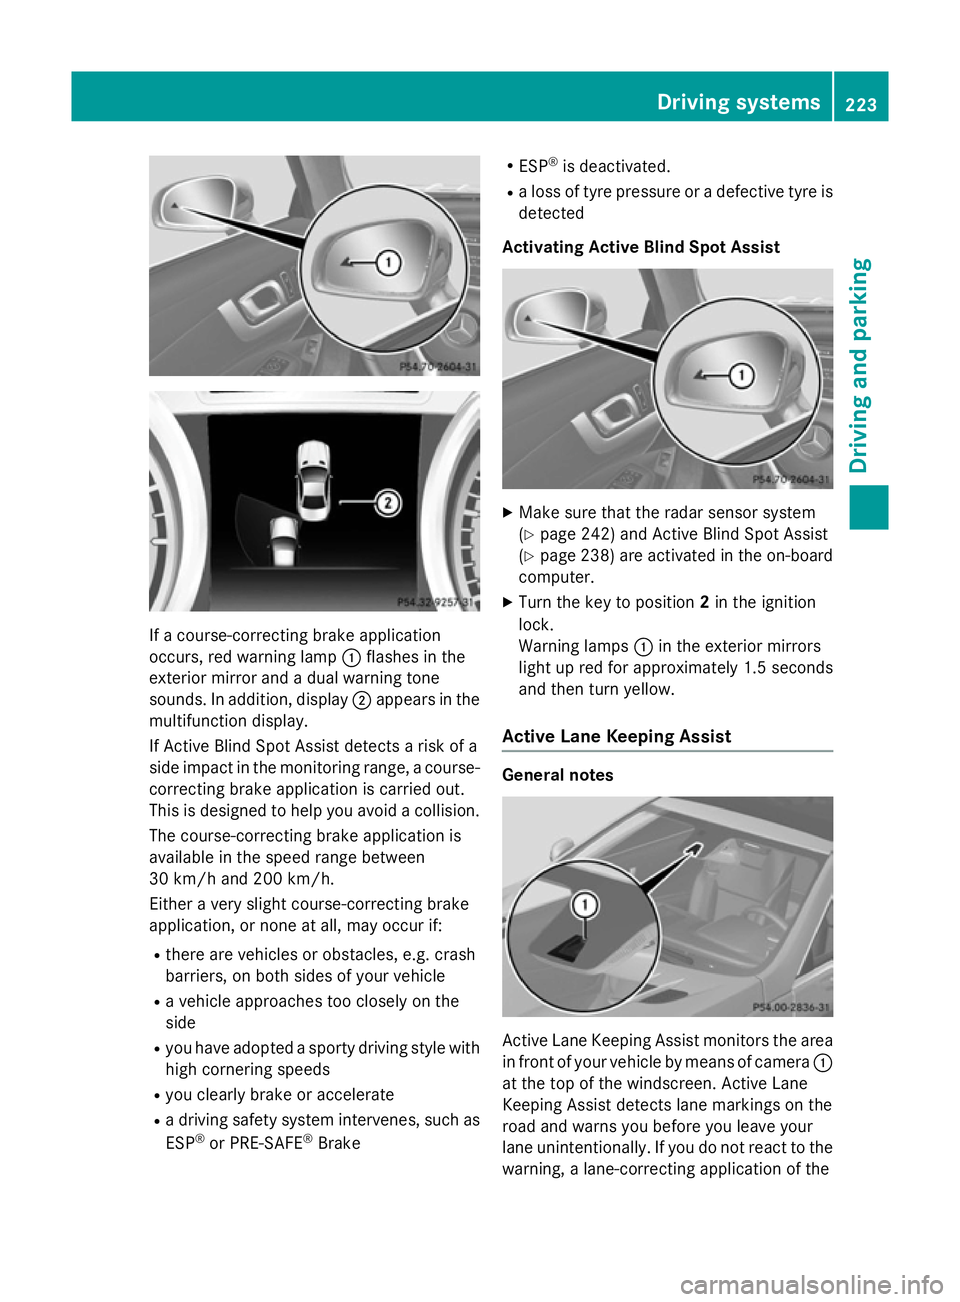
If a course-correcting brake application
occurs, red warning lamp :flashes in the
exterior mirror and a dual warning tone
sounds. In addition, display ;appears in the
multifunction display.
If Active Blind Spot Assist detects a risk of a
side impact in the monitoring range, a course- correcting brake application is carried out.
This is designed to help you avoid a collision.
The course-correcting brake application is
available in the speed range between
30 km/h and 200 km/h.
Either a very slight course-correcting brake
application, or none at all, may occur if:
R there are vehicles or obstacles, e.g. crash
barriers, on both sides of your vehicle
R a vehicle approaches too closely on the
side
R you have adopted a sporty driving style with
high cornering speeds
R you clearly brake or accelerate
R a driving safety system intervenes, such as
ESP ®
or PRE-SAFE ®
Brake R
ESP ®
is deactivated.
R a loss of tyre pressure or a defective tyre is
detected
Activating Active Blind Spot Assist X
Make sure that the radar sensor system
(Y page 242) and Active Blind Spot Assist
(Y page 238) are activated in the on-board
computer.
X Turn the key to position 2in the ignition
lock.
Warning lamps :in the exterior mirrors
light up red for approximately 1.5 seconds
and then turn yellow.
Active Lane Keeping Assist General notes
Active Lane Keeping Assist monitors the area
in front of your vehicle by means of camera :
at the top of the windscreen. Active Lane
Keeping Assist detects lane markings on the
road and warns you before you leave your
lane unintentionally. If you do not react to the warning, a lane-correcting application of the Driving systems
223Driving and parking Z
Page 232 of 637
At high outside temperatures and when driv-
ing uphill, the coolant temperature may rise
to the end of the scale. Rev counter
! Do not drive in the overrevving range.
Doing so will damage the engine.
The red band in the rev counter indicates the
engine's overrevving range.
The fuel supply is interrupted to protect the
engine when the red band is reached. Outside temperature display
You should pay special attention to road con-
ditions when temperatures are around the
freezing point.
The outside temperature display is in the mul- tifunction display (Y page 230).
Changes in the outside temperature are dis-
played after a short delay. Speedometer with segments
The segments in the speedometer indicate
which speed range is available. R Cruise control activated (Y page 182):
The segments light up from the stored
speed to the maximum speed.
R Variable SPEEDTRONIC activated
(Y page 193):
The segments light up from the start of the
scale to the selected limit speed.
R DISTRONIC PLUS activated (Y page 185):
One or two segments in the set speed
range light up.
R DISTRONIC PLUS detects a vehicle in front:
The segments between the speed of the
vehicle in front and the stored speed light
up. Operating the on-board computer
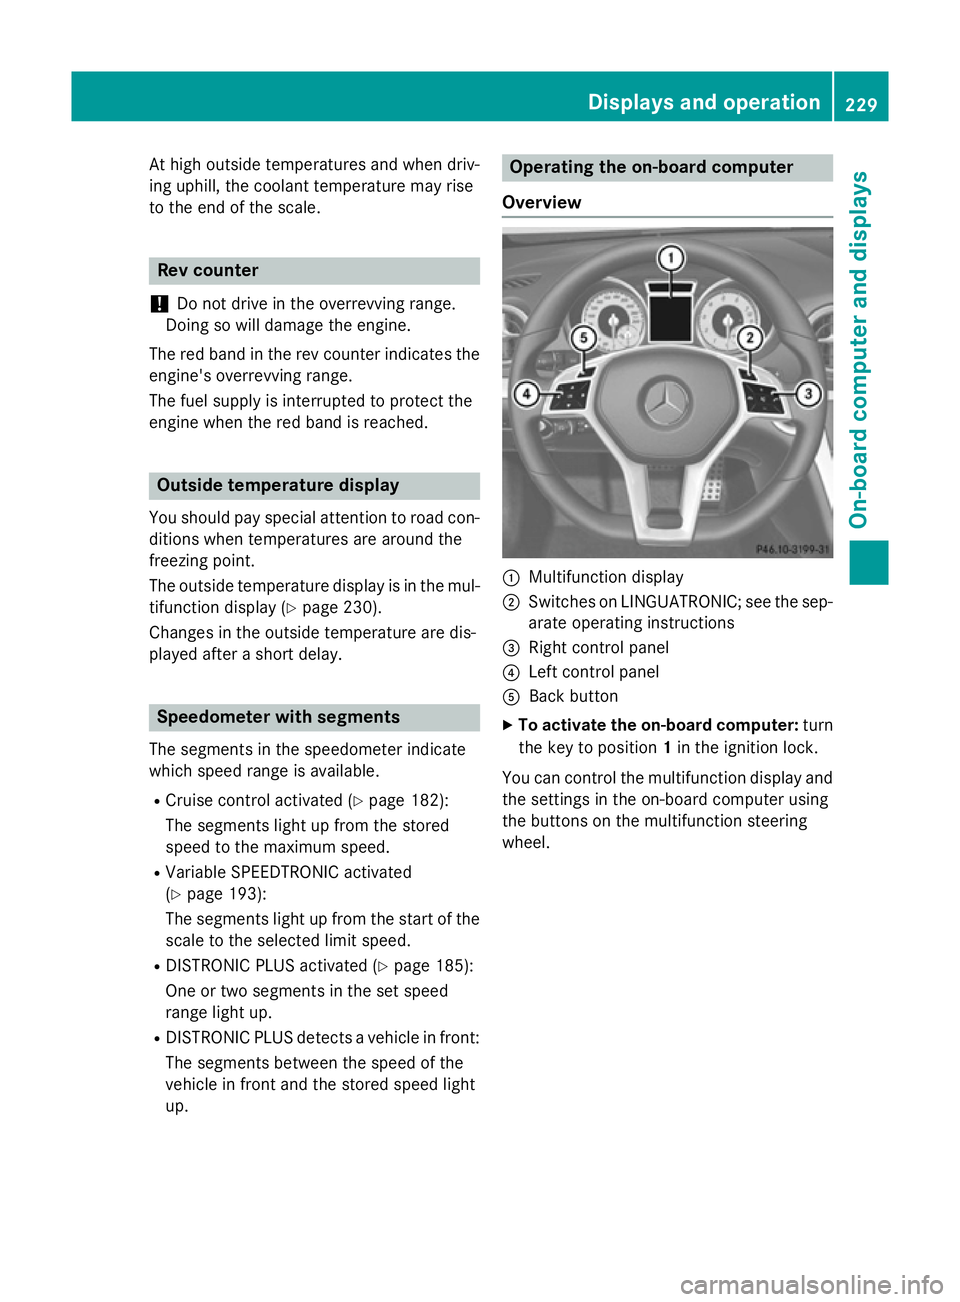
Overview :
Multifunction display
; Switches on LINGUATRONIC; see the sep-
arate operating instructions
= Right control panel
? Left control panel
A Back button
X To activate the on-board computer: turn
the key to position 1in the ignition lock.
You can control the multifunction display and
the settings in the on-board computer using
the buttons on the multifunction steering
wheel. Displays and operation
229On-board computer and displays Z
Page 235 of 637
R
the ignition has been switched off for more
than four hours.
R 999 hours have been exceeded.
R 9,999 kilometres have been exceeded.
The From reset
From reset trip computer is automati-
cally reset if the value exceeds 9,999 hour sor
99,999 kilometres.
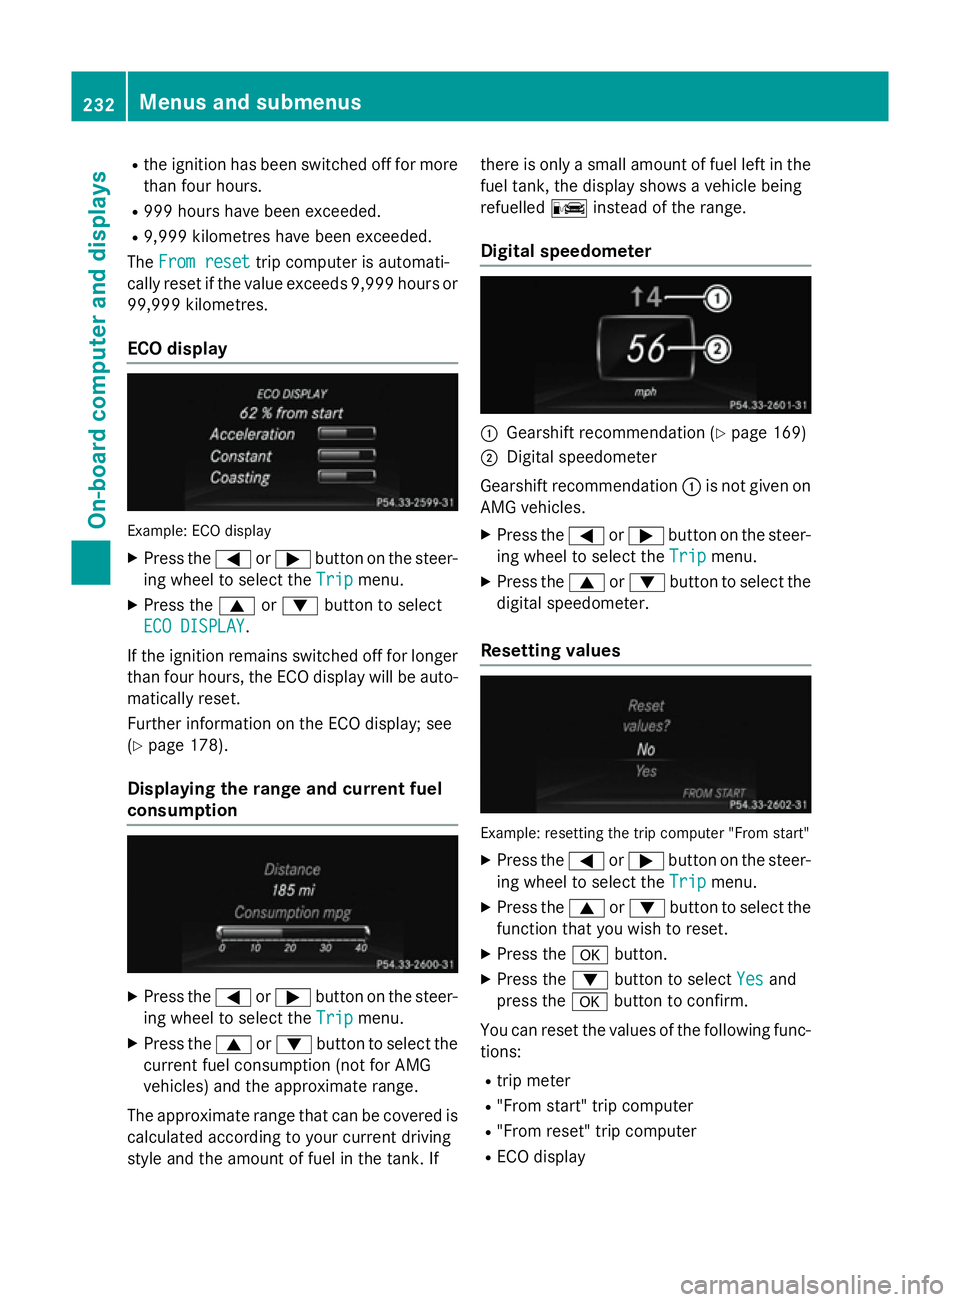
ECO display Example: ECO display
X Press the =or; button on the steer-
ing wheel to select the Trip
Tripmenu.
X Press the 9or: button to select
ECO DISPLAY
ECO DISPLAY.
If the ignition remains switched off for longer
than four hours, the ECO display will be auto- matically reset.
Further information on the ECO display; see
(Y page 178).
Displaying the range and current fuel
consumption X
Press the =or; button on the steer-
ing wheel to select the Trip Tripmenu.
X Press the 9or: button to select the
current fuel consumption (not for AMG
vehicles) and the approximate range.
The approximate range that can be covered is calculated according to your current driving
style and the amount of fuel in the tank. If there is only a small amount of fuel left in the
fuel tank, the display shows a vehicle being
refuelled Cinstead of the range.
Digital speedometer :
Gearshift recommendation (Y page 169)
; Digital speedometer
Gearshift recommendation :is not given on
AMG vehicles.
X Press the =or; button on the steer-
ing wheel to select the Trip Tripmenu.
X Press the 9or: button to select the
digital speedometer.
Resetting values Example: resetting the trip computer "From start"
X Press the =or; button on the steer-
ing wheel to select the Trip
Tripmenu.
X Press the 9or: button to select the
function that you wish to reset.
X Press the abutton.
X Press the :button to select Yes
Yesand
press the abutton to confirm.
You can reset the values of the following func-
tions:
R trip meter
R "From start" trip computer
R "From reset" trip computer
R ECO display 232
Menus and submenusOn-board computer and displays
Page 244 of 637
Setting the brightness of the ambient
lighting
X Press the =or; button on the steer-
ing wheel to select the Settings Settingsmenu.
X Press the :or9 button to select the
Lights Lights submenu.
X Press ato confirm.
X Press the :or9 button to select the
Amb. light +/-
Amb. light +/- function.
You will see the selected setting.
X Press ato confirm.
X Press the :or9 button to adjust the
brightness to a level from Off
OfftoLevel 5
Level 5
(bright).
X Press the aor% button to save the
setting.
Setting the ambient lighting colour
X Press the =or; button on the steer-
ing wheel to select the Settings
Settingsmenu.
X Press the :or9 button to select the
Lights
Lights submenu.
X Press ato confirm.
X Press the :or9 button to select the
Ambient light colour
Ambient light colour function.
X Press ato confirm.
X Press the :or9 button to set the
colour to SOLAR
SOLAR,SOLAR orange
SOLAR orange orSOLAR
SOLAR
red
red.
X Press the aor% button to save the
setting.
Activating/deactivating the surround
lighting and exterior lighting delayed
switch-off X Press the =or; button on the steer-
ing wheel to select the Settings
Settings menu.
X Press the :or9 button to select the
Lights Lights submenu.
X Press ato confirm.
X Press the :or9 button to select the
Surround lighting
Surround lighting function.
When the Surround lighting
Surround lighting function is
activated, the light cone and the area around the vehicle are displayed in orange
in the multifunction display.
X Press the abutton to save the setting.
Deactivating delayed switch-off of the exte-
rior lighting temporarily: X Before leaving the vehicle, turn the key to
position 0in the ignition lock.
X Turn the key to position 2in the ignition
lock.
The exterior lighting delayed switch-off is
deactivated.
Delayed switch-off of the exterior lighting is
reactivated the next time you start the
engine.
If you have activated the Surround light‐
Surround light‐
ing ing function and the light switch is set to
Ã, the following functions are activated
when it is dark:
R surround lighting: the exterior lighting
remains lit for 40 seconds after unlocking
with the key. If you start the engine, the
surround lighting is switched off and auto-
matic headlamp mode is activated
(Y page 127).
R exterior lighting delayed switch-off: the
exterior lighting remains lit for 60 seconds
after the engine is switched off. If you close all the doors and the boot lid, the exterior
lighting goes off after 15 seconds.
i Depending on your vehicle's equipment,
when the surround lighting and delayed
switch-off exterior lighting are on, the fol-
lowing light up:
R side lamps
R dipped-beam headlamps
R daytime driving lights
R surround lighting in the exterior mirrors
Activating/deactivating the interior light-
ing delayed switch-off
If you activate the Lighting delayed sw.- Lighting delayed sw.-
off
off function, the interior lighting remains on
for 20 seconds after you remove the key from
the ignition lock. Menus and submenus
241On-board computer and displays Z
Page 247 of 637
mirrors in using button
:, they will not fold
out automatically (Y page 121).
You can then only fold out the exterior mirrors using button :.
If you have switched the function on and you fold the exterior mirrors in using the button on
the door (Y page 121), they will not fold out
automatically. The exterior mirrors can then
only be folded out using the button on the
door.
Resetting to factory settings X
Press the =or; button on the steer-
ing wheel to select the Settings Settingsmenu.
X Press the :or9 button to select the
Factory setting
Factory setting submenu.
X Press ato confirm.
The Reset all settings?
Reset all settings? message
appears.
X Press the :or9 button to select No
No
or Yes
Yes.
X Press the abutton to confirm the selec-
tion.
If you have selected Yes Yes, the multifunction
display shows a confirmation message.
For safety reasons, not all functions are reset: the Limit
Limit speed
speed(winter
(winter tyres)
tyres)function
in permanent SPEEDTRONIC can only be set
in the Vehicle
Vehicle submenu. If you want to reset
the Daytime
Daytime driving
drivinglights
lightsin theLights
Lights
submenu, you must turn the key to position 1
in the ignition lock. AMG menu in AMG vehicles
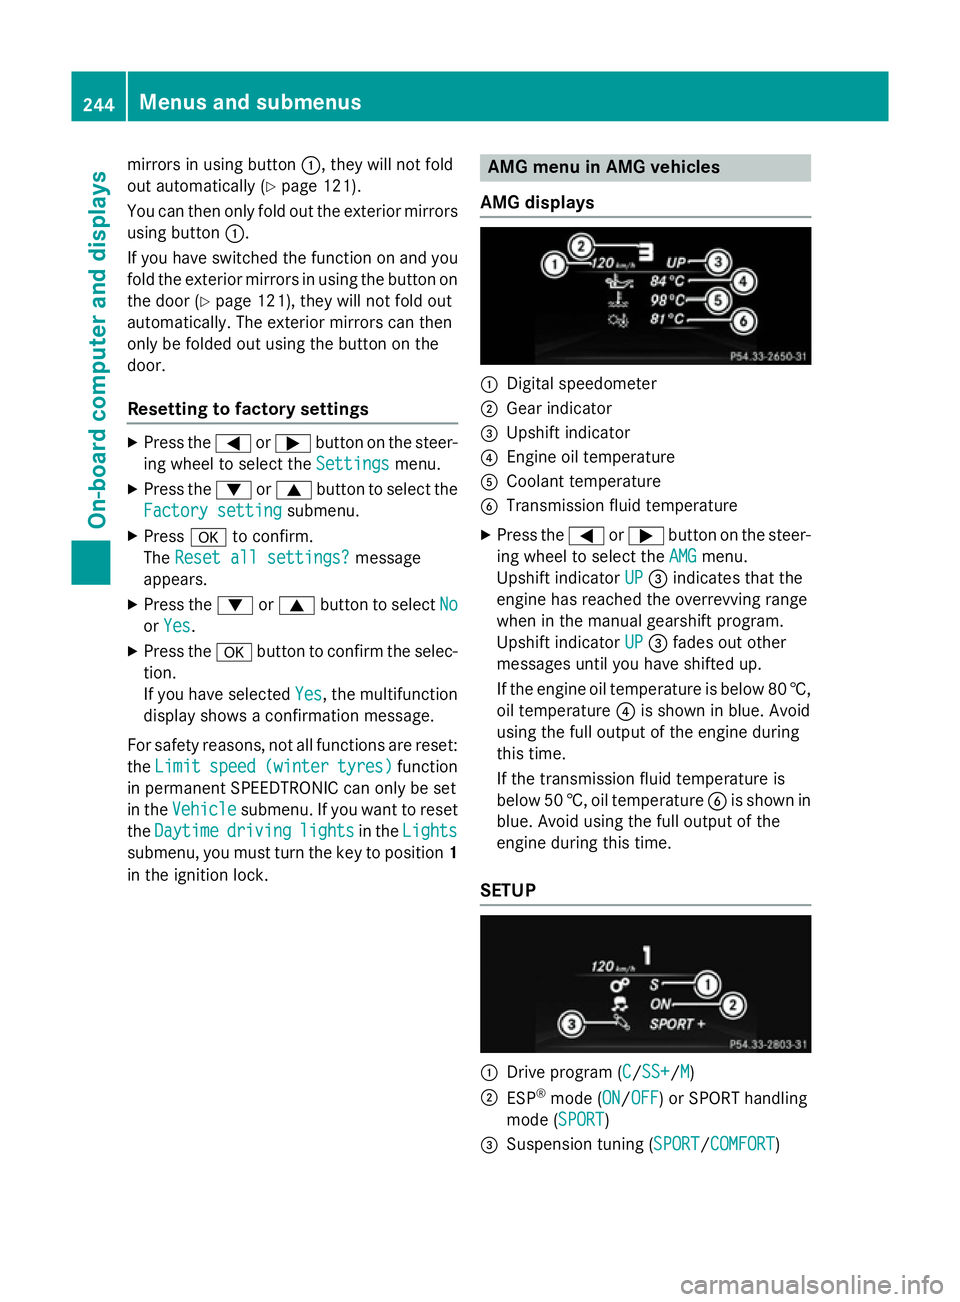
AMG displays :
Digital speedometer
; Gear indicator
= Upshift indicator
? Engine oil temperature
A Coolant temperature
B Transmission fluid temperature
X Press the =or; button on the steer-
ing wheel to select the AMG
AMG menu.
Upshift indicator UP
UP= indicates that the
engine has reached the overrevving range
when in the manual gearshift program.
Upshift indicator UP UP= fades out other
messages until you have shifted up.
If the engine oil temperature is below 80 †, oil temperature ?is shown in blue. Avoid
using the full output of the engine during
this time.
If the transmission fluid temperature is
below 50 †, oil temperature Bis shown in
blue. Avoid using the full output of the
engine during this time.
SETUP :
Drive program (C C/SS+SS+/M M)
; ESP ®
mode (ON ON/OFFOFF) or SPORT handling
mode (SPORT SPORT)
= Suspension tuning (SPORT SPORT/COMFORT COMFORT) 244
Menus and submenusOn-board computer and displays
Page 248 of 637
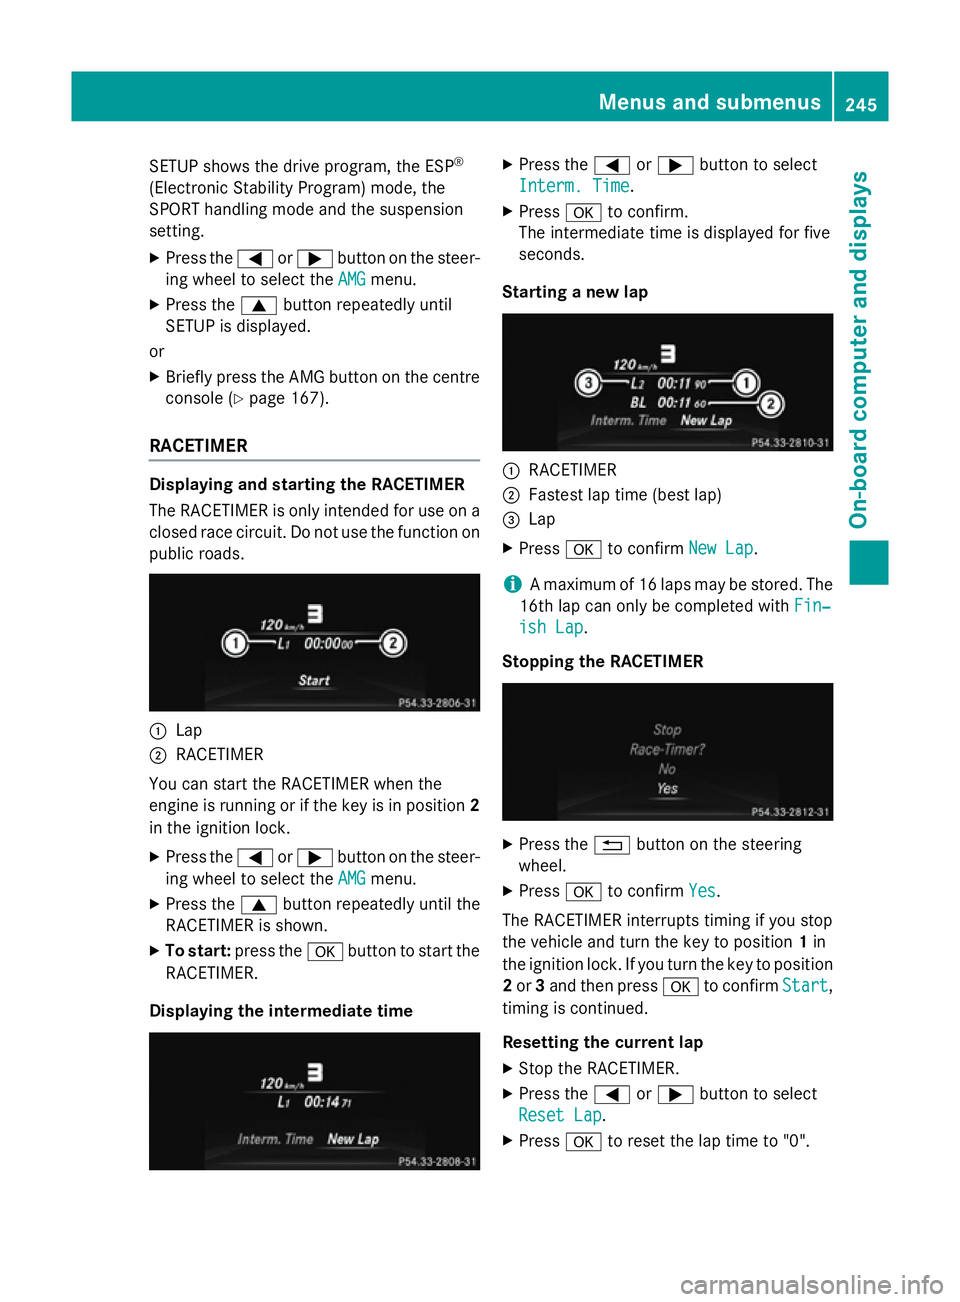
SETUP shows the drive program, the ESP
®
(Electronic Stability Program) mode, the
SPORT handling mode and the suspension
setting. X Press the =or; button on the steer-
ing wheel to select the AMG AMGmenu.
X Press the 9button repeatedly until
SETUP is displayed.
or
X Briefly press the AMG button on the centre
console (Y page 167).
RACETIMER Displaying and starting the RACETIMER
The RACETIMER is only intended for use on a closed race circuit. Do not use the function on
public roads. :
Lap
; RACETIMER
You can start the RACETIMER when the
engine is running or if the key is in position 2
in the ignition lock.
X Press the =or; button on the steer-
ing wheel to select the AMG
AMGmenu.
X Press the 9button repeatedly until the
RACETIMER is shown.
X To start: press the abutton to start the
RACETIMER.
Displaying the intermediate time X
Press the =or; button to select
Interm. Time
Interm. Time.
X Press ato confirm.
The intermediate time is displayed for five
seconds.
Starting a new lap :
RACETIMER
; Fastest lap time (best lap)
= Lap
X Press ato confirm New Lap New Lap.
i A maximum of 16 laps may be stored. The
16th lap can only be completed with Fin‐
Fin‐
ish Lap
ish Lap .
Stopping the RACETIMER X
Press the %button on the steering
wheel.
X Press ato confirm Yes
Yes.
The RACETIMER interrupts timing if you stop
the vehicle and turn the key to position 1in
the ignition lock. If you turn the key to position
2 or 3and then press ato confirm Start
Start,
timing is continued.
Resetting the current lap
X Stop the RACETIMER.
X Press the =or; button to select
Reset Lap Reset Lap .
X Press ato reset the lap time to "0". Menus and submenus
245On-board computer and displays Z