keyless MERCEDES-BENZ SL ROADSTER 2012 Owners Manual
[x] Cancel search | Manufacturer: MERCEDES-BENZ, Model Year: 2012, Model line: SL ROADSTER, Model: MERCEDES-BENZ SL ROADSTER 2012Pages: 637, PDF Size: 20.68 MB
Page 13 of 637
Cup holder
Centre console .............................. 548
Important safety notes .................. 548 D
DAB radio (Digital Audio Broad-
casting) Selecting a station ........................ .464
see Radio
Dashboard lighting
see Instrument cluster lighting
Data
see Technical data
Data carrier ................................ 479, 484
Audio DVD ..................................... 479
MUSIC REGISTER ........................... 484
Data modem mode
Telephone with Bluetooth® (SAP
profile) .......................................... .423
Data roaming
Telephone module with Blue-
tooth® (SAP profile) ..................... .424
Daytime driving lights
Display message ............................ 257
Function/notes ............................ .127
Switching on/off (on-board com-
puter) ............................................. 239
Declarations of conformity ................. 33
Delayed switch-off
Exterior lighting (on-board com-
puter) ............................................. 241
Interior lighting .............................. 241
Delete button ..................................... 297
Destination ........................................ 370
Assigning a destination to an
address book entry ........................ 370
Destination (navigation)
Displaying information ................... 358
Entering a destination by address .. 326
Entering a destination using the
map ............................................... 333
Entering a POI ................................ 338
Entering using geo-coordinates ..... 334
Entering using Mercedes-Benz
Apps .............................................. 335
Saving ............................................ 369 Selecting from the destination
memory ......................................... 332
Selecting from the list of last des- tinations ......................................... 333
Selecting storage options .............. 370
Storing after destination entry ....... 369
Storing during route guidance ....... 369
Destination memory (navigation)
Deleting an entry ........................... 371
Entering/saving your home
address .......................................... 330
Previous destinations .................... 372
Diagnostics connection ......................33
Dialling a number (telephone) .......... 397
Digital speedometer .........................232
Digital teletext (MHEG-5) .................. 508
Digital TV channels ........................... 506
Programme preview ....................... 506
Dipped-beam headlamps
Display message ............................ 255
Setting for driving abroad (sym-
metrical) ........................................ 126
Setting for driving on the right/
left ................................................. 240
Switching on/off ........................... 127
Disc
CD/DVD ........................................ 480
MP3 ............................................... 479
DISC button
Activating audio CD/DVD or MP3mode ............................................. 472
Activating Bluetooth® Audio ......... 492
Switching on the Media Interface .. 495
Switching to the MUSIC REGIS-
TER ................................................ 484
Display
Selecting the design ..................... .310
Display message
Driving systems ............................ .260
KEYLESS-GO .................................. 272
Display messages
ASSYST PLUS ................................ 566
Calling up (on-board computer) ..... 247
Engine ............................................ 258
General information ....................... 247
Hiding (on-board computer) ........... 247
Key ................................................ 272 10
Index
Page 16 of 637
ECO start/stop functio
n................ 158
Engine number ............................... 622
Jump-starting ................................. 586
Running irregularly ......................... 162
Starting problems .......................... 162
Starting the engine with the key .... 157
Starting with KEYLESS GO ............. 157
Stopping ........................................ 176
Tow-starting (vehicle) ..................... 591
Warning lamp (engine diagnos-
tics) ............................................... 280
Engine electronics
Notes ............................................. 620
Problem (fault) ............................... 162
Engine jump starting
see Jump starting (engine)
Engine oil
Additives ........................................ 626
Checking the oil level ..................... 564
Checking the oil level using the
dipstick .......................................... 564
Display message ............................ 259
Filling capacity ............................... 626
Notes about oil grade s................... 626
Notes on oil level/consumption .... 564
Temperature (on-board com-
puter) ............................................. 244
Topping up ..................................... 564
Viscosity ........................................ 626
Entering a junction name ................. 330
Entering a street name ..................... 327
Entering an address (example) ........ 326
Entering the house number .............. 327
Entering the town .............................. 327
Entry ........................................... 304, 307
Deleting ......................................... 307
Saving ............................................ 304
Environmental protection
Returning an end-of-life vehicle ....... 31
ESP® (Electronic Stability Pro-
gram)
AMG menu (on-board computer) ... 244
Characteristics ................................. 74
Deactivating/activating (AMG
vehicles) .......................................... 75
Deactivating/activating (notes;
except AMG vehicles) ...................... 74 Display message ............................ 248
ETS .................................................. 73
Function/note s................................ 73
General notes .................................. 73
Important safety guidelines ............. 74
Warning lamp ................................. 277
ETS (Electronic Traction System) ....... 73
Example display ........................ 473, 484
Audio CD mode .............................. 473
MUSIC REGISTER ........................... 484
Exhaust pipe (cleaning instruc-
tions) .................................................. 572
Exterior lighting
Settings options ............................. 126
see Lights
Exterior mirrors
Adjusting ....................................... 120
Anti-dazzle mode (automatic) ........ 121
Folding in when locking (on-boardcomputer) ...................................... 243
Folding in/out (automatically )....... 121
Folding in/out (electrically) ........... 121
Out of position (troubleshooting) ... 121
Parking position ............................. 122
Resetting ....................................... 121
Storing settings (memory func-
tion) ............................................... 123 F
Factory setting (reset function) ....... 316
Fast forward
Audio mode (CD, DVD, MP3) ......... 476
Video DVD ..................................... 513
Fast rewind
Audio mode (CD, DVD, MP3) ......... 476
Video DVD ..................................... 513
Fault message
see Display messages
Favourites (Internet) ......................... 459
Favourites button .............................. 313
Filler cap
see Fuel filler flap
Fire extinguisher ............................... 577
First-aid kit ......................................... 576
Fitting a wheel
Fitting a wheel ............................... 609
Lowering the vehicle ...................... 609 Index
13
Page 19 of 637
Selecting favourites ....................... 455
Selecting/setting access data ....... 434
Internet radio
Calling up ....................................... 454
Searching for stations .................... 454
iPod® ................................. 494, 497, 498
Alphabetic track selection ............. 498
Connecting to Media Interface ...... 494
Selecting a category/playlist ......... 497
ISOFIX child seat securing system .... 64
iTunes® .............................................. 498 J
Jack Storage location ............................ 577
Using ............................................. 607
Jump starting (engine) ...................... 586K
Key Changing the battery ....................... 88
Checking the battery ....................... 87
Convenience opening feature ........ 101
Display message ............................ 272
Door central locking/unlocking ....... 85
Emergency key element ................... 86
Important safety notes .................... 84
Loss ................................................. 89
Modifying the programming ............. 86
Opening/closing the roof .............. 105
Overview .......................................... 84
Positions (ignition lock) ................. 155
Problem (malfunction) ..................... 89
Starting the engine ........................ 157
Key positions
Key ................................................ 155
KEYLESS GO .................................. 155
KEYLESS-GO
Convenience closing ...................... 101
Display message ............................ 272
Locking ............................................ 85
Removing the Start/Stop button ... 156
Start/Stop button .......................... 155
Starting the engine ........................ 157
Unlocking ......................................... 85 Kickdown
Driving tips .................................... 167
Manual drive progra m.................... 171 L
Lamps see Warning and indicator lamps
Lane Keeping Assist
see Active Lane Keeping Assist
Lane recommendations .................... 353
Explanation .................................... 353
Presentation .................................. 353
Lap time (RACETIMER) ...................... 245
Licence plate lamp (display mes-
sage) ................................................... 256
Light sensor (display message) ....... 257
Lights
Activating/deactivating the Intel-
ligent Light System ........................ 240
Activating/deactivating the inte-
rior lighting delayed switch-off ....... 241
Active light function ....................... 131
Automatic headlamp mod e............ 127
Cornering light function ................. 131
Dipped-beam headlamp s............... 127
Driving abroad ............................... 126
Foglamps (extended range) ........... 132
Hazard warning lamps ................... 130
Headlamp flashe r........................... 130
Light switch ................................... 126
Main-beam headlamp s................... 130
Misted up headlamp s.................... 133
Motorway mod e............................. 132
Parking lamps ................................ 129
Rear foglamp ................................. 128
Setting the ambient lighting
brightness (on-board computer) .... 241
Setting the ambient lighting col-
our (on-board computer) ................ 241
Side lamps ..................................... 128
Switching the daytime driving
lights on/off (on-board com-
puter) ............................................. 239
Switching the exterior lighting
delayed switch-off on/off (on-
board computer) ............................ 241
Switching the spotlight on/of f....... 240 16
Index
Page 53 of 637
Useful information
i This Owner's Manual describes all mod-
els, series and optional equipment for your
vehicle that were available at the time of
going to press. National variations are pos- sible. Note that your vehicle may not be
equipped with all of the functions descri-
bed. This is also the case for systems and
functions relevant to safety.
i Read the information on qualified special-
ist workshops: (Y page 34). Panic alarm
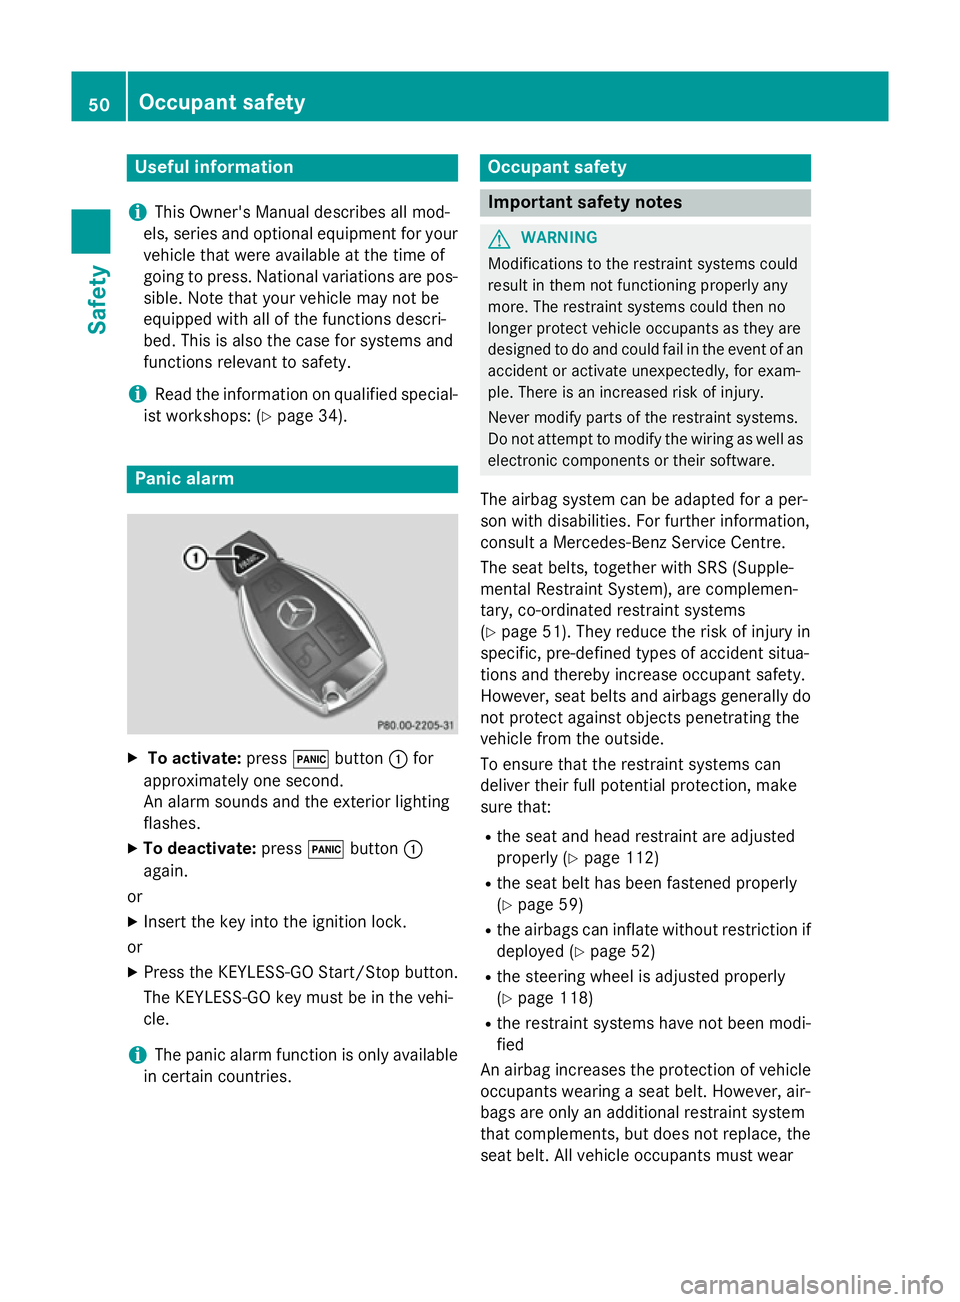
X
To activate: press!button :for
approximately one second.
An alarm sounds and the exterior lighting
flashes.
X To deactivate: press!button :
again.
or
X Insert the key into the ignition lock.
or X Press the KEYLESS-GO Start/Stop button.
The KEYLESS-GO key must be in the vehi-
cle.
i The panic alarm function is only available
in certain countries. Occupant safety
Important safety notes
G
WARNING
Modifications to the restraint systems could
result in them not functioning properly any
more. The restraint systems could then no
longer protect vehicle occupants as they are
designed to do and could fail in the event of an accident or activate unexpectedly, for exam-
ple. There is an increased risk of injury.
Never modify parts of the restraint systems.
Do not attempt to modify the wiring as well as
electronic components or their software.
The airbag system can be adapted for a per-
son with disabilities. For further information,
consult a Mercedes-Benz Service Centre.
The seat belts, together with SRS (Supple-
mental Restraint System), are complemen-
tary, co-ordinated restraint systems
(Y page 51). They reduce the risk of injury in
specific, pre-defined types of accident situa-
tions and thereby increase occupant safety.
However, seat belts and airbags generally do
not protect against objects penetrating the
vehicle from the outside.
To ensure that the restraint systems can
deliver their full potential protection, make
sure that:
R the seat and head restraint are adjusted
properly (Y page 112)
R the seat belt has been fastened properly
(Y page 59)
R the airbags can inflate without restriction if
deployed (Y page 52)
R the steering wheel is adjusted properly
(Y page 118)
R the restraint systems have not been modi-
fied
An airbag increases the protection of vehicle
occupants wearing a seat belt. However, air-
bags are only an additional restraint system
that complements, but does not replace, the
seat belt. All vehicle occupants must wear 50
Occupant safetySafety
Page 82 of 637

This steering support is provided in particular
if:
R both right wheels or both left wheels are on
a wet or slippery road surface when you
brake.
R the vehicle starts to skid.
Important safety notes i
Observe the "Important safety notes" sec-
tion (Y page 70).
No steering support is provided from STEER
CONTROL, if:
R ESP ®
is malfunctioning.
R the steering is faulty.
Power steering will, however, continue to
function. Anti-theft systems
Immobiliser
X To activate with the key: remove the key
from the ignition lock.
X To activate with KEYLESS-GO: switch the
ignition off and open the driver's door.
X To deactivate: switch on the ignition.
The immobiliser prevents your vehicle from
being started without the correct key.
When leaving the vehicle, always take the
SmartKey with you and lock the vehicle. The
engine can be started by anyone with a valid
key that is left inside the vehicle.
i The immobiliser is always deactivated
when you start the engine. ATA (Anti-Theft Alarm system)
X
To prime: lock the vehicle with the key or
KEYLESS-GO.
Indicator lamp :flashes. The alarm sys-
tem is primed after approximately
15 seconds.
X To switch off: unlock the vehicle with the
key or KEYLESS-GO.
A visual and audible alarm is triggered if the
alarm system is primed and you open:
R a door
R the vehicle with the emergency key ele-
ment
R the boot lid
R the bonnet
R the glove compartment
R the stowage space under the armrest
R a stowage compartment in the rear
X To turn the alarm off with the key: press
the % or& button on the key.
The alarm is switched off.
or
X Insert the key into the ignition lock.
The alarm is switched off.
X To stop the alarm using KEYLESS-GO:
grasp the outside door handle. The key
must be outside the vehicle.
The alarm is switched off.
or
X Press the Start/Stop button on the dash-
board. The key must be inside the vehicle.
The alarm is switched off. Anti-theft systems
79Safety Z
Page 83 of 637
The alarm is not switched off, even if you
close the open door that has triggered it, for
example. Tow-away protection
Function An audible and visual alarm is triggered if your
vehicle's angle of inclination is altered while
tow-away protection is primed. This can occur
if the vehicle is jacked up on one side, for
example.
Activating X
Make sure that:
R the doors are closed
R the boot lid is closed
Only then is the tow-away protection
primed.
X Lock the vehicle with the key or KEYLESS-
GO.
Tow-away protection is primed after
approximately 30 seconds.
Deactivating X
To switch off: unlock the vehicle with the
key or KEYLESS-GO.
Tow-away protection is switched off auto-
matically.
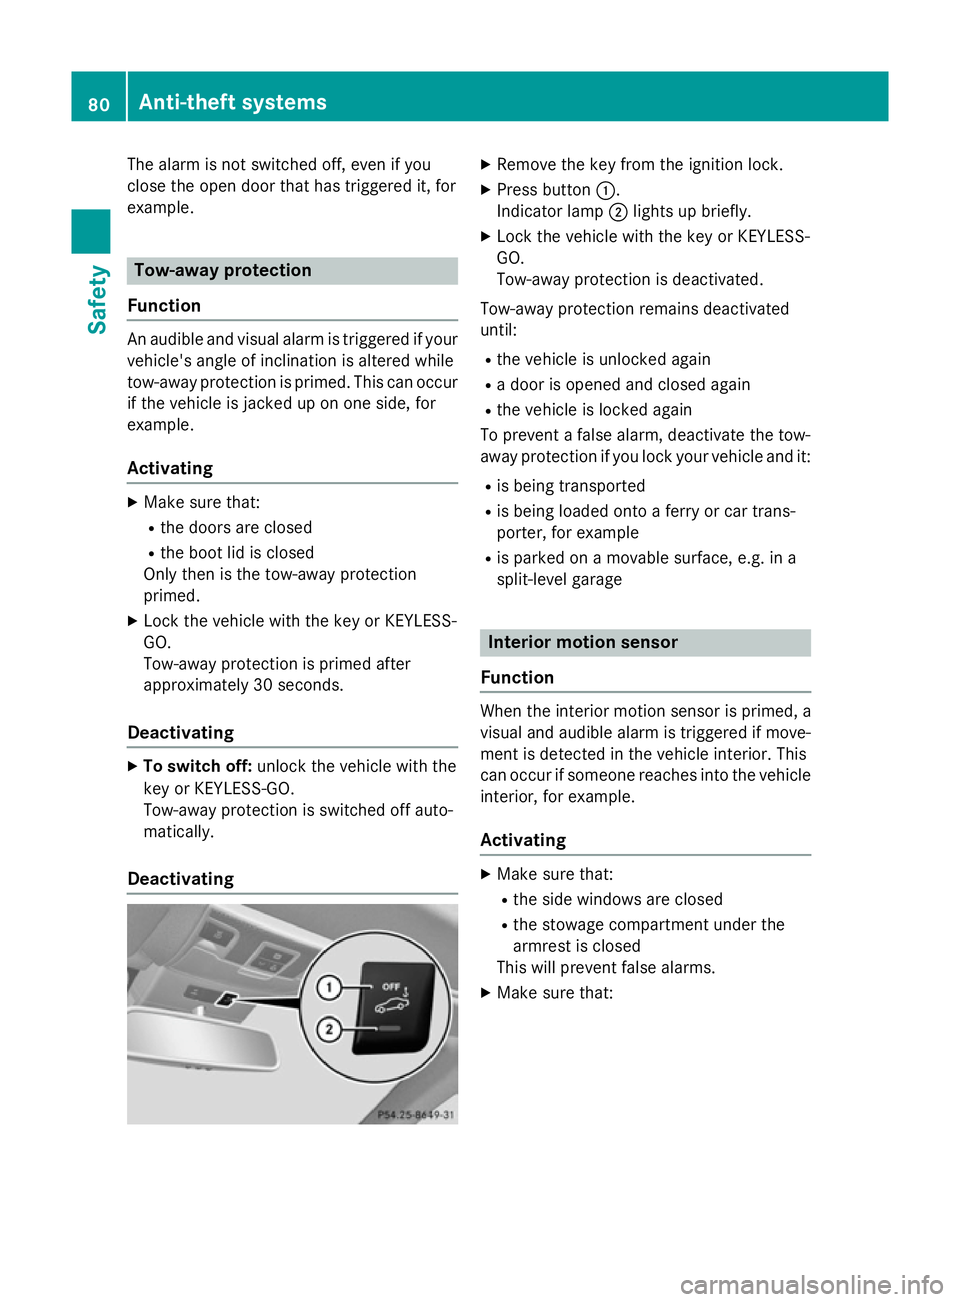
Deactivating X
Remove the key from the ignition lock.
X Press button :.
Indicator lamp ;lights up briefly.
X Lock the vehicle with the key or KEYLESS-
GO.
Tow-away protection is deactivated.
Tow-away protection remains deactivated
until: R the vehicle is unlocked again
R a door is opened and closed again
R the vehicle is locked again
To prevent a false alarm, deactivate the tow-
away protection if you lock your vehicle and it:
R is being transported
R is being loaded onto a ferry or car trans-
porter, for example
R is parked on a movable surface, e.g. in a
split-level garage Interior motion sensor
Function When the interior motion sensor is primed, a
visual and audible alarm is triggered if move-
ment is detected in the vehicle interior. This
can occur if someone reaches into the vehicle interior, for example.
Activating X
Make sure that:
R the side windows are closed
R the stowage compartment under the
armrest is closed
This will prevent false alarms.
X Make sure that: 80
Anti-theft systemsSafety
Page 84 of 637
R
the roof is closed
R the doors are closed
R the boot lid is closed
Only then is the interior motion sensor
primed.
X Lock the vehicle with the key or KEYLESS-
GO.
The interior motion sensor is primed after
approximately 30 second s.
i Only
for the Netherlands and Belgium:
the interior motion sensor is primed even
when the roof is open. However, the roof
should be closed so as to prevent a false
alarm.
Deactivating X
Unlock the vehicle with the key or KEY-
LESS-GO.
The interior motion sensor is automatically
deactivated.
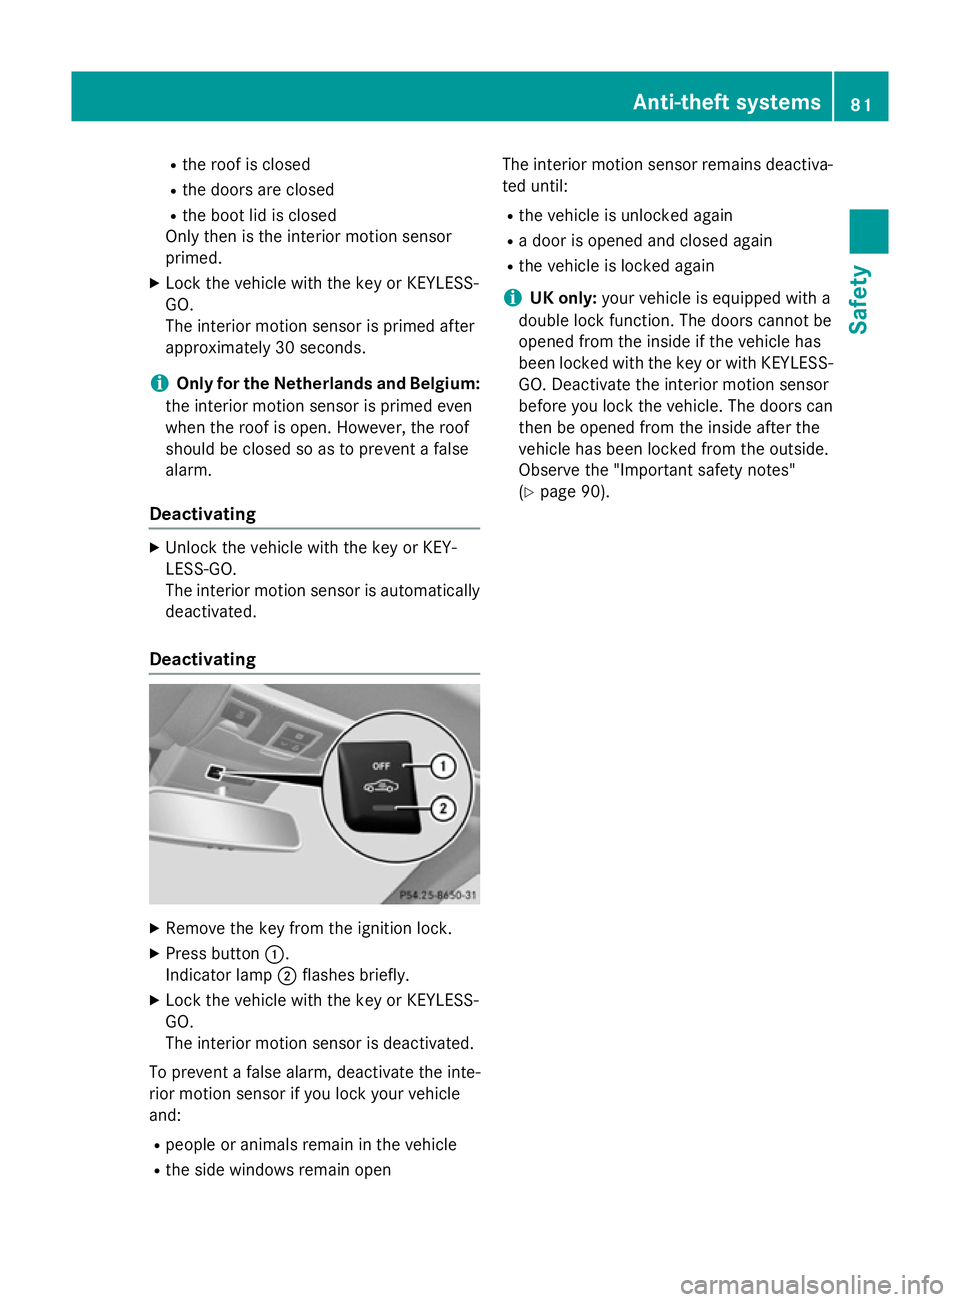
Deactivating X
Remove the key from the ignition lock.
X Press button :.
Indicator lamp ;flashes briefly.
X Lock the vehicle with the key or KEYLESS-
GO.
The interior motion sensor is deactivated.
To prevent a false alarm, deactivate the inte-
rior motion sensor if you lock your vehicle
and:
R people or animals remain in the vehicle
R the side windows remain open The interior motion sensor remains deactiva-
ted until:
R the vehicle is unlocked again
R a door is opened and closed again
R the vehicle is locked again
i UK only:
your vehicle is equipped with a
double lock function. The doors cannot be
opened from the inside if the vehicle has
been locked with the key or with KEYLESS- GO. Deactivate the interior motion sensor
before you lock the vehicle. The doors can
then be opened from the inside after the
vehicle has been locked from the outside.
Observe the "Important safety notes"
(Y page 90). Anti-theft systems
81Safety Z
Page 88 of 637
Do not keep the key:
R
with electronic devices, e.g. a mobile
phone or another key
R with metallic objects, e.g. coins or metal
film
R inside metallic objects, e.g. a metal case
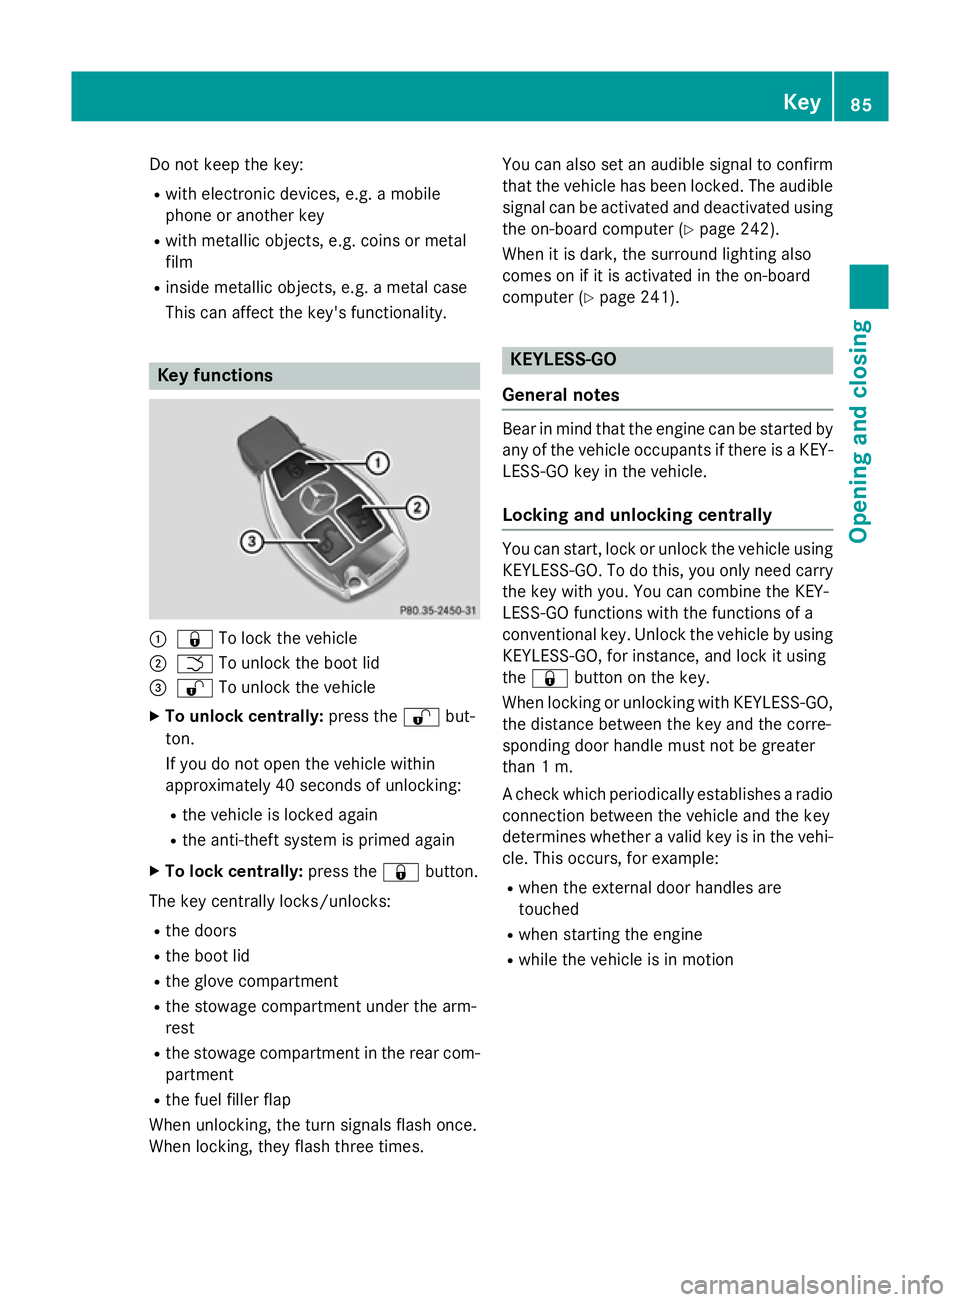
This can affect the key's functionality. Key functions
:
& To lock the vehicle
; F To unlock the boot lid
= % To unlock the vehicle
X To unlock centrally: press the%but-
ton.
If you do not open the vehicle within
approximately 40 second s of unlocking:
R the vehicle is locked again
R the anti-theft system is primed again
X To lock centrally: press the&button.
The key centrally locks/unlocks: R the doors
R the boot lid
R the glove compartment
R the stowage compartment under the arm-
rest
R the stowage compartment in the rear com-
partment
R the fuel filler flap
When unlocking, the turn signals flash once.
When locking, they flash three times. You can also set an audible signal to confirm
that the vehicle has been locked. The audiblesignal can be activated and deactivated using
the on-board computer (Y page 242).
When it is dark, the surround lighting also
comes on if it is activated in the on-board
computer (Y page 241). KEYLESS-GO
General notes Bear in mind that the engine can be started by
any of the vehicle occupants if there is a KEY- LESS-GO key in the vehicle.
Locking and unlocking centrally You can start, lock or unlock the vehicle using
KEYLESS-GO. To do this, you only need carry the key with you. You can combine the KEY-
LESS-GO functions with the functions of a
conventional key. Unlock the vehicle by using
KEYLESS-GO, for instance, and lock it using
the & button on the key.
When locking or unlocking with KEYLESS-GO,
the distance between the key and the corre-
sponding door handle must not be greater
than 1 m.
A check which periodically establishes a radio
connection between the vehicle and the key
determines whether a valid key is in the vehi- cle. This occurs, for example:
R when the external door handles are
touched
R when starting the engine
R while the vehicle is in motion Key
85Opening and closing Z
Page 89 of 637

X
To unlock the vehicle: touch the inner
surface of the door handle.
X To lock the vehicle: touch sensor sur-
face :.
X Convenience closing feature: touch
recessed sensor surface ;for an exten-
ded period.
Further information on the convenience
closing feature (Y page 101).
X To unlock the boot lid: pull the boot lid
handle.
The vehicle only unlocks the boot lid. Changing the settings of the locking
system
You can change the settings of the locking
system. This means only the driver's door, the
lockable stowage compartments in the vehi-
cle interior and the fuel filler flap are unlocked when the vehicle is unlocked. This is useful if
you frequently travel on your own.
X To change the setting: press and hold
down the %and& buttons simulta-
neously for approximately six seconds until the battery check lamp flashes twice
(Y page 87).
i If the setting of the locking system is
changed within the signal range of the vehi- cle, pressing the &or% button:
R locks or
R unlocks the vehicle The key now functions as follows:
X To unlock the driver's door: press the
% button once.
X To unlock centrally: press the%but-
ton twice.
X To lock centrally: press the&button.
The KEYLESS-GO function is changed as fol-
lows:
X To unlock the driver's door: touch the
inner surface of the door handle on the
driver's door.
X To unlock centrally: touch the inner sur-
face of the front-passenger door handle.
X To lock centrally: touch the outer sensor
surface on one of the door handles.
X To restore the factory settings: press
and hold down the %and& buttons
simultaneously for approximately six sec-
onds until the battery check lamp flashes
twice (Y page 87). Emergency key element
General notes If the vehicle can no longer be locked or
unlocked with the key, use the emergency
key element.
If you use the emergency key element to
unlock and open the driver's door or the boot
lid, the anti-theft alarm system will be trig-
gered (Y page 79).
There are several ways to deactivate the
alarm:
X To deactivate the alarm with the key:
press the %or& button on the key.
or
X Insert the key into the ignition lock.
or
X To deactivate the alarm with KEYLESS-
GO: press the Start/Stop button in the igni-
tion lock. The key must be in the vehicle. 86
KeyOpening and closing
Page 90 of 637
or
X Lock or unlock the vehicle using KEYLESS-
GO. The key must be outside the vehicle.
If you unlock the vehicle using the emergency
key element, the fuel filler flap will not auto-
matically be unlocked.
X To unlock the fuel filler flap: insert the
key into the ignition lock.
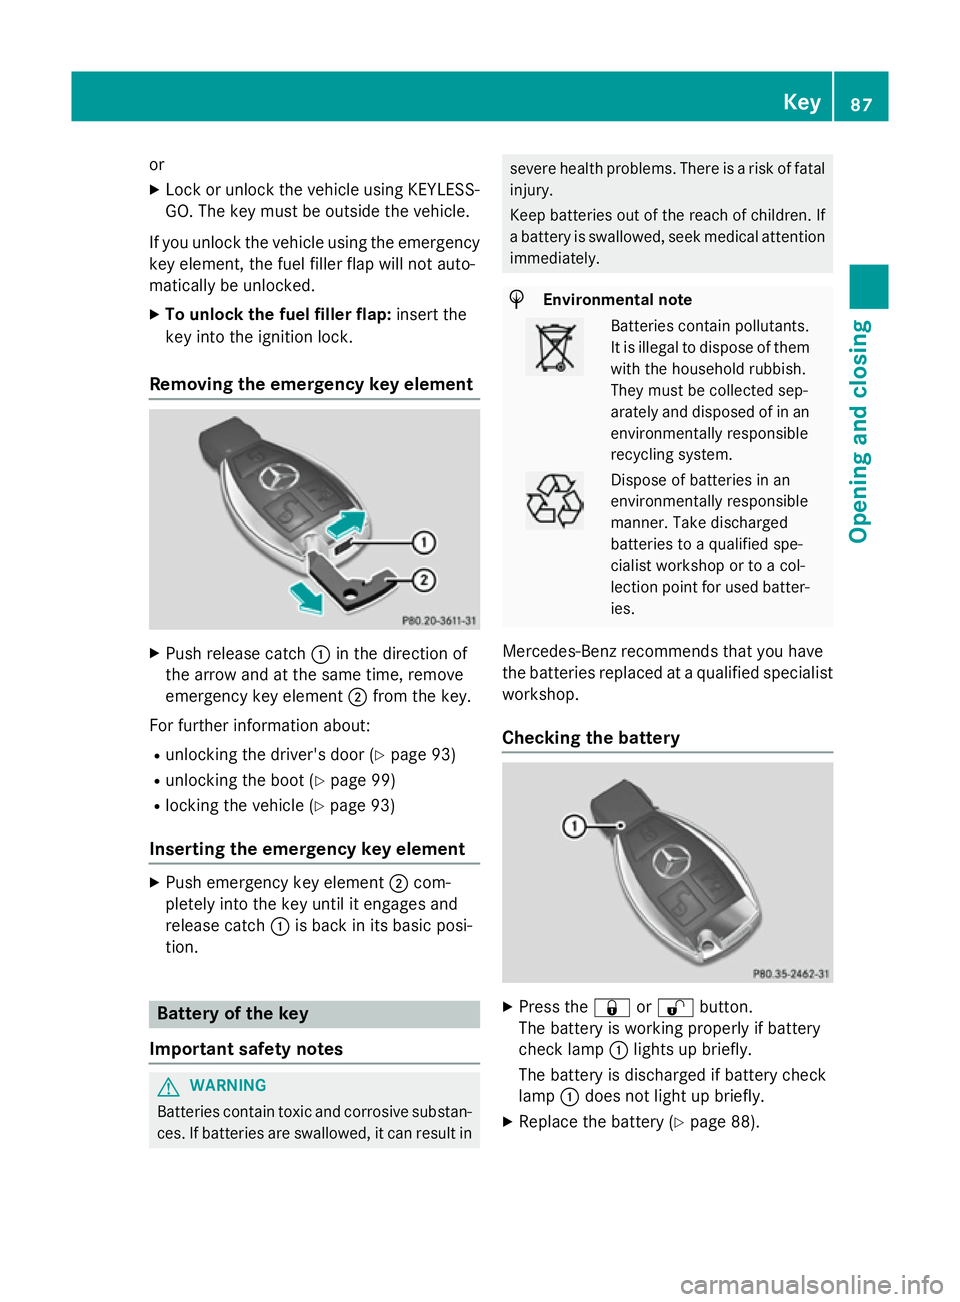
Removing the emergency key element X
Push release catch :in the direction of
the arrow and at the same time, remove
emergency key element ;from the key.
For further information about: R unlocking the driver's door (Y page 93)
R unlocking the boot (Y page 99)
R locking the vehicle (Y page 93)
Inserting the emergency key element X
Push emergency key element ;com-
pletely into the key until it engages and
release catch :is back in its basic posi-
tion. Battery of the key
Important safety notes G
WARNING
Batteries contain toxic and corrosive substan- ces. If batteries are swallowed, it can result in severe health problems. There is a risk of fatal
injury.
Keep batteries out of the reach of children. If
a battery is swallowed, seek medical attention immediately. H
Environmental note Batteries contain pollutants.
It is illegal to dispose of them
with the household rubbish.
They must be collected sep-
arately and disposed of in anenvironmentally responsible
recycling system. Dispose of batteries in an
environmentally responsible
manner. Take discharged
batteries to a qualified spe-
cialist workshop or to a col-
lection point for used batter-
ies.
Mercedes-Benz recommends that you have
the batteries replaced at a qualified specialist workshop.
Checking the battery X
Press the &or% button.
The battery is working properly if battery
check lamp :lights up briefly.
The battery is discharged if battery check
lamp :does not light up briefly.
X Replace the battery (Y page 88). Key
87Opening and closing Z