clock MERCEDES-BENZ SL ROADSTER 2018 User Guide
[x] Cancel search | Manufacturer: MERCEDES-BENZ, Model Year: 2018, Model line: SL ROADSTER, Model: MERCEDES-BENZ SL ROADSTER 2018Pages: 322, PDF Size: 5.43 MB
Page 263 of 322
XPark the vehicle on a level surface.
Only check the coolant level when the vehicleis on a level surface and the engine has cooled
down.
XTurn the SmartKey to position 2in the igni-
tion lock (Ypage 122).
On vehicles with KEYLESS-GO, press the
Start/Stop button twice (
Ypage 122).
XCheck the coolant temperature gage in the
multifunction display.
The coolant temperature must be below
158 ‡ (70 †).
XTurn the SmartKey to position u
(Ypage 122) in the ignition lock.
XSlowly turn cap ;half a turn counter-clock-
wise to allow excess pressure to escape.
XTurn cap ;further counter-clockwise and
remove it.
If the coolant is at the level of marker bar =
in the filler neck when cold, there is enough
coolant in coolant expansion tank :.
If the coolant level is approximately 0.6 in
(1.5 cm) above marker bar =in the fuel filler
neck when warm, there is enough coolant in
expansion tank :.
XIf necessary, add coolant that has been tested
and approved by Mercedes-Benz.
XReplace cap;and turn it clockwise as far as
it will go.
Further information on coolant (
Ypage 315).
Windshield washer system
GWARNING
Certain components in the engine compart-
ment, such as the engine, radiator and parts
of the exhaust system, can become very hot.
Working in the engine compartment poses a
risk of injury.
Where possible, let the engine cool down and touch only the components described in the
following.
GWARNING
Windshield washer concentrate could ignite if it comes into contact with hot engine compo-
nents or the exhaust system. There is a risk of
fire and injury.
Make sure that no windshield washer con-
centrate is spilled next to the filler neck.
Example
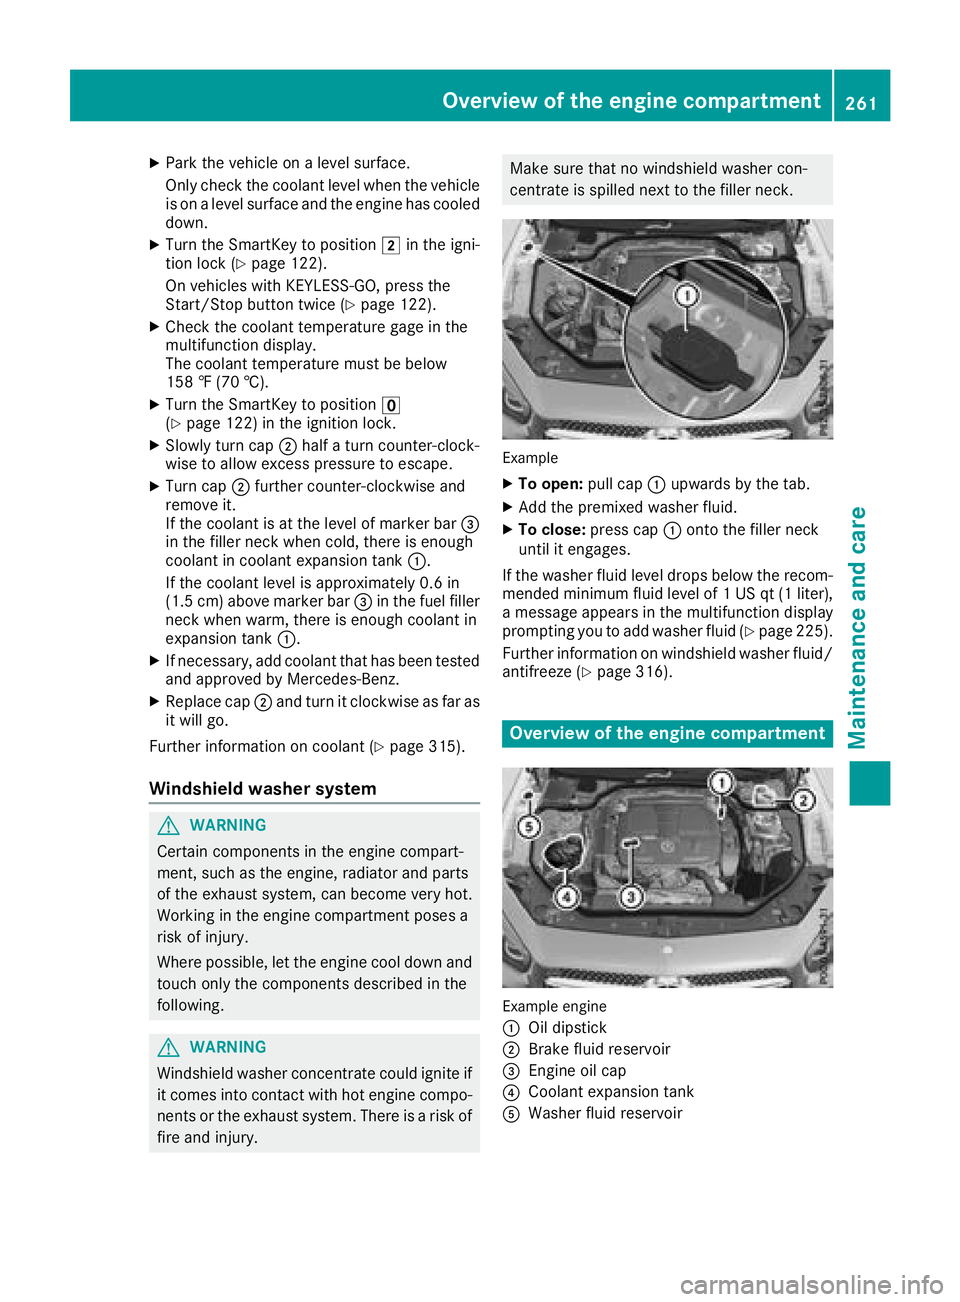
XTo open: pull cap:upwards by the tab.
XAdd the premixed washer fluid.
XTo close: press cap :onto the filler neck
until it engages.
If the washer fluid level drops below the recom-
mended minimum fluid level of 1 US qt (1 liter),
a message appears in the multifunction display
prompting you to add washer fluid (
Ypage 225).
Further information on windshield washer fluid/
antifreeze (
Ypage 316).
Overview of the engine compartment
Example engine
:
Oil dipstick
;Brake fluid reservoir
=Engine oil cap
?Coolant expansion tank
AWasher fluid reservoir
Overview of the engine compartment261
Maintenance and care
Z
Page 279 of 322
Wear eye protection.
Keep children away.
Observe this Operator's Manual.
For safety reasons, Mercedes-Benz recom-
mends that you only use batteries which have
been tested and approved for your vehicle by
Mercedes-Benz. These batteries provide
increased impact protection to prevent vehicle
occupants from suffering acid burns should the
battery be damaged in the event of an accident.
In order for the battery to achieve the maximum
possible service life, it must always be suffi-
ciently charged.
Like other batteries, the vehicle battery may
discharge over time if you do not use the vehicle.
In this case, have the battery disconnected at a
qualified specialist workshop. You can also
charge the battery with a charger recommended
by Mercedes-Benz. Contact a qualified special-
ist workshop for further information.
Have the battery condition of charge checked
more frequently if you use the vehicle mainly for
short trips or if you leave it standing idle for a
lengthy period. Consult a qualified specialist
workshop if you wish to leave your vehicle
parked for a long period of time.
Remove the SmartKey if you park the vehicle
and do not require any electrical consumers.
The vehicle will then use very little energy, thus conserving battery power.
After an interruption to the power supply, e.g.
due to a discharged battery, you must reset the
clock (see the Digital Operator's Manual).
Charging the battery
GWARNING
During charging and jump-starting, explosive
gases can escape from the battery. There is a risk of an explosion.
Particularly avoid fire, open flames, creating
sparks and smoking. Ensure there is sufficient
ventilation while charging and jump-starting.
Do not lean over a battery.
GWARNING
Battery acid is caustic. There is a risk of injury.
Avoid contact with skin, eyes or clothing. Do
not inhale any battery gases. Do not lean over
the battery. Keep children away from batter-
ies. Wash away battery acid immediately with
plenty of clean water and seek medical atten-
tion.
GWARNING
A discharged battery can freeze at tempera-
tures below freezing point. When jump-start-
ing the vehicle or charging the battery, gases can escape from the battery. There is a risk of
an explosion.
Allow the frozen battery to thaw out before
charging it or jump-starting.
!Only use battery chargers with a maximum
charging voltage of 14.8 V.
!Only charge the battery using the jump-
starting connection point.
The jump-starting connection point is in the
engine compartment.
If the indicator/warning lamps do not light up at
low temperatures, it is very likely that the dis-
charged battery has frozen. In this case, you
may neither charge the battery nor jump-start
the vehicle. The service life of a thawed-out bat-
tery may be shorter. The starting characteristics
can be impaired, particularly at low tempera-
tures. Have the thawed-out battery checked at a
qualified specialist workshop.
Read the battery charger's operating instruc-
tions before charging the battery.
XOpen the hood.
XConnect the battery charger to the positive
terminal and ground point in the same order
as when connecting the donor battery in the
jump-starting procedure (
Ypage 278).
Battery (vehicle)277
Breakdown assistance
Z
Page 281 of 322

Do not start the vehicle using a rapid charging device. If your vehicle's battery is discharged, the
engine can be jump-started from another vehicle or from a second battery using jumper cables.
Observe the following points:
RThe battery is not accessible in all vehicles. If the other vehicle's battery is not accessible, jump-
start the vehicle using a second battery or a jump-starting device.
RYou may only jump-start the vehicle when the engine and exhaust system are cold.
RDo not start the engine if the battery is frozen. Let the battery thaw first.
ROnly jump-start from batteries with a 12 V voltage rating.
ROnly use jumper cables which have a sufficient cross-section and insulated terminal clamps.
RIf the battery is fully discharged, leave the battery that is being used to jump-start connected for
a few minutes before attempting to start. This charges the battery slightly.
RMake sure that the two vehicles do not touch.
Make sure that:
RThe jumper cables are not damaged.
RBare parts of the terminal clamp do not come into contact with other metal parts while the jumper
cables are connected to the battery.
RThe jumper cables cannot come into contact with parts which can move when the engine is
running, such as the V-belt pulley or the fan.
XSecure the vehicle by applying the electric parking brake.
XShift the transmission to position j.
XMake sure that the ignition is switched off. All indicator lamps in the instrument cluster must be
off. When using the SmartKey, turn the SmartKey to position uin the ignition lock and remove it
(
Ypage 122).
XSwitch off all electrical consumers, e.g. rear window defroster, lighting, etc.
XOpen the hood.
Position number Bidentifies the charged battery of the other vehicle or an equivalent jump-starting
device.
XPress cover :of positive terminal ;down (in the direction of the arrow) and turn it clockwise.
To expose positive terminal ;, press cover:down further.
XConnect positive terminal ;on your vehicle to positive terminal =of donor battery Busing the
jumper cable, always begin with positive terminal ;on your own vehicle first.
Jump-starting279
Breakdown assistance
Z
Page 283 of 322
The battery must be connected and charged.
Otherwise, you:
Rcannot turn the SmartKey to position2in
the ignition lock.
Rcannot shift the automatic transmission to
position i.
Deactivate the automatic locking feature before
the vehicle is towed (
Ypage 196). You could
otherwise be locked out when pushing or towing
the vehicle.
Installing/removing the towing eye
Installing the towing eye
GWARNING
The exhaust tail pipe may be very hot. There is
a risk of burns when removing the rear cover.
Do not touch the exhaust pipe. Take particular
care when removing the rear cover.
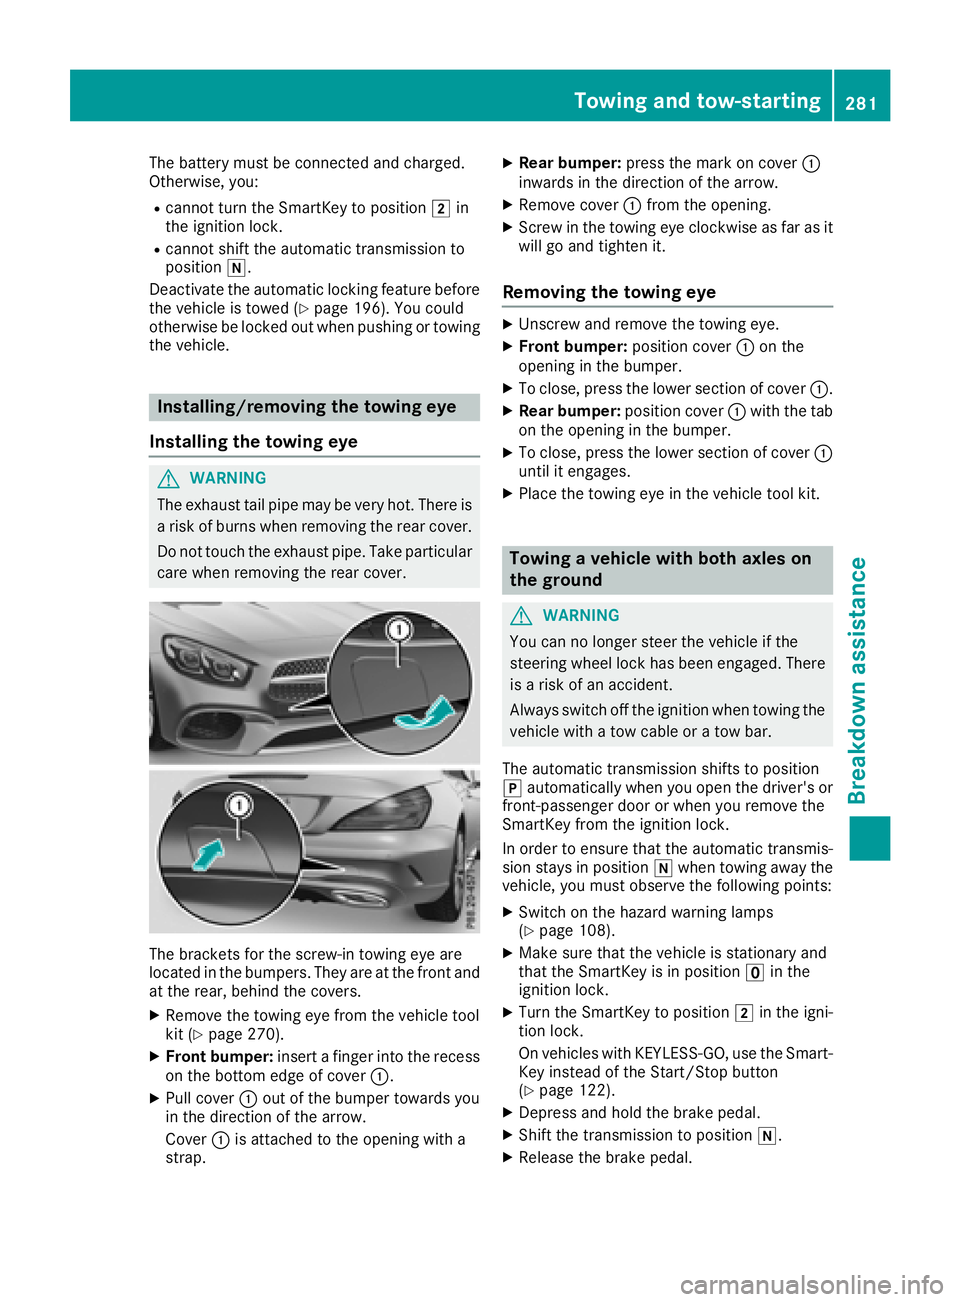
The brackets for the screw-in towing eye are
located in the bumpers. They are at the front and
at the rear, behind the covers.
XRemove the towing eye from the vehicle tool
kit (Ypage 270).
XFront bumper: insert a finger into the recess
on the bottom edge of cover :.
XPull cover:out of the bumper towards you
in the direction of the arrow.
Cover :is attached to the opening with a
strap.
XRear bumper: press the mark on cover :
inwards in the direction of the arrow.
XRemove cover :from the opening.
XScrew in the towing eye clockwise as far as it
will go and tighten it.
Removing the towing eye
XUnscrew and remove the towing eye.
XFront bumper: position cover:on the
opening in the bumper.
XTo close, press the lower section of cover :.
XRear bumper:position cover:with the tab
on the opening in the bumper.
XTo close, press the lower section of cover :
until it engages.
XPlace the towing eye in the vehicle tool kit.
Towing a vehicle with both axles on
the ground
GWARNING
You can no longer steer the vehicle if the
steering wheel lock has been engaged. There
is a risk of an accident.
Always switch off the ignition when towing the
vehicle with a tow cable or a tow bar.
The automatic transmission shifts to position
j automatically when you open the driver's or
front-passenger door or when you remove the
SmartKey from the ignition lock.
In order to ensure that the automatic transmis-
sion stays in position iwhen towing away the
vehicle, you must observe the following points:
XSwitch on the hazard warning lamps
(Ypage 108).
XMake sure that the vehicle is stationary and
that the SmartKey is in position uin the
ignition lock.
XTurn the SmartKey to position 2in the igni-
tion lock.
On vehicles with KEYLESS-GO, use the Smart-
Key instead of the Start/Stop button
(
Ypage 122).
XDepress and hold the brake pedal.
XShift the transmission to position i.
XRelease the brake pedal.
Towing and tow-starting281
Breakdown assistance
Z
Page 308 of 322

XTo remove:take socket;and lug wrench
= from the vehicle tool kit (Ypage 270).
XPosition socket ;on hub cap :.
XPosition lug wrench =on socket ;.
XUsing lug wrench =, turn hub cap:coun-
ter-clockwise and remove it.
XTo install: before installing, check hub cap :
and the wheel area for soiling and clean if
necessary.
XPut hub cap :in position and turn until it is in
the right position.
XPosition socket ;on hub cap :.
XAttach lug wrench =to socket ;and
tighten hub cap :.
The tightening torque must be
18 lb-ft (25 Nm) .
iNotethat the hub cap should be tightened
to the specified torque of 18 lb-ft (25 Nm).
Mercedes-Benz recommends that you have
the hub cap installed at a qualified specialist
workshop.
XUsing lug wrench =, loosen the bolts on the
wheel you wish to change by about one full
turn. Do not unscrew the bolts completely.
The jacking points are located just behind the
front wheel housings and just in front of the rear
wheel housings (arrows).
Mercedes-AMG vehicles and vehicles with
AMG equipment: to protect the vehicle body,
the vehicle has covers installed next to the jack-
ing points on the outer sills.
XMercedes-AMG vehicles and vehicles
with AMG equipment: fold cover?
upwards.
XPosition jack Bat jacking point A.
306Changing a wheel
Wheels and tires
Page 309 of 322

XMake sure the foot of the jack is directly
beneath the jacking point.
XTurn crankCclockwise until jack Bsits
completely on jacking point A. The base of
the jack must lie evenly on the ground.
XTurn crank Cuntil the tire is raised a maxi-
mum of 1.2 in (3 cm) from the ground.
Removing a wheel
!Mercedes-AMG vehicles: during removal
and repositioning of the wheel, the wheel rim
can strike the ceramic-brake disc and dam-
age it. Therefore, you should proceed care-
fully and get a second person assist to you.
Alternatively, you can use a second alignment
bolt.
!Do not place wheel bolts in sand or on a dirty
surface. The bolt and wheel hub threads could
otherwise be damaged when you screw them
in.
XUnscrew the uppermost wheel bolt com-
pletely.
XScrew alignment bolt :into the thread
instead of the wheel bolt.
XUnscrew the remaining wheel bolts fully.
XRemove the wheel.
Mounting a new wheel
GWARNING
Oiled or greased wheel bolts or damaged
wheel bolts/hub threads can cause the wheel bolts to come loose. As a result, you could
lose a wheel while driving. There is a risk of
accident.
Never oil or grease wheel bolts. In the event of
damage to the threads, contact a qualified
specialist workshop immediately. Have the
damaged wheel bolts or hub threads
replaced/renewed. Do not continue driving.
GWARNING
If you tighten the wheel bolts or wheel nuts
when the vehicle is raised, the jack could tip
over. There is a risk of injury.
Only tighten the wheel bolts or wheel nuts
when the vehicle is on the ground.
Always pay attention to the instructions and
safety notes in the "Changing a wheel" section
(
Ypage 304).
Only use wheel bolts that have been designed
for the wheel and the vehicle. For safety rea-
sons, Mercedes-Benz recommends that you
only use wheel bolts which have been approved for Mercedes-Benz vehicles and the respective
wheel.
!Mercedes-AMG vehicles: during removal
and repositioning of the wheel, the wheel rim
can strike the ceramic-brake disc and dam-
age it. Therefore, you should proceed care-
fully and get a second person assist to you.
Alternatively, you can use a second alignment
bolt.
!To prevent damage to the paintwork, hold
the wheel securely against the wheel hub
while screwing in the first wheel bolt.
Changing a wheel307
Wheels and tires
Z
Page 310 of 322

XClean the wheel and wheel hub contact sur-
faces.
XSlide the wheel to bemounted onto the align-
ment boltand push iton.
XTighten the wheel bolts unt ilthey are finger-
tight.
XUnscrew the alignment bolt.
XTighten the last wheel boltuntil it is finger-
tight.
Lowering the vehicle
GWAR NING
The wheels could work loose ifthe wheel nuts
and bolts are not tightened to the specifie d
tightening torque. There isa risk of acc ident.
Have the tightening torque immediately
checked at a qualified specialist workshop
after a wheel ischanged.
XTurn the crank of the jack counter-clock wise
unt ilthe veh icle isonce again standing firmly
on the ground.
XPlace the jack to one side.
XTighten the wheel bolts evenly ina crosswise
pattern inthe sequence indicated (: toA). The specified tightening torque is
96lb-ft
(1 30 Nm) .
XTurn the jack back to its initial position.
XStow the jack and the rest of the vehicle tools
in the trunk again.
XMercedes-AMG vehicles and vehicles
with AMG equipment: insert the cover into
the outer sill.
XCheck the tire pressure of the ne wlymounted
wheel and adjust it if necessary.
Observe the recommended tire pressure
(
Ypage 288).
Vehicles with a tire pressure controlsys-
tem: all installed wheels must beequipped with
functioning sensors.
When you are driving with the emergency spare
wheel mounte d,the tire pressure monitor can-
not function reliably. Only restart the tire pres-
sure monitor when the defective wheel has been
replaced with a new wheel.
All mounted wheels must beequipped with func-
tioning sensors for the tire pressure monitor.
Wheel and tire combinations
You can ask for information regarding permitted
wheel/tire co mbinations at an authorized
Mercedes-Benz Center.
!For safety reasons, Mercedes-Benz recom-
mends that you only use tires and wheels
which have been approved by Mercedes-Benz
specifically for your vehicle.
These tires have been specially adapted for
use with the control systems, such as ABS or
ESP
®, and are marked as follows:
RMO = Mercedes-Benz Original
RMOE = Mercedes-Benz Original Extended
(t ires featuring run-flat characteristics)
RMO1 = Mercedes-Benz Original (only cer-
tain AMG tires)
Mercedes-Benz Original Extended tires may
only beused on wheels that have been spe-
cifically approved by Mercedes-Benz.
Only use tires, wheels or accessories tested
and approved by Mercedes-Benz. Certain
characteristics, e.g. handling, vehicle noise
emissions or fuel consumption, may other-
wise be adverselyaffected. In addition, when
driving with a load, tire dimension variations
308Wheel and tire combinations
Wheels and tires