remove seats MERCEDES-BENZ SL ROADSTER 2018 Owner's Manual
[x] Cancel search | Manufacturer: MERCEDES-BENZ, Model Year: 2018, Model line: SL ROADSTER, Model: MERCEDES-BENZ SL ROADSTER 2018Pages: 322, PDF Size: 5.43 MB
Page 26 of 322
Protecting the environment
General notes
HEnvironmental note
Daimler's declared policy is one of compre-
hensive environmental protection.
The objectives are for the natural resources
that form the basis of our existence on this
planet to be used sparingly and in a manner
that takes the requirements of both nature
and humanity into account.
You too can help to protect the environment
by operating your vehicle in an environmen-
tally responsible manner.
Fuel consumption and the rate of engine,
transmission, brake and tire wear are affected by these factors:
Roperating conditions of your vehicle
Ryour personal driving style
You can influence both factors. You should
bear the following in mind:
Operating conditions:
Ravoid short trips as these increase fuel con-
sumption.
Ralways make sure that the tire pressures
are correct.
Rdo not carry any unnecessary weight.
Rremove roof racks once you no longer need
them.
Ra regularly serviced vehicle will contribute
to environmental protection. You should
therefore adhere to the service intervals.
Ralways have service work carried out at a
qualified specialist workshop.
Personal driving style:
Rdo not depress the accelerator pedal when
starting the engine.
Rdo not warm up the engine when the vehicle
is stationary.
Rdrive carefully and maintain a safe distance
from the vehicle in front.
Ravoid frequent, sudden acceleration and
braking.
Rchange gear in good time and use each gear
only up to Ôof its maximum engine speed.
Rswitch off the engine in stationary traffic.
Rkeep an eye on the vehicle's fuel consump-
tion.
Environmental concerns and recom-
mendations
Wherever the operating instructions require you
to dispose of materials, first try to regenerate or
re-use them. Observe the relevant environmen-
tal rules and regulations when disposing of
materials. In this way you will help to protect the
environment.
Genuine Mercedes-Benz parts
HEnvironmental note
Daimler AG also supplies reconditioned major
assemblies and parts which are of the same
quality as new parts. They are covered by the
same Limited Warranty entitlements as new
parts.
!Air bags and Emergency Tensioning Devi-
ces, as well as control units and sensors for
these restraint systems, may be installed in
the following areas of your vehicle:
Rdoors
Rdoor pillars
Rdoor sills
Rseats
Rcockpit
Rinstrument cluster
Rcenter console
Do not install accessories such as audio sys-
tems in these areas. Do not carry out repairs or welding. You could impair the operating
efficiency of the restraint systems.
Have aftermarket accessories installed at a
qualified specialist workshop.
You could jeopardize the operating safety of
your vehicle if you use parts, tires and wheels as
well as accessories relevant to safety which
have not been approved by Mercedes-Benz. This
could lead to malfunctions in safety-relevant
24Genuine Mercedes-Benz parts
Introduction
Page 98 of 322
GWARNING
When you adjust a seat, you or other vehicle
occupants could become trapped, e.g. on the seat guide rail. There is a risk of injury.
Make sure when adjusting a seat that no one
has any body parts in the sweep of the seat.
GWARNING
If the driver's seat is not engaged, it could
move forwards as far as the next catch during movement such as braking or abrupt changes
of direction. As a result, you would be pushed
against your seat belt by the unsecured driv-
er's seat.
This could cause you to lose control of the
vehicle. The seat belt cannot protect as inten-
ded and could result in additional injury.
There is a risk of an accident and injury.
Before every journey, make sure that the driv-
er's seat is fully engaged.
Observe the safety notes on "Air bags"
(
Ypage 45) and "Children in the vehicle"
(Ypage 56).
GWARNING
If you adjust the seat height carelessly, you or
other vehicle occupants could be trapped and
thereby injured. Children in particular could
accidentally press the electrical seat adjust-
ment buttons and become trapped. There is a
risk of injury.
While moving the seats, make sure that your
hands or other body parts do not get under the
lever assembly of the seat adjustment sys-
tem.
GWARNING
If the head restraints are not installed or not
adjusted correctly, they cannot provide pro-
tection as intended. There is an increased risk
of injury in the head and neck area, e.g. in the event of an accident or when braking.
Always drive with the head restraints instal-
led. Before driving off, make sure for every
vehicle occupant that the center of the head
restraint supports the back of the head at
about eye level.
GWARNING
You could lose control of your vehicle if you do the following while driving:
Radjust the driver's seat, head restraint,
steering wheel or mirrors
Rfasten the seat belt
There is a risk of an accident.
Adjust the driver's seat, head restraint, steer-
ing wheel and mirror and fasten your seat belt before starting the engine.
!To prevent damage to the seats and the seat
heating, observe the following notes:
RDo not spill liquids onto the seats. Dry the
seats as soon as possible if liquid does get
spilled on the seats.
RIf the seat covers are damp or wet, do not
switch on the seat heating. Also, do not use
the seat heating to dry the seats.
RClean the seat covers as recommended;
see the "Interior care" section.
RDo not transport heavy loads on the seats.
Do not place pointed objects on the seat
cushions such as knives, nails or tools.
Where possible, use the seats only for car-
rying passengers.
RWhen operating the seat heating, do not
cover the seats with insulating materials,
e.g. blankets, coats, bags, protective cov-
ers, child seats or booster seats.
RWhen the seat heating is switched on, the
seat surface can be damaged as a result of
objects being placed on the seats; for
example, seat cushions, child seats and
protective covers not approved by
Mercedes-Benz.
!Make sure that there are no objects in the
footwell under or behind the seats when mov-
ing the seats back. There is a risk that the
seats and/or the objects could be damaged.
iThe head restraints cannot be removed.
For more information, contact a qualified spe-
cialist workshop.
96Seats
Seats, steering wheel and mirrors
Page 99 of 322
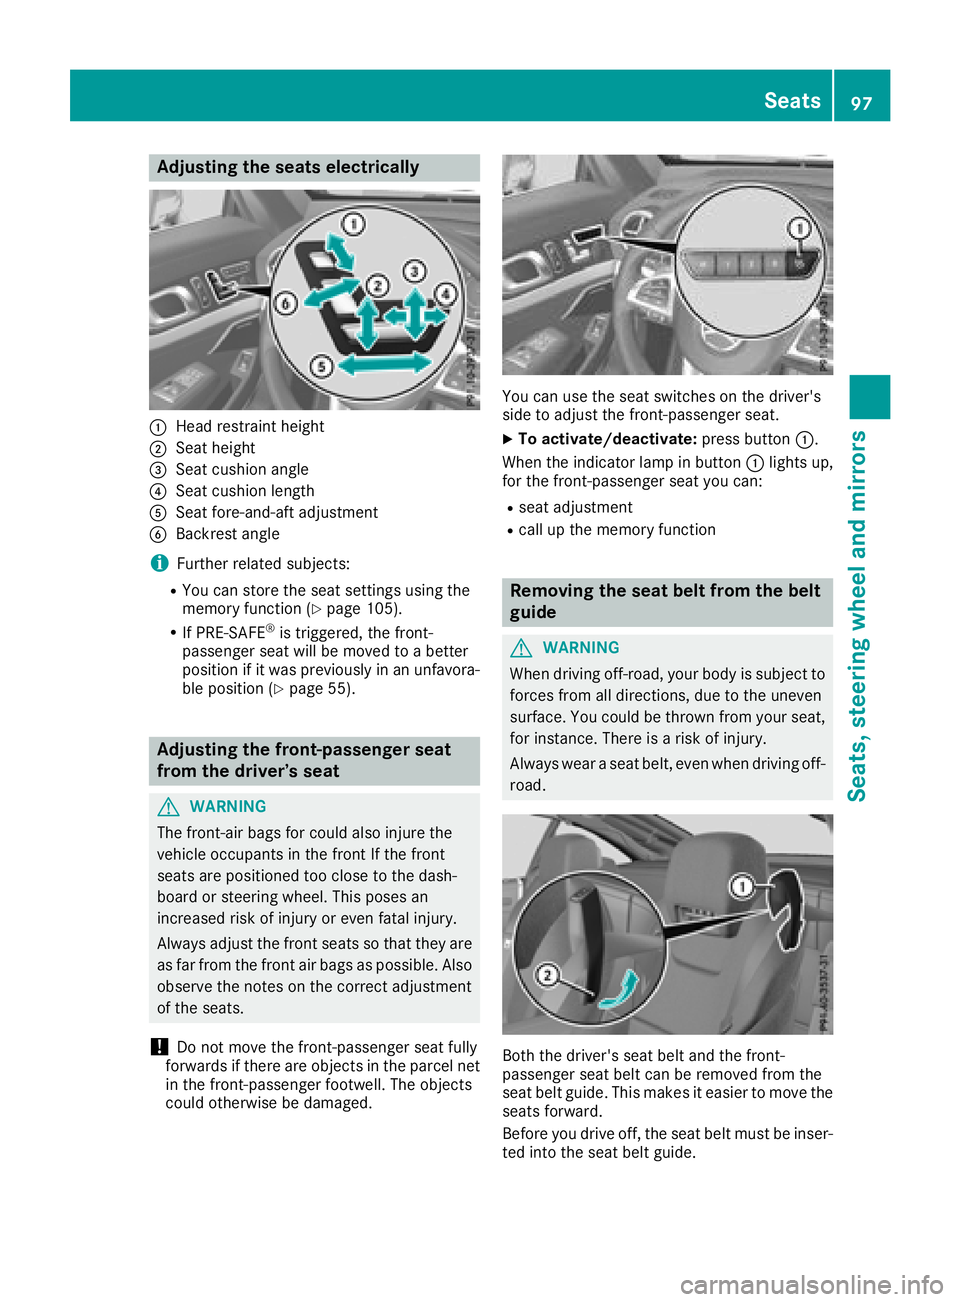
Adjusting the seats electrically
:Headrestrain theight
;Seat height
=Seat cushion angle
?Seat cushion lengt h
ASeat fore-and-aftadjustmen t
BBackrest angle
iFurther relate dsubjects :
RYou can store th eseat setting susin gth e
memory function (Ypage 105).
RIf PRE-SAFE®is triggered ,th efront-
passenger seat will be moved to abette r
position if it was previously in an unfavora-
ble position (
Ypage 55).
Adjusting the front-passenger seat
from the driver’s seat
GWARNIN G
The front-air bags for could also injure th e
vehicl eoccupant sin th efron tIf th efron t
seat sare positioned to oclose to th edash -
boar dor steering wheel. This poses an
increased ris kof injury or eve nfatal injury.
Always adjust th efron tseat sso that they are
as far from th efron tair bags as possible. Als o
observ eth enote son th ecorrec tadjustmen t
of th eseats.
!Do no tmov eth efront-passenger seat fully
forward sif there are objects in th eparcel ne t
in th efront-passenger footwell. The objects
could otherwise be damaged.
You can use th eseat switches on th edriver's
side to adjust th efront-passenger seat .
XTo activate/deactivate: press button:.
When th eindicator lamp in butto n: lights up,
for th efront-passenger seat you can :
Rseat adjustment
Rcall up thememory function
Removing the seat belt fr omthe belt
guide
GWARNIN G
When drivin goff-road, your body is subjec tto
force sfrom all directions, due to th euneven
surface. You could be throw nfrom your seat ,
for instance .There is aris kof injury.
Always wear aseat belt ,eve nwhen drivin goff -
road .
Both th edriver's seat belt and th efront-
passenger seat belt can be remove dfrom th e
seat belt guide .This makes it easie rto mov eth e
seat sforward .
Befor eyou drive off ,th eseat belt mus tbe inser-
te dint oth eseat belt guide .
Seats97
Seats, steering wheel and mirrors
Z
Page 100 of 322
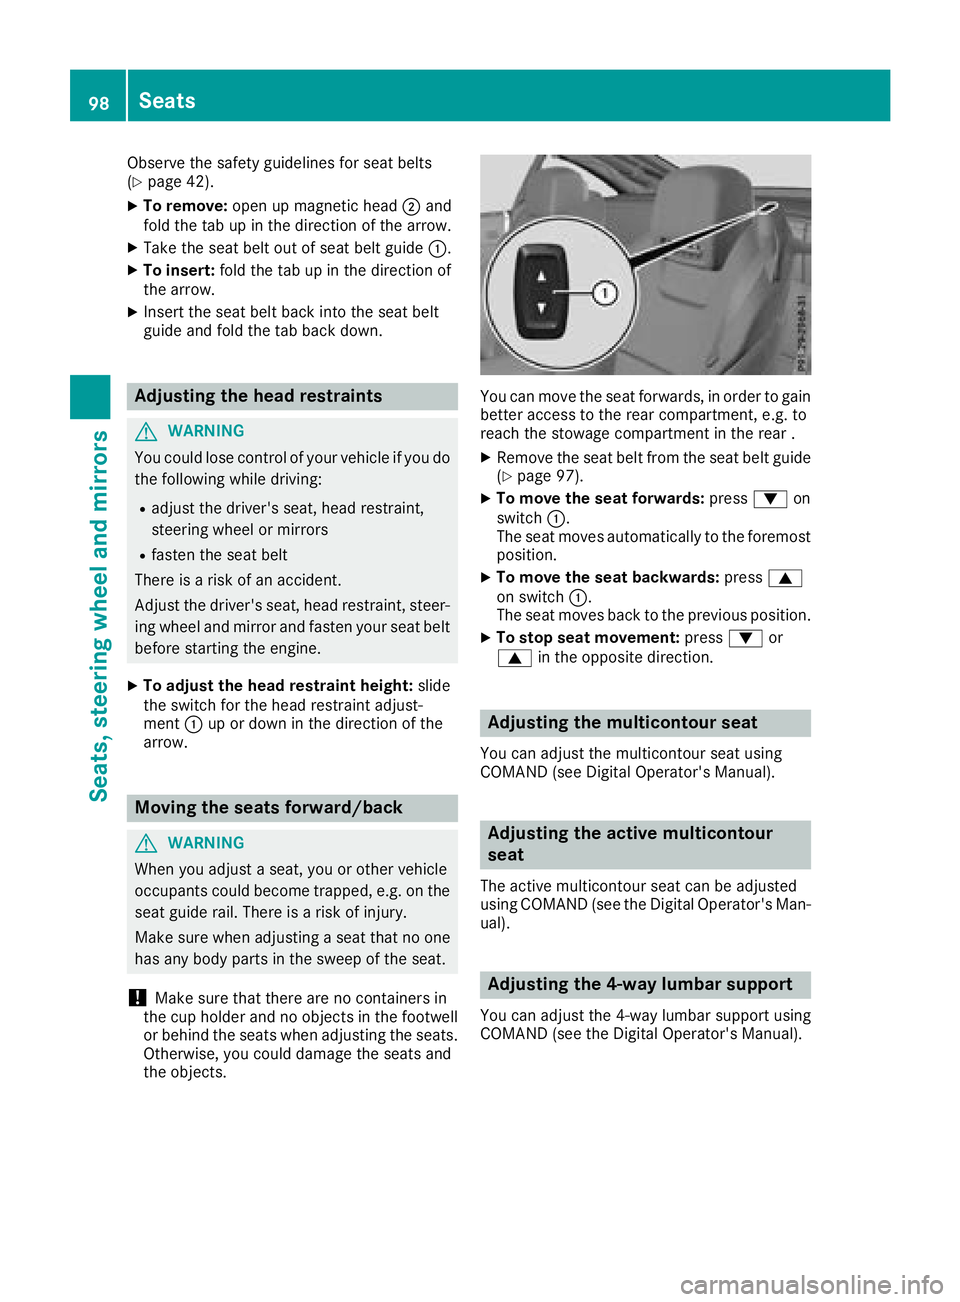
Observe the safety guidelines for seat belts
(Ypage 42).
XTo remove:open up magnetic head ;and
fold the tab up in the direction of the arrow.
XTake the seat belt out of seat belt guide :.
XTo insert:fold the tab up in the direction of
the arrow.
XInsert the seat belt back into the seat belt
guide and fold the tab back down.
Adjusting the head restraints
GWARNING
You could lose control of your vehicle if you do the following while driving:
Radjust the driver's seat, head restraint,
steering wheel or mirrors
Rfasten the seat belt
There is a risk of an accident.
Adjust the driver's seat, head restraint, steer-
ing wheel and mirror and fasten your seat belt before starting the engine.
XTo adjust the head restraint height: slide
the switch for the head restraint adjust-
ment :up or down in the direction of the
arrow.
Moving the seats forward/back
GWARNING
When you adjust a seat, you or other vehicle
occupants could become trapped, e.g. on the seat guide rail. There is a risk of injury.
Make sure when adjusting a seat that no one
has any body parts in the sweep of the seat.
!Make sure that there are no containers in
the cup holder and no objects in the footwell
or behind the seats when adjusting the seats.
Otherwise, you could damage the seats and
the objects.
You can move the seat forwards, in order to gain
better access to the rear compartment, e.g. to
reach the stowage compartment in the rear .
XRemove the seat belt from the seat belt guide
(Ypage 97).
XTo move the seat forwards: press:on
switch :.
The seat moves automatically to the foremost position.
XTo move the seat backwards: press9
on switch :.
The seat moves back to the previous position.
XTo stop seat movement: press:or
9 in the opposite direction.
Adjusting the multicontour seat
You can adjust the multicontour seat using
COMAND (see Digital Operator's Manual).
Adjusting the active multicontour
seat
The active multicontour seat can be adjusted
using COMAND (see the Digital Operator's Man-
ual).
Adjusting the 4-way lumbar support
You can adjust the 4-way lumbar support using
COMAND (see the Digital Operator's Manual).
98Seats
Seats, steering wheel and mirrors
Page 104 of 322
Position of the steering wheel when the
EASY-ENTRY/EXIT feature is active
The steering wheel swings up when you:
Rremove the SmartKey from the ignition lock
Ropen the driver's door with KEYLESS-GO in
position1
Ropen the driver's door and the SmartKey is in
position uor1
iThe steering wheel moves upwards only if it
has not already reached the upper steering
limiter.
Position of the steering wheel for driv-
ing
The steering wheel is moved to the last selected
position when:
Rthe driver's door is closed
Ryou insert the SmartKey into the ignition lock
or
Ryou press the Start/Stop button once on vehi-
cles with KEYLESS-GO
When you close the driver's door with the igni-
tion switched on, the steering wheel is also
automatically moved to the previously set posi-
tion.
The last position of the steering column is stored
when you switch off the ignition or when you
store the setting with the memory function
(
Ypage 105).
Crash-responsive EASY-EXIT feature
If the crash-responsive EASY-EXIT feature is trig-
gered in an accident, the steering column will
move upwards when the driver's door is opened. This occurs irrespective of the position of the
SmartKey in the ignition lock. This makes it eas-
ier to exit the vehicle and rescue the occupants.
The crash-responsive EASY-EXIT feature is only
operational if the EASY-EXIT/ENTRY feature is
activated in the on-board computer
(
Ypage 196).
Mirrors
Exterior mirrors
Adjusting the exterior mirrors
GWARNING
You could lose control of your vehicle if you do the following while driving:
Radjust the driver's seat, head restraint,
steering wheel or mirrors
Rfasten the seat belt
There is a risk of an accident.
Adjust the driver's seat, head restraint, steer-
ing wheel and mirror and fasten your seat belt before starting the engine.
GWARNING
The exterior mirror on the front-passenger
side reduces the size of the image. Visible
objects are actually closer than they appear.
This means that you could misjudge the dis-
tance from road users traveling behind, e.g.
when changing lane. There is a risk of an acci-
dent.
For this reason, always make sure of the
actual distance from the road users traveling
behind by glancing over your shoulder.
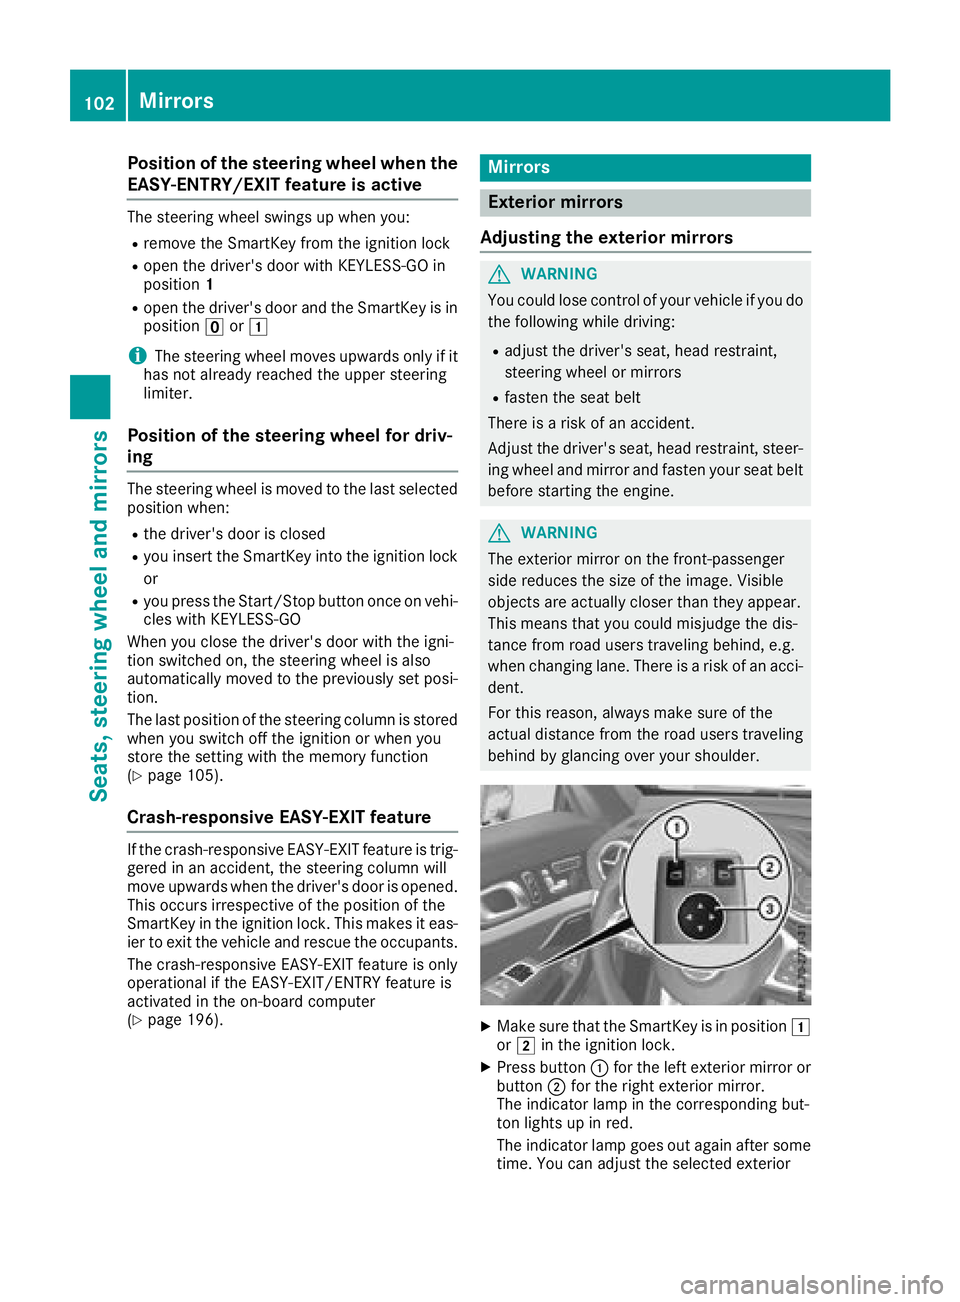
XMake sure that the SmartKey is in position 1
or 2 in the ignition lock.
XPress button :for the left exterior mirror or
button ;for the right exterior mirror.
The indicator lamp in the corresponding but-
ton lights up in red.
The indicator lamp goes out again after some time. You can adjust the selected exterior
102Mirrors
Seats, steering wheel and mirrors