light MERCEDES-BENZ SL550 2012 R230 User Guide
[x] Cancel search | Manufacturer: MERCEDES-BENZ, Model Year: 2012, Model line: SL550, Model: MERCEDES-BENZ SL550 2012 R230Pages: 316, PDF Size: 7.21 MB
Page 37 of 316
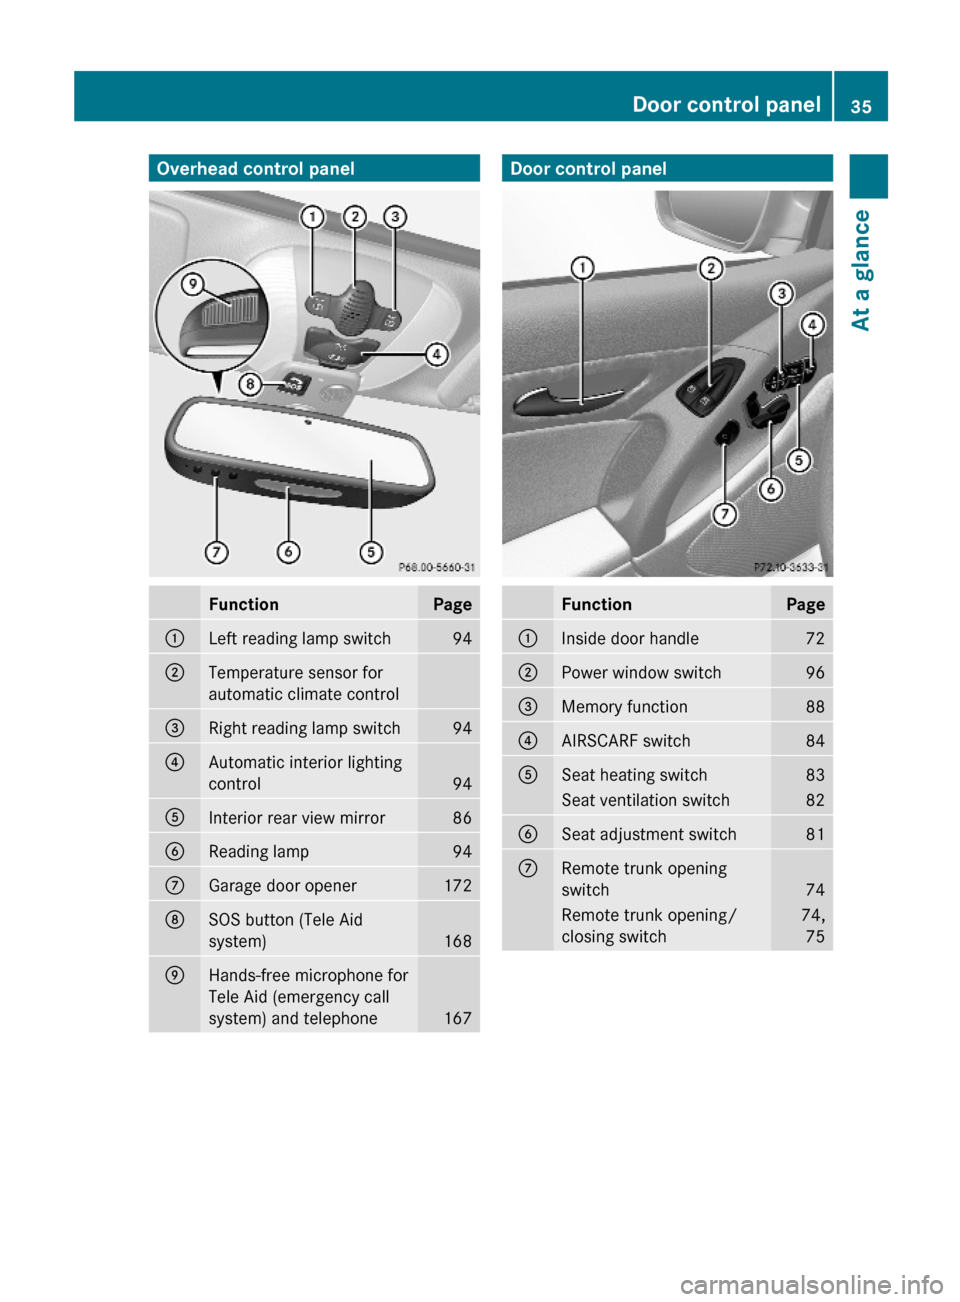
Overhead control panelFunctionPage:Left reading lamp switch94;Temperature sensor for
automatic climate control
=Right reading lamp switch94?Automatic interior lighting
control94
AInterior rear view mirror86BReading lamp94CGarage door opener 172DSOS button (Tele Aid
system)168
EHands-free microphone for
Tele Aid (emergency call
system) and telephone 167
Door control panelFunctionPage:Inside door handle 72;Power window switch96=Memory function88?AIRSCARF switch84ASeat heating switch83Seat ventilation switch82BSeat adjustment switch81CRemote trunk opening
switch74
Remote trunk opening/
closing switch
74,
75
Door control panel35At a glance230_AKB; 6; 22, en-USd2ureepe,Version: 2.11.8.12009-07-28T18:49:58+02:00 - Seite 35Z
Page 44 of 316
Driver and passenger front air bag and
driver’s side knee bag are deployed
Rin the event of certain frontal impacts
Rif the system determines that air bag
deployment can offer additional protection
to that provided by the seat belt
Rdepending on whether the respective seat
belt is in use
Rindependently of the head-thorax air bags
The front air bags in this vehicle have been
designed to inflate in two stages. This allows
the air bags to have different rates of inflation.
The rate of inflation is based on the vehicle
deceleration rate as assessed by the air bag
control unit.
The passenger front air bag deployment is
additionally influenced by the passenger’s
weight category as identified by the Occupant
Classification System (OCS) (Y page 43).
The lighter the passenger-side occupant, the
higher the vehicle deceleration rate required
for second stage inflation of the passenger
front air bag.
The air bags will not deploy in impacts which
do not exceed the system’s preset
deployment thresholds. You will then be
protected by the fastened seat belts.
The front air bags will not deploy in the event
of a rollover unless the vehicle’s rate of
longitudinal deceleration or acceleration
exceeds the preset deployment threshold for
the front air bags.
The passenger air bag will only be deployed if
Rthe system, based on OCS weight sensor
readings, detects that the passenger seat
is occupied
Rthe 45 indicator lamp in the center
console is not lit (Y page 43)
Rthe impact exceeds a preset deployment
threshold
Knee bag
Knee bag = is designed to provide increased
protection for the driver against the risk of
injuries to the knees, thighs and lower legs.
Knee bag = is located on the driver side
lower instrument panel. It is designed to
operate together with the driver front air bag
in certain frontal impacts if the system
determines that air bag deployment can offer
additional protection to that provided by the
seat belt. Knee bag = operates best in
conjunction with a properly positioned and
fastened seat belt.
Head-thorax air bags
GObserve Safety notes, see page 39.
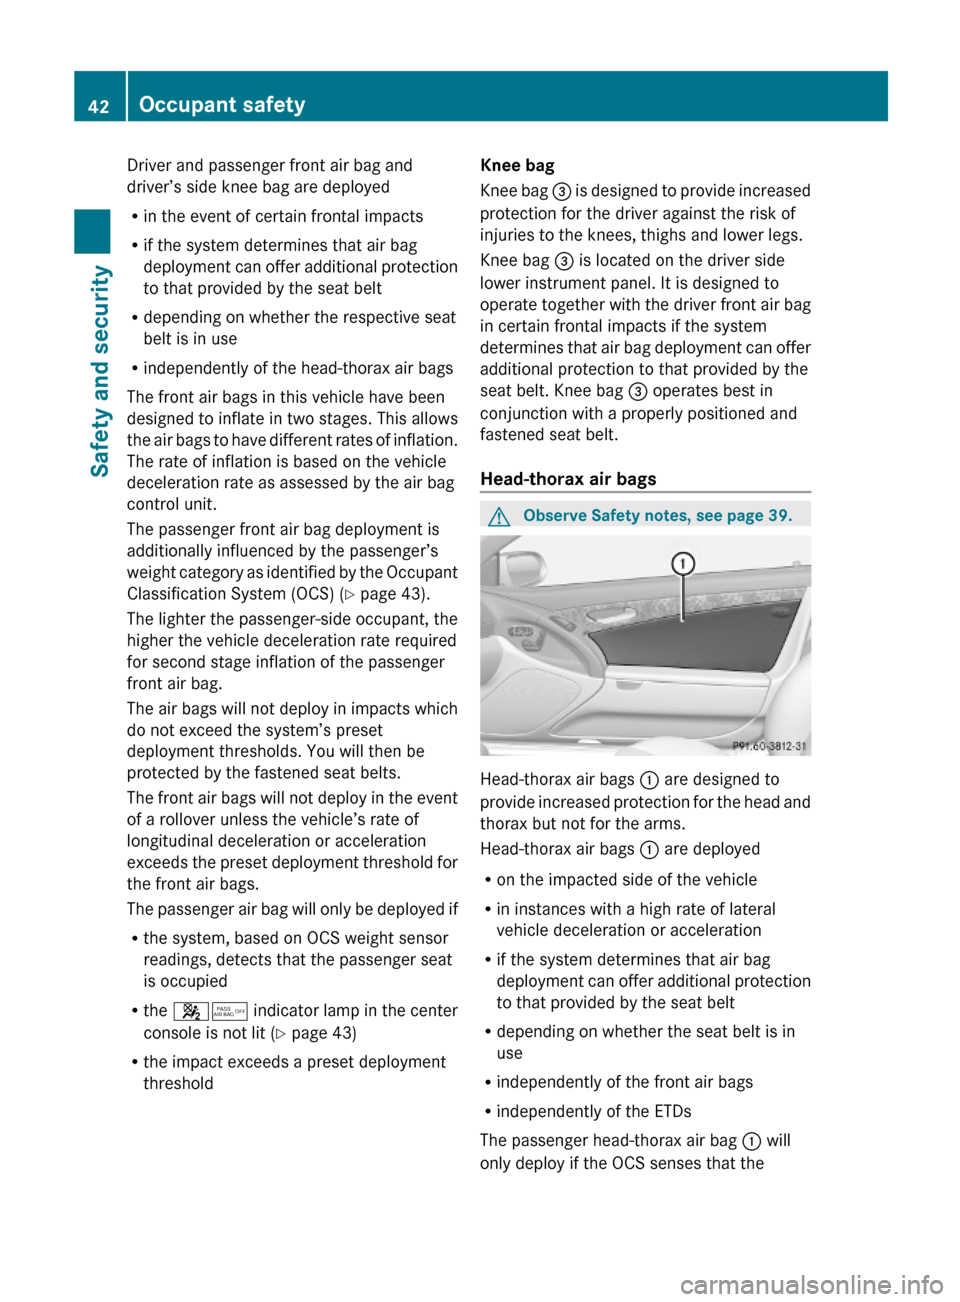
Head-thorax air bags : are designed to
provide increased protection for the head and
thorax but not for the arms.
Head-thorax air bags : are deployed
Ron the impacted side of the vehicle
Rin instances with a high rate of lateral
vehicle deceleration or acceleration
Rif the system determines that air bag
deployment can offer additional protection
to that provided by the seat belt
Rdepending on whether the seat belt is in
use
Rindependently of the front air bags
Rindependently of the ETDs
The passenger head-thorax air bag : will
only deploy if the OCS senses that the
42Occupant safetySafety and security
230_AKB; 6; 22, en-USd2ureepe,Version: 2.11.8.12009-07-28T18:49:58+02:00 - Seite 42
Page 52 of 316
Correct driver seat adjustmentGWarning!
In order to avoid possible loss of vehicle
control the following must be done before the
vehicle is put into motion:
Rseat adjustment
Rhead restraint adjustment
Rsteering wheel adjustment
Rrear view mirror adjustment
Rfastening of seat belts
Steering wheel
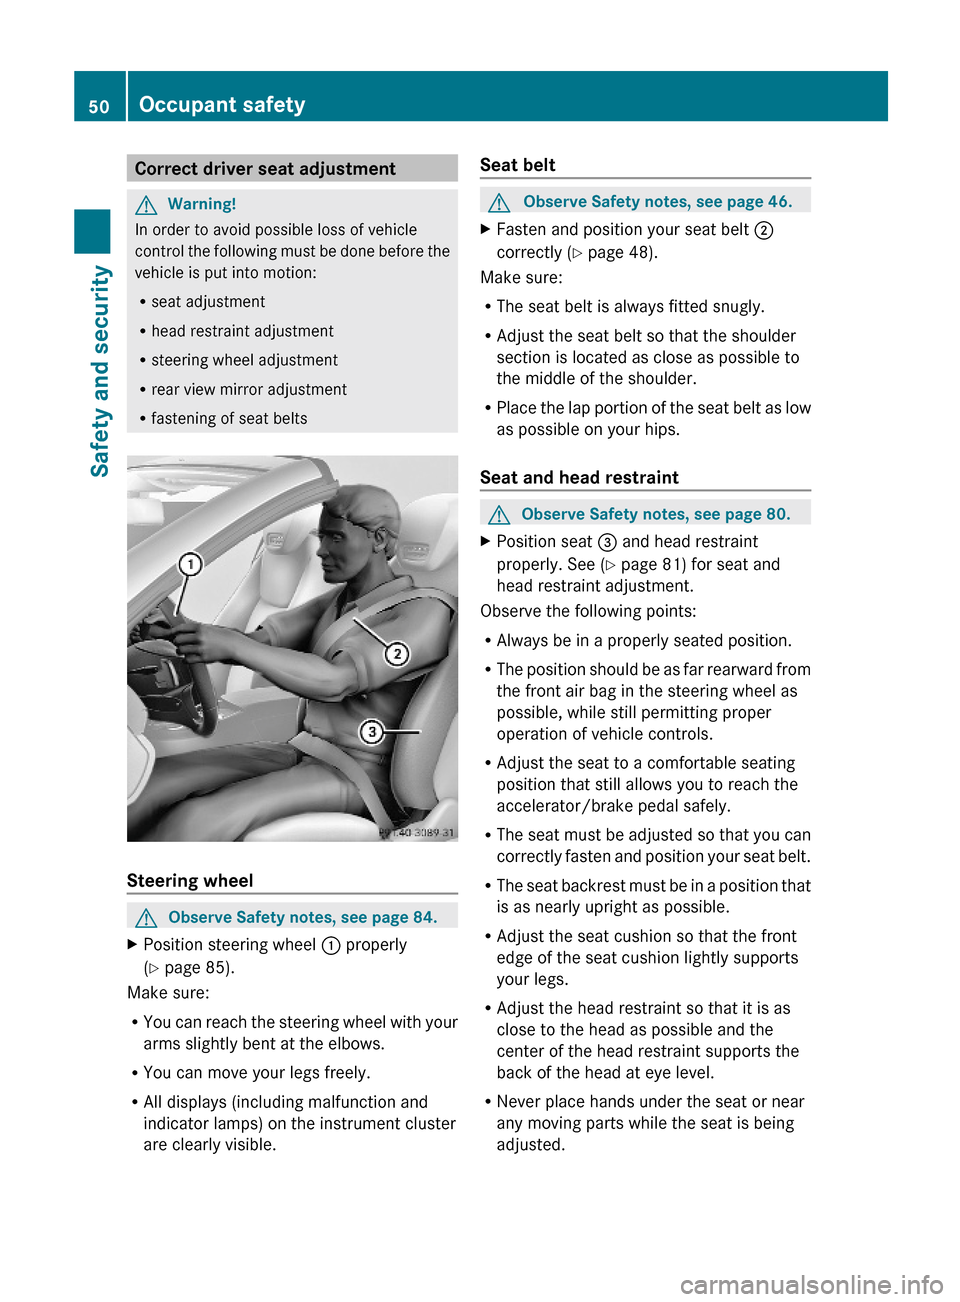
GObserve Safety notes, see page 84.XPosition steering wheel : properly
(Y page 85).
Make sure:
RYou can reach the steering wheel with your
arms slightly bent at the elbows.
RYou can move your legs freely.
RAll displays (including malfunction and
indicator lamps) on the instrument cluster
are clearly visible.
Seat beltGObserve Safety notes, see page 46.XFasten and position your seat belt ;
correctly (Y page 48).
Make sure:
RThe seat belt is always fitted snugly.
RAdjust the seat belt so that the shoulder
section is located as close as possible to
the middle of the shoulder.
RPlace the lap portion of the seat belt as low
as possible on your hips.
Seat and head restraint
GObserve Safety notes, see page 80.XPosition seat = and head restraint
properly. See (Y page 81) for seat and
head restraint adjustment.
Observe the following points:
RAlways be in a properly seated position.
RThe position should be as far rearward from
the front air bag in the steering wheel as
possible, while still permitting proper
operation of vehicle controls.
RAdjust the seat to a comfortable seating
position that still allows you to reach the
accelerator/brake pedal safely.
RThe seat must be adjusted so that you can
correctly fasten and position your seat belt.
RThe seat backrest must be in a position that
is as nearly upright as possible.
RAdjust the seat cushion so that the front
edge of the seat cushion lightly supports
your legs.
RAdjust the head restraint so that it is as
close to the head as possible and the
center of the head restraint supports the
back of the head at eye level.
RNever place hands under the seat or near
any moving parts while the seat is being
adjusted.
50Occupant safetySafety and security
230_AKB; 6; 22, en-USd2ureepe,Version: 2.11.8.12009-07-28T18:49:58+02:00 - Seite 50
Page 54 of 316
GWarning!
When leaving the vehicle, always remove the
SmartKey from the starter switch. Always
take the SmartKey with you and lock the
vehicle. Do not leave children unattended in
the vehicle, even if they are secured in a child
restraint system, or with access to an
unlocked vehicle. A child’s unsupervised
access to a vehicle could result in an accident
and/or serious personal injury. The children
could
R injure themselves on parts of the vehicle
R be seriously or fatally injured through
excessive exposure to extreme heat or cold
R injure themselves or cause an accident with
vehicle equipment that can be operated
even if the SmartKey is removed from the
starter switch or removed from the vehicle,
such as seat adjustment, steering wheel
adjustment, or the memory function
If children open a door, they could injure other
persons or get out of the vehicle and injure
themselves or be injured by following traffic.
Do not expose the child restraint system to
direct sunlight. The child restraint system’s
metal parts, for example, could become very
hot, and the child could be burned by these
parts.
GWarning!
Do not carry heavy or hard objects in the
passenger compartment unless they are
firmly secured in place.
Unsecured or improperly positioned cargo
increases a child’s risk of injury in the event
of
R strong braking maneuvers
R sudden changes of direction
R an accident
Infant and child restraint systemsGObserve Safety notes, see page 51.
We recommend all infants and children be
properly restrained at all times while the
vehicle is in motion.
The passenger lap/shoulder belt has a
special seat belt retractor for secure
fastening of child restraints.
To fasten a child restraint, follow the child
restraint manufacturer’s instructions for
mounting.
To activate the special seat belt retractor:
XPull the shoulder belt out completely and
let it retract.
During seat belt retraction, a ratcheting
sound can be heard to indicate that the
special seat belt retractor is activated.
The seat belt is now locked.XPush down on child restraint to take up any
slack.
To deactivate the special seat belt retractor:
XRelease the seat belt buckle and let the
seat belt retract completely.
The seat belt can then again be used in the
usual manner.GWarning!
Never release the seat belt buckle while the
vehicle is in motion, since the special seat belt
retractor will be deactivated.
The use of infant or child restraints is required
by law in all 50 states, the District of
Columbia, the U.S. territories and all
Canadian provinces.
Infants and small children should be seated
in an appropriate infant or child restraint
system. They must be properly secured by a
lap/shoulder belt in accordance with the
manufacturer’s instructions for the child
restraint. All infant or child restraint systems
must comply with U.S. Federal Motor Vehicle
Safety Standards 213 and 225 and Canadian
Motor Vehicle Safety Standards 213 and
210.2.
52Occupant safetySafety and security
230_AKB; 6; 22, en-USd2ureepe,Version: 2.11.8.12009-07-28T18:49:58+02:00 - Seite 52
Page 57 of 316
Safety notesGWarning!
The following factors increase the risk of
accidents:
R Excessive speed, especially in turns
R Wet and slippery road surfaces
R Following another vehicle too closely
The driving safety systems described in this
section cannot reduce these risks or prevent
the natural laws of physics from acting on the
vehicle. They cannot increase braking or
steering efficiency beyond that afforded by
the condition of the vehicle brakes and tires
or the traction afforded.
Only a safe, attentive, and skillful driver can
prevent accidents.
The capabilities of a vehicle equipped with the
driving safety systems described in this
section must never be exploited in a reckless
or dangerous manner which could jeopardize
the user’s safety or the safety of others.
Always adjust your driving style to the
prevailing road and weather conditions and
keep a safe distance to other road users and
objects on the street.
If a driving system malfunctions, other driving
safety systems may also switch off. Observe
indicator and warning lamps that may come
on as well as messages in the multifunction
display that may appear.
ABS
GObserve Safety notes, see page 55.GWarning!
Do not pump the brake pedal. Use firm, steady
brake pedal pressure instead. Pumping the
brake pedal defeats the purpose of the ABS
and significantly reduces braking
effectiveness.
The Antilock Brake System (ABS) regulates
the brake pressure so that the wheels do not
lock during braking. This allows you to
maintain the ability to steer your vehicle.
The ABS is functional above a speed of
approximately 5 mph (8 km/h) independent
of road surface conditions.
On slippery road surfaces, the ABS will
respond even to light brake pressure.
The ABS indicator lamp ! in the
instrument cluster comes on when you switch
on the ignition. It goes out when the engine
is running.
Braking
If the ABS activates during braking, the ABS/
ESP ®
warning lamp ÷ or d 7
in the
instrument cluster flashes. Because of the
electro-hydraulic brake system, you will not
feel any pulsation in the brake pedal.
XKeep firm and steady pressure on the brake
pedal.
Continuous, steady brake pedal pressure
yields the advantages provided by the ABS,
namely braking power and the ability to steer
the vehicle.
The ABS/ESP ®
warning lamp ÷ or d 7
flashes whenever the ABS is activated. It can
be an indication for hazardous road
conditions and functions as a reminder to
take extra care while driving.
Emergency brake maneuver
XKeep continuous full pressure on the brake
pedal.GWarning!
If the ABS malfunctions, other driving safety
systems such as the BAS or the ESP ®
are also
switched off. Observe indicator and warning
lamps that may come on as well as messages
in the multifunction display that may appear.
7 Depending on vehicle production date.Driving safety systems55Safety and security230_AKB; 6; 22, en-USd2ureepe,Version: 2.11.8.12009-07-28T18:49:58+02:00 - Seite 55Z
Page 69 of 316
Vehicle equipment ..............................68
Locking and unlocking .......................68
Starter switch positions .....................78
Seats ....................................................80
Multifunction steering wheel .............84
Mirrors .................................................86
Memory function .................................88
Lighting ................................................89
Wipers ..................................................95
Power windows ...................................96
Driving and parking ............................98
Automatic transmission ...................103
Instrument cluster ............................111
Control system ..................................113
Driving systems ................................130
Climate control system ....................148
Rear window defroster .....................155
Retractable hardtop .........................155
Loading and storing ..........................161
Useful features .................................164
67Controls in detail230_AKB; 6; 22, en-USd2ureepe,Version: 2.11.8.12009-07-28T18:49:58+02:00 - Seite 67
Page 70 of 316
Vehicle equipment
iThis Operator’s Manual describes all
features, standard or optional, potentially
available for your vehicle at the time of
purchase. Please be aware that your
vehicle might not be equipped with all
features described in this manual.
Locking and unlocking
Notes
GObserve Safety notes, see page 51.
When unlocking or locking the vehicle with
the SmartKey an acoustic signal sounds. The
acoustic signal is activated at the factory. If
you wish to deactivate the feature, or adjust
its signal volume, contact an authorized
Mercedes-Benz Center.
When unlocking the vehicle, all turn signal
lamps flash once. An acoustic signal sounds
once, and the locking knobs in the doors
move up. The anti-theft alarm system is
disarmed.
When locking the vehicle, all turn signal lamps
flash three times. An acoustic signal sounds
three times, and the locking knobs in the
doors move down. The anti-theft alarm
system is armed.
All doors and the trunk must be closed.
If you cannot lock or unlock the vehicle with
the SmartKey, the batteries in the SmartKey
are discharged, the SmartKey is
malfunctioning, or the vehicle battery is
drained.
XCheck the batteries in the SmartKey
(Y page 71) and replace them if
necessary.
XUse the mechanical key to unlock the
driver’s door and the trunk (Y page 267).
XUse the mechanical key to lock the vehicle
(Y page 269).
XHave the vehicle battery and the vehicle
battery connections checked at an
authorized Mercedes-Benz Center.
If the SmartKey is malfunctioning, contact
Roadside Assistance or an authorized
Mercedes-Benz Center.
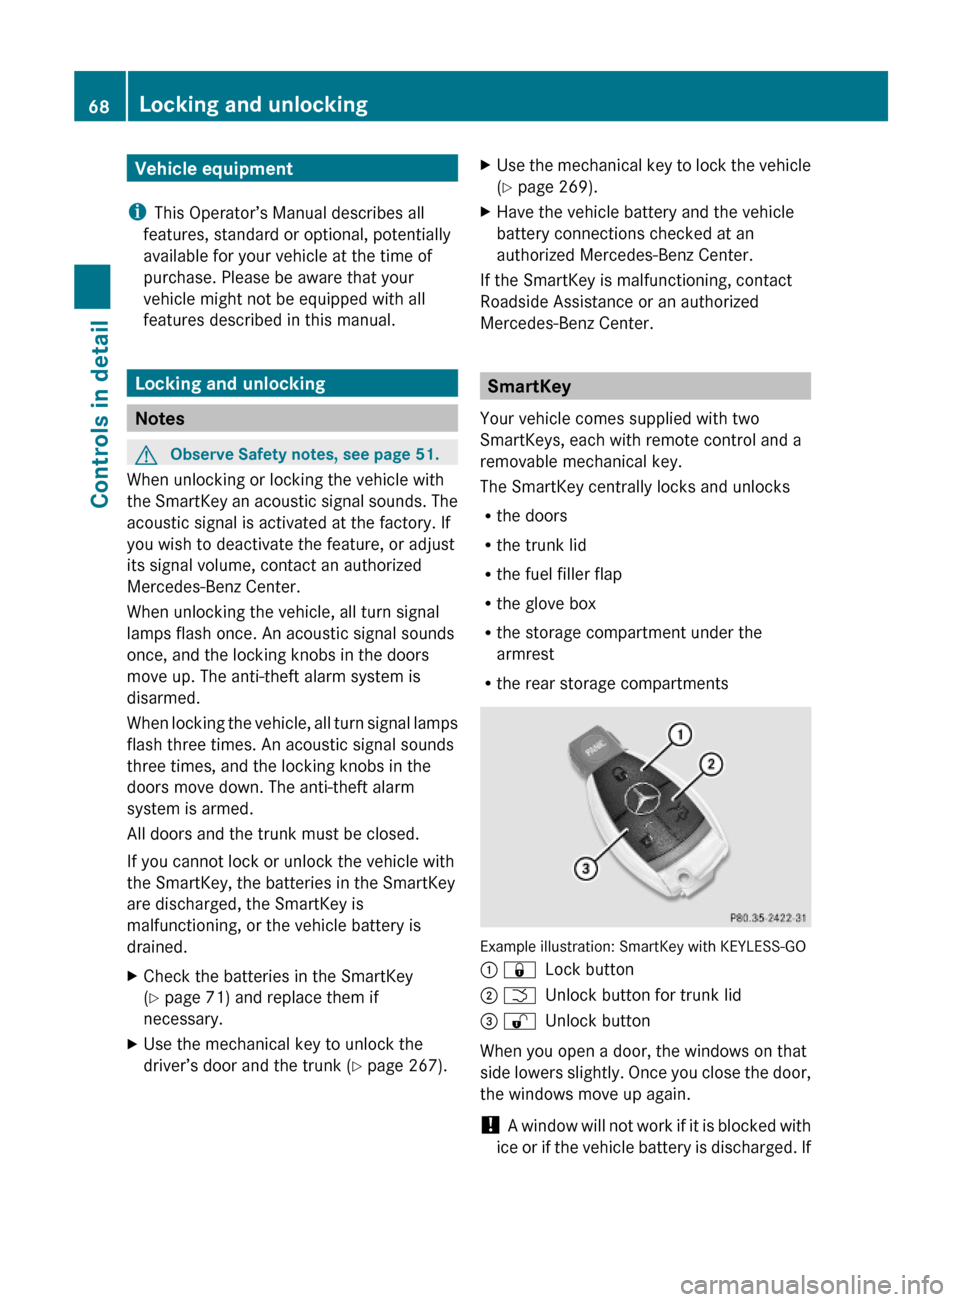
SmartKey
Your vehicle comes supplied with two
SmartKeys, each with remote control and a
removable mechanical key.
The SmartKey centrally locks and unlocks
Rthe doors
Rthe trunk lid
Rthe fuel filler flap
Rthe glove box
Rthe storage compartment under the
armrest
Rthe rear storage compartments
Example illustration: SmartKey with KEYLESS-GO
: &Lock button; FUnlock button for trunk lid= %Unlock button
When you open a door, the windows on that
side lowers slightly. Once you close the door,
the windows move up again.
! A window will not work if it is blocked with
ice or if the vehicle battery is discharged. If
68Locking and unlockingControls in detail
230_AKB; 6; 22, en-USd2ureepe,Version: 2.11.8.12009-07-28T18:49:58+02:00 - Seite 68
Page 71 of 316
you cannot shut a door, do not force it or
you could damage the door or the window.
Fix whatever is affecting the window before
trying to shut the door.
i USA only:
This device complies with Part 15 of the
FCC Rules. Operation is subject to the
following two conditions:
1. This device may not cause harmful interference, and
2. this device must accept any interference received, including
interference that may cause undesired
operation.
Any unauthorized modification to this
device could void the user’s authority to
operate the equipment.
i Canada only:
This device complies with RSS-210 of
Industry Canada. Operation is subject to
the following two conditions:
1. This device may not cause interference,
and
2. this device must accept any interference received, including
interference that may cause undesired
operation of the device.
Any unauthorized modification to this
device could void the user’s authority to
operate the equipment.
Factory setting XGlobal unlocking: Press button %.
Unless you open a door or the trunk within
approximately 40 seconds after unlocking
the vehicle:
R The vehicle will be locked again.
R The anti-theft alarm system will be
rearmed.
XGlobal locking: Press button &.Selective setting
If you frequently travel alone, you may wish
to reprogramm the SmartKey. Pressing
button % will then only unlock the driver’s
door, interior lockable storage
compartments, and the fuel filler flap.
XSwitching on/off: Press and hold buttons
% and & simultaneously for
approximately 6 seconds until the battery
check lamp ( Y page 71) flashes twice.
The SmartKey will then function as follows:
XUnlocking driver’s door and fuel filler
flap: Press button % once.XGlobal unlocking: Press button %
twice.XGlobal locking: Press button &.
KEYLESS-GO
Vehicles equipped with KEYLESS-GO come
with two SmartKeys with KEYLESS-GO, each
with remote control and a removable
mechanical key.
The KEYLESS-GO function is integrated into
the SmartKey. The validity of the SmartKey is
checked every time you grasp an outside door
handle.
When the SmartKey is valid, your vehicle
unlocks
R the doors
R the trunk lid
R the fuel filler flap
R the glove box
R the storage compartment under the
armrest
R the rear storage compartments
When you open a door, the windows on that
side lowers slightly. Once you close the door,
the windows move up again.
! A window will not work if it is blocked with
ice or if the vehicle battery is discharged. If
Locking and unlocking69Controls in detail230_AKB; 6; 22, en-USd2ureepe,Version: 2.11.8.12009-07-28T18:49:58+02:00 - Seite 69Z
Page 74 of 316
& or % will lock or unlock the vehicle
accordingly.
Loss of the SmartKey
If you lose your SmartKey or mechanical key,
you should do the following:
XHave the SmartKey deactivated by an
authorized Mercedes-Benz Center.
XReport the loss of the SmartKey or the
mechanical key to your car insurance
company immediately.
XHave the mechanical lock replaced if
necessary.
Any authorized Mercedes-Benz Center will be
glad to supply you with a replacement. For
information on replacing the SmartKey, see
“Replacing the SmartKey” (Y page 72).
Replacing the SmartKey
Only you, or someone authorized by you can
order a replacement key from any Mercedes-
Benz Center. In order to do so, the Mercedes-
Benz Center will require proof of identity and
vehicle ownership with original documents,
including the following:
If you are the current owner of the vehicle:
Rthe vehicle’s current state registration
Ra current identity card, passport, or drivers
license
If you are an authorized person:
Rthe vehicle’s current state registration
Ra current identity card, passport, or drivers
license for the authorized individual
Rsigned and dated authorization from the
owner of the vehicle for which the key is
being requested
iDuplicated or photocopied
documentation will not be accepted.
Activating the key
Once you, or an authorized person, has
provided the appropriate documents, the
Mercedes-Benz Center will need to
synchronize the key to your vehicle before it
can be used. In order to do so, the Mercedes-
Benz Center need access to your vehicle.
Opening the doors from the inside
You can open a locked door from the inside.
Open door only when conditions are safe to
do so.
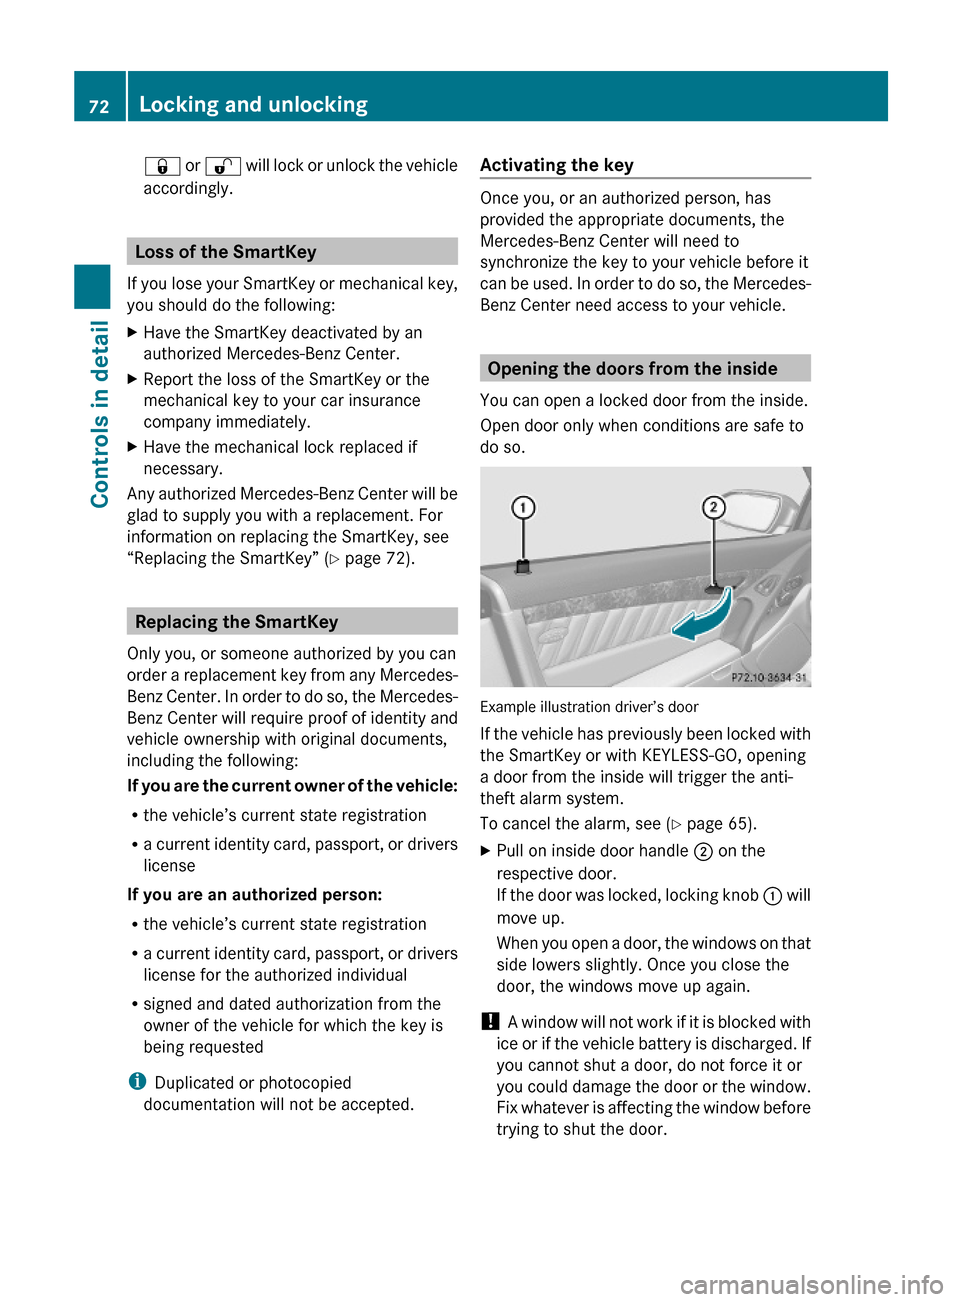
Example illustration driver’s door
If the vehicle has previously been locked with
the SmartKey or with KEYLESS-GO, opening
a door from the inside will trigger the anti-
theft alarm system.
To cancel the alarm, see (Y page 65).
XPull on inside door handle ; on the
respective door.
If the door was locked, locking knob : will
move up.
When you open a door, the windows on that
side lowers slightly. Once you close the
door, the windows move up again.
! A window will not work if it is blocked with
ice or if the vehicle battery is discharged. If
you cannot shut a door, do not force it or
you could damage the door or the window.
Fix whatever is affecting the window before
trying to shut the door.
72Locking and unlockingControls in detail
230_AKB; 6; 22, en-USd2ureepe,Version: 2.11.8.12009-07-28T18:49:58+02:00 - Seite 72
Page 76 of 316
Remember to re-secure the luggage cover
after loading/unloading the trunk.
Otherwise you will not be able to lower the
retractable hardtop.
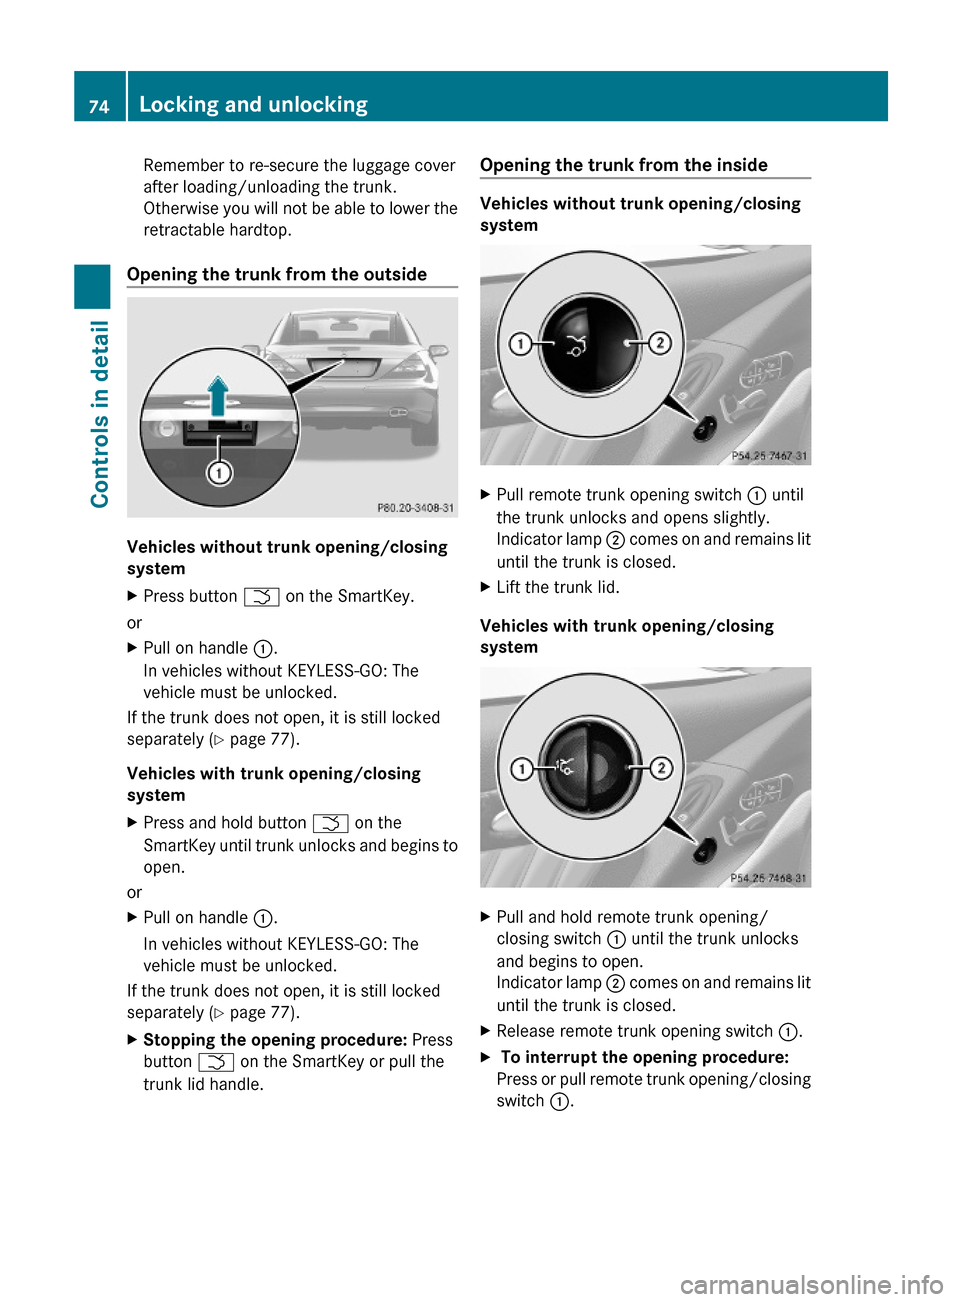
Opening the trunk from the outside
Vehicles without trunk opening/closing
system
XPress button F on the SmartKey.
or
XPull on handle :.
In vehicles without KEYLESS-GO: The
vehicle must be unlocked.
If the trunk does not open, it is still locked
separately (Y page 77).
Vehicles with trunk opening/closing
system
XPress and hold button F on the
SmartKey until trunk unlocks and begins to
open.
or
XPull on handle :.
In vehicles without KEYLESS-GO: The
vehicle must be unlocked.
If the trunk does not open, it is still locked
separately (Y page 77).
XStopping the opening procedure: Press
button F on the SmartKey or pull the
trunk lid handle.
Opening the trunk from the inside
Vehicles without trunk opening/closing
system
XPull remote trunk opening switch : until
the trunk unlocks and opens slightly.
Indicator lamp ; comes on and remains lit
until the trunk is closed.
XLift the trunk lid.
Vehicles with trunk opening/closing
system
XPull and hold remote trunk opening/
closing switch : until the trunk unlocks
and begins to open.
Indicator lamp ; comes on and remains lit
until the trunk is closed.
XRelease remote trunk opening switch :.X To interrupt the opening procedure:
Press or pull remote trunk opening/closing
switch :.
74Locking and unlockingControls in detail
230_AKB; 6; 22, en-USd2ureepe,Version: 2.11.8.12009-07-28T18:49:58+02:00 - Seite 74