wheel MERCEDES-BENZ SL550 2012 R230 Service Manual
[x] Cancel search | Manufacturer: MERCEDES-BENZ, Model Year: 2012, Model line: SL550, Model: MERCEDES-BENZ SL550 2012 R230Pages: 316, PDF Size: 7.21 MB
Page 105 of 316
XRemove the SmartKey from the starter
switch.
The SmartKey can only be removed from the
starter switch with the automatic
transmission in park position P.
With KEYLESS-GO
XPress the KEYLESS-GO start/stop button.
With the driver’s door closed, the starter
switch is now in position 1. With the driver’s
door opened, the starter switch is set to
position 0, same as the SmartKey removed
from the starter switch (Y page 78).
If an acoustic warning sounds, you have tried
to turn off the engine with the KEYLESS-GO
start/stop button while the automatic
transmission was not in park position P.
Read and observe messages that may appear
in the multifunction display (Y page 234).
Automatic transmission
Introduction
For information on driving with an automatic
transmission, see “Driving and parking”
(Y page 98).
GWarning!
Make sure absolutely no objects are
obstructing the pedals’ range of movement.
Keep the driver’s footwell clear of all
obstacles. If there are any floormats or
carpets in the footwell, make sure the pedals
still have sufficient clearance.
During sudden driving or braking maneuvers
the objects could get caught between or
under the pedals. You could then no longer
brake or accelerate. This could lead to
accidents and injury.
! Allow the engine to warm up under low
load use. Do not place full load on the
engine until the operating temperature has
been reached.
Avoid spinning of a drive wheel for an
extended period when driving off on
slippery road surfaces.
This may cause serious damage to the
engine and the drivetrain which is not
covered by the Mercedes-Benz Limited
Warranty.
iDuring the brief warm-up, transmission
upshifting is delayed. This allows the
catalytic converter to heat up more quickly
to operating temperature.
Gear selector lever
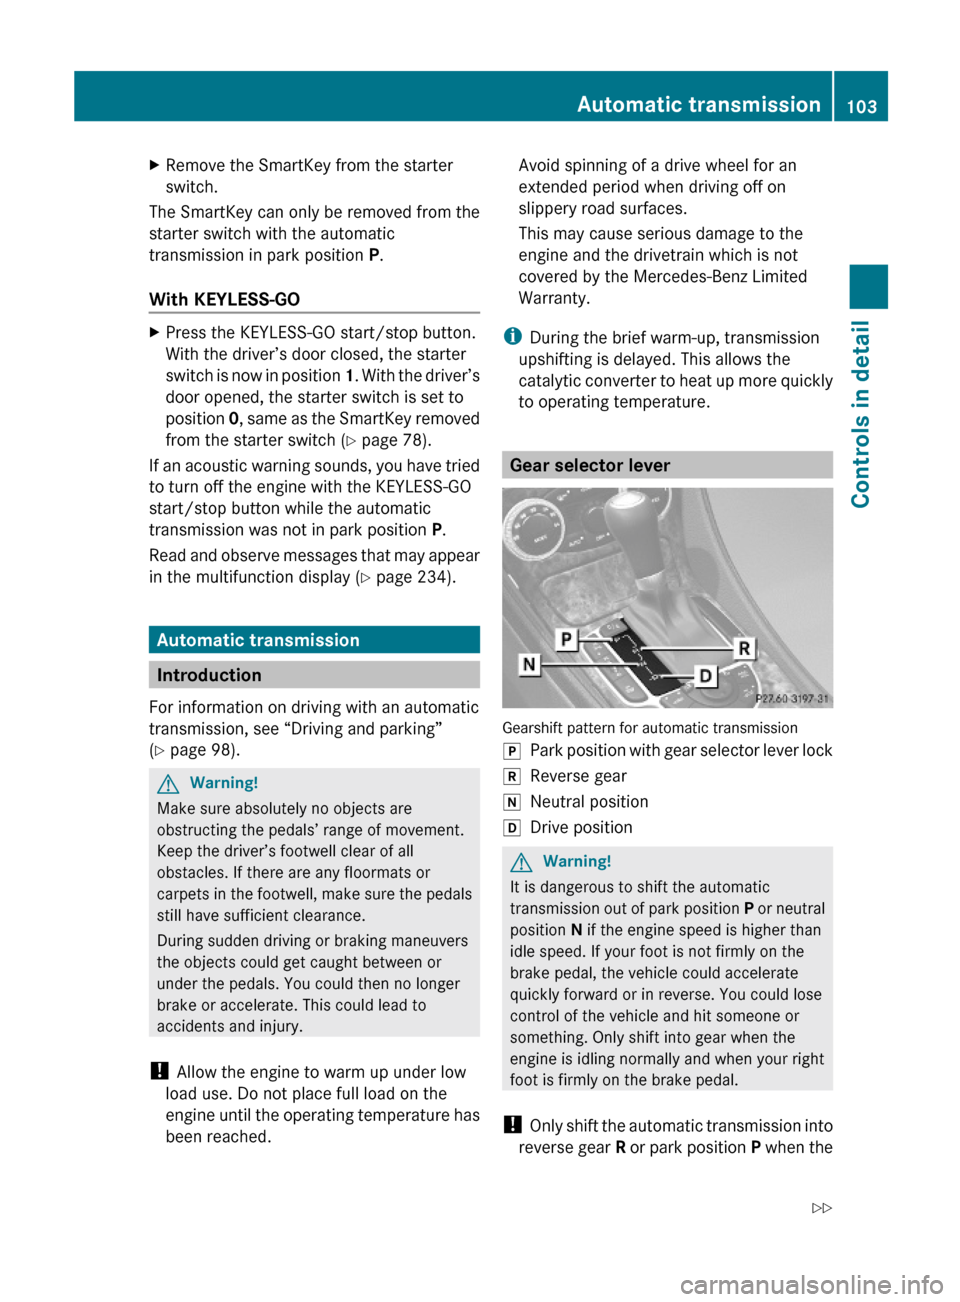
Gearshift pattern for automatic transmission
jPark position with gear selector lever lockkReverse geariNeutral positionhDrive positionGWarning!
It is dangerous to shift the automatic
transmission out of park position P or neutral
position N if the engine speed is higher than
idle speed. If your foot is not firmly on the
brake pedal, the vehicle could accelerate
quickly forward or in reverse. You could lose
control of the vehicle and hit someone or
something. Only shift into gear when the
engine is idling normally and when your right
foot is firmly on the brake pedal.
! Only shift the automatic transmission into
reverse gear R or park position P when the
Automatic transmission103Controls in detail230_AKB; 6; 22, en-USd2ureepe,Version: 2.11.8.12009-07-28T18:49:58+02:00 - Seite 103Z
Page 110 of 316
Selecting program mode C means:
RThe vehicle starts out more gentle, both
forward and reverse, except when driving
off with full throttle.
RTraction and driving stability are improved
on icy roads.
RUpshifts occur earlier even when you give
more gas. The engine then operates at
lower revolutions and the wheels are less
likely to spin.
Selecting program mode S means that
upshifts occur later.
One-touch gearshifting
With the automatic transmission in drive
position D and driving in automatic program
mode C or S, you can limit or extend the gear
range using the gear selector lever or the
steering wheel gearshift control.
SL 63 AMG and SL 65 AMG: For information
on using the gear selector lever or the
steering wheel gearshift control in manual
program mode M, see “Manual shift program”
(Y page 109).
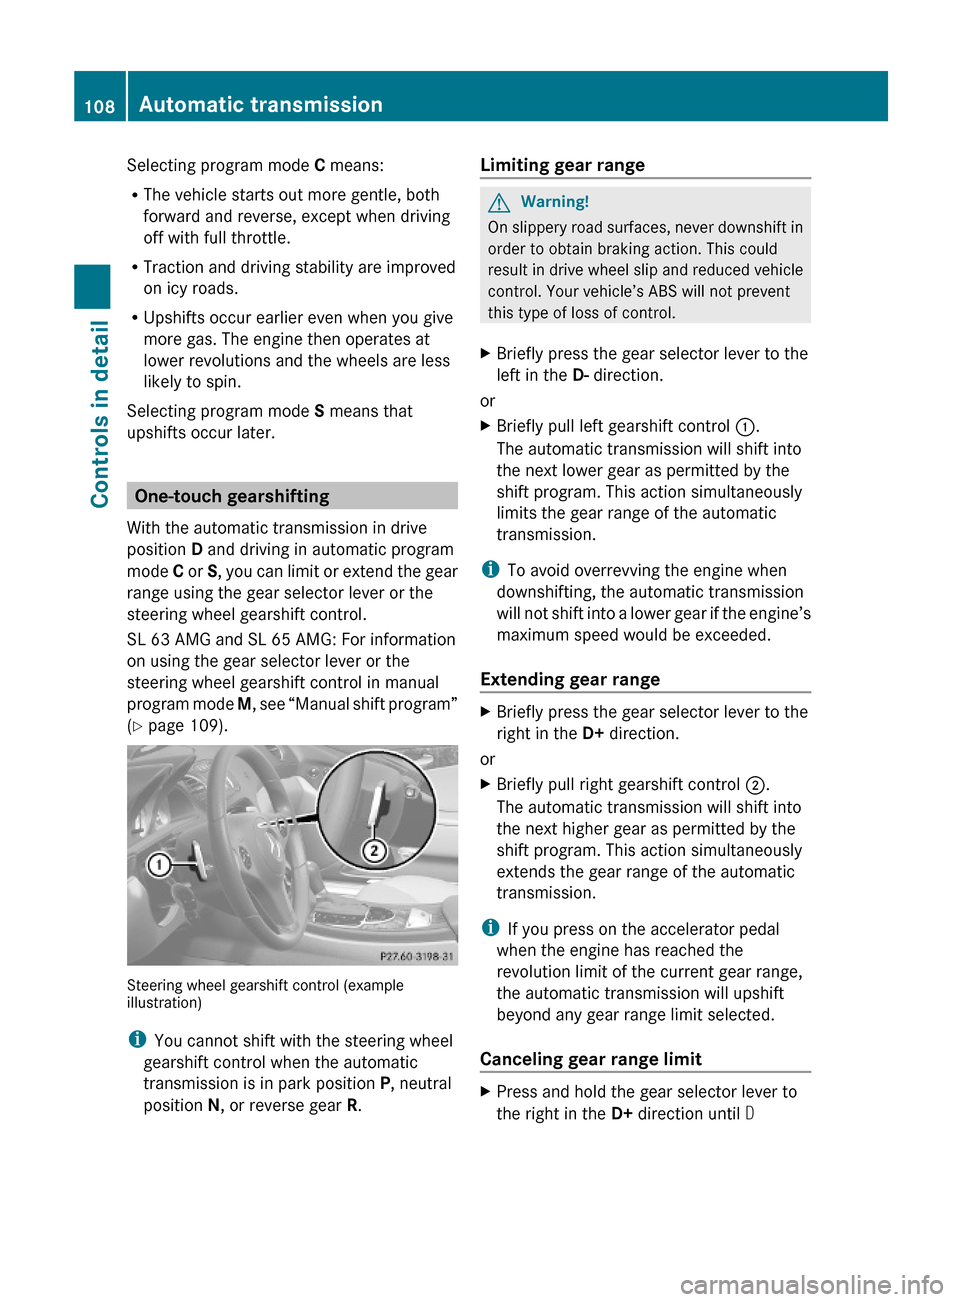
Steering wheel gearshift control (exampleillustration)
iYou cannot shift with the steering wheel
gearshift control when the automatic
transmission is in park position P, neutral
position N, or reverse gear R.
Limiting gear range GWarning!
On slippery road surfaces, never downshift in
order to obtain braking action. This could
result in drive wheel slip and reduced vehicle
control. Your vehicle’s ABS will not prevent
this type of loss of control.
XBriefly press the gear selector lever to the
left in the D- direction.
or
XBriefly pull left gearshift control :.
The automatic transmission will shift into
the next lower gear as permitted by the
shift program. This action simultaneously
limits the gear range of the automatic
transmission.
iTo avoid overrevving the engine when
downshifting, the automatic transmission
will not shift into a lower gear if the engine’s
maximum speed would be exceeded.
Extending gear range
XBriefly press the gear selector lever to the
right in the D+ direction.
or
XBriefly pull right gearshift control ;.
The automatic transmission will shift into
the next higher gear as permitted by the
shift program. This action simultaneously
extends the gear range of the automatic
transmission.
iIf you press on the accelerator pedal
when the engine has reached the
revolution limit of the current gear range,
the automatic transmission will upshift
beyond any gear range limit selected.
Canceling gear range limit
XPress and hold the gear selector lever to
the right in the D+ direction until D
108Automatic transmissionControls in detail
230_AKB; 6; 22, en-USd2ureepe,Version: 2.11.8.12009-07-28T18:49:58+02:00 - Seite 108
Page 111 of 316
reappears in the right multifunction
display.
or
XPull and hold right gearshift control ; until
D reappears in the right multifunction
display.
The automatic transmission will shift from
the current gear range directly into drive
position D.
Shifting into optimal gear range
XPress and hold the gear selector lever to
the left in the D- direction.
or
XPull and hold left gearshift control :.
The automatic transmission will select the
gear range suited for optimal acceleration
and deceleration automatically. This will
involve shifting down one or more gears.
Manual shift program
The manual shift program is available on
vehicles with AMG Sport Package, SL 63 AMG
and SL 65 AMG only.
Manual program mode M differs with regard
to spontaneity, response time, and shifting
smoothness from automatic program modes
S or S+ (SL 63 AMG only).
In manual program mode M, system-
controlled automatic gearshifting is switched
off. You need to change the gears by manually
upshifting or downshifting using the gear
selector lever or the steering wheel gearshift
control.
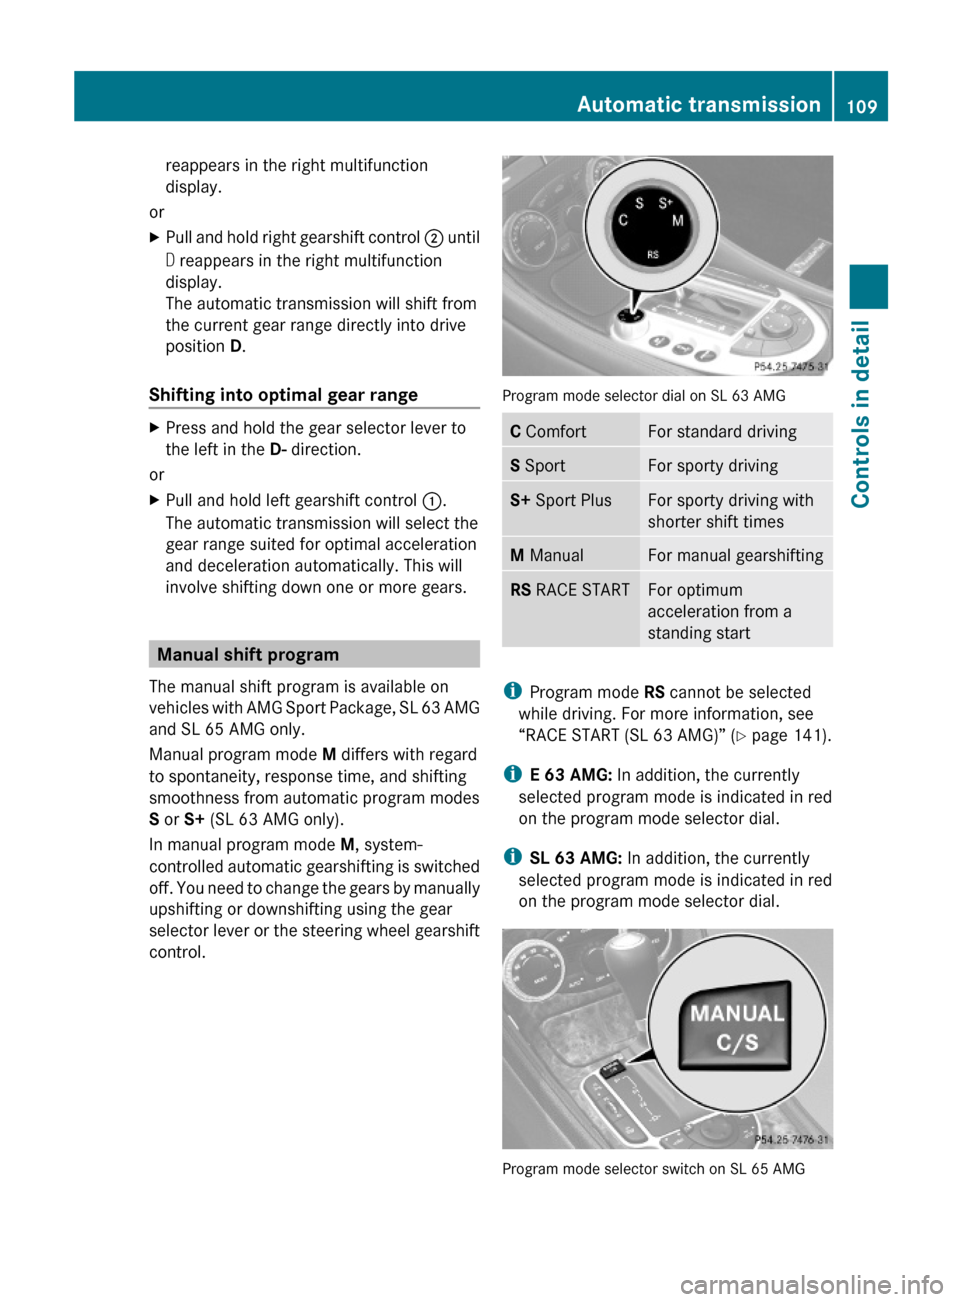
Program mode selector dial on SL 63 AMG
C ComfortFor standard drivingS SportFor sporty drivingS+ Sport PlusFor sporty driving with
shorter shift times
M ManualFor manual gearshiftingRS RACE STARTFor optimum
acceleration from a
standing start
iProgram mode RS cannot be selected
while driving. For more information, see
“RACE START (SL 63 AMG)” (Y page 141).
iE 63 AMG: In addition, the currently
selected program mode is indicated in red
on the program mode selector dial.
iSL 63 AMG: In addition, the currently
selected program mode is indicated in red
on the program mode selector dial.
Program mode selector switch on SL 65 AMG
Automatic transmission109Controls in detail230_AKB; 6; 22, en-USd2ureepe,Version: 2.11.8.12009-07-28T18:49:58+02:00 - Seite 109Z
Page 113 of 316
the maximum engine speed for each gear
without overrevving the engine.XShift the automatic transmission from
current gear : into the next higher gear.
The fuel supply will otherwise be
interrupted to prevent the engine from
overrevving.
Downshifting
GWarning!
On slippery road surfaces, never downshift in
order to obtain braking action. This could
result in drive wheel slip and reduced vehicle
control. Your vehicle’s ABS will not prevent
this type of loss of control.
XBriefly press the gear selector lever to the
left in the D- direction.
or
XBriefly pull left gearshift control :
( Y page 108).
The automatic transmission shifts into the
next lower gear.
i For maximum acceleration, press and
hold the gear selector lever to the left in the
D- direction or pull and hold the left
gearshift control. Depending on the engine
speed the automatic transmission selects
the optimal gear for maximum
acceleration.
i When you brake or stop, the automatic
transmission shifts down into a gear from
which you can easily accelerate or take off.
Kickdown
Using the kickdown while driving in manual
program mode M is not possible.
Deactivating manual shift program
XAll models except SL 63 AMG: Press the
program mode selector switch repeatedly
until C or S appears in the right
multifunction display.XSL 63 AMG: Turn the program mode
selector dial until C or S appears in the right
multifunction display.
or
XRestart the engine.
The automatic transmission will go to
automatic program mode C.
Manual program mode M is not stored.
Emergency operation (limp-home
mode)
If vehicle acceleration becomes less
responsive or sluggish or the automatic
transmission no longer shifts, the automatic
transmission is most likely operating in limp-
home (emergency operation) mode. In this
mode only second gear and reverse gear R
can be selected.
XStop the vehicle in a safe location.XShift the automatic transmission into park
position P.XTurn off the engine.XWait at least 10 seconds before restarting.XRestart the engine.XShift the automatic transmission into drive
position D (for second gear) or reverse gear
R .XHave the automatic transmission checked
at an authorized Mercedes-Benz Center as
soon as possible.
Instrument cluster
Introduction
For a full view illustration of the instrument
cluster, see “Instrument cluster”
( Y page 30).
GWarning!
No messages will be displayed if either the
instrument cluster or the multifunction
display is inoperative.
Instrument cluster111Controls in detail230_AKB; 6; 22, en-USd2ureepe,Version: 2.11.8.12009-07-28T18:49:58+02:00 - Seite 111Z
Page 115 of 316
Doing so may cause serious engine damage
which is not covered by the Mercedes-Benz
Limited Warranty.
Resetting trip odometer
XMake sure you are viewing the standard
display (Y page 116) in the multifunction
display.
XPress and hold the reset button in the
instrument cluster (Y page 111) until the
trip odometer is reset.
Tachometer
The red marking on the tachometer
(Y page 30) denotes excessive engine speed.
! Avoid driving at excessive engine speeds,
as it may result in serious engine damage
that is not covered by the Mercedes-Benz
Limited Warranty.
To help protect the engine, the fuel supply is
interrupted if the engine is operated within
the red marking.
Control system
Introduction
The control system is activated as soon as the
starter switch is in position 1.
The control system enables you to call up
information about your vehicle and to change
vehicle settings.
For example, you can use the control system
to find out when your vehicle is next due for
maintenance service, to set the language for
messages in the instrument cluster display,
and much more.
GWarning!
A driver’s attention to the road and traffic
conditions must always be his/her primary
focus when driving.
For your safety and the safety of others,
selecting features through the multifunction
steering wheel should only be done by the
driver when traffic and road conditions permit
it to be done safely.
Bear in mind that at a speed of just 30 mph
(approximately 50 km/h), your vehicle is
covering a distance of 44 feet (approximately
14 m) every second.
The control system relays information to the
multifunction display.
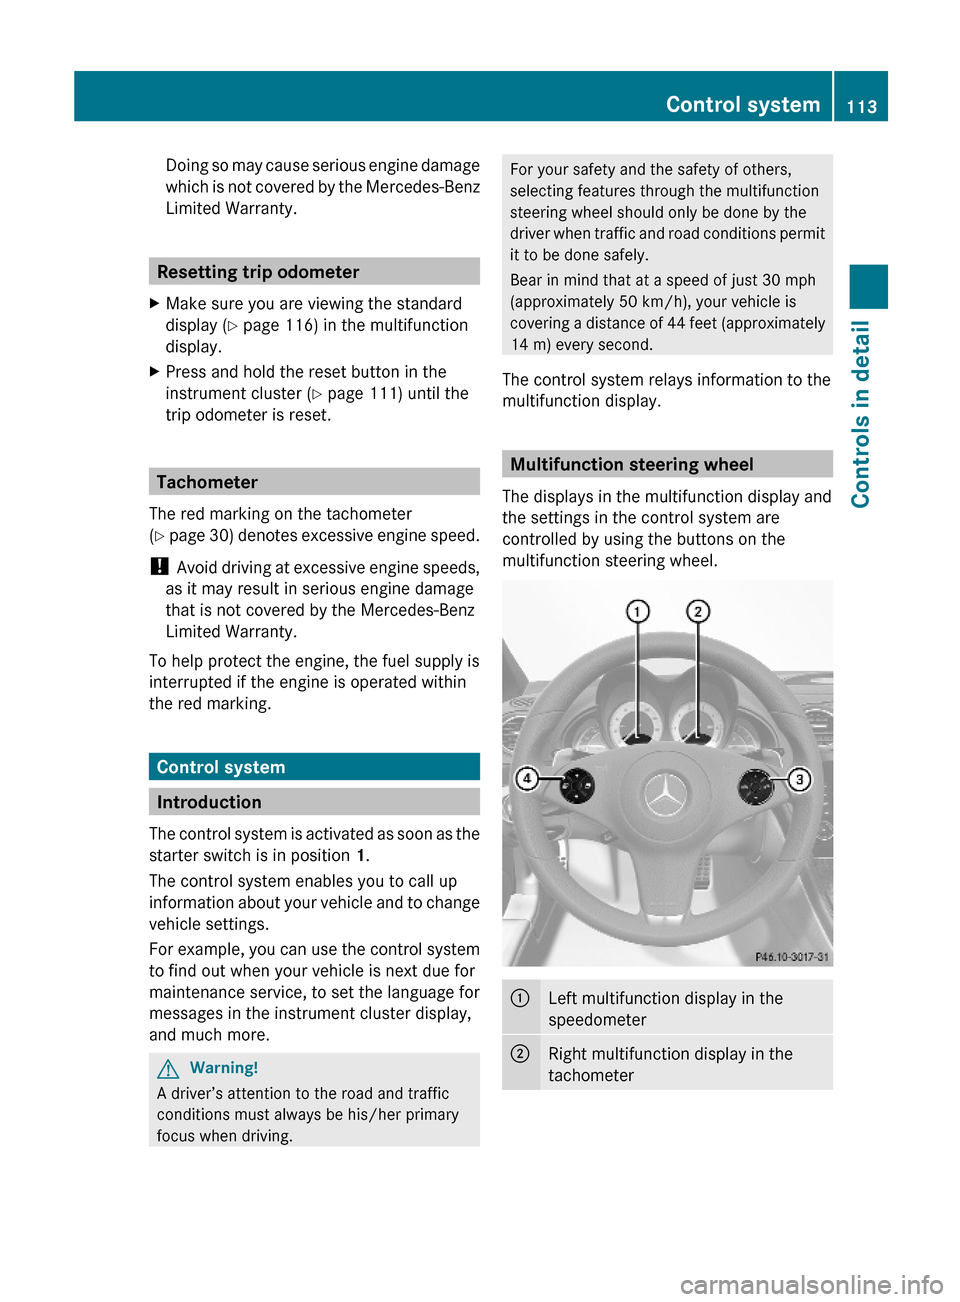
Multifunction steering wheel
The displays in the multifunction display and
the settings in the control system are
controlled by using the buttons on the
multifunction steering wheel.
:Left multifunction display in the
speedometer
;Right multifunction display in the
tachometer
Control system113Controls in detail230_AKB; 6; 22, en-USd2ureepe,Version: 2.11.8.12009-07-28T18:49:58+02:00 - Seite 113Z
Page 116 of 316
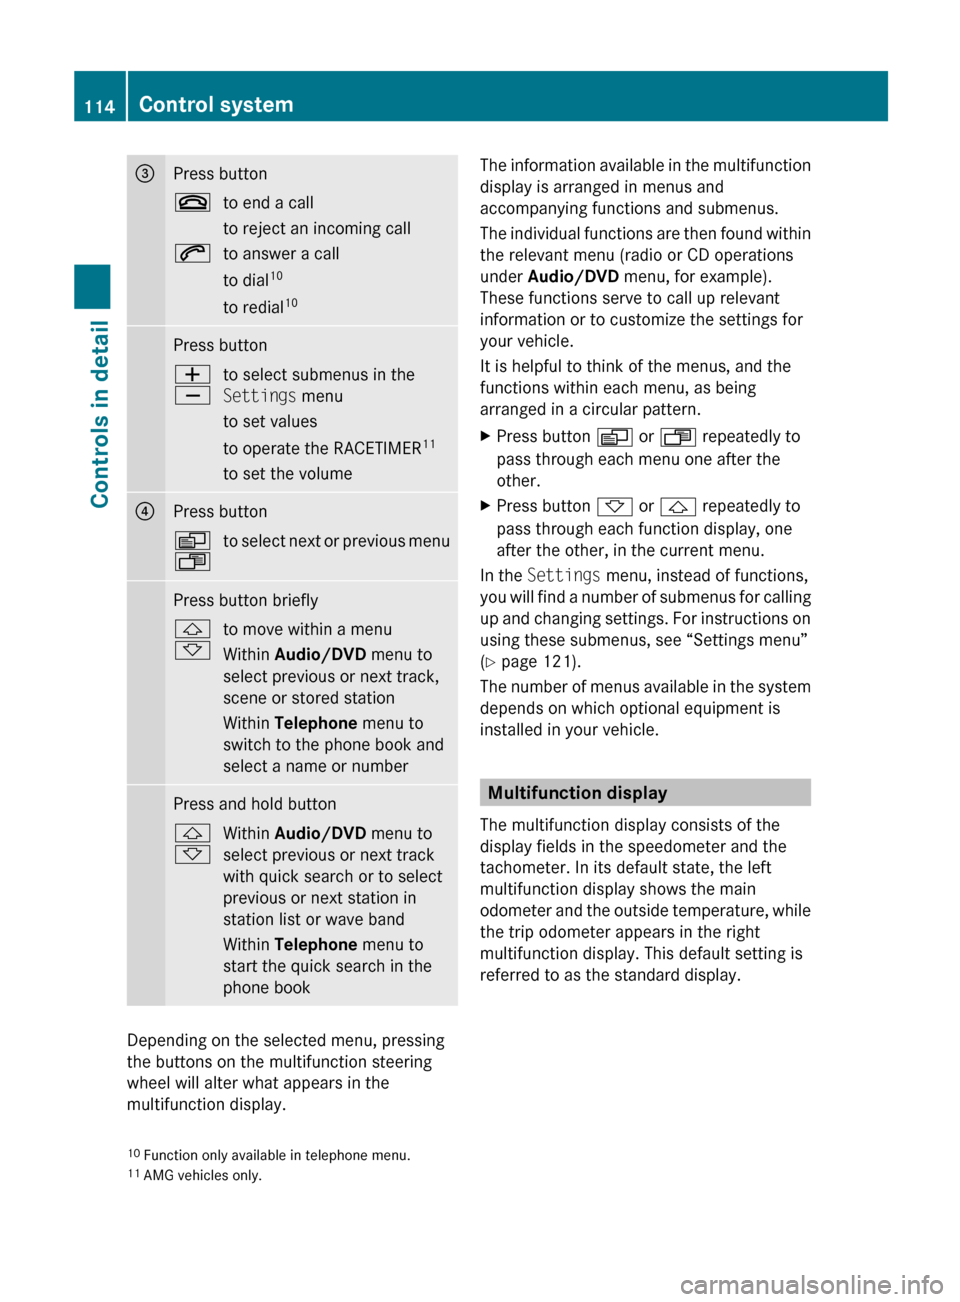
=Press button~to end a call
to reject an incoming call6to answer a call
to dial 10
to redial 10Press buttonW
Xto select submenus in the
Settings menu
to set values
to operate the RACETIMER 11
to set the volume?Press buttonV
Uto select next or previous menuPress button briefly&
*to move within a menu
Within Audio/DVD menu to
select previous or next track,
scene or stored station
Within Telephone menu to
switch to the phone book and
select a name or numberPress and hold button&
*Within Audio/DVD menu to
select previous or next track
with quick search or to select
previous or next station in
station list or wave band
Within Telephone menu to
start the quick search in the
phone book
Depending on the selected menu, pressing
the buttons on the multifunction steering
wheel will alter what appears in the
multifunction display.
The information available in the multifunction
display is arranged in menus and
accompanying functions and submenus.
The individual functions are then found within
the relevant menu (radio or CD operations
under Audio/DVD menu, for example).
These functions serve to call up relevant
information or to customize the settings for
your vehicle.
It is helpful to think of the menus, and the
functions within each menu, as being
arranged in a circular pattern.XPress button V or U repeatedly to
pass through each menu one after the
other.XPress button * or & repeatedly to
pass through each function display, one
after the other, in the current menu.
In the Settings menu, instead of functions,
you will find a number of submenus for calling
up and changing settings. For instructions on
using these submenus, see “Settings menu”
( Y page 121).
The number of menus available in the system
depends on which optional equipment is
installed in your vehicle.
Multifunction display
The multifunction display consists of the
display fields in the speedometer and the
tachometer. In its default state, the left
multifunction display shows the main
odometer and the outside temperature, while
the trip odometer appears in the right
multifunction display. This default setting is
referred to as the standard display.
10 Function only available in telephone menu.
11 AMG vehicles only.114Control systemControls in detail
230_AKB; 6; 22, en-USd2ureepe,Version: 2.11.8.12009-07-28T18:49:58+02:00 - Seite 114
Page 129 of 316
Convenience submenu
Access the Convenience submenu via the
Settings menu. Use the Convenience
submenu to activate the easy-entry/exit
feature (Y page 127), or to set the fold-in
function for exterior rear view mirrors
(Y page 127).
Activating easy-entry/exit feature
Use this function to activate and deactivate
the easy-entry/exit feature (Y page 85).
GWarning!
You must make sure no one can become
trapped or injured by the moving steering
wheel when the easy-entry/exit feature is
activated.
To stop steering wheel movement do one of
the following:
RMove steering wheel adjustment stalk.
RPress one of the memory position buttons.
RPress memory button M.
Do not leave children unattended in the
vehicle, or with access to an unlocked vehicle.
Children could open the driver’s door and
unintentionally activate the easy-entry/exit
feature, which could result in an accident
and/or serious personal injury.
XPress button V or U repeatedly until
the Settings menu appears in the
multifunction display.
XPress button &.XMove the selection marker with button
W or X to the Convenience
submenu.
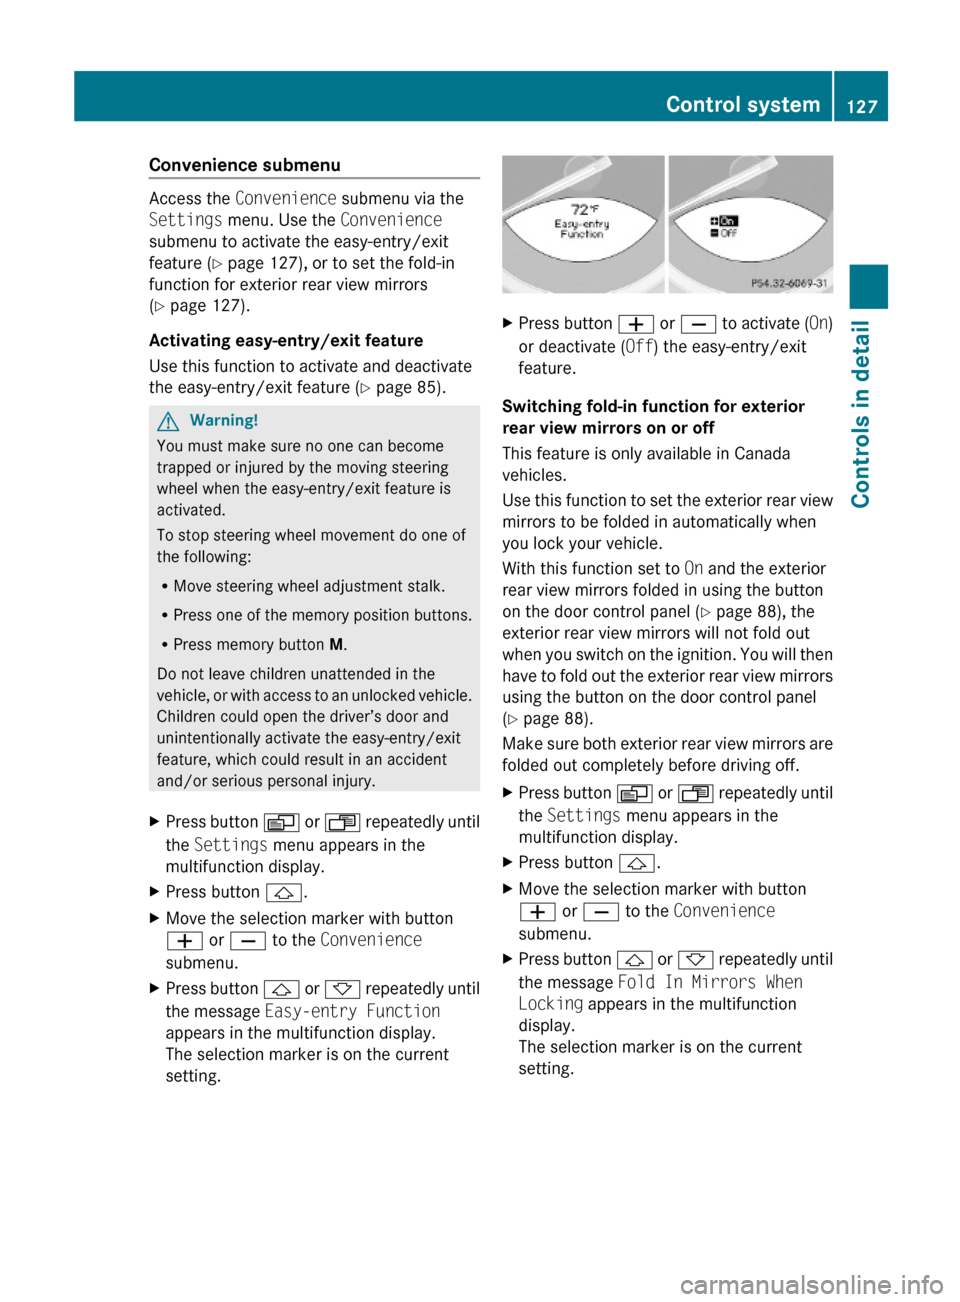
XPress button & or * repeatedly until
the message Easy-entry Function
appears in the multifunction display.
The selection marker is on the current
setting.
XPress button W or X to activate (On)
or deactivate (Off) the easy-entry/exit
feature.
Switching fold-in function for exterior
rear view mirrors on or off
This feature is only available in Canada
vehicles.
Use this function to set the exterior rear view
mirrors to be folded in automatically when
you lock your vehicle.
With this function set to On and the exterior
rear view mirrors folded in using the button
on the door control panel (Y page 88), the
exterior rear view mirrors will not fold out
when you switch on the ignition. You will then
have to fold out the exterior rear view mirrors
using the button on the door control panel
(Y page 88).
Make sure both exterior rear view mirrors are
folded out completely before driving off.
XPress button V or U repeatedly until
the Settings menu appears in the
multifunction display.
XPress button &.XMove the selection marker with button
W or X to the Convenience
submenu.
XPress button & or * repeatedly until
the message Fold In Mirrors When
Locking appears in the multifunction
display.
The selection marker is on the current
setting.
Control system127Controls in detail230_AKB; 6; 22, en-USd2ureepe,Version: 2.11.8.12009-07-28T18:49:58+02:00 - Seite 127Z
Page 133 of 316
The currently set speed or last set speed
(“Resume” function) appears in the left
multifunction display:
RUSA only: e.g. CC 55 MPH
RCanada only: e.g. ¯ 90 Km/h
GWarning!
The cruise control is a convenience system
designed to assist the driver during vehicle
operation. The driver is and must always
remain responsible for the vehicle’s speed
and for safe brake operation.
Only use the cruise control if the road, traffic,
and weather conditions make it advisable to
travel at a constant speed.
RThe use of the cruise control can be
dangerous on winding roads or in heavy
traffic because conditions do not allow safe
driving at a constant speed.
RThe use of the cruise control can be
dangerous on slippery roads. Rapid
changes in tire traction can result in wheel
spin and loss of control.
RDeactivate the cruise control when driving
in fog.
The “Resume” function should only be
operated if the driver is fully aware of the
previously set speed and wishes to resume
this particular preset speed.
GWarning!
The cruise control brakes automatically so
that the set speed is not exceeded.
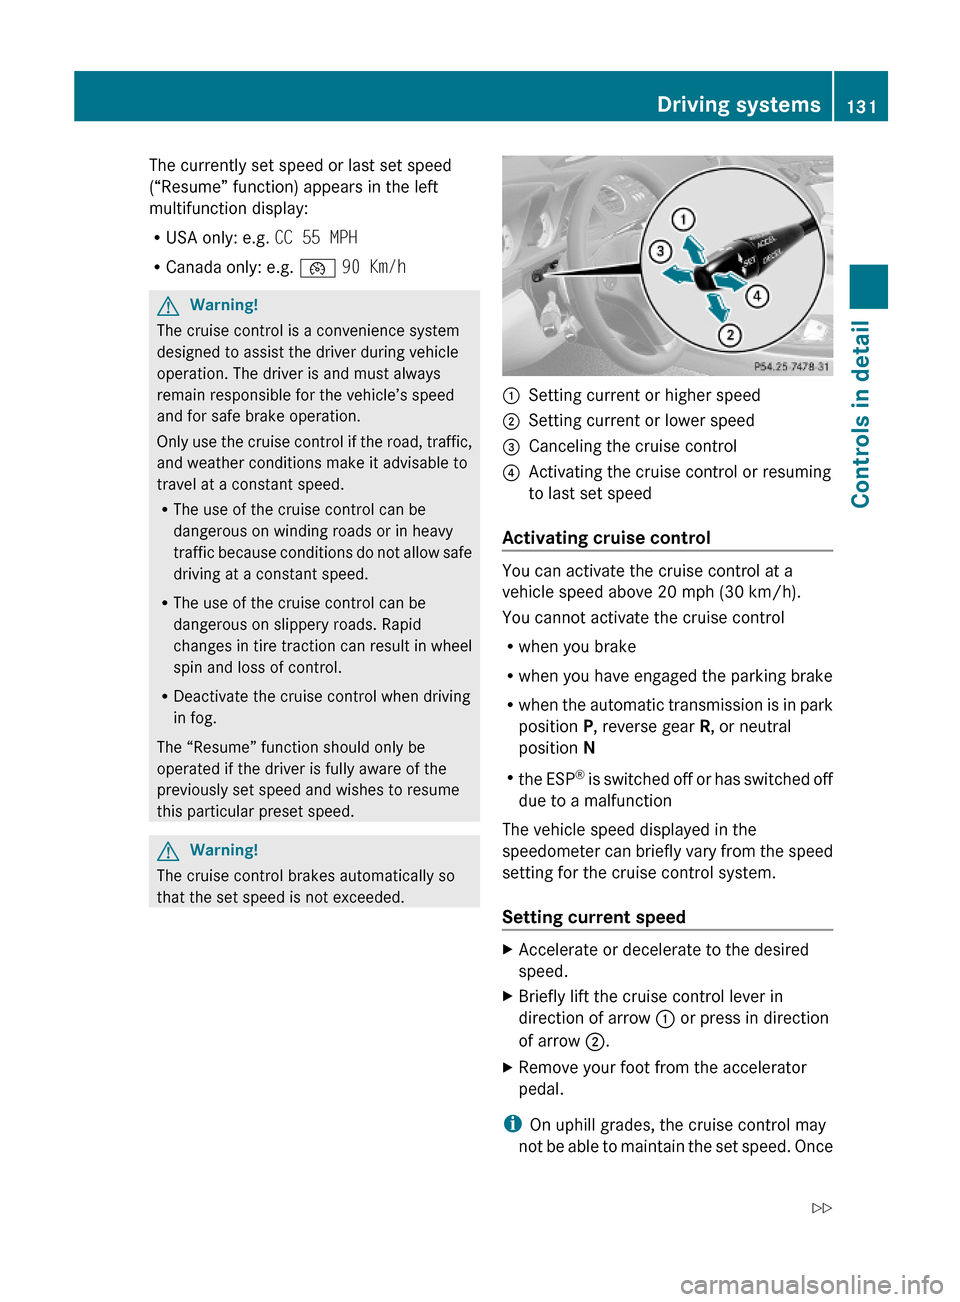
:Setting current or higher speed ;Setting current or lower speed=Canceling the cruise control?Activating the cruise control or resuming
to last set speed
Activating cruise control
You can activate the cruise control at a
vehicle speed above 20 mph (30 km/h).
You cannot activate the cruise control
Rwhen you brake
Rwhen you have engaged the parking brake
Rwhen the automatic transmission is in park
position P, reverse gear R, or neutral
position N
Rthe ESP® is switched off or has switched off
due to a malfunction
The vehicle speed displayed in the
speedometer can briefly vary from the speed
setting for the cruise control system.
Setting current speed
XAccelerate or decelerate to the desired
speed.
XBriefly lift the cruise control lever in
direction of arrow : or press in direction
of arrow ;.
XRemove your foot from the accelerator
pedal.
iOn uphill grades, the cruise control may
not be able to maintain the set speed. Once
Driving systems131Controls in detail230_AKB; 6; 22, en-USd2ureepe,Version: 2.11.8.12009-07-28T18:49:58+02:00 - Seite 131Z
Page 135 of 316
XBriefly pull the cruise control lever in
direction of arrow ?.
If no speed is stored, the current speed is
set and stored.XRemove your foot from the accelerator
pedal.
The last stored speed is deleted from memory
when the engine is turned off.
Distronic
Safety notes
When activated, the Distronic adaptive cruise
control increases the driving convenience
afforded by the cruise control while traveling
on expressways and other major roadways.
R If the Distronic distance sensor detects a
slower moving vehicle directly ahead, your
vehicle speed will be reduced so that you
follow that vehicle at your preset following
distance.
R If there is no vehicle directly ahead of you,
the Distronic will function in the same way
as standard cruise control ( Y page 130).
GWarning!
The Distronic requires familiarity with its
operational characteristics. We strongly
recommend that you review the following
information carefully before operating the
system.
GWarning!
The Distronic is a convenience system. Its
speed adjustment reduction capability is
intended to make cruise control more
effective and usable when traffic speeds vary.
It is not however, intended to, nor does it,
replace the need for extreme care.
The responsibility for the vehicle’s speed,
distance to the preceding vehicle and, most
importantly, brake operation to ensure a safe
stopping distance, always remains with the
driver.
The Distronic cannot take street and traffic
conditions into account. Complex driving
situations are not always fully recognized by
the Distronic. This could result in wrong or
missing distance warnings.GWarning!
The Distronic adaptive cruise control is not a
substitute for active driving involvement. It
does not react to pedestrians or on stationary
objects, nor does it recognize or predict the
lane curvature or the movement of preceding
vehicles.
The Distronic can only apply 20% of the
maximum braking power of the vehicle.
It is the driver’s responsibility at all times to
be attentive to the road, weather and traffic
conditions. Additionally, the driver must
provide the steering, braking and other driving
inputs necessary to remain in control of the
vehicle.
High-frequency sources such as toll stations,
speed measuring systems etc. can cause the
Distronic system to malfunction.
GWarning!
The Distronic cannot take road and traffic
conditions into account. Only use the
Distronic if the road, weather and traffic
conditions make it advisable to travel at a
constant speed.
GWarning!
Use of the Distronic can be dangerous on
slippery roads. Rapid changes in tire traction
can result in wheel spin and loss of control.
The Distronic does not function in adverse
sight and distance conditions. Do not use the
Distronic during conditions of fog, heavy rain,
snow or sleet.
Driving systems133Controls in detail230_AKB; 6; 22, en-USd2ureepe,Version: 2.11.8.12009-07-28T18:49:58+02:00 - Seite 133Z
Page 136 of 316

GWarning!
The Distronic cannot take weather conditions
into account. Switch off the Distronic or do
not switch it on if:
R roads are slippery or covered with snow or
ice. The wheels could lose traction while
braking or accelerating, and the vehicle
could skid.
R the Distronic system sensor cover is dirty
or visibility is diminished due to snow, rain
or fog, for example. The distance control
system functionality could be impaired.
Always pay attention to surrounding traffic
conditions even while the Distronic is
switched on. Otherwise, you may not be able
to recognize dangerous situations until it is
too late. This could cause an accident in which
you and/or others could be injured.
GWarning!
The “Resume” function should only be
operated if the driver is fully aware of the
previously set speed and wishes to resume
this particular preset speed.
GWarning!
Close attention to road and traffic conditions
is imperative at all times, regardless of
whether or not the Distronic is activated.
Use of the Distronic can be dangerous on
winding roads or in heavy traffic because
conditions do not allow safe driving at a
constant speed.
The Distronic will not react to stationary
objects in the roadway (e.g. a stopped vehicle
in a traffic jam or a disabled vehicle). The
Distronic will also not respond to oncoming
vehicles.
Switch off the Distronic
R when changing from the left to the right
lane if vehicles are moving more slowly in
the left lane
R when entering a turn lane or highway off
ramp
R in complex driving situations, such as in
highway construction zones
In these situations, the Distronic will continue
to maintain the set speed unless deactivated.
The Distronic is designed and intended only
to maintain a set speed and keep a set
distance from moving objects in front of it.
i USA only:
This device has been approved by the FCC
as a “Vehicular Radar System”. The radar
sensor is intended for use in an automotive
radar system only. Removal, tampering, or
altering of the device will void any
warranties, and is not permitted by the
FCC. Do not tamper with, alter, or use in
any non-approved way.
Any unauthorized modification to this
device could void the user’s authority to
operate the equipment.
i Canada only:
This device complies with RSS-210 of
Industry Canada. Operation is subject to
the following two conditions:
1. This device may not cause interference,
and
2. this device must accept any interference received, including
interference that may cause undesired
operation of the device.
Removal, tampering, or altering of the
device will void any warranties, and is not
permitted. Do not tamper with, alter, or use
in any non-approved way.
Any unauthorized modification to this
device could void the user’s authority to
operate the equipment.134Driving systemsControls in detail
230_AKB; 6; 22, en-USd2ureepe,Version: 2.11.8.12009-07-28T18:49:58+02:00 - Seite 134