tire pressure MERCEDES-BENZ SL600 2002 R129 Owner's Manual
[x] Cancel search | Manufacturer: MERCEDES-BENZ, Model Year: 2002, Model line: SL600, Model: MERCEDES-BENZ SL600 2002 R129Pages: 302, PDF Size: 7.21 MB
Page 8 of 302

5 Contents
Practical hints First aid kit ..................................... 216
Stowing things in the vehicle ...... 216
Vehicle tools .................................... 217
Vehicle jack ..................................... 218
Fuses ................................................ 219
Hood .................................................220
Automatic transmission
fluid level ...................................222
Checking engine oil level .............222
Coolant level ...................................224
Adding coolant ...............................225
Windshield and
headlamp washer
fluid mixing ratio ......................226
Wheels .............................................227
Tire replacement ............................227
Rotating wheels ..............................228
Spare wheel ....................................229
Changing wheels ........................... 231
Tire inflation pressure ..................235
Battery .............................................237
Battery Recycling .......................238Jump starting ................................. 239
Towing the vehicle ........................ 241
Exterior lamps ............................... 243
Headlamp assembly
(Halogen) .................................... 244
Taillamp assemblies .................. 250
Changing batteries in the
remote control ........................... 252
Synchronizing ............................ 253
Raising soft top manually ............ 254
Replacing wiper blade ................. 258
Manual release of
fuel filler flap ............................ 260
Trunk lamp ..................................... 260
Vehicle care Cleaning and care
of the vehicle ............................. 262
Power washer ............................. 263
Tar stains .................................... 263
Paintwork, Painted Body
Components ................................ 263
Engine cleaning ......................... 264
Vehicle washing ......................... 264Ornamental moldings ................264
Headlamps, taillamps,
turn signal lenses ......................264
Window cleaning .......................265
Light alloy wheels ......................265
Instrument cluster .....................265
Steering wheel and
gear selector lever ......................265
Cup holder ...................................265
Seat belts .....................................266
Headliner, shelf behind
roll bars, and other hard
plastic trim items .......................266
Soft top .........................................266
Headliner .....................................267
Wind screen ................................267
Automatic antenna .....................267
Wiper blade .................................267
Headlamp cleaning
system ..........................................267
Leather upholstery .....................268
Plastic and rubber parts ............268
Illuminated door sill panels .....268
Page 180 of 302
176 Driving instructions
Te ch n ica l
data Instruments
and controlsOperationDrivingInstrument
cluster displayPractical hints Car care Index
Driving instructions
Drive sensibly - Save fuel
Fuel consumption, to a great extent, depends on driving
habits and operating conditions.
To save fuel you should:
• keep tires at the recommended inflation pressures,
• remove unnecessary loads,
• allow engine to warm up under low load use,
• avoid frequent acceleration and deceleration,
• have all maintenance work performed at regular
intervals by an authorized Mercedes-Benz Center.
Fuel consumption is also increased by driving in cold
weather, in stop-and-go traffic, on short trips and in hilly
country.Drinking and driving
Pedals
Wa r n i n g !
Drinking or taking drugs and driving can be a very
dangerous combination. Even a small amount of
alcohol or drugs can affect your reflexes,
perceptions and judgement.The possibility of a serious or even fatal accident is
sharply increased when you drink or take drugs
and drive.Please don’t drink or take drugs and drive or allow
anyone to drive after drinking or taking drugs.Wa r n i n g !
Keep driver’s foot area clear at all times. Objects
stored in this area may impair pedal movement.
Page 184 of 302
180 Driving instructions
Te ch n ica l
data Instruments
and controlsOperationDrivingInstrument
cluster displayPractical hints Car care Index
Specified tire pressures must be maintained. This
applies particularly if the tires are subjected to high
loads (e.g. high speeds, heavy loads, high ambient
temperatures).
Aquaplaning
Depending on the depth of the water layer on the road,
aquaplaning may occur, even at low speeds and with
new tires. Reduce vehicle speed, avoid track grooves in
the road and apply brakes cautiously in the rain.Tire traction
The safe speed on a wet, snow covered or icy road is
always lower than on a dry road.
You should pay particular attention to the condition of
the road whenever the outside temperatures are close to
the freezing point.
We recommend M+S rated radial-ply tires for the winter
season for all four wheels to insure normal balanced
handling characteristics. On packed snow, they can
reduce your stopping distance as compared with
summer tires. Stopping distance, however, is still
considerably greater than when the road is not snow or
ice covered.
Wa r n i n g !
Do not drive with a flat tire. A flat tire affects the
ability to steer or brake the vehicle. You may lose
control of the vehicle. Continued driving with a flat
tire or driving at high speed with a flat tire will
cause excessive heat build-up and possibly a fire.
Wa r n i n g !
If ice has formed on the road, tire traction will be
substantially reduced. Under such weather
conditions, drive, steer and brake with extreme
caution.
Page 192 of 302
188 Driving systems
Te ch n ica l
data Instruments
and controlsOperationDrivingInstrument
cluster displayPractical hints Car care Index
Brake assist system (BAS)The BAS is designed to maximize the vehicle’s braking
capability during emergency braking maneuvers by
having maximum power boost applied to the brakes
more quickly in emergency braking conditions than
might otherwise be afforded solely by the driver’s
braking style. This can help reduce braking distances
over what ordinary driving and braking style might do.
The BAS complements the antilock brake system (ABS).
Applying the brakes very quickly results in maximum
BA S a ssistance.
To receive the benefit of the system you must apply
continuous full braking power during the stopping
sequence. Do not reduce brake pedal pressure.
Wa r n i n g !
BAS cannot prevent the natural laws of physics
from acting on the vehicle, nor can it increase
braking efficiency beyond that afforded by the
condition of the vehicle brakes and tires or the
traction afforded. The BAS cannot prevent
accidents, including those resulting from excessive
speed in turns, following another vehicle too
closely, or aquaplaning. Only a safe, attentive, and
skillful driver can prevent accidents. The
capabilities of a BAS equipped car must never be
exploited in a reckless or dangerous manner which
could jeopardize the user’s safety or the safety of
others.
Page 205 of 302
201 What you should know at the gas station
Te ch n ica l
data Instruments
and controlsOperationDrivingInstrument
cluster displayPractical hints Car care Index •Engine oil
Engine oil level check, see page 82 or 222.
Fill quantity between upper and lower dipstick
marking level: 2.1 US qt (2.0 l).
Recommended engine oils, see page 277.
•Coolant
For normal replenishing, use water (potable water
quality).
For further information (e.g. anticorrosion/
antifreeze), see page 225.
•Spark plugs
Approved spark plugs, see page 276.
•Tire pressure
For tire pressure, refer to tire pressure label inside
the fuel filler flap.
•Air conditioner
R-134a refrigerant and special PAG lubricant,
see page 277.•Bulbs
High and low beams: Halogen type 9004,
low beam: Xenon, for model SL 600 (SL 500
optional)
high beam (models with Xenon): H 1 (55 W)
fog lamps: H1 (55 W),
turn signal, standing, side marker and parking
lamps, front: 2357 NA (28.5/8.3 W/30/2.2 cp), tail,
parking, standing and driver’s side rear fog lamp:
21 / 4 W,
turn signal lamps, rear: 21 W/32 cp,
side marker lamps, rear: 10W/6 cp,
stop lamps: 21 W/32 cp,
backup lamps: 21 W/32 cp,
license plate lamps: 5W/4 cp.
Page 219 of 302
215 Contents - Practical hints
Te ch n ica l
data Instruments
and controlsOperation DrivingInstrument
cluster displayPractical hintsCar care Index
Practical hints First aid kit ..................................... 216
Stowing things in the vehicle ...... 216
Vehicle tools .................................... 217
Vehicle jack ..................................... 218
Fuses ................................................ 219
Hood .................................................220
Automatic transmission
fluid level ...................................222
Checking engine oil level .............222
Coolant level ...................................224
Adding coolant ...............................225Windshield and
headlamp washer
fluid mixing ratio ..................... 226
Wheels ............................................ 227
Tire replacement ........................... 227
Rotating wheels ............................. 228
Spare wheel .................................... 229
Changing wheels ........................... 231
Tire inflation pressure ................. 235
Battery ............................................. 237
Battery Recycling ....................... 238
Jump starting ................................. 239
Towing the vehicle ........................ 241Exterior lamps ................................243
Headlamp assembly
(Halogen) .....................................244
Taillamp assemblies ..................250
Changing batteries in the
remote control ...........................252
Synchronizing ............................253
Raising soft top manually .............254
Replacing wiper blade .................258
Manual release of
fuel filler flap .............................260
Trunk lamp .....................................260
Page 233 of 302
229 Tires, Wheels
Te ch n ica l
data Instruments
and controlsOperation DrivingInstrument
cluster displayPractical hintsCar care Index Notes:
Thoroughly clean the inner side of the wheels any time
you rotate the wheels or wash the vehicle underside.
The use of retread tires is not recommended. Retread
tires may adversely affect the handling characteristics
and safety of the vehicle.
Dented or bent rims can cause tire pressure loss and
damage to the tire beads. For this reason, check rims for
damage at regular intervals. The rim f langes must be
checked for wear before a tire is mounted. Remove
burrs, if any.
Check and ensure proper tire inflation pressure after
rotating the wheels. For tire inflation pressure see
page 235.Spare wheel
(except Sport Package)
The spare wheel rim size is 8
1/4 J x 17 H2.
In the case of a f lat tire, or breakdown, you may
temporarily use the spare wheel.
Unid irectional tires must a lways be mou nted w it h a rrow
on tire sidewall pointing in direction of vehicle forward
movement.
If the arrow on tire sidewall does not point in direction
of vehicle forward movement when using the spare
wheel, observe the following restrictions:
• Drive to the nearest repair facility to have the flat
tire repaired or replaced as appropriate.
• Do not operate vehicle with more than one spare
wheel mounted.
For additional information, refer to page 274.
Wa r n i n g !
The spare wheel rim is for temporary use only. Use
for over a total of 12 000 miles (20 000 km)
(aggregate of all uses) may cause wheel rim failure
leading to an accident and possible injuries.
Page 238 of 302
234 Tires, Wheels
Te ch n ica l
data Instruments
and controlsOperation DrivingInstrument
cluster displayPractical hintsCar care Index
13. Lower vehicle. Remove jack and insert jack tube
cover.
Before storing the jack, the jack arm must be
lowered almost to the base of the jack.
Store the spare wheel first and then the vehicle jack.
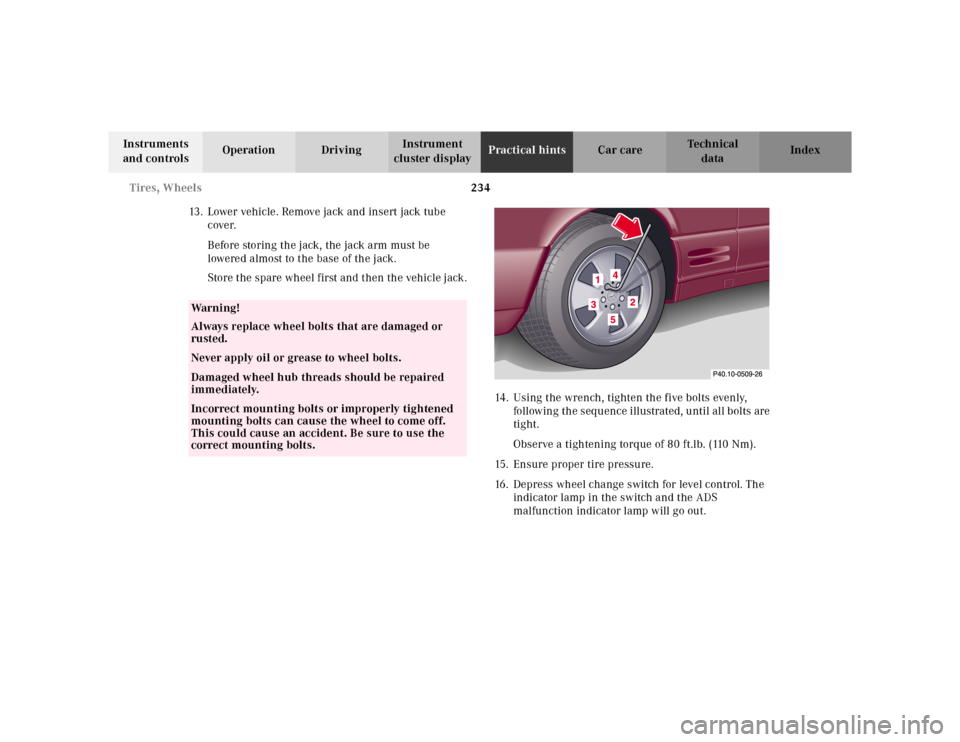
14. Using the wrench, tighten the five bolts evenly,
following the sequence illustrated, until all bolts are
tight.
Observe a tightening torque of 80 ft.lb. (110 Nm).
15. Ensure proper tire pressure.
16. Depress wheel change switch for level control. The
indicator lamp in the switch and the ADS
malfunction indicator lamp will go out.
Wa r n i n g !
Always replace wheel bolts that are damaged or
rusted.Never apply oil or grease to wheel bolts.Damaged wheel hub threads should be repaired
immediately.Incorrect mounting bolts or improperly tightened
mounting bolts can cause the wheel to come off.
This could cause an accident. Be sure to use the
correct mounting bolts.
Page 239 of 302
235 Tires, Wheels
Te ch n ica l
data Instruments
and controlsOperation DrivingInstrument
cluster displayPractical hintsCar care Index Tire inflation pressure
A table (see fuel filler flap) lists the tire inflation
pressures specified for Mercedes-Benz recommended
tires as well as for the varying operating conditions.
Important!
Tire pressure changes by approx. 1.5 psi (0.1 bar) per
18°F (10°C) of air temperature change. Keep this in
mind when checking tire pressure inside a garage -
especially in the winter.
Example:
If garage temperature = approx. +68°F (+20°C) and
ambient temperature = approx. +32°F (0°C) then the
adjusted air pressure = specified air pressure +3psi
(+0.2 bar).
Tire pressures listed for light loads are minimum values
offering high driving comfort. Increased inflation
pressures for heavy loads produce favorable handling
characteristics with lighter loads and are perfectly
permissible. The ride of the vehicle, however, will
become somewhat harder.
Tire temperature and pressure increase with the vehicle
speed. Tire pressure should therefore only be checked
and corrected on cold tires. Correct tire pressure in
Wa r n i n g !
Do not drive the vehicle while the wheel change
switch is activated since the vehicle suspension
will not function properly.Wa r n i n g !
The spare wheel rim is for temporary use only. Use
for over a total of 12 000 miles (20 000 km) may
cause wheel rim failure leading to an accident and
possible injuries. Vehicles with Sport Package:
The dimensions of the spare wheel are different
from those of road wheels. As a result, the vehicle
handling characteristics change when driving with
a mounted spare wheel.The spare wheel should only be used temporarily,
and replaced with a regular road wheel as quickly
as possible.
Page 240 of 302
236 Tires, Wheels
Te ch n ica l
data Instruments
and controlsOperation DrivingInstrument
cluster displayPractical hintsCar care Index
warm tires only if pressure has dropped below the
pressure listed in the table and the respective operating
conditions are taken into consideration.
An underinflated tire due to a slow leak (e.g. due to a
nail in the tire) may cause damage such as tread
separation, bulging etc. Regular tire pressure checks at
intervals of no more than 14 days are therefore
essential.
If a tire constantly loses air, it should be inspected for
damage.
The spare tire should be checked periodically for
condition and inflation. Spare tire will age and become
worn over time even if never used, and thus should be
inspected and replaced when necessary.
Wa r n i n g !
Do not overinflate tires. Overinflating tires can
result in sudden deflation (blowout) because they
are more likely to become punctured or damaged
by road debris, potholes etc. Follow recommended
inflation pressures.Do not overload the tires by exceeding the specified
vehicle capacity weight (as indicated by the label
on the driver’s door latch post). Overloading the
tires can overheat them, possibly causing a
blowout.