key MERCEDES-BENZ SL600 2012 R230 Workshop Manual
[x] Cancel search | Manufacturer: MERCEDES-BENZ, Model Year: 2012, Model line: SL600, Model: MERCEDES-BENZ SL600 2012 R230Pages: 316, PDF Size: 7.21 MB
Page 128 of 316

XPress button W or X to switch the
headlamps delayed shut-off feature On or
Off.
XTurn the exterior lamp switch to position
à before turning off the engine.
The headlamps delayed shut-off feature is
activated.
You can temporarily deactivate the
headlamps delayed shut-off feature:
XBefore exiting the vehicle, turn the
SmartKey in the starter switch to position
0.
XThen turn it to position 2 and back to
position 0.
The headlamps delayed shut-off feature is
deactivated. It will reactivate as soon as
you start the engine.
Switching interior lighting delayed shut-
off on or off
Use this function to set whether you would
like the interior lighting to remain on for
10 seconds during darkness after you have
removed the SmartKey from the starter
switch.
XPress button V or U repeatedly until
the Settings menu appears in the
multifunction display.
XPress button &.XMove the selection marker with button
W or X to the Lighting submenu.
XPress button & or * repeatedly until
the message Interior Lighting
Delayed Switch-off appears in the
multifunction display.
The selection marker is on the current
setting.
XPress button W or X to switch the
interior lighting delayed shut-off feature
On or Off.
Vehicle submenu
Access the Vehicle submenu via the
Settings menu. Use the Vehicle submenu
to set the automatic central locking.
Switching automatic central locking on or
off
Use this function to switch the automatic
central locking on or off. With the automatic
central locking activated, the vehicle is
locked centrally at a vehicle speed of
approximately 9 mph (15 km/h).
XPress button V or U repeatedly until
the Settings menu appears in the
multifunction display.
XPress button &.XMove the selection marker with button
W or X to the Vehicle submenu.
XPress button & or * repeatedly until
the message Automatic Door Lock
appears in the multifunction display.
The selection marker is on the current
setting.
XPress button W or X to switch the
automatic central locking On or Off.
126Control systemControls in detail
230_AKB; 6; 22, en-USd2ureepe,Version: 2.11.8.12009-07-28T18:49:58+02:00 - Seite 126
Page 130 of 316
XPress button W or X to switch the
function On or Off.
Trip computer menu
Use the Trip computer menu to call up
statistical data on your vehicle.
The following information is available:
RFuel consumption statistics since start
(Y page 128)
RFuel consumption statistics since last reset
(Y page 128)
RResetting fuel consumption statistics
(Y page 128)
RDistance to empty (Y page 129)
The last function called up will reappear the
next time you enter the trip computer menu.
Fuel consumption statistics since start
XPress button U or V repeatedly until
the first function of the Trip computer
menu appears in the multifunction display.
XPress button & or * repeatedly until
the message From Start appears in the
left multifunction display.
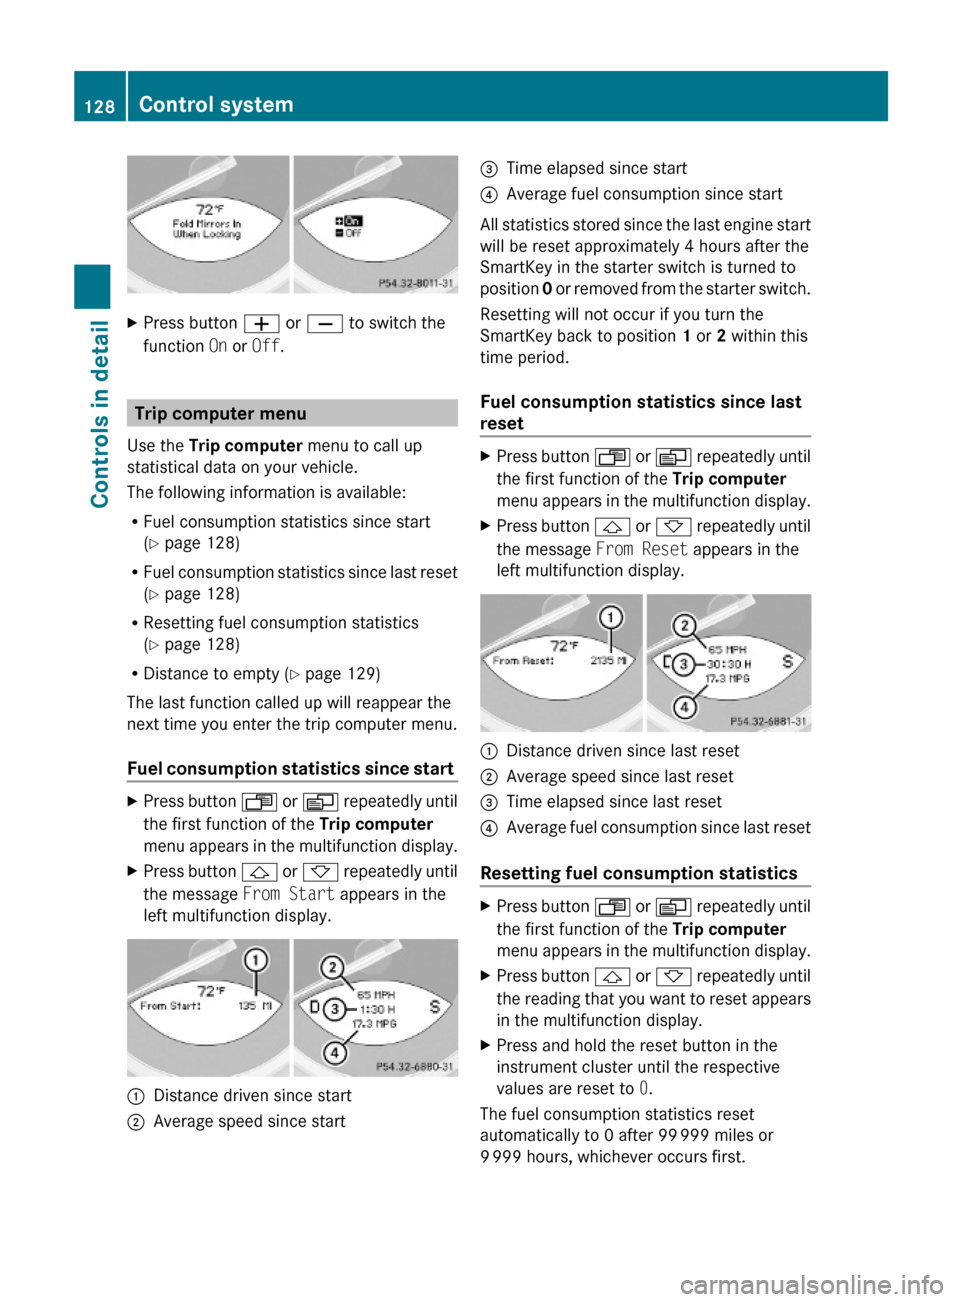
:Distance driven since start;Average speed since start=Time elapsed since start?Average fuel consumption since start
All statistics stored since the last engine start
will be reset approximately 4 hours after the
SmartKey in the starter switch is turned to
position 0 or removed from the starter switch.
Resetting will not occur if you turn the
SmartKey back to position 1 or 2 within this
time period.
Fuel consumption statistics since last
reset
XPress button U or V repeatedly until
the first function of the Trip computer
menu appears in the multifunction display.
XPress button & or * repeatedly until
the message From Reset appears in the
left multifunction display.
:Distance driven since last reset;Average speed since last reset=Time elapsed since last reset?Average fuel consumption since last reset
Resetting fuel consumption statistics
XPress button U or V repeatedly until
the first function of the Trip computer
menu appears in the multifunction display.
XPress button & or * repeatedly until
the reading that you want to reset appears
in the multifunction display.
XPress and hold the reset button in the
instrument cluster until the respective
values are reset to 0.
The fuel consumption statistics reset
automatically to 0 after 99 999 miles or
9 999 hours, whichever occurs first.
128Control systemControls in detail
230_AKB; 6; 22, en-USd2ureepe,Version: 2.11.8.12009-07-28T18:49:58+02:00 - Seite 128
Page 158 of 316
& on the SmartKey. This immediately
interrupts the raising or lowering procedure.
You then can operate the retractable hardtop
switch or press button % or & on the
SmartKey to raise or lower the retractable
hardtop away from the danger zone
! Never sit or place heavy objects on the
rear shelf. Doing so could cause damage to
the retractable hardtop and the rear shelf.
! Please keep in mind that weather
conditions can sometimes change rapidly.
Make sure to close the retractable hardtop
when leaving the vehicle. If water enters
the vehicle interior, vehicle electronics
could be damaged which is not covered by
the Mercedes-Benz Limited Warranty.
! When opening and closing the retractable
hardtop, make sure
Rthere is sufficient clearance for the
retractable hardtop to move up and for
the trunk lid to move back
Rthe luggage cover is installed, extended
and closed
Rthe trunk is loaded only to the height of
the luggage cover
Rthe luggage/cargo does not push up the
closed luggage cover
Rthe trunk lid is closed
Rthe outside temperature is above +5‡
(-15†)
Otherwise the retractable hardtop and
trunk as well as other parts of the vehicle
could be damaged.
Opening and closing
With the retractable hardtop switch
GObserve Safety notes, see page 155.XEngage the parking brake.XClose the luggage cover (Y page 158).XClose the trunk lid.XSwitch on the ignition.
Retractable hardtop switch
Opening
iMake sure the retractable hardtop is dry
before you open it. Otherwise water may
enter the trunk interior.
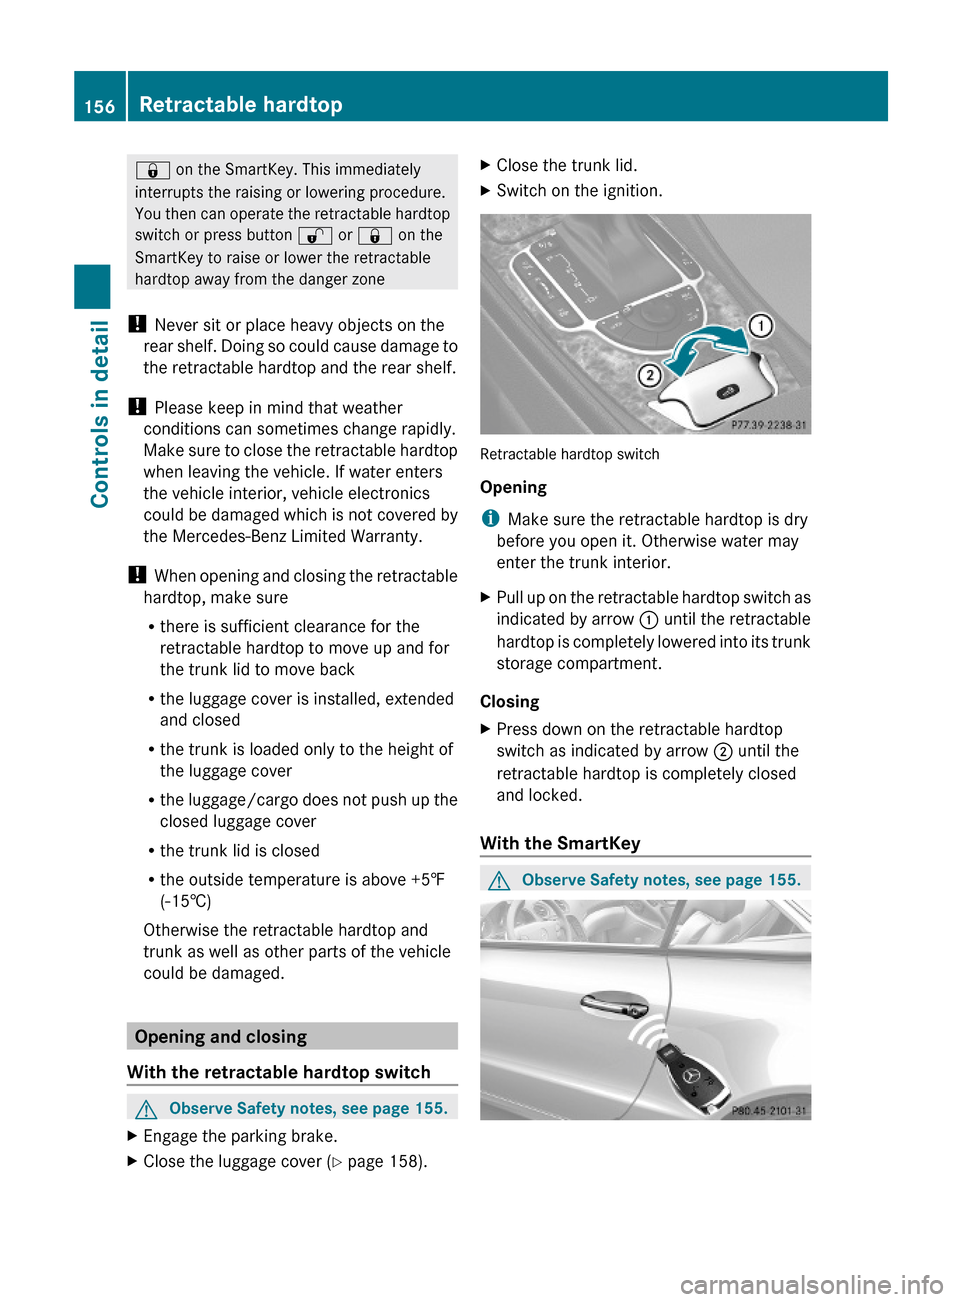
XPull up on the retractable hardtop switch as
indicated by arrow : until the retractable
hardtop is completely lowered into its trunk
storage compartment.
Closing
XPress down on the retractable hardtop
switch as indicated by arrow ; until the
retractable hardtop is completely closed
and locked.
With the SmartKey
GObserve Safety notes, see page 155.156Retractable hardtopControls in detail
230_AKB; 6; 22, en-USd2ureepe,Version: 2.11.8.12009-07-28T18:49:58+02:00 - Seite 156
Page 159 of 316
XClose the luggage cover (Y page 158).XClose the trunk lid.XAim the transmitter eye at an outside door
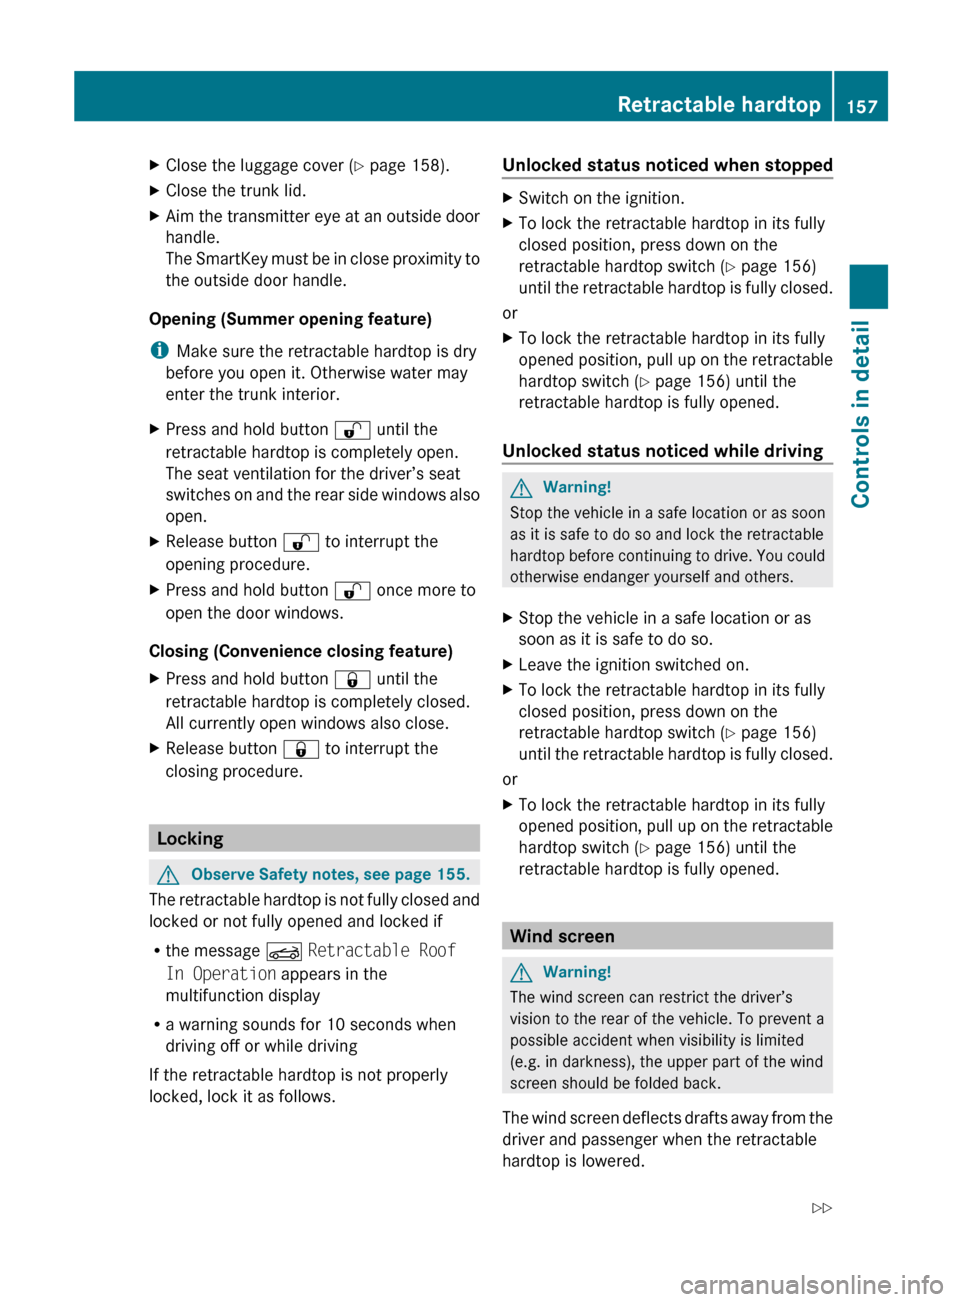
handle.
The SmartKey must be in close proximity to
the outside door handle.
Opening (Summer opening feature)
i Make sure the retractable hardtop is dry
before you open it. Otherwise water may
enter the trunk interior.
XPress and hold button % until the
retractable hardtop is completely open.
The seat ventilation for the driver’s seat
switches on and the rear side windows also
open.XRelease button % to interrupt the
opening procedure.XPress and hold button % once more to
open the door windows.
Closing (Convenience closing feature)
XPress and hold button & until the
retractable hardtop is completely closed.
All currently open windows also close.XRelease button & to interrupt the
closing procedure.
Locking
GObserve Safety notes, see page 155.
The retractable hardtop is not fully closed and
locked or not fully opened and locked if
R the message K Retractable Roof
In Operation appears in the
multifunction display
R a warning sounds for 10 seconds when
driving off or while driving
If the retractable hardtop is not properly
locked, lock it as follows.
Unlocked status noticed when stoppedXSwitch on the ignition.XTo lock the retractable hardtop in its fully
closed position, press down on the
retractable hardtop switch ( Y page 156)
until the retractable hardtop is fully closed.
or
XTo lock the retractable hardtop in its fully
opened position, pull up on the retractable
hardtop switch ( Y page 156) until the
retractable hardtop is fully opened.
Unlocked status noticed while driving
GWarning!
Stop the vehicle in a safe location or as soon
as it is safe to do so and lock the retractable
hardtop before continuing to drive. You could
otherwise endanger yourself and others.
XStop the vehicle in a safe location or as
soon as it is safe to do so.XLeave the ignition switched on.XTo lock the retractable hardtop in its fully
closed position, press down on the
retractable hardtop switch ( Y page 156)
until the retractable hardtop is fully closed.
or
XTo lock the retractable hardtop in its fully
opened position, pull up on the retractable
hardtop switch ( Y page 156) until the
retractable hardtop is fully opened.
Wind screen
GWarning!
The wind screen can restrict the driver’s
vision to the rear of the vehicle. To prevent a
possible accident when visibility is limited
(e.g. in darkness), the upper part of the wind
screen should be folded back.
The wind screen deflects drafts away from the
driver and passenger when the retractable
hardtop is lowered.
Retractable hardtop157Controls in detail230_AKB; 6; 22, en-USd2ureepe,Version: 2.11.8.12009-07-28T18:49:58+02:00 - Seite 157Z
Page 164 of 316
You can also lock the storage compartments
separately, e.g. when the vehicle is in the
shop for service.
The following storage compartments remain
locked, even when the vehicle is unlocked
with the SmartKey:
RGlove box
RStorage compartment under the armrest
RRear storage compartments
The separate locking status of these storage
compartments can only be canceled with the
mechanical key.
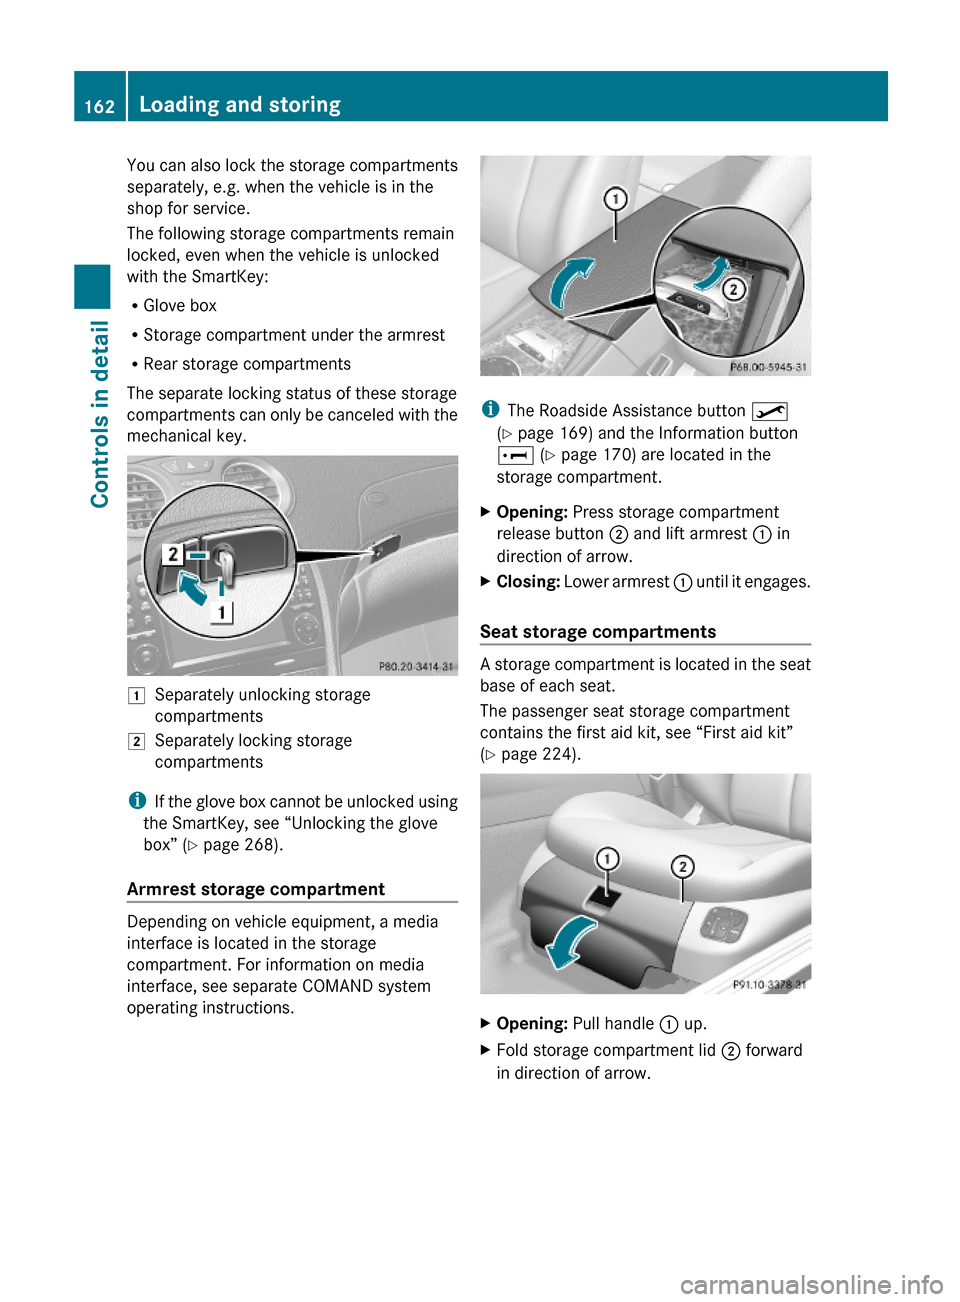
1Separately unlocking storage
compartments
2Separately locking storage
compartments
iIf the glove box cannot be unlocked using
the SmartKey, see “Unlocking the glove
box” (Y page 268).
Armrest storage compartment
Depending on vehicle equipment, a media
interface is located in the storage
compartment. For information on media
interface, see separate COMAND system
operating instructions.
iThe Roadside Assistance button º
(Y page 169) and the Information button
E (Y page 170) are located in the
storage compartment.
XOpening: Press storage compartment
release button ; and lift armrest : in
direction of arrow.
XClosing: Lower armrest : until it engages.
Seat storage compartments
A storage compartment is located in the seat
base of each seat.
The passenger seat storage compartment
contains the first aid kit, see “First aid kit”
(Y page 224).
XOpening: Pull handle : up.XFold storage compartment lid ; forward
in direction of arrow.
162Loading and storingControls in detail
230_AKB; 6; 22, en-USd2ureepe,Version: 2.11.8.12009-07-28T18:49:58+02:00 - Seite 162
Page 173 of 316
iWhen a Tele Aid call has been initiated,
the COMAND system audio is muted. The
mobile phone is no longer connected to the
COMAND system. If you must use this
phone, we recommend that you use it only
with the vehicle at a standstill in a safe
location.
Destination Download to the COMAND
system
i The components and operating principles
of the COMAND system can be found in the
separate COMAND system operating
instructions.
Destination Download allows you access to a
database of over 10 million points of interest
(POIs) that can be downloaded to your
vehicle’s navigation system. If you know the
destination, the address can be downloaded,
or can be provided with points of interests
near your location.
Route guidance
You will be prompted to confirm that route
guidance to the entered address is to be
started.
XSelect Yes using button = or ; on
the COMAND system.XPress button 9 on the COMAND system
to confirm.
The system calculates the route and
subsequently starts the route guidance to the
defined address.
i If you select No, you can save the address
to your address book.
i The Destination Download feature is
available if the relevant mobile phone
network is available and data connection is
possible.
Search & Send
“Search & Send” is a navigation destination
address entry service. For more information
on “Search & Send”, refer to separate
COMAND system operating instructions.
Remote door unlock
In case you have locked your vehicle
unintentionally (e.g. SmartKey inside vehicle),
and the reserve SmartKey is not available:
XContact the Customer Assistance Center
at 1-800-FOR-MERCedes
(1-800-367-6372) (USA only) or
1-888-923-8367 (Canada only).
You will be asked to provide your password.XThen return to your vehicle at the time
arranged with the Customer Assistance
Center and pull the trunk recessed handle
for a minimum of 20 seconds until the
indicator lamp in the SOS button is flashing.
The message Connecting Call appears in
the multifunction display.
As an alternative, you may unlock the vehicle
via Internet in the “My Tele Aid” section of
“Owner’s Online”, using your ID and password
(USA only).
i The remote door unlock feature is
available if the relevant cellular phone
network is available.
The SOS button will flash and the message
Call Connected will appear in the
multifunction display to indicate receipt of
the door unlock command.
If the trunk recessed handle was pulled for
more than 20 seconds before door unlock
authorization was received by the
Customer Assistance Center, you must
wait 15 minutes before pulling the trunk
recessed handle again.
Useful features171Controls in detail230_AKB; 6; 22, en-USd2ureepe,Version: 2.11.8.12009-07-28T18:49:58+02:00 - Seite 171Z
Page 181 of 316
Mercedes-Benz Center to have the fuel
system drained completely.
! To prevent damage to the catalytic
converters, only use premium unleaded
gasoline in this vehicle.
Any noticeable irregularities in engine
operation should be repaired promptly.
Otherwise, excessive unburned fuel may
reach the catalytic converter, causing it to
overheat and potentially start a fire.
i Only use premium unleaded gasoline with
a minimum Posted Octane Rating of 91
(average of 96 RON/86 MON).
Information on gasoline quality can
normally be found on the fuel pump. Please
contact gas station personnel in case
labels on the pump cannot be found.
For more information on gasoline, see
“Premium unleaded gasoline”
(Y page 306), see “Fuel requirements”
(Y page 307), or contact an authorized
Mercedes-Benz Center, or visit
www.mbusa.com (USA only).
Locking/unlocking the vehicle with the
SmartKey or KEYLESS-GO automatically
locks/unlocks the fuel filler flap.
iIn case the central locking system does
not release the fuel filler flap, or the
opening mechanism is clamping, contact
Roadside Assistance or an authorized
Mercedes-Benz Center.
The fuel filler flap is located on the right-hand
side of the vehicle towards the rear.
XTurn off the engine.
iLeaving the engine running and the fuel
filler cap open can cause the yellow fuel
tank reserve warning lamp to flash and the
malfunction indicator lamp = (USA
only14) or ; (Canada only14) to
illuminate.
For more information, see also “Practical
hints” (Y page 263).
XRemove the SmartKey from the starter
switch.
KEYLESS-GO: Open the driver’s door. This
puts the starter switch in position 0, same
as with the SmartKey removed from the
starter switch. The driver’s door then can
be closed again.
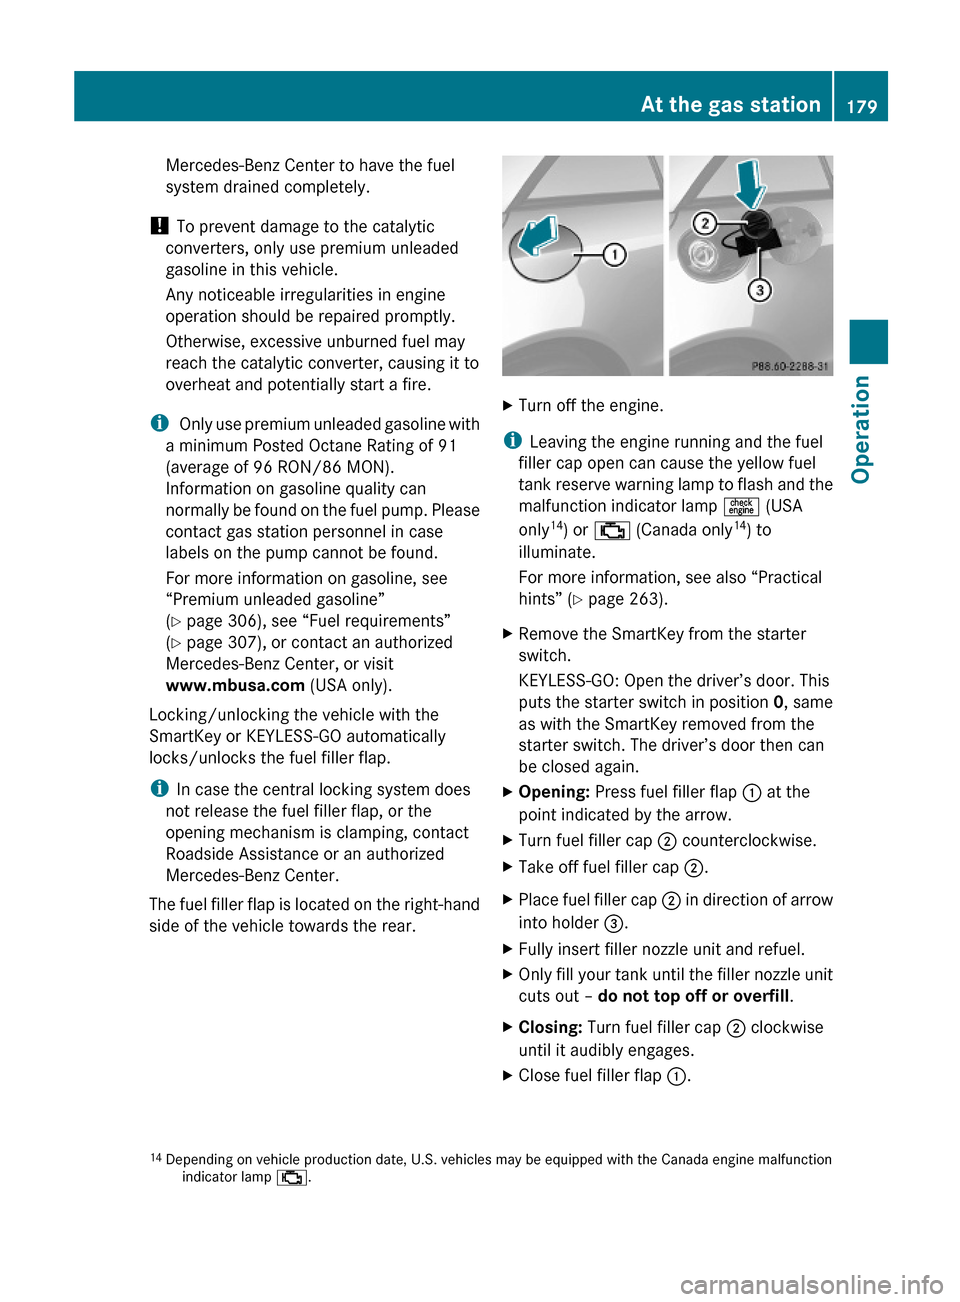
XOpening: Press fuel filler flap : at the
point indicated by the arrow.
XTurn fuel filler cap ; counterclockwise.XTake off fuel filler cap ;.XPlace fuel filler cap ; in direction of arrow
into holder =.
XFully insert filler nozzle unit and refuel.XOnly fill your tank until the filler nozzle unit
cuts out – do not top off or overfill.
XClosing: Turn fuel filler cap ; clockwise
until it audibly engages.
XClose fuel filler flap :.14Depending on vehicle production date, U.S. vehicles may be equipped with the Canada engine malfunctionindicator lamp ;.
At the gas station179Operation230_AKB; 6; 22, en-USd2ureepe,Version: 2.11.8.12009-07-28T18:49:58+02:00 - Seite 179Z
Page 213 of 316
considerable force prior to parking. The heat
generated serves to dry the brakes.
Salt-covered roadsGWarning!
A layer of salt on the brake discs and the brake
linings may cause a delay in the braking
effect, resulting in a significantly increased
braking distance, which could lead to an
accident.
To avoid this danger, you should:
R occasionally brake carefully when you are
driving on salt-covered roads, so that any
layer of salt that may have built up on the
brake discs and the brake linings is
removed without putting other road users
at risk
R maintain a greater distance to the vehicle
ahead and drive with particular care
R carefully apply the brakes at the end of a
trip and immediately after commencing a
new trip, so that salt residues are removed
from the brake disc
Brake service
! The brake fluid level in the reservoir may
be too low or the electro-hydraulic brake
system may be malfunctioning if the brake
warning lamp in the instrument cluster
comes on and an acoustic warning sounds
although the parking brake is released.
Observe additional messages in the
multifunction display that may appear.
Brake pad wear or a leak in the system may
be the reason for low brake fluid in the
reservoir.
Have the brake system inspected
immediately. Contact an authorized
Mercedes-Benz Center.
All checks and service work on the brake
system should be carried out by qualified
technicians only. Contact an authorized
Mercedes-Benz Center.
Only install brake pads and use brake fluid
recommended by Mercedes-Benz.GWarning!
If other than recommended brake pads are
installed, or other than recommended brake
fluid is used, the braking properties of the
vehicle can be degraded to an extent that safe
braking is substantially impaired. This could
result in an accident.
! Because the ESP ®
operates
automatically, the engine and ignition must
be shut off (SmartKey in starter switch
position 0 or 1 or KEYLESS-GO start/stop
button in position 0 or 1) when the parking
brake is being tested on a brake test
dynamometer or when the vehicle is being
towed with the front axle raised.
Active braking action through the ESP ®
may otherwise seriously damage the brake
system which is not covered by the
Mercedes-Benz Limited Warranty.
If your brake system is only subjected to
moderate loads, you should occasionally test
the effectiveness of the brakes by applying
above-normal braking pressure at higher
speeds. This will also enhance the grip of the
brake pads.
GWarning!
Make sure not to endanger any other road
users when carrying out these braking
maneuvers.
Refer to the description of the Brake Assist
System (BAS) ( Y page 56).
High-performance brake system
The high-performance brake system is only
available on SL 63 AMG and SL 65 AMG.
GWarning!
New vehicle brake pads and disks, and
replacement brake pads and disks may take
several hundred miles of driving until they
Driving instructions211Operation230_AKB; 6; 22, en-USd2ureepe,Version: 2.11.8.12009-07-28T18:49:58+02:00 - Seite 211Z
Page 218 of 316
RCoolant
R Brake fluid
R Bird droppings
R Insects
R Tree resins etc.
Frequent washing reduces and/or eliminates
the aggressiveness and potency of the above
adverse influences.
More frequent washings are necessary to
deal with unfavorable conditions:
R near the ocean
R in industrial areas (smoke, exhaust
emissions)
R during winter operation
You should check your vehicle from time to
time for stone chipping or other damage. Any
damage should be repaired as soon as
possible to prevent corrosion.
In doing so, do not neglect the underbody of
the vehicle. A prerequisite for a thorough
check is a washing of the underbody followed
by a thorough inspection. Damaged areas
need to be re-undercoated.
Your vehicle has been treated at the factory
with a wax-base rustproofing in the body
cavities which will last for the lifetime of the
vehicle. Post-production treatment is neither
necessary nor recommended by Mercedes-
Benz because of the possibility of
incompatibility between materials used in the
production process and others applied later.
We have selected vehicle-care products and
compiled recommendations which are
specially matched to our vehicles and which
always reflect the latest technology. You can
obtain Mercedes-Benz approved vehicle-care
products at an authorized Mercedes-Benz
Center.
Scratches, corrosive deposits, corrosion or
damage due to negligent or incorrect care
cannot always be removed or repaired with
the vehicle-care products recommendedhere. In such cases it is best to seek aid at an
authorized Mercedes-Benz Center.
The following topics deal with the cleaning
and care of your vehicle and give important
“how-to” information as well as references to
Mercedes-Benz approved vehicle-care
products.
Power washer
! Follow the instructions provided by the
power washer manufacturer on
maintaining a distance between the vehicle
and the nozzle of the power washer.
Never use a round nozzle to power-wash
tires. The intense jet of water can result in
damage to the tire.
Always replace a damaged tire.
Always keep the jet of water moving across
the surface. Do not aim directly at electrical
parts, electrical connectors, seals, or other
rubber parts.
i Vehicles with KEYLESS-GO:
If a door handle is hit by a strong jet of
water, and a SmartKey is within
approximately 3 ft (1 m) of the vehicle, it
could be inadvertently locked or unlocked.
Tar stains
Quickly remove tar stains before they dry and
become more difficult to remove. A tar
remover is recommended.
Paintwork, painted body components
! Affixing stickers, magnets, adhesive tape
or similar materials to painted body
components may damage the paintwork.
Mercedes-Benz approved Paint Care should
be applied when water drops on the paint
surface do not “bead up”. This should
normally be done every 3 to 5 months,
depending on the climate and washing
detergent used.
216Vehicle careOperation
230_AKB; 6; 22, en-USd2ureepe,Version: 2.11.8.12009-07-28T18:49:58+02:00 - Seite 216
Page 219 of 316
Mercedes-Benz approved Paint Cleaner
should be applied if the paint surface shows
signs of embedded dirt (i.e. loss of gloss).
Do not apply any of these products or wax if
your vehicle is parked in the sun or if the hood
is still hot.XUse the appropriate MB-Touch-Up Stick for
quick and provisional repairs of minor paint
damage (i.e. chips from stones, vehicle
doors, etc.).
Vehicles with mat paint
Your vehicle is painted with mat clear-coat
paint. Observe the following notes to avoid
paint damage caused by improper treatment.
i Only use insect remover and car shampoo
approved by Mercedes-Benz.
! Do not polish the vehicle. Polishing will
brighten the paintwork.
Do not use paintwork cleaning agents,
abrasives, polishing compounds, or wax for
paintwork care. Such products are
intended for use on high-polish surfaces.
Using such products on mat paint causes
severe damage, such as bright, spotted
areas on the respective surface.
Have paintwork repairs performed at an
authorized Mercedes-Benz Center.
Have stone chipping repairs as soon as
possible.
Remove the following immediately if possible.
Do not apply strong force.
R Soak insect remains with insect remover
and rinse them of with water afterwards.
Use a soft bristle toothbrush for remains
that have not come off.
R Soak bird droppings with water and rinse
them of with water afterwards. Use a soft
bristle toothbrush for remains that have not
come off.
R Remove tree resins, grease, oil, and
gasoline with silicone remover.
R Dab off wax with silicone remover.
R Dab off tar splashes or tar stains with tar
remover.
Engine cleaning
Prior to cleaning the engine compartment,
make sure to protect electrical components
and connectors from contact with water and
cleaning agents.
Corrosion protection, such as MB
Anticorrosion Wax should be applied to the
engine compartment after every engine
cleaning. Before applying, all control linkage
bushings and joints should be lubricated. The
poly-V-belt and all pulleys should be
protected from any wax.
Vehicle washing
In the winter, thoroughly remove all traces of
road salt as soon as possible.
When washing the vehicle underbody, do not
forget to clean the inner sides of the wheels.
i Vehicles with KEYLESS-GO:
If a door handle is hit by a strong jet of
water, and a SmartKey is within
approximately 3 ft (1 m) of the vehicle, it
could be inadvertently locked or unlocked.
Hand-wash
XDo not use hot water or wash your vehicle
in direct sunlight.XOnly use a soft, wet cloth or sponge to
clean the vehicle.XOnly use a mild vehicle wash detergent,
such as Mercedes-Benz approved Car
Shampoo.XThoroughly spray the vehicle with a
diffused jet of water.XDo not spray directly towards the
ventilation intake.XUse plenty of water and rinse the sponge
and chamois frequently.XRinse with clean water and dry with a
chamois thoroughly.Vehicle care217Operation230_AKB; 6; 22, en-USd2ureepe,Version: 2.11.8.12009-07-28T18:49:58+02:00 - Seite 217Z